mtaylor
-
Posts
26,273 -
Joined
-
Last visited
Content Type
Profiles
Forums
Gallery
Events
Everything posted by mtaylor
-
Nenad gave you some solid advice... Go to the kit builds area and enter "victory" into the search box. You'll see all the Victory builds. Or.... hang on for a bit, do something else... Amati/Victory models is bringing out their Victory. If you're interested in 1:64 size Vic, goto this topic http://modelshipworld.com/index.php/topic/985-amati-and-chris-watton/ and search on Victory.
-
This ought to be great... Popcorn? Comfy chair... John said "unusual"... does that mean icebergs?
-
Nice work on the Alfred, Adam. I've noticed that about Swiss Pear, it loses the pink and goes to a golden color. It's a little softer than cherry or boxwood and though it holds a edge and carves nicely, it doesn't take much to put a ding in it.
-
Jay, In the book, is the hatch "4' grates wide or "3" wide? The picture show "4". I'm wondering if there might have been a change somewhere. I know that the overhaul/rebuild in '29 changed a lot of things and they're just now beginning to go back to the way she sat in 1812. A long way to go on the one for sure. Does Marquardt specify his point in time for his drawings? I know, the debate on the Constitution is as confusing as the one's on Victory.
- 572 replies
-
- 3
-

-
- constitution
- frigate
- (and 1 more)
-
Jay, Your fallback position is the one that works for you. And it looks like it will work. I like the way that is coming together along with listening on the research.
- 572 replies
-
- 2
-
-
- constitution
- frigate
- (and 1 more)
-
That is great news that you got off the easy way...

-
Love it, Gaetan. One definitely feels like they're on board the real thing from the photography
- 728 replies
-
- 1
-
-
- le fleuron
- 64 gun
- (and 1 more)
-
Well done Popeye... a salute to you and the AG... It all just came together so well. You have me re-thinking down the road.. maybe something other than a tall ship.

- 956 replies
-
- 3
-
-
- andrea gail
- trawler
- (and 1 more)
-
Design by Modelling
mtaylor replied to Hellmut1956's topic in CAD and 3D Modelling/Drafting Plans with Software
Thanks Helmutt. I'll look into that course. I barely got past Trigonometry in college. Calculus wasn't an option for me. Maybe as I've aged, I'll be able to see the math concepts better. -
Jerry, There's a video on Youtube of live fire at the Niagara museum where they are firing at mockup using full load. There's also another one of , I think it's a Vasa cannon, live firing at a hull mockup. Ah.... Niagara museum video: https://youtu.be/U6foV4lmL4A and that Wasa... http://www.thelocal.se/20141022/iconic-vasa-ship-fires-biggest There's more cannon fire here: http://modelshipworld.com/index.php?/topic/4503-live-fire-when-the-gunz-go-boooooom/
-
Cutty Sark by NenadM
mtaylor replied to NenadM's topic in - Build logs for subjects built 1851 - 1900
I'm happy to hear the surgery was good. Was this on your mother? Hard times seem to hit everyone sometime. I don't know who said it but it fits: "Hard times do not shape character. They reveal it.". I hope that translates well. Indeed, war is harder as too much of the unknown can happen too quick to too many people. For right now, take care of yourself, my friend.- 4,152 replies
-
- 5
-
-
- cutty sark
- tehnodidakta
- (and 1 more)
-
There's several options here... you could try to remove and then reset the deck. If you used carpenter's (PVA) glue, then isopropyl alcohol on the joints will allow you to remove it. Or, sand the overhang off, and build up the "short" side of the deck. Sanding the bulkheads on one side and building up the other will offset the keel probably enough to be noticeable. I'll keep my fingers crossed for you.
-
Looking sharp, Jerry. I got my fingers crossed that all goes well with weather and ship this weekend.
-
Sweet work, Augie. Everything just pops, just right. A thousand hours so far? Looks like more than that went into her.
- 2,191 replies
-
- 5
-
-
- confederacy
- Model Shipways
- (and 1 more)
-
Bil, It's part of the process... we've all had those "Doh!!!" moments.
-
I do like the looks of the new stem, Mike. And all the cannon.. Have fun with the boat. both the real one and the model.
- 969 replies
-
- 2
-
-
- hahn
- oliver cromwell
- (and 1 more)
-
Stergios, Short answer is no.. the milling bit will need higher rpm's as well. I wonder if a drum sander like the Dremel style would work? Lots of sawdust but it might do the trick. What I and others have been able to do is get close on that cutout with a scroll saw and the file to the final shape and size.
-
Design by Modelling
mtaylor replied to Hellmut1956's topic in CAD and 3D Modelling/Drafting Plans with Software
Hellmut, Most of your math is way over my head. The fact you can present it and discuss says a lot about your mental acuity and more about your attitude. I'm searching but not finding it. I thought it was in a box of some documents. I'll have to start online. While it was more for high speed, high horsepower applications, I think it would apply here as a sheave is a sheave and it doesn't matter if it's a belt or rope, the forces are still present. -
Design by Modelling
mtaylor replied to Hellmut1956's topic in CAD and 3D Modelling/Drafting Plans with Software
As I recall from my racing days with pulleys and belts (same principle), the deeper the groove, the higher the friction. Much depends on if the sides of the sheave rub/touch the (in this case) rope. Wider sides would be preferable to a shallow groove. We'd want the rope to be as loose in the groove as possible with minimum touching friction on the sides. I've seen a chart somewhere but it was for pullys and v-belts and minimizing horsepower losses depending on rpm, etc. so I'll have to do some digging. -
Izzy, Have a look here: http://modelshipworld.com/index.php/topic/7942-removing-paint-from-plastic-kit/
- 79 replies
-
- 1
-
-
- cutty sark
- airfix
- (and 1 more)
-
Thanks for the "likes" and the comments. Dan, That is a good point I didn't think of. With the thicker timbers it will probably be more apparent. I'm going to line out the area between the wales and the batten and work on that area... then drop a batten between the wide planks and garboard since those (except for the garboard) are all the same width. So by doing the thicker planks first, I should be able to get a better idea on the narrow planks, I'm thinking. Plus I've got some fiddly things to clean up caused by naïveté on my part. The rabbet needs attention where it goes to almost vertical (the dreaded bevel) at the bow and stern along with some frames that aren't faired quite right.
-
Bil, Don't look at the total.. just do one frame at a time. Remco, a most excellent builder has this as his tagline in his signature and it's a perfect explanation: Treat each part as if it is a model on its own, you will finish more models in a day than others do in a lifetime
-
Jeff, What Ken said about people. I bought a conductor set and they look like officers. They're not on the model.. but I used them a lot for scale.
-
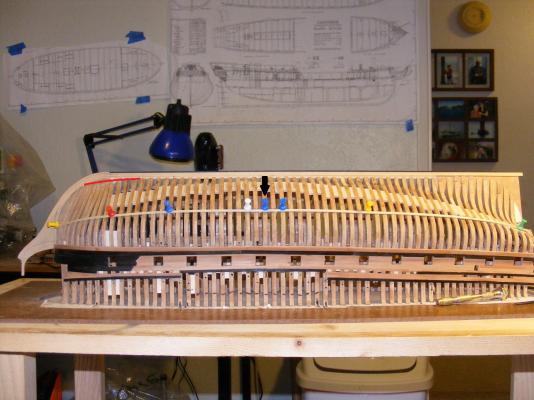
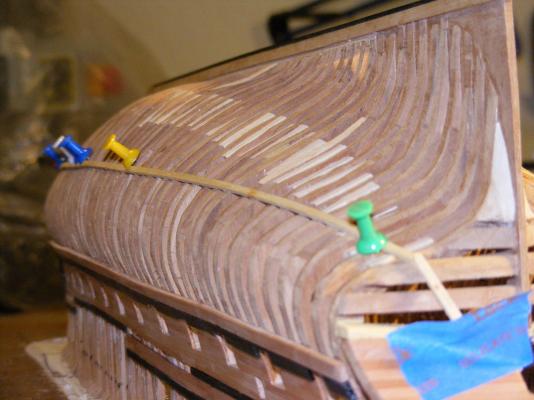
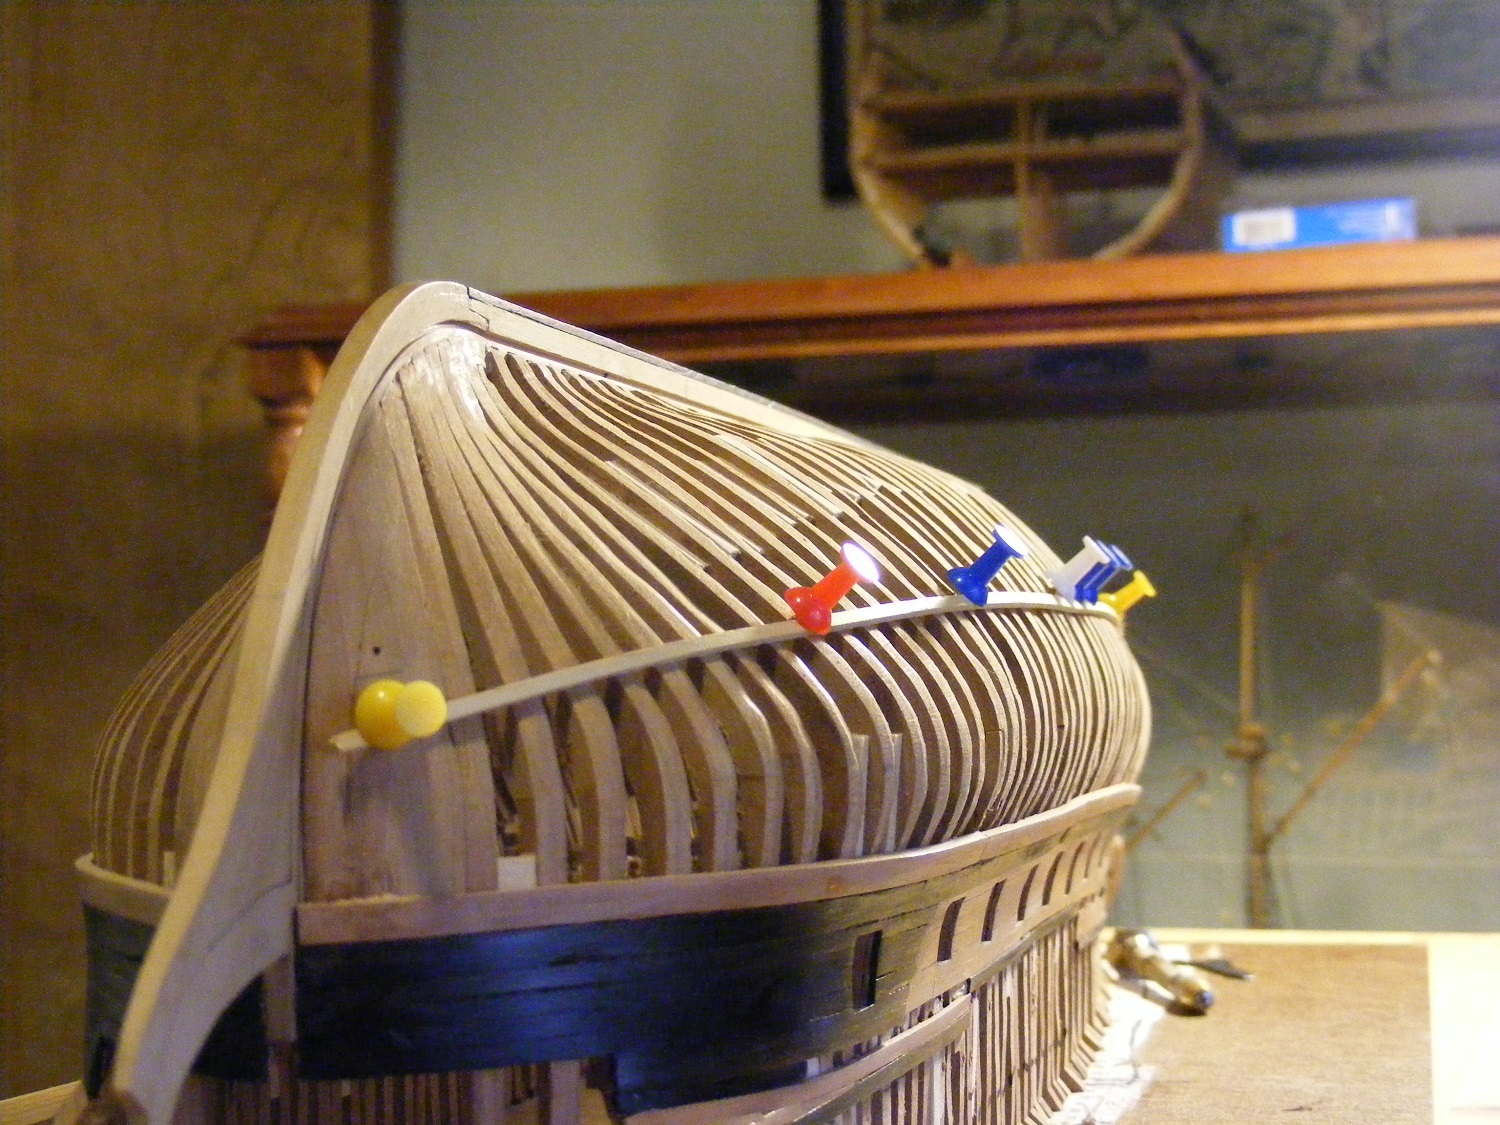
Thanks for the likes and comments. Dan, I'm absorbing all I can.... Your post is big help. I rechecked the Belle Poule and La Venus monographs as they have the same planking style as Licorne. The pics show the re-positioned (this morning) batten. Not much from the red pin back but definitely moreso at the bow. My dead flat and the widest frame is frame 20 (black arrow in full length picture below). The batten at that point is 41 mm which is 8 planks wide. I examined the planking schemes and did some rough measurements from the plans and moved the bow piece towards the wale. This flattened the plank out so there's not a nasty twist/bend in it. It's 17.5 mm. I measured the last strern frame and I get 37 mm. The area between the batten and wales is for the wider planks of 5/32" (5mm). For reference, the dead flat frame dimension from keel to wale is 129mm, first frame forward is 80 mm and last frame is 123 mm These plans also show that the fore part of the garboard doesn't taper down like an English ship but goes up. I need to double check this as could just be a drawing distortion. (see the red line). Nor does it appear that they used a broad strake next to the garboard (which was wide) but a wide stealer near the stern. <scratches head> The other oddball (to me) thing is that the planks are not uniform in width at the midsection for those but the NMM cross-section plan for Licorne is. I'll give the tape method a shot and see what it does... sounds like a good idea.