mtaylor
-
Posts
26,273 -
Joined
-
Last visited
Content Type
Profiles
Forums
Gallery
Events
Everything posted by mtaylor
-
Lovely rope, Paul. Are you making this yourself? If so, what kind of ropewalk?
-
Just magnificent.... If only I had the room to go big...
- 728 replies
-
- 1
-

-
- le fleuron
- 64 gun
- (and 1 more)
-
Have a safe trip, Fam. You "brick" is looking fabulous.
-
Can i live without a BYRNES TABLE SAW
mtaylor replied to shihawk's topic in Modeling tools and Workshop Equipment
Yep. (short answer). It's eating the wood for the kerf and thicknessing takes it's share. On that, I thicknessed the planks to 1/32 (they were slightly thicker) and then cut in 1/8 wide using .20 kerf blade (230 teeth). It seems to be accurate. I spot check about every 4th plank or so. The key is to make sure everything is locked down on the saw. I'll be starting the blade eater (ebony) later this week....but luckily, it's only the two 'larger' sizes. For those, I bought billets and cut them into planks on the full size saw. I'll be running them down to what I need for wales, railings, and a few of the smallest size for planking the stern above the counter. It will either be a PITA or fun.. not sure yet. -
Beautifully stunning, especially that stern shot. I'm wondering the same thing as John about why beams first and then clamps.
-
All this paint available
mtaylor replied to Nirvana's topic in Painting, finishing and weathering products and techniques
Apparently, they're made by Gunze Sangyo and are a lacquer based paint... Here's some links: http://cs.finescale.com/fsm/tools_techniques_and_reference_materials/f/18/t/114013.aspx http://www.armorama.com/modules.php?op=modload&name=SquawkBox&file=index&req=viewtopic&topic_id=142542\ http://www.britmodeller.com/forums/index.php?/topic/234946027-mr-color-paints-in-uk-or-alternative/ http://www.heavyarmourstudio.com/InstructTools3.html (about halfway down the page.) There's lots of forum posts but no real info than apparently it's good stuff. -
Can i live without a BYRNES TABLE SAW
mtaylor replied to shihawk's topic in Modeling tools and Workshop Equipment
I think Bob's problem with dust is that he's got a full-size table saw. The bottom is open unlike our modeling saws which are basically a box. -
A very impressive gundeck, Sjors. She's getting her teeth.
- 1,616 replies
-
- 3
-
-
- caldercraft
- agamemnon
- (and 1 more)
-
You ought to be grinning from ear to ear and then some, sir. That is a very fine bit of machining and it meshes perfectly with no fiddling.. Totally amazing to me. I take it that you won't cut and pin the lobes until later? I'm curious about where the timing is taken from on the cam also.
-
Is a waterline marker useful?
mtaylor replied to CharlieZardoz's topic in Modeling tools and Workshop Equipment
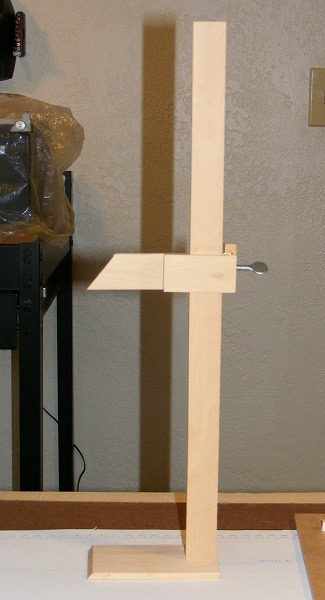
Charlie, You could make one.. I use this and just tape a pencil to it. When I'm not using it to mark, it's used to pick off a dimension from the plans and transfer it to the model. .
-
Can i live without a BYRNES TABLE SAW
mtaylor replied to shihawk's topic in Modeling tools and Workshop Equipment
Bob, I'm milling planking... 1/16 X 1/8, 1/32 X 1/8 and 3/32 X 3/16 (all dimensions in inches). I'm using my table saw as there isn't any other way to do this that I can see. The wood is ebony and swiss pear. As much use as my MicroLux has had, if I were buying a new saw today, it would be a Byrnes. Just for the precision. There a coupe of problems with the MicroLux.. That little motor gets really hot in production type sawing. I usually take a break every 15 minutes or so to let it cool by running it for 5 minutes under no load. I guess I'm just being finicky on that. But the other hang up is the movable arbor. If lets you cut angles. I'm not sure about the new version, but on the old one, the guage isn't accurate and setting it for 0 degrees or an angle requires a bit of fiddling. Same for the mitre.. Mines off 1/2 degree. Not much until you're trying to cut wood to butt up against another piece. like a coaming. I've had to do a fair amount of "bashing" and calibrating of the thing that I wouldn't have had to with a Byrnes. -
Between trained termites and rigging spiders, we're well on our way to some nice ships.
- 120 replies
-
- 1
-
-
- mystic
- motor yacht
- (and 2 more)
-
Truly awful question (thread from kits)
mtaylor replied to achuck49's topic in Masting, rigging and sails
Valid point, Greg. I was going for the humor value after I saw friend's cat tear up a ball of yarn last summer. -
You're getting close, Gil. That little cutter looks right at home on the davits. BTW, i'm not a moderator anymore after stepping down for personal reasons. So, I get more shop time.
- 755 replies
-
- 1
-
-
- finished
- caldercraft
- (and 1 more)
-
Truly awful question (thread from kits)
mtaylor replied to achuck49's topic in Masting, rigging and sails
Of give it to the ship's cat. It'll get stretched and spread from one end of the house to the other. Then you can just reel it up. -
You might try to find something like these: http://www.micromark.com/4-piece-Center-Drill-Set,7952.html I'm not sure how small you want to go.... Have you tried center tapping using a small nail?
-
Running the breeching rope through the cheeks similar to what the French used. I'm not sure why the quoin was stuck in there that way. On the French ships, the rope would have lying off to the sides and not pulled out the back.
-
ancre Le Fleuron by cabrapente - FINISHED
mtaylor replied to cabrapente's topic in - Build logs for subjects built 1501 - 1750
Contact ANCRE about that. If my Google Translate worked right, all you got was the words and no drawings? If you have the French version, youll have to go to that book for the drawings maybe? The English versions I got from them all had the plans and drawings.- 332 replies
-
- 1
-
-
- le fleuron
- 64 gun
- (and 1 more)
-
The figurehead is a marvelous addition to a marvelous build. Hat's off to both you and Janos.

- 1,477 replies
-
- 2
-
-
- essex
- model shipways
- (and 1 more)
-
Thinking Things Through - French Frigates
mtaylor replied to mtaylor's topic in Nautical/Naval History
2 down, more to go... -
Great looking guns. What did you use for the casabels? Is that wood or paper?
-
Thanks Alex. You answered my question perfectly.
-
Thinking Things Through - French Frigates
mtaylor replied to mtaylor's topic in Nautical/Naval History
I blew it again. Ah the joys of research and being pointed in unknown directions... the 8-pdr frigates that didn't have a chase port did not have them added . The first port had a gun, no lid, and was smaller because of the location. Anchor handling was done from the forecastle, the platform, and 'hanging off the side'. Still digging through these materials. Better to have found it late than never but I'm at a good point in the build to resolve these kinds of finishing issues. Thanks for letting me think out loud.... -
Cutty Sark by NenadM
mtaylor replied to NenadM's topic in - Build logs for subjects built 1851 - 1900
Have a good day with family, Nenad. Her majesty will understand and be patient.- 4,152 replies
-
- 2
-
-
- cutty sark
- tehnodidakta
- (and 1 more)
-
Hi Walt, I make the same wishes to you and Linda. I'm praying that 2015 will be better for all of us. Anyway, take your time and make yourself and your bride comfortable and happy. The ship isn't going anywhere and we'll be here.