HOLIDAY DONATION DRIVE - SUPPORT MSW - DO YOUR PART TO KEEP THIS GREAT FORUM GOING! (Only 13 donations so far - C'mon guys!)
×


Beef Wellington
-
Posts
2,249 -
Joined
-
Last visited
Content Type
Profiles
Forums
Gallery
Events
Everything posted by Beef Wellington
-
Wish I knew! - I had just come across the photo when looking at some pictures some time ago. It looks suitably 'authentic' and not just some sort of touristy reconstruction. It seems to be the only example I've seen that is contrary to the perpendicular hook.
-
Except when they're parallel!
-
USS/HMS Chesapeake is correct. There are some interesting pictures posted here of the interior, many of the floorboards are from the deck of the ship, and many timbers bear the marks of their original purpose. Interestingly, the US considered the USS Chesapeake to be the runt of the litter of the original 6 frigates produced, but I wonder how much of that was historical propaganda after the loss of the ship. The Chespeake was captured by HMS Shannon (Leda class frigate, sister to HMS Trincomalee in Hartlepool) after a brief 15min dual, . http://www.armchairgeneral.com/the-fate-of-uss-chesapeake.htm/2 As many know, the captain of the Chesapeake, James Lawrence was killed in the action after uttering the famous "don't give up the ship" order. Captain Broke of the Shannon was severely injured and never commanded at sea again,although he did support improvements in Royal Navy gunnery schools. Probably the luckiest person in the whole affair was First Lieutenant Provo Wallis, after a rather mundane and non-distinguished career to that point, he was promoted Commander as was usual at the time after such an engagement and ultimately died at the age of 100 as Admiral of the Fleet - still on the active duty list after having refused suggested retirement by the Admiralty in his 90s. He was the last survivor of the Napoleonic war era. Pompey 2, you had the winning guess, so the next ship is yours to post.
-
Robhvw - not HMS President - although a good suggestion, I'd forgotten about the "Little Belt" affair. As far as I'm aware the condition of President was so defective or rotten that she was not of further. You're very hot on the trail, go for Broke!
-
Doreltomin, I'm glad you like this, thought it would be an interesting change. Some pointers trying not to give it away. The ship served under 2 flags, and was involved in a rather famous "incident" that contributed to starting the war in which she changed hands. She was "broke" up shortly after that and timber sold to construct this building.
-
Jan - not the Jolly Sailor. "HMS" is not incorrect...but don't want to say more without it giving away so soon.
-
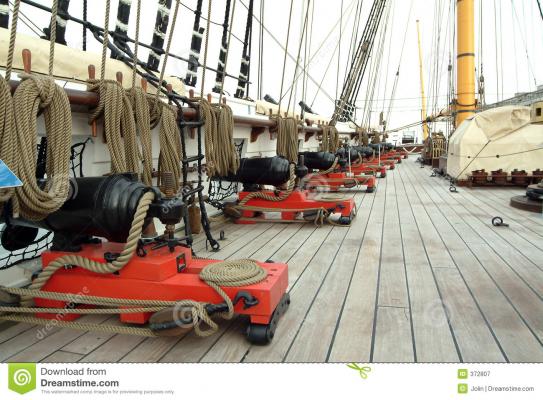
 The loop in the drawing looks a little long to me Kevin, would it prevent recoil into the center coamings and fittings on the deck? Don't think I've ever seen a breach rope look like the one in drawing. The cannon looks great by the way!
 -
Thanks, Werik..and thanks David for explaining! Here's the next one, a little change of pace...

-
Think I have it, Nokaze?....but not sure why its last of anything...
-
Is it one of the Japanese 'Minekaze' class? If the last one ,then the 'Numakaze'?
-
Jpett - not sure the misalignment is anything to worry about at all. Even if it doesn't disappear when you sand to shape, you can always add some more scrap wood to build it up appropriately. Everything look impeccable, not even a stray glue smear!
-
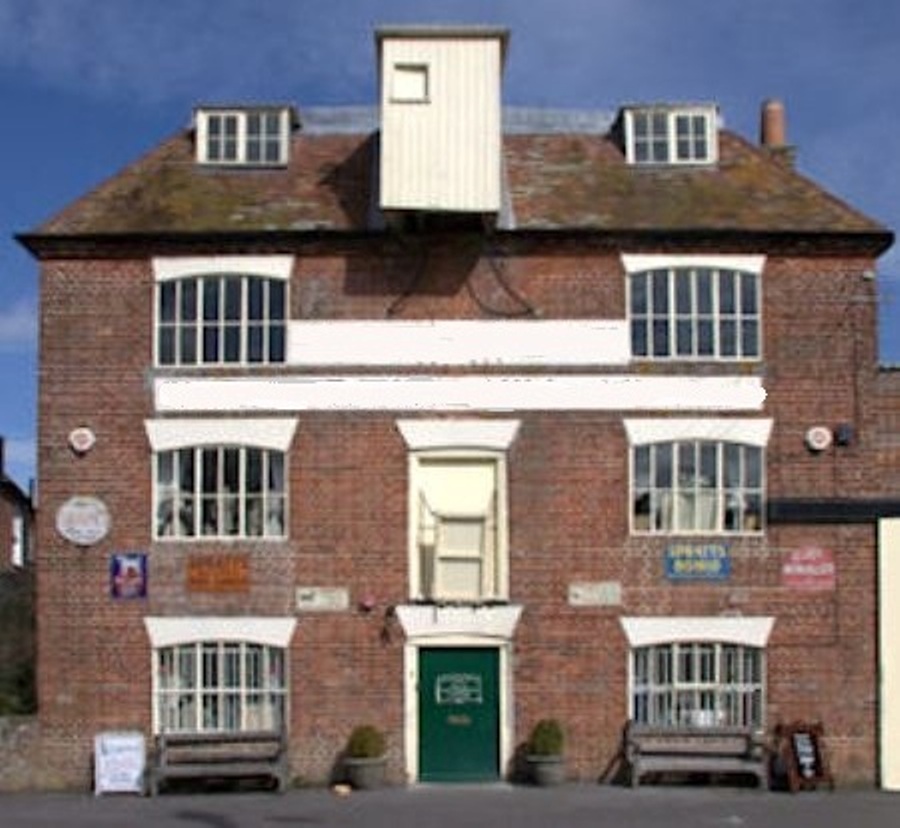
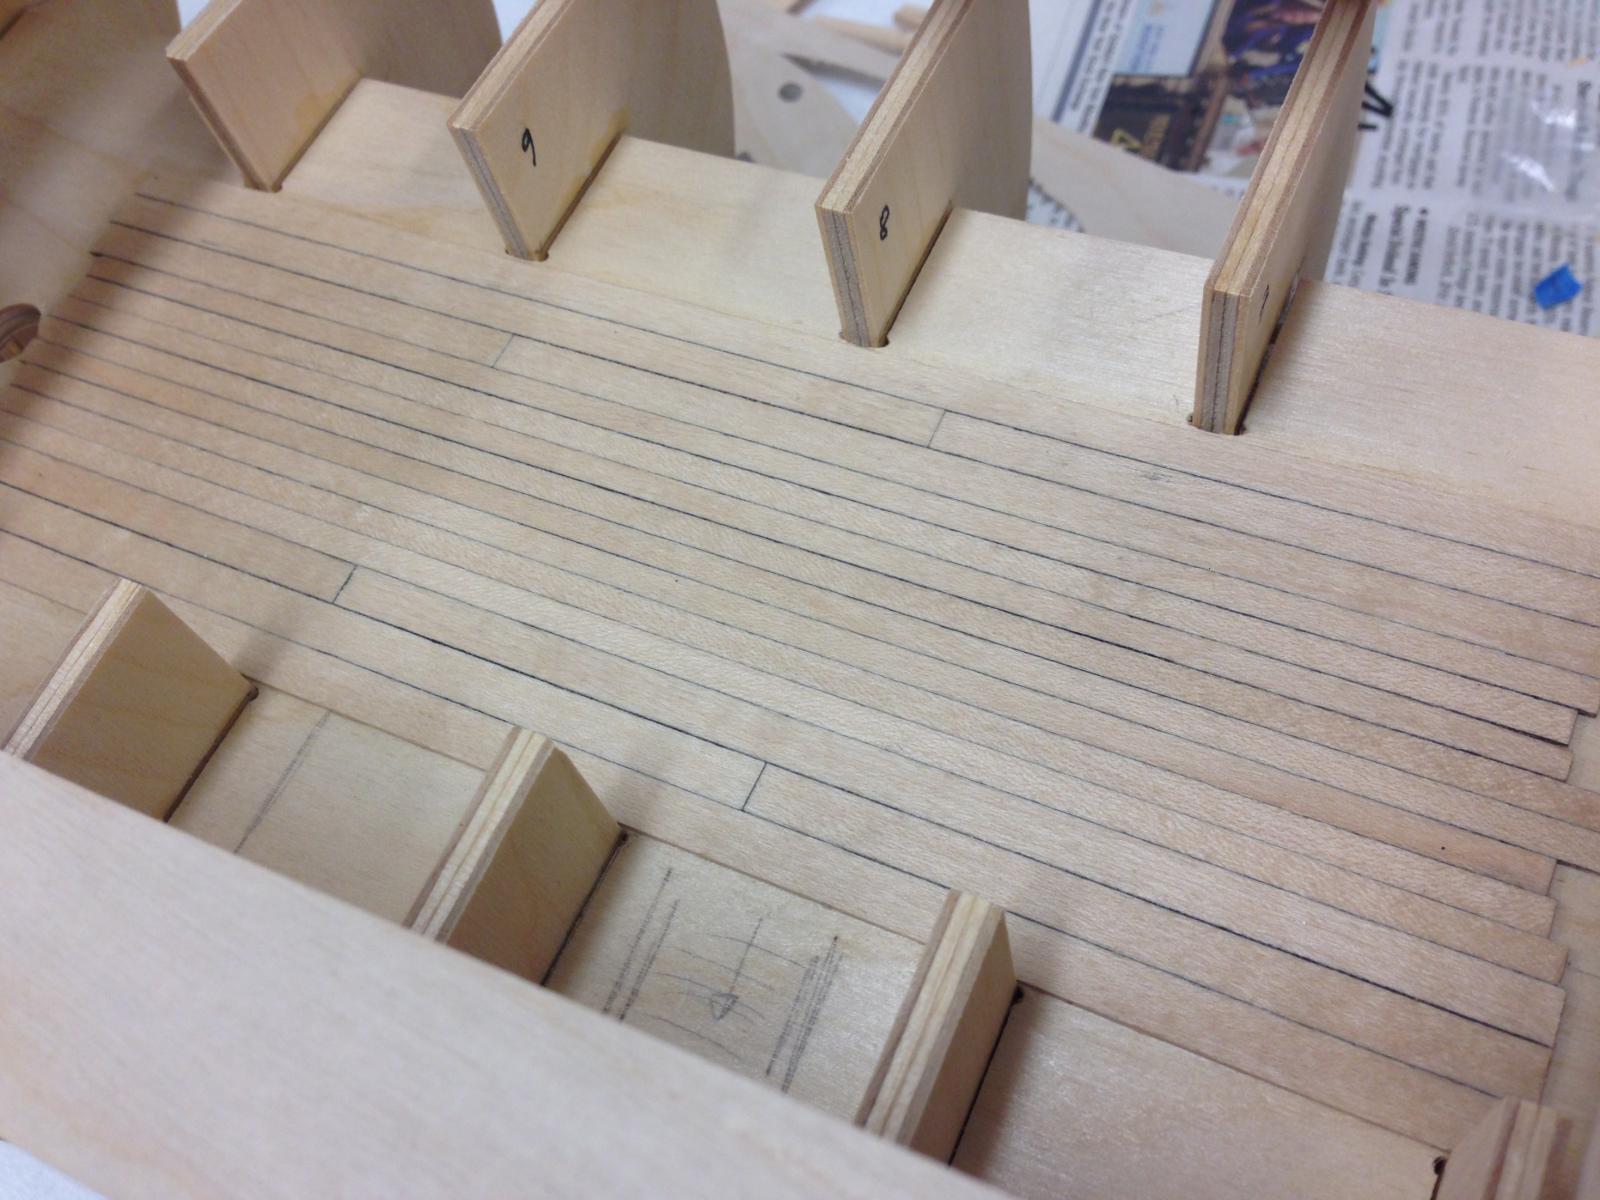
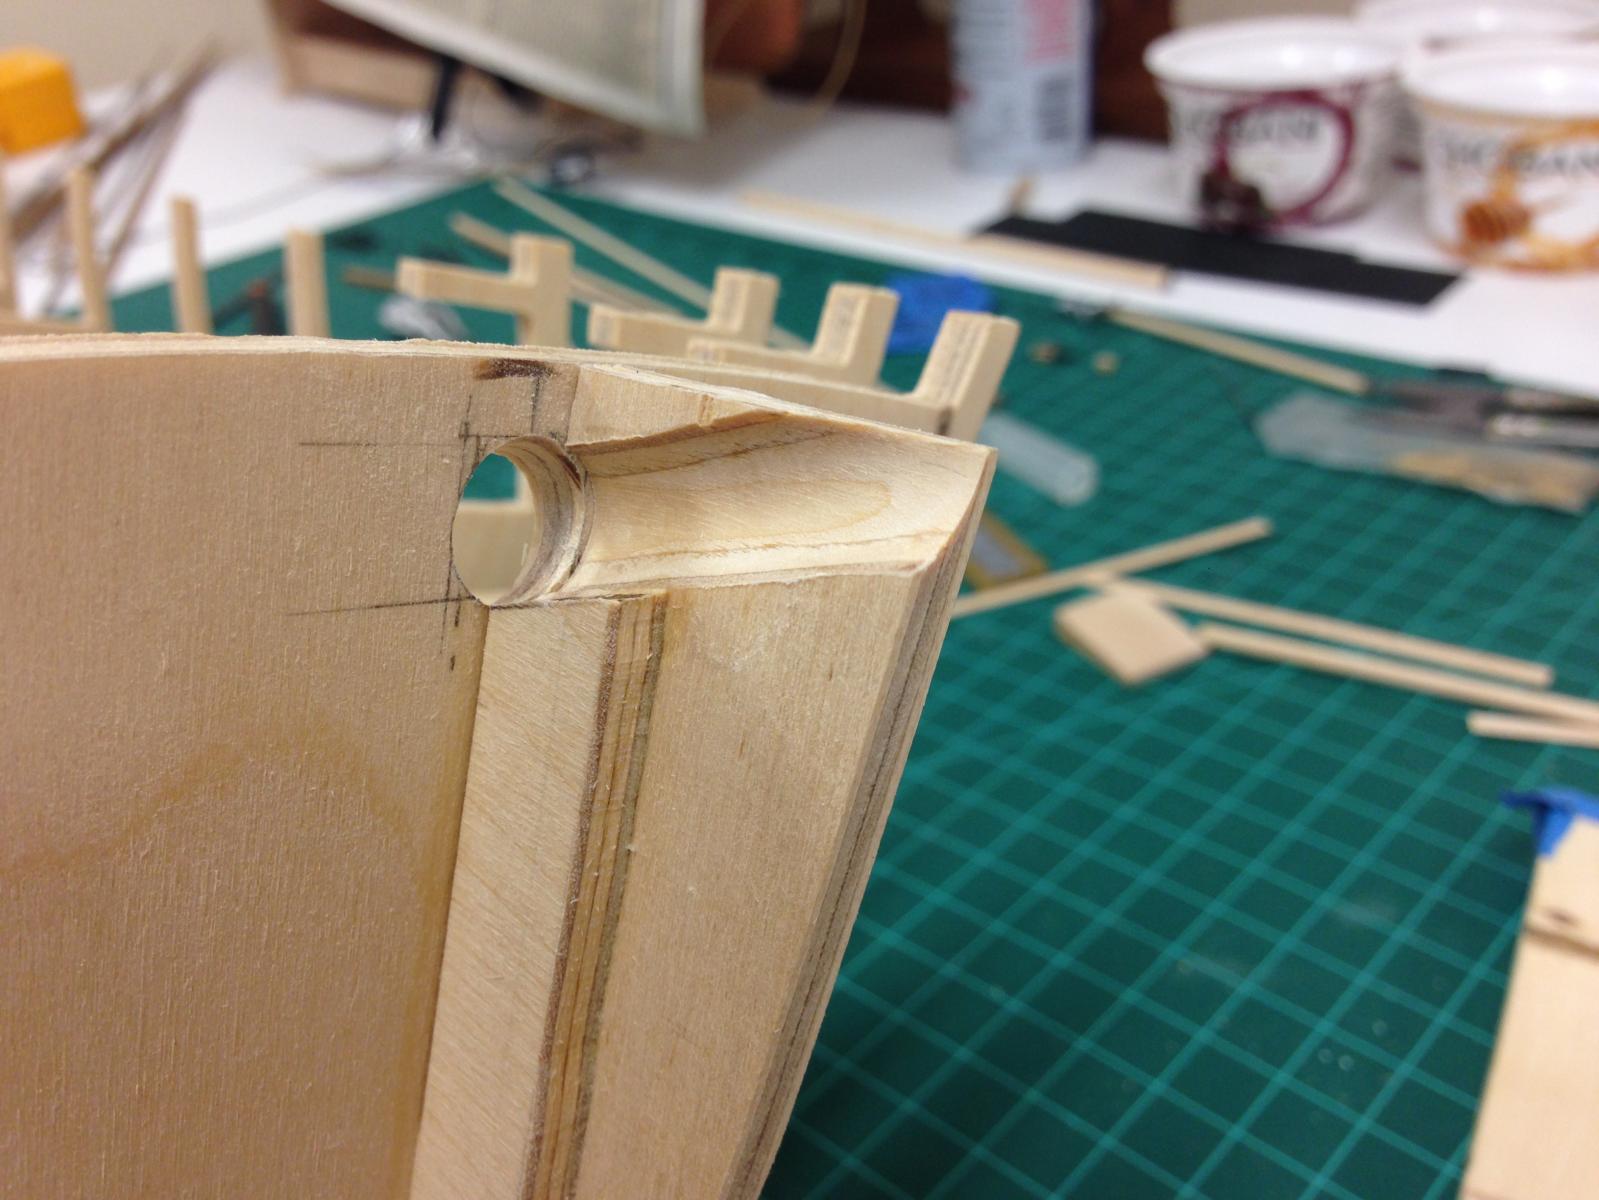
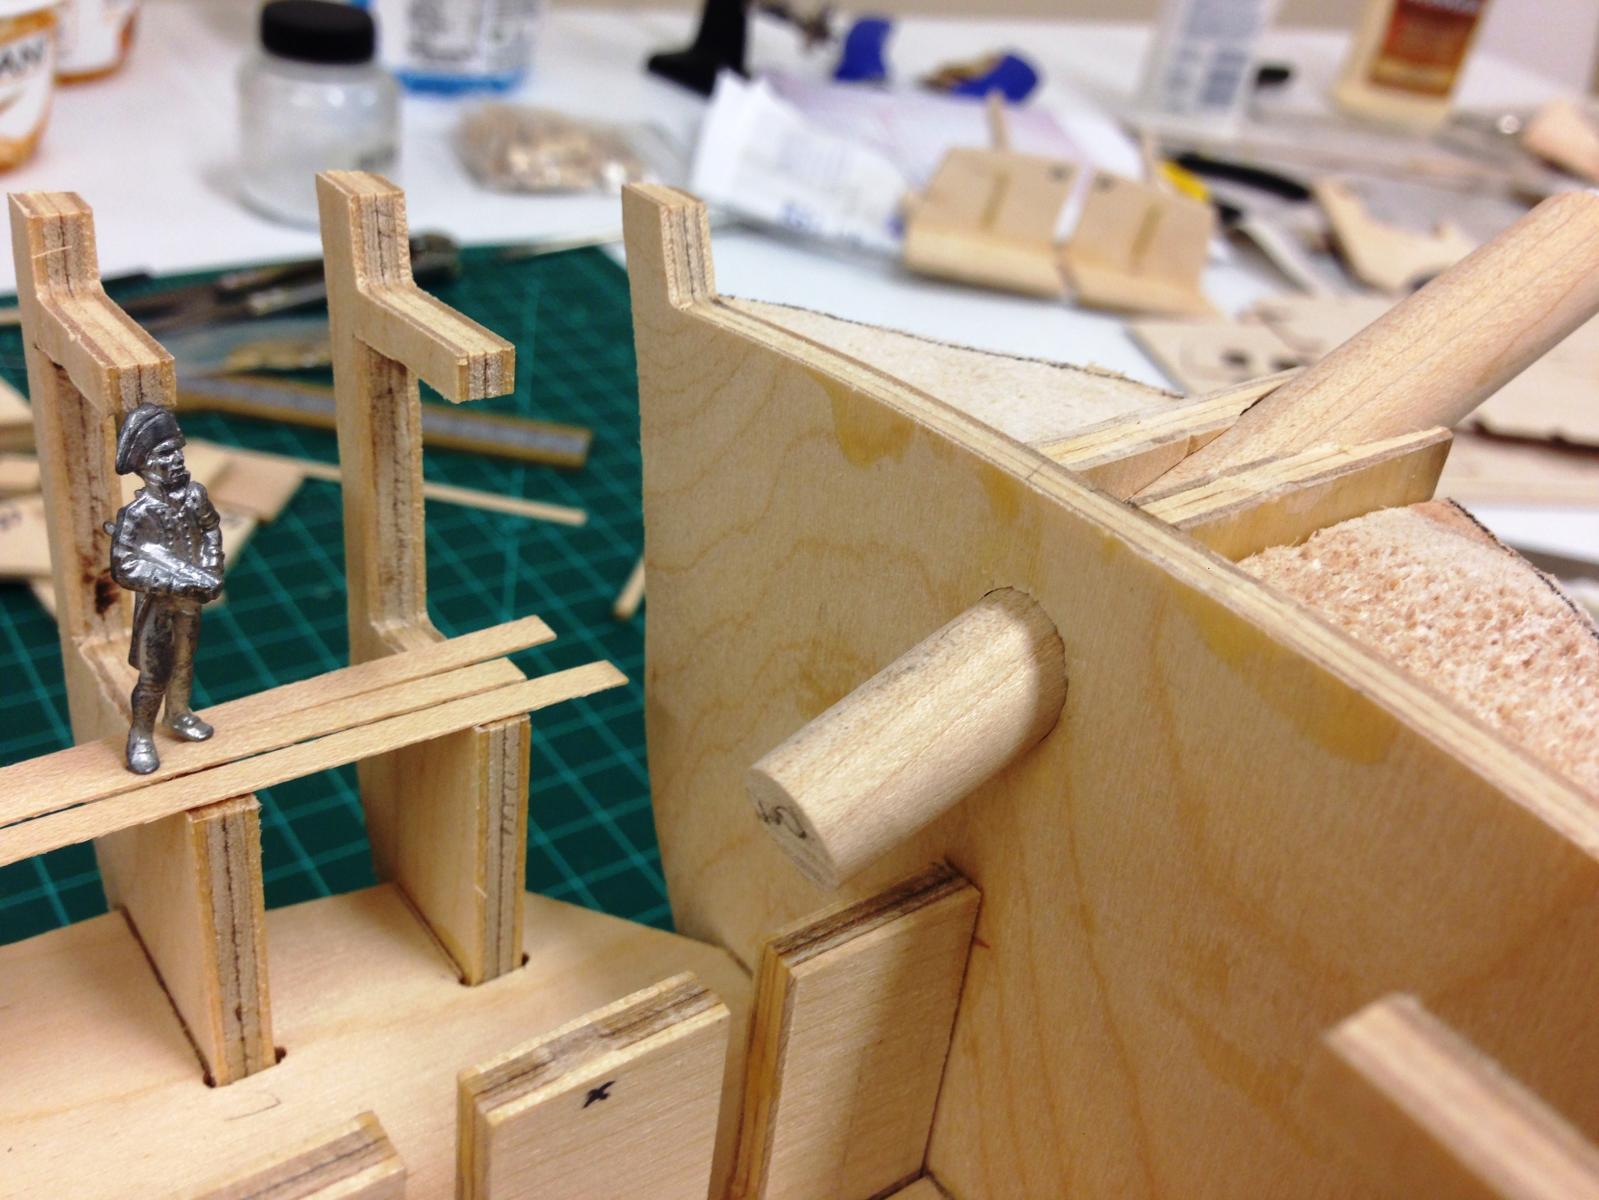
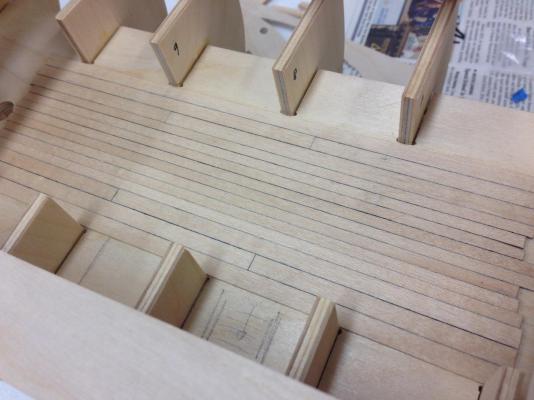
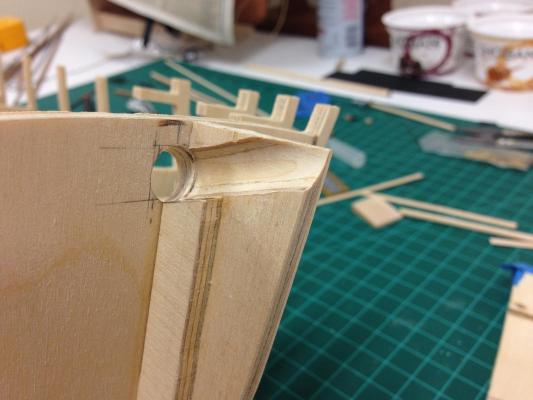
Preparing the bow Had to do a bit of thinking on how I want to proceed with the bow as I couldn't get comfortable with the kit approach to attach the bowsprit. This basically has the bowsprit sitting in small recess in the keel former, and although no-one has taken issue with this I wanted to revisit it. Another problem also came to light s part of this process. The rake of the bowsprit on the plans is less than that suggested in the AOTS book (~17deg on plans vs ~20deg in AOTS), doesn't seem much of a difference but its enough to cause the bowsprit to interfere with the figure head. Further review highlighted another discrepancy, the AOTS book clearly shows the top of the bowsprit appearing through the top deck at the bow. The bowsprit dimensions also appear a little odd on the plans, being made from 10mm dowel, but reduced to 6.5mm at the saddle, that doesn't seem to match the AOTS book either which shows the bowsprit thinning but only after the saddle and not the same degree. So, considering all this I decided to allow the bowsprit to be seated more securely through the hull (as per the original) and tweaked to alignment to ensure it clears the figurehead. Not sure exactly how I'll do this but should have some options now. Bow arrangement with the slot for the bowsprit Hole drilled in forward bulkhead and bow shapers adjusted to allow bowsprit to feed through Bowsprit arrangement being examined by Captain Stirling, balsa wood bow filler also installed but not yet fully shaped. ....and also, planked the false deck with maple simulating planking per the AOTS. This will not really be seen that much but it was a good chance to see how the maple would turn out. I didn't like the supplied Tanganika at all, it looks paler than I've seen before, which is fine, but has a lot of brown 'flecks' in it that look really out of scale and a little odd.

-
Keith, just found a read through your log, wonderful work and a great result - well done indeed. I really appreciate you sharing your techniques!
- 78 replies
-
- 1
-

-
- model shipways
- bounty launch
- (and 1 more)
-
Those buckets look great Kevin. I'd be very interesting in seeing how you approach the decals if you go down that road.
- 1,319 replies
-
- 1
-
-
- caldercraft
- Victory
- (and 1 more)
-
I think you are safe doing what you think looks best - check out the pictures of the HMS Vanguard kit from Amati - it shows the unpainted topmasts as well. http://www.historicships.com/TALLSHIPS/Amati/HMS%20Vanguard%20AM130004/HMS_Vanguard.htm As far as historical accuracy - I'm sure painted and non-painted are equally appropriate. The reason for painting I think is more to mask the lighter colour of the dowels which don't really match the walnut. Your Snake is looking great!
- 1,144 replies
-
- 2
-
-
- snake
- caldercraft
- (and 1 more)
-
Mark, I think Russ hit the nail on the head. Models that are designed to be double planked typically come with a limited number of bulkheads that give the shape to the hull-far fewer than would be on a real ship. Because there is a reasonably large distance between these, its very hard avoid having peaks and valleys no matter how well bulkheads are fared. Smoothing out the first planking and covering with a second layer makes up for this deficiency. I don';t think its down to skill level, its inherent in the structure. Kits (and scratch builds) that use a significant number of bulkheads or frames have a much smaller distance between them which allows a modeler to simulate the original ship using single planks, as each one can be given a much better lie to each plank. On the double plank hulls you sometimes see builders simulating with shaped balsa filler to provide extra shape to the hull, typically at the bow and stern where the lines change most significantly. Of course this method of building is more manually intensive to get the frames correct. Of course, in both of these methods, it ultimately comes down to the skills of the modeler on how good a finish they can achieve - its never guaranteed.
-
Mike, thats the approach I'm hoping to take on 'Jason', I'm hoping it will allow a cleaner angle between the stem and the hull, but time will tell. Part of that decision was also was that I don't have my replacement wood yet but want to move forward.
-
Have fun with the serving machine Ray, I've been happy with mine (though I do feel a bit like Gandhi when doing the longer lengths!). One trick I've learned by experience is to periodically "compress" the thinner line every 2cm or so to keep the serving as tight as possible. Your Burton pendants came out very well.
- 536 replies
-
- 1
-
-
- diana
- caldercraft
- (and 1 more)
-
Cheers Nigel, if it is a first, I hope I'm not heading over a cliff Time will tell....
-
Tim, nice end to the bowsprit. I'm sure you'll get the hang of the octagonal sections with a little practice. Something that really helps me is to shade/colour in the initial 4 sides lightly with a pencil. It makes it that much easier to see the shape as it develops filing down the corners and really helps you get the sides equally proportioned - imperfections in proportions don't hit you in the face (at least mine ).
- 366 replies
-
- 2
-
-
- granado
- caldercraft
- (and 1 more)
-
Sjors - very nice job with those plates, they look great. Good to get the "learning curve" out of the way
- 1,616 replies
-
- 1
-
-
- caldercraft
- agamemnon
- (and 1 more)
-
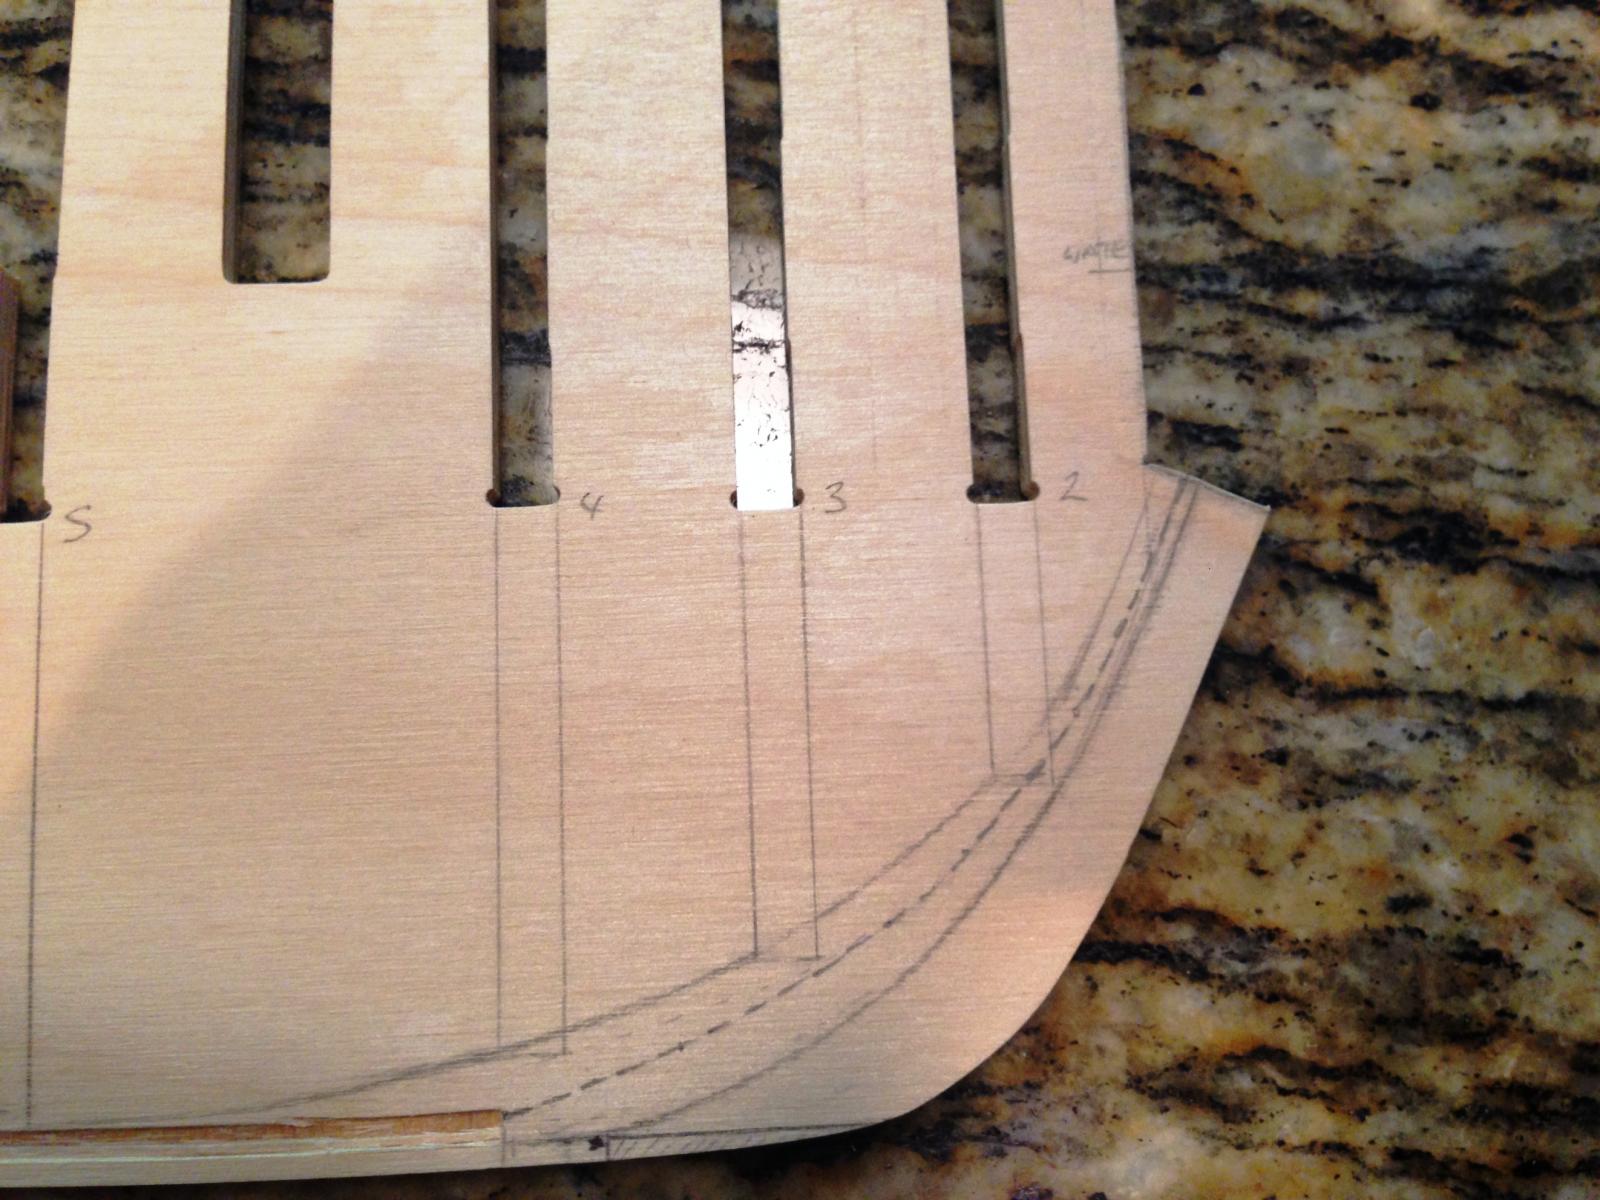
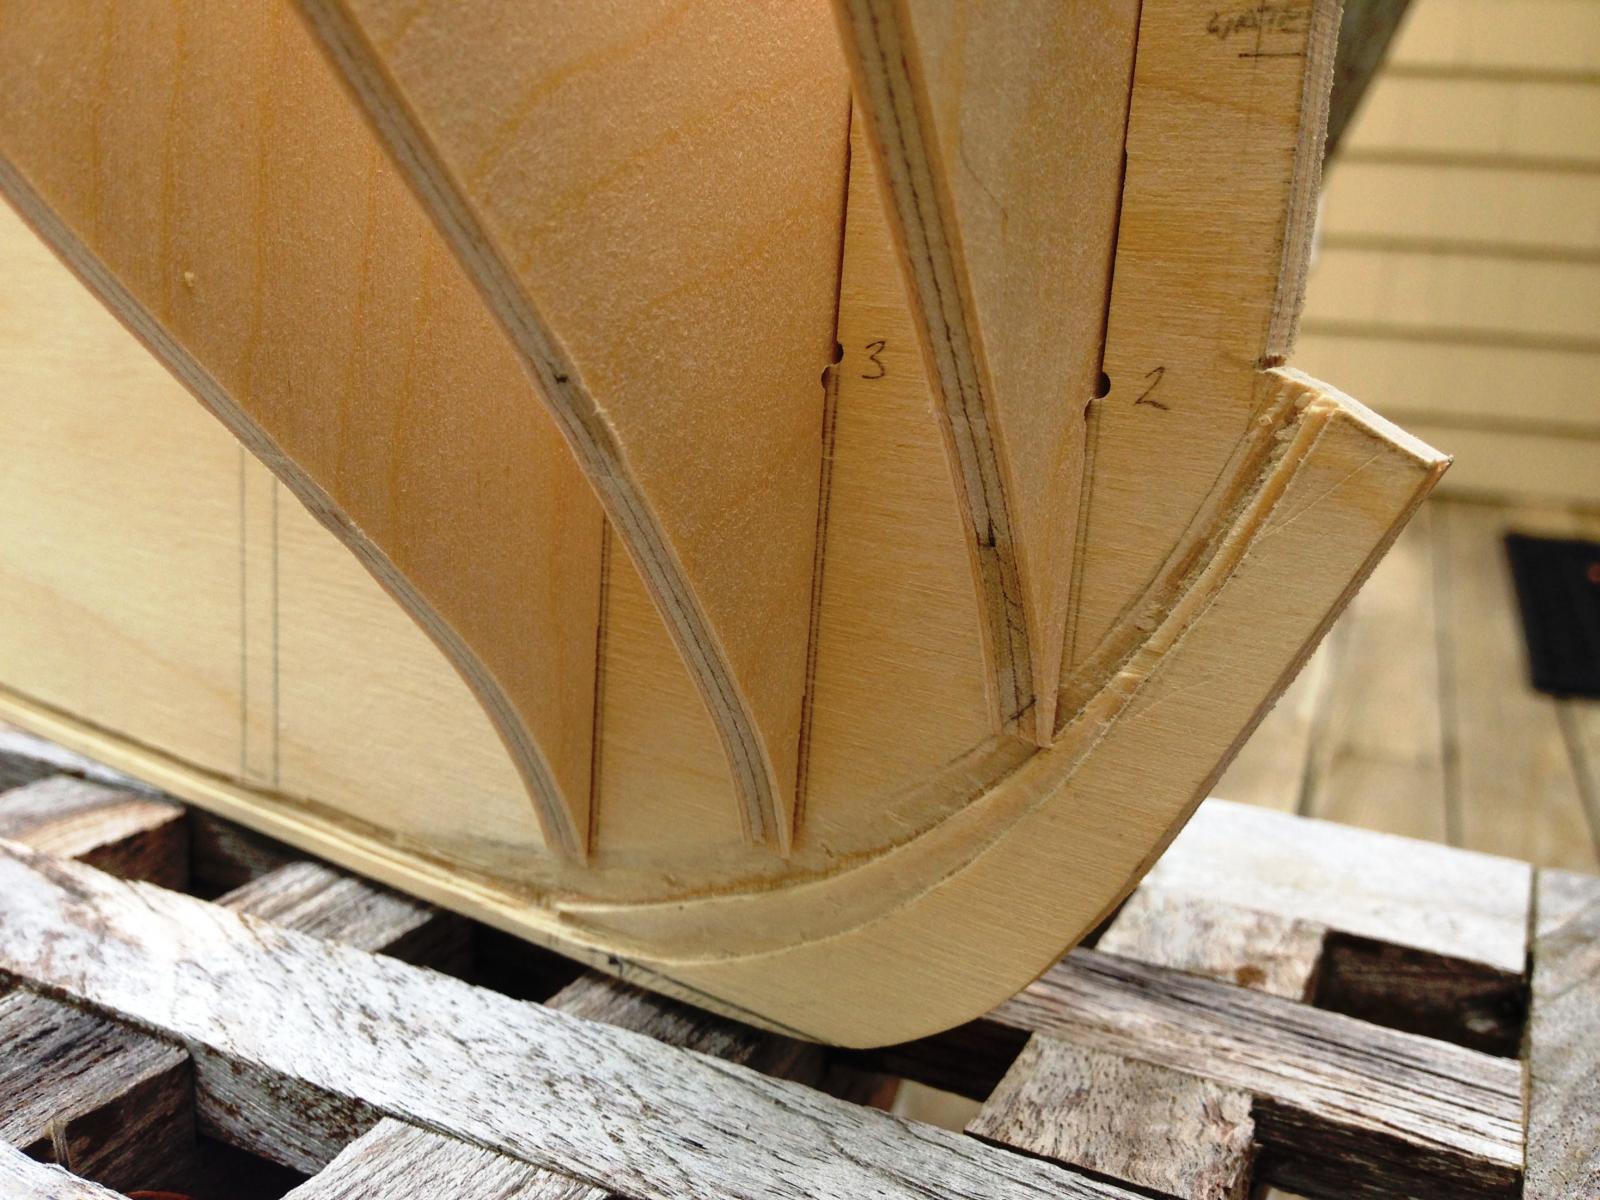
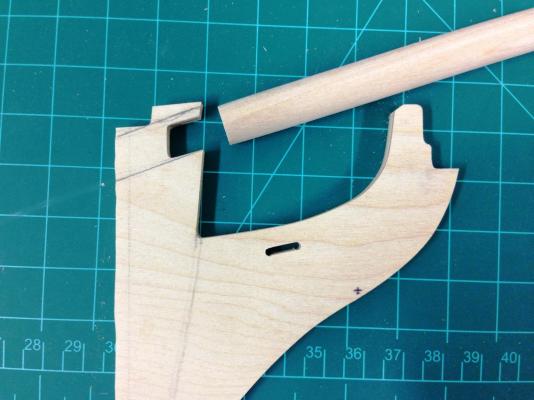
Rabbet at the Bow I really want to make sure that the lines will be as accurate as the kit will allow. Because the keel comes in piece, it was a little challenging to visualize how this would come together. You will also notice that I have taken a rather drastic step of cutting off the stem - this will eventually be replaced with boxwood. There are some shaper pieces that will be added in due course. Drafted 3 lines onto the keel to allow any preliminary rabbets and shaping to be done before bulkheads are installed. Outside line represents the outside shape of the hull, I took this shape from the rabbet profile in the AOTS book by copying and enlarging to scale. This is not wildly different from the plans but it was important to me to get lines as accurate as possible recognizing the plans don't reconcile 100% to the pre-cut keel. This also needed to tie in with the rabbet already established in the bottom of the keel. Inside line reflect my best estimate of the inside edge of the necessary rabbet based on the shape of the bulkheads (using the rear edge of the bulkhead as the guide) The middle dotted line is the best approximation I could determine on where the outside edge of the rabbet needed for the first planking should be. Given the first planking is 1.5mm limewood, and the second planking 1mm thick, the dotted line represents the curve 2/5ths horizontally from and the outside rabbet edge and 3/5ths from the intererior rabbet line. Its an approximation but hopefully close enough to make the planking gosmoothly and replicate the true hull shape as best I can. Keel shaped based on previously drafted lines, relationship to the bulkheads can be seen. These have not yet been shaped, but the forward edge will match the inner faring line. This will all the fine tuned once bulkheads are installed.