


vossiewulf
-
Posts
1,477 -
Joined
-
Last visited
Content Type
Profiles
Forums
Gallery
Events
Posts posted by vossiewulf
-
-
2 hours ago, mtaylor said:
Definitely some damage to the chassis. Maybe tell folks it ran out of race track when the chute didn't open and now needs a rework.
You have to explain the roof/body damage. So the story needs to include the sentence "[a]t that point I was inverted at 180 miles per hour."
-
9 hours ago, paulsutcliffe said:
I saw that in I guess your build log for it? I can't look at those pictures, it's like a scene from a 1960s Driver's Ed movie. Not to mention that's a few dollars of holly unless you milled it yourself. In which case the time and machines cost a lot. Either way a seriously bad day.
- Keith Black, paulsutcliffe and Canute
-
 3
3
-
Drazen, a very good rule of thumb when working with wood is whatever you do to one side of a table/board/wooden ship, you do exactly the same thing to the other side. If you want really stable furniture for example, when machining down from boards it's good practice to constantly flip board faces when you get to the planer stage so that the same amount of wood is removed from each side of each board. If you live in high or low humidity conditions and you don't do that, you'll come in the next day to find all sorts of sweeps and winding and checks in your boards.
So yes sealing the inside to the same extent that the outside is sealed is a good idea.
Once you establish a controlled humidity you should give the ship at least a few weeks to equilibrate to the new moisture baseline. Guitar makers will frequently leave guitar necks for months in the shop before using them in a guitar to ensure they're fully stable within their environment. Ship models that aren't solid hulls will become stable much faster because of greater relative surface area, but you still need to give it some time. And remember it's been under enough stress to break things.
With respect to repairs, you seem to know what you're doing in building ship models, so let your own judgment be your guide. Only thing I will say is if you are in doubt about any piece, rip it off and replace it. That's likely to be the smart thing to do.
- mtaylor, Keith Black, Canute and 1 other
-
4
-
-
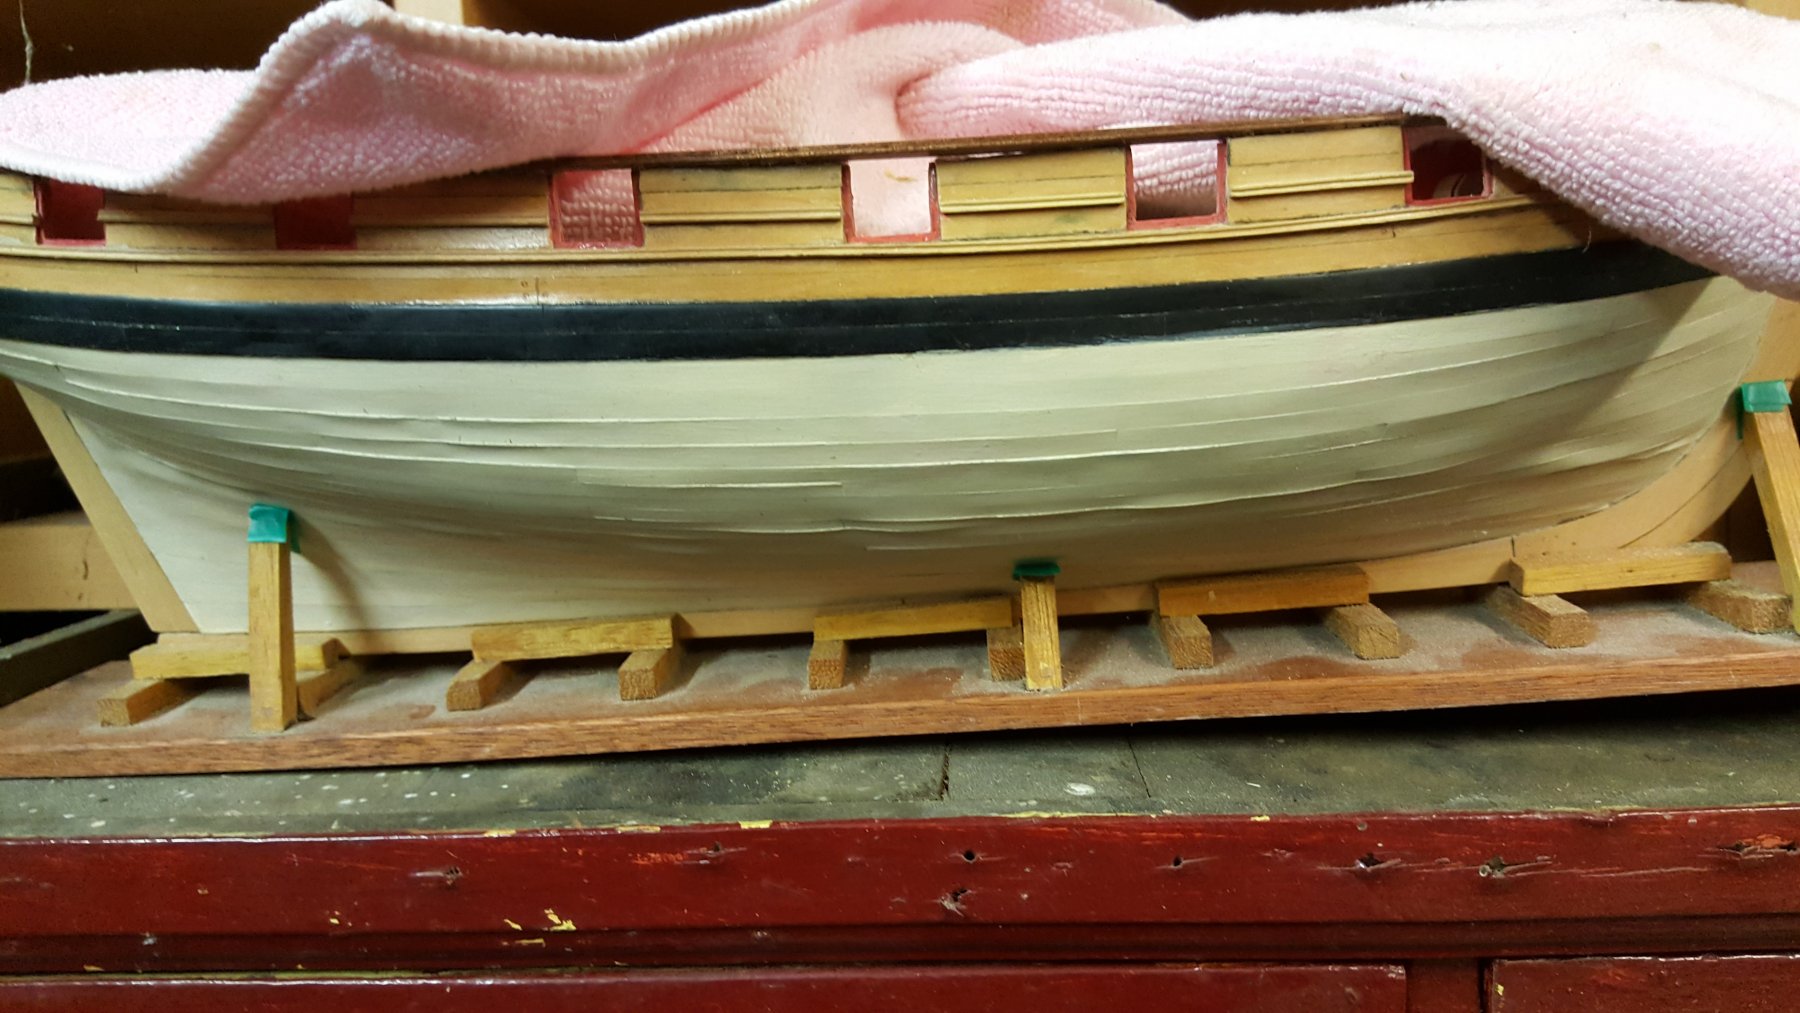
A piece of wood acts with respect to humidity like a balloon with a skin that doesn't stretch well. As humidity goes higher, internal compressive pressures build because every cell in the wood structure is trying to get bigger, with the vast majority of these stresses oriented in the radial direction of the tree rings. When humidity drops, the process reverses and internal tension stresses build until humidity stops changing and the wood reaches a steady state again. Now wood doesn't handle that well in the long run even if it's totally free to move. However if you add glue someplace that is constraining the wood from moving in the direction it wants to go, the failure process is much faster and usually much worse.
With your ship, I see what looks like both compression and tension failures, like it sat in place in the cellar for most of a year and went through both cycles.
-
-
Robert, wood doesn't get brittle with age, the timber of Khufu's boat at the Great Pyramid was just about fully sound after 4000 years. To the extent wood brittleness varies in human time scales, it's a function of the moisture content of the wood, which is a function of the relative humidity of its environment. Any wood stored in a dry place without either radical swings in humidity or constant very high humidity will decay very, very slowly. Wood is amazingly tough stuff.
However, I don't have the years of experience with little bits of strip wood, I'm more familiar with furniture scales, but I see no reason that wood only a few decades old would decay unless maintained in poor conditions. Anyone with more experience correct me if I'm wrong on this for some reason with planking wood.
-
Every experience I've had with teak, it ate edge tools alive. It has a nice natural slipperiness that helps but the plane iron edges are like you're planing sandpaper.
- paulsutcliffe, Omega1234, druxey and 3 others
-
6
-
Also, where is the wood lock on this rudder? And I assume cutters had rudder pendants, right? The contemporary models don't show them but it's basically crazy to go to sea without some secondary rudder attachment.
-
Short update, I finished the cap rails and cleaned up everything and painted a satin clear coat over everything, especially the deck. I really don't like how that polyurethane looked, so proving you can paint anything over anything if you let it dry enough, I switched to real nitrocellulose lacquer, the Mohawk brand used by luthiers. It's dried a week now, I need to hit it with 1500 and then shoot a final coat. The satin is still a tad glossy for my tastes, I may mix it down a little bit with matte.
Otherwise, when I've had time, I've been figuring out numerous creative ways for how not to make pintles and gudgeons. But I'm making progress now. Also I am still waiting for my boxwood square stock for the yards from Crown, and trying to figure out what I'm going to do with the guns. I thought I had measured everything but I forgot to measure the very important height above deck, and the 6 pounders from Chuck are just too big, I'll use them one something else later. But the 3 pounders in the kit are only 17mm and look tiny for the carriages. I've ordered some 20mm "swivel guns" and will see if they look better.
And I got likes from Chris Watton! Woohoo! (runs around the room high-fiving everyone)
-
-
I'd suggest alcohol-based aniline dye rather than water-based like Ritt, it would dry much faster and not effect the line in any way except coloring it. I don't like pigment-based stains, they always obscure what they're staining to some degree, most staining I do now is with dye.
- Bob Cleek, mtaylor and paulsutcliffe
-
3
-
Does the Minwax not affect your ability to glue the rigging as required? I would think it would.
- mtaylor and paulsutcliffe
-
2
-
I would add a small Zona hand saw to the list Amateur provided. Also fingernail files in various grits are cheap and reasonably effective replacements for lots of files.
Planking is obviously something doable from all the models you see here, but it's not easy the first time. Look in the forums for the section on planking and framing models and read up there and look for the planking tutorial videos you can find there.
Don't cheat and go quick on the first planking layer, go slowly and try to plank it exactly as you would do the second layer. That way the first layer acts as a practice run for the second planking layer, which will go much better as a result.
You need patience for ship modeling. Planking can take a while, as will rigging- you just have to plug ahead and keep making progress.
Spend lots of time reading other build logs. You will learn immense amounts from doing so.
Look in the gallery of completed models here for Le Hussard, people usually upload quite a few pics that show the finished ship from many directions and that can very much help figure out what you need to do and what certain parts are and what they should look like when finished.
- russ and pontiachedmark
-
2
-
Someone else with much more knowledge would have to confirm but I think the square mizzen topsail over a lateen-rigged course places it in the late 1600s/early 1700s. At least the development sequence I remember is lateen course > lateen course + square topsail > Lateen course with no sail ahead of the mast + square topsail > Loose foot gaff course + square topsail > Spanker boom added, spanker + square topsail.
-
1 hour ago, RPaul said:
Missed that one, thanks, although I've been to that website. Still, no plans, only history.
I would contact them, as the standing authority for lighthouses they're most likely to have plans, even if they're not publicly offering them on their site. And wouldn't enough good photographs serve the purpose? If you know the height of the lighthouse from standard data, you could scale everything from good quality photos.
-
I just typed "Scotland Lighthouse Authority" into Google and it returned the Northern Lighthouse Board. They don't seem to have plans, but they have photographs and information about all lighthouses in Scotland.
-
-
With 3D printing, I'm still waiting for a photolithographic (laser) machine that seems to work consistently much cheaper than they are today. About the only one that seems to work well is the Formlabs 2 and it is $3500. I keep looking at reviews of much cheaper ones, but they all sound like a lot of frustration and not much good printing.
The extrusion machines can try to make thinner layers, but they have fundamentally lower detail and still come out with visible layers and an uneven surface. I used to be a 3D artist in the games industry, so I'm lucky in that I wouldn't have to learn 3d modeling from scratch, I can already model anything and I keep myself reasonably active with it. So actually if anyone is dying for some modeling work that wouldn't take 1000 hours, I might be able to help.
First up on the printer would probably be some of my Battletech models
")

- GrandpaPhil, mtaylor and paulsutcliffe
-
3
-
Yeah, agreed that brass output is more aesthetically pleasing and why we like heft I don't know but we do. But the subject was need a cheap way to add guns to a build. At least people should remember that they could turn beautifully detailed cannon for an entire Victory build for about $5 in acrylic rod.
- GrandpaPhil and mtaylor
-
2
-
I've wondered why people don't use acrylic rod to scratch guns. It's cheaper and easier to turn than brass and holds at least as much detail, and is indistinguishable from brass once painted.
- Jolley Roger and mtaylor
-
2
-
-
Micromotors are small brushless high-torque rotary tools.
- thibaultron and Canute
-
2
-
HMS Surprise by Navis Factorem - FINISHED - 1:75
in - Build logs for subjects built 1751 - 1800
Posted
Extremely spiffy yards.