


vossiewulf
-
Posts
1,207 -
Joined
-
Last visited
Content Type
Profiles
Forums
Gallery
Events
Posts posted by vossiewulf
-
-
41 minutes ago, popeye the sailor said:
......you really want to see me in a white jacket........don't you?!?!?!?!

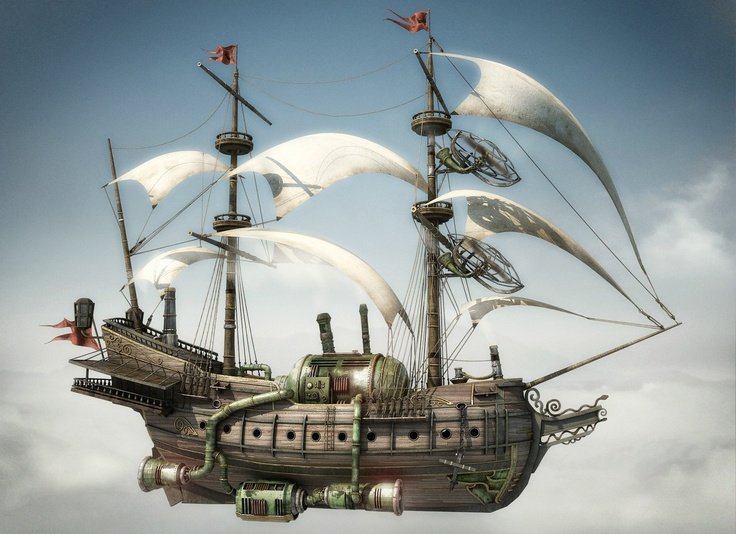
Nah I think it would be the exact opposite, no real ship to match or plans to figure out, sketch out something for yourself, maybe buy a couple cheap rocket kits for parts, and build whatever comes to your mind when you think of a flying sailing ship as imagine by H.G. Wells
")
- popeye the sailor, mtaylor, src and 2 others
-
 5
5
-
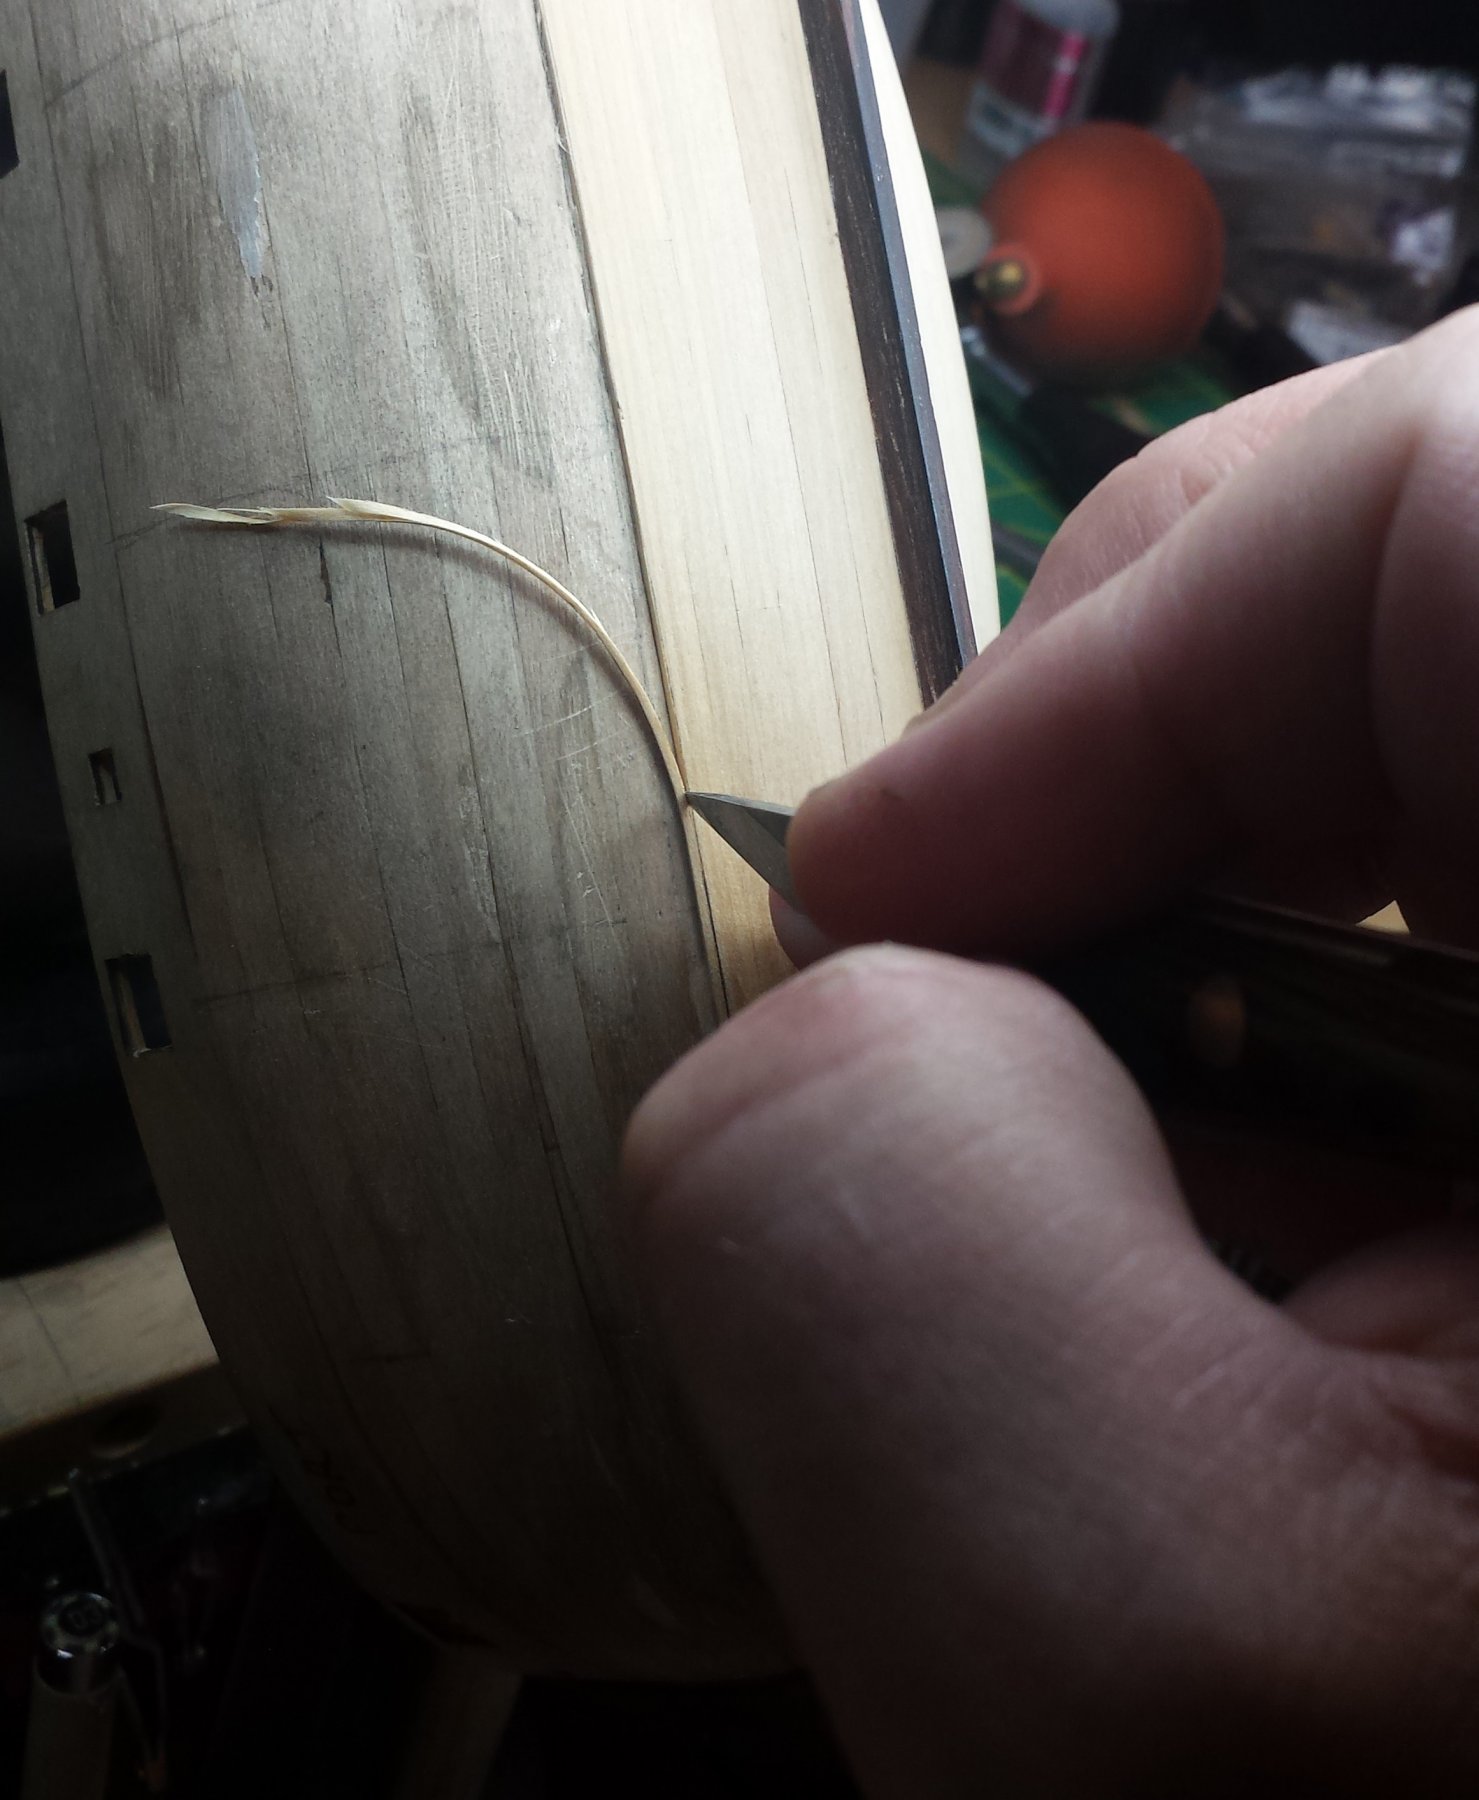
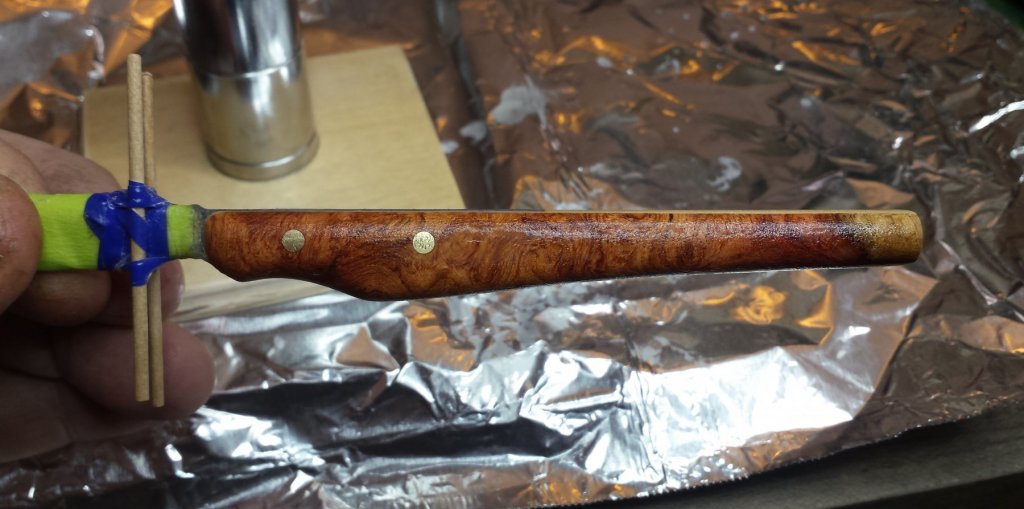
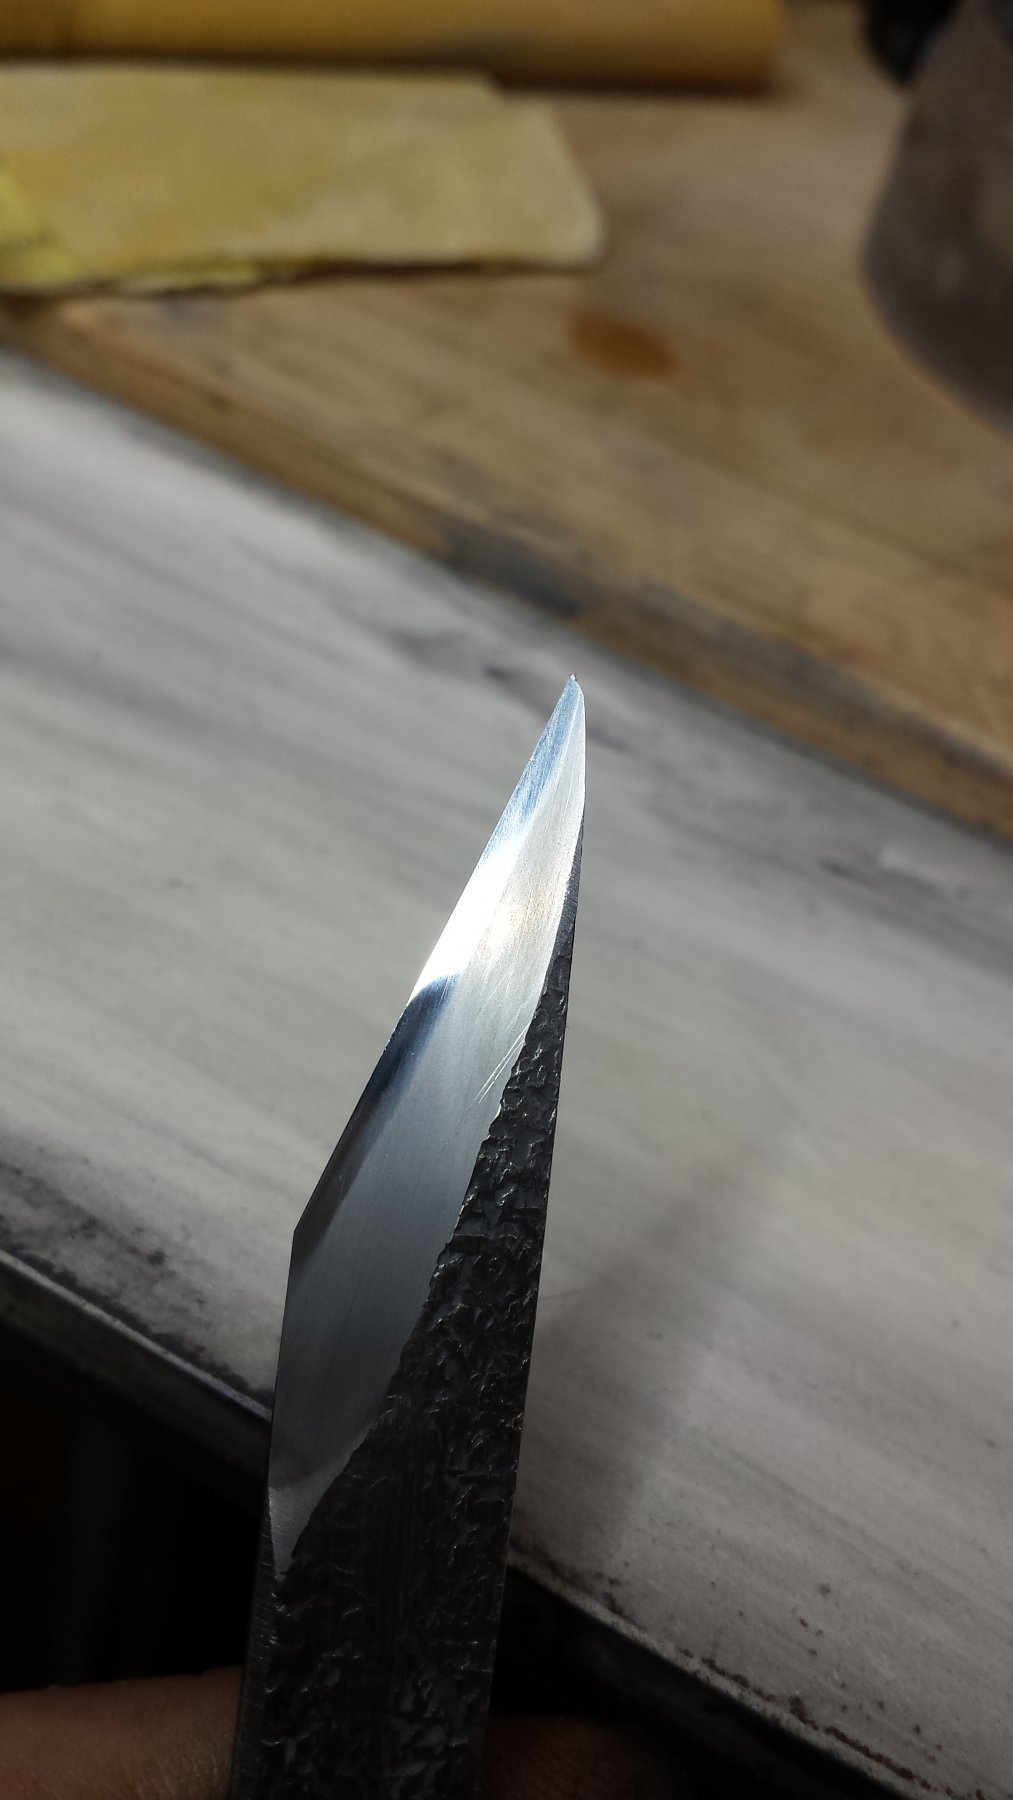
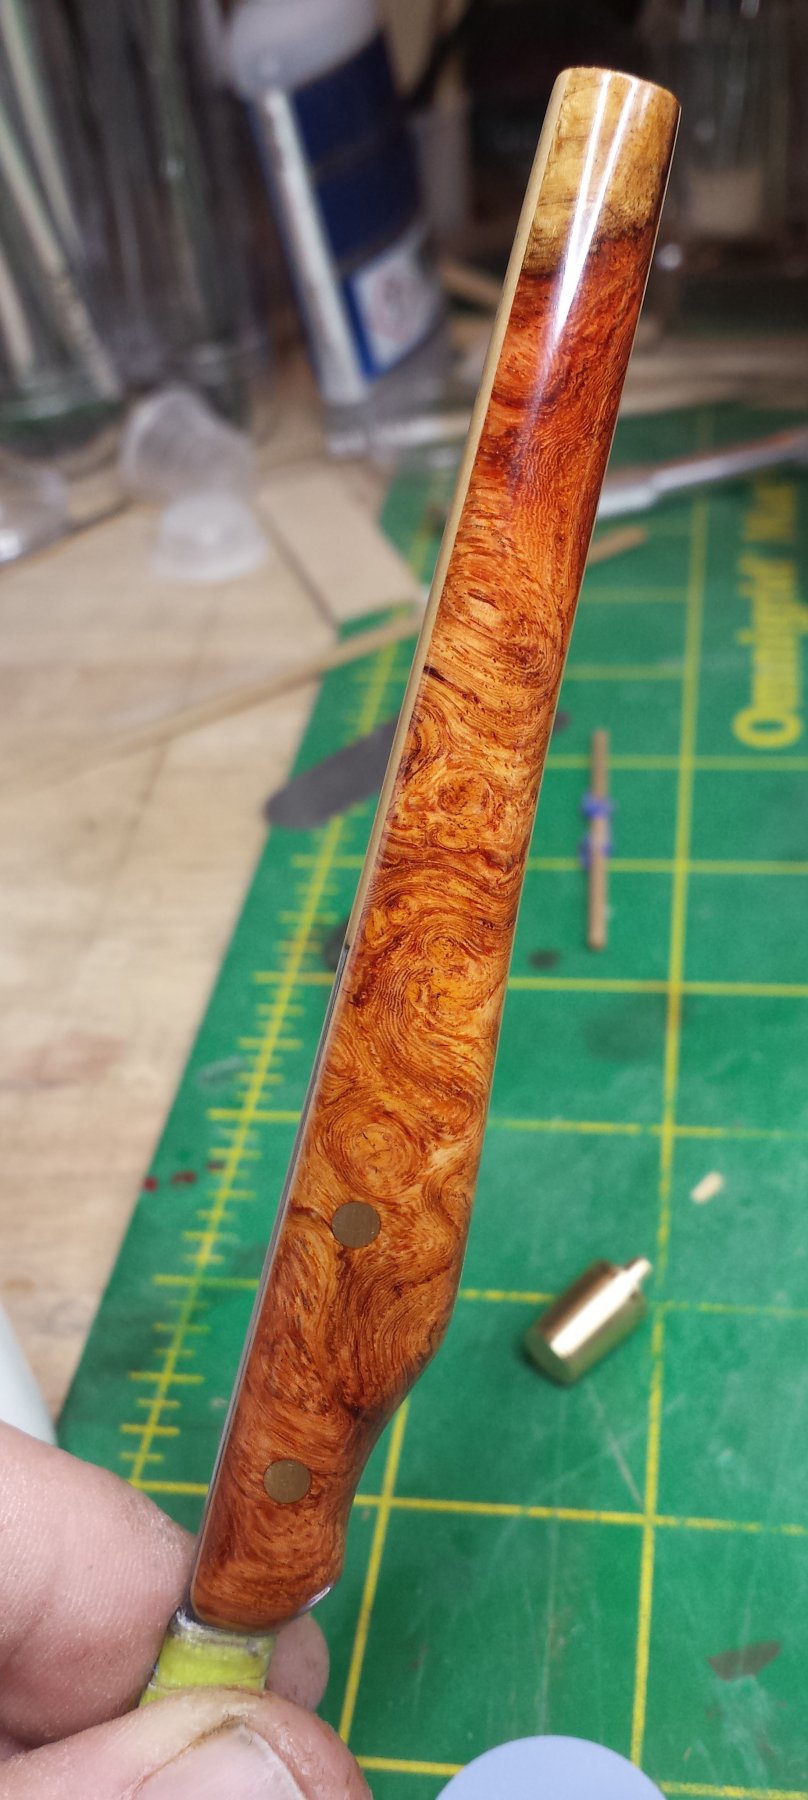
For anyone who has ever considered making their own knives with custom blade shapes, I just did this and the full walkthrough on how I did is in my build log starting here. I decided I wanted paired single-bevel knives for employment in the planking method I'm using; I have lots and lots of experience using knives for precision purposes. That said, if you like my planking results you can use the same method without doing the trimming via knife the way I do it, or at least not use them to trim quite as close to the mark as I do.
Single-bevel knives for me immediately bring to mind Japanese marking knives. In traditional Japanese joinery these make not just a mark to cut to, their "marks" are actually the visible edge of the joint. So they are made single-bevel with the perfectly-flat back of the knife going against the ruler with the bevel facing the waste part that will be removed, and they are made in pairs so you can make the proper marks in both directions if needed.
And as is usual for Japanese knives, there is only a thin strip of very high-carbon cutting edge steel that is welded to very low-carbon steel or in some cases even plain iron to provide flexibility, and as a result the cutting edge steel can be extremely hard, typically Rc63-64. And that means they can be made extremely sharp and the edge will hold for a long time.
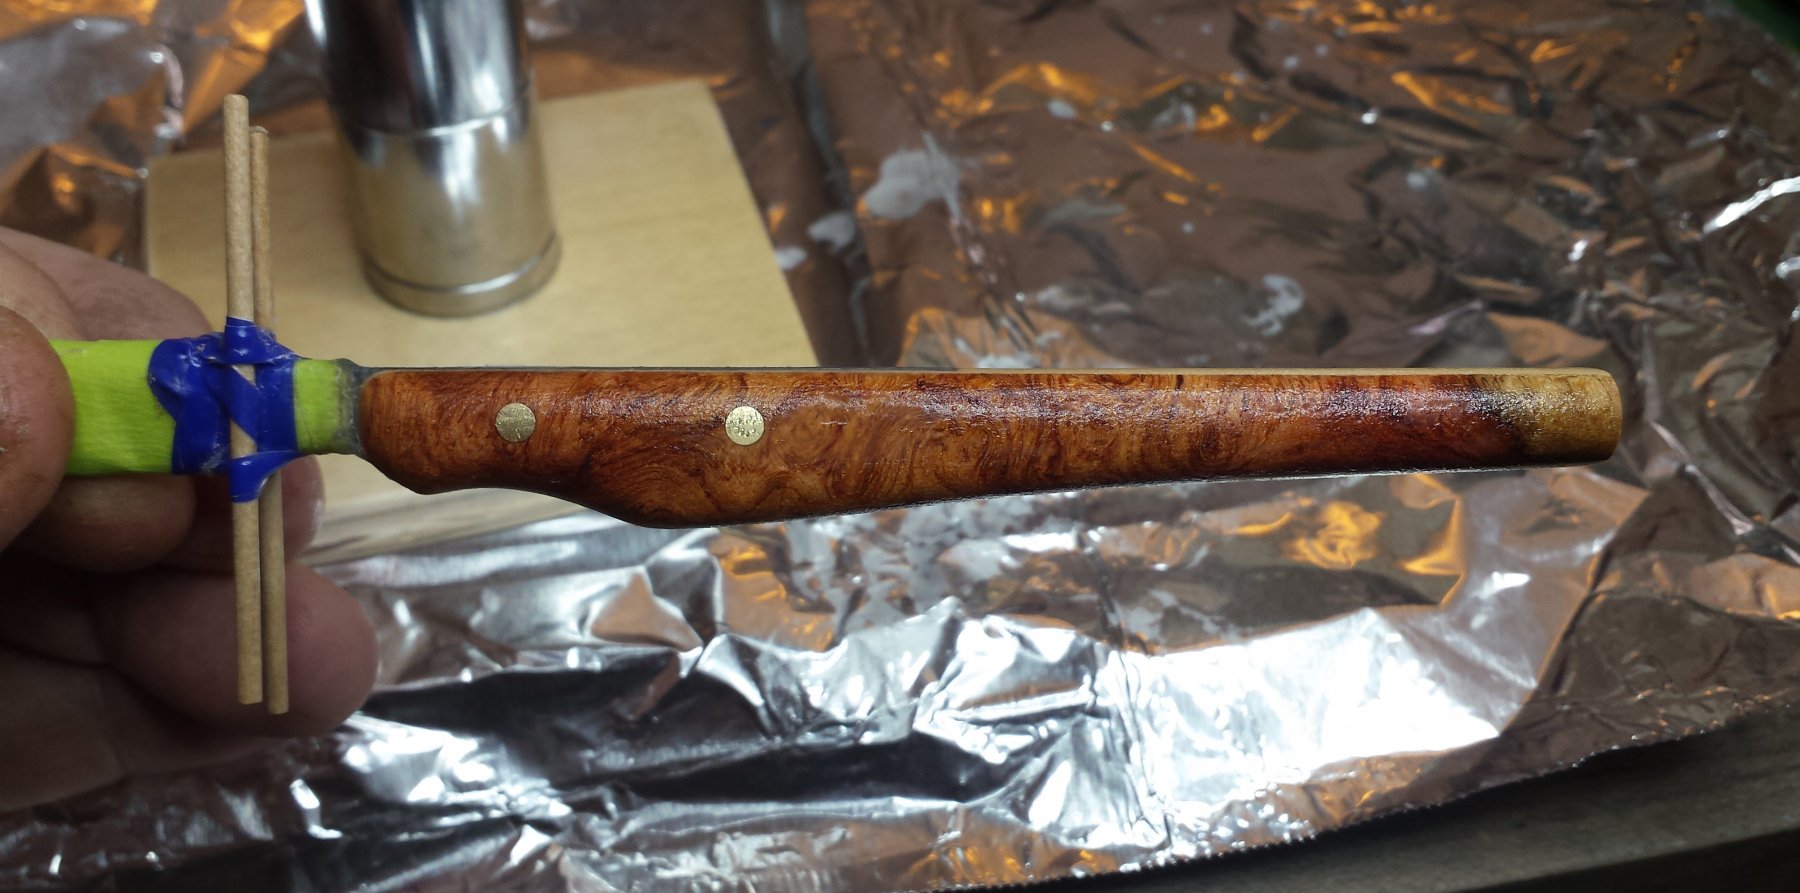
So I bought a pair of 1/2" wide marking knives from Japan Woodworker, I knew the steel quality would be very good even on a mid-price marking knife, and they were $22 each. If you follow the tutorial also, you'll see I ended up cutting them in half as I didn't need the full length for the final knives, so in effect I'm going to get two knives out of each of those $22 blades.
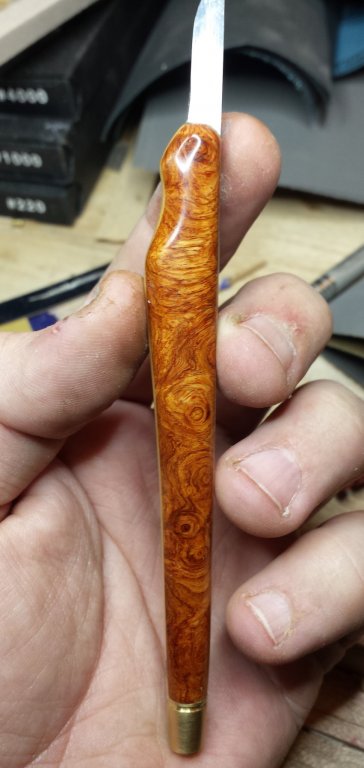
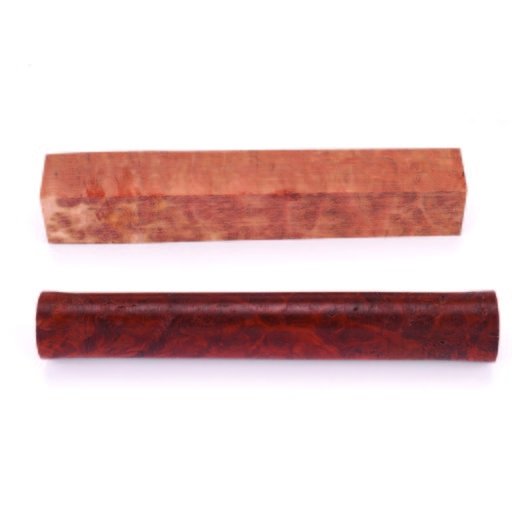
Blanks for the handles can be easily had by buying pen blanks use by pen makers, and you can get extremely nice wood for this purpose for $5-$10. In my case I used a single $10 amboyna burl piece glued to 1/16" castello boxwood sheet pieces to provide extra strength - you'll want to do something similar if you go with burl wood for the outer handle parts as all burl wood is inherently weak with lots of short grain no matter which way you cut it.
I also mitigate that weakness by soaking the handles for an hour at least in thin CA glue, which penetrates deeply and turns the whole thing into a composite material with considerable strength.
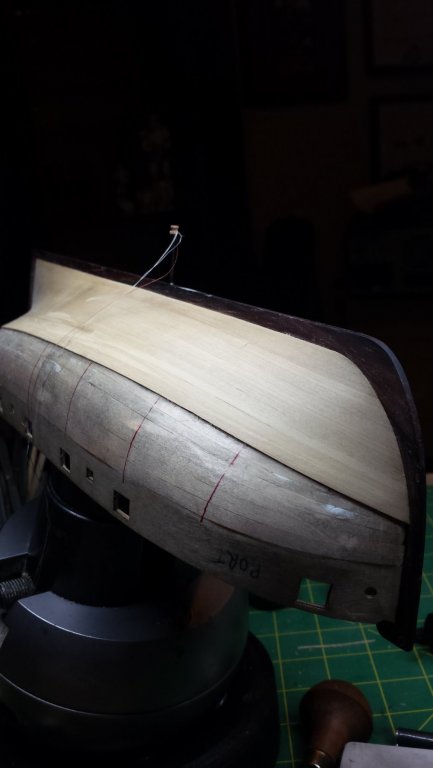
This is how I will be using the knives, one for each cutting direction to ensure the cut on the work side leaves a perfectly flat and vertical surface for the next plank (after a bit of sanding to finalize) - the method I'm using is to do the taper and beveling one the plank is already glued on the ship.
And this is the result so far.
In any case, this is what I started with -
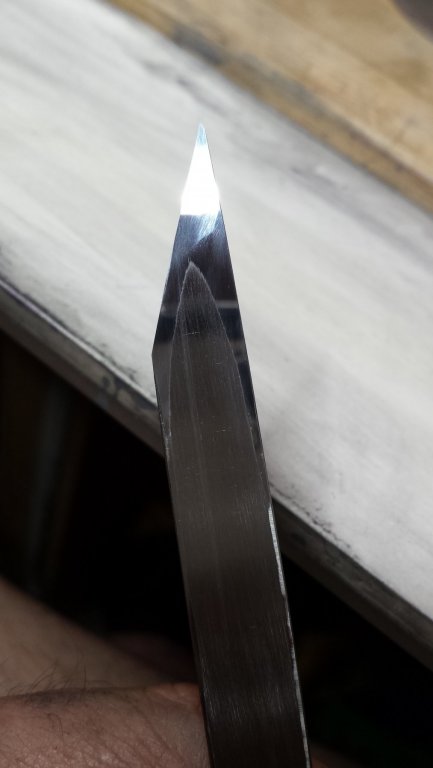
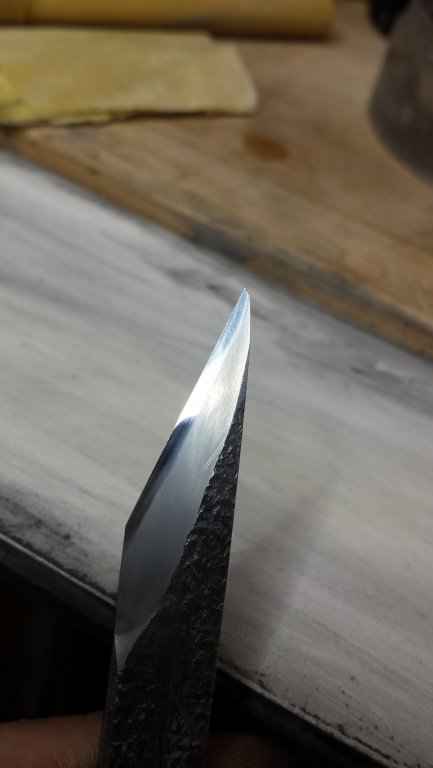
And that was a mistake, at least on the width - I bought 1/2" knives when I really needed no more than 1/4". This led to lots of grinding I shouldn't have needed to do.
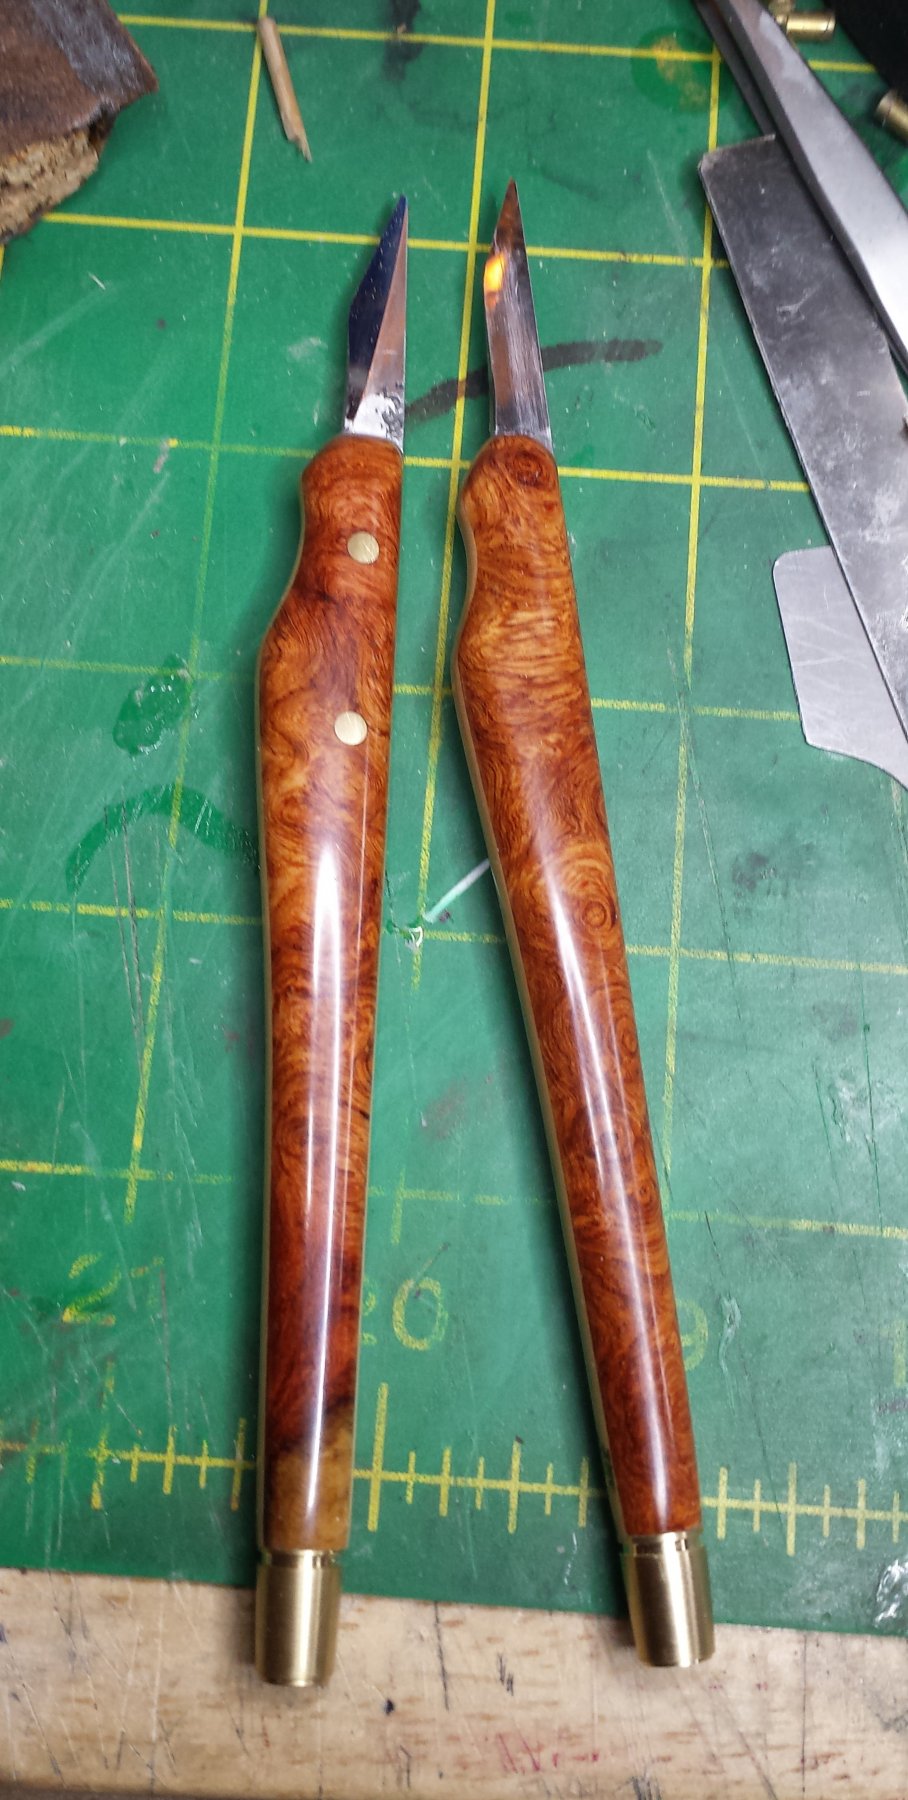
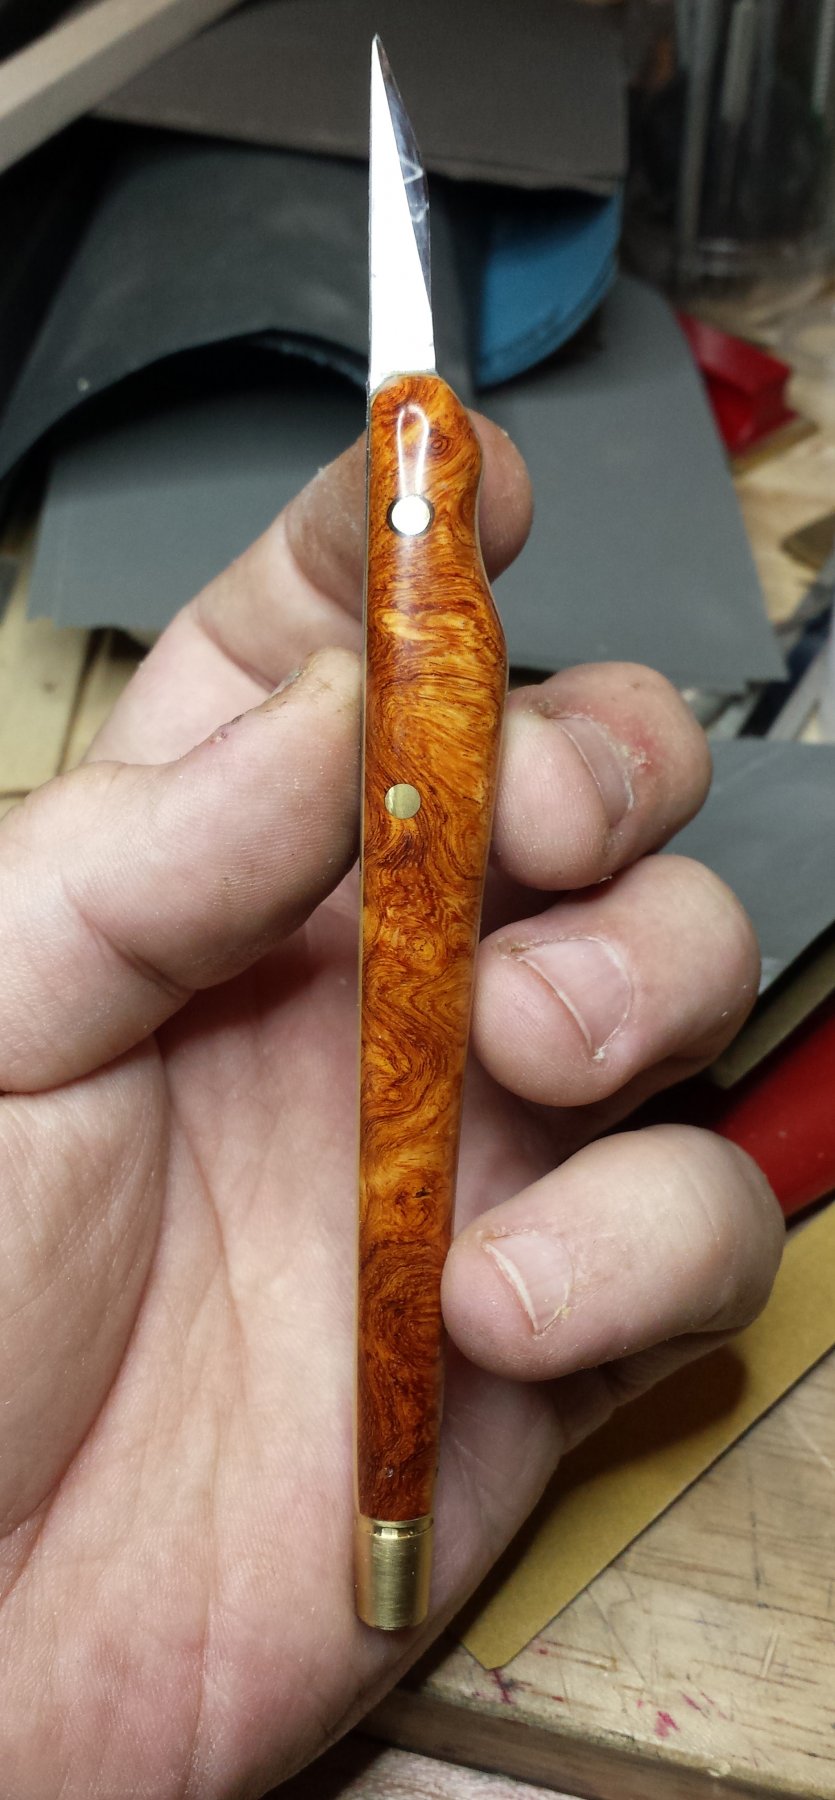
And this is the final result, a pair of amboyna burl pen-handled single bevel knives that I will be using from this point forward for all planking jobs.


- Tadeusz43, KeithAug, John Allen and 13 others
-
16
-
Thanks guys. No Popeye, unless it was sudden onset as I've had that in my face since I started using Zap a Gap in like 1988?
Pat, I'm very please with blade shape and handle shape. The taper of the blade from the top view makes it nice and thin and low cutting resistance at tip, and my hand really likes the new handle design, super secure and stable.
- Canute, popeye the sailor, mtaylor and 2 others
-
5
-
Been really sick last couple days. But just need to resharpen these and off we go.
Second knife.
I wish I could find a pen with a really fine line, most of these will make a fine line on paper and nothing else.

- popeye the sailor, src, Canute and 5 others
-
8
-
Oh yeah the consensus at the time was the French-built engines were better so it wasn't uncommon to replace a UR.II with a Le Rhone on Dr.Is. Josef Jacobs is the only one I'm aware of that mounted a Clerget on a Dr.I. The problem wasn't just the quality of the engine build however, it was the oil, the Germans ran short of castor oil and tried all sorts of ersatz products with little success, and the engines suffered as a result.
Actually if there was a severe failure by the German air industry, it was in engine development, they fell behind in 1916 and were falling farther behind at the end of the war with the allies fielding multiple fighter aircraft with 220+hp engines, with the Dolphin having a 300hp engine, while the "fast" version of Germany's top front-line fighter, the D.VII was flying with a 180hp BMW IIIa and the Albatros D.Vas were mostly still flying with the Mercedes D.III(a or au) most still developing 165hp but the aus could push it up to 185hp.
Actually the Albatros D.V is a very good example, because meanwhile the Austrians had turned the earlier Albatros D.III they licensed into a MUCH better fighter than either the D.III or D.V versions the Germans flew, except for the absurd Schwarsloze MGs. Oeffag, the Austrian manufacturer, immediately realized the problem with the single spar lower wing leading to resonance and the resultant loss of the lower wing. After a bunch of German pilots were killed Albatros slapped a short strut from the wing V-strut to the lower wing leading edge which helped, but the German Albatrosen were never good divers, you could only push that lower wing so far. The Oeffag engineers instead redsigned the lower wing with two spars, redesigned the lower part of the v-struts and their mounting, and the OEF aircraft never had that resonance and could be dived much harder.
The lowest hp engines the Austrians used was the 185hp Daimler-Benz, the other two Albatros series they built had the 200hp and 225hp Daimler-Benz engines. Then they realized the plane was faster without its spinner, something that wasn't too hard to verify since the one thing OEF engineers couldn't do was keep their spinners from falling off the plane in flight. So they redesigned the forward fuselage into a simple rounded shape, and got another 9mph increase. I've often wondered how the Western Front might have played out different had Albatros dumped their D.V and built the OEF D.IIIs instead.
Series 253 OEF Albatros D.III with redesigned forward fuselage and 225hp Daimler Benz, probably 30mph faster than the Albatros D.Va.

-
1 hour ago, thibaultron said:
I broke down and bought one the Hagasawa Le Rhones. Should be here next week. Haven't decided whether to keep or resell the Williams Brothers 80HP model.
When the 110HP arrives, I'll post some pictures of the parts. I also bought one of there Camel engines, its coming from Canada.
There were several Camel engines, from Le Rhone and Clerget and Bentley, and they all flew a bit differently. Josef Jacobs, the German ace who flew the Dr.I longer than anyone preferred the Clerget, and provided rewards to front-line troops who let him know about downed Clerget Camels with undamaged engines. Most of the other information I have says the Bentley Br.I versions were the best, with a nominal 150hp, with Clerget having a nominal 130hp, but only the RNAS used Bentley-powered Camels.
Also your Dr.I book should provide lots of detail reference pics. I need to find someone who knows the whole story, but I'm a bit confused by it; one the one hand Oberursel signed a license agreement with Gnome/Le Rhone in 1914 (who thought that was a good idea in France also?) that included the "lambda" 9 cylinder engine, Oberursel didn't begin design and development on it until 1917 and Le Rhone maybe in 1916? So I'm confused by the fact that I can't find any reference to any differences between the 9J and the UR.II, everything I can find says they're identical engines, and that makes no sense as no engine ever survived the transition from design drawings to working engines without changes. And I also can't find any information saying Oberursel copied captured 9Js, what I do have says their design engineers started building prototypes in 1917 and they went through an independent development and testing process before Idflieg certified it for production.
- Canute, Nirvana, popeye the sailor and 1 other
-
4
-
14 minutes ago, Angelwr said:
Impressive work! Unfortunately I can not undertake certain projects. In my country I am considered as a blind man (I am retired therefore).
I still have some visual acuity, but I can't do certain things. It is life!
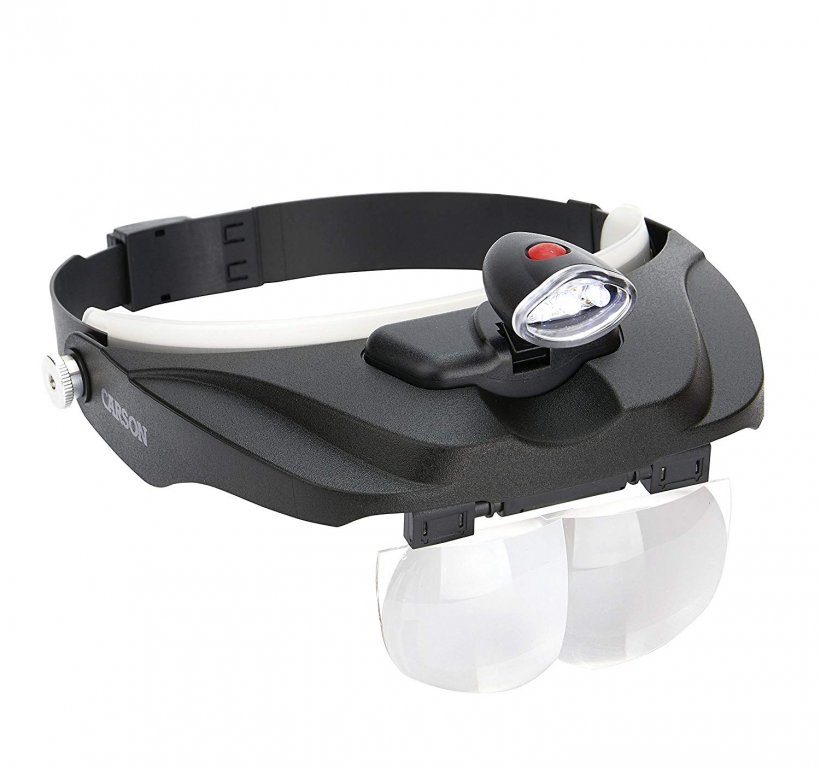
Despite that limitation, your ships all look very good, neat and clean. I assume you mean that very small pieces and details are difficult. Have you tried a magnifying headset like the Carson one below? I like it because you can wear your normal glasses underneath them and just flip down the magnifying lenses when you need them. I've been using mine for several months now and really like how well they work, and the LED light on top works well too.

-
4 hours ago, Nirvana said:
Ha en trevlig semester!
Ok I had to look that up and yes in fact "semester" in Swedish means "holiday". Swedish students going to college in the US must have an amusing time scheduling brutal classes for their first and second "holidays" each year
-
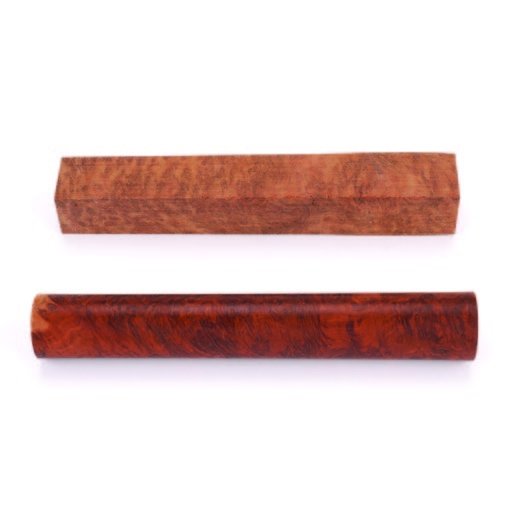
For anyone who wants the same look AND is lucky enough to live in the land of milk and honey and low shipping costs, 3/4" x 3/4" x 5" Amboyna burl pen blank for $10.19. As mentioned I suggest making that a single handle rather than two unless your scroll saw/saw frame can easily handle making straight cuts in this.
They also have some nice-looking options in coolibah burl and malee burl and (I've never heard of any of these BTW, you definitely want to wear dust protection) thuya burl along with more standard burl woods. All $10.19 per blank.
Coolibah, Malee, Thuya in order.
-
8 minutes ago, CédricL said:
Hello vossiewulf,
My profile is the stern of La Reine, not le Soleil Royal !
Both were near sister-ships indeed, but you'll find lots of différences between them.
Have a nice day.
(still don't know how to add smileys)
One is click on the smiley face at the top of the message-typing interface and then click on whichever one you want.

Most of them can just be typed. Colon : followed by ) =
Semi colon ; followed by ) =
")
- mtaylor, Hubac's Historian, CédricL and 1 other
-
4
-
Worse than the pushrods- those could be fixed without too much pain- are the exhausts. In the 9J they go to the back half of the crankcase, and I think the 9j has a larger-diameter crankcase too that provides a bit more room for the exhaust, and to make those you need to make a blank with baking clay and then carve it down into a master for casting. Much better plan to wait and get a real 110.
-
Looks good Danny. One thing I haven't seen yet, and something I want to do, is a waterline with a realistic suction wave- I'd like to do WWI BCs at flank speed, I have a pic of Vonn der Tann at speed and the suction trough/wave from the props is really significant, 100k+ shp could move serious masses of water. To do it right you'd have to establish that wave first, and in the case of VdT the low point is at least several feet below the lwl, and then do a water modeling process like you've done over top of that - that wave really doesn't seem to alter the surrounding water state much.
- Eddie, popeye the sailor, Dan Vadas and 1 other
-
4
-
On 6/8/2017 at 5:34 PM, Hubac'sHistorian said:
The distortion tool you are using here, on the other hand, is a really fascinating thing. I'll have to see whether GIMP has something like that in its arsenal because I agree that perspective of the QGs can be improved a bit, as the relate to the sheer of the Heller kit.
Distort is one of the transform modes in Photoshop but the one Dan should have used, and you should look for in GIMP, is Perspective. That mode is designed to do exactly what you're trying to do here.
I also like the dueling SR stern drawings with HH and Cedric's profile images
-
7 hours ago, src said:
Oh, and for attracting the attention of the local LEO's I have always found a bottle of single malt scotch, a bonfire, some sheep leggings and a bit of 70's disco to dance naked to works well. Just watch the "dangly bits."
Very creative! If I still hosted parties like I used to you'd be top of the invite list. They almost always ended in flashing lights and one or more chase scenes.
- Canute, mtaylor, popeye the sailor and 1 other
-
4
-
-
14 minutes ago, vossiewulf said:
On the up side, I got to say "I'd have to get on a plane for a funeral in Australia for a guy I killed with a funny knife joke", so I think it's a wash
Reminded me of the Monty Python Funniest Joke In the World sketch.
- popeye the sailor and Canute
-
2
-
21 minutes ago, Rick01 said:
You very nearly set Australian/US relations back to the Battle of Brisbane with your first paragraph (if you've never come across this WWII pacific theatre episode Google it
 ). However someone who looks after cats so well can't be all bad so I will continue to assist as and how I may.
Will have to say WOW really can't think of any other comment here.
On the up side, I got to say "I'd have to get on a plane for a funeral in Australia for a guy I killed with a funny knife joke", so I think it's a wash
Ms. Takita is not just well looked after, she is maintained in a totally spoiled bubble of perfect catness. I think she has four different heated beds now, not to mention the fireplace we turn on most evenings. If she's not in one of her beds a couple feet away, she's in my lap. At night she sleeps under the blankets of the bed, apparently unaware that cats don't do that.
-
The evil Jay who sits on my shoulder suggesting funny but wrong things to do had a great idea - the day after I finish these knives, post that I tried them for a few minutes, decided I didn't like them, and am going back to my old knife. If I could then have a webcam capture the expression on Rick's face I think it would be good for at least a solid 30 minutes of laughing.
But then I decided he might actually stroke out and then his admiral would be understandably annoyed with me and I'd have to get on a plane for a funeral in Australia for a guy I killed with a funny knife joke, and I decided it was probably not a good idea. I'll just have to keep myself happy giggling imagining that expression
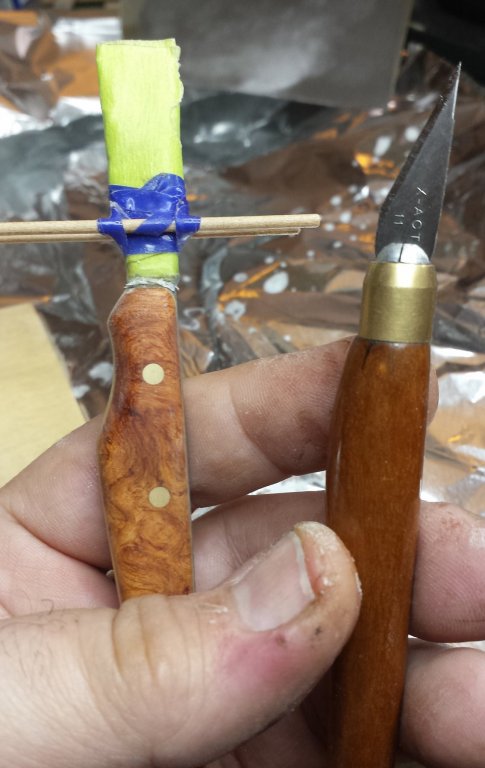
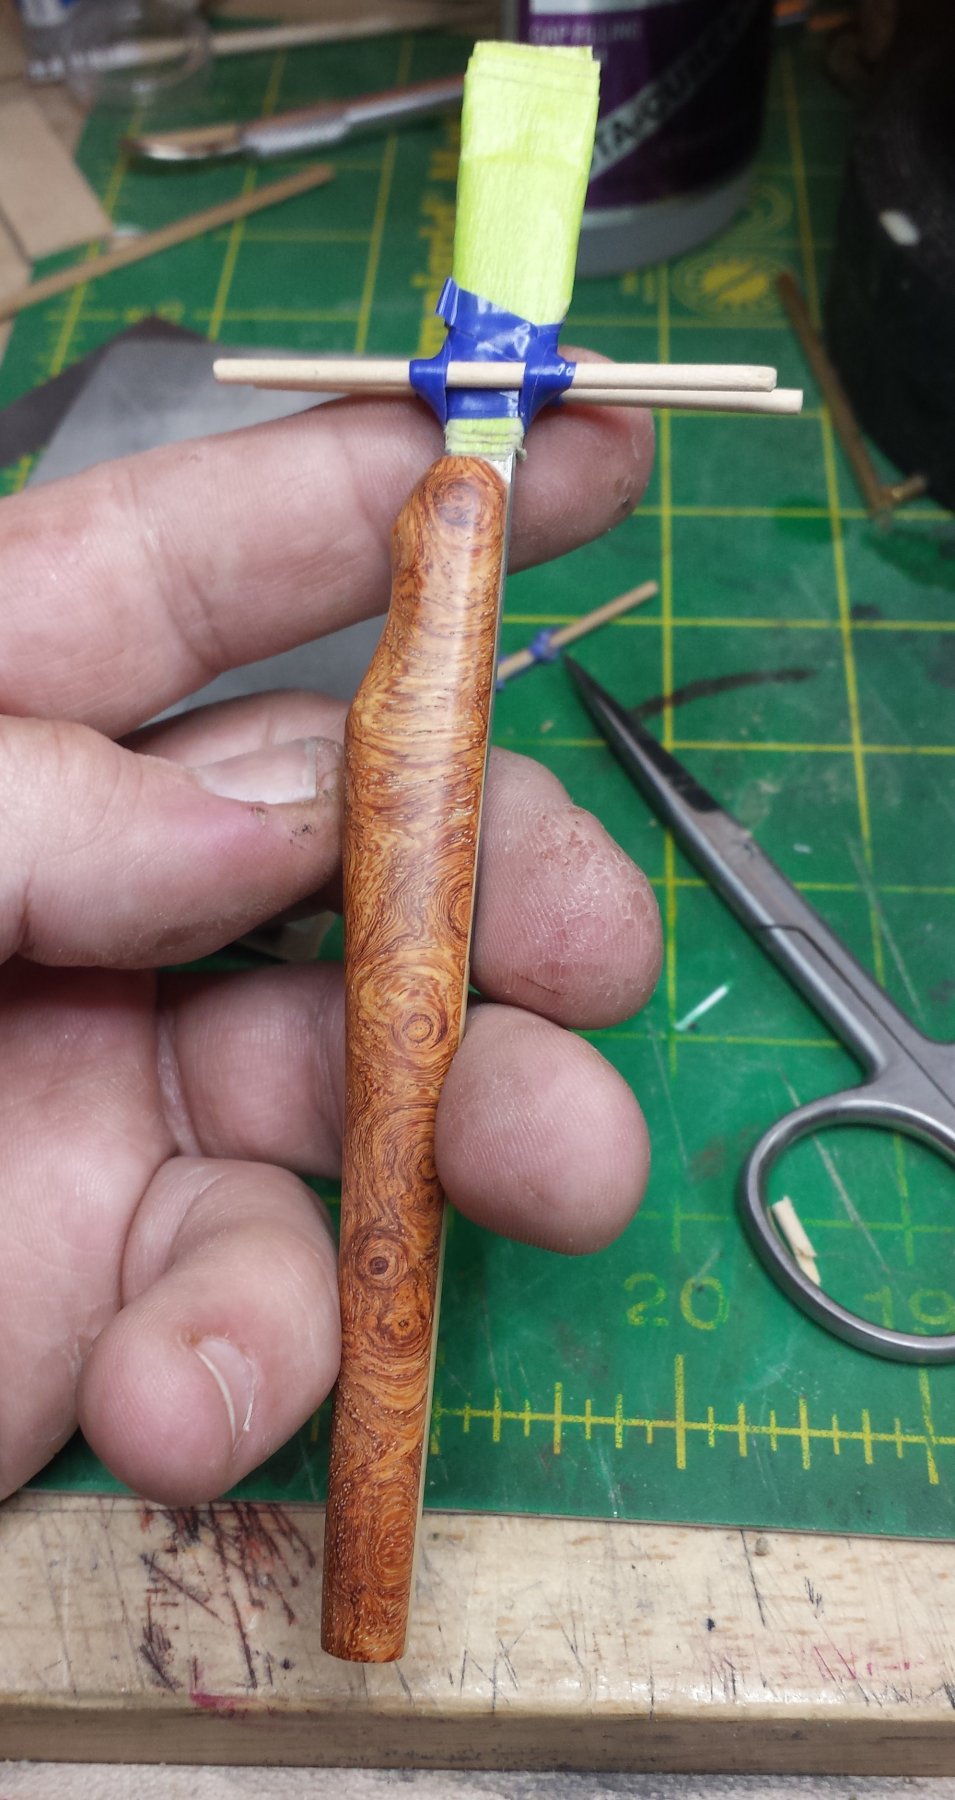
So one knife done, other just has a bit more to go that I'll finish tomorrow.
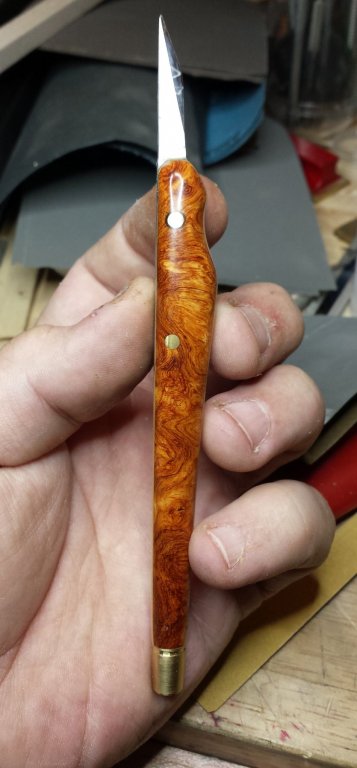
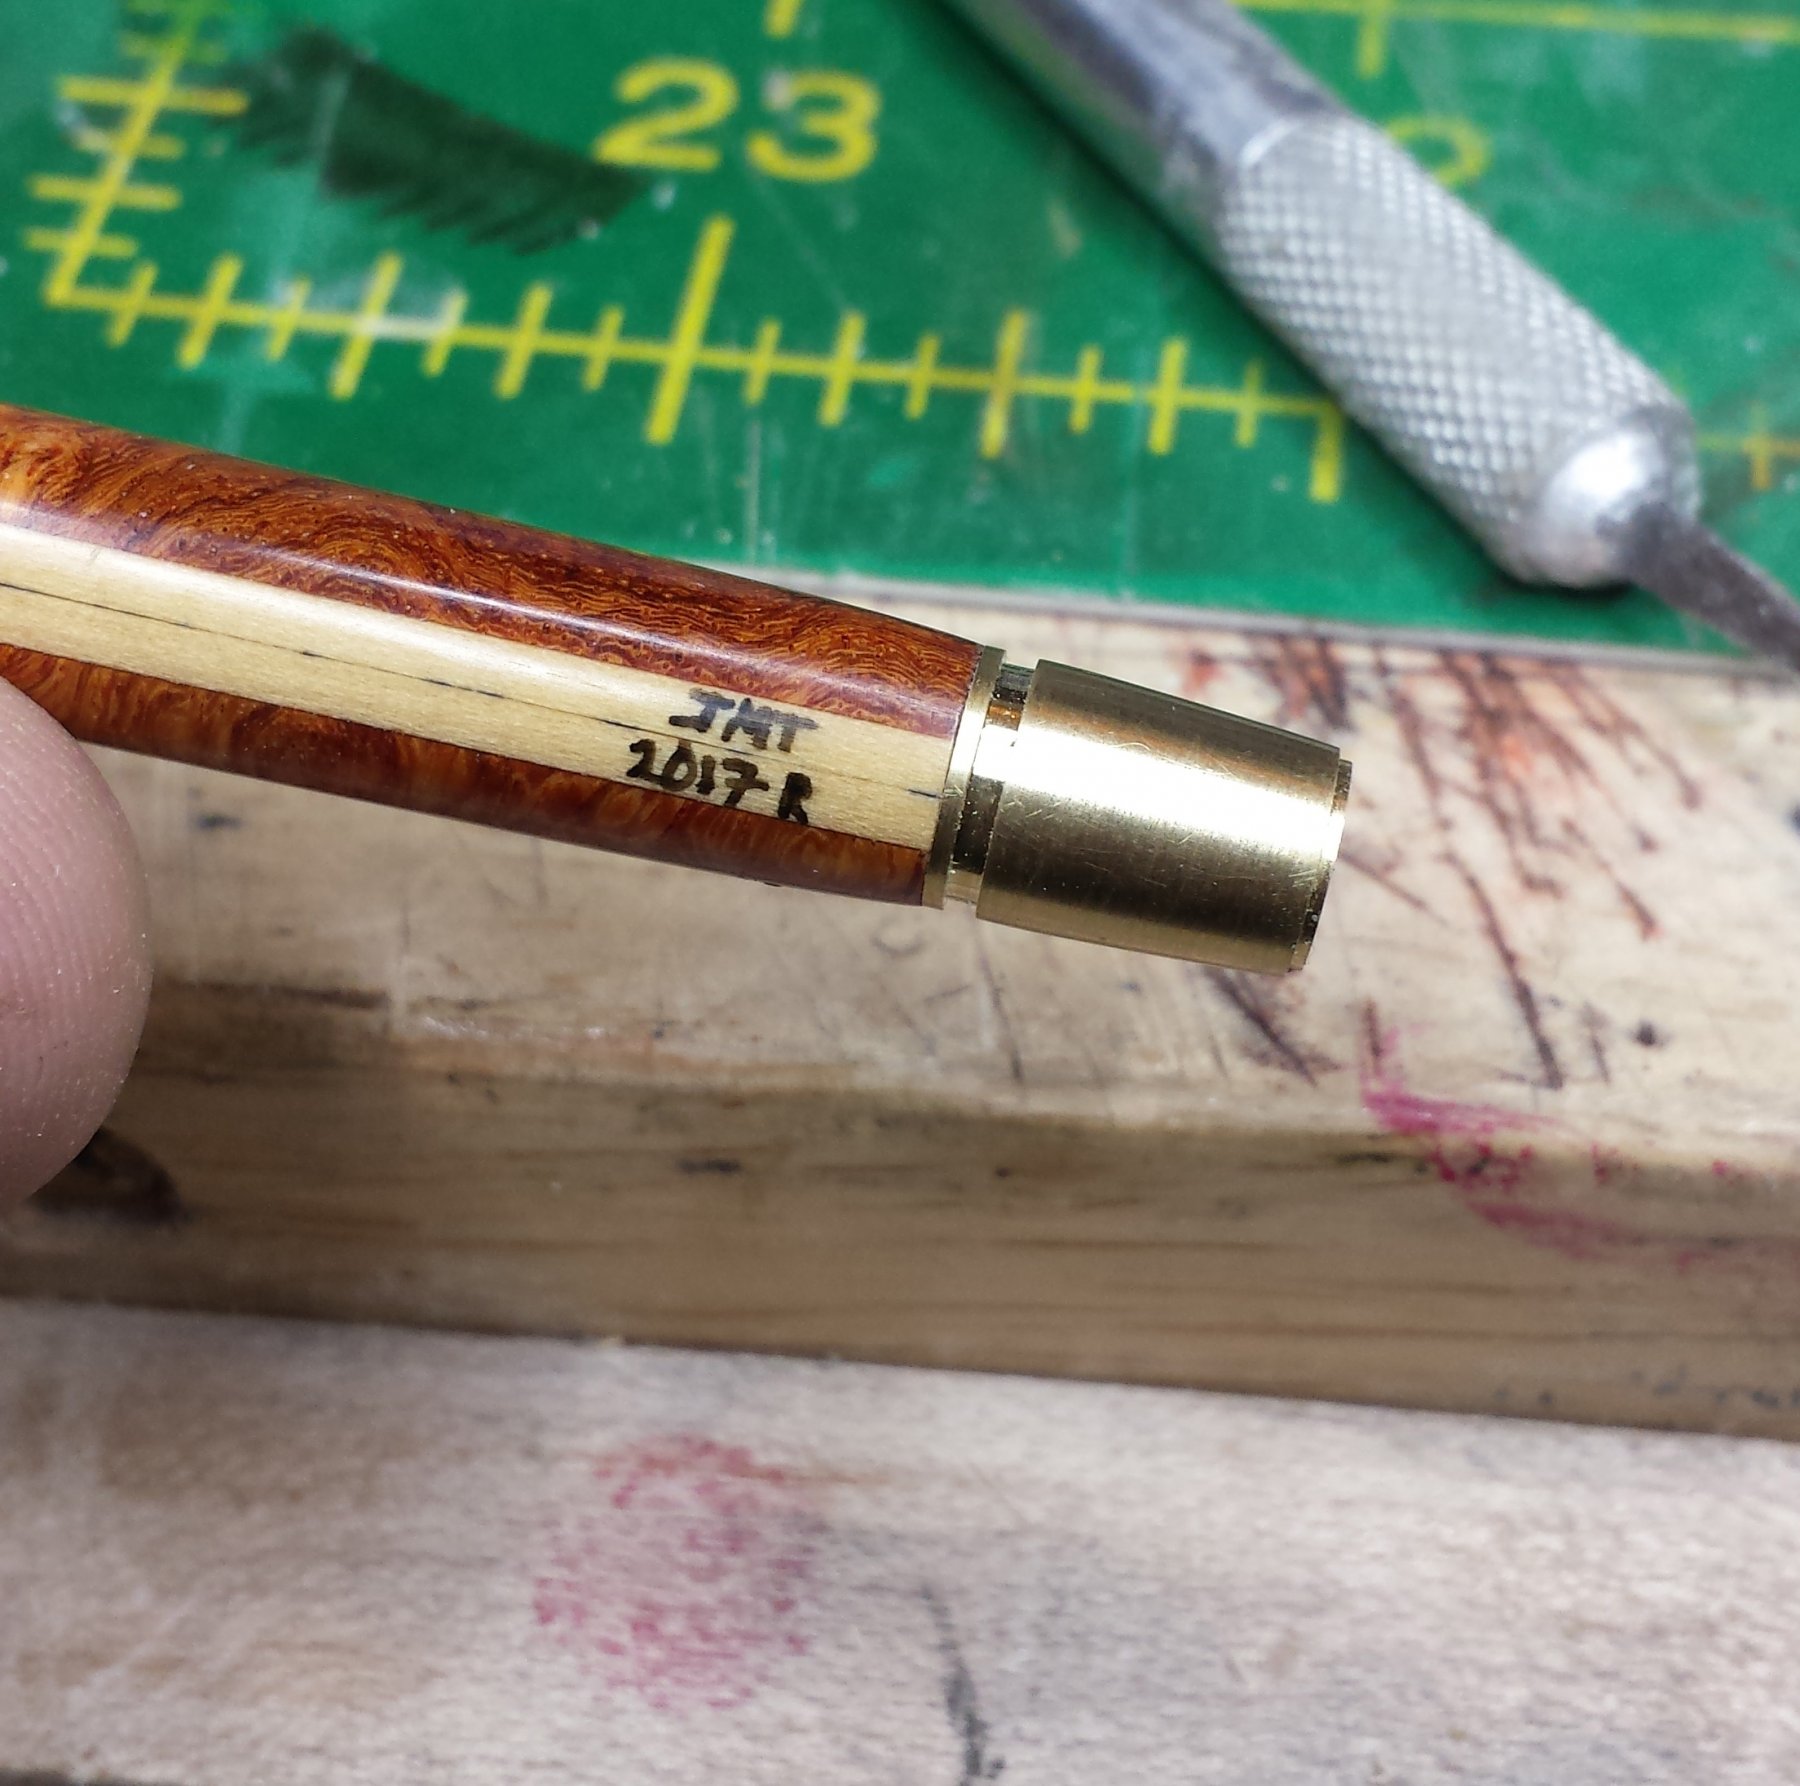
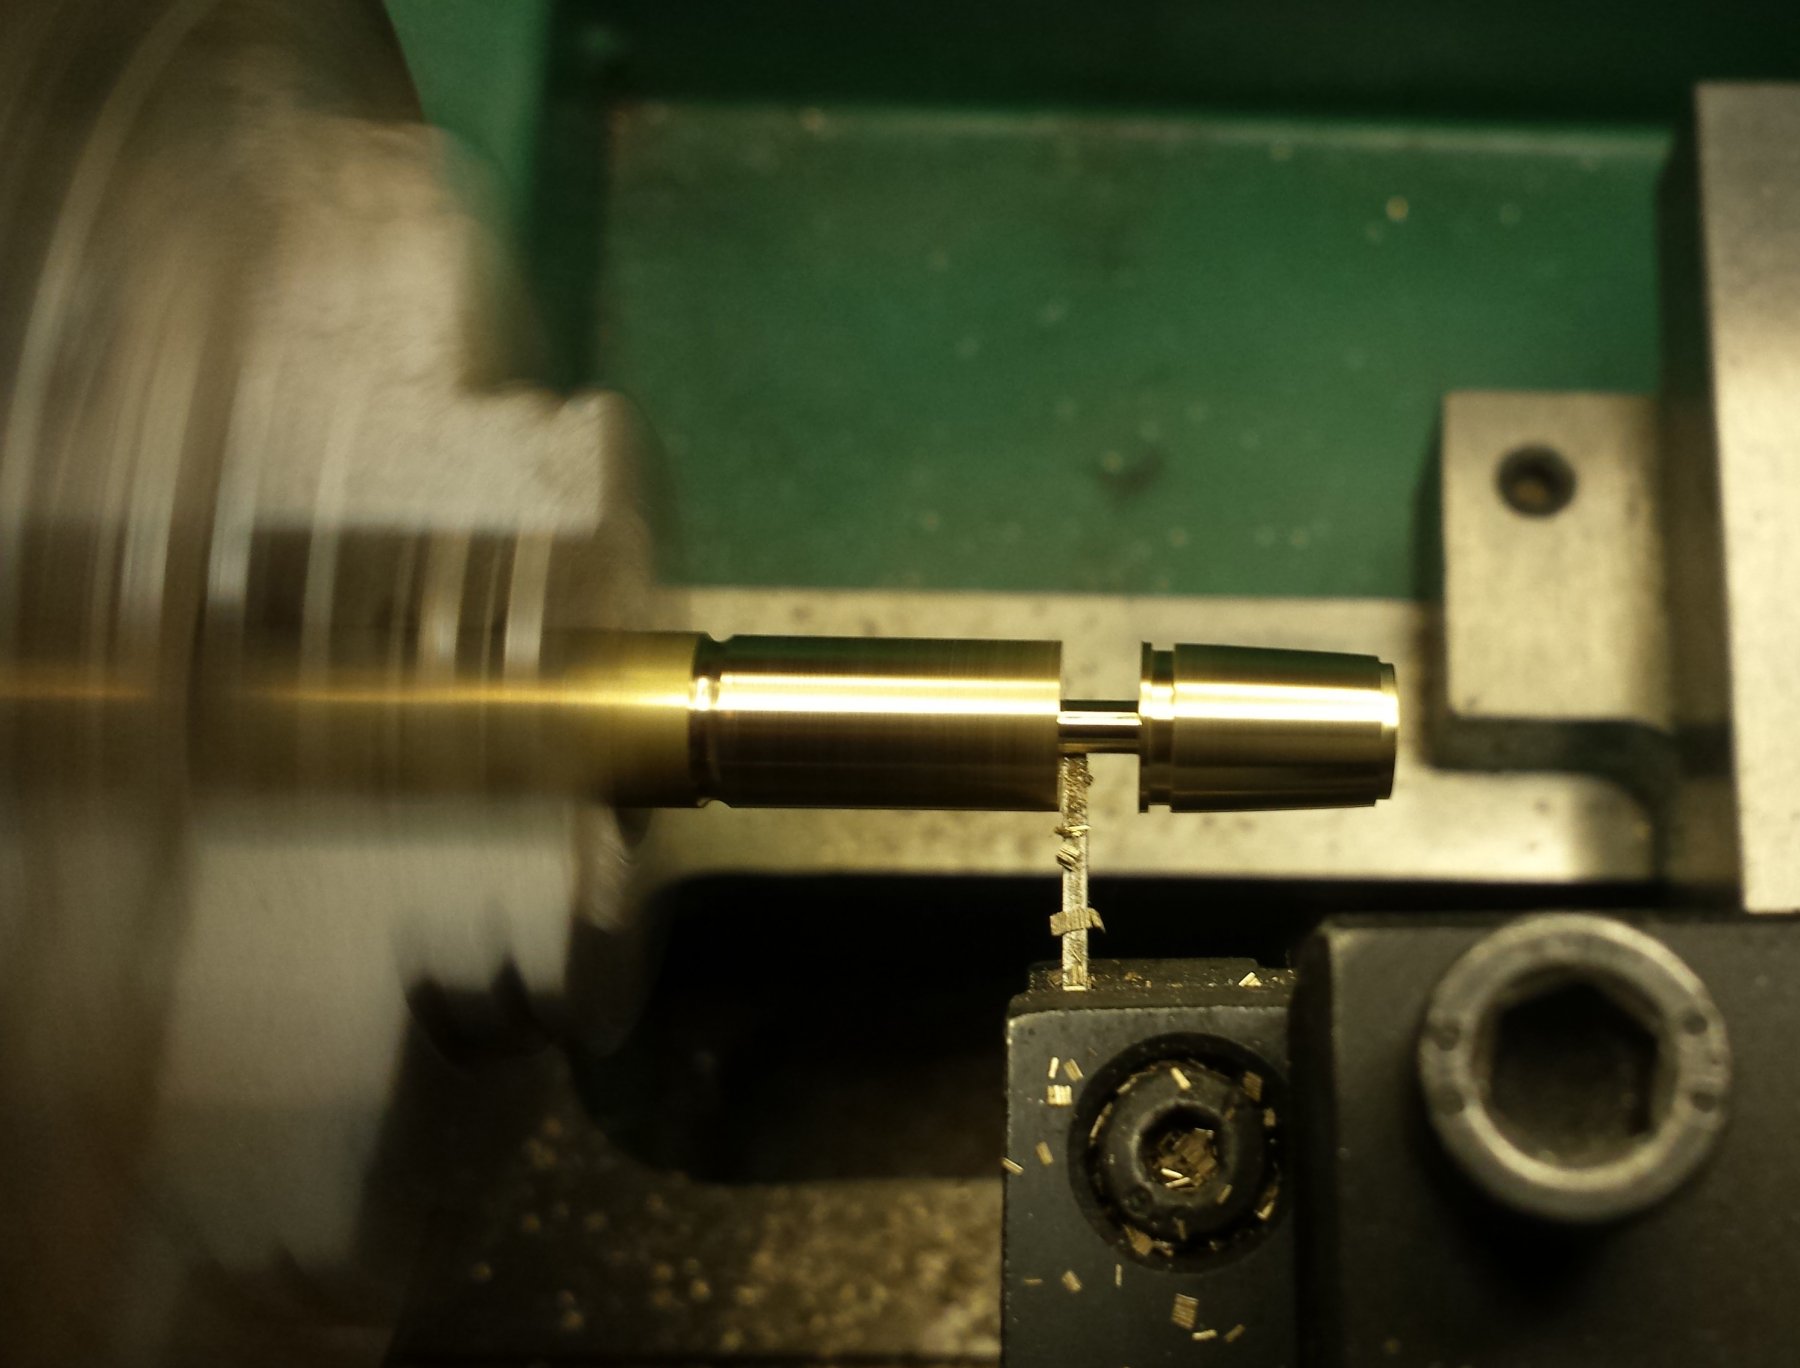
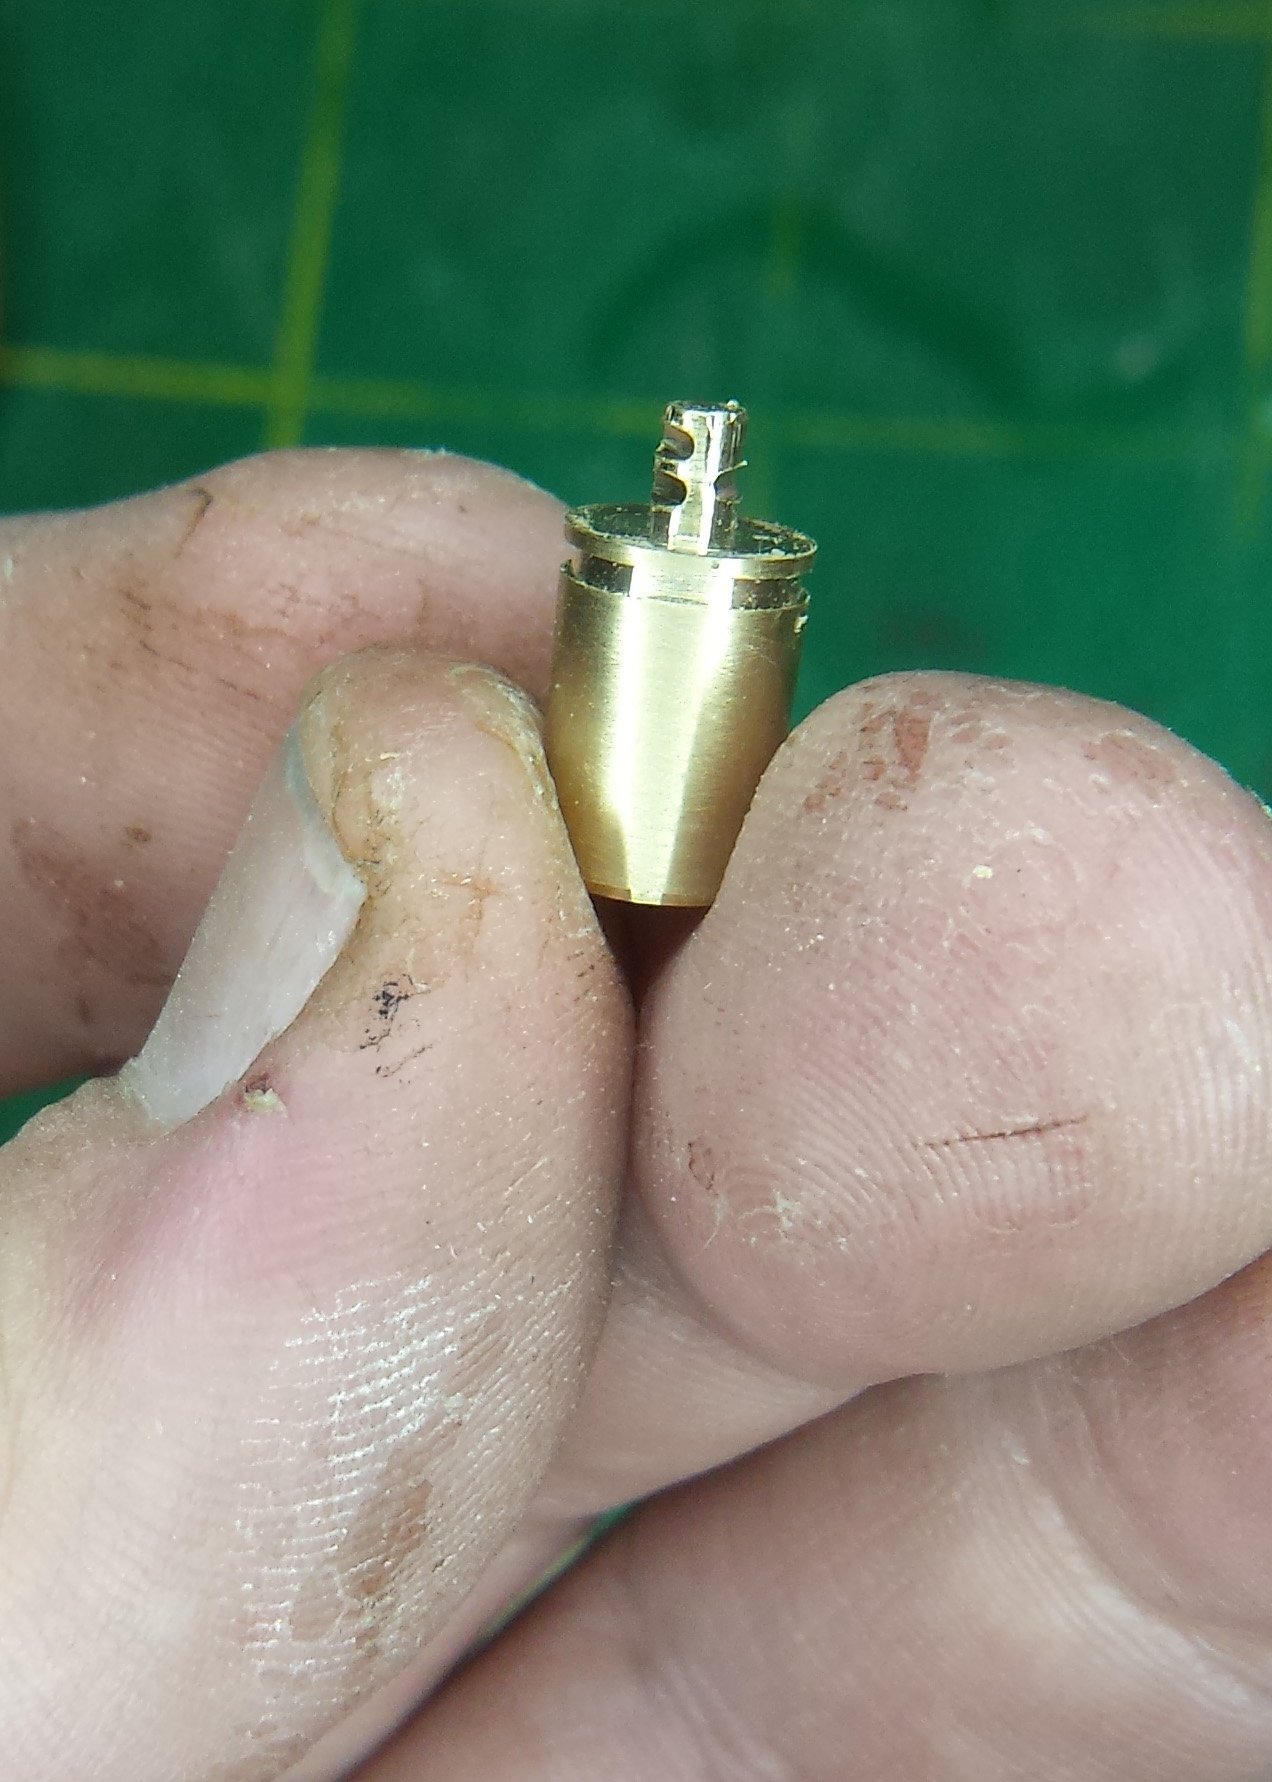
As alluded to in the last update, these were going to get my normal brass counterweight, it adds mass that I like and it moves the balance point to more or less the center of the knife, which I also prefer. And yes you need a lathe and basic metal lathe tools and knowledge, but otherwise these are Basic Metal Lathe Work, Chapter 1 level simple. It's not worth setting up the cross slide to do the taper, so I do them with files and sandpaper and the Mk.I Eyeball measuring system. You need a facing tool to face off the ends, otherwise the rest of the operations are all done with the parting tool you see here. Two reveals that I again do by eye, and I don't even measure the width of the shaft that goes into the handle, I eyeball more or less 1/8". This time I was +/- .005" for the two of them.
The reveals should have a shiny finish from the parting tool, the rest I finish with 1200 grit sandpaper to give it a considerably duller finish, the contrast is nice. It's not very noticeable when they're brand new but after given a chance to oxidize a bit it looks good, or at least I think so.

As these knives are tricky to drill on my small mill, I drilled the required holes by hand with pin vises. Like files, there is no such thing as too many pin vises. Another good example of where my giant pile of tools in many cases is just adding a bit of speed by for example having several pin vises each with a different chuck so I never have to stop and do that switching process again. I put three increasing diameter drills in the pin vises and drilled the normal way by doing say three turns looking at the piece from one orientation, ensuring the bit is aligned with the knife axis, and then rotating the knife handle 90 degrees and doing three turns, etc., you can drill holes very accurately that way. Final size was set by a small mill in my rotary tool, we need close here not a press fit.
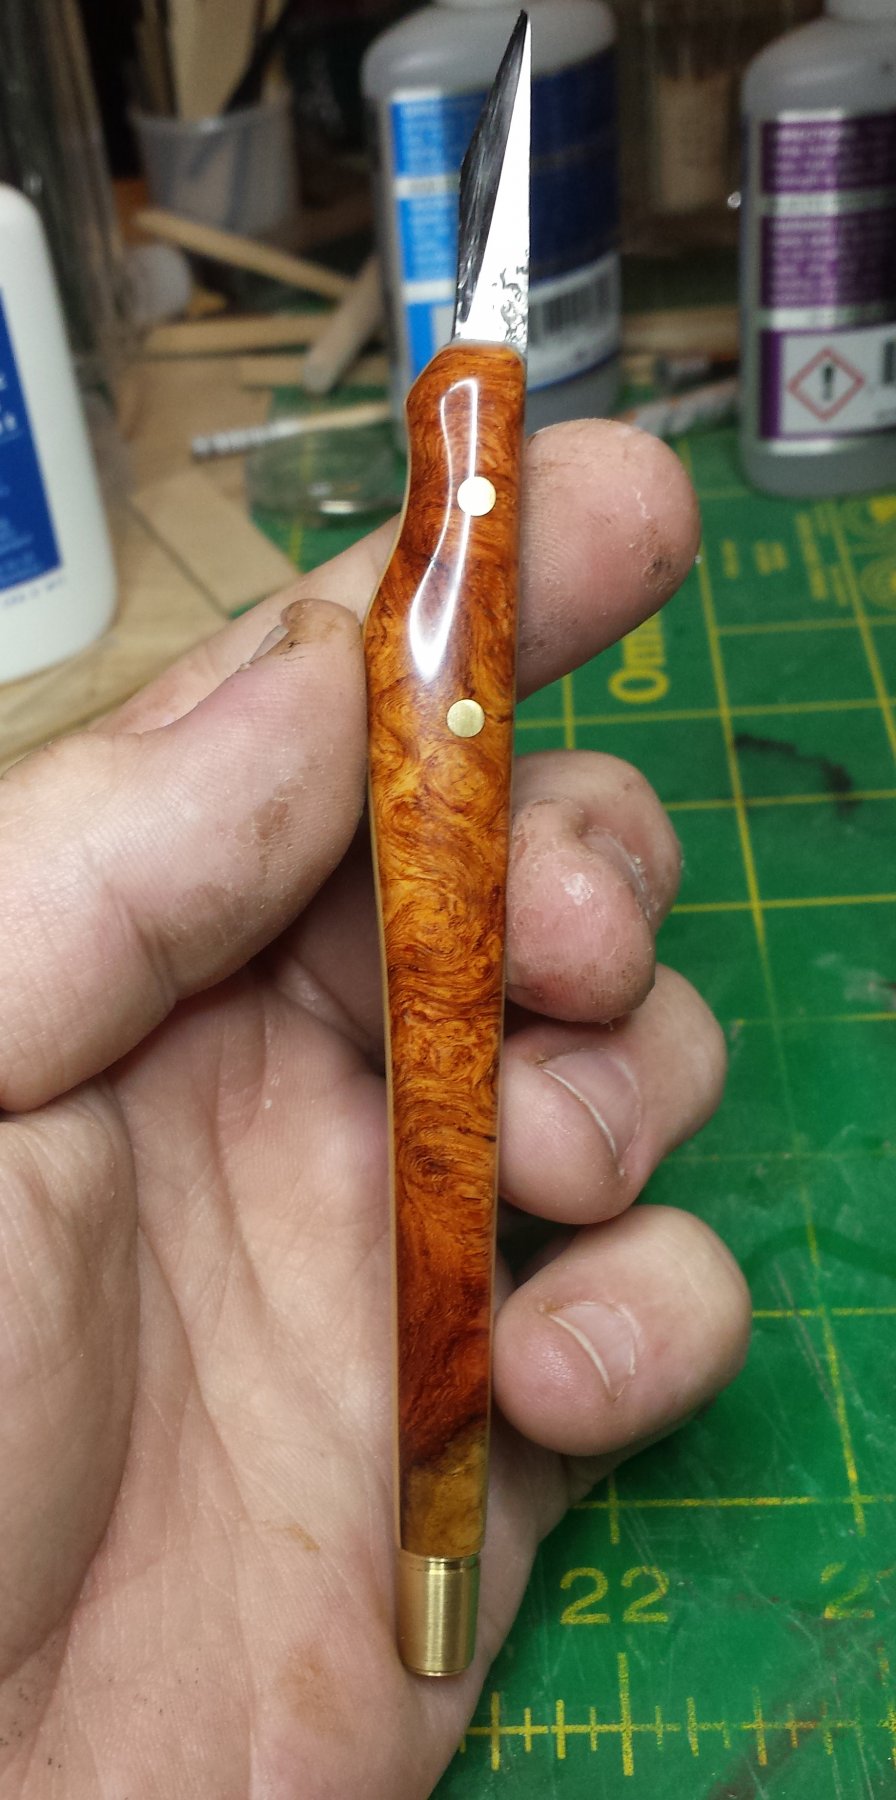
Here's what they will look like mounted.


Let's go over the advantages of a CA finish for tool handles again:
- It is the most crystal-clear finish I am aware of, perfect for highly figured woods.
- It provides a better grip than any finish I am aware of, including bare wood. And the shinier it gets the better the grip gets, opposite of what you see with most finishes.
- It is the hardest finish I am aware of. Rap a knife handle like these on the edge of your bench and it's the edge of your bench that will come out the loser.
-
When you spill super glue all over it you're just refreshing the finish
- You can start, apply multiple coats, sand, polish, run around in the street naked while pouring mustard over your head and be back inside hiding behind a shower curtain while the admiral pretends to know nothing when the cops show up, and STILL be done in two hours with a knife you could use right then and there. Show me another finish where two hours is not replaced by two days, at LEAST.
Disadvantages:
- Difficult to apply on anything much bigger than a tool handle.
- Easily the worst-leveling finish in existence. You HAVE to sand between coats and do so quickly while the finish isn't fully cured.
- Any coat you apply needs to be fully sanded before you can do anything else. If you let it fully cure before you level-sand it, you're going to have oodles of fun getting it level.
- Comparatively very expensive, making it not worth it from a cost perspective also to use on anything bigger than a tool handle.
It's not perfect, but the disadvantages can be managed and I use it for all tool handles now, I don't see anything else as competitive. And cost can be very much controlled by the process you follow.
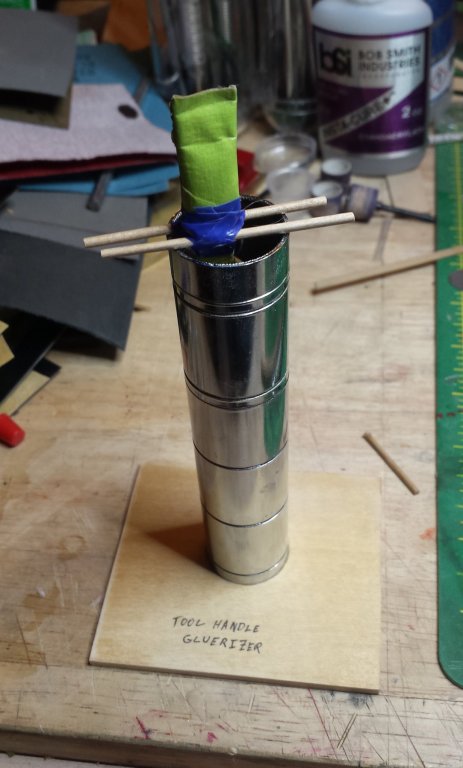
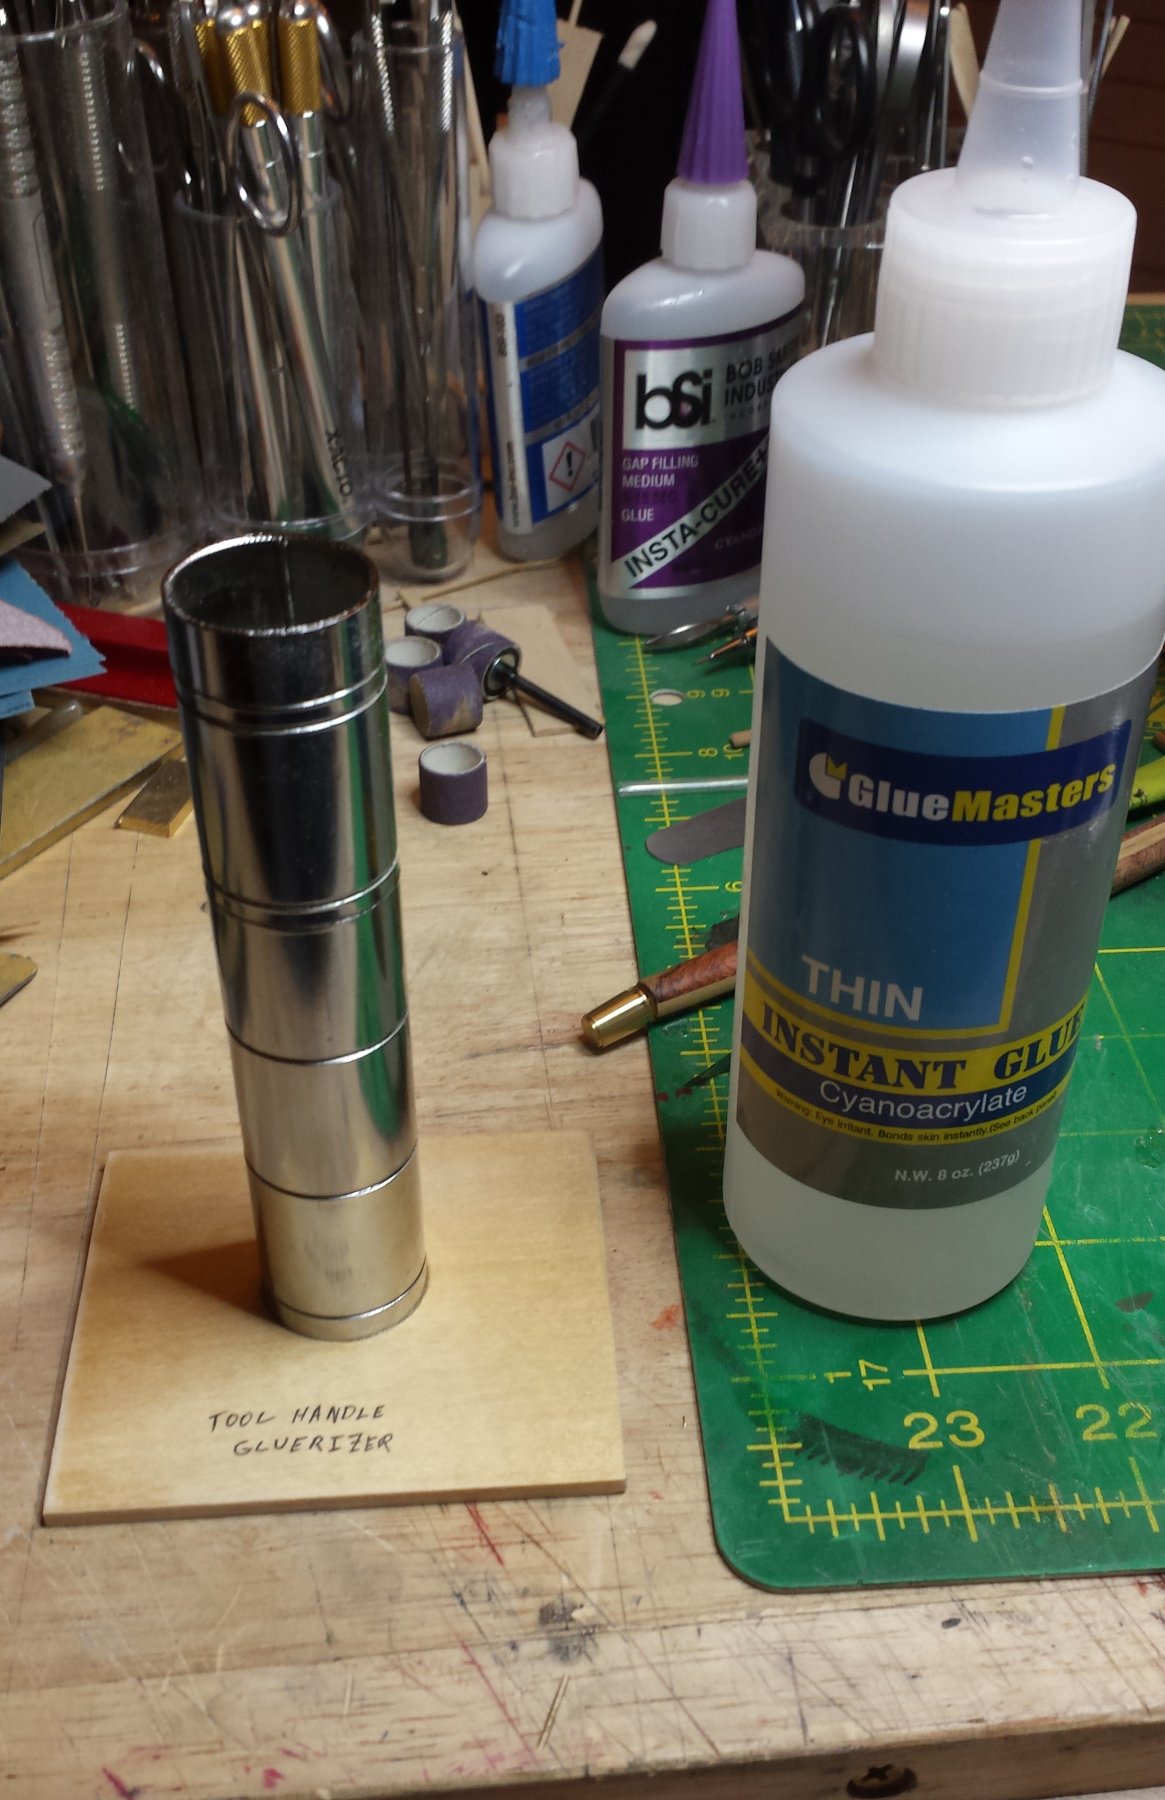
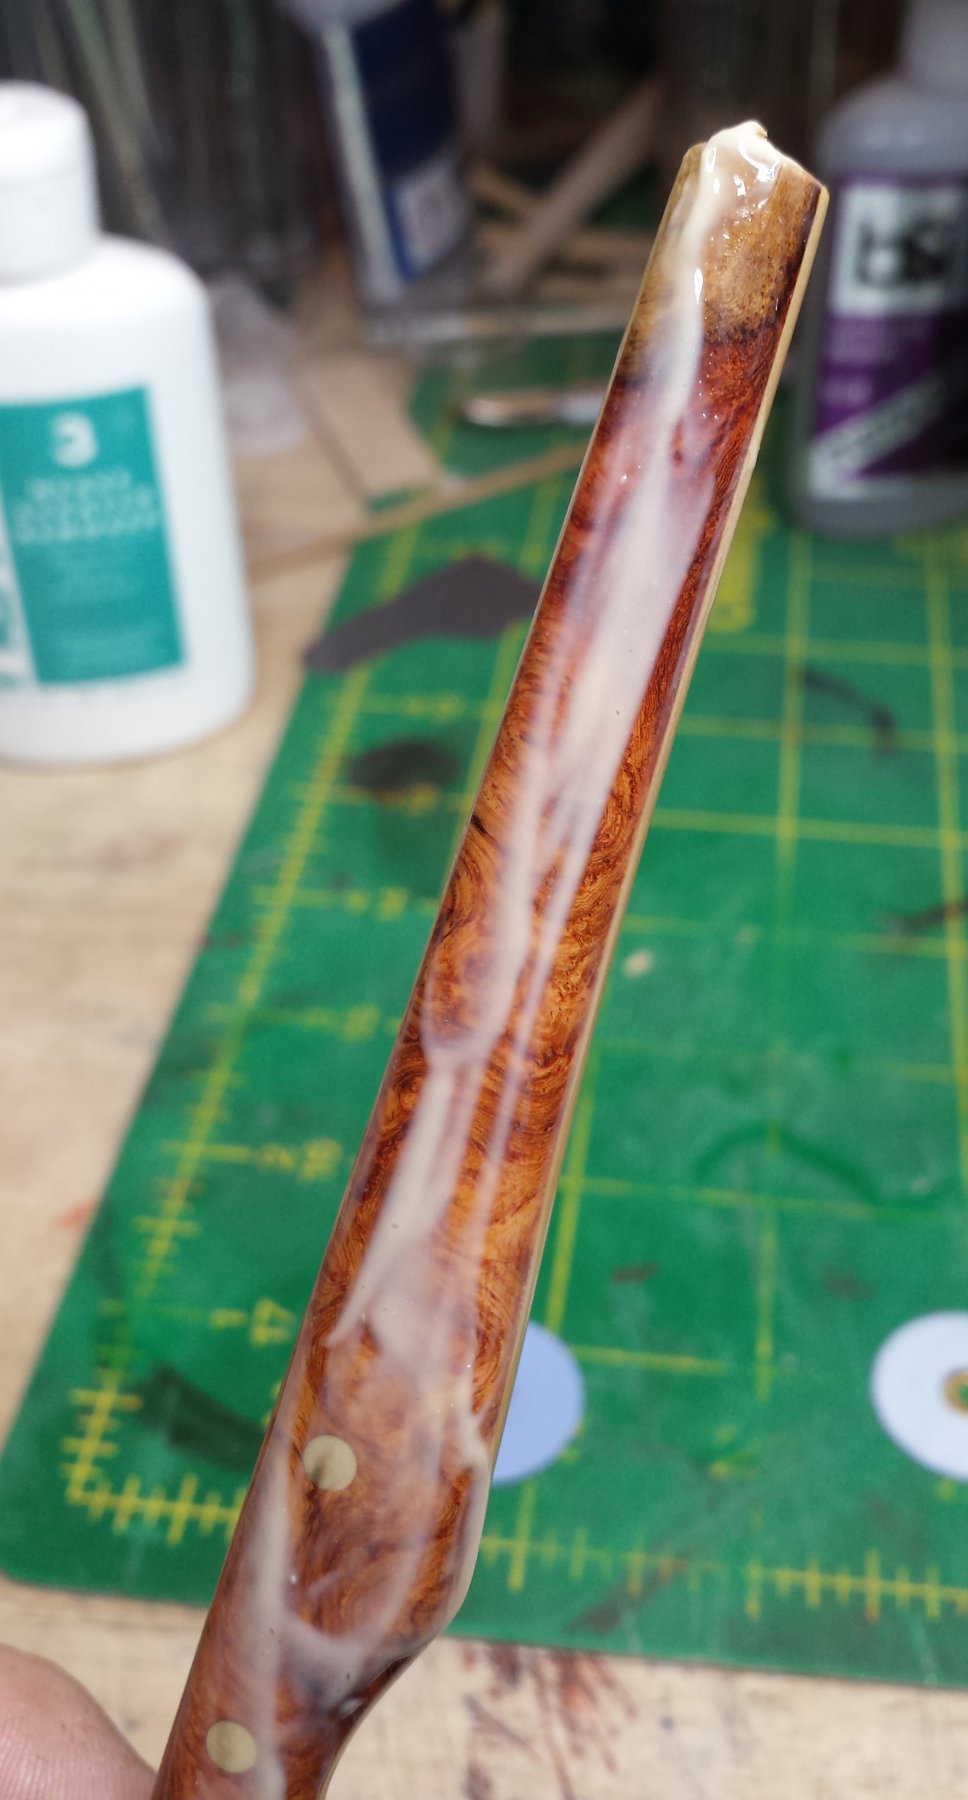
Here is my sophisticated setup. I'm using nothing but thin CA here, and it's important you do so for the first coat at least, which is more of a soaking. The 8oz of thin CA here was $21 from Amazon, and I will use < 5% for these two handles- I fill the tube/bath, do the soaks/coats, and then pour the remainder into the bottle. I've found no negative effects on the glue in doing so. So I could make another 30 knives minimum from this bottle if needed. If you're concerned about buying that much volume, I've had much success making it last longer by storing it in the refrigerator, just let it reach room temp before use.

I tape on dowels to suspend the knife handle in the bath and keep it balanced, don't want it touching the metal as it can trigger local setting.
For the first coat, as mentioned it's a soak. I left these in there for an hour each, the thin CA penetrates as deeply as possible and you turn much of it into a composite material.
For the later coats - you really shouldn't need more than one soak and two coats - you just dip and remove.
This is the tricky part, getting rid of the excess glue and then doing everything possible to keep the coat as even as possible and not pooling anywhere while it sets. I put a nice big double piece of foil down, and when I pull it off I shake it straight downward and touch the tail down to the foil a few times in an effort to get the excess off. As SOON as I think I have removed as much as I can/want, I level the handle's long axis with the horizon and then starting turning it constantly along that axis like a mini slow-roaster. And I keep turning it until the surface is fully set.
For the soak coat, the turning while waiting to set can take quite a while - 15 minutes or more. For the coats it acts more like thin CA and will set within a minute or two.
This is what it will look like after the current coat is set, you can see it's none too level. You definitely don't want to put on multiple coats without sanding fully level between coats. BTW, I am using 400 grit for the level sanding between coats.
Another issue is that while it's relatively easy to sand the overall handle level, glue will build up around the handle/blade joint, and you really really don't want to let that fully cure before you deal with it. Here you can see I'm in the process of trimming that back, using the first knife I made, an xacto replacement. This is what disposable blades are for, cutting through nasty glue
You can also see what the surface looks like after sanding, this one has been fully level-sanded before working on the glue buildup.
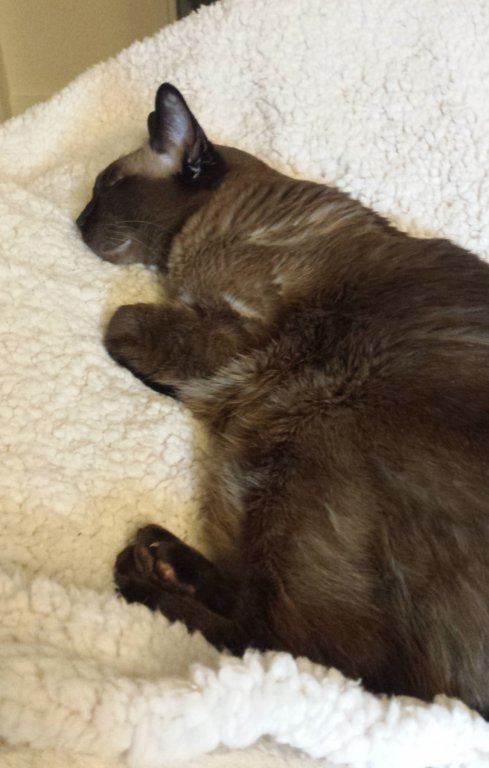
And this is Ms. Takita, who closely monitors all my activities so she always knows exactly how much she needs to disapprove of them. This is the electrically-warmed bed that sits on one of the tool chests of drawers right next to my workbench, where she has a good view of everything noisy and annoying that she needs to disapprove of. And the bed is close enough to where I sit to demand regular ear scratches to make up for all of the bad things I am doing.
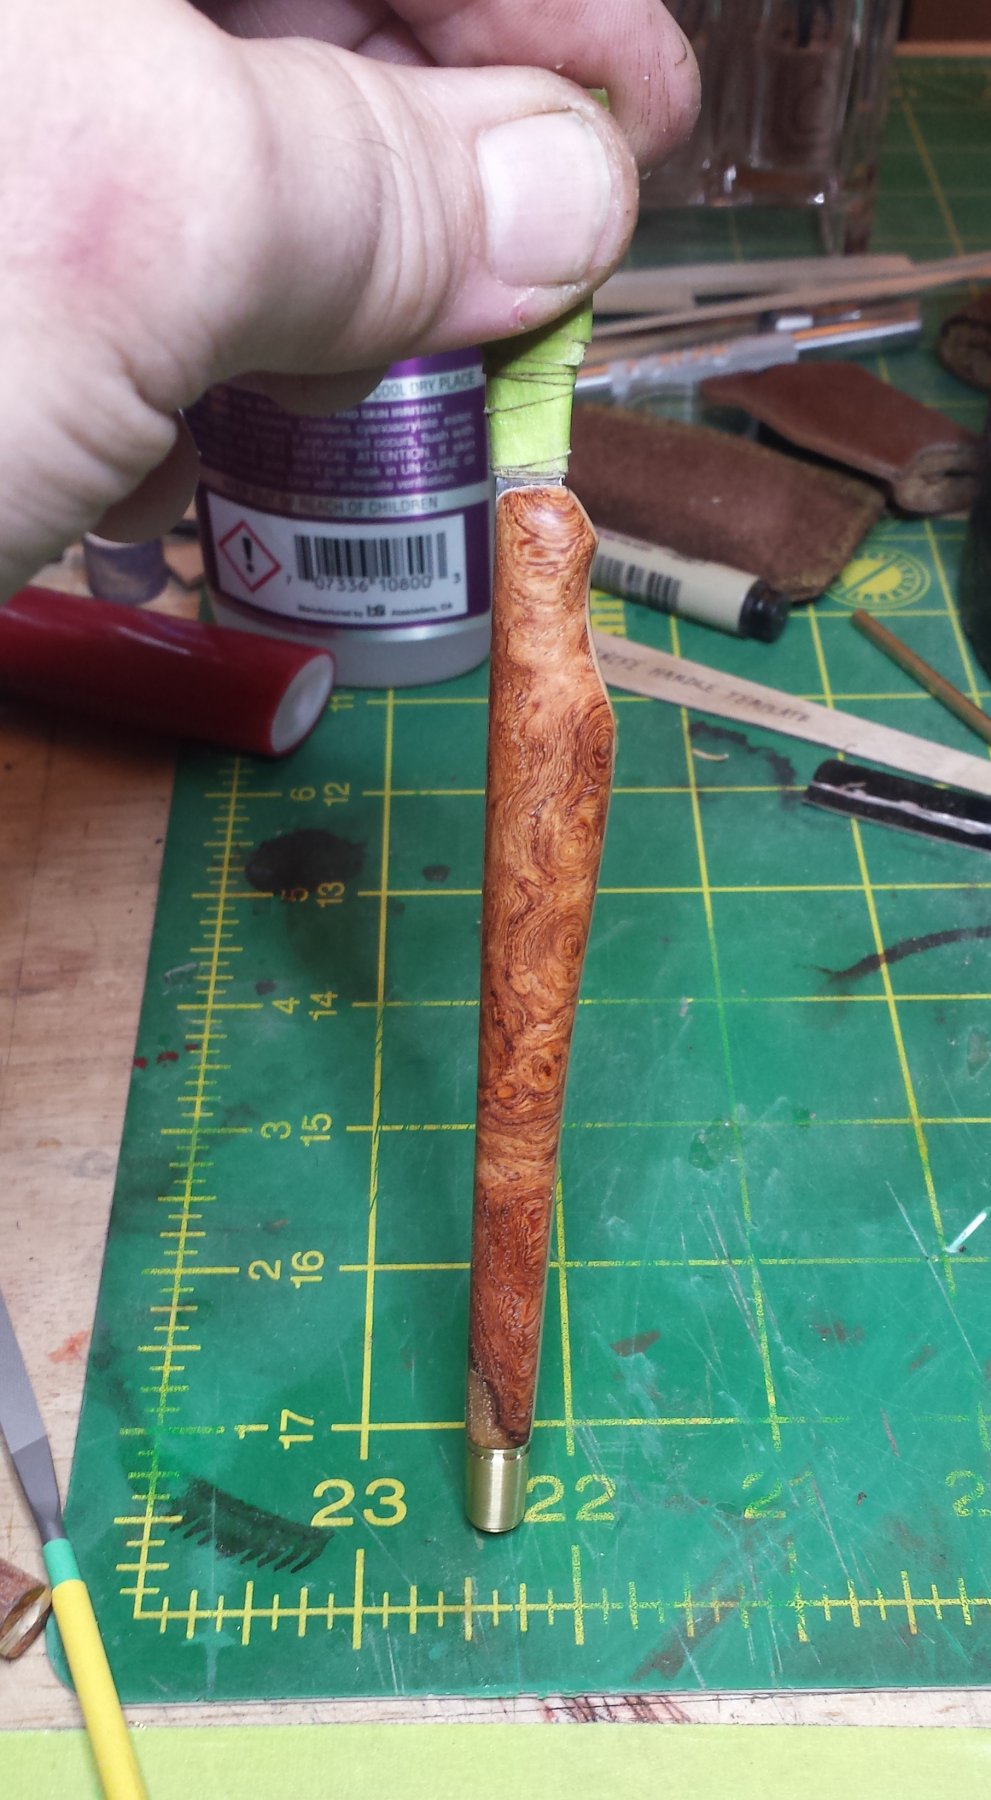
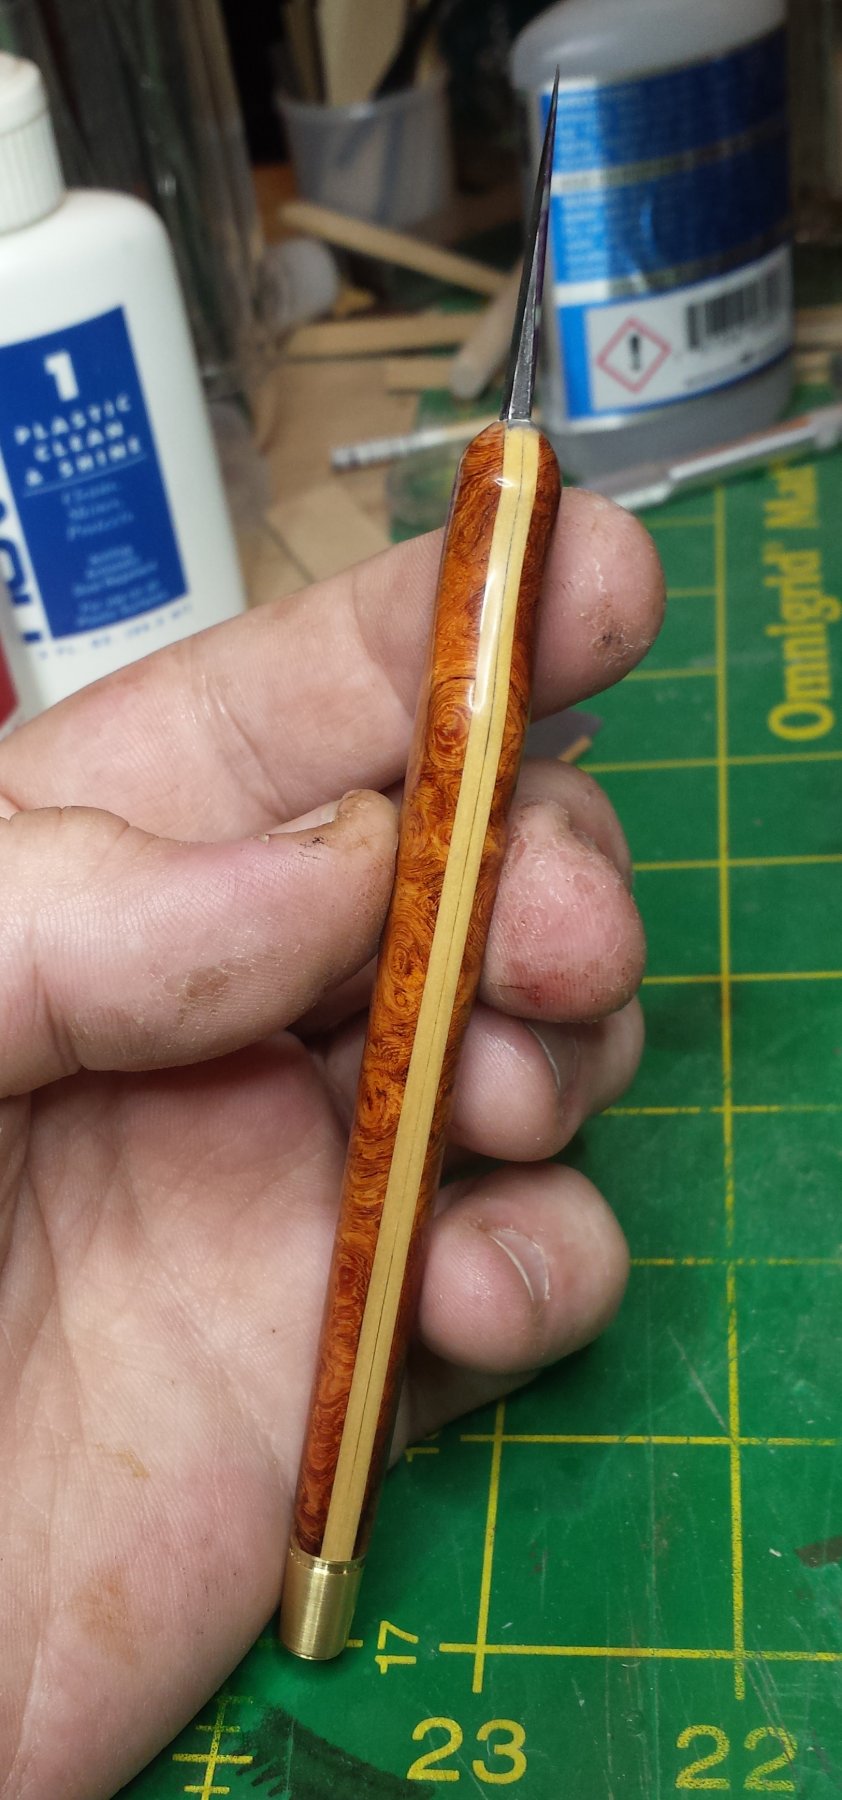
Here is the second knife getting ready to go in for his initial soaking. Since the wood is so nice here, the handles are sanded out to 2000 grit before getting their finish.

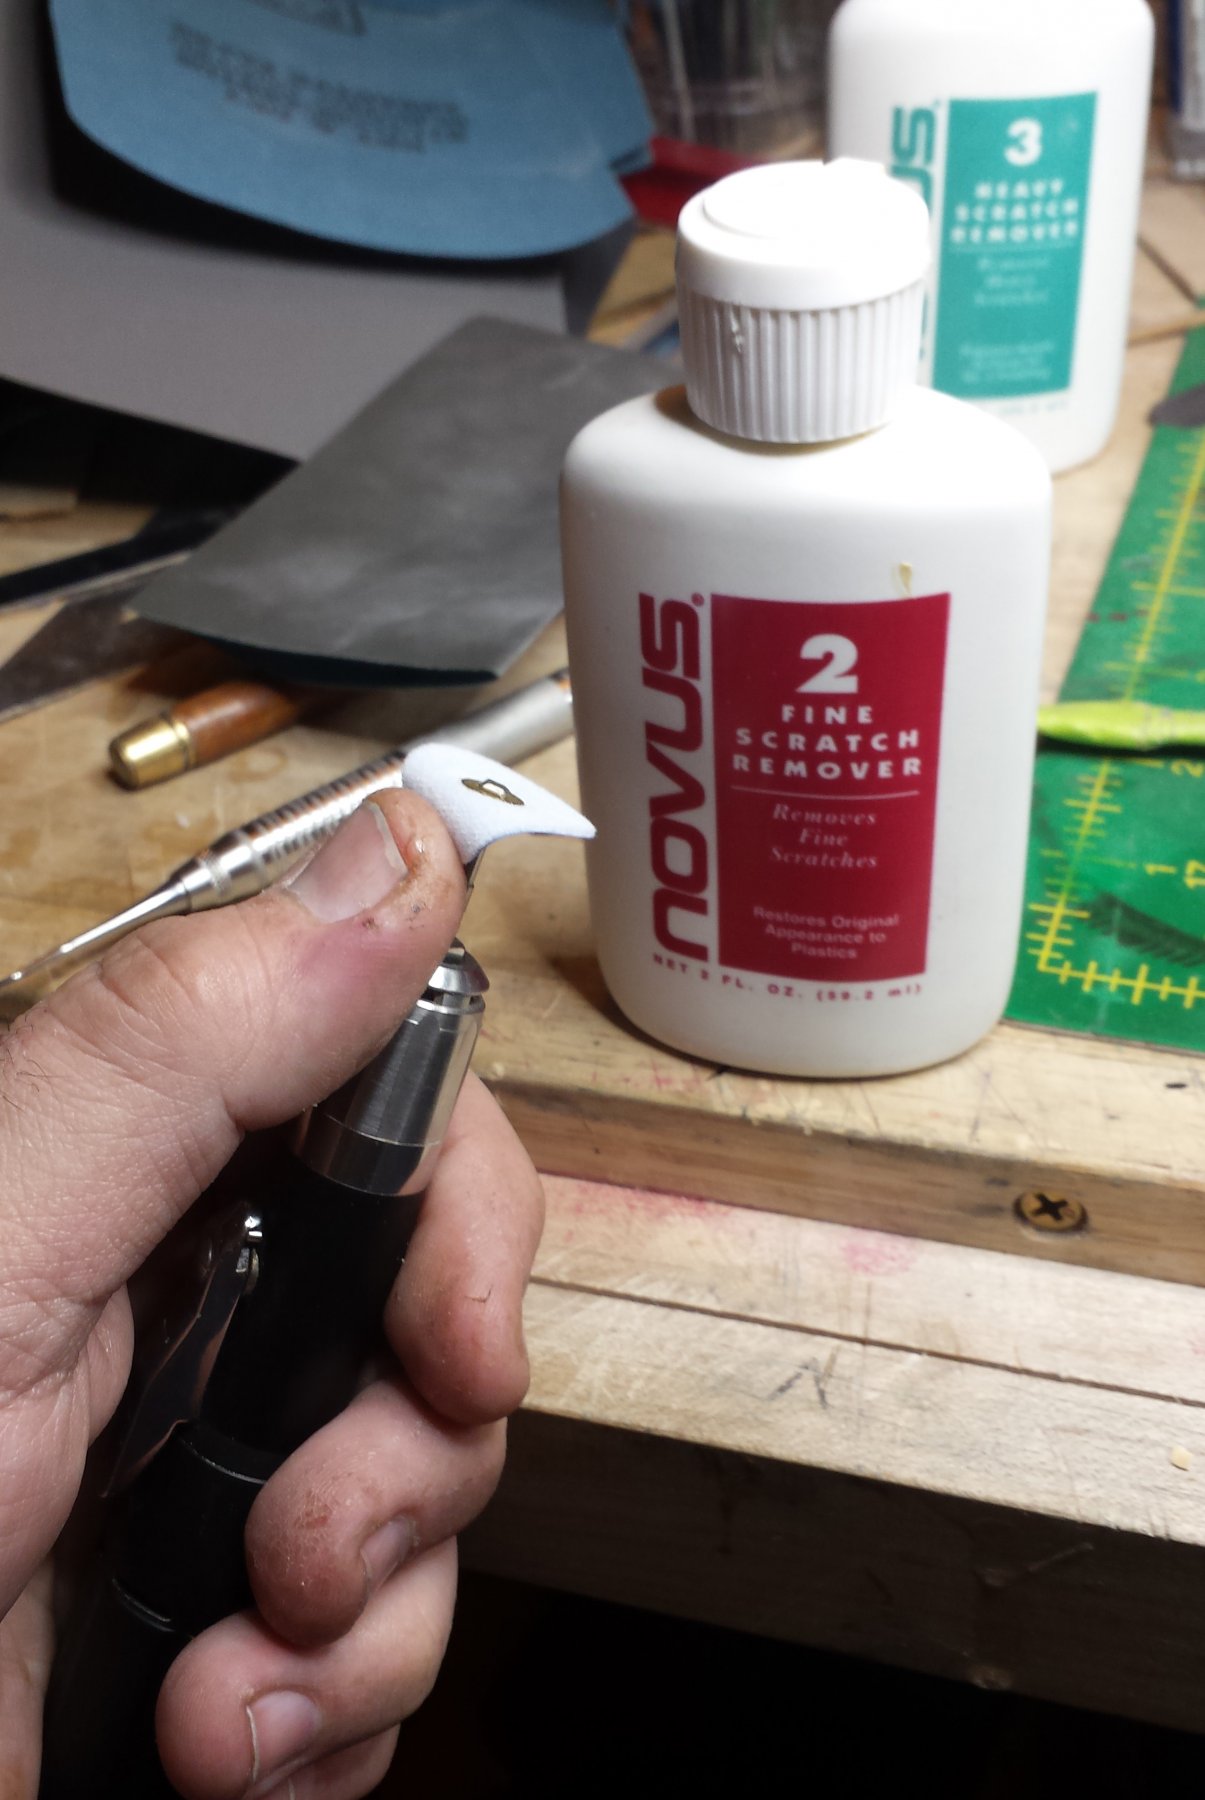
Once we have our three coats and everything is level sanded with 400 grit, we're ready to finalize the finish. I work my way up through the grits again to 2000 grit. Then it's time for the final polish, I'm using Novus plastic polish #2. There are a couple hundred ways to polish something like this, I use Novus because it works very well on CA, you can get it about anywhere, and it's not super-expensive at least compared to some other options.
You can use a cloth and do it by hand easily enough, and with a rotary tool the most common thing to use is felt points. I am using these floppy polishing disks as it makes me let the polish do the work.
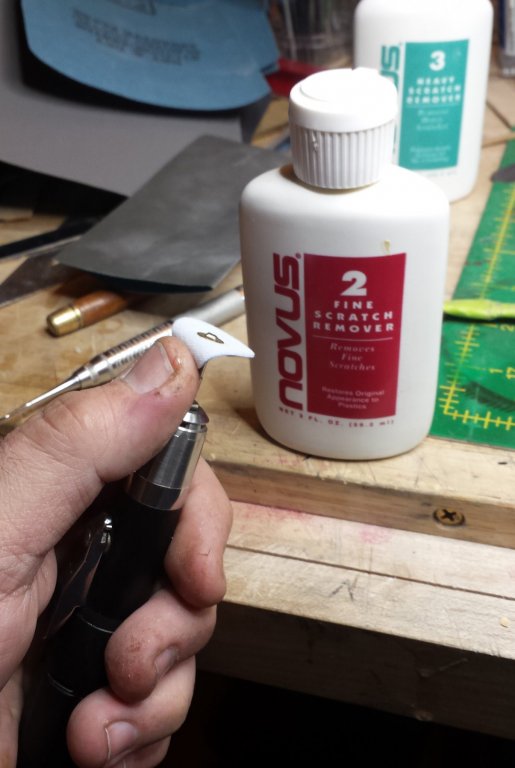
As you see I apply the polish to the handle, not the disk. You can do it the other way around, but if so I recommend full face coverage and not wearing any clothes you like
Also I'm running down at like 5-6k rpm, the only thing accomplished by going faster is creating a mess.

And after only 5-10min of polishing, we have a final finish
Go ahead and look at the full-sized version here, you should be able to see why the wood was sanded out to a polish before adding the finish, I'm not aware of anything that shows off figured wood better than this.
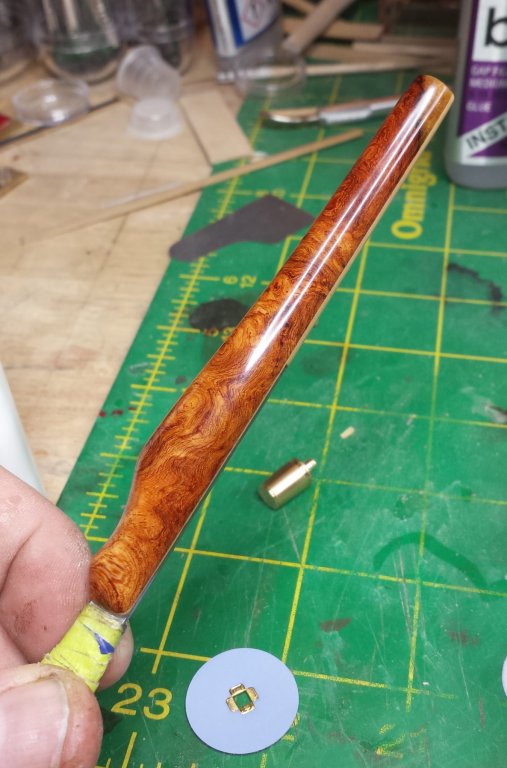
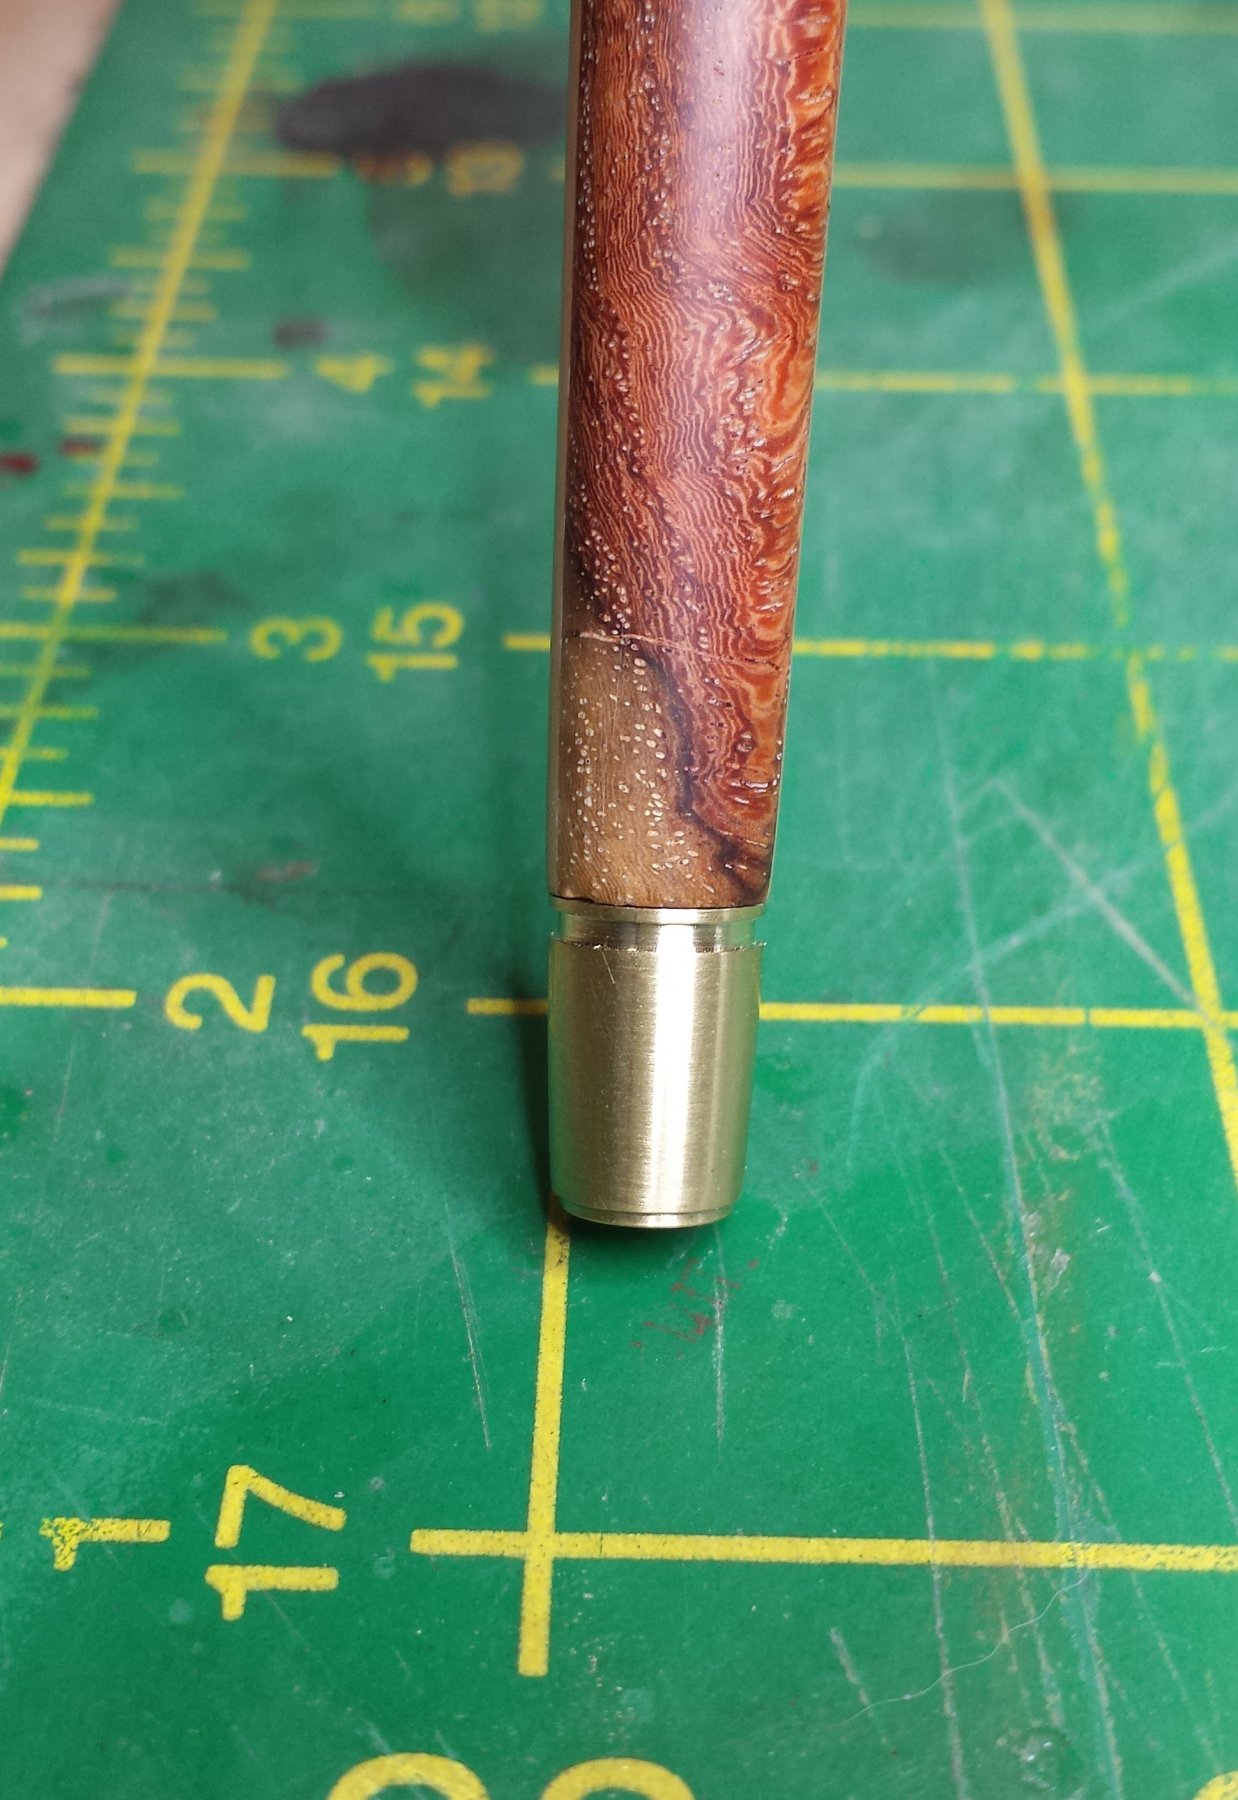
I used a cutoff wheel to cut some notches into the brass tailpiece shaft to give the glue a mechanical hold as well as the adhesive hold.

And we have a new knife. His brother will join him tomorrow and we can start working on ships again!


- Landlubber Mike, MEDDO, KORTES and 7 others
-
10
-
No idea how you keep the grate glue joints invisible when you flex it like that. I'm going to have to buy a Spanish thesaurus, I've run out of English superlatives.
- aviaamator, Nirvana, daHeld and 2 others
-
5
-
Oh no, not for Themopylae, just planting a seed for you maybe to think about for later (because it would be awesome).
- popeye the sailor, Nirvana, Piet and 2 others
-
5
-
Woohoo! The answer is carefully! (ducks)
Take a look here. I pinged them to see what AU shipping rates would be, here it's free shipping. They seem to carry a pretty large range of mid-price Japanese carving tools, which means like the ones I bought the steel will be very good but you may need to do some reshaping of bevels and flattening backs etc.
Look at this specifically. If you look at the people who viewed this also viewed list you'll see they have a series of knives like this, from mid-length to pencil handles with blades of varying shape and length, find the one(s) that work best for you. Best case you have at least three, one with the cutting edge aligned to the handle's long axis (straight blade) a skew like your marking knife, and something that faces more or less forward. The best I think is curved edge with tip almost facing pure forward, but keep in mind that sharpening curved edges is considerably trickier than straight edges.
There are at least a half-dozen basic ways to sharpen knives in terms of the kinds of stones. The performance/cost sweet spot IMO is Japanese water stones, good quality stones can be had for not much.
-
5 hours ago, src said:
LOL Dennis!! I had a good laugh when I saw the difference. Mount them on the stern, early technology afterburners.
Sam
I was just thinking that Popeye could probably make an awesome steampunk clipper. No really, that would be awesome. We just need to explain what steampunk is
I think the best simple explanation though is imagine that H.G. Wells thought up jet engines and all sorts of powerful machines (that would be powered by steam, since those were the engines of his time) and flying vehicles and what they would look like and how they would work if that were the case. Re-imagine what followed Victorian/Edwardian England if Nautilus became the pattern for an amazing range of new machines.
Generally good fun right up to the point where they start taking themselves a tad too seriously, but that could be said about almost anyone. Including ship modelers


-
And one more before I go try to finish these, remember a goodly portion of the ooh ah factor here is just the wood, and buying a nice piece of wood requires no skill
If you have a local Woodcraft store or a lumber supply place that carries supplies for wood turners and especially pen turners, stop by semi-regularly and poke around what they have. Even the most stringent admirals generally don't complain about buying a $5 piece of wood that will make a very nice knife.
This is as expensive as it gets, snakewood. Very dramatic, $10 for one piece. Although I made two handles out of one blank I wouldn't recommend trying that unless you have a very good scroll saw, you need to cut it with the thinness of a scroll saw blade if you're going to get enough material.
Here's cocobolo and you get 5 pieces for $10. A total of $2 per knife handle or $1 if you quarter it like I did.
Really, the wood cost is very little, so no excuse for not having your own knives have really nice handles
-
Oh also, I should have remembered to clearly explain that the only reason the holes are really necessary is if you have the blade top line be the same as the handle top line, giving you an open-topped rabbet/mortise for the blades. When you do that the handle wood isn't going to provide meaningful resistance to the torsion moment it feels during cutting, so you run these pins through and through to provide the necessary retention.
If you have handle wood on both sides of the blade, there is no need for the pins and you can make a knife with a blade like these with none of that hassle. I just prefer the point to be dead on the handle top line, I think that helps me locate the point more easily, but it's hardly required.
Here are some examples of no-pins buried-blade knives with very simple handles to make.

- Jack12477, popeye the sailor, Canute and 1 other
-
4


Soleil Royal by Hubac's Historian - Heller - An Extensive Modification and Partial Scratch-Build
in - Kit build logs for subjects built from 1501 - 1750
Posted
Welcome. It's not perfect but it works well for some images. If that doesn't work, you can try the Warp option under Transform, it's the most powerful but as with everything in computers that gets that label, that also means it's hard to control. You have four moveable control points on the corners, plus they each have two bezier control points that can be also be used to stretch the outer edges of your selection. Then you can also click anywhere within the selected area and click and drag to move the contents around and other areas with get squished or stretched to compensate.
One trick with all of these (that really need a "strength" setting) to attenuate the effects is to select an area bigger than that you want to alter. So if you have a drawing you can increase the size of the canvas and then select an area bigger than the drawing itself and that will make the effects of dragging transform control points less dramatic.