.JPG.ca33079f5815b861e67b9c2cccd37982.JPG)

Blue Ensign
-
Posts
4,574 -
Joined
-
Last visited
Content Type
Profiles
Forums
Gallery
Events
Everything posted by Blue Ensign
-
 Hi Michael, I hadn’t realised that you are safemaster until Hubac made a link reference to my Le Praetorian build. Your work on these Heller kits is second to none, and your current project is no exception. I still fondly remember your 1765 Victory build, and the Figurehead, a magnificent bash if ever there was one. Glad to see you are still creating your wonderful models. B.E. (Maurice)
- 222 replies
-
- 1
-

-
- reale de france
- heller
- (and 1 more)
-
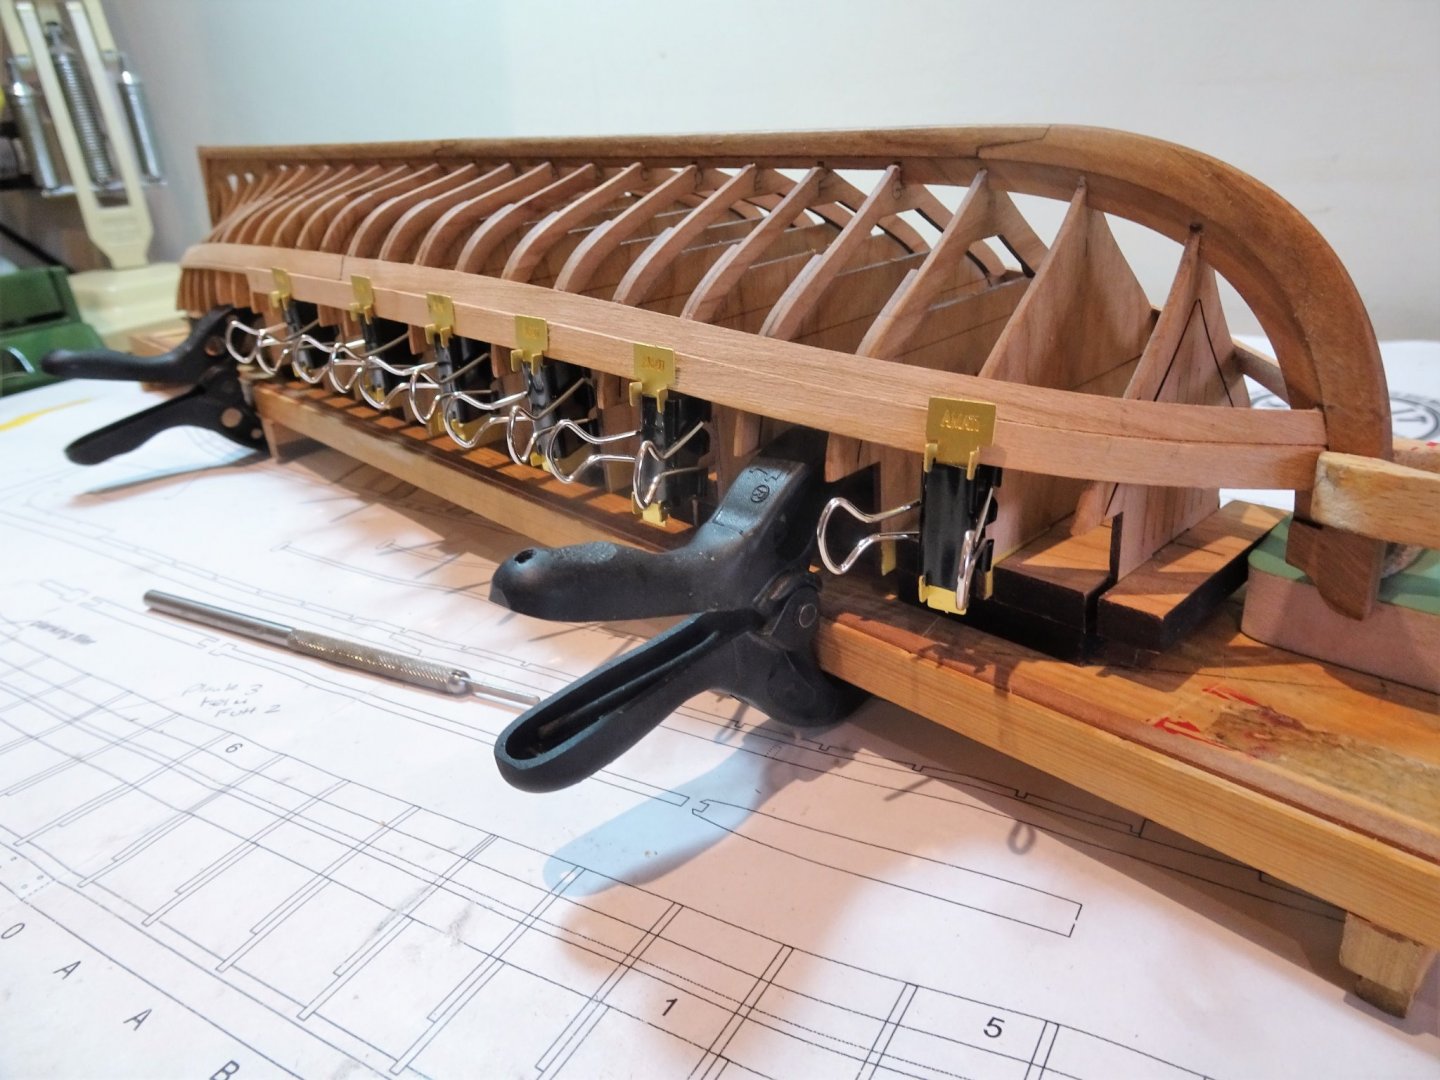
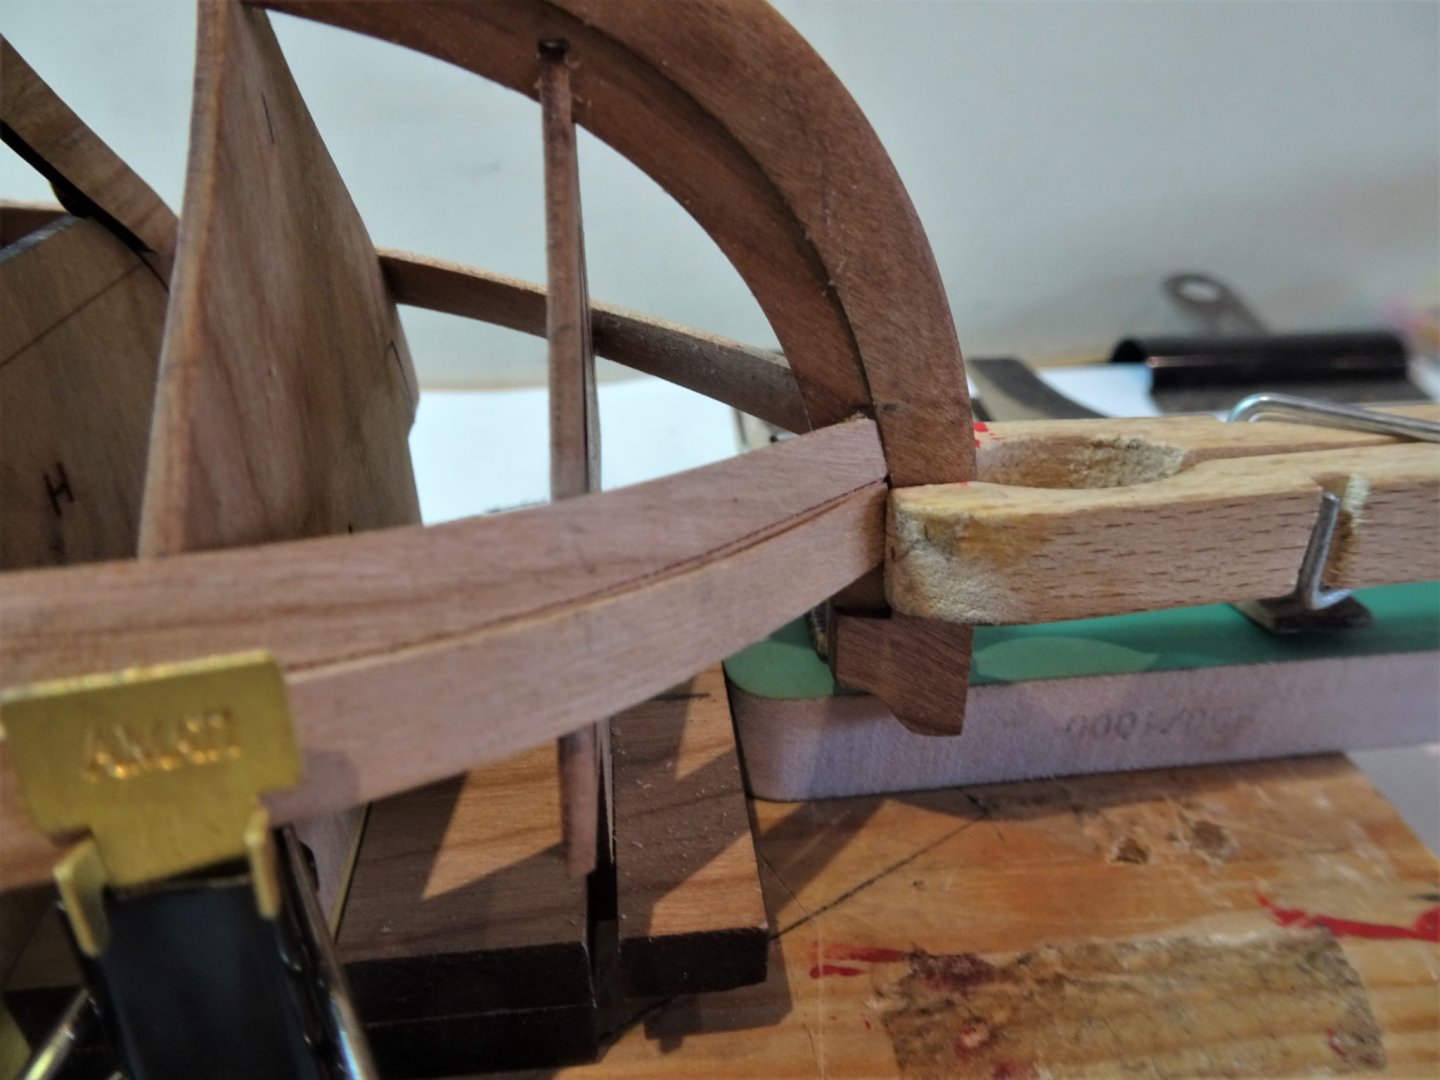
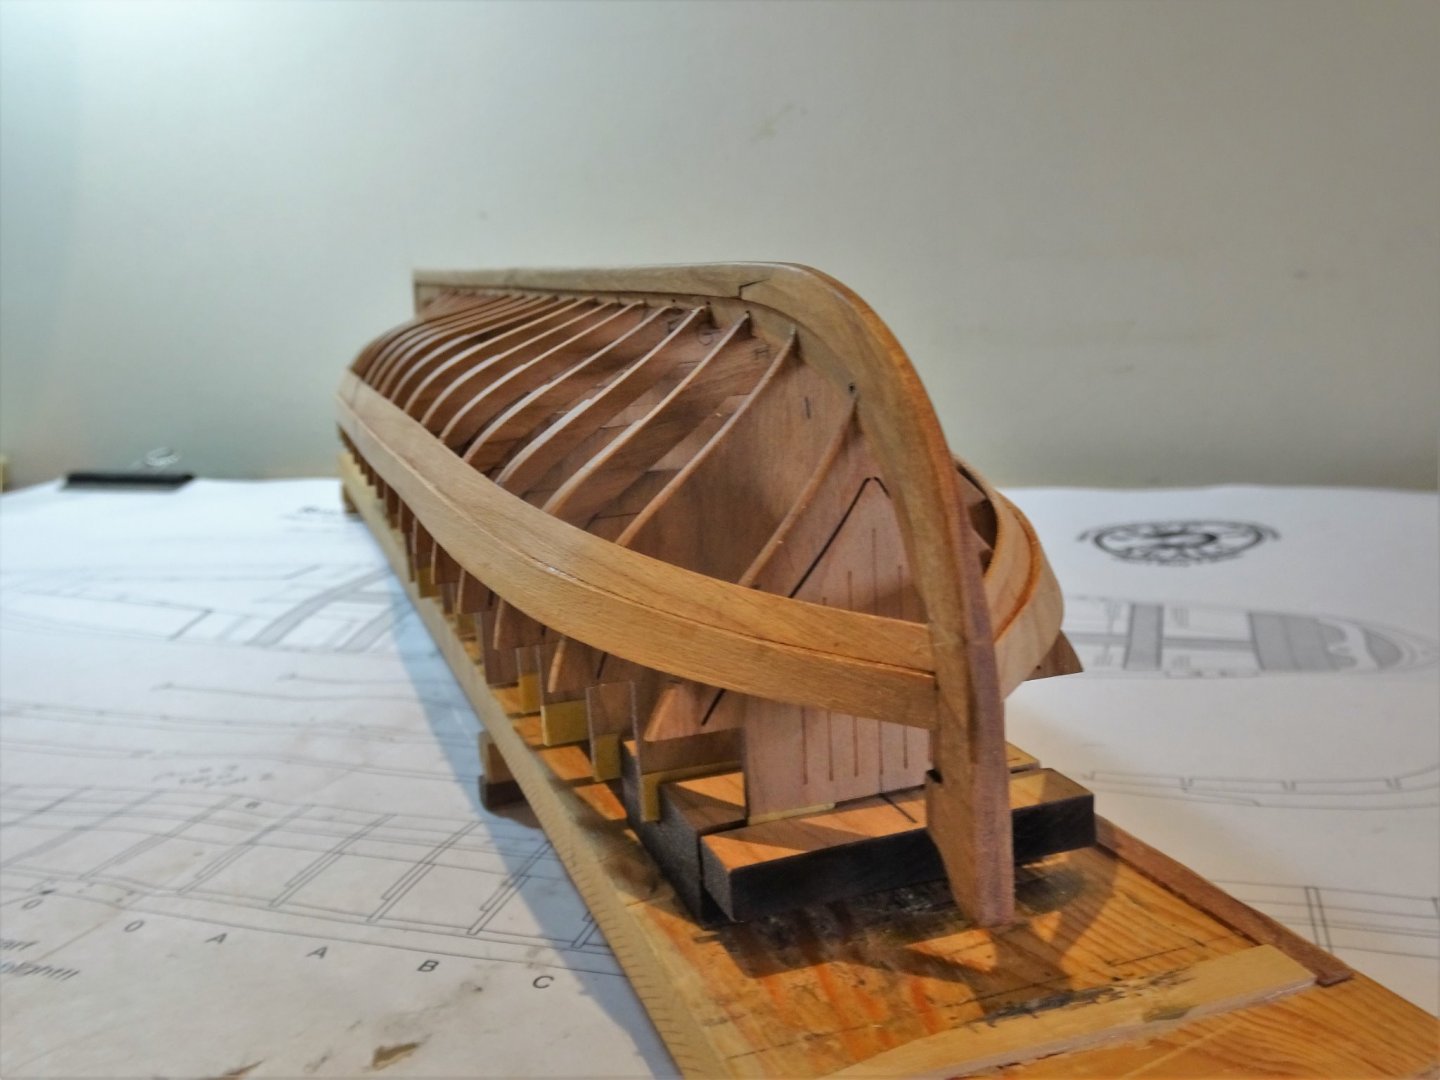
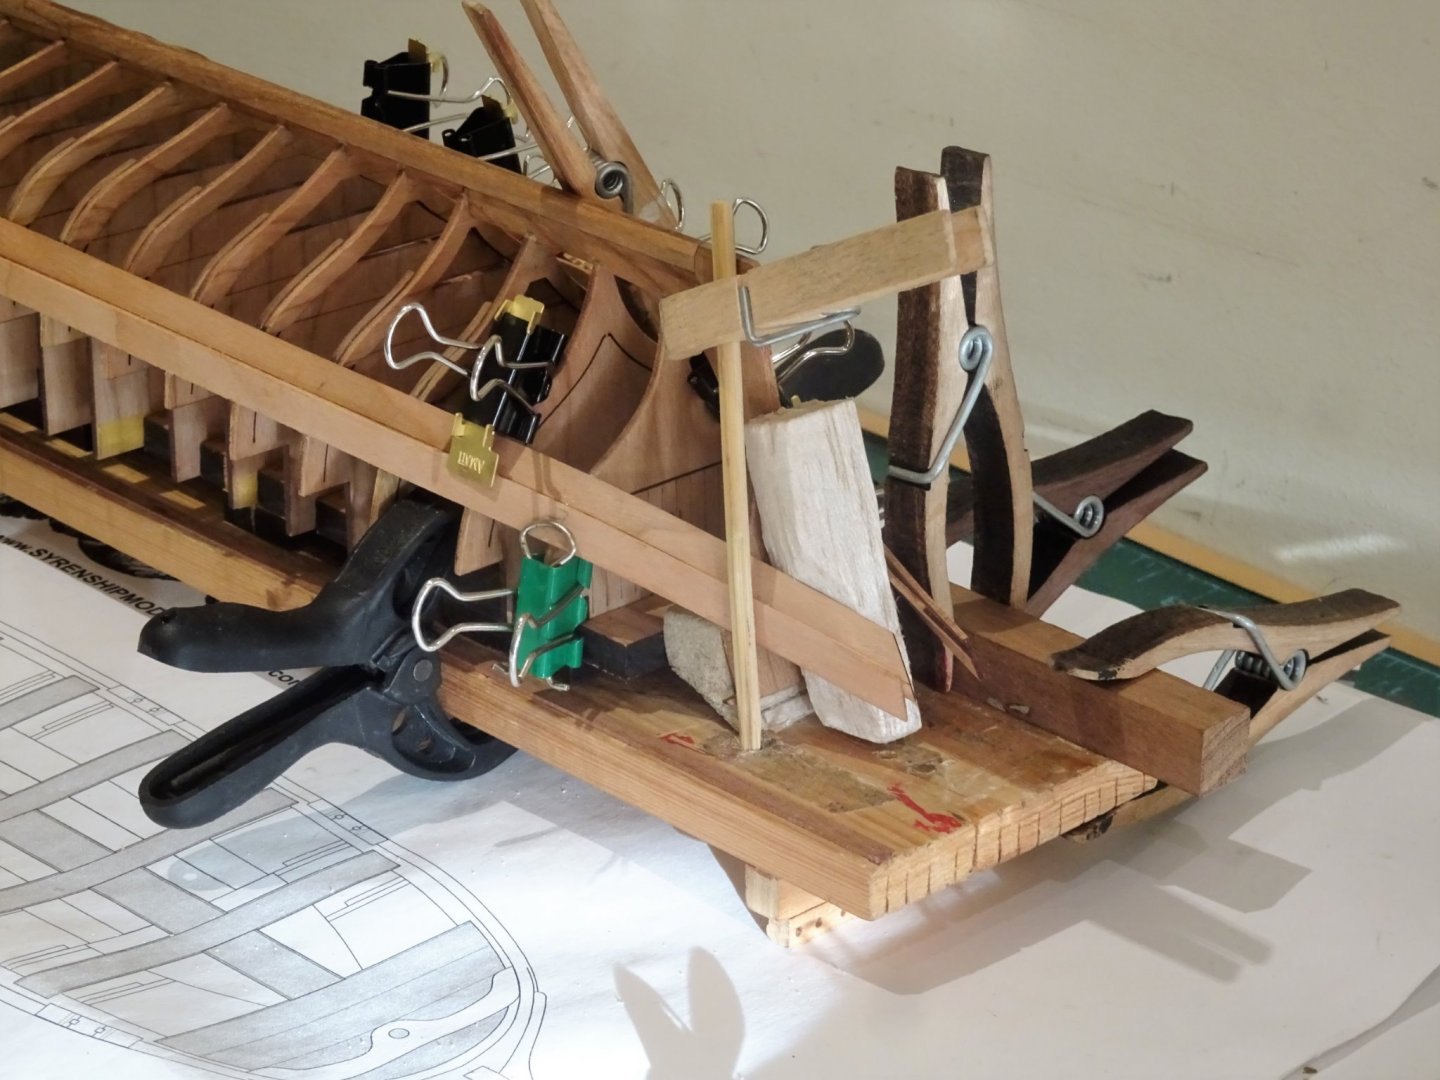
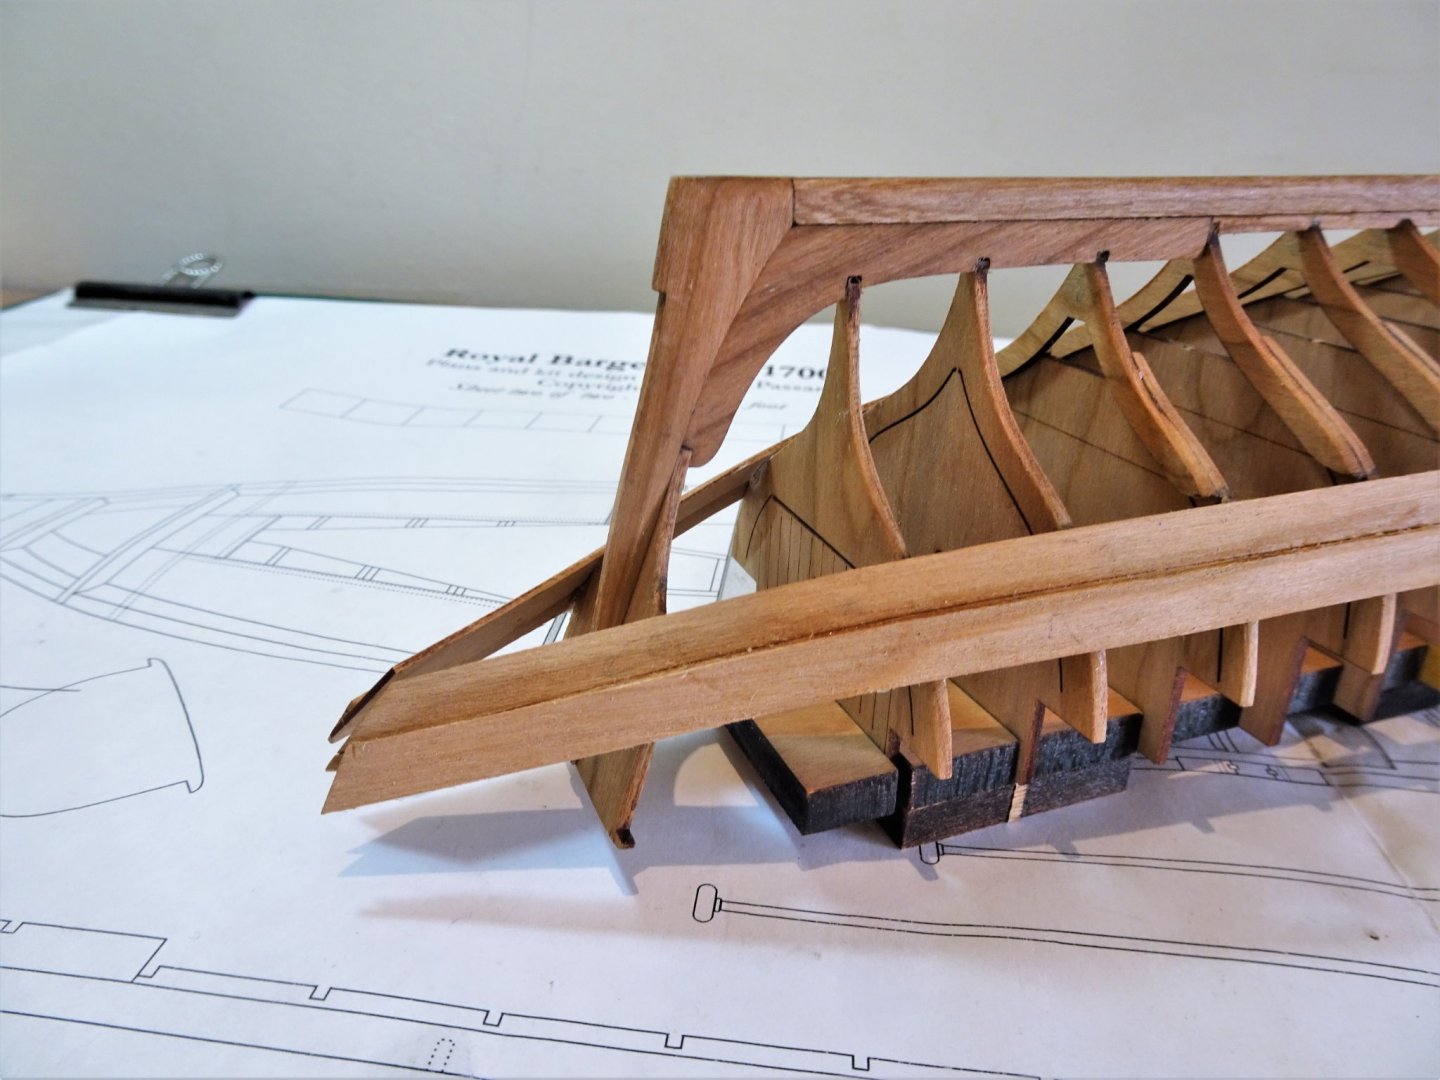
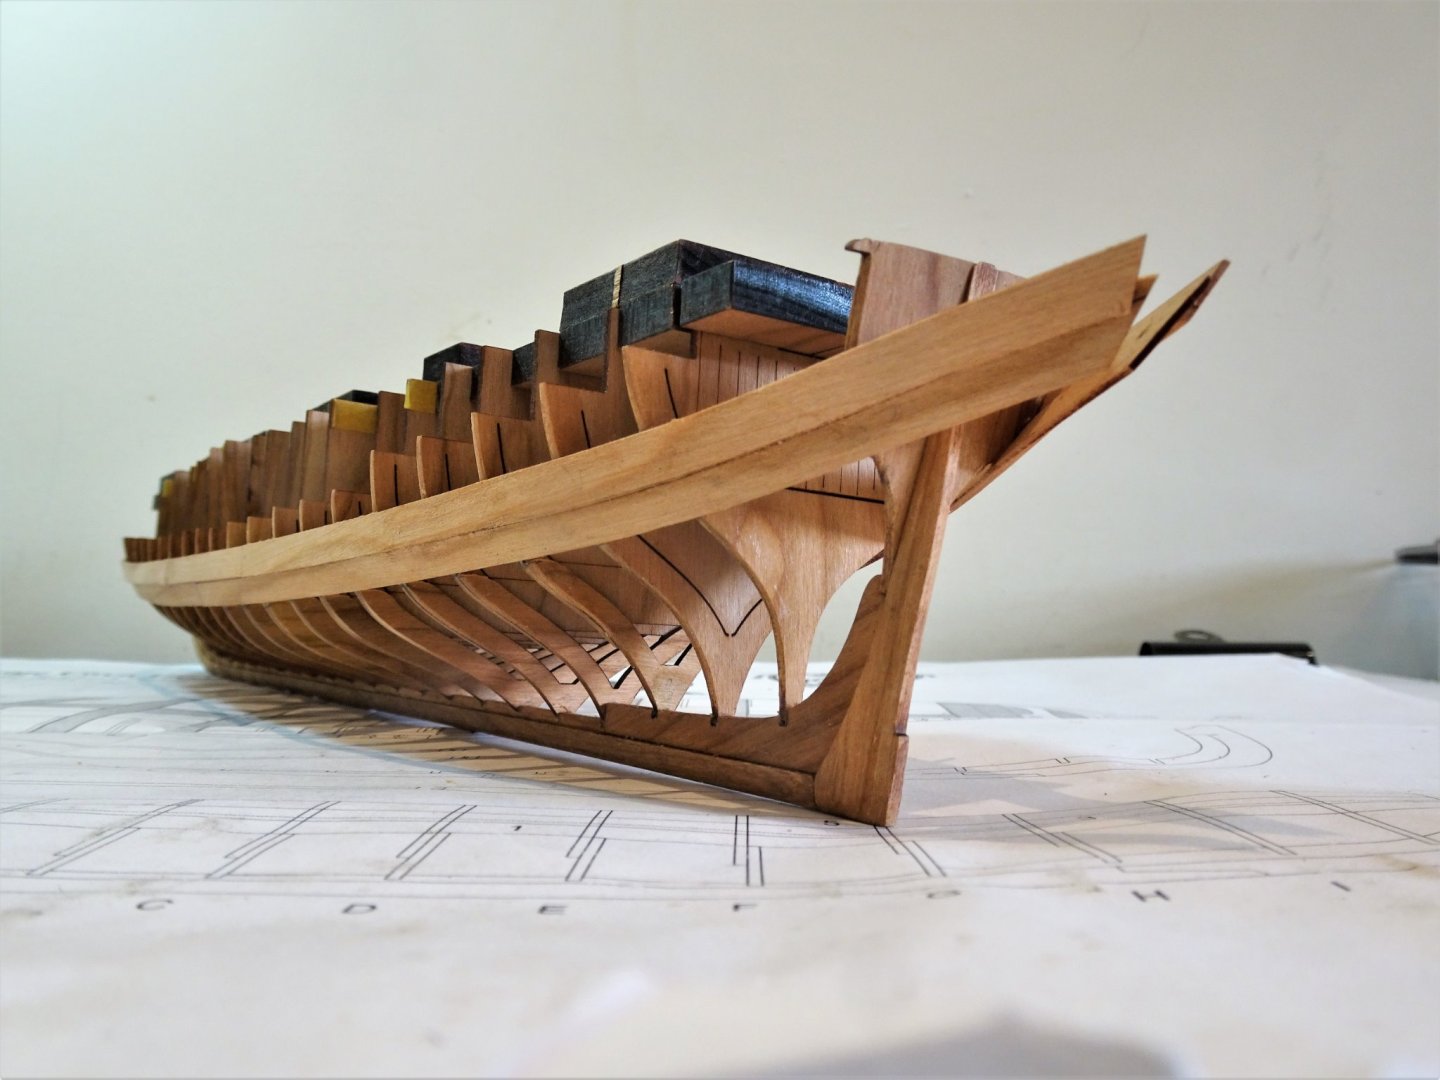
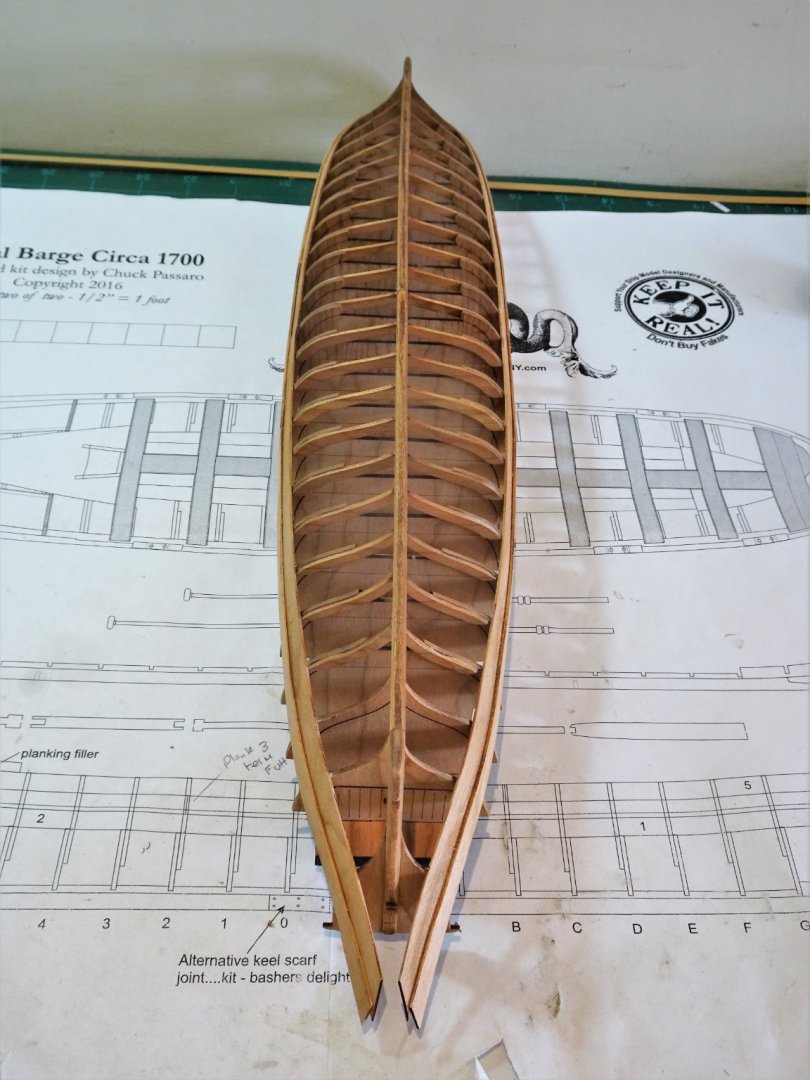
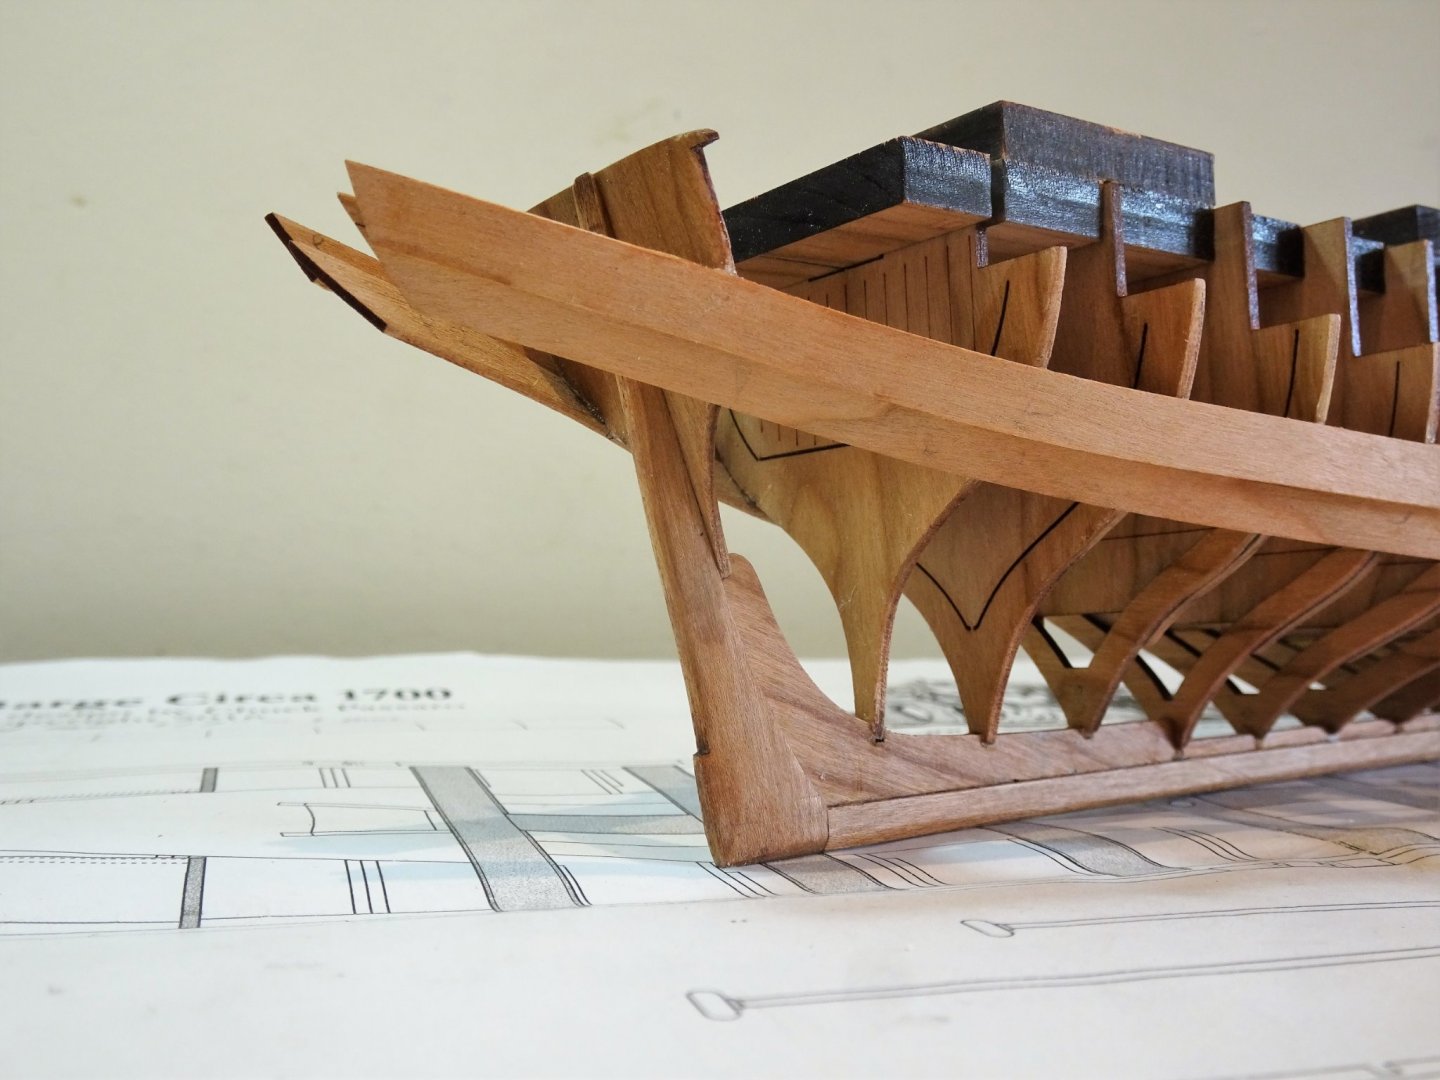
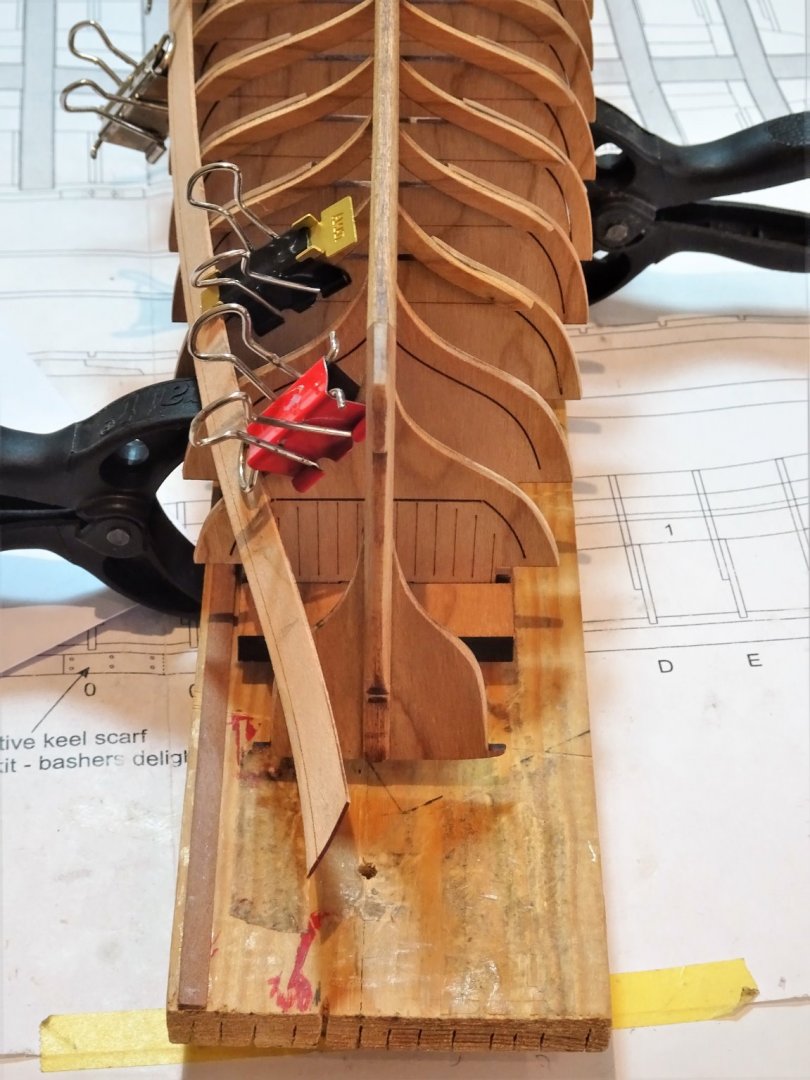
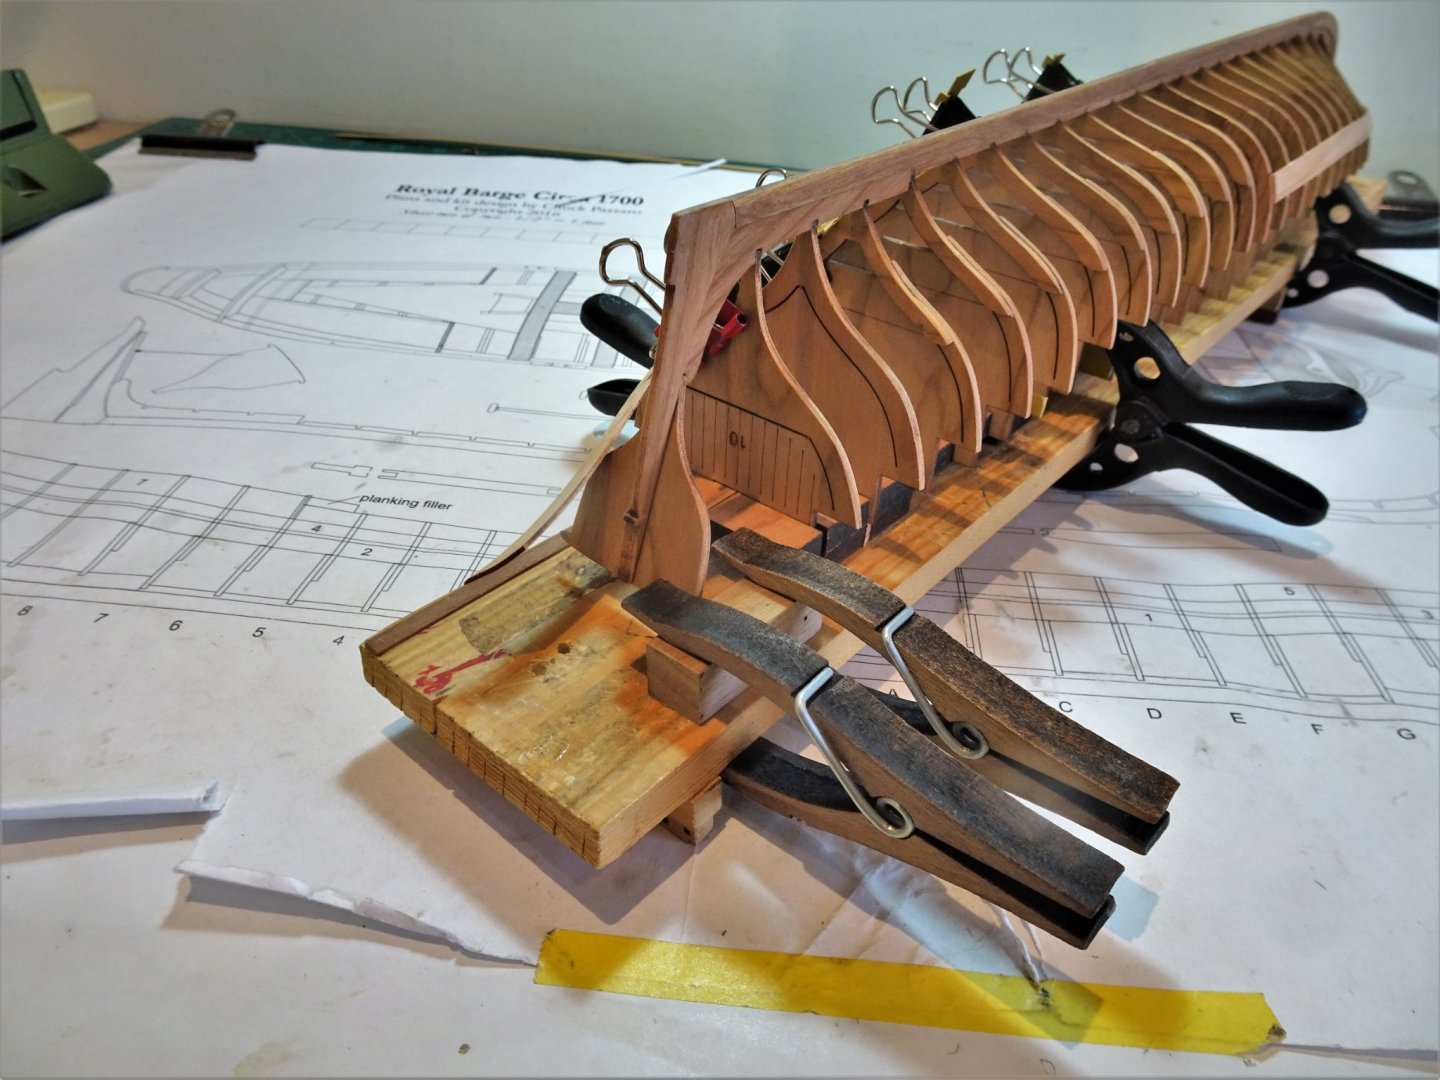
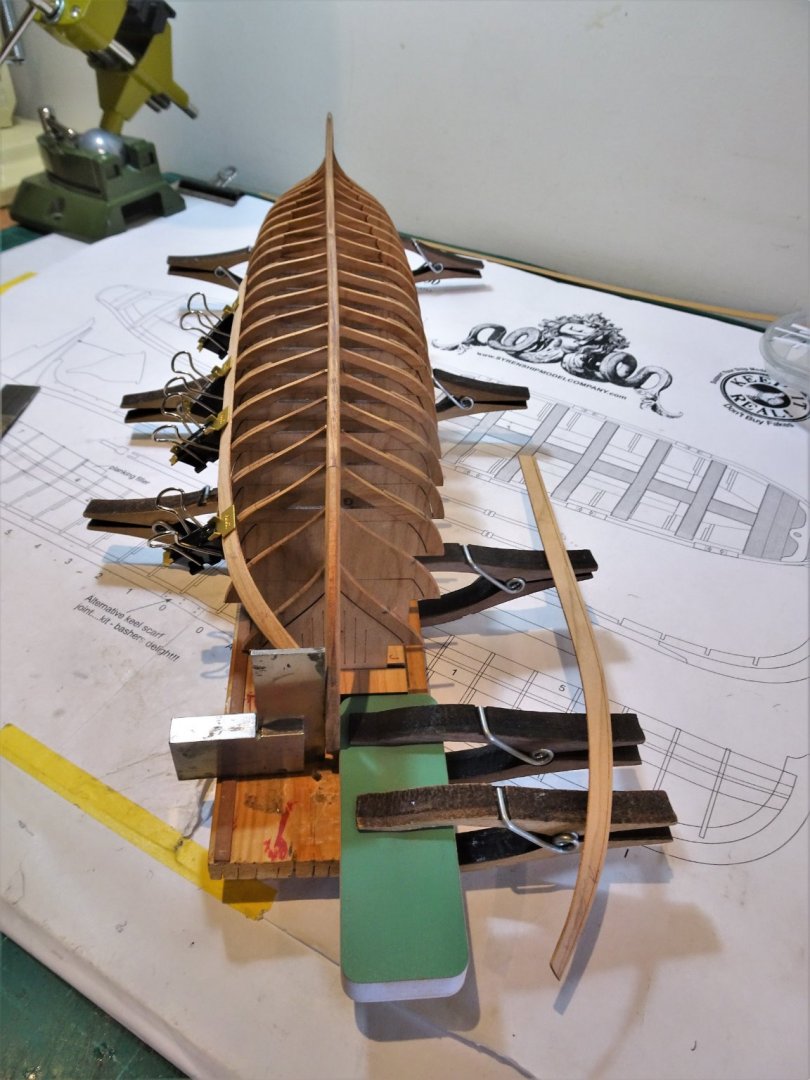
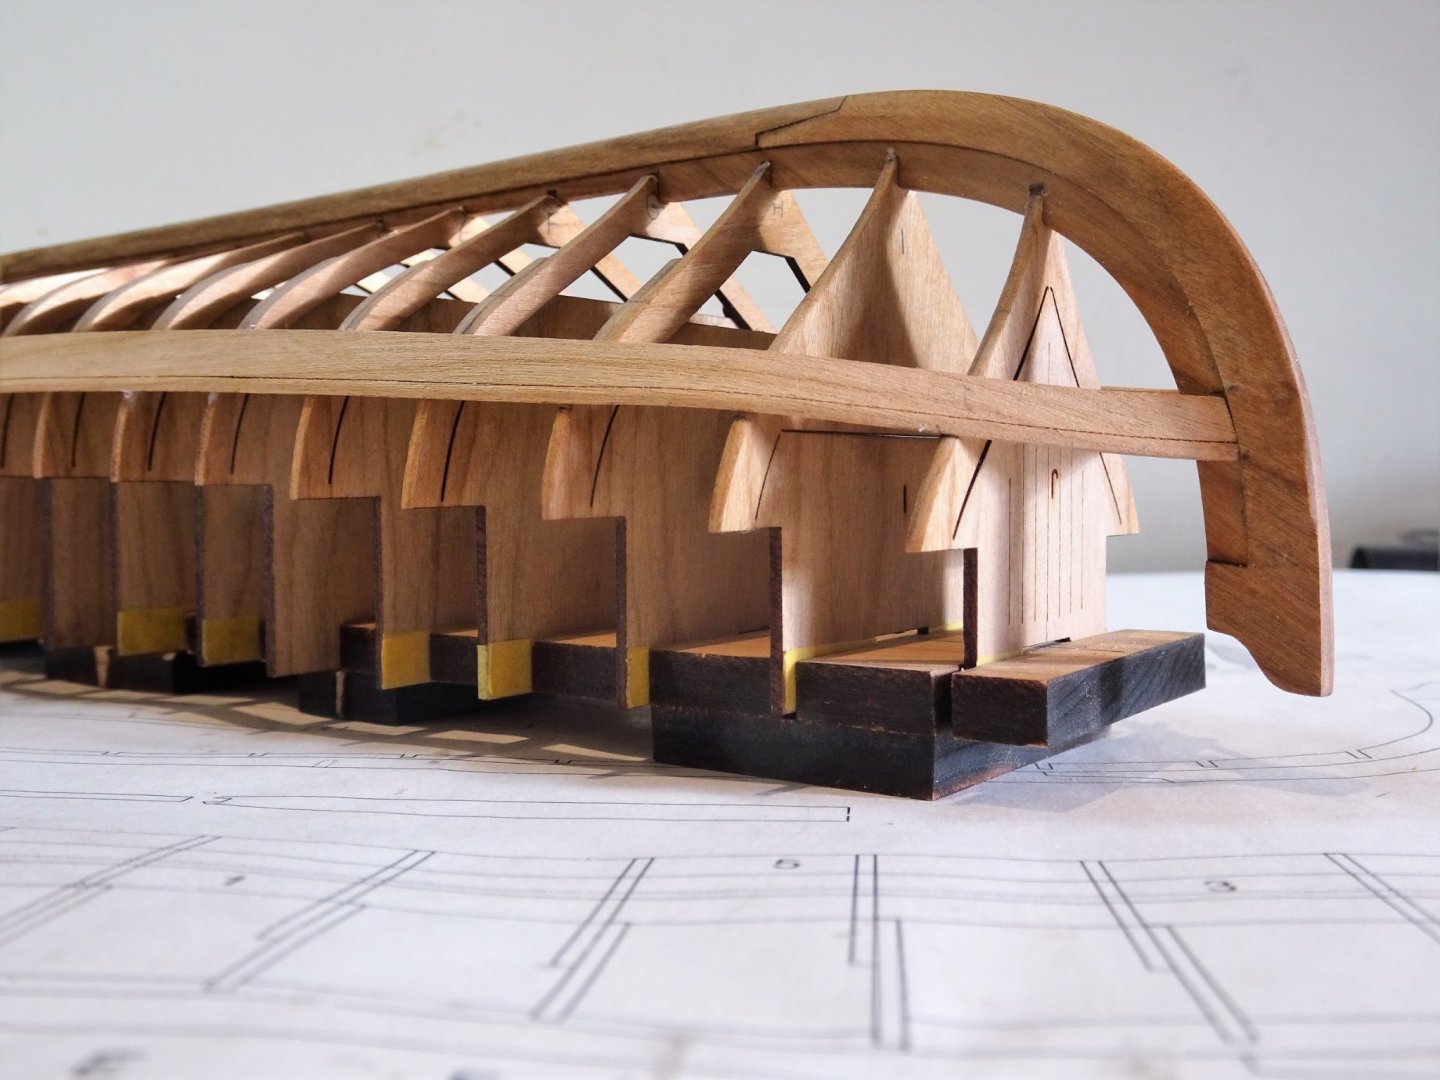
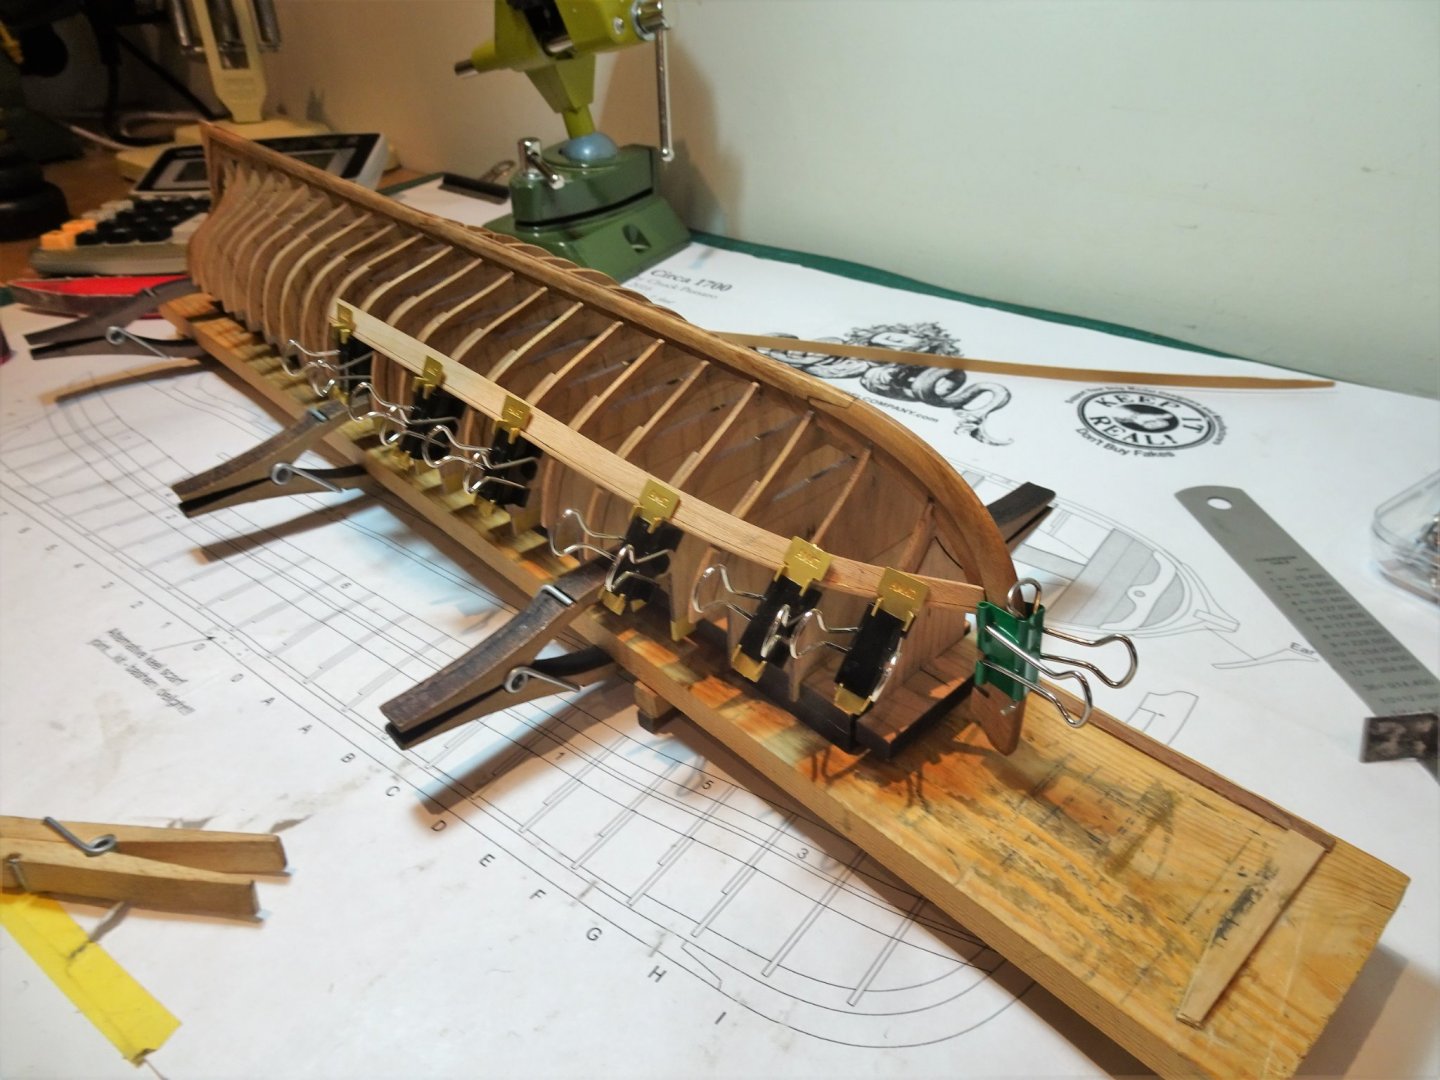
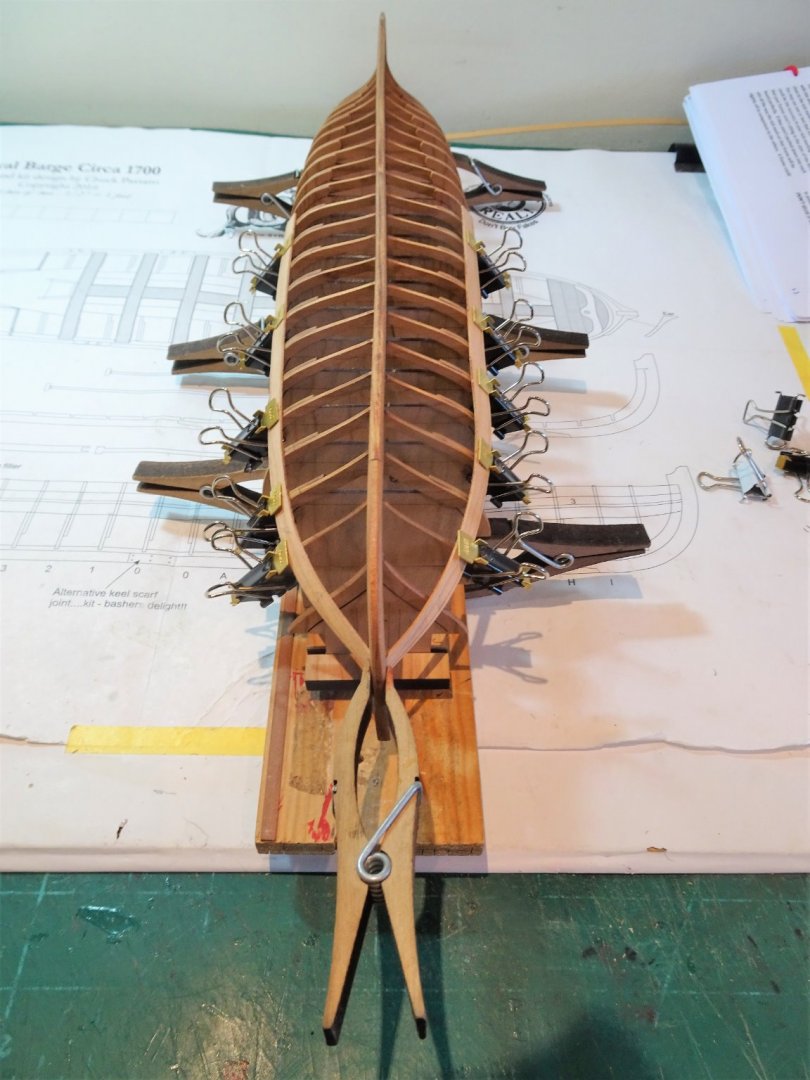
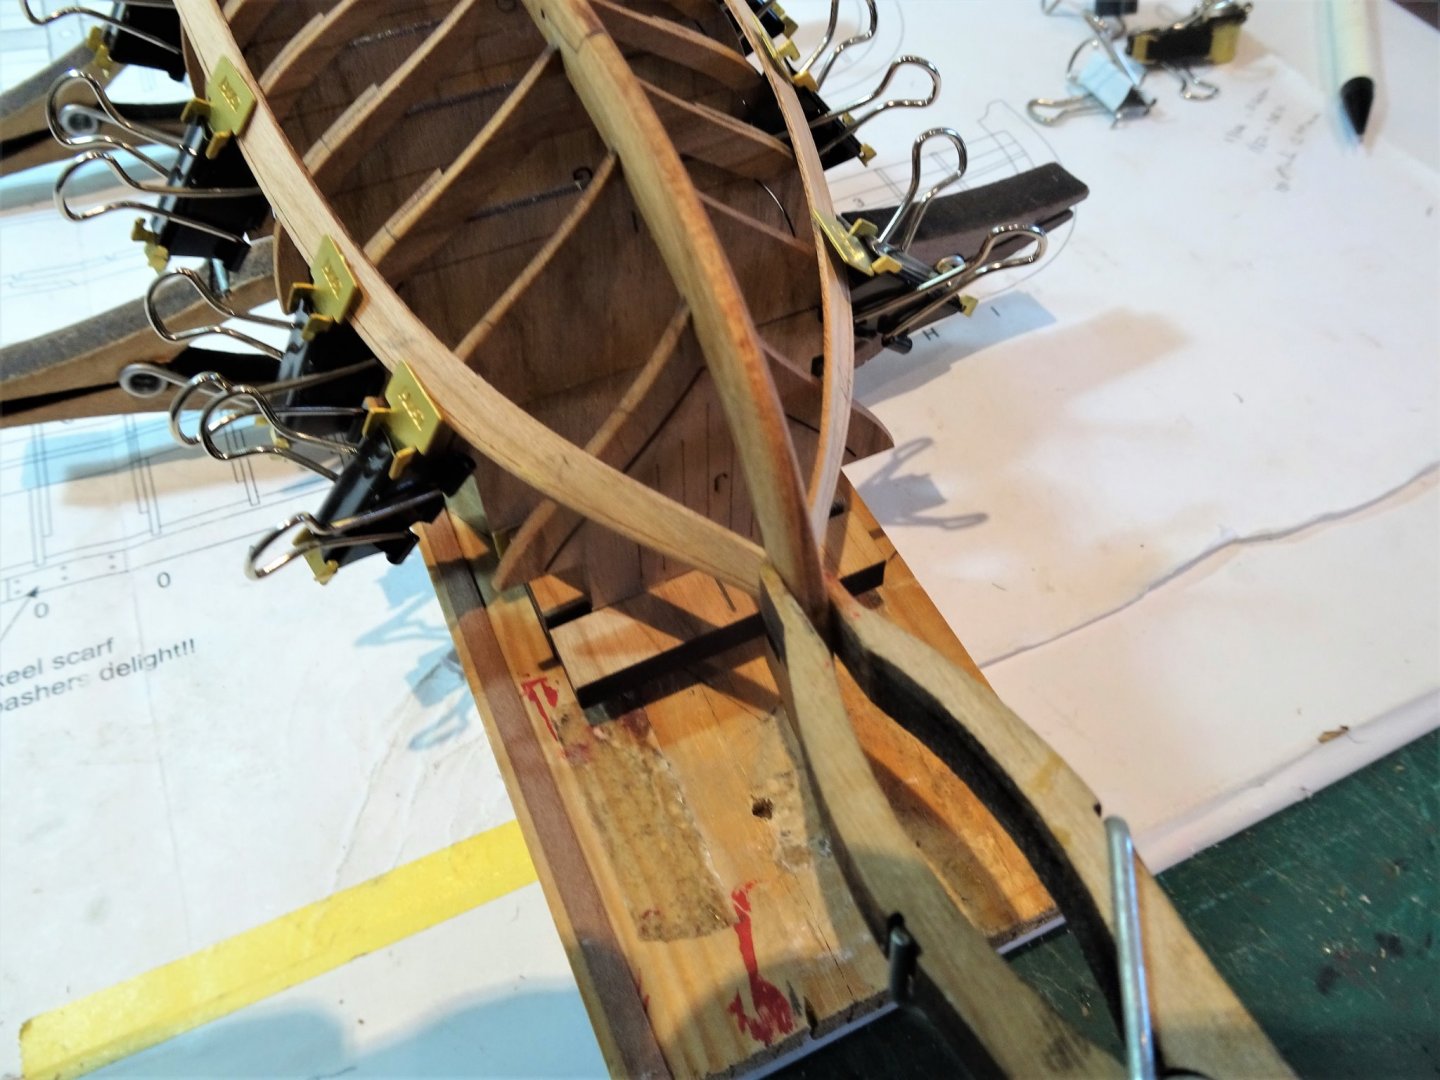
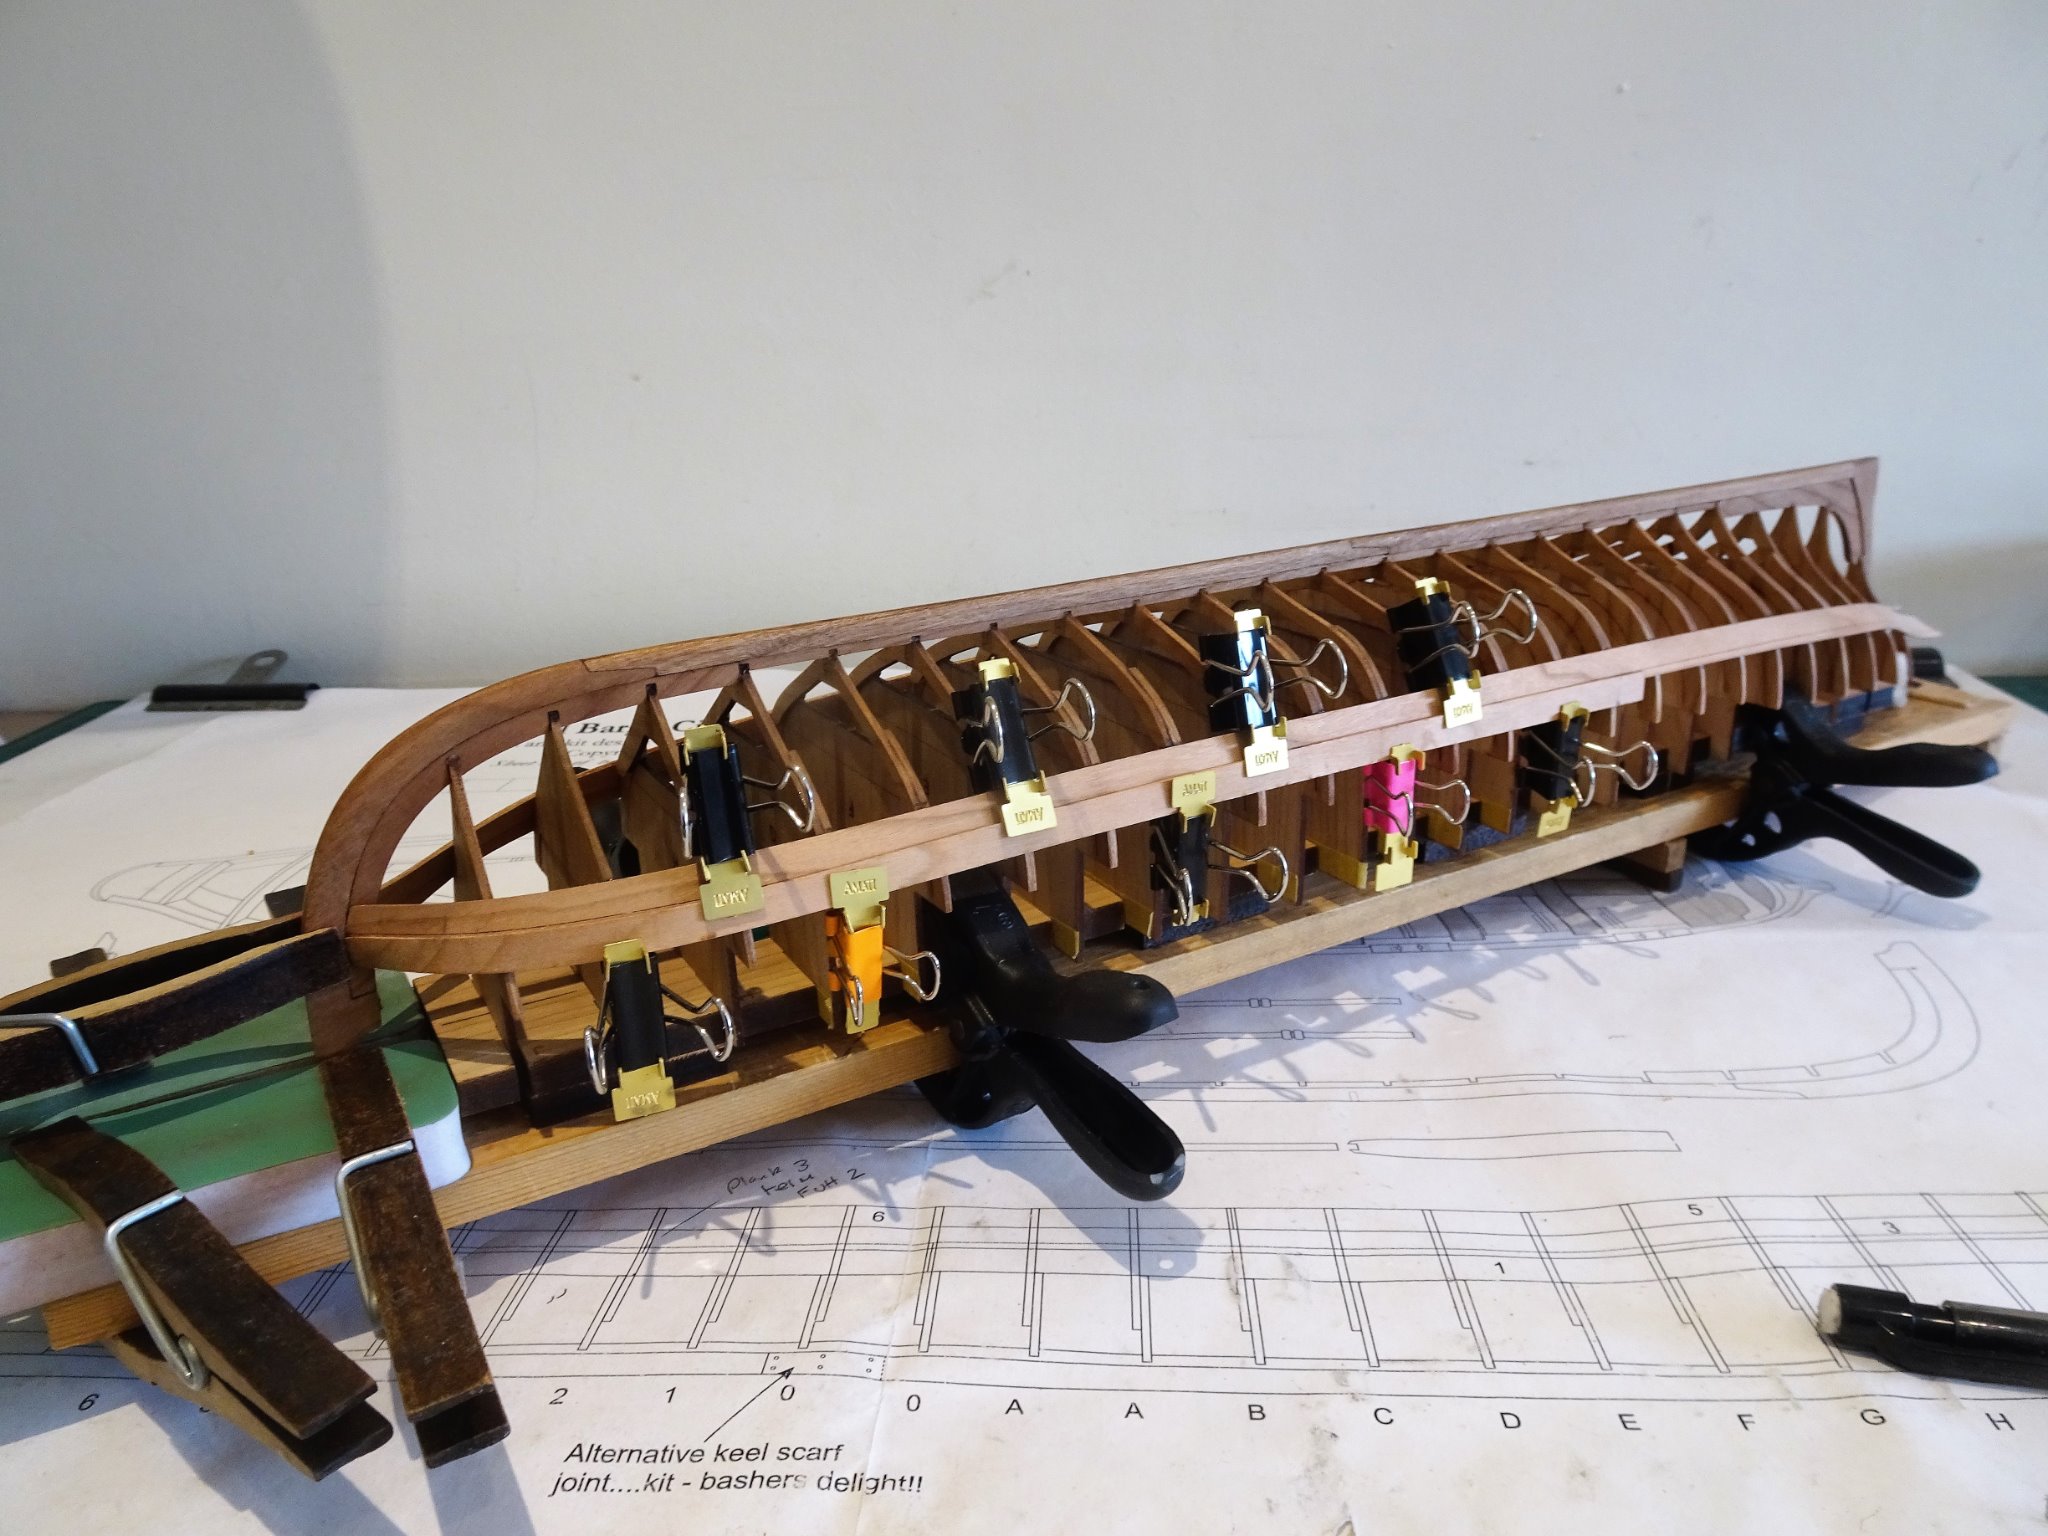
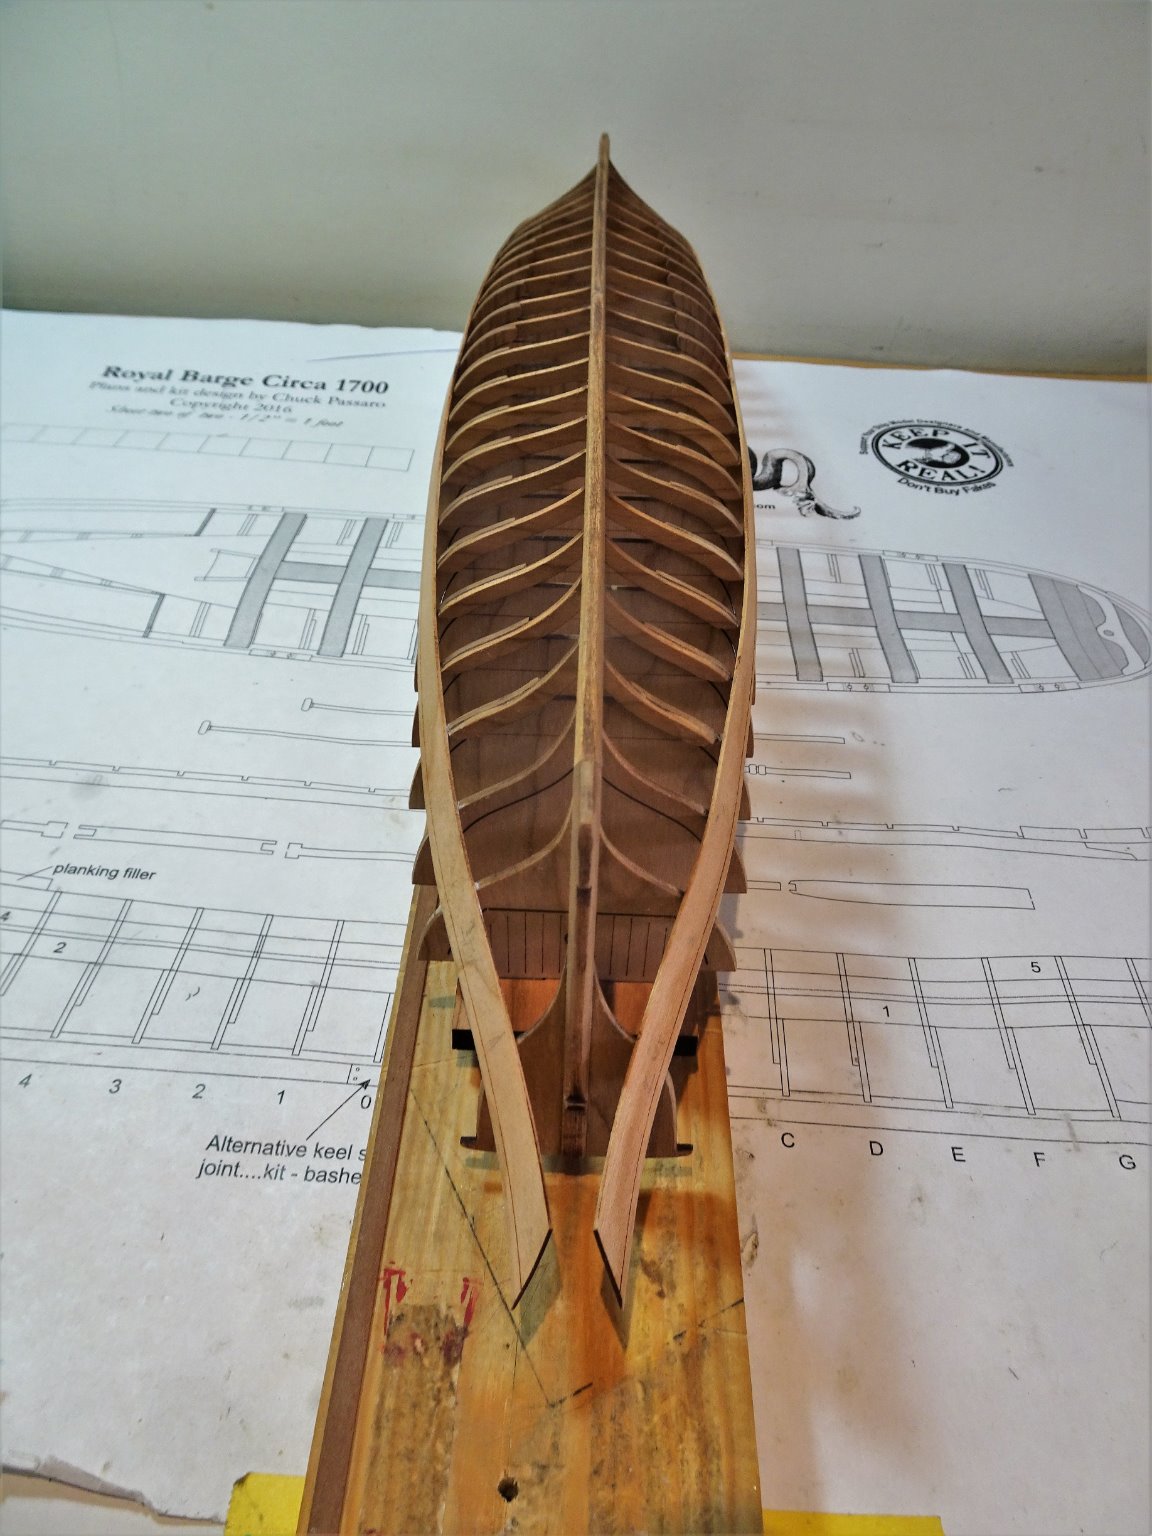
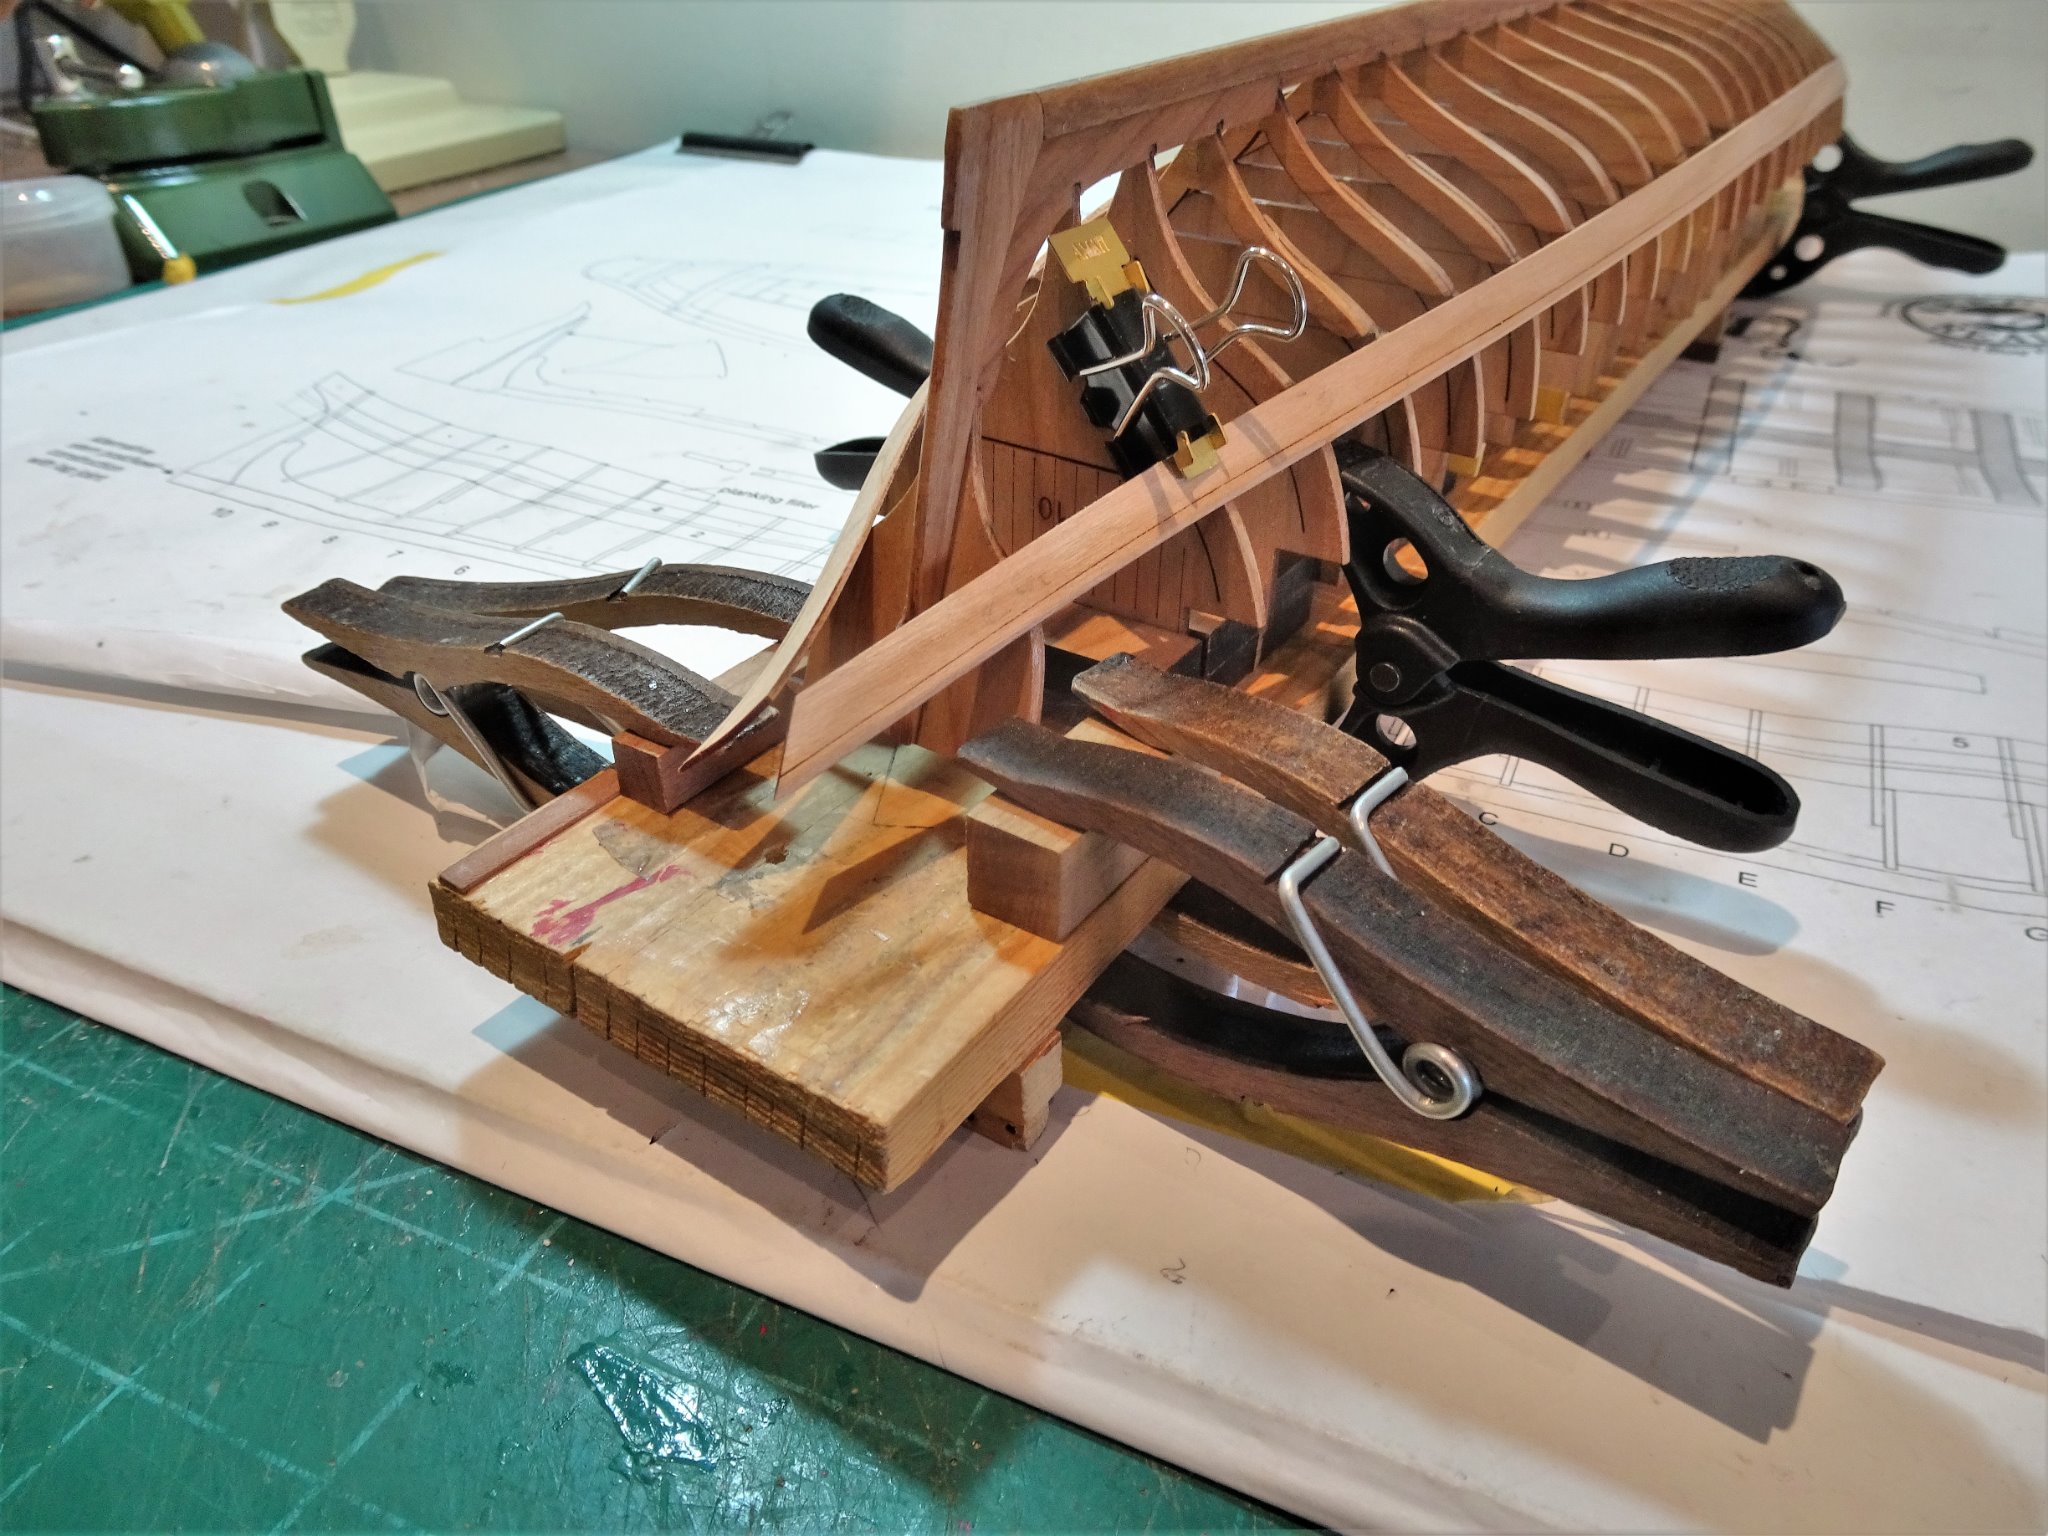
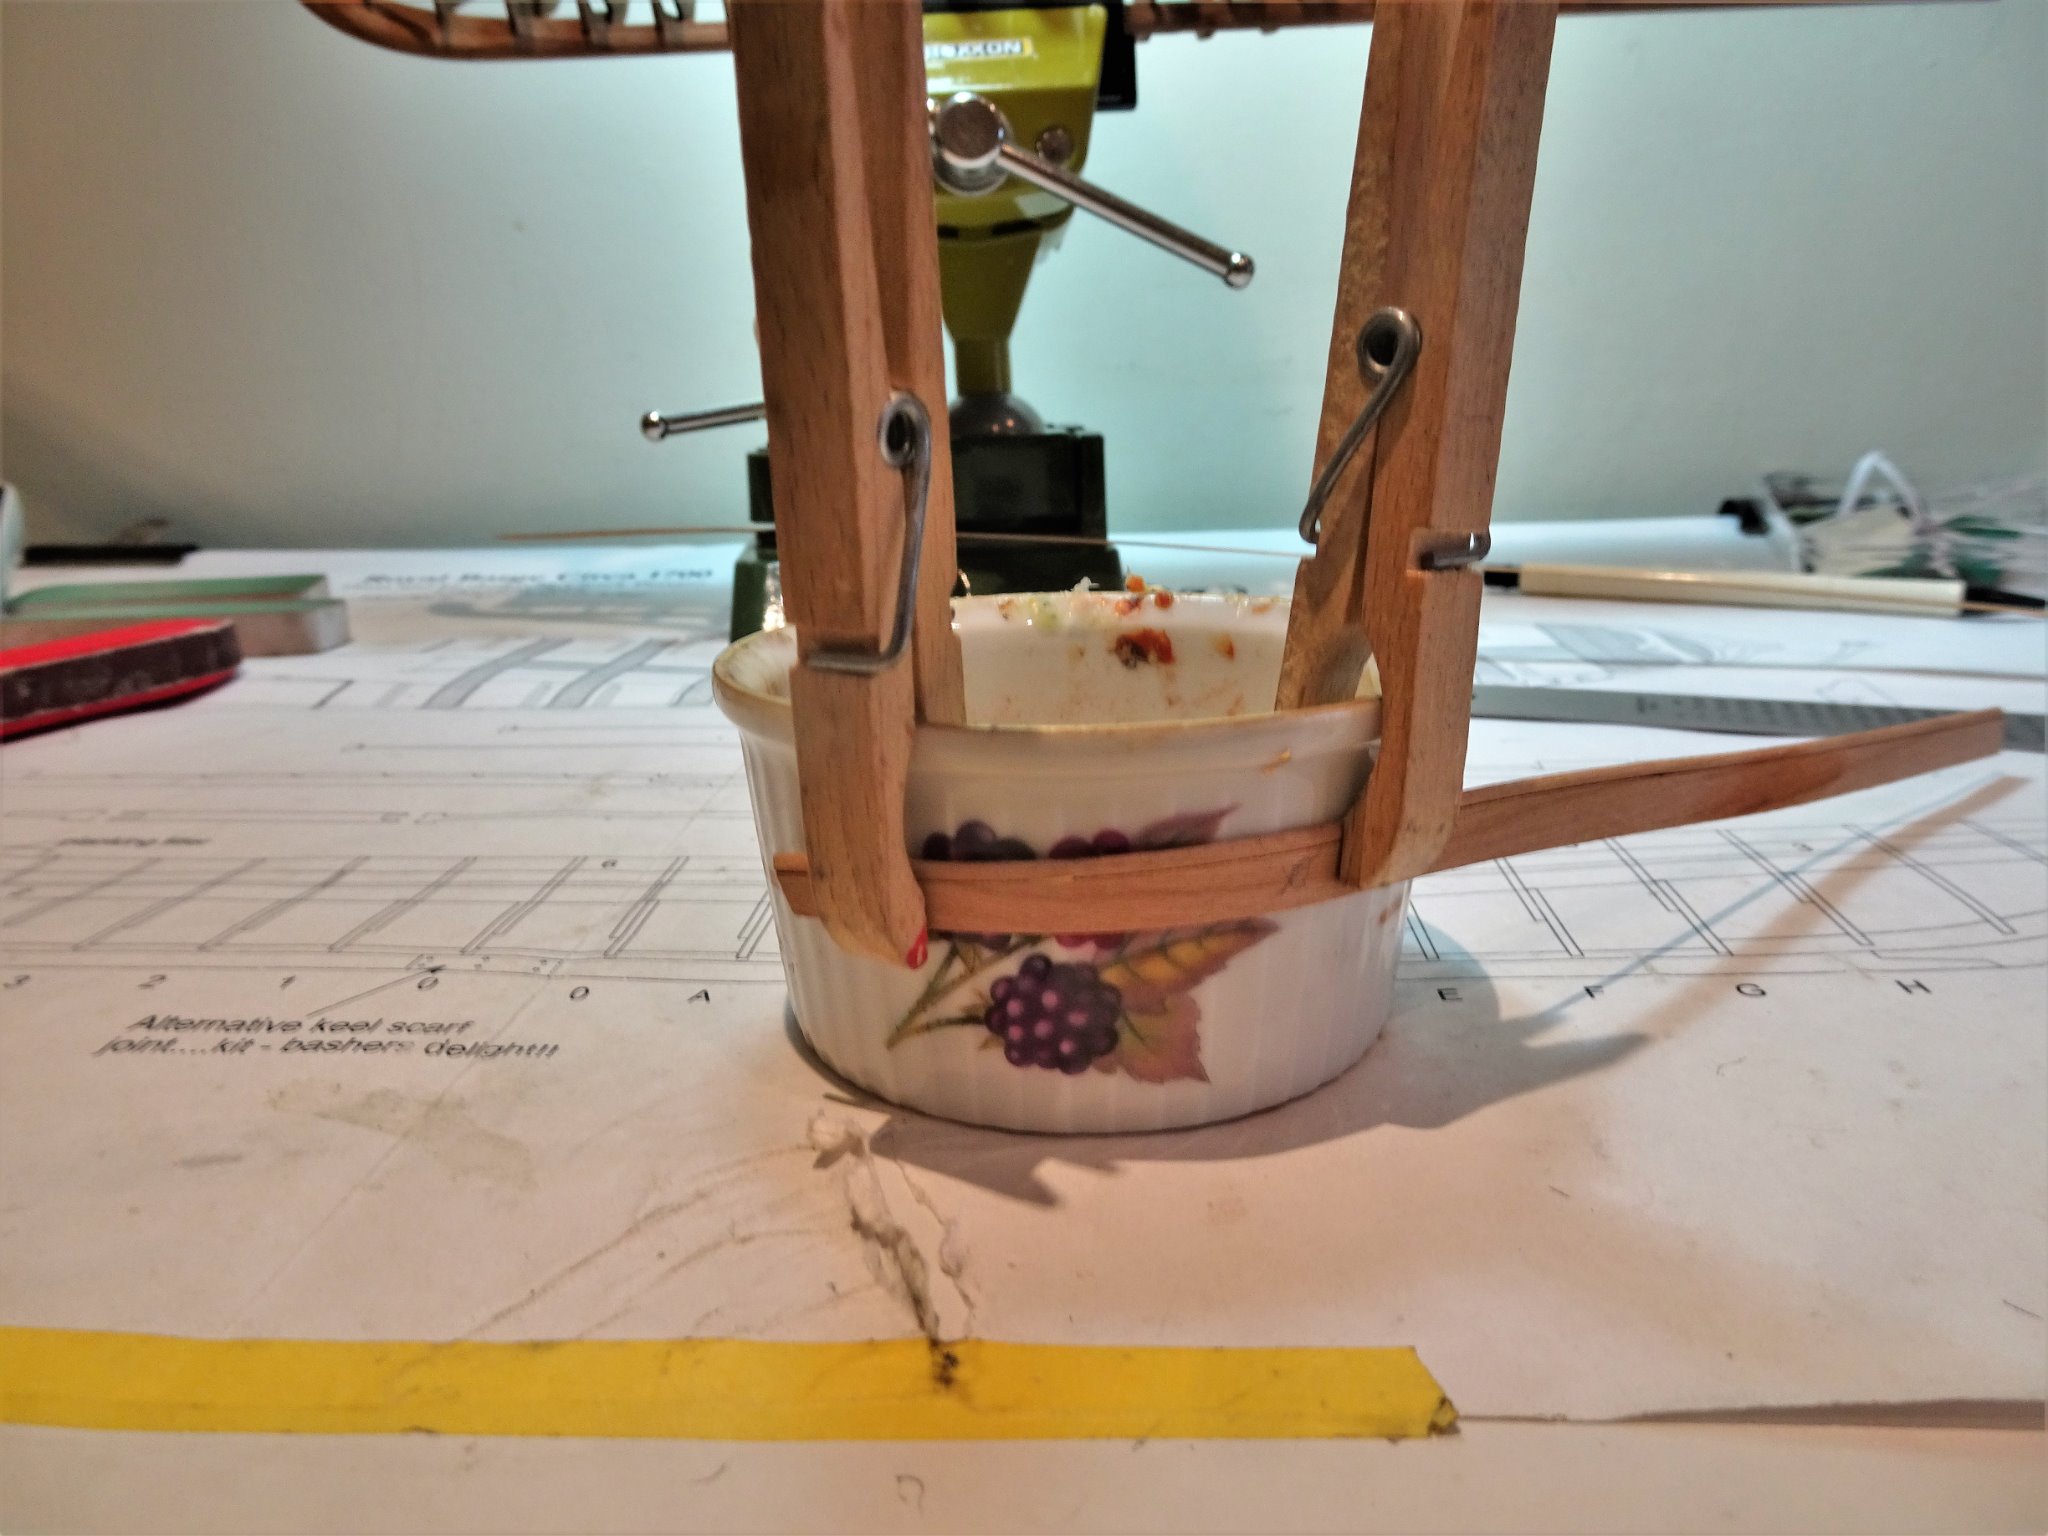
Post Nine Fitting planks 3 and 4 This is where the clinker comes into play. Port and Starboard can get a little confusing when it comes to these pre spiled planks. What initially looks like the outboard face of Plank 3 on the fret is in fact the inboard face. When working with the hull inverted I have to remind my addled old brain that Port is on the right and Starboard on the left. Having bevelled the inward face of plank 3, the corresponding bevel of plank 1 is carefully pared down at the bow to allow plank 3 to fit into the stem rabbet with a feather edge. I find the 2mm Swann-Morton chisel blade perfect for this. 1071 The plank is water/heat treated to form the bend around the bow, and a small amount of lateral twist is imparted to the end of the plank to allow it to sit flush against the stem rabbet. 1069 With the plank temporarily in place the aft end can be marked for trimming on Futtock 2. As with the first planks I prepare both sides before any glue is applied. The Portside plank went on without trouble using ca, but I keep a small pot of acetone at hand to clean off any overspill on the face of the plank. The main concern now is to ensure that the opposite side plank has a uniform meet at the bow rabbet. 1073 For this reason and to give me a little tweak time I used pva for the rabbet join and the first two Futtocks. This allowed me to sight along the bow and make any minor adjustment before clamping in position. Use of ca would have precluded this. 1078(2) Light pressure is used and the model is set aside for the pva to cure. 1083 Plank three successfully (I hope) attached. I continued to use pva which worked out ok. 1084(2) It will stand a little more feathering into the bow but that can wait awhile. Onto Plank 4 Very little fiddling needs to be done, I did impart a little twist towards the end to allow the plank to lie flat without tension across Futtocks 9 and 10 and the Transom. 1100 At the sternpost I added a balsa support piece to brace the planking for gluing the extensions beyond the transom. 1106 The final plank 4 goes on without incident. 1113 1108 1111 At this point the clinker has yet to be feathered out at the stern. Onward and upwards to the sheer strake. B.E. 17/03/21

.thumb.JPG.184239cff6faac73f91d30e855bc5b51.JPG)
.thumb.JPG.ae40b33ceb38faea1d76546101052c8b.JPG)
- 185 replies
-
- 15
-
-
- queen anne barge
- Syren Ship Model Company
- (and 1 more)
-
Great artistry and innovation to produce this wonderful model Kirill, many congratulations on a project well done. Regards, B.E.
- 228 replies
-
- 5
-
-
- spanish galleon
- lee
- (and 1 more)
-
Hi Wood gnome, thanks for looking in. Yes, once the false deck was installed, which was cut around the bulkhead tops, the tops were cut down and covered by the the Margin Plank. The bulkheads do not correspond with 'frames' which on the kit are represented by the timberheads added later. The inside of the bulwarks were then lined. Hope you enjoy your Fly build. B.E.
-
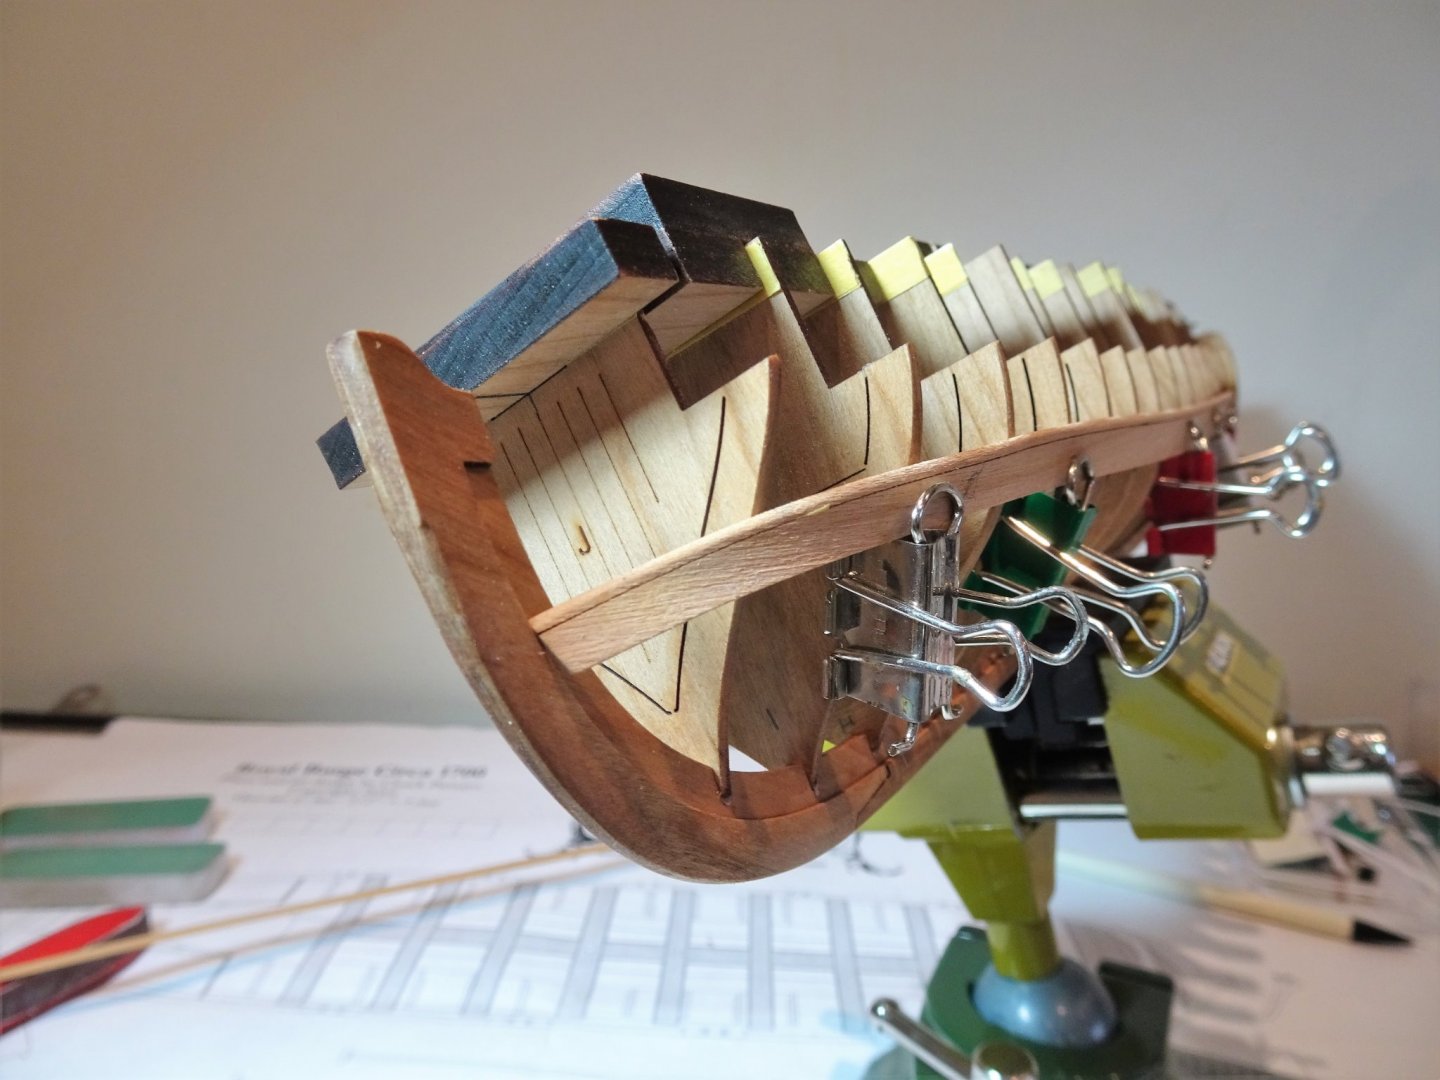
Hi Derek, I too have made my own like yours, but Amati have brought out this more formal set using a brass plate. I first saw them on one of James Hatch’s logs, they are called a clamp set (Item 7377) and contain 12 clamps. I still use my home made ones as well, but these are a useful addition to the clamping arsenal, and they don’t exert too much pressure, which is good when working on more delicate framing. If I want to exert slightly more pressure I bend the handle on the homemade version slightly inwards. Cheers, B.E.
- 185 replies
-
- 4
-

-
-
- queen anne barge
- Syren Ship Model Company
- (and 1 more)
-
As a picture Chuck, and all down to your great design features, and guidance. I'm feeling a little more relaxed now that the frames are secured by the planking. 👍 B.E.
- 185 replies
-
- 2
-
-
- queen anne barge
- Syren Ship Model Company
- (and 1 more)
-
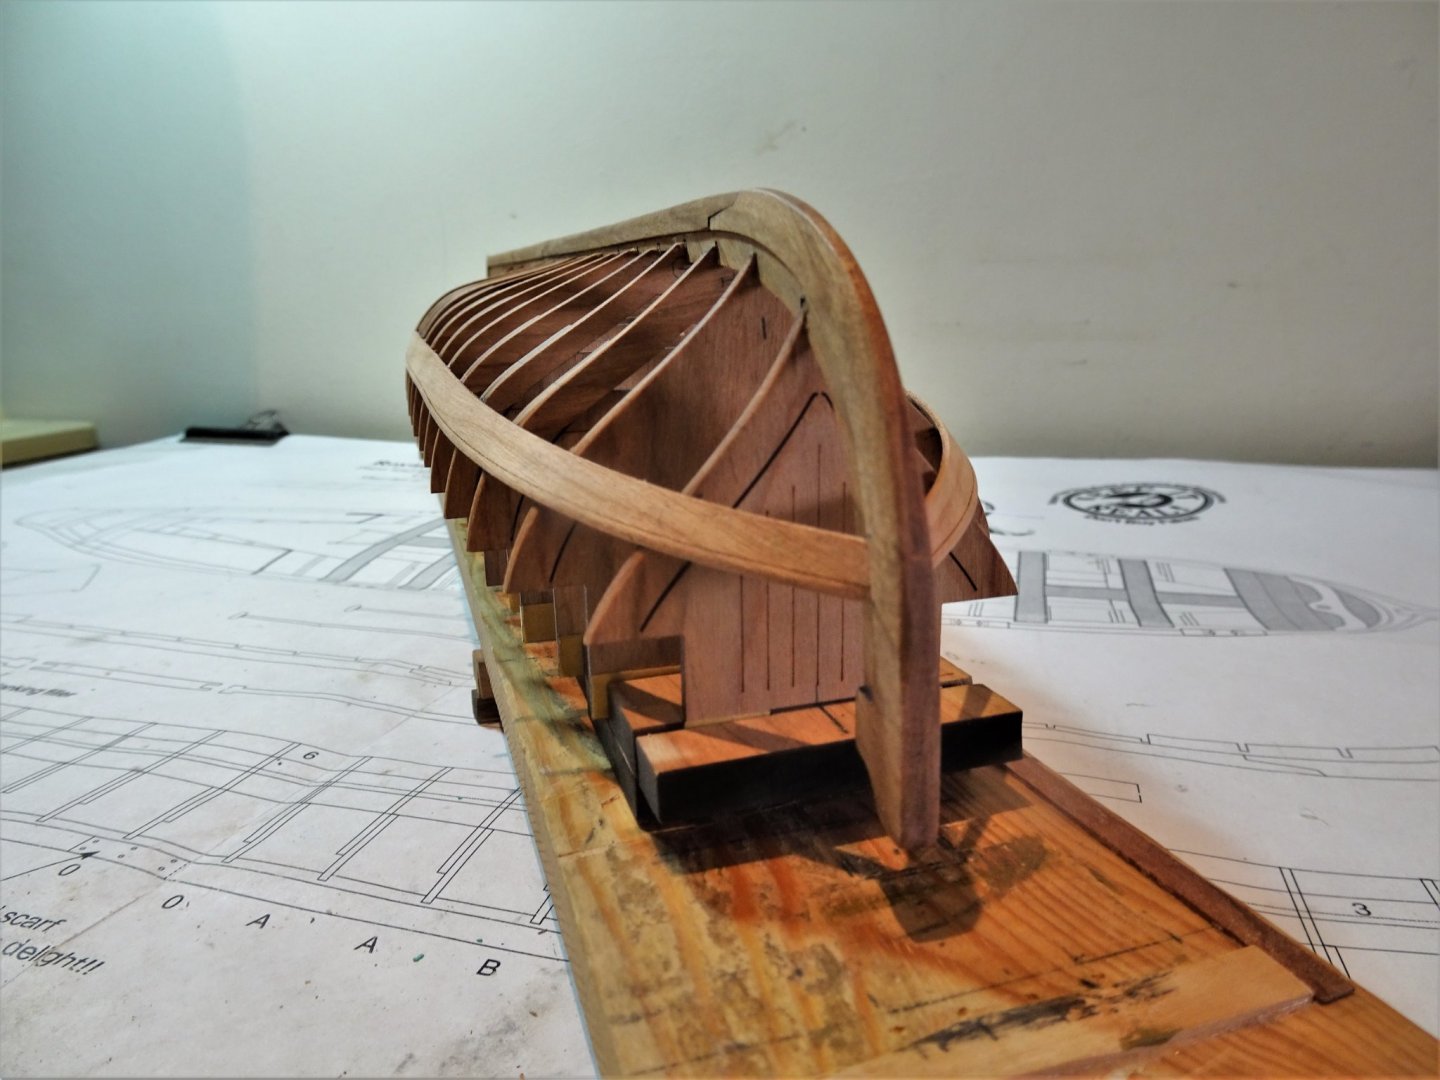
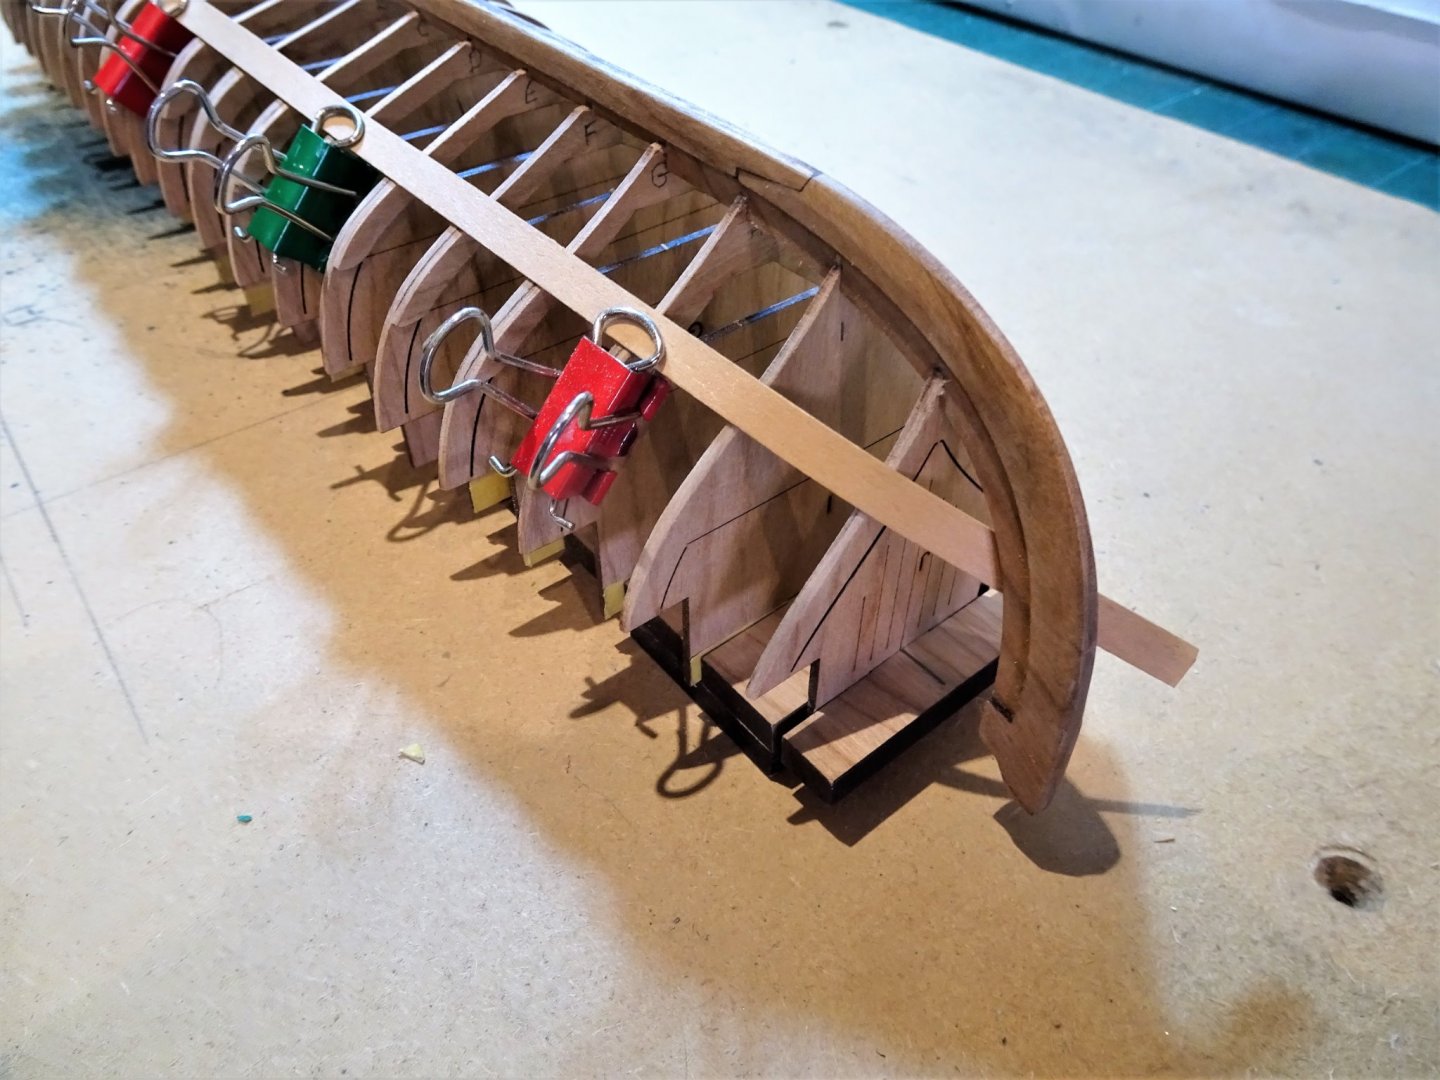
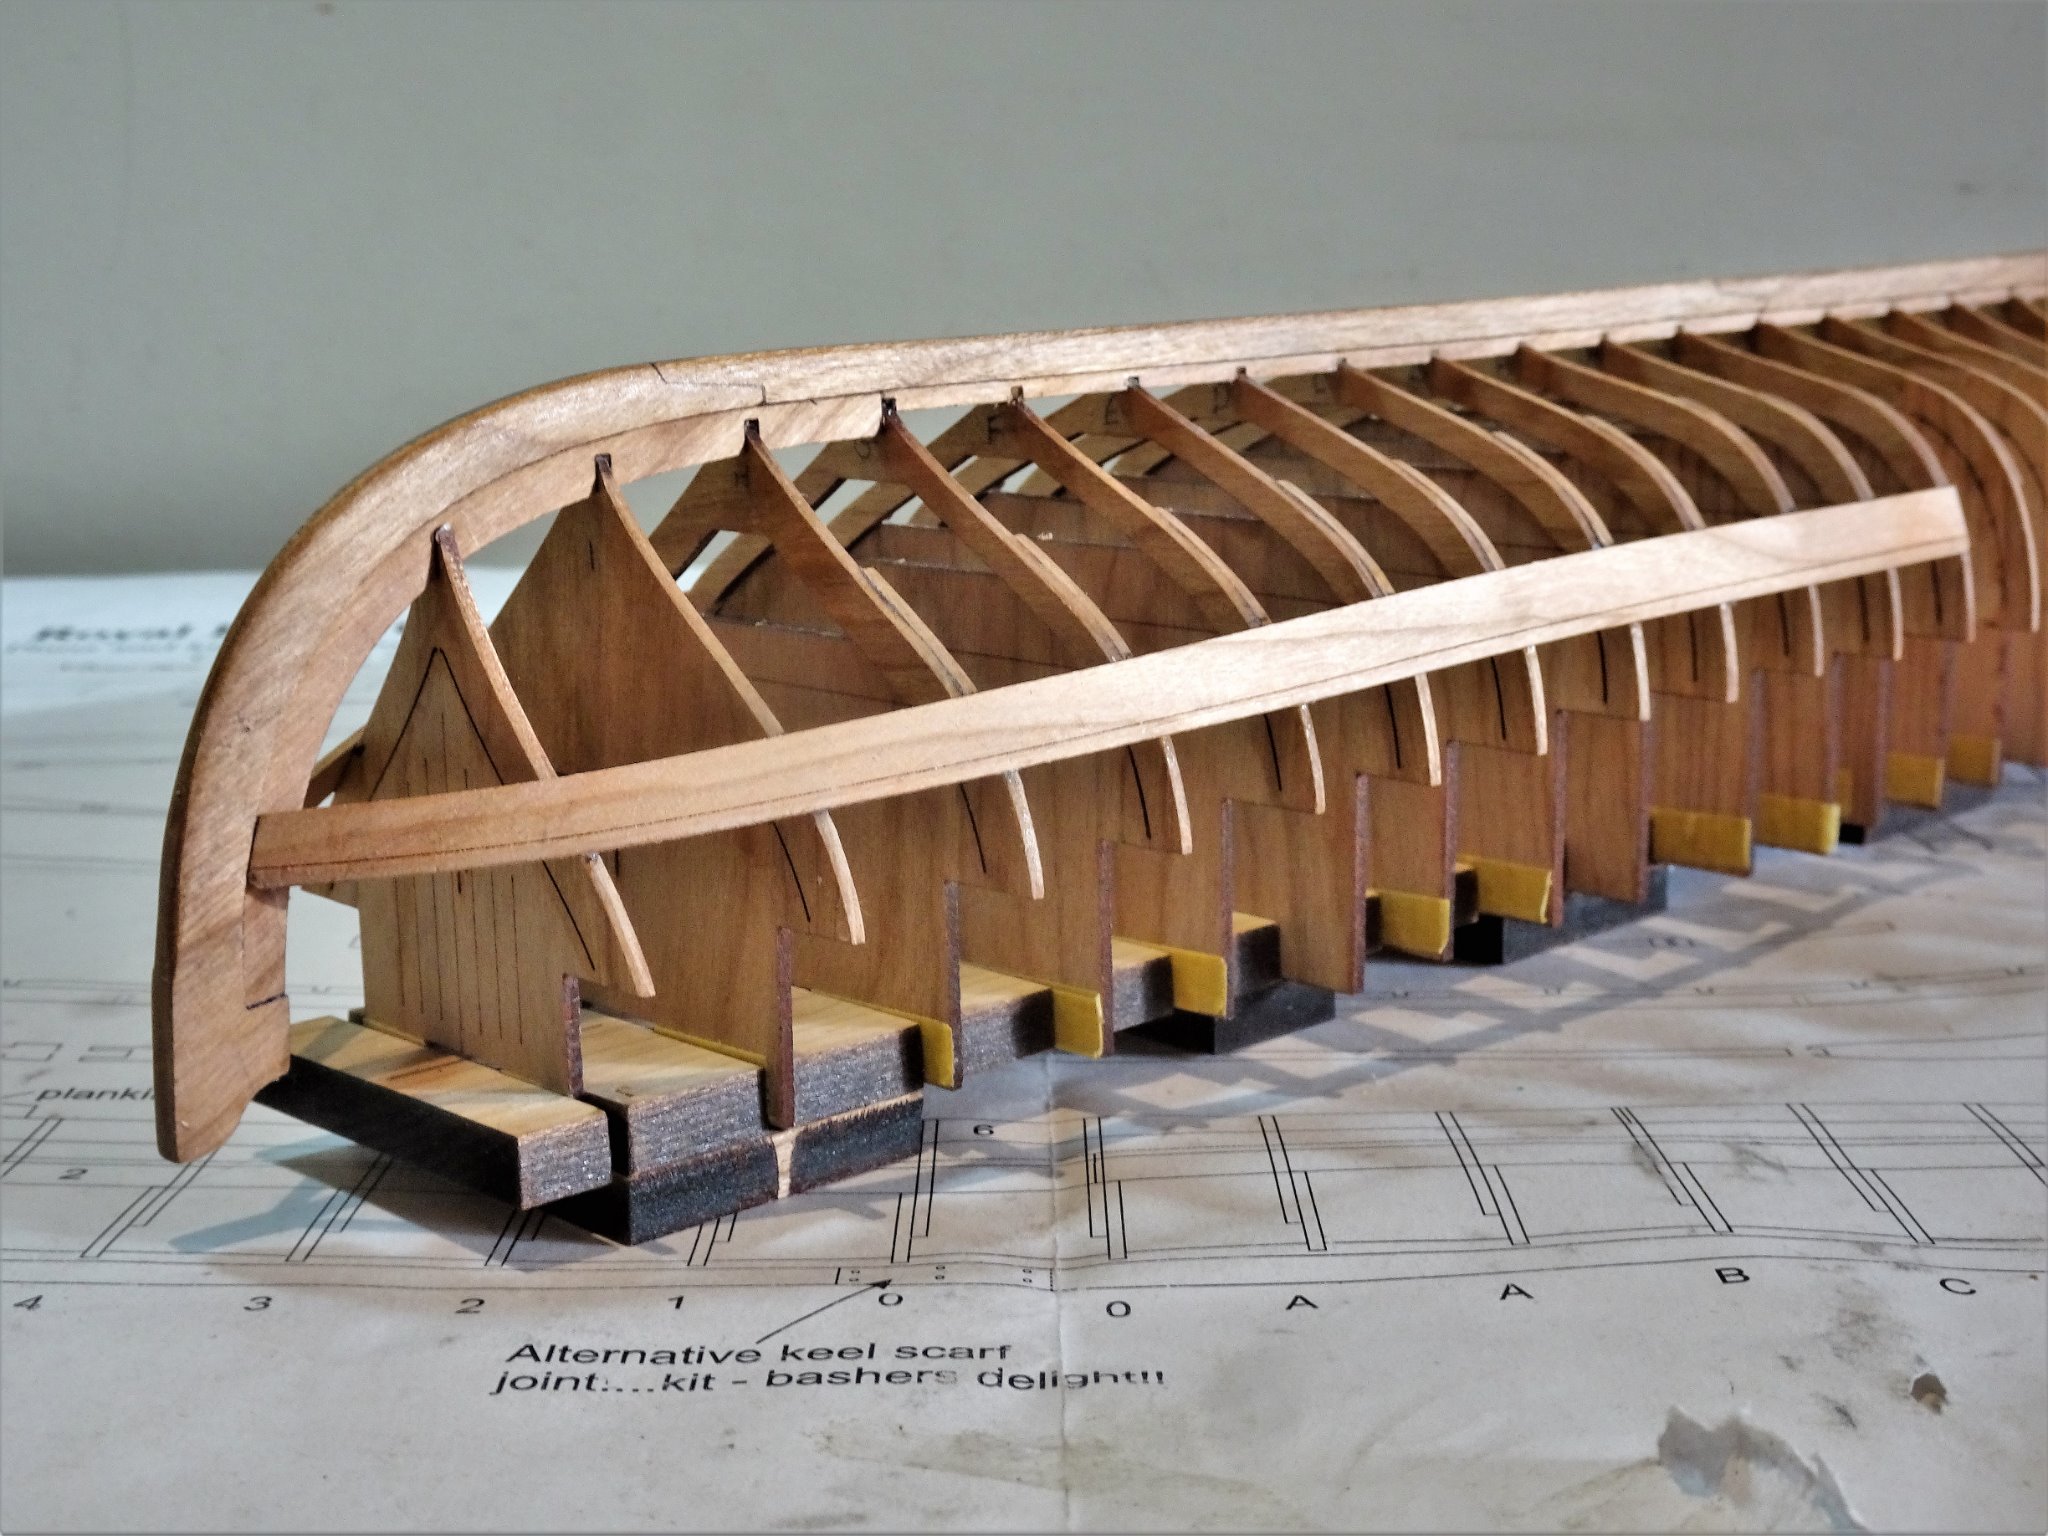
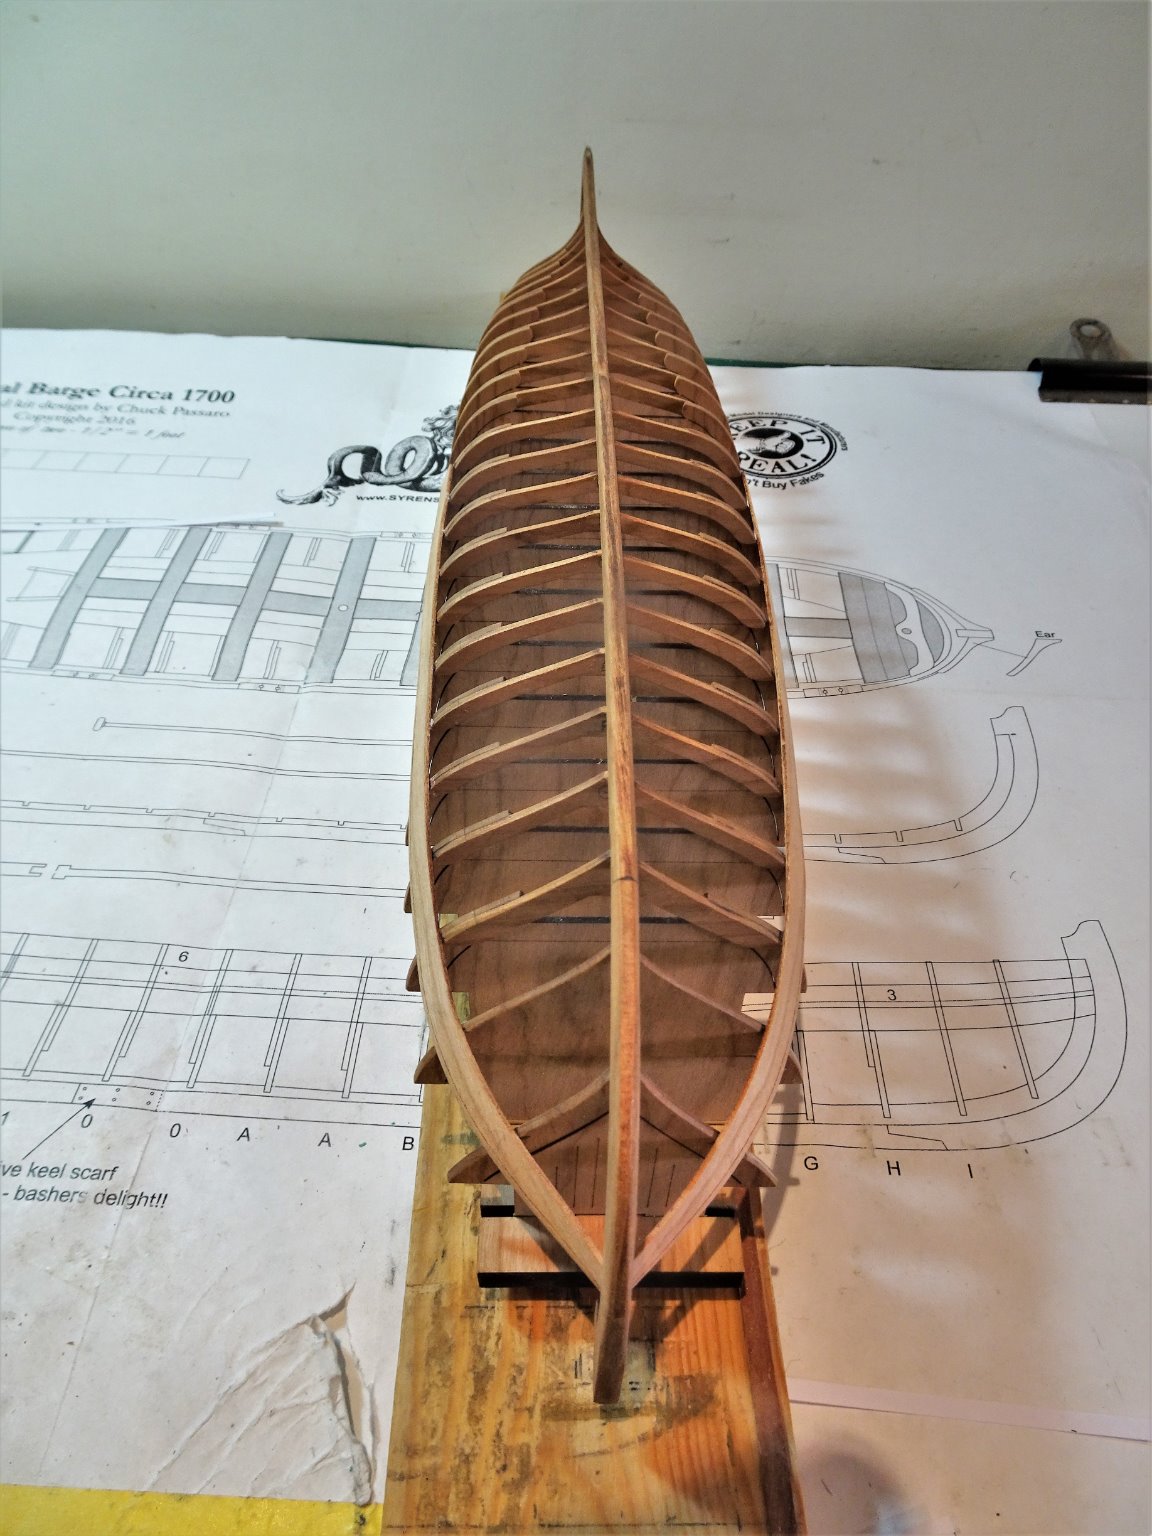
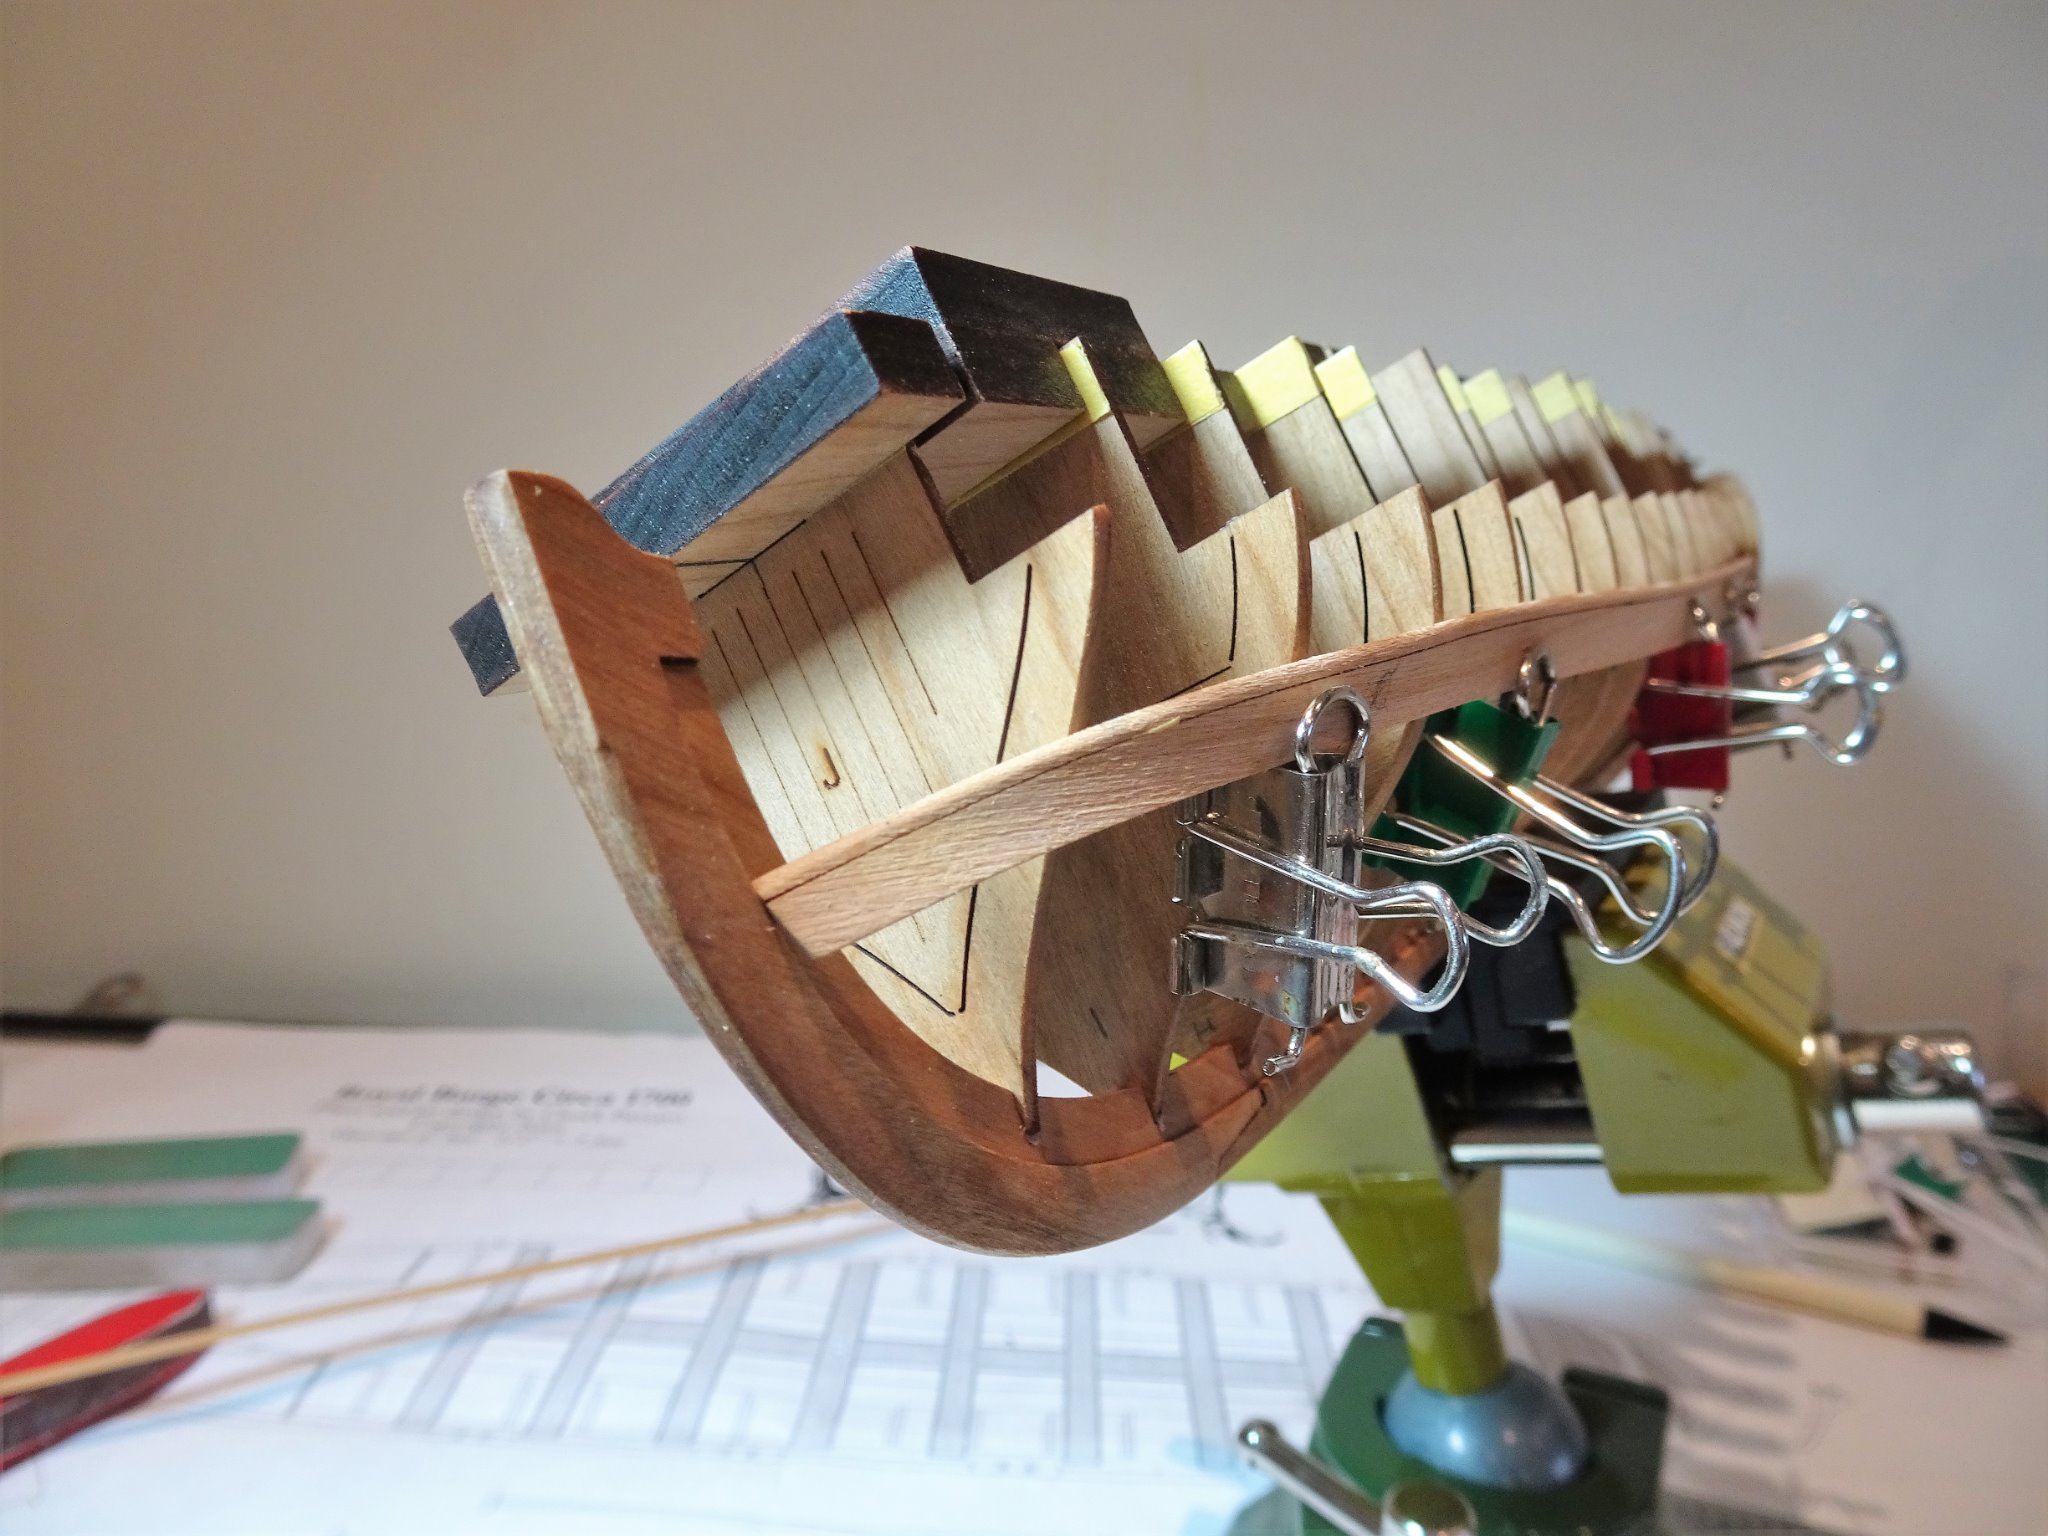
Post Eight Progressing the planking strakes. I begin with the Starboard aft first strake which is a simpler arrangement than the bow section. 1024(2) Dry fitting the aft plank. I imparted a shallow bend to assist the plank to lie flat across Futtocks 8 and 9, followed by a shallow outward bend between Futtocks 10 and the transom. This is to create a concave sweep running into the Flying Transom. 1025 This photo shows the concave curve that will run to connect with the Flying Transom. 1027 As with the stem, a support block is temporarily fixed to the board to support the Transom and counter any lateral pressure when gluing. At this point I haven’t glued the aft plank to the transom, I will do that once the second (Portside) plank is fixed, and I can tweak the set up with both in place. 1030 Aft piece shape. 1051 The Transom is held steady for the gluing. 1050(2) 1036 1048(2) 1063(2) A small block of balsa is used to support and protect the transom. B.E. 13/03/21
.thumb.JPG.247632b19b7d8f6cb1abd3d370e41662.JPG)

.thumb.JPG.30ed9cbb5cac1c46846c74c74c6538b4.JPG)
.thumb.JPG.bdea1976ee77066eb5dd29c5ed577168.JPG)

.thumb.JPG.386e2c89e471f41b524a5f74a5372b19.JPG)
- 185 replies
-
- 20
-
-
- queen anne barge
- Syren Ship Model Company
- (and 1 more)
-
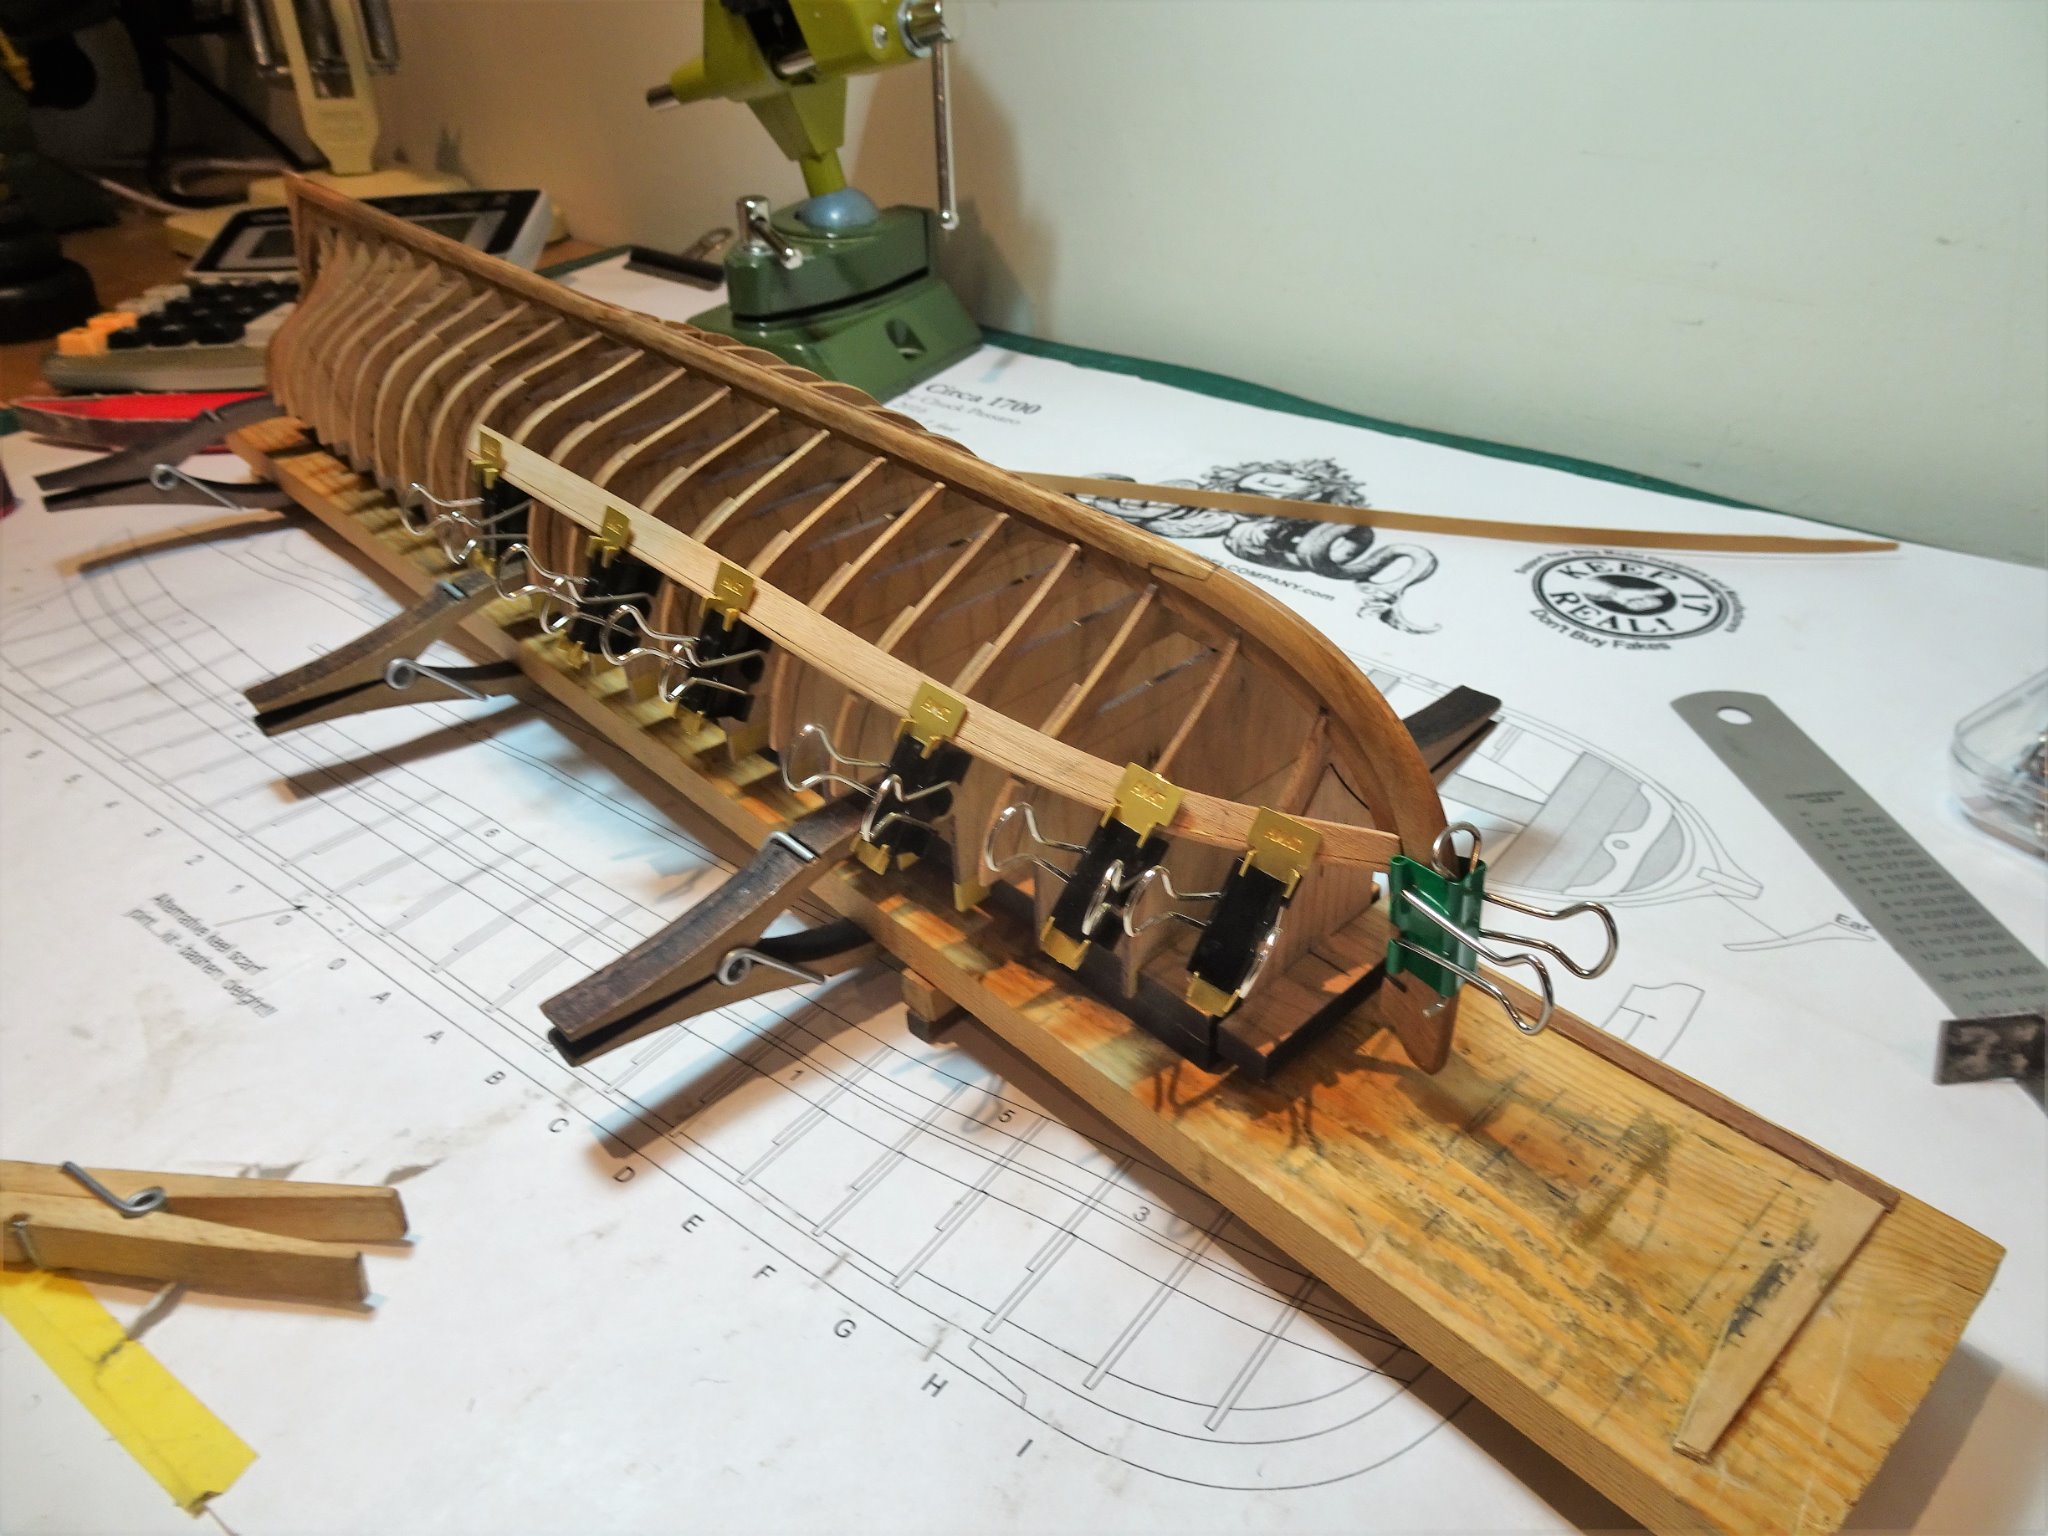
Thanks Rusty, sometimes that ‘handle’ feels a little fragile, this is a build that surely concentrates the mind, but enjoyable all the same. Post Seven First fixings I have spent most of yesterday faffing around with the first planks. The final tasks before gluing is to bevel the plank for the bow /rabbet fit and trim the plank to terminate at the forward Futtock ‘O’. The Portside plank went on fairly easily, but the Starboard version not so. To my increasing frustration the ca initially refused to grab on several of the Futtocks. The bow strake/rabbet connection was particularly stubborn and in the end I left it until last and used pva which allowed me to tweak the level to match the Portside. 0991 There is an element of flexibility in the as yet unsupported stem, and it really needs holding in the vertical line whilst the first plank is applied. 1013 1012(2) 1007 1001(2) 0993 0996 1018(2) 1009(2) I am satisfied with the outcome, and not a little relieved that this first critical task is completed. B.E. 12/03/21

.thumb.JPG.d254b03503115cc3e0be42e4431a6c0d.JPG)

.thumb.JPG.592d84e75d70298b0dde6ee98d7cd8c2.JPG)
.thumb.JPG.f7adbf6474856d3a069649b45fc89bfc.JPG)
.thumb.JPG.f52b2b6c255cc72254c86778d4624267.JPG)
- 185 replies
-
- 14
-
-
- queen anne barge
- Syren Ship Model Company
- (and 1 more)
-
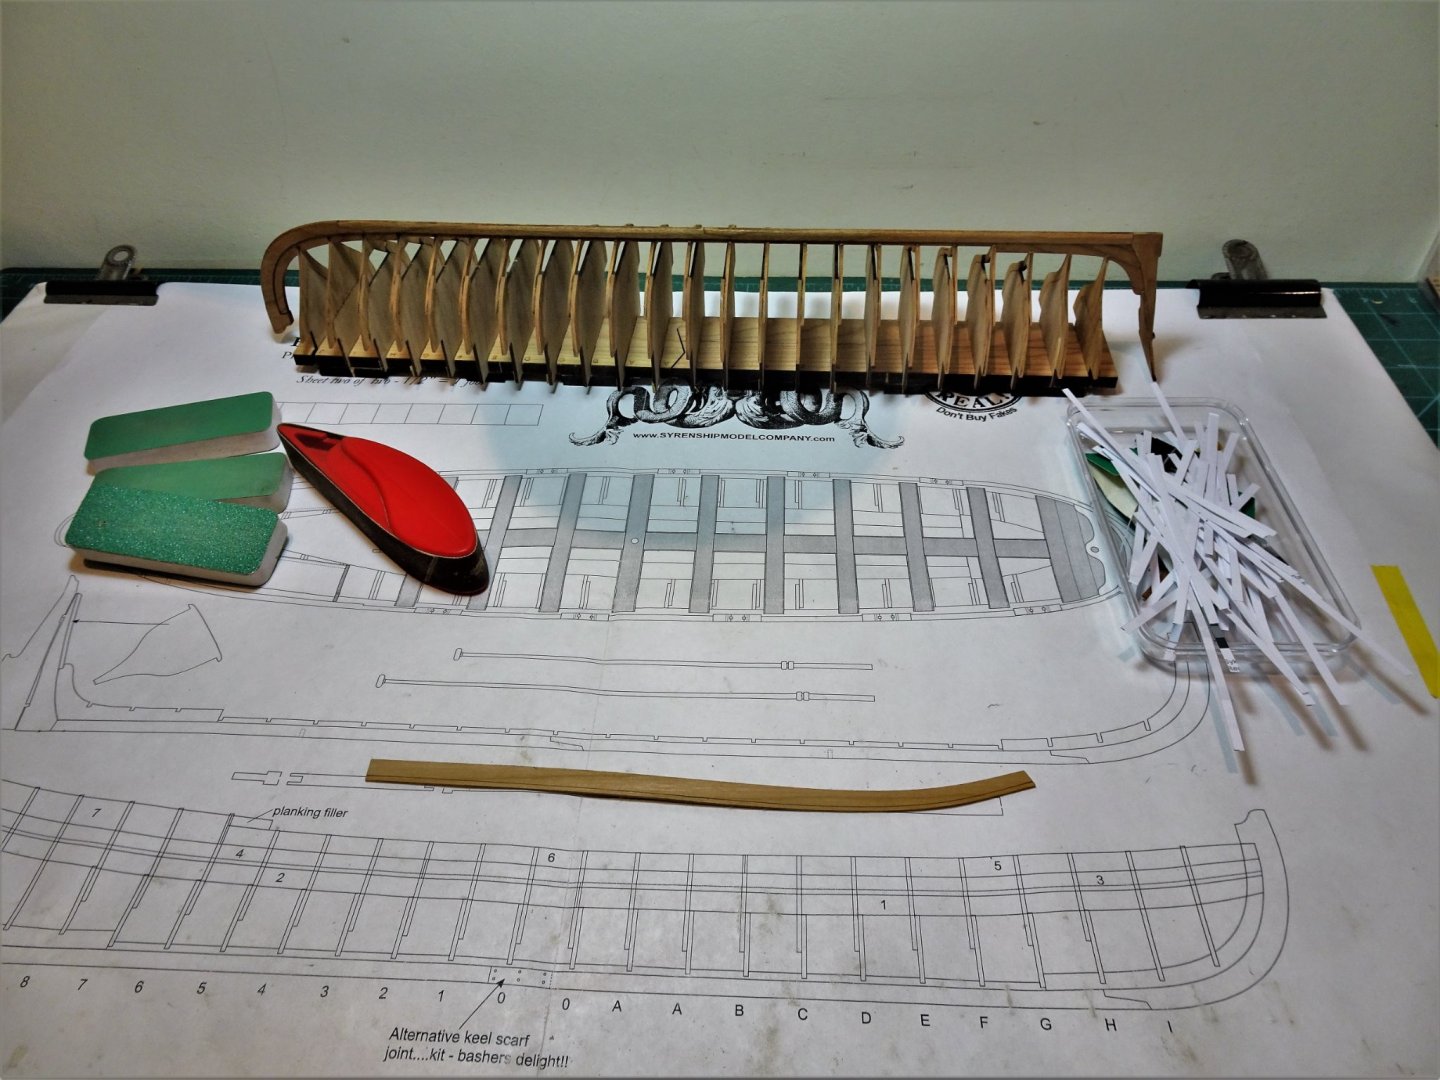
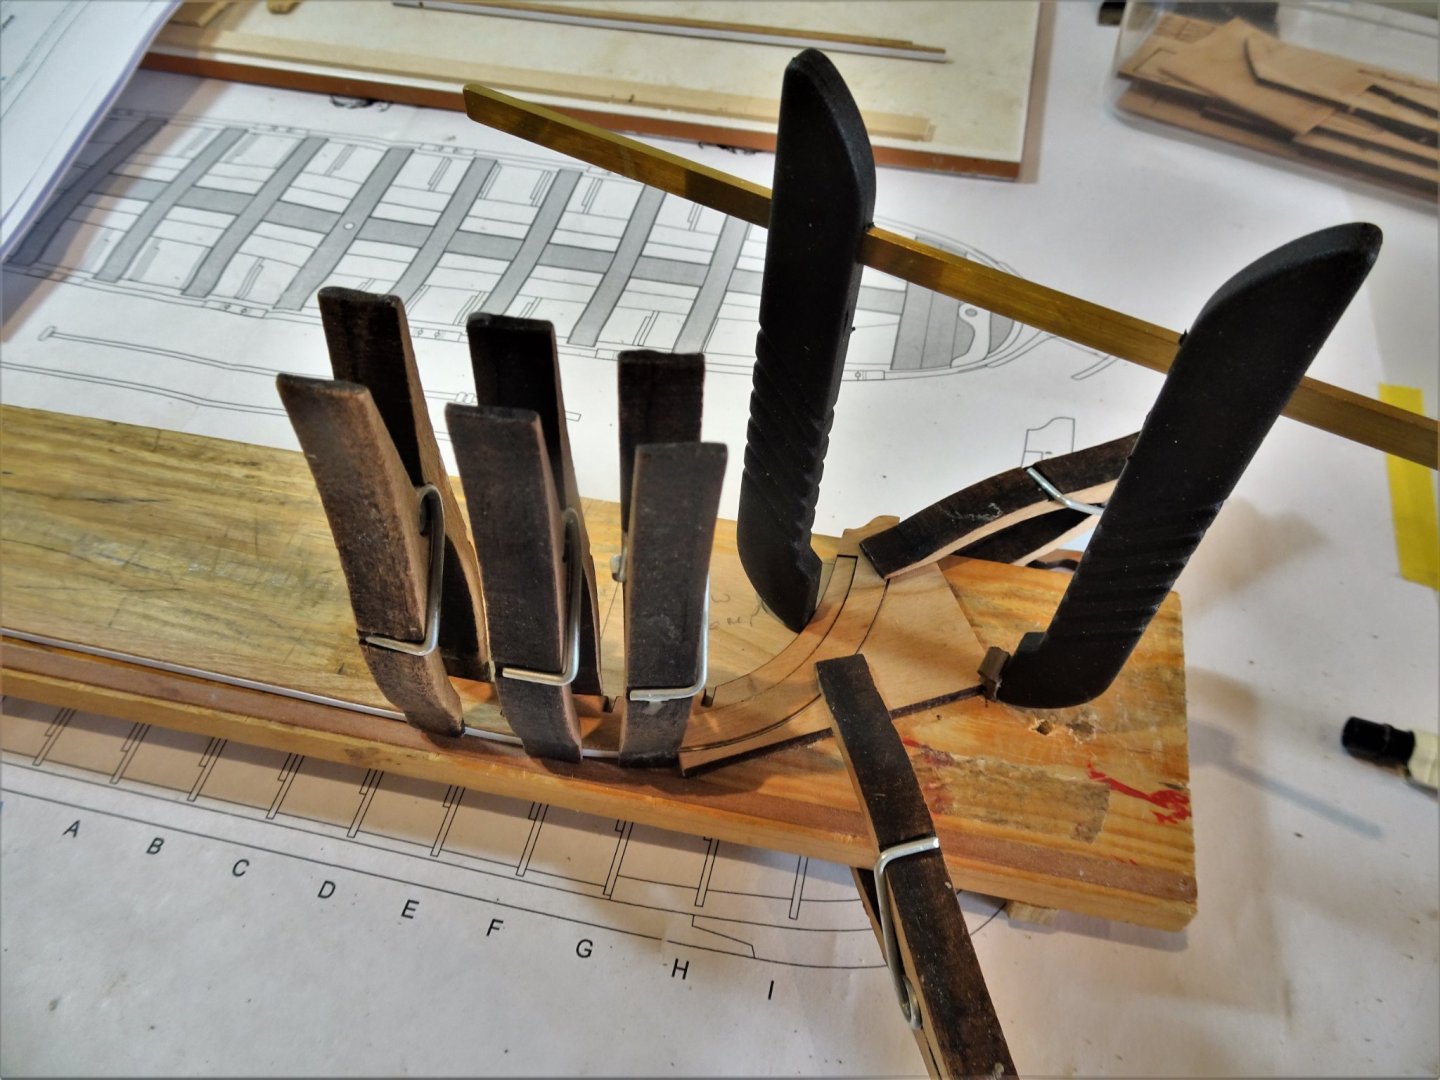
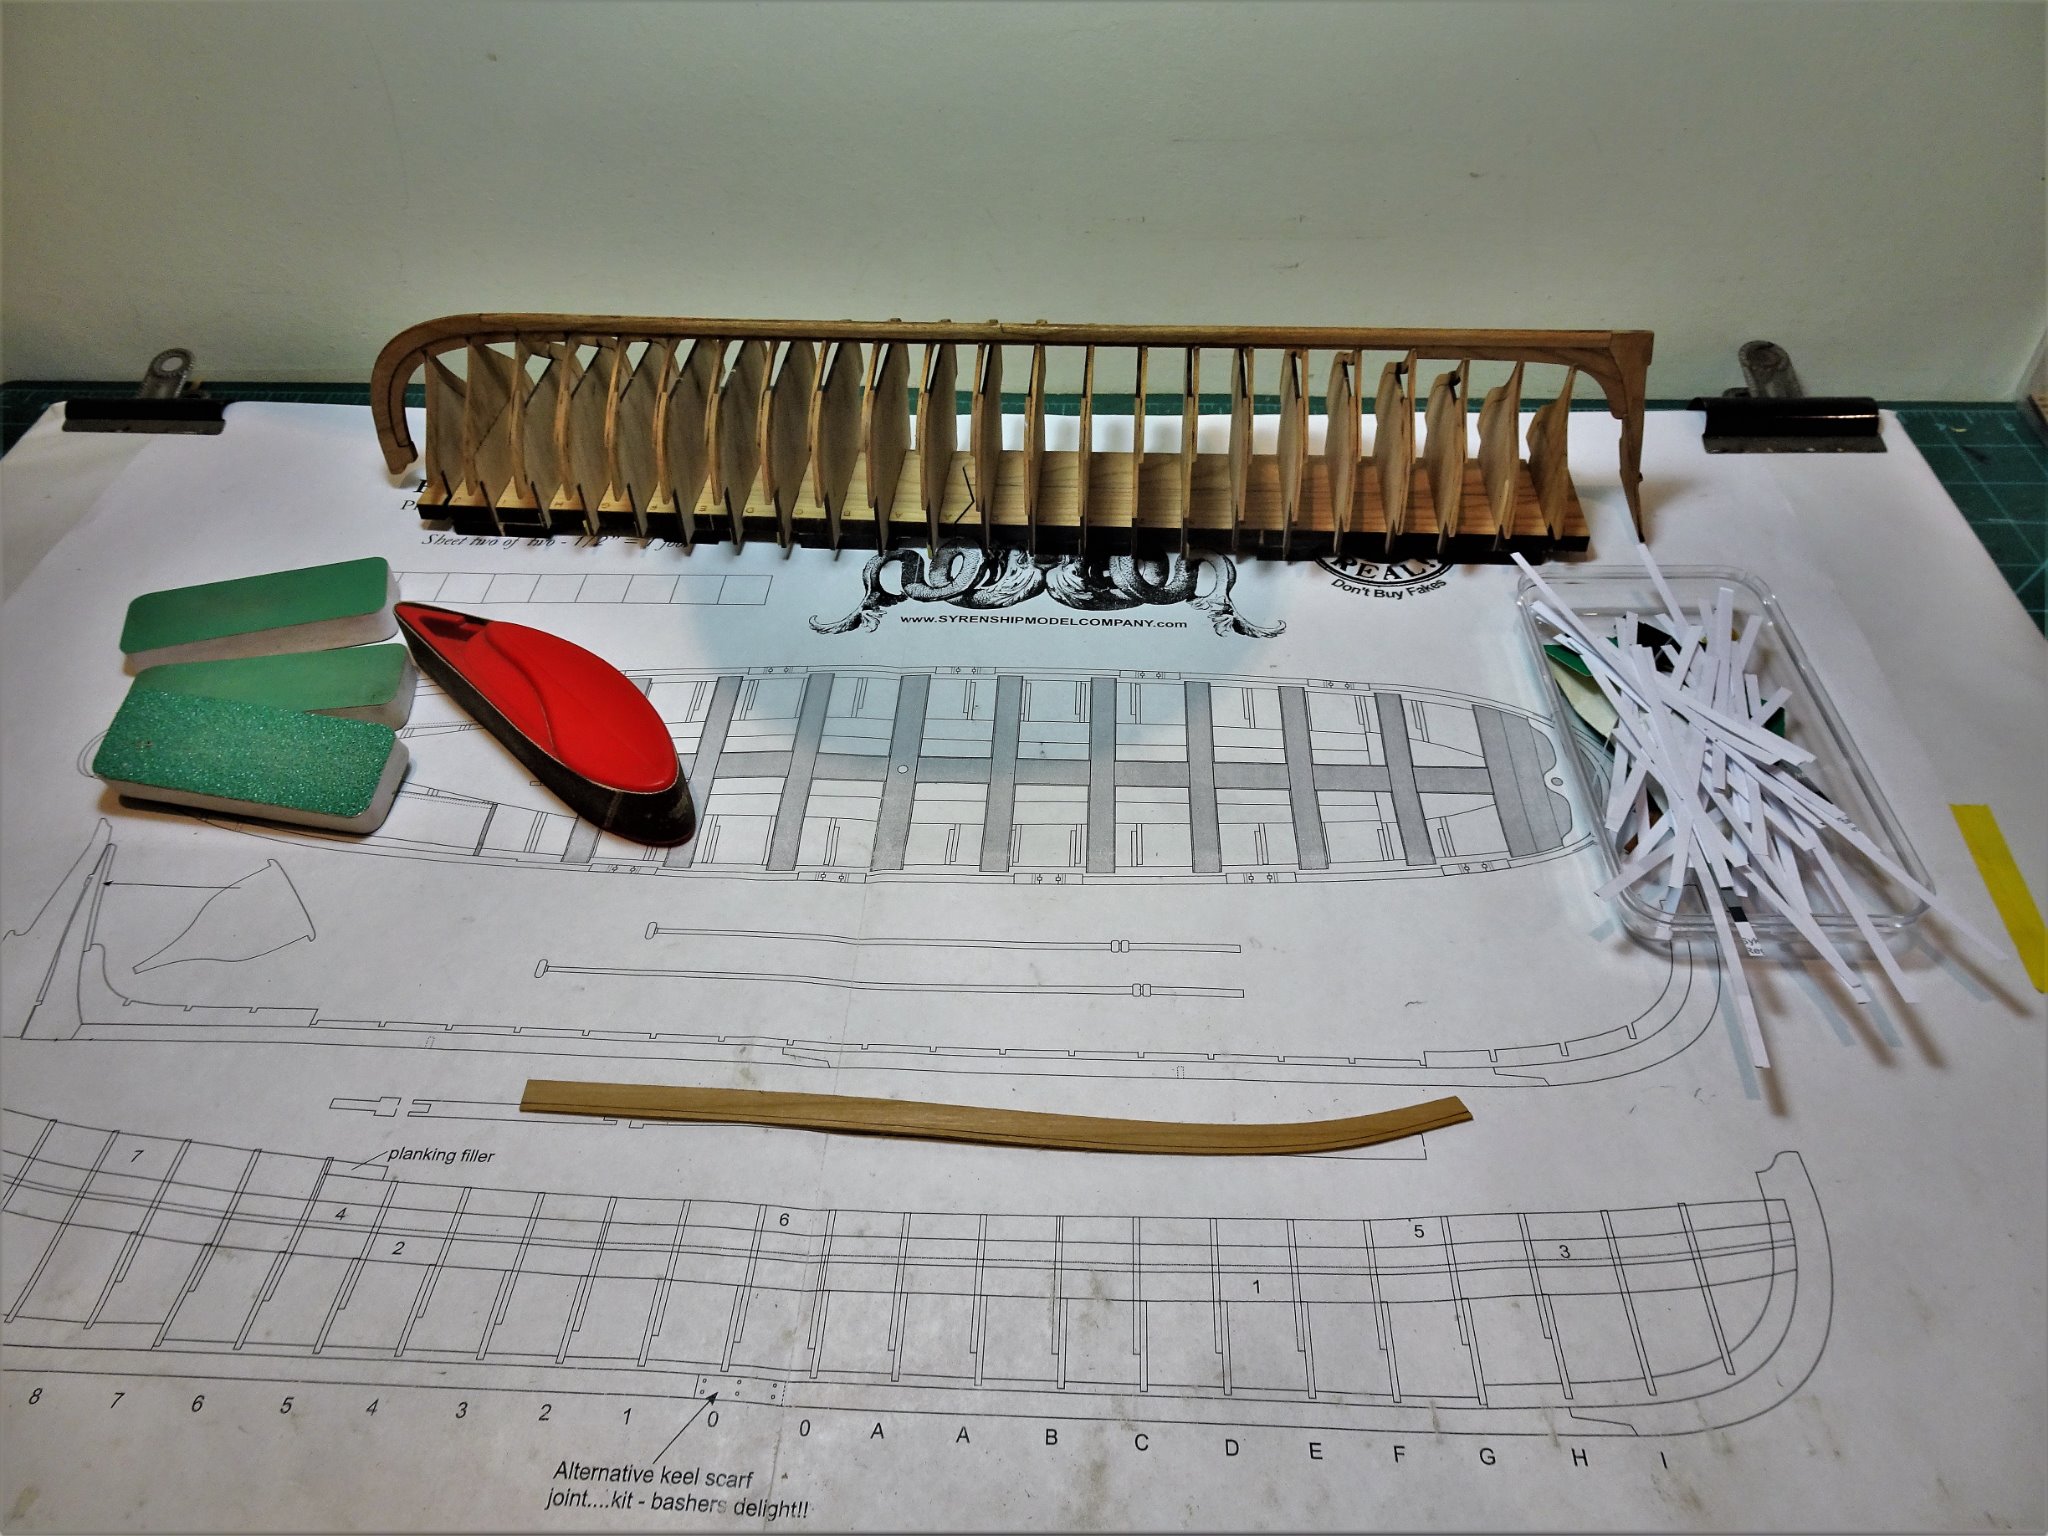
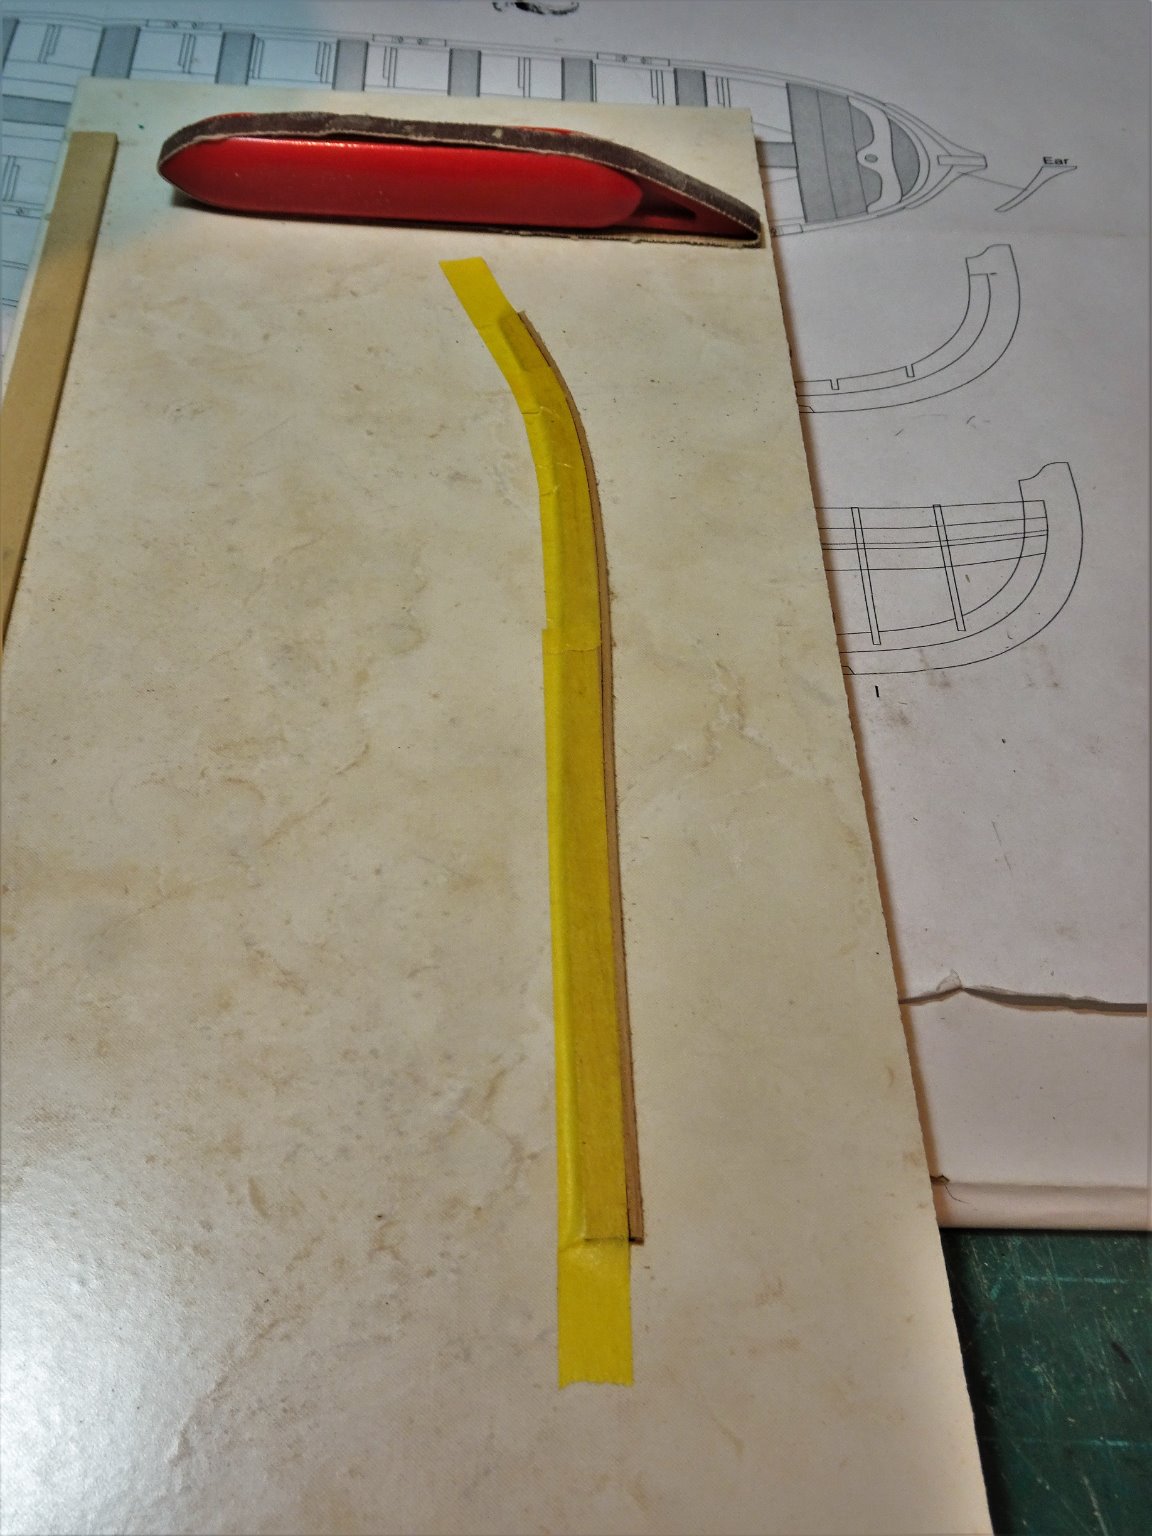
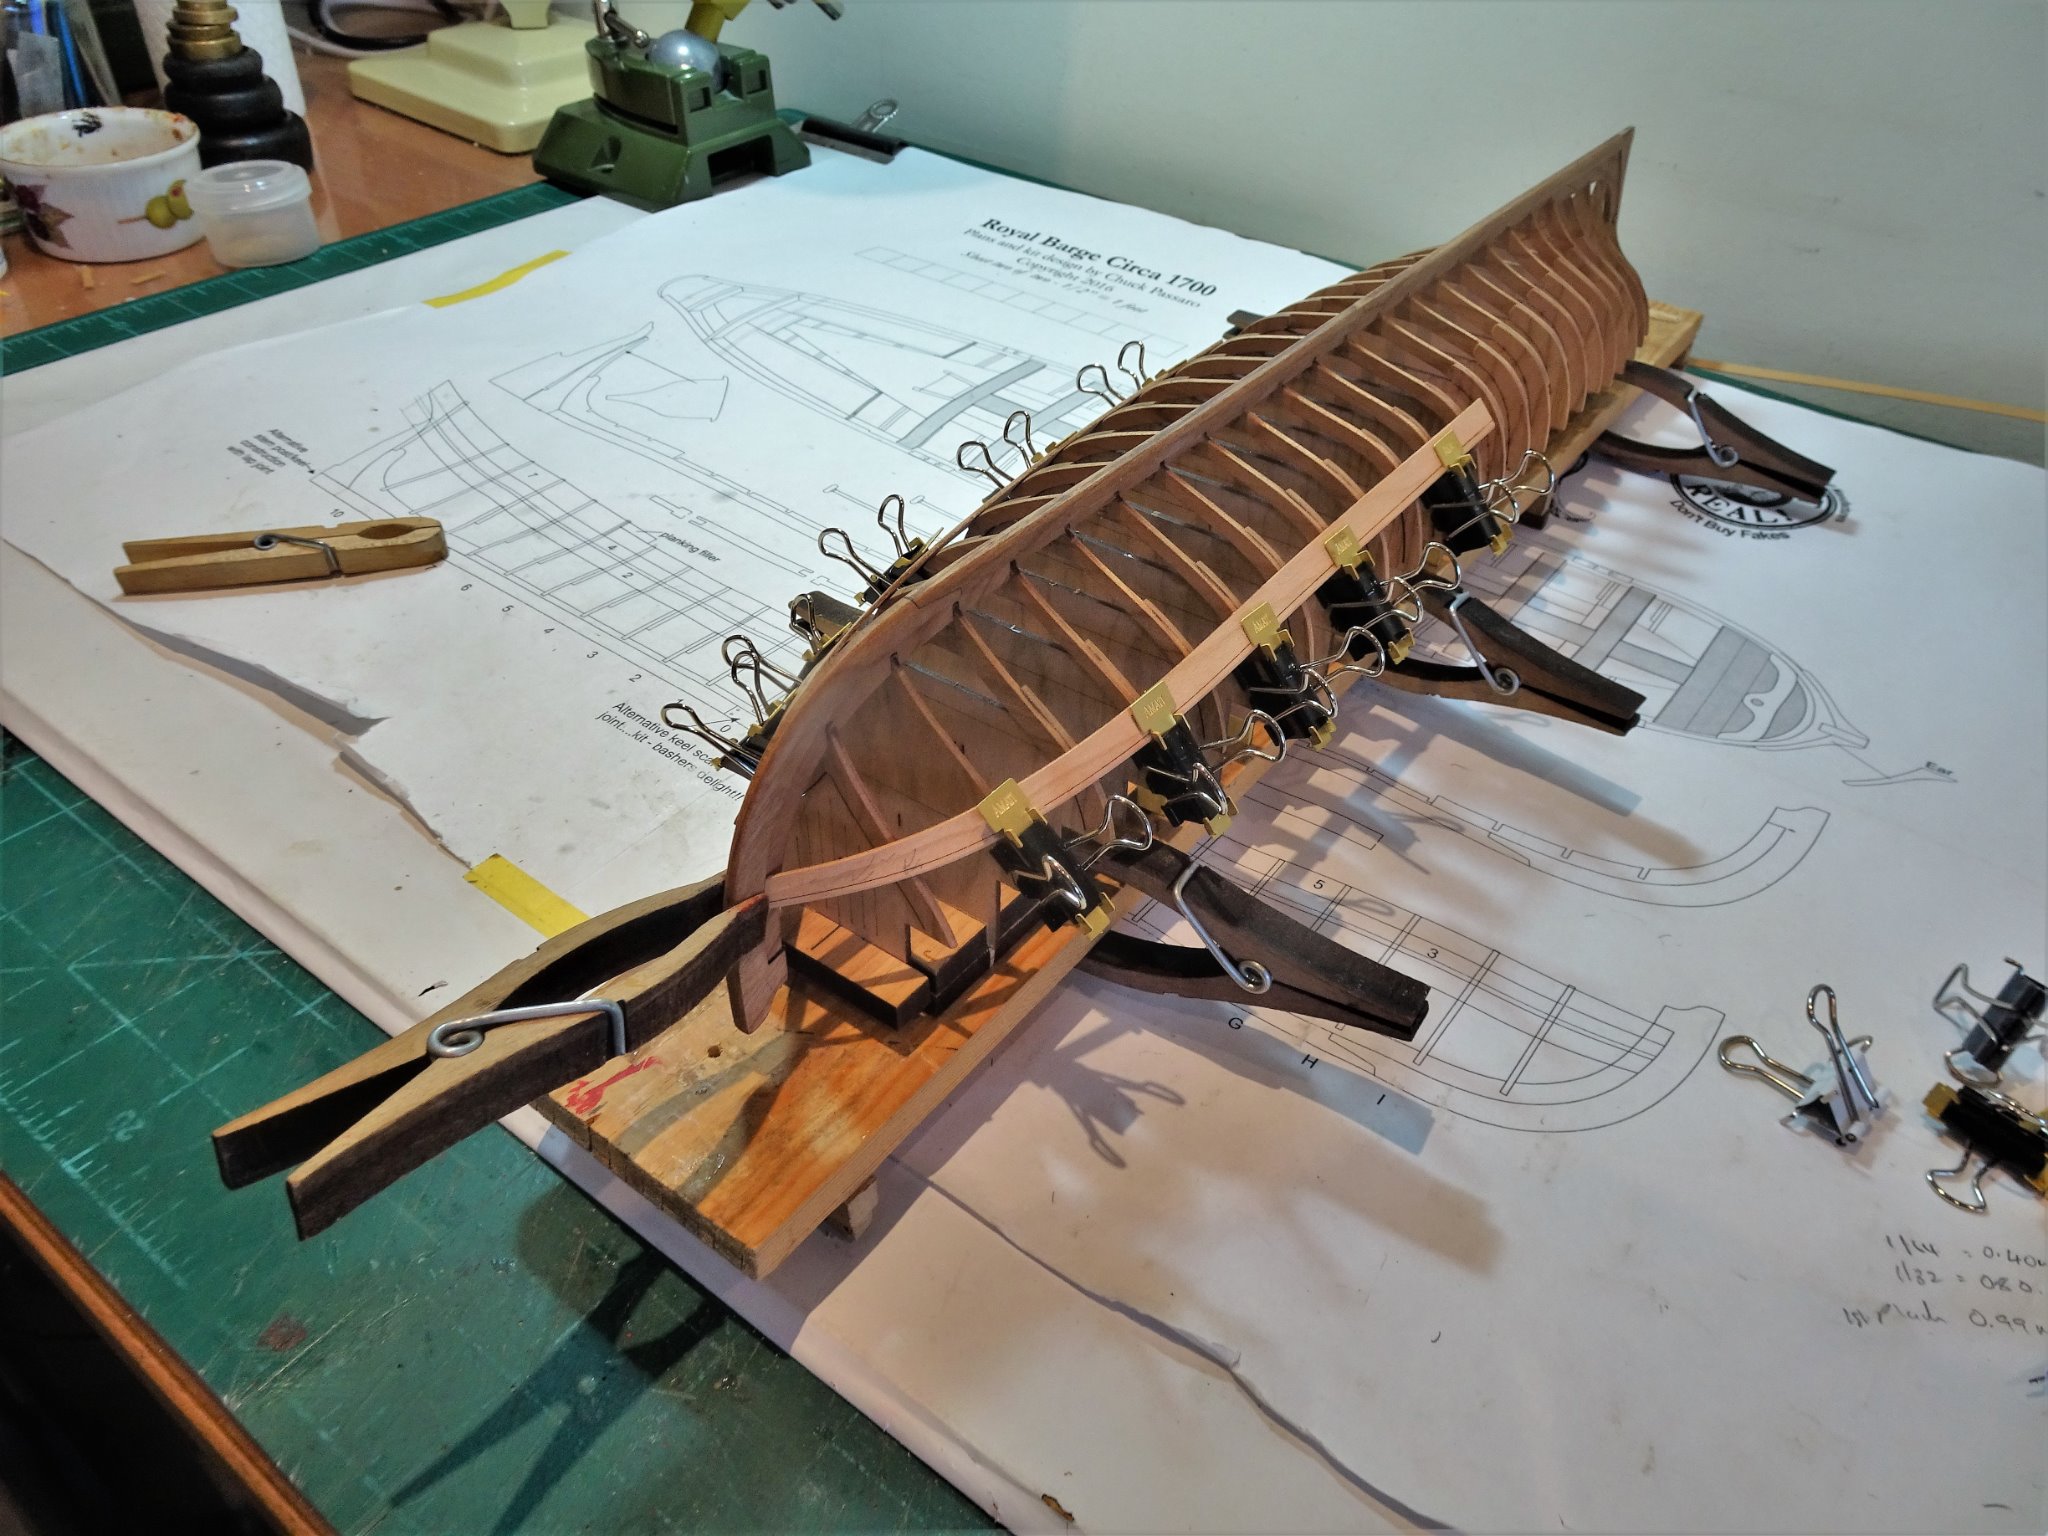
Post Six Planking begins. The positives Chuck has designed this kit with pre spiled planking. The materials are excellent. The instructions are clear. There are excellent build logs providing the benefit of experience, and I read them all before moving to a new section. One would be a fool to forgo all this valuable information. There are only three strakes which reduces the error element that can creep into fully planked builds. The Negatives. None as such, but the planking is quite delicate, and care must be taken to avoid undue pressures that may result in breakages of plank or frame. In the event of disasters Chuck does supply a get out of jail card in the form of spare planking sets. To avoid such setbacks, I will try my best to achieve a no tension fit of planks before I commit to glue. I start on the Portside. 0963 Tick strips prepared and sanding sticks assembled. 0967 I use Tamiya tape to define the bevelling area. 0974 I soak the plank and heat treat to impart the bend into the bow. In practice this amount of bend is not required, a shallower curve is sufficient. 0977 This photo demonstrates the direction of twist that is required to enable the plank to sit square in the stem rabbet. 0980 With the twist imparted the plank lies correctly. The clamps are applying very little pressure, sufficient only to hold the plank in place. Lateral pressure on the frames must be avoided at all costs. 0986 Before I fix the first plank I prepared the Starboard side so I can gauge the uniformity of the pair. 0988 0985 A little more dry fitting and fettlin’ required before I commit to glue, I think. B.E. 11/03/21


- 185 replies
-
- 14
-
-
- queen anne barge
- Syren Ship Model Company
- (and 1 more)
-
Well done, a good decision to not to proceed with the suggested kit arrangement. B.E.
- 16 replies
-
- 1
-
-
- Swan Class Sloop
- fly
- (and 2 more)
-
What a nuisance Bradley, hope you fix it ok, it is in an awkward position. I suppose you could get a replacement from Chuck to restore your options. B.E.
-
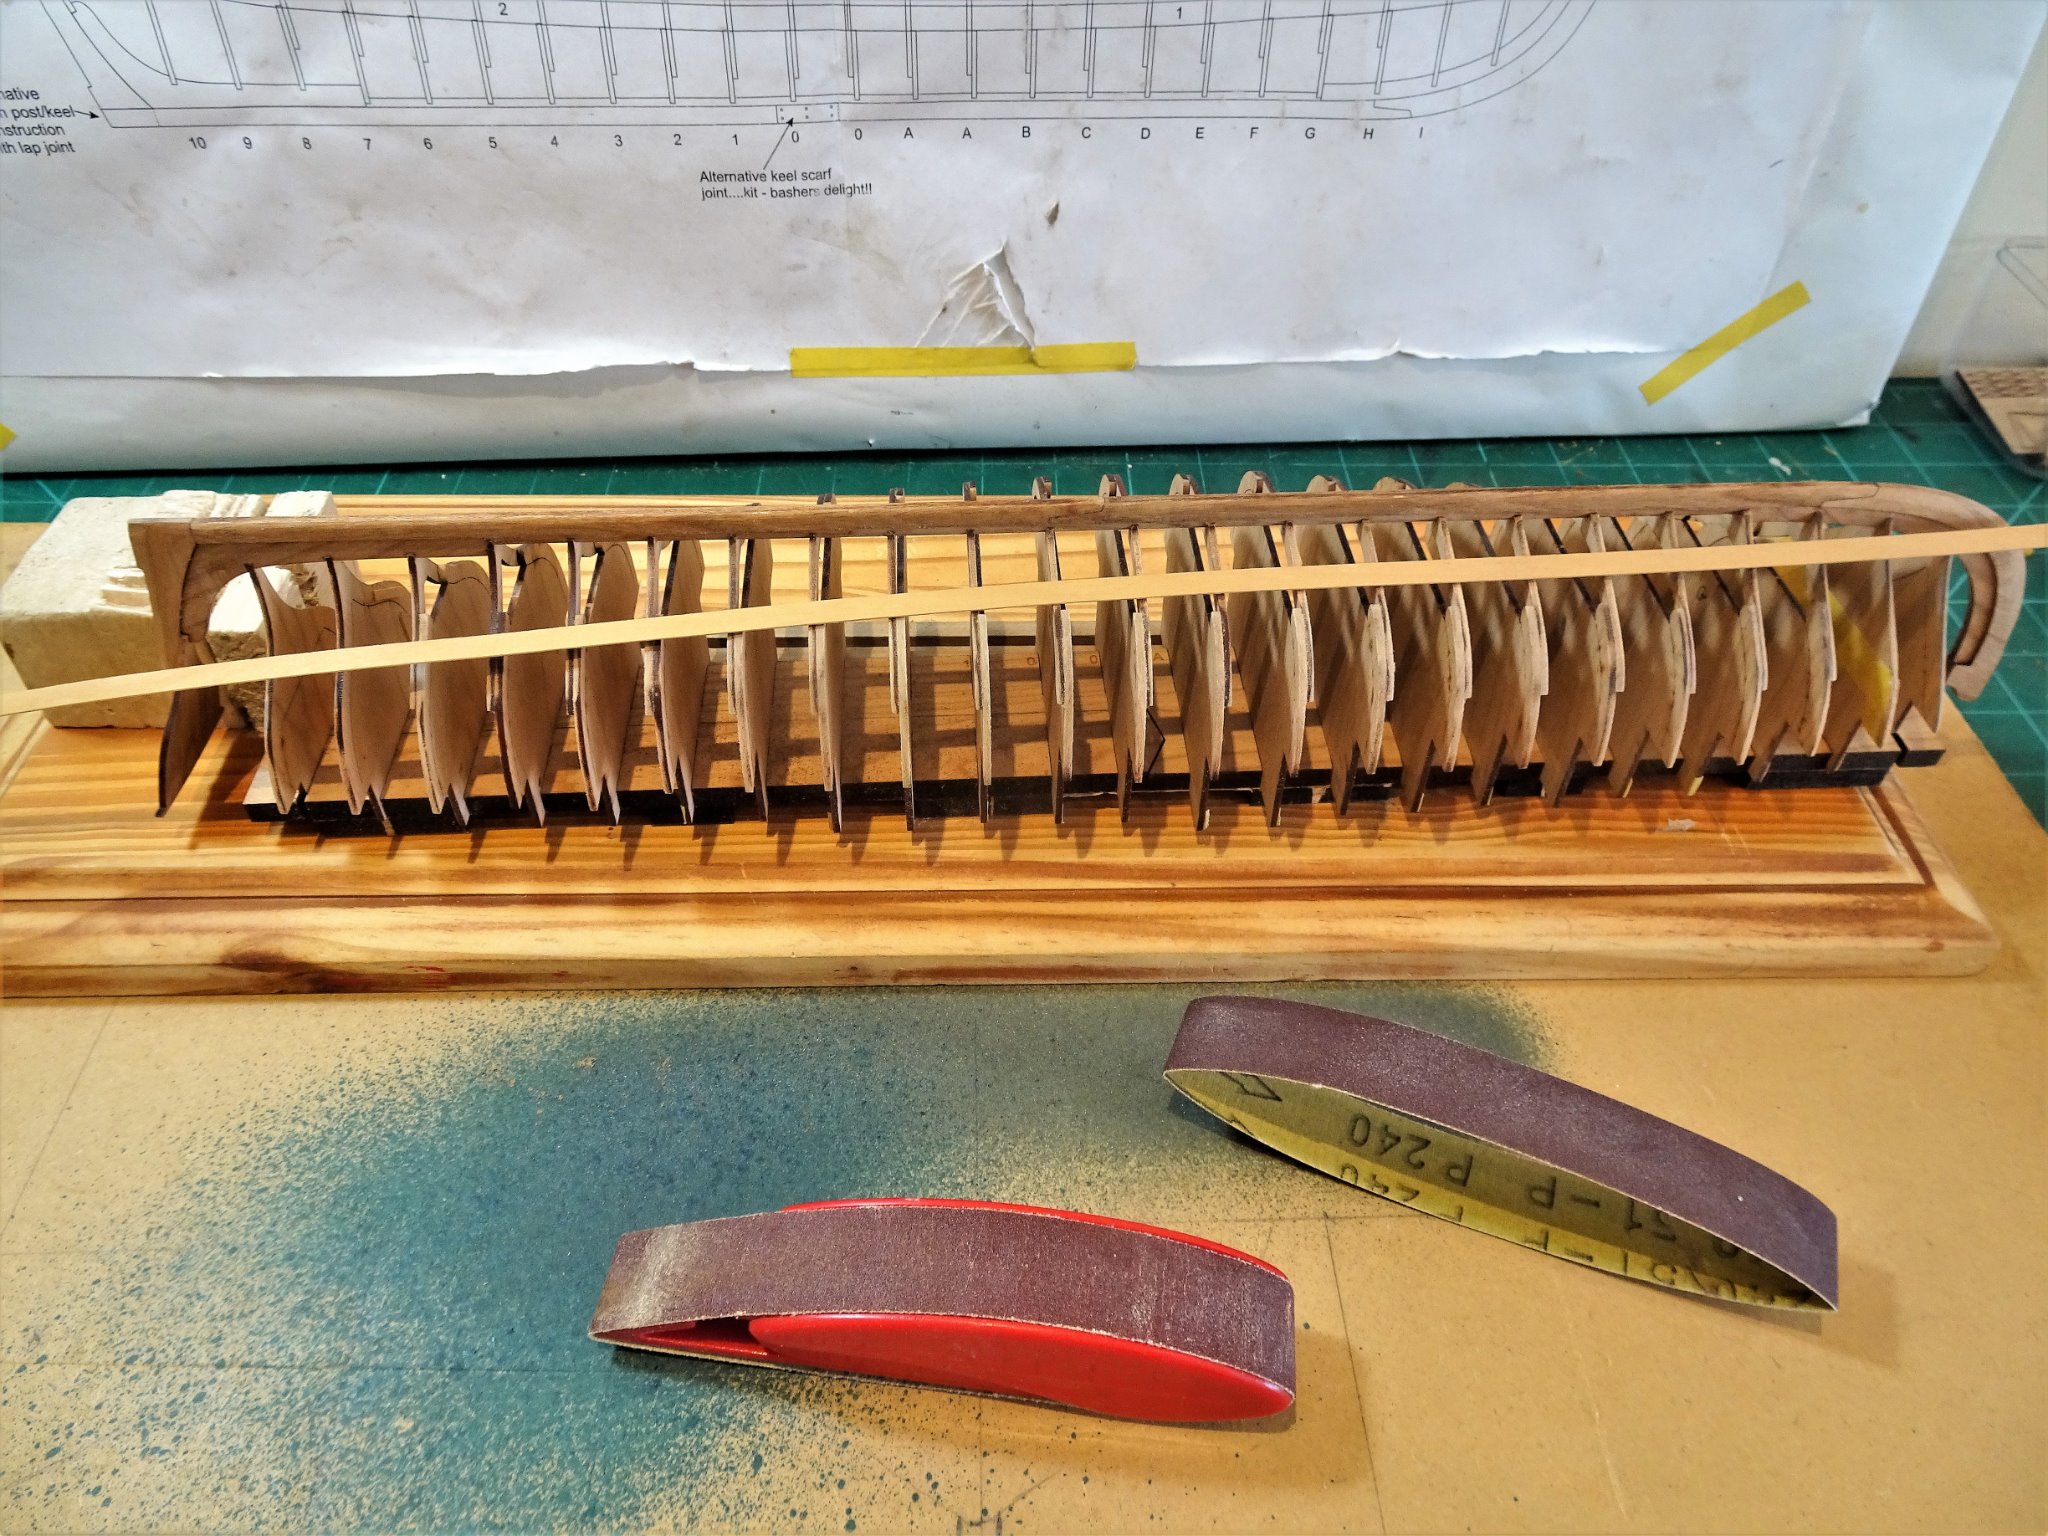
Post Five Fairing. I approach this job with a degree of trepidation, being aware of the damage that can be done by a simple lapse of concentration in holding or manoeuvring, or a degree too much pressure put on the frames. Chuck re-iterates this point more than once. Using the fret from the Futtock sheets, I practised sanding the edges with a variety of different grade papers to gauge the removal effect and effort required to achieve it. 0929 I am using a finger sander with P150 and P240 papers, and Sheet P240 papers were also used. Using a fine touch was uppermost in my mind but even so a couple of frames dislodged from the keel at the stern, but it was easy work to re glue them. The process mainly seems to consist of cleaning off the char with actual bevelling only being applicable to the forward four and aft five Futtocks/frames plus the Transom board. 0935 I use a 0.7 x 6mm Boxwood strip to check the lie of the strake across the Frames. I am taking this very slowly, a lot of the fairing I do is along the vertical line to clean the char to avoid putting lateral pressure on the frames. This also has the effect of easing the friction when applying the necessary lateral strokes to fair the forward and aft frames. I didn’t do too much fairing at one time lest my natural inclination to complete the job got too much and the speed of working picked up. 0930 With the test strake fully sitting across all frames at various points I decided it was time to move on. A coat of wipe-on-poly is applied. 0942 0943(2) 0939 0953(2) The planking phase beckons. B.E. 09/03/21

.thumb.JPG.06f838820ebe515edaaf82b50577f470.JPG)

.thumb.JPG.1e91e7ace069f39838e59cba62152615.JPG)
.thumb.JPG.62583e0c004749b60c79eeafba9fa58e.JPG)
- 185 replies
-
- 16
-
-
- queen anne barge
- Syren Ship Model Company
- (and 1 more)
-
Thanks for that Chuck, what a beautiful model, is that one made of Cherry? I will be well pleased if mine turns out any where near looking like that. B.E.
-
Hi Tim, The kit plan lengths tend to represent the full length taking into consideration the below decks element. The Bowsprit does have a taper, in my case I followed Steel - Taking a 20” heel (8mm ø ) 1st Qtr = 19¼” (7.86mm) 2nd Qtr 18¼ (7.33mm) 3rd Qtr 16” (6.4mm) End 11½”(4.5mm) The kit arrangement does have some simplifications, the jib boom inner end should be octagonal, I used 4mm square stock, and there should be sheaves set into the boom at the inner and outer ends and a hole at the inner end to facilitate the heel lashing. In practise Bowsprit caps were slightly wider on the starboard side of the mortise for the bowsprit and hole for the Jib boom, to allow for the Jack staff. Having said all this the proportions of your arrangement look good to my eye. B.E.
-
Nice progress Jean-Paul, if Cheerful turns out as did your Royal Barge build, she will be a beauty. I too dabbled with a ‘below decks’ element on Cheerful, but perhaps not to the degree you are doing. I am a serial ‘basher’ but in the case of Cheerful that was the only modification I made. I do like a view below decks and with the likes of Skylights and companions I think it gives a more realistic impression of space that should be there. I also open up beneath gratings which I usually have as removeable items. In practice all that can be seen thro’ the Skylight is the painted sailcloth flooring and a little section of panelling, but I know it’s there. Regards, B.E.
-
Thank you Terry I didn’t record the dimensions, but they are not difficult to work out. The width of the stove is governed by the space between the standards of the Riding Bitts, the height by the beam of the Fore deck which on my model I recessed to take the chimney. The length of the stove can be gauged near enough from the photos. I think others have also included a stove in their builds and those logs may contain dimensions if you’re lucky. Good luck with your build. Regards, B.E.
- 366 replies
-
- 2
-
-
- pegasus
- victory models
- (and 2 more)
-
Thanks for your input Guys. Thanks for the advice Chuck. @ Glenn – you’ve got to be working on the kit to appreciate the problem, but I doubt you will have any issues once you get around to it. @ Bradley – useful insight, and yours turned out beautifully. @ Derek - It’s always worth having one of Chuck’s kits on hand, in fact I’ve also got the Longboat kit beneath the bench. There are so many exiting new projects coming along now from Syren and Vanguard, - too many models not enough time – surely does resonate. Post Four Completion of Keel/frames assembly I did a little more work on the slots and tabs to give the lateral movement necessary to align the frames. I concentrated on the underside and didn’t touch the upper edge. I also took Chuck’s advice and made a pass of the sanding stick across the tabs. 0862(2) The keel then fitted much better and I felt confident enough to apply the glue. 0924(2) The forward section went somewhat easier, but I still managed to break the tab on the single frame H, temporarily secured with Tamiya tape. 0918(2) 0923(2) 0915(2) 9012(2) 0914(2) 0913(2) Moving on to fairing. B.E. 06/03/21
.thumb.JPG.60884c4e1ec1b828f2d186e6c93b4bb4.JPG)
.thumb.JPG.e50ecc33c517cf3143099bfd7ba22ff4.JPG)
.thumb.JPG.593fd6f692c8561d9b35c018754d882d.JPG)
.thumb.JPG.ff47cb41abe819dd051e6530e8209bc1.JPG)
.thumb.JPG.80283a68c0442dba2c3fa627b4735f2e.JPG)
.thumb.JPG.c3d9bd7444831a2801f5aab1752873d6.JPG)
.thumb.JPG.448b353ff13b74388056c6966984d2e5.JPG)
.thumb.JPG.c2fed571d5ce0bd2f1677db9420d6312.JPG)
- 185 replies
-
- 14
-
-
- queen anne barge
- Syren Ship Model Company
- (and 1 more)
-
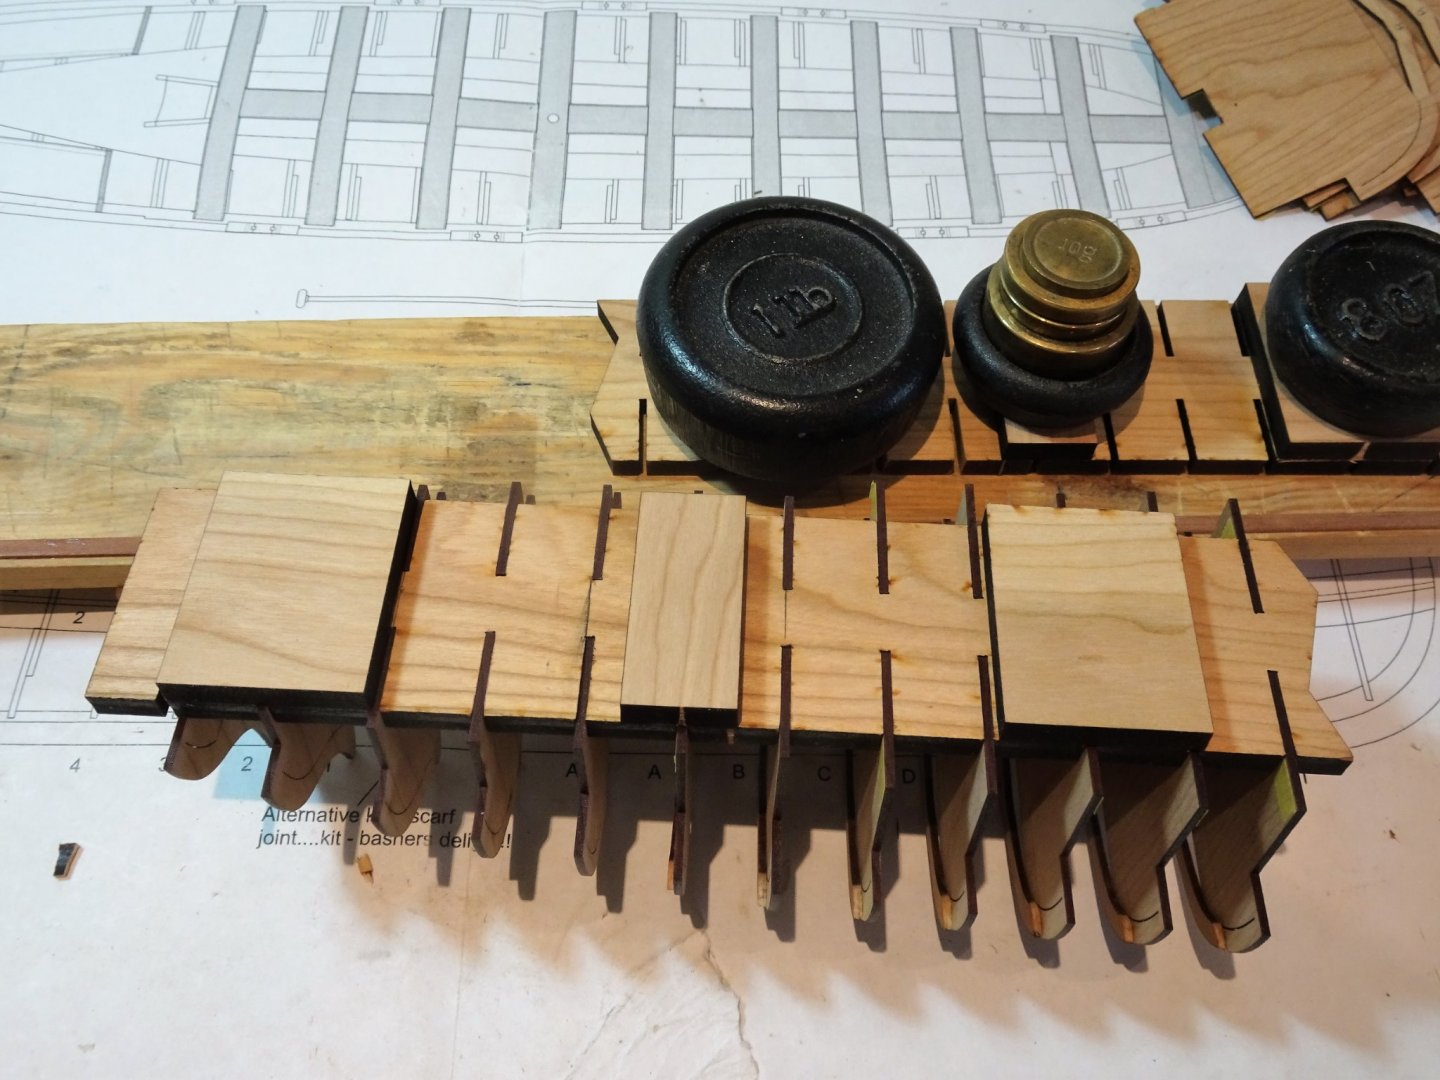
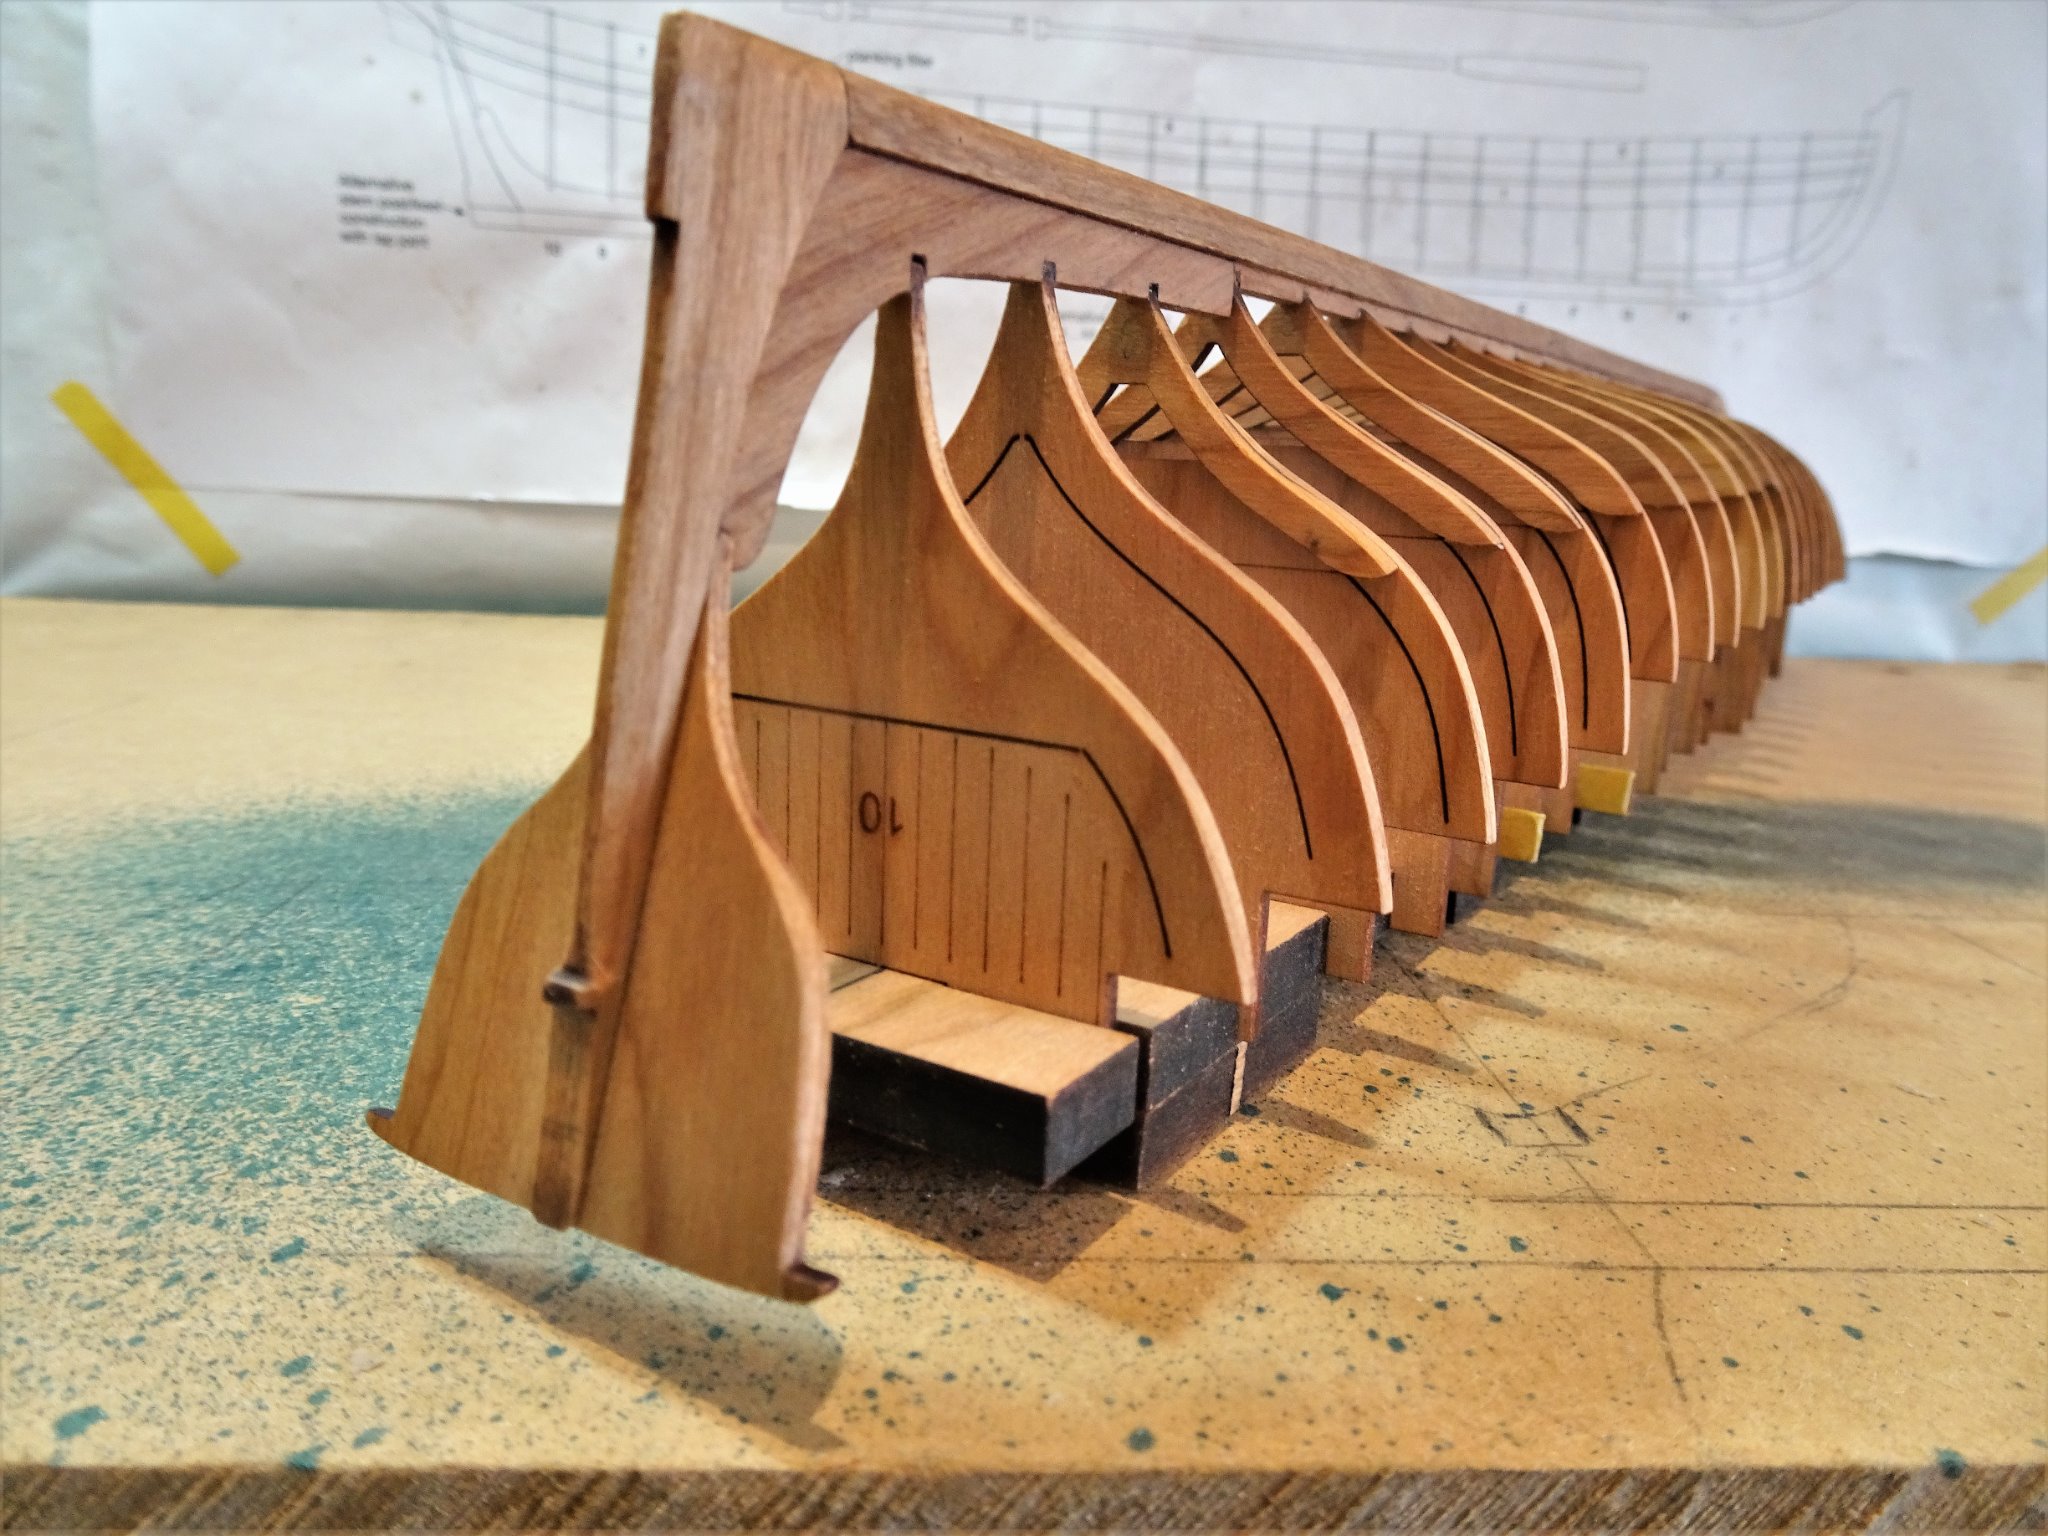
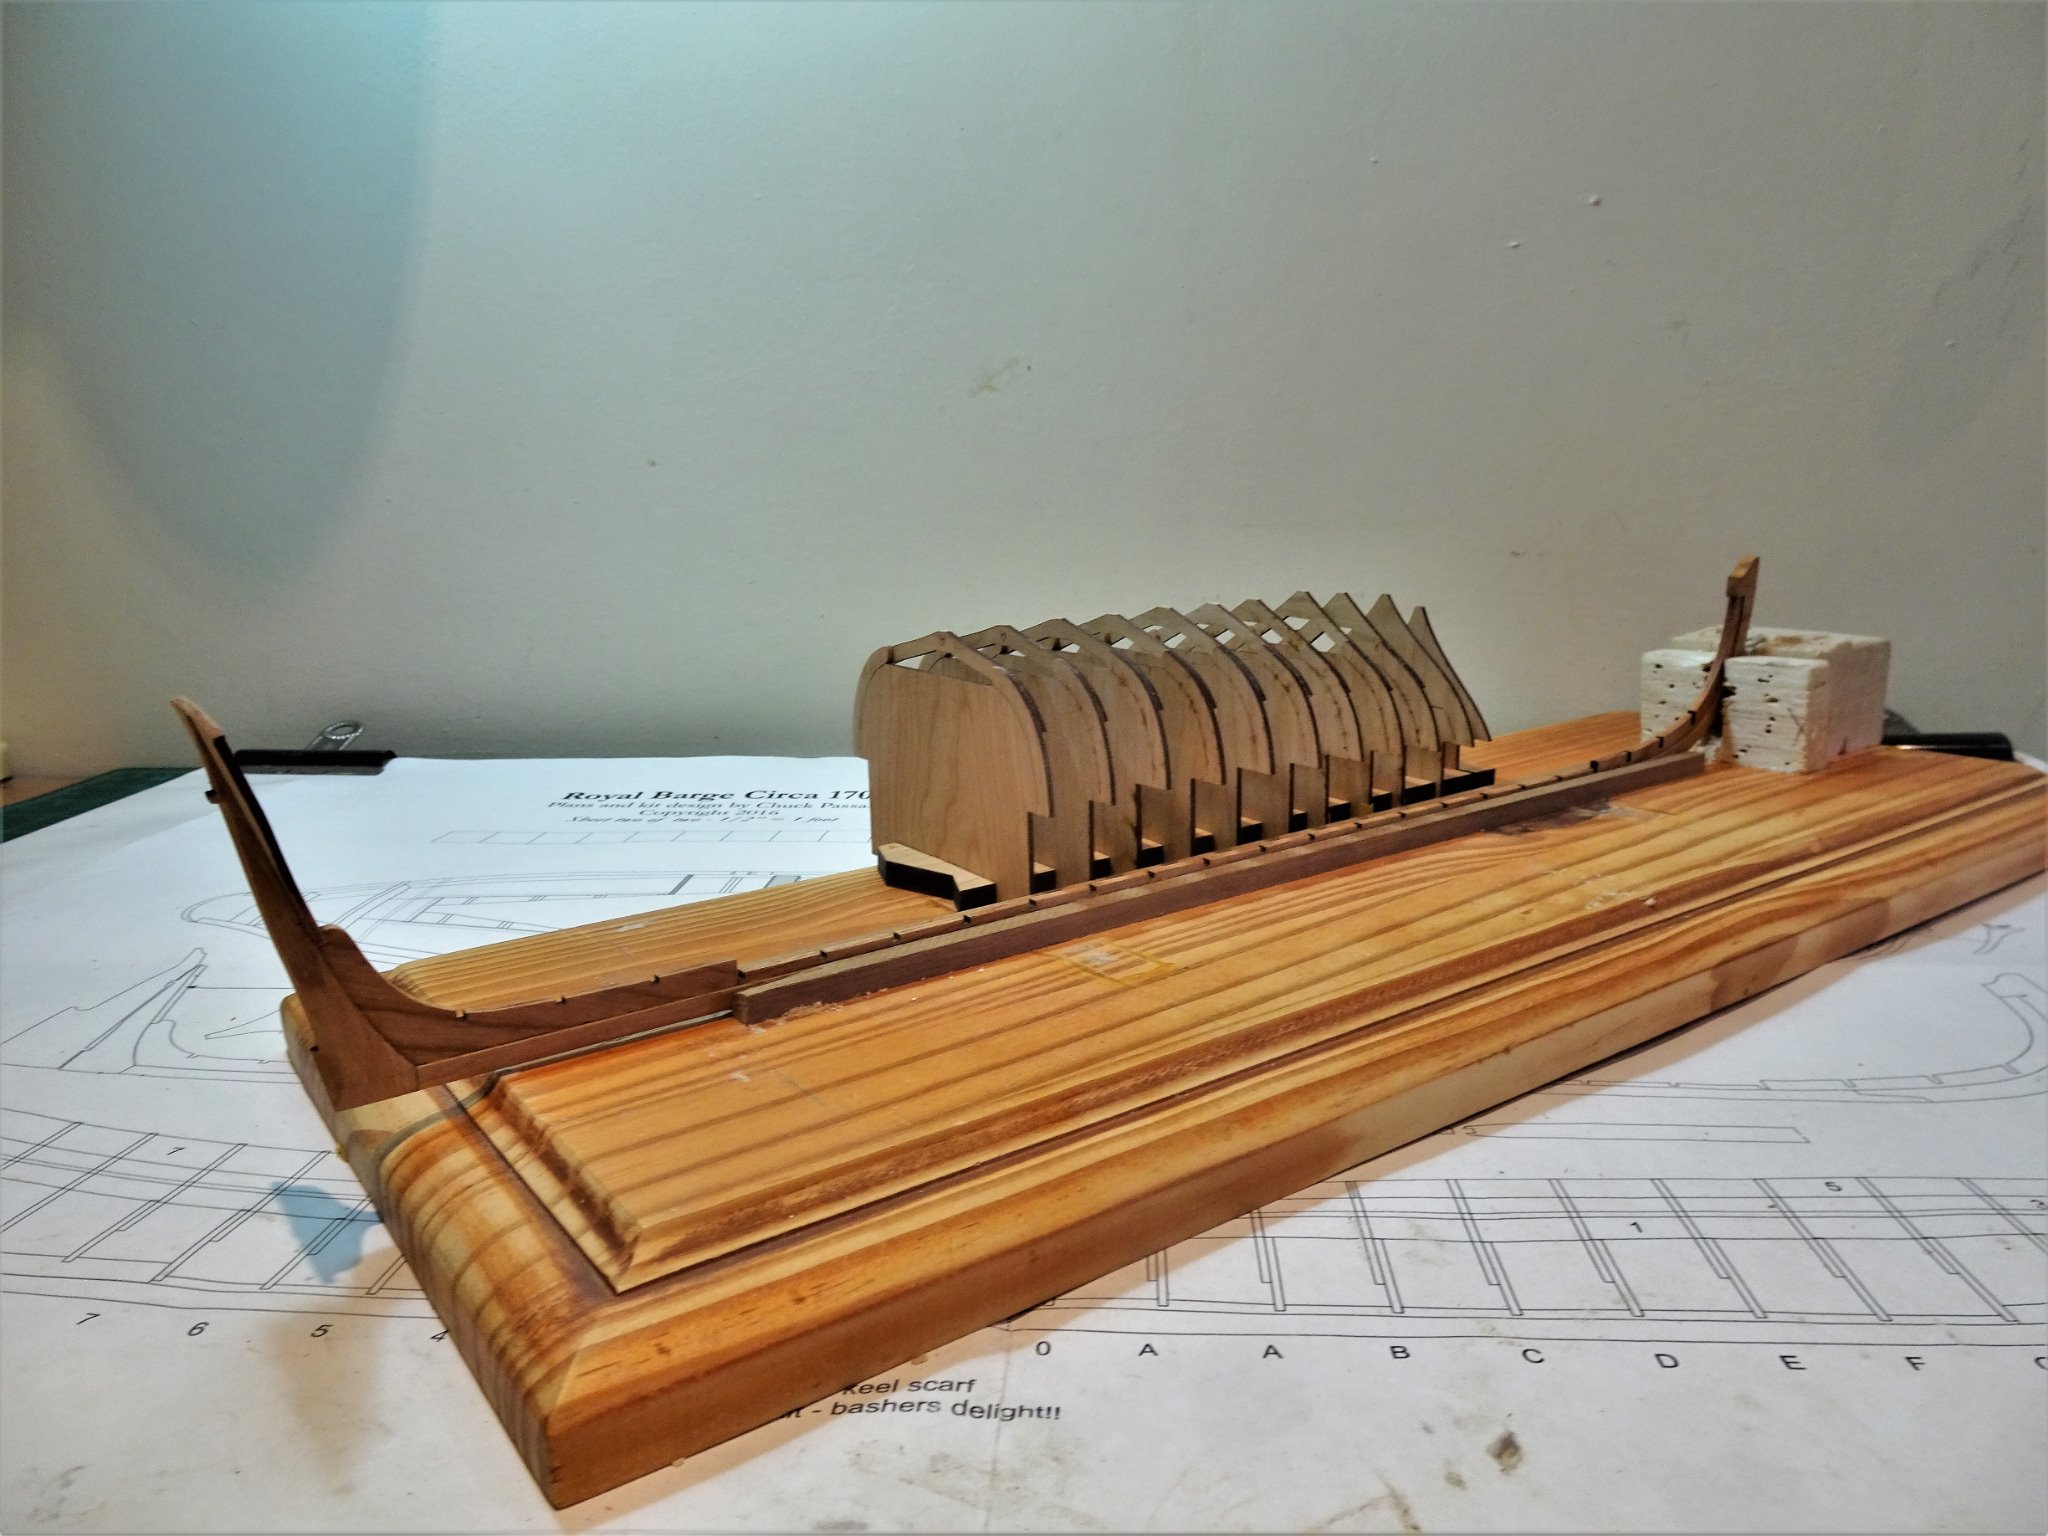
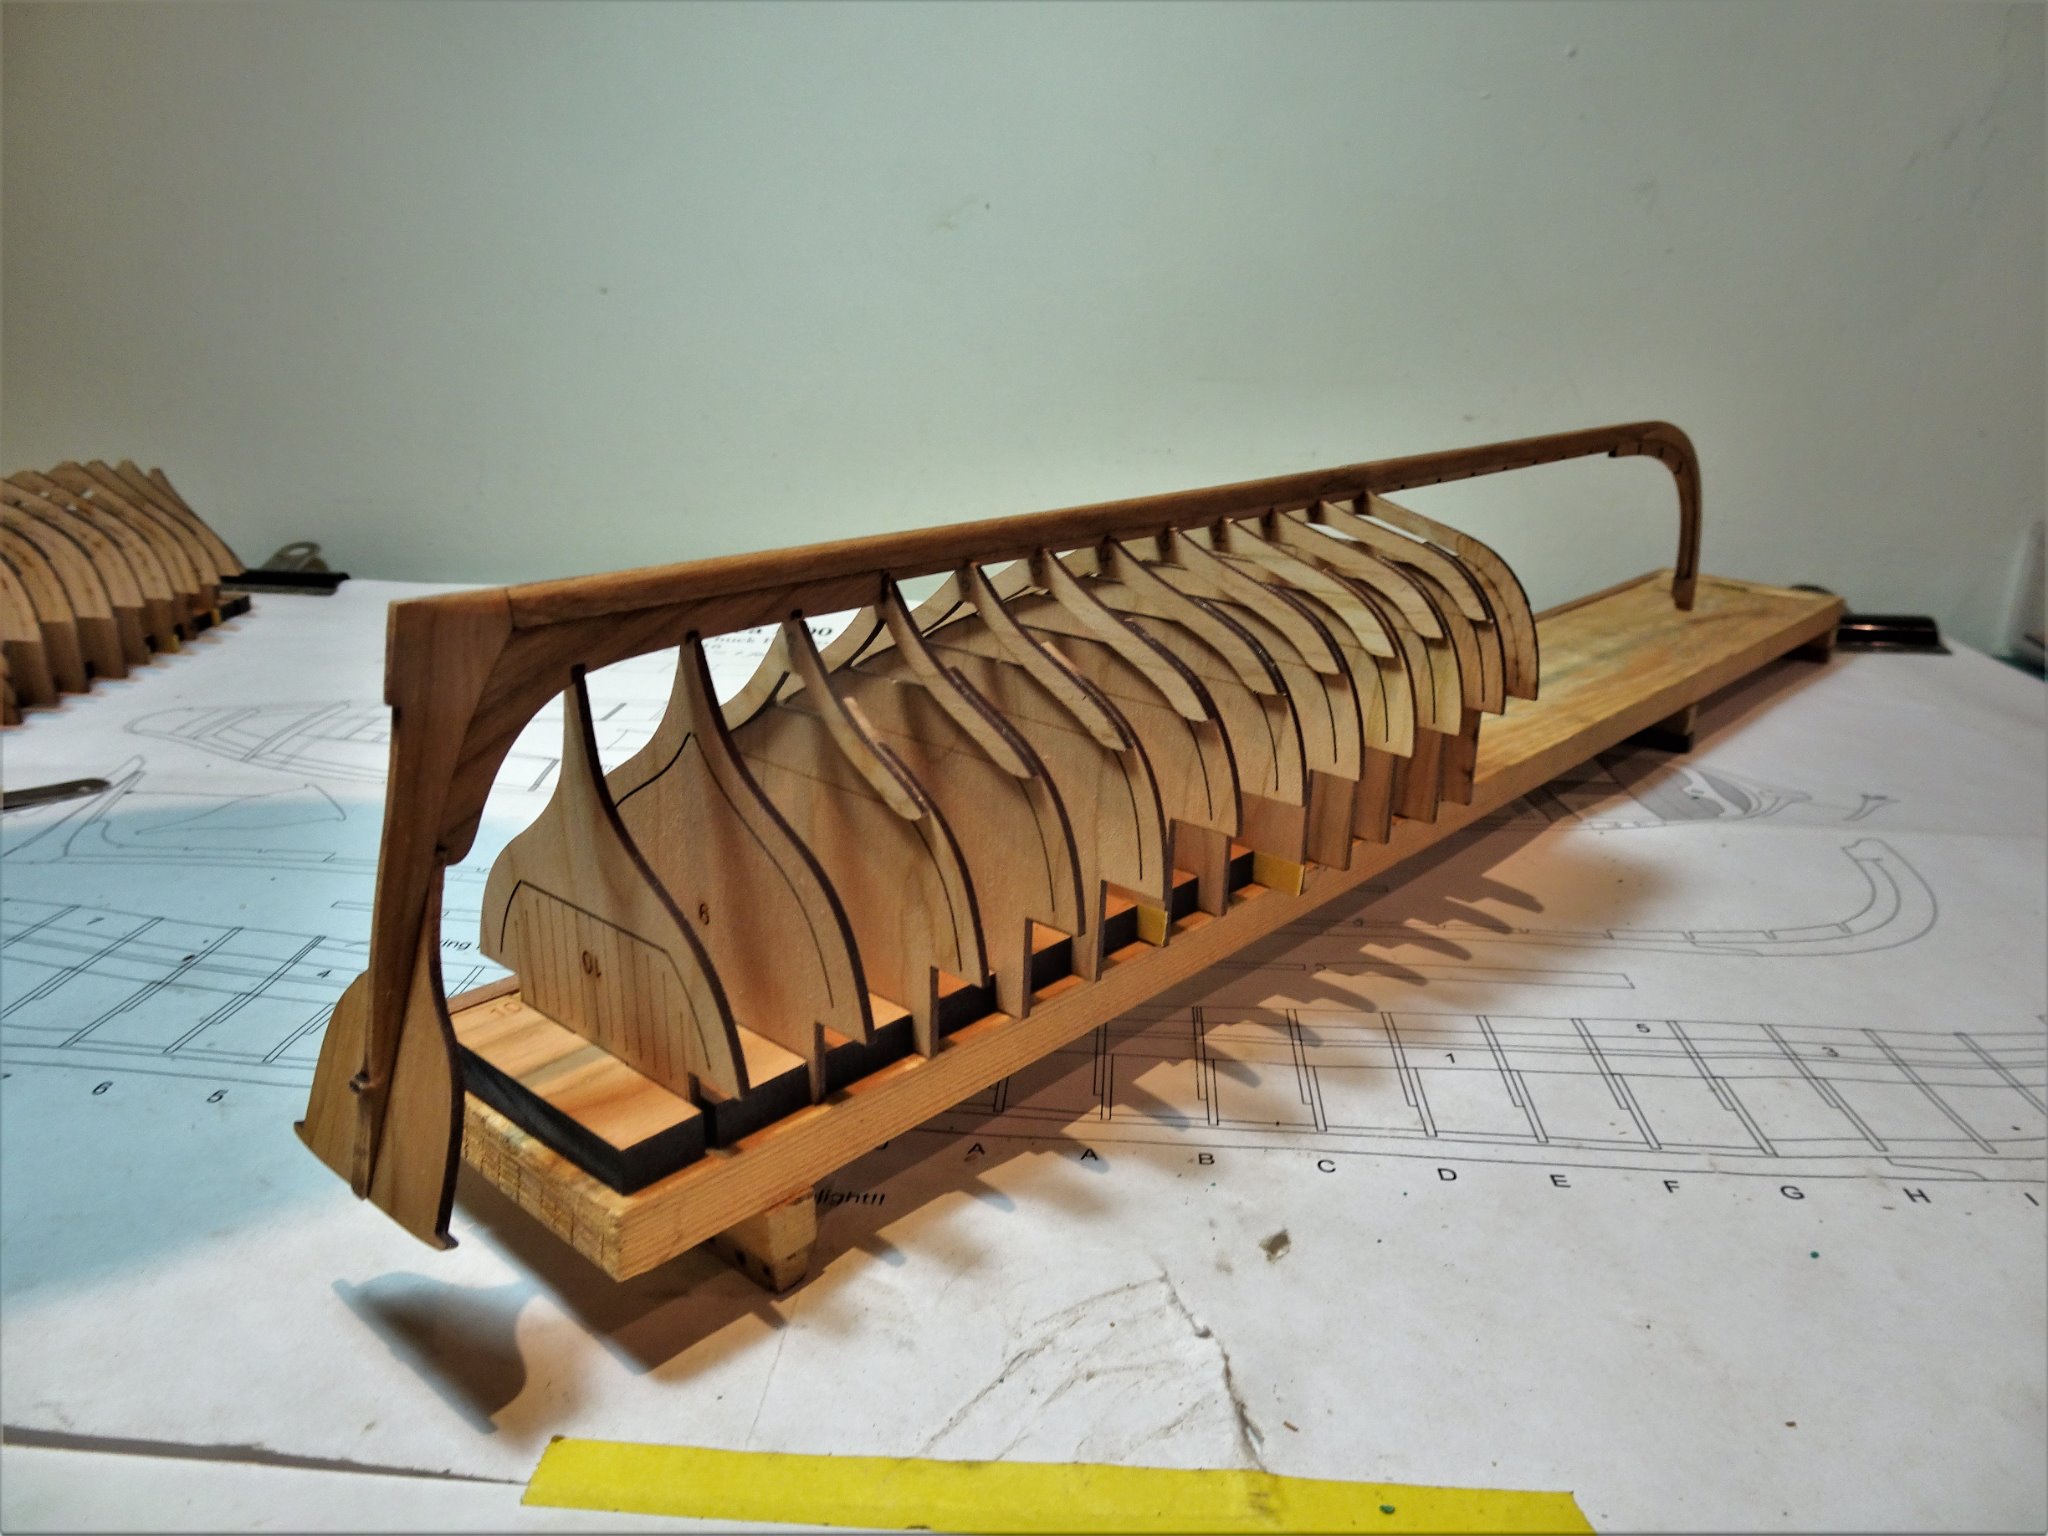
Post Three Bringing together keel and frames. The futtocks are sufficiently firm in the base board, and the frames sit cleanly in the keel slots, so I can move onto the next stage. 0838 Support blocks added to the board underside. The prime concern now is to ensure that the frames are properly centred in the build board, the keel is vertical and centred along the frames, and the final fixing and tweaking is achieved before the glue starts to set. Chuck mentions in the blurb that there is a little wriggle room in the slots of the build board so the frames can be shifted left or right. 0839 This does not seem to be the case with my kit, there is no leeway to tweak the Futtocks in aligning the keel along the top. With the Futtocks fixed I am limited to ensuring that the keel is vertical across the top. 0843(2) Sighting along the set up the keel does not sit naturally centred across all Frames. Warp in the keel is not the issue. 0850 The mismatch in aftermost frame 10 is clear to see here. 0851 If Frame 10 is centred it throws several of the others out. 0854 I am reluctant to introduce ‘wriggle room’ into the building board slots but I do need to resolve this issue before I can move on. B.E Postscript Having disassembled everything again I think I have found the issue. The tabs in the board feel ok for removal but from beneath there is no ‘wriggle’ gap apparent. From the top laying the Futtocks on the board there is a gap of around 1mm. The board slot cut must have a slight inward angle to it top to bottom which prevents the futtock tabs from moving. I will take a shave off with a micro chisel and try again. B.E.

.thumb.JPG.0a60e995794bdcabcf3f239e81470da9.JPG)

- 185 replies
-
- 11
-
-
- queen anne barge
- Syren Ship Model Company
- (and 1 more)
-
Thank you Jean-Paul, your own build is one of my go to reference works. Chuck surely does produce fine kits, my Cheerful model remains one of my favourites, and the one that has given me the most satisfaction. Regards, B.E.
- 185 replies
-
- 2
-
-
- queen anne barge
- Syren Ship Model Company
- (and 1 more)
-
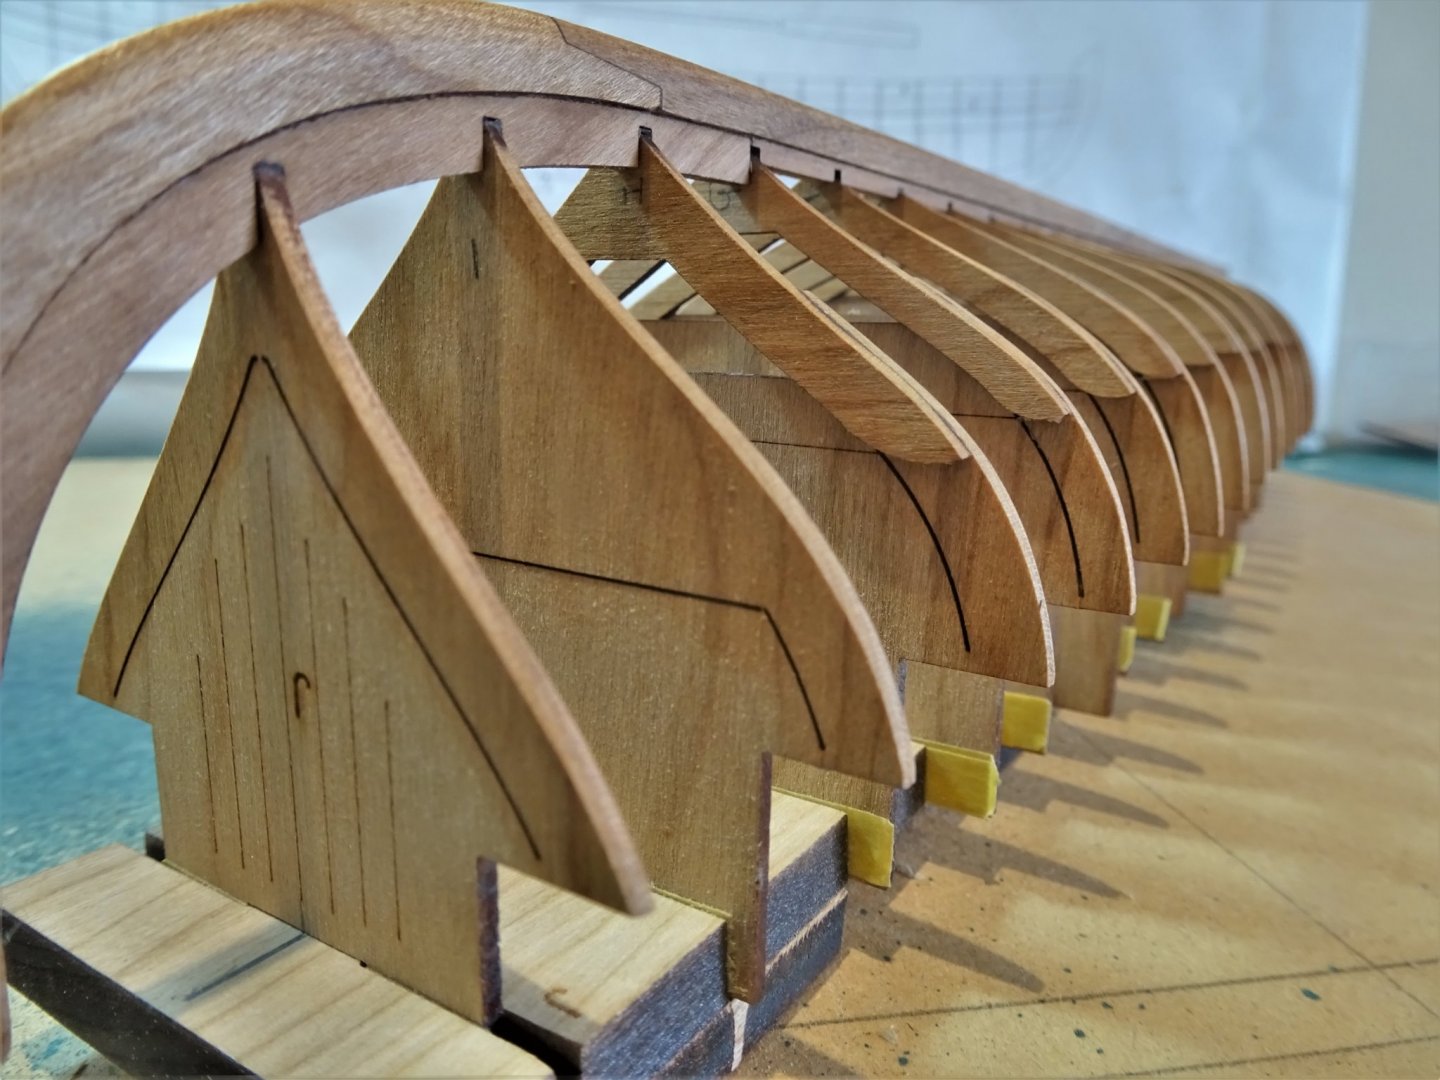
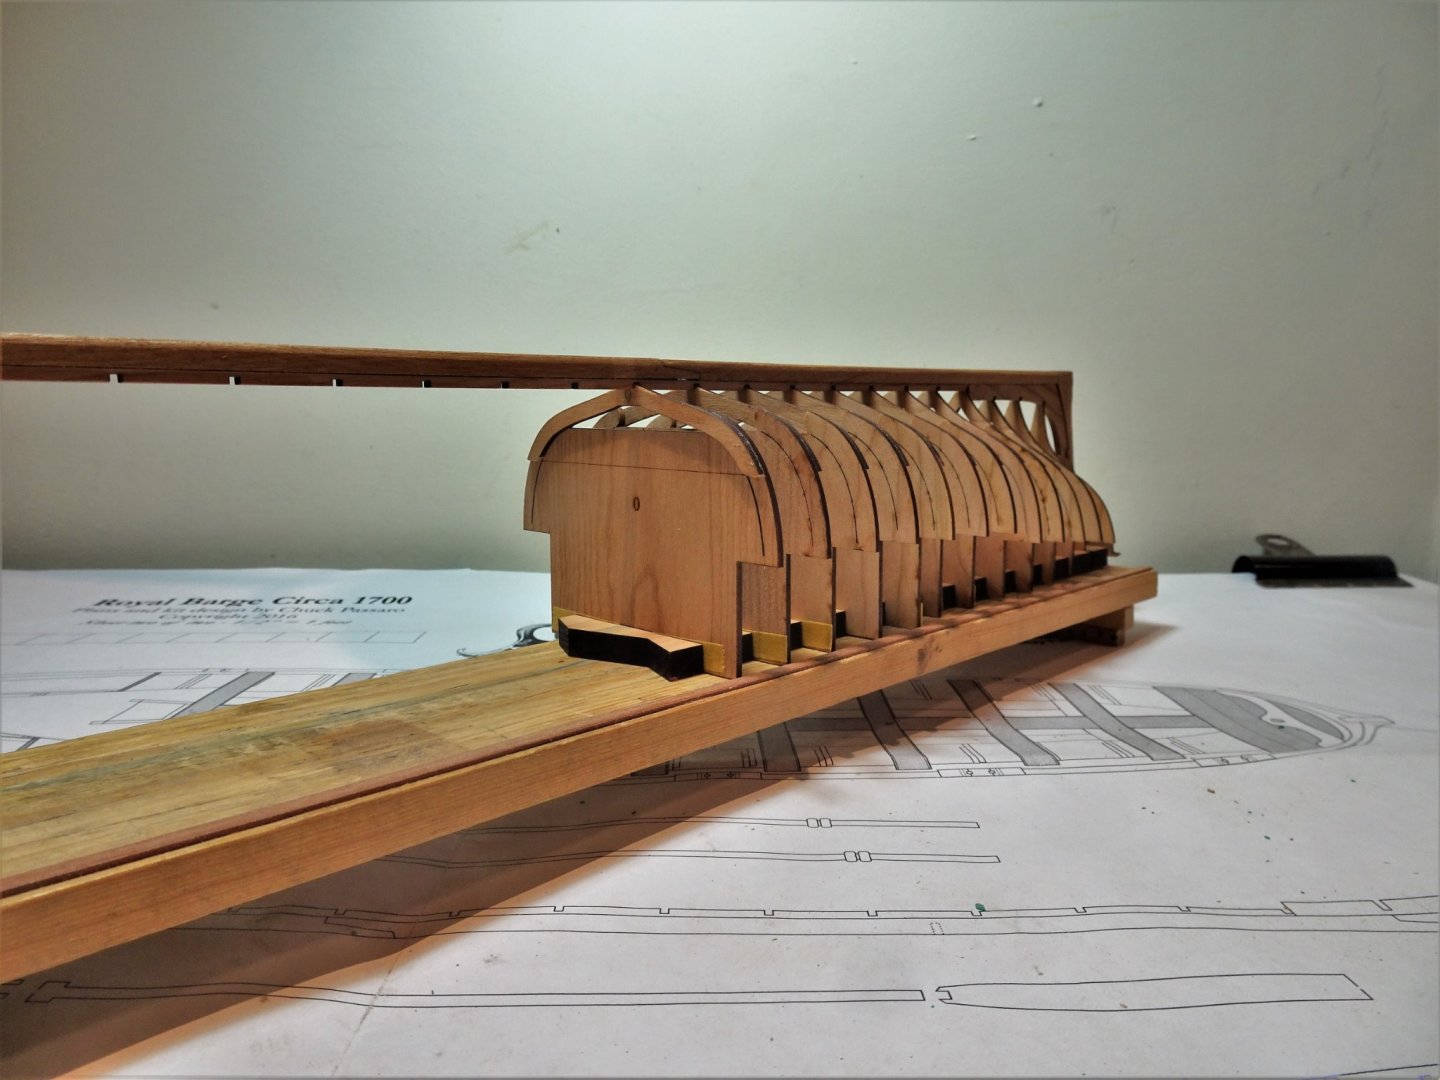
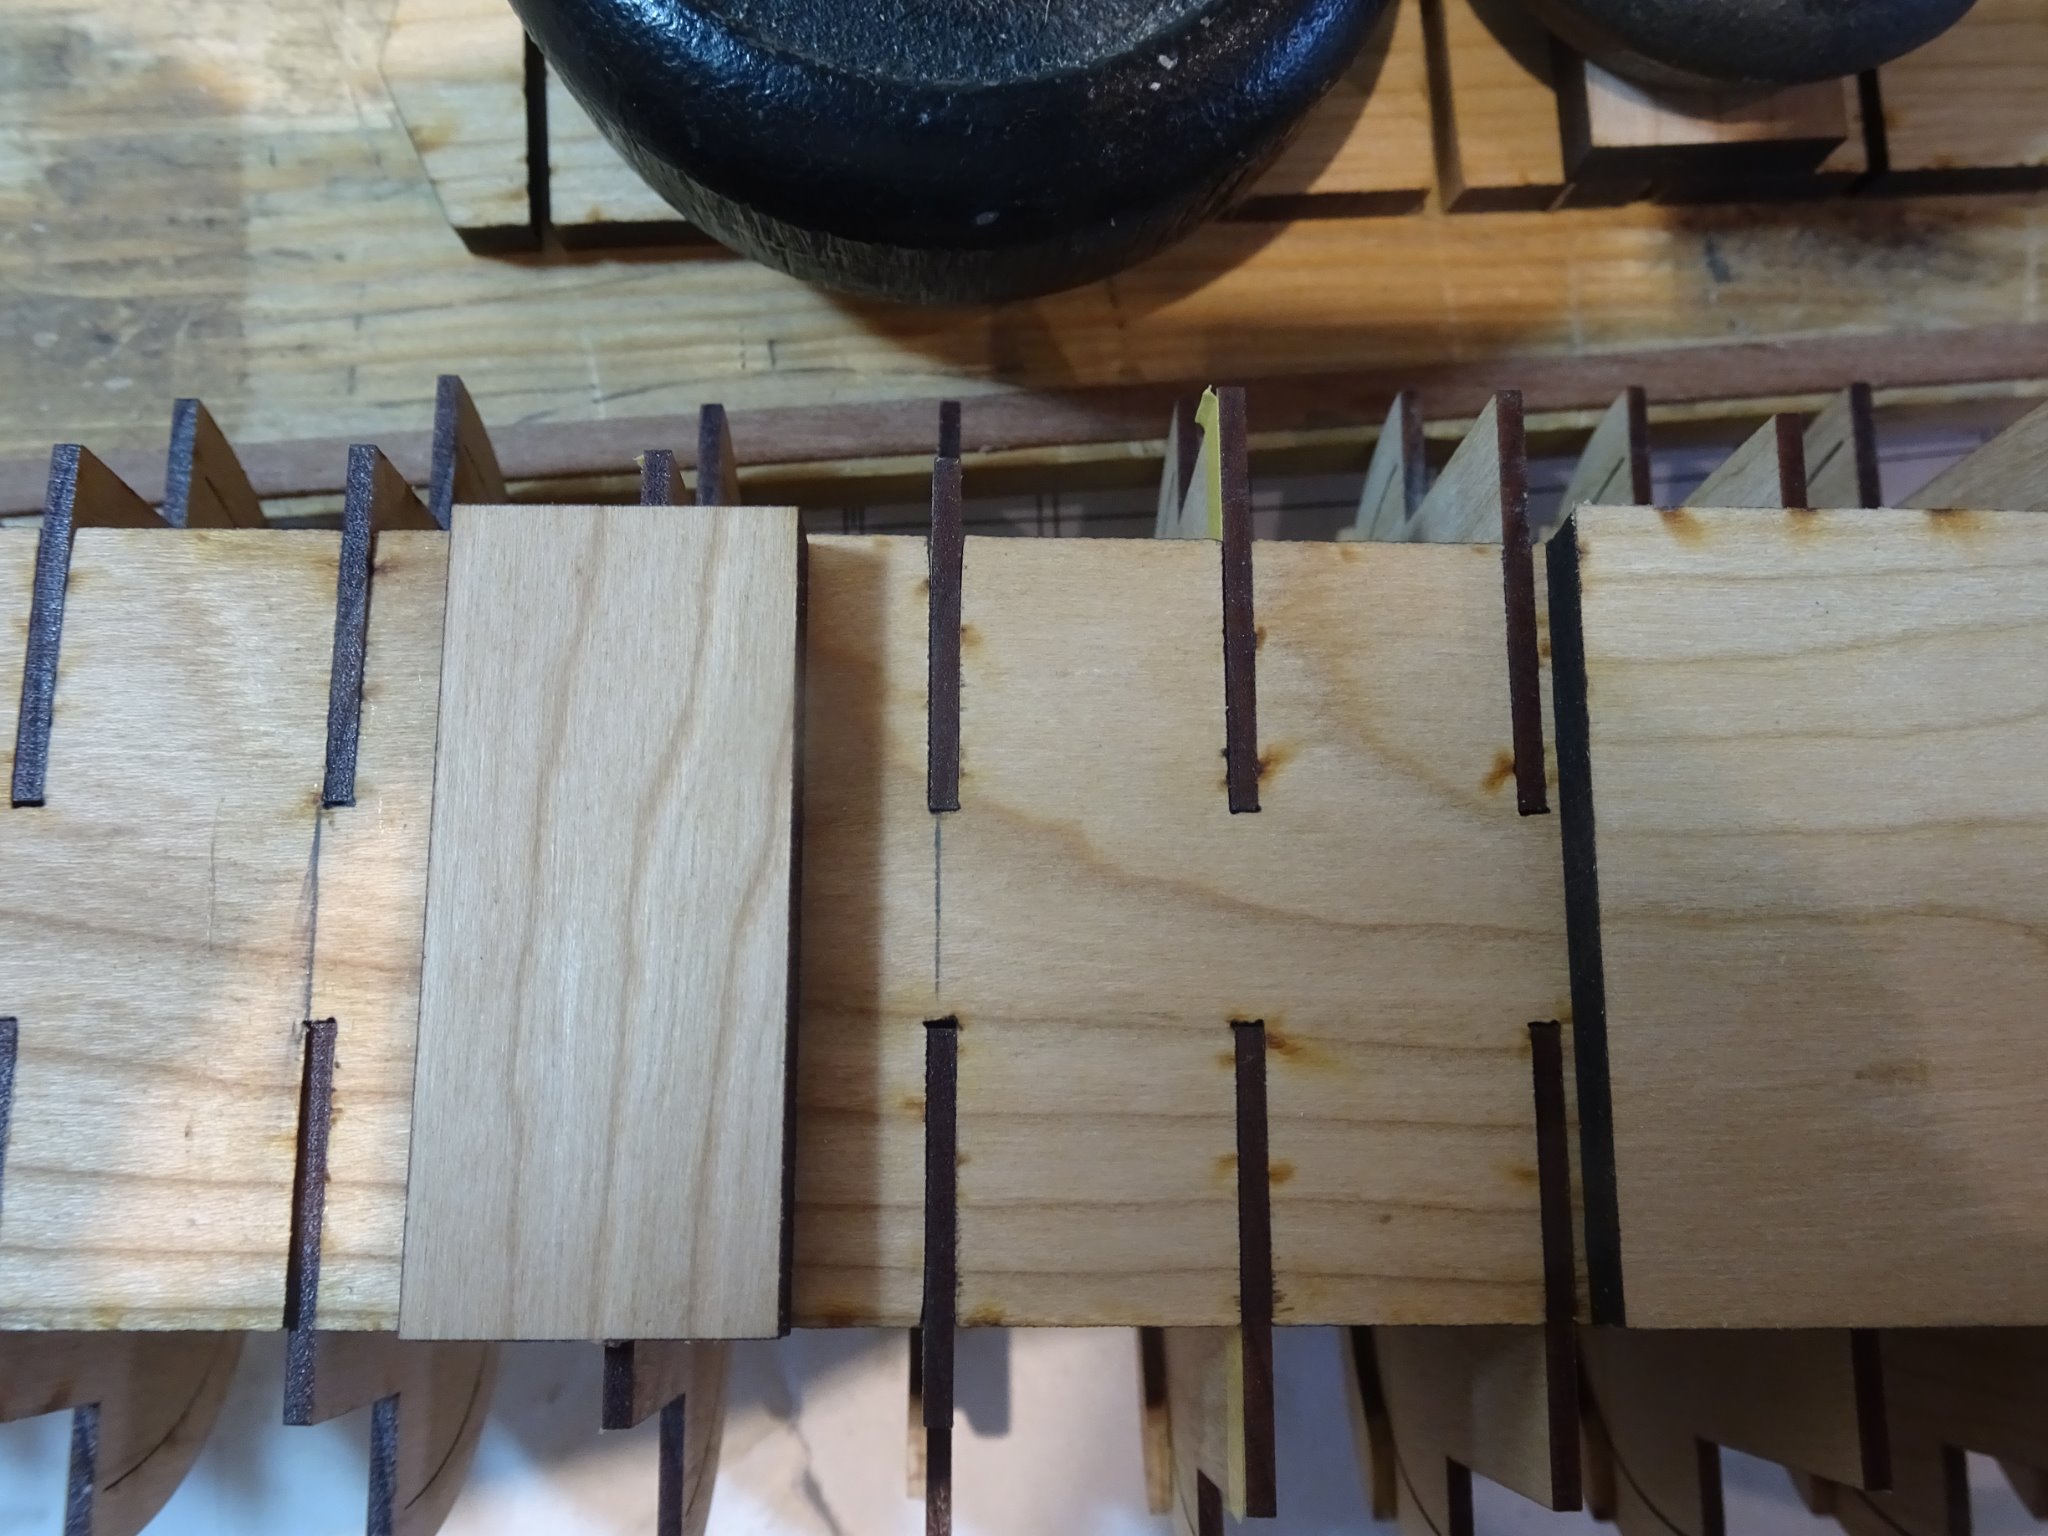
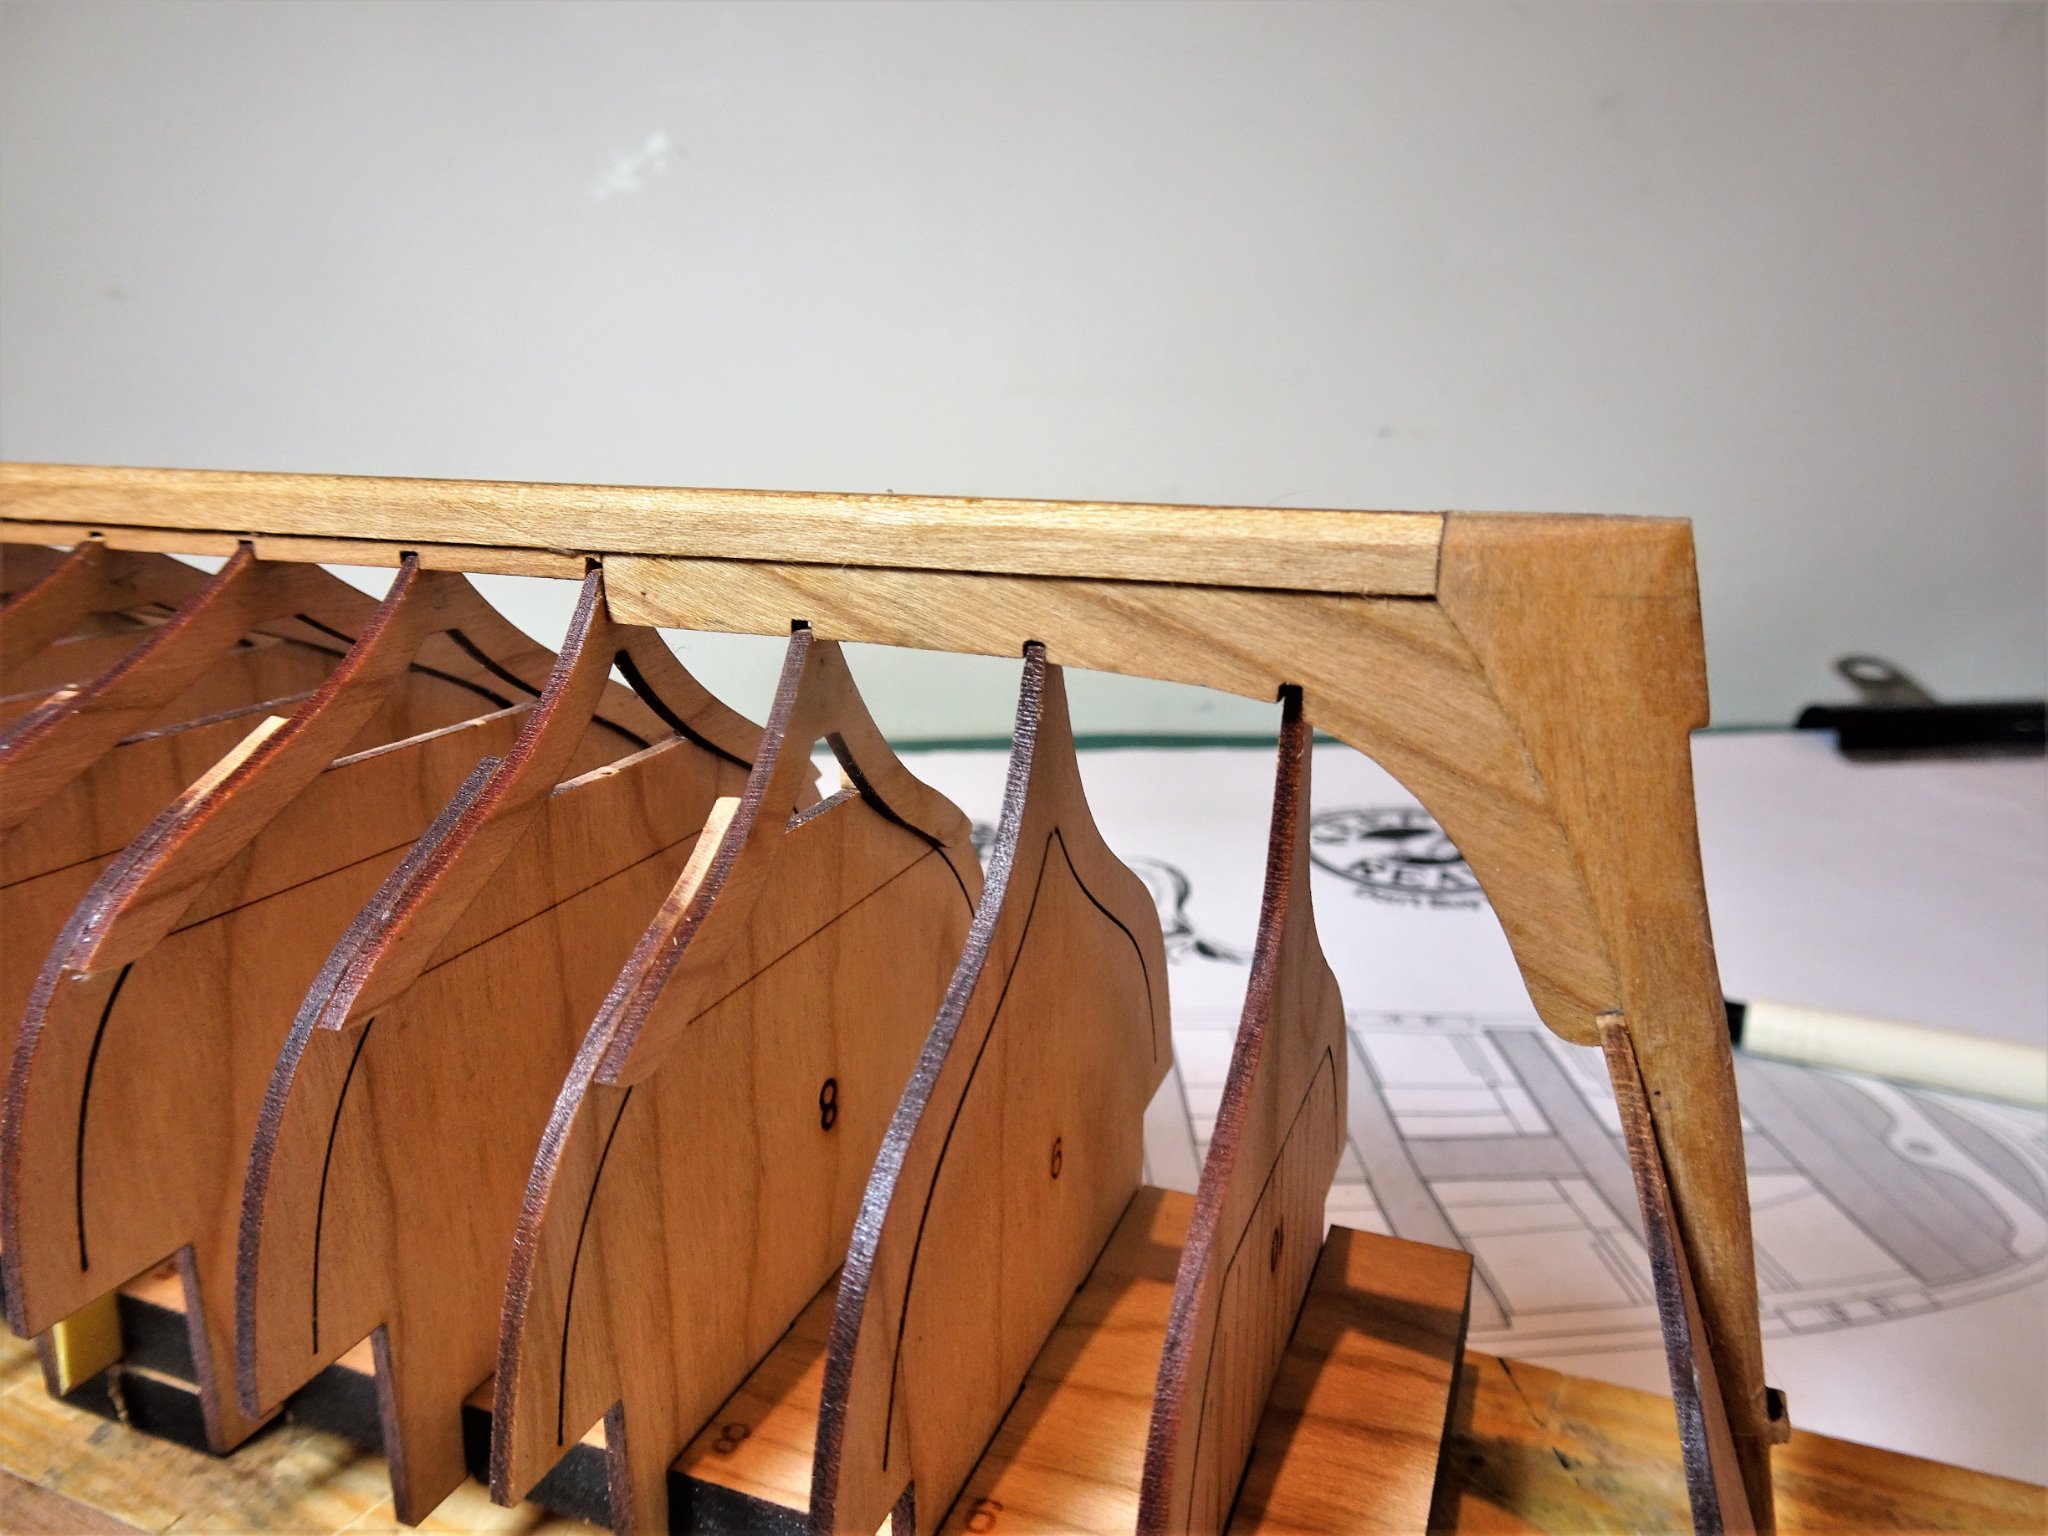
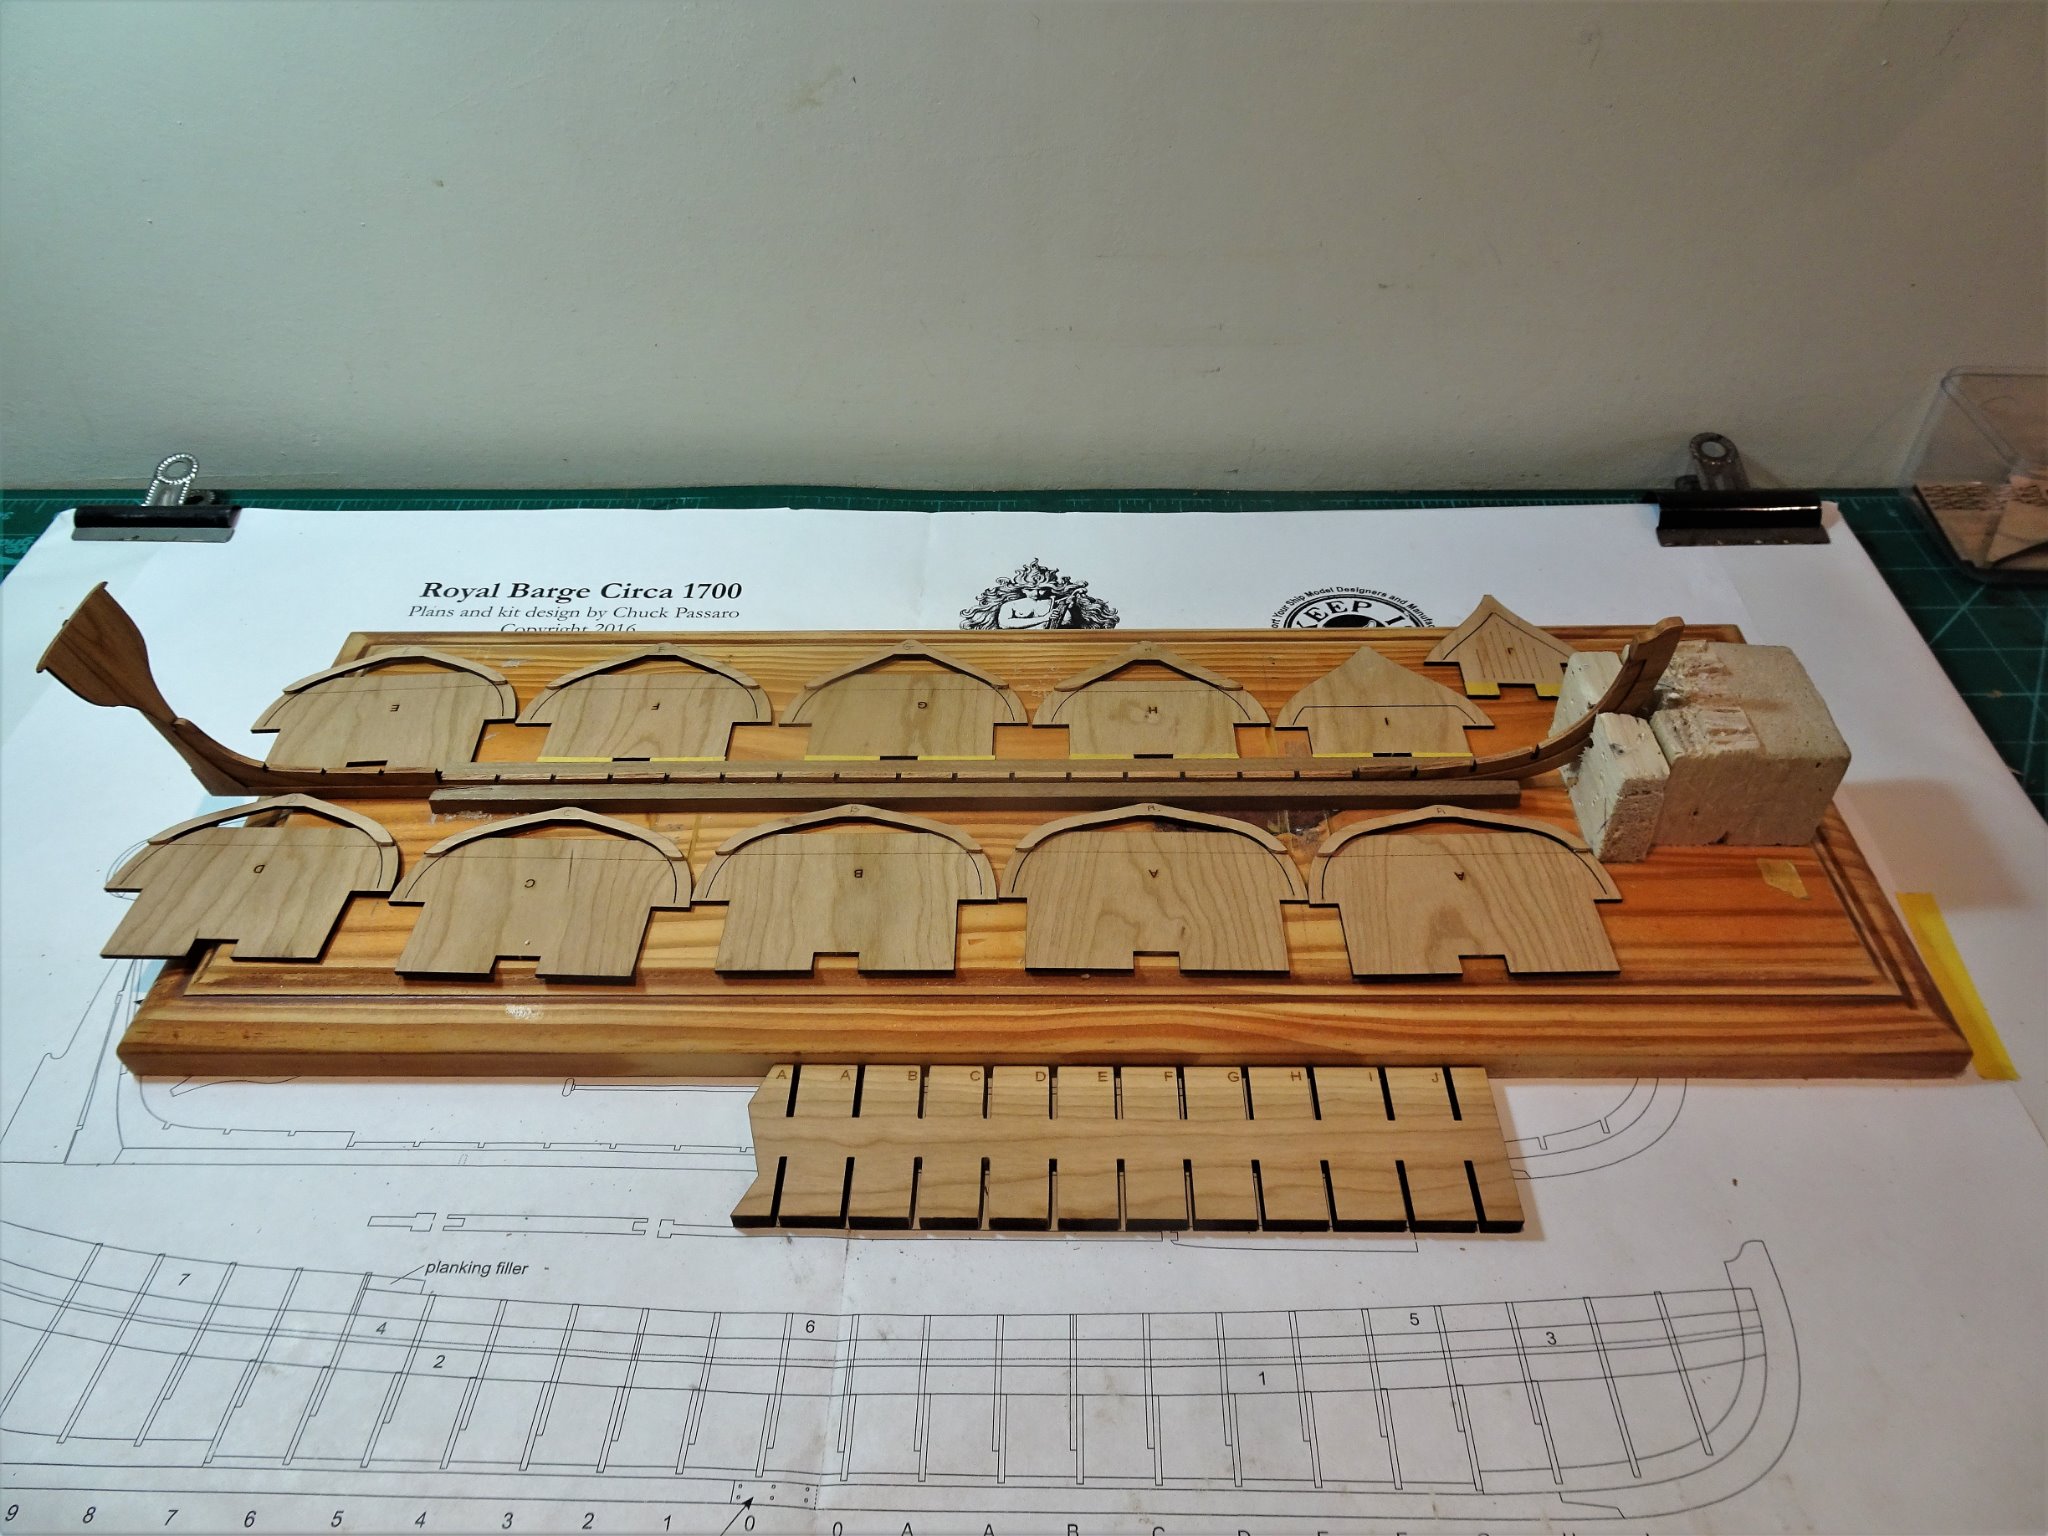
Thank you, Jason, I found your insights and tribulations regarding the frames of great assistance, and also a little worrying, good that you are returning to the build. Post Two Prepping the frames. With the keel section completed a simple jig/building board is made to hold the keel straight and prevent warping whilst I attend to the Futtocks and frames. 0759 A slow process but valuable in the sense that it lowers the natural build pace. This is not a project to rush, deliberate movements and soft hands are I suspect essential to avoiding mishaps on this build. 0765 I started with the fore half and found that futtocks J – F required tape over the tabs to give a good fit, and Futtocks E -B required the building board slots easing for a good push fit. The final two Futtocks ‘A’ fitted without attention. One slight hitch, I mistakenly glued a Frame O to Futtock A because the incised reference letter was closer to the O than the A frames on the fret. There are two Frames A and O. My error was quickly rectified but I note it as something to watch out for. 0767 The aft half of the Futtock/ frames generally fitted without attention, only a couple required slot sanding and the application of tape. 0819 Before going further I test checked each of the frame bottoms into the keel slots, most needed a pass with the sanding stick to fit in the slots. I hesitated about what to do with the keel slot for Futtock 7. This was narrower because the long central keel slot section was slightly reduced to fit on the keel. I settled on a combination of shaving a fraction off the forward edge of the slot and reducing the frame bottom. I didn’t want to thin the frame bottom too much lest it weakened the structure. 0832(2) 0825 Having checked both slots and tabs the parts will now be taken apart and the building board support blocks added to the underside. B.E. 04/03/21


.thumb.JPG.f979d0fb791a151561c849733ed91f53.JPG)
- 185 replies
-
- 14
-
-
- queen anne barge
- Syren Ship Model Company
- (and 1 more)
-
Looking very smart Bradley, nicely done 👍 B.E.
-
Wow Glenn a lot of progress since I last looked in, very nice iron work, and Cheerful is looking splendid. Your post on making the boom crutches brought back memories of much fiddling time getting those angles right, happy days. 🙄 B.E.
-
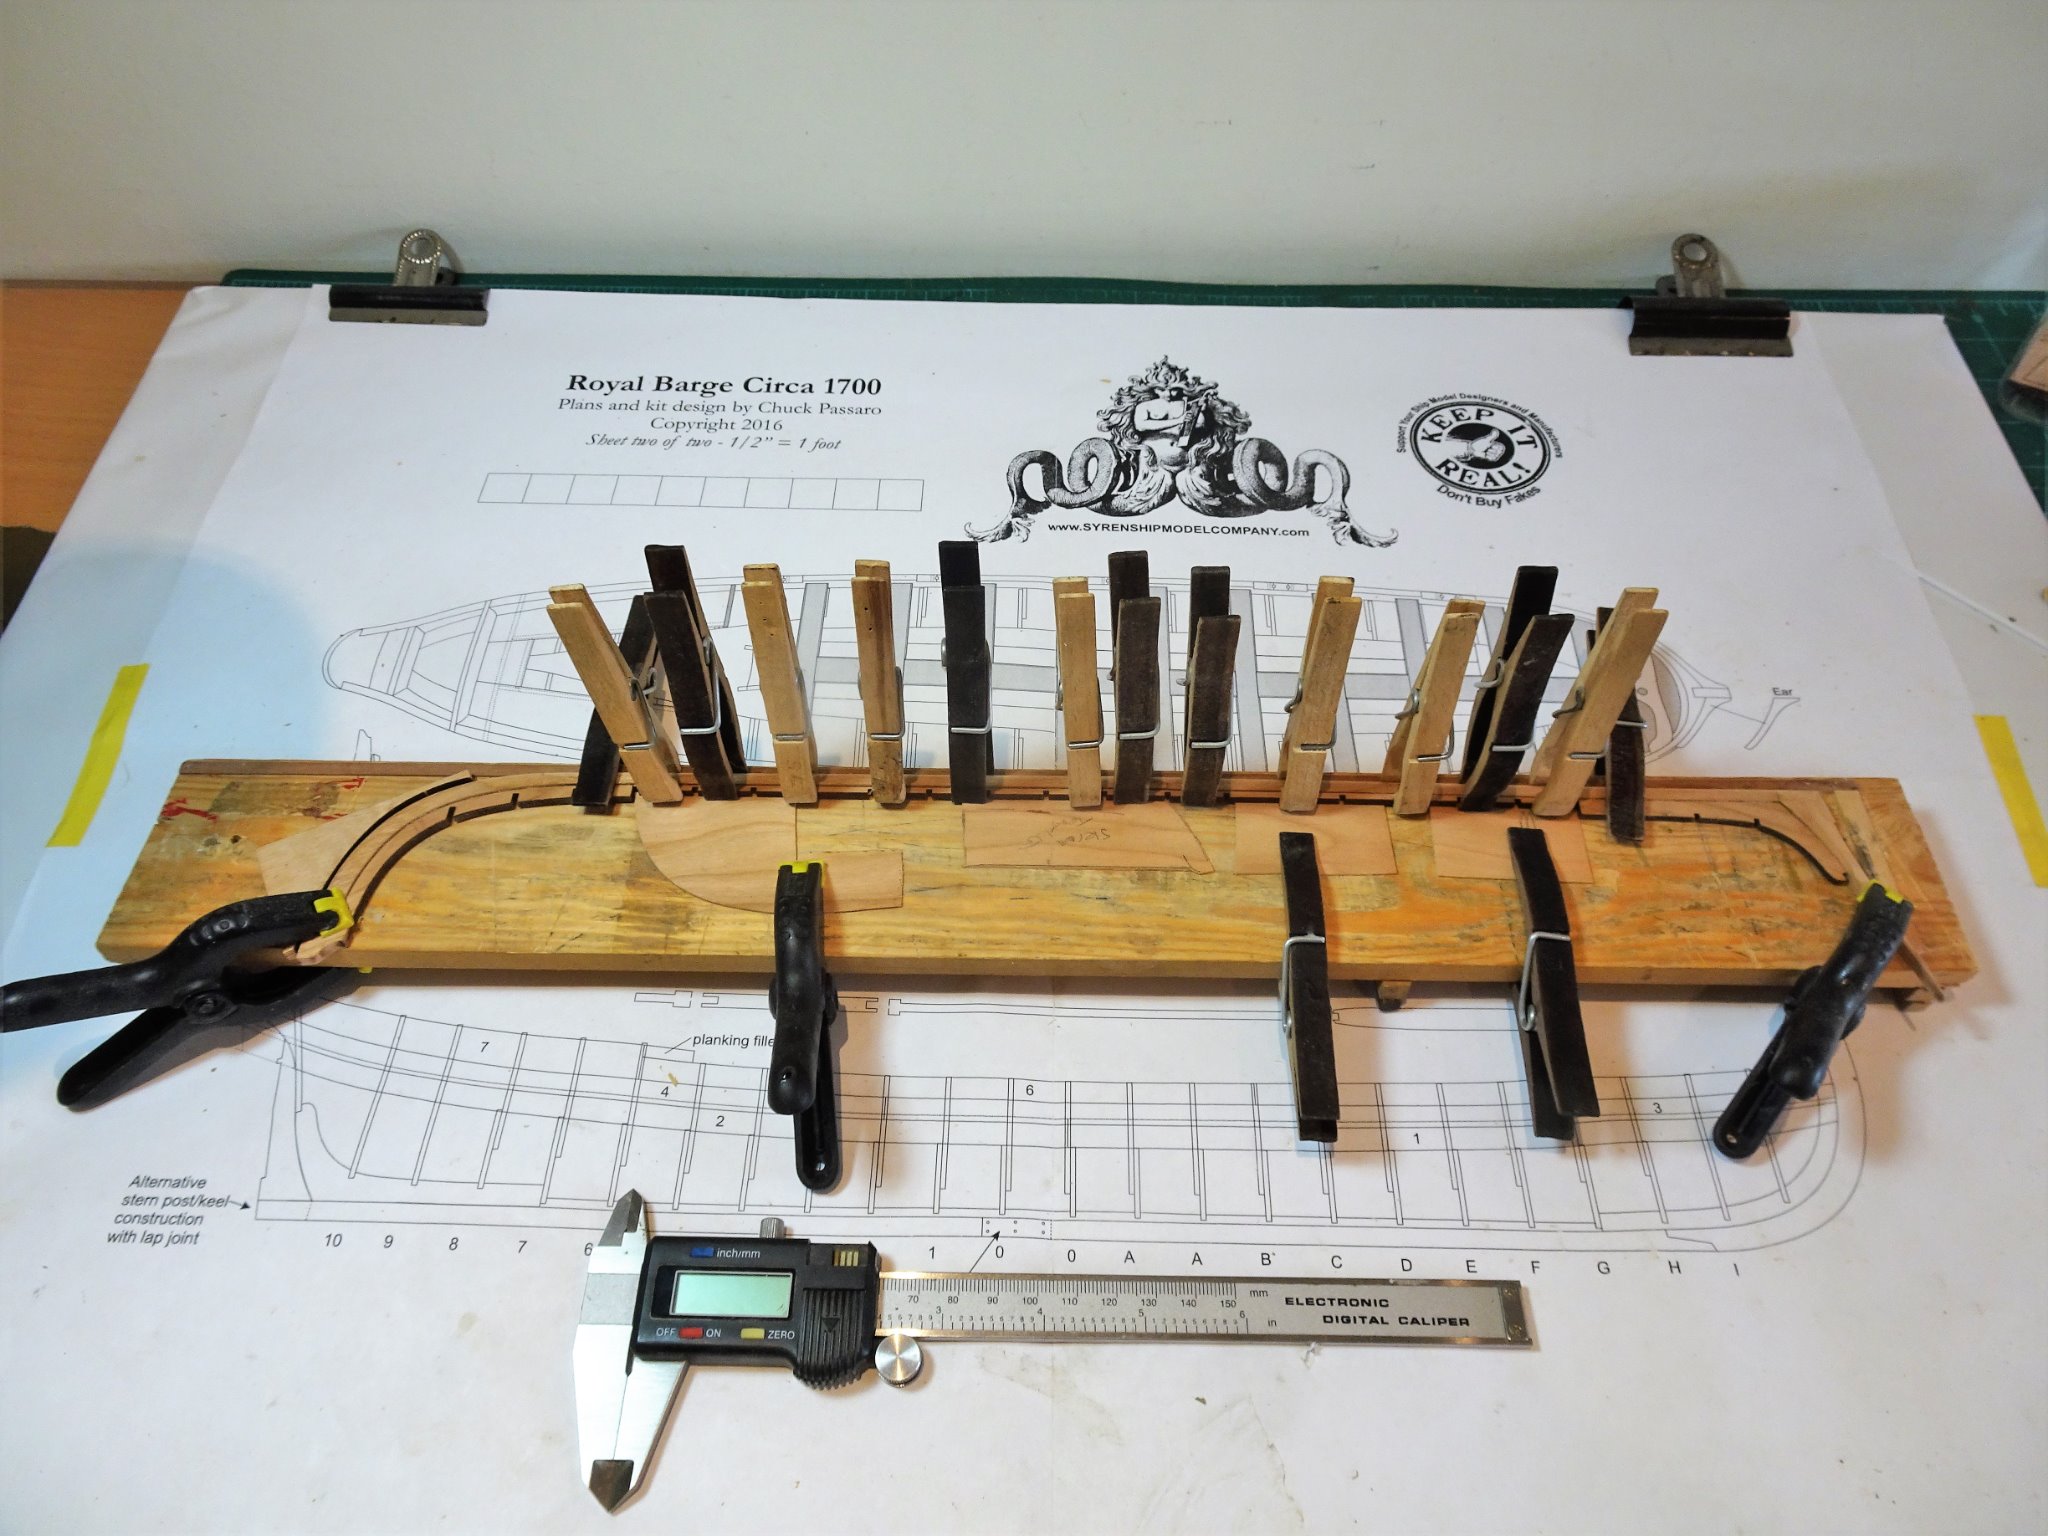
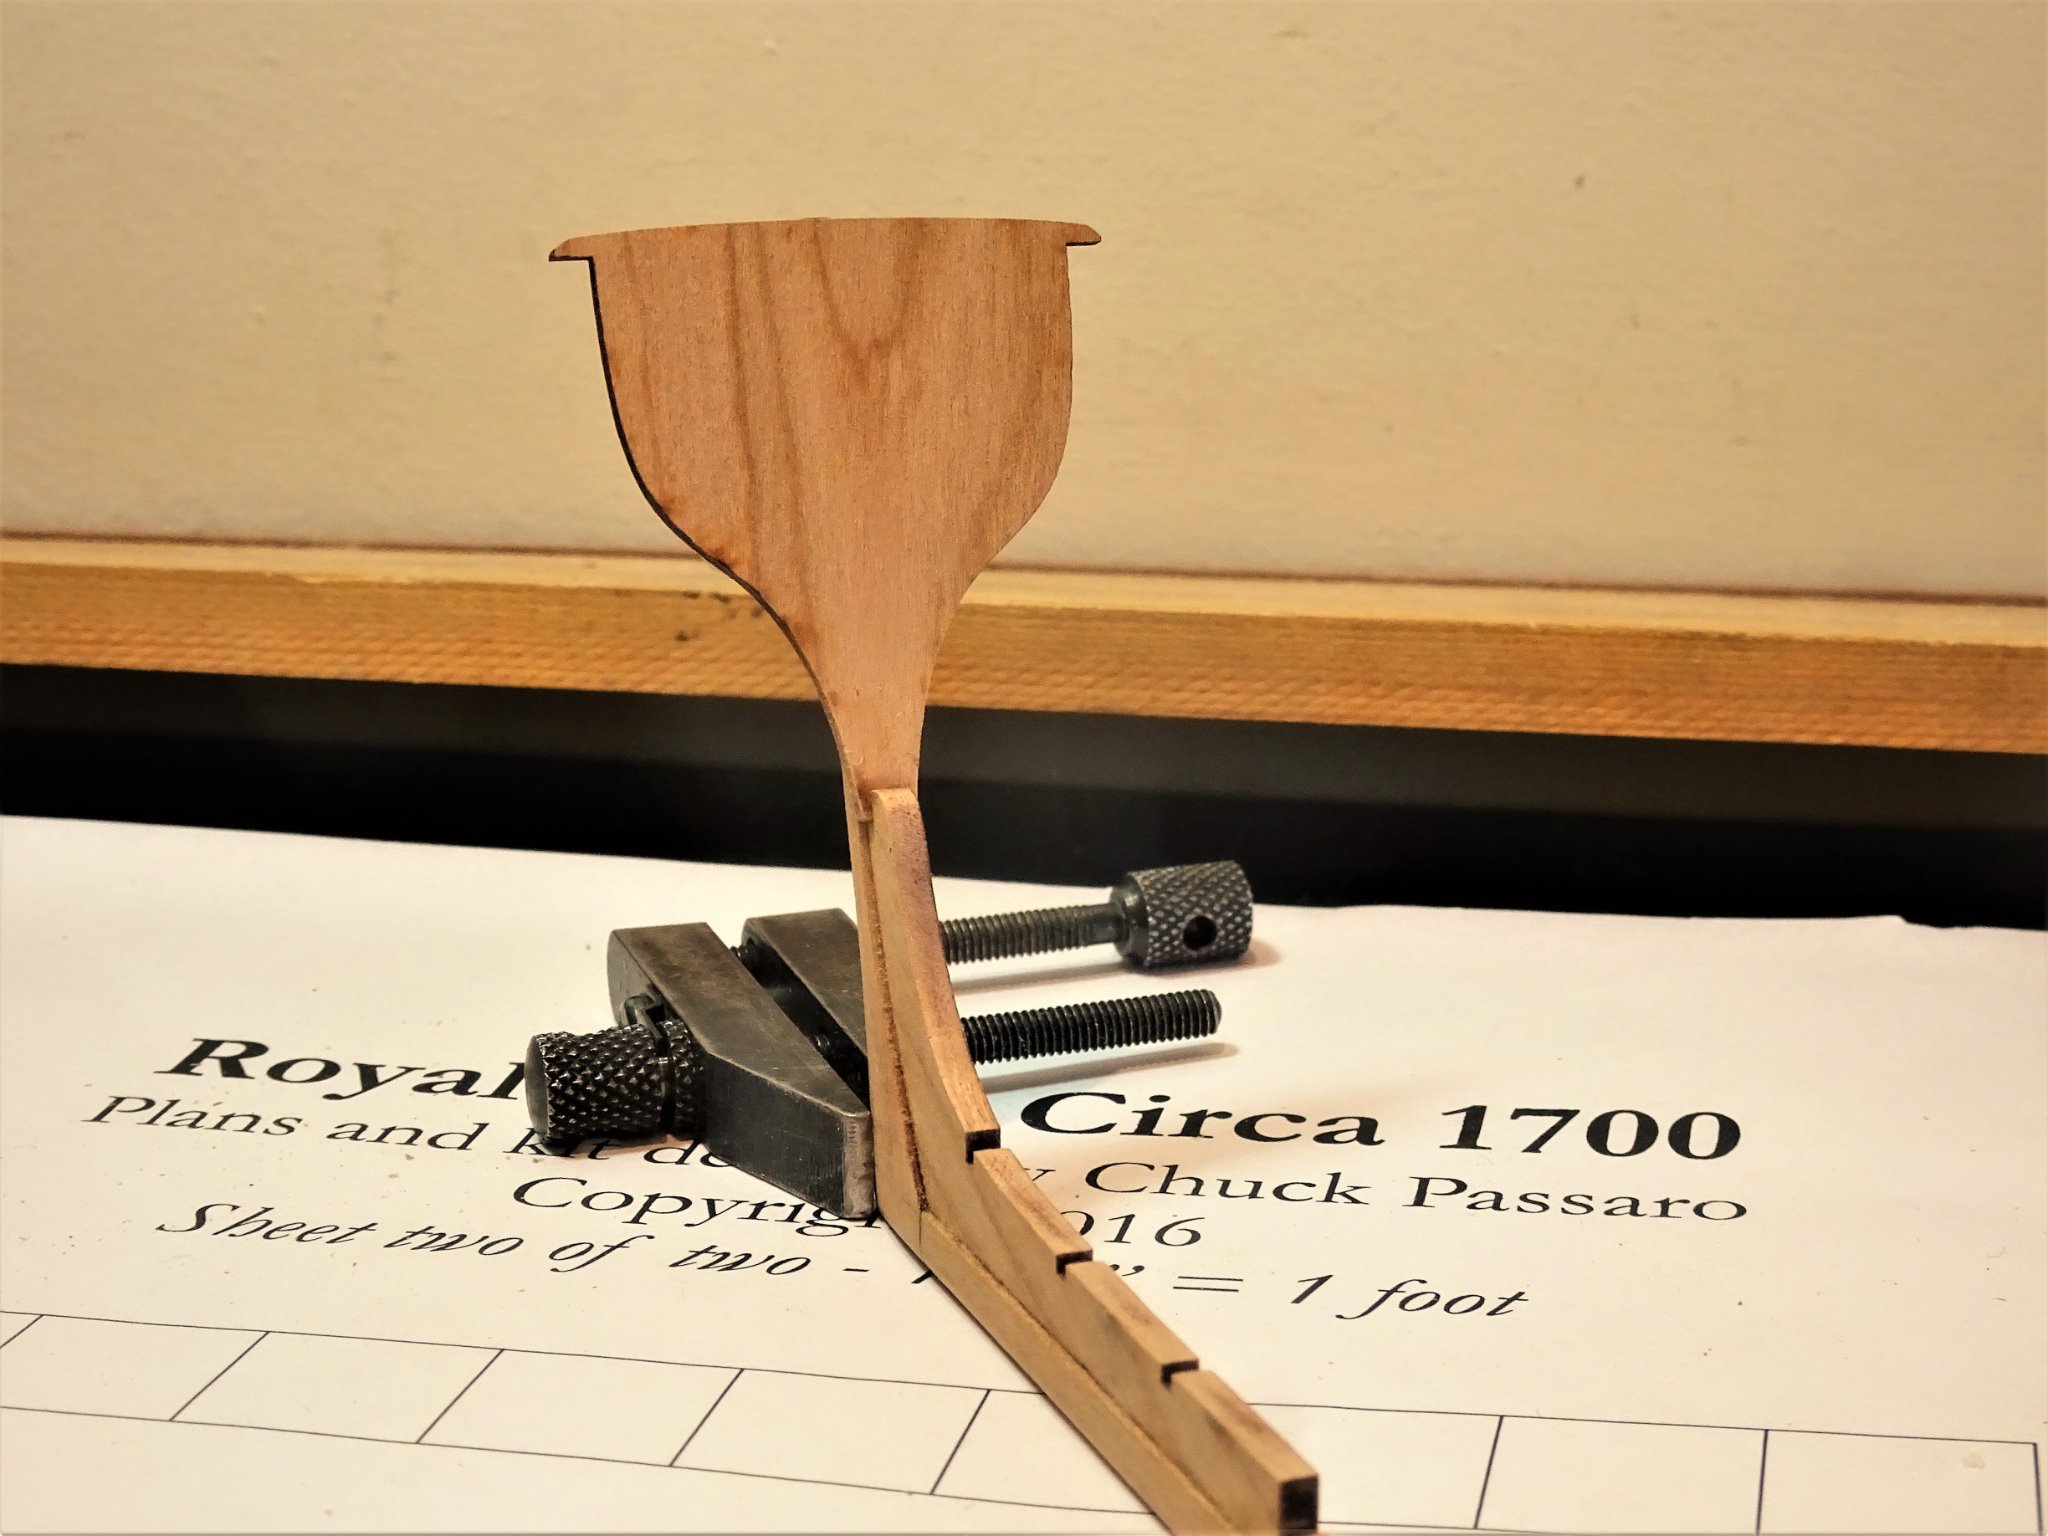
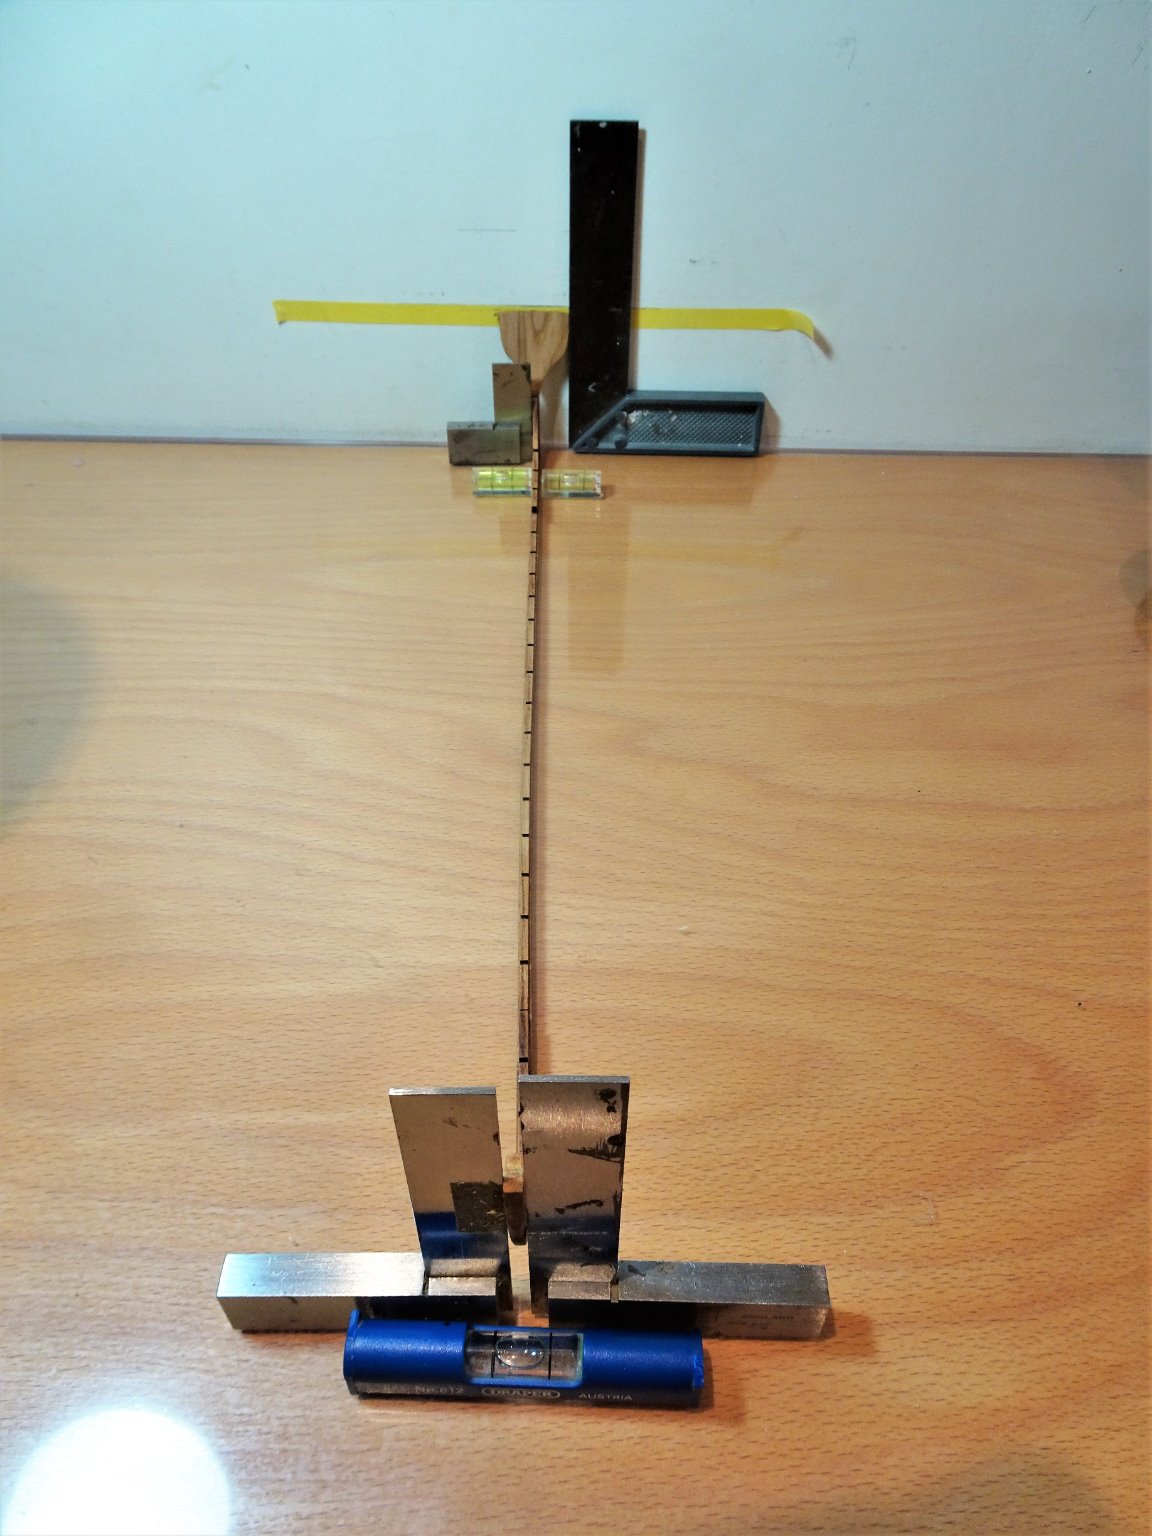
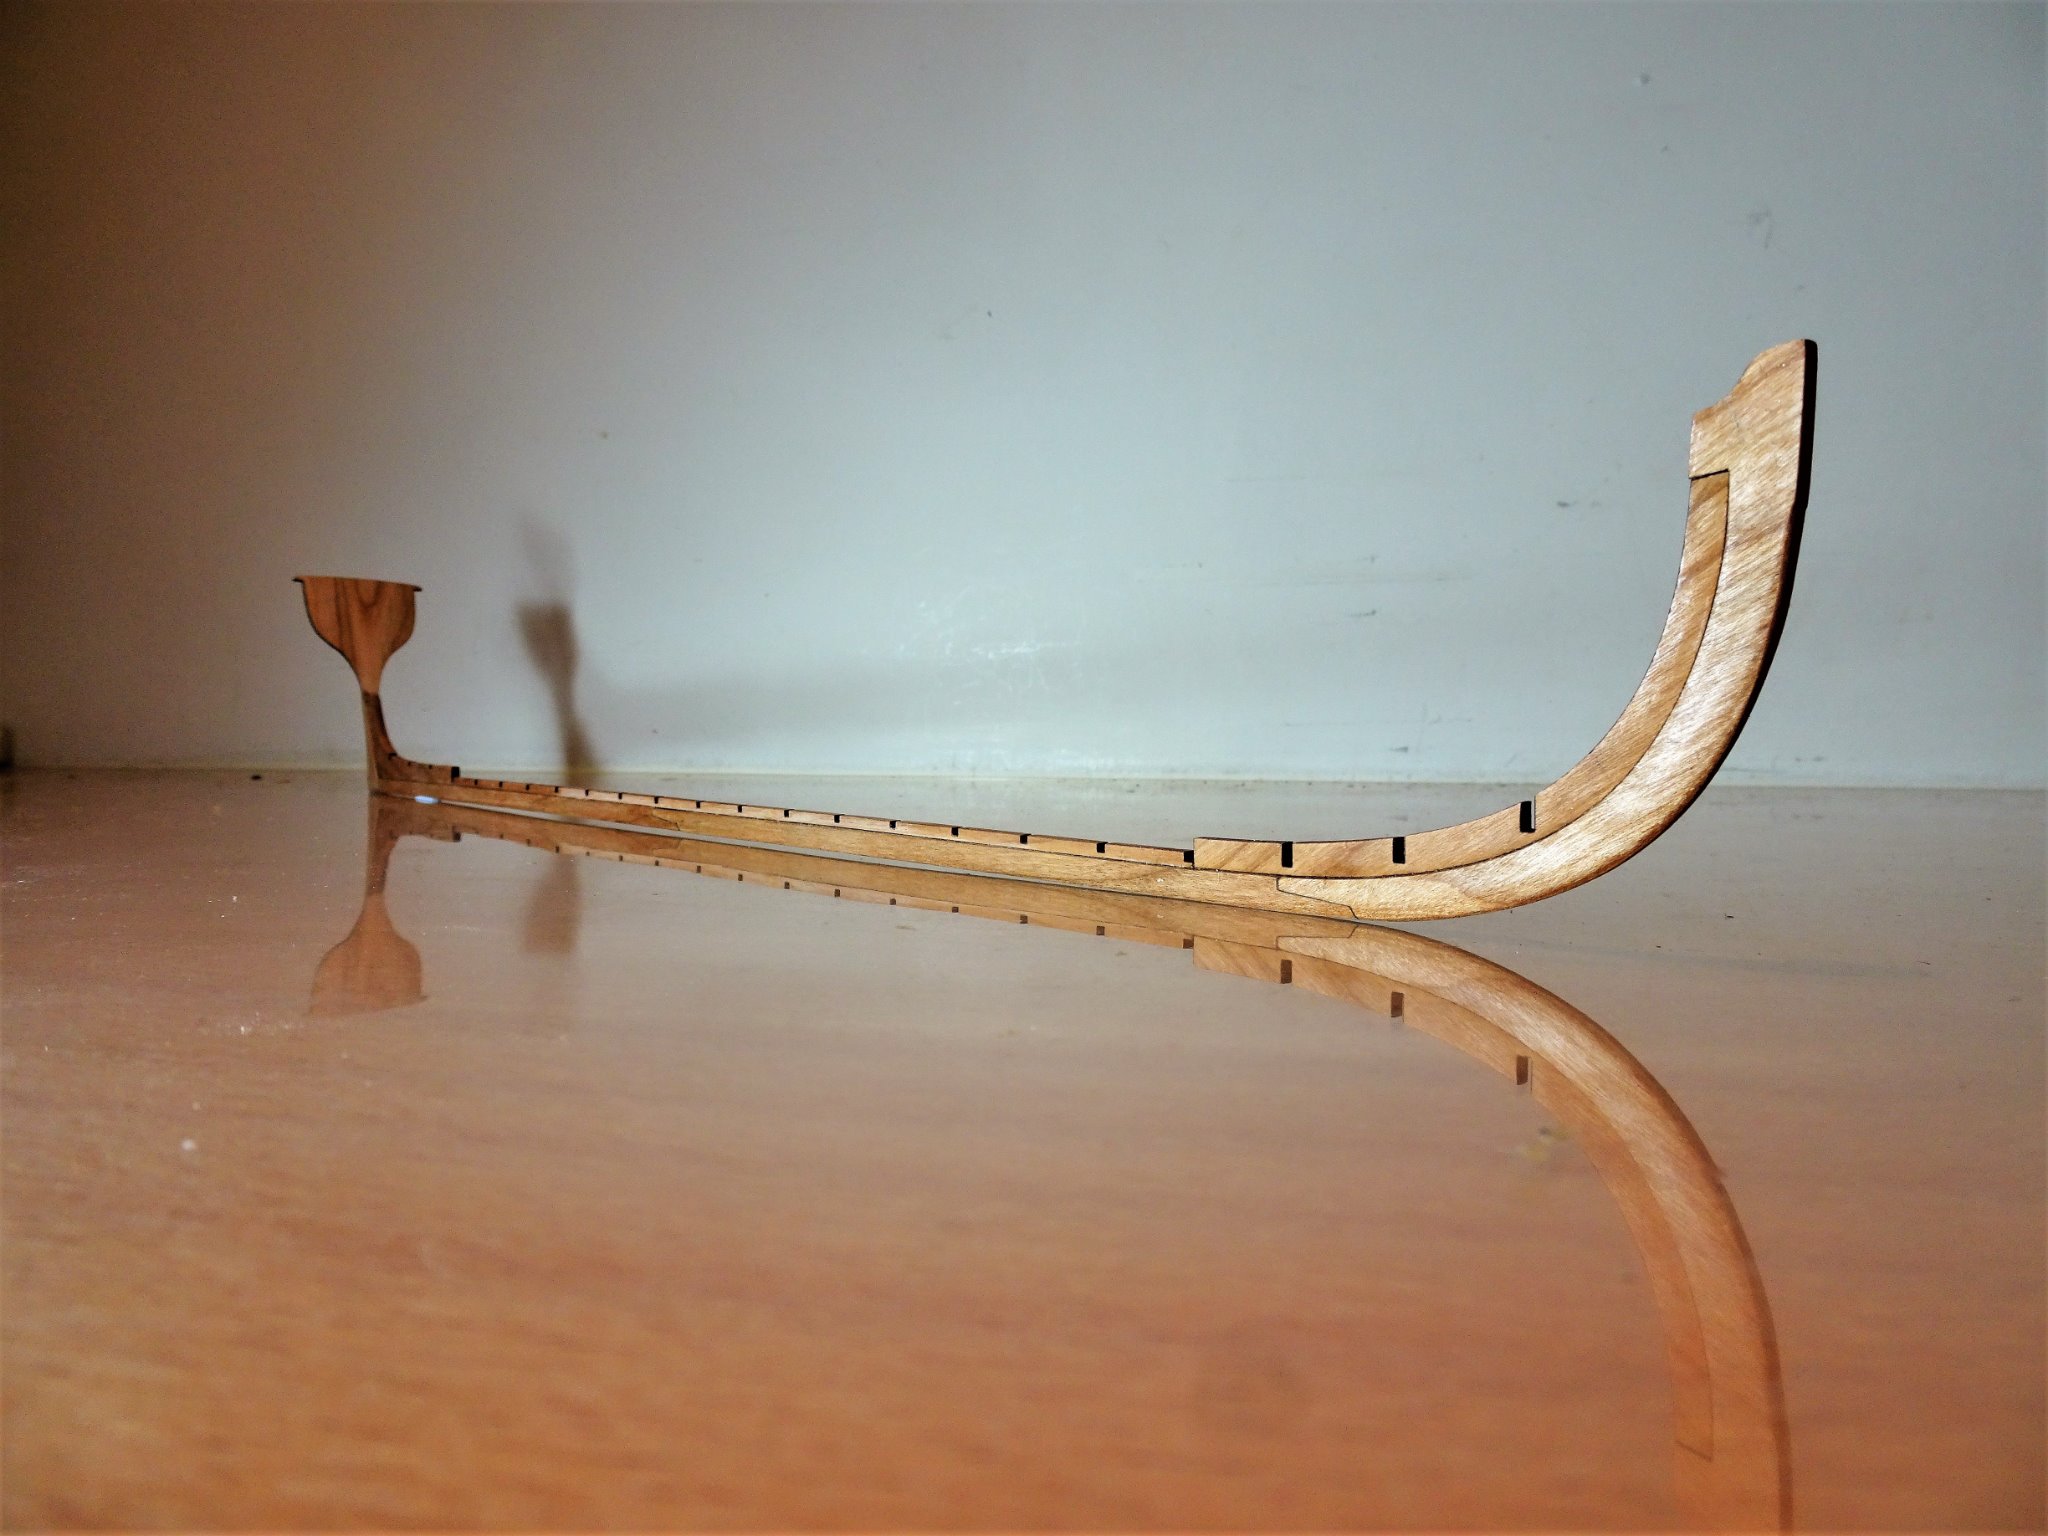
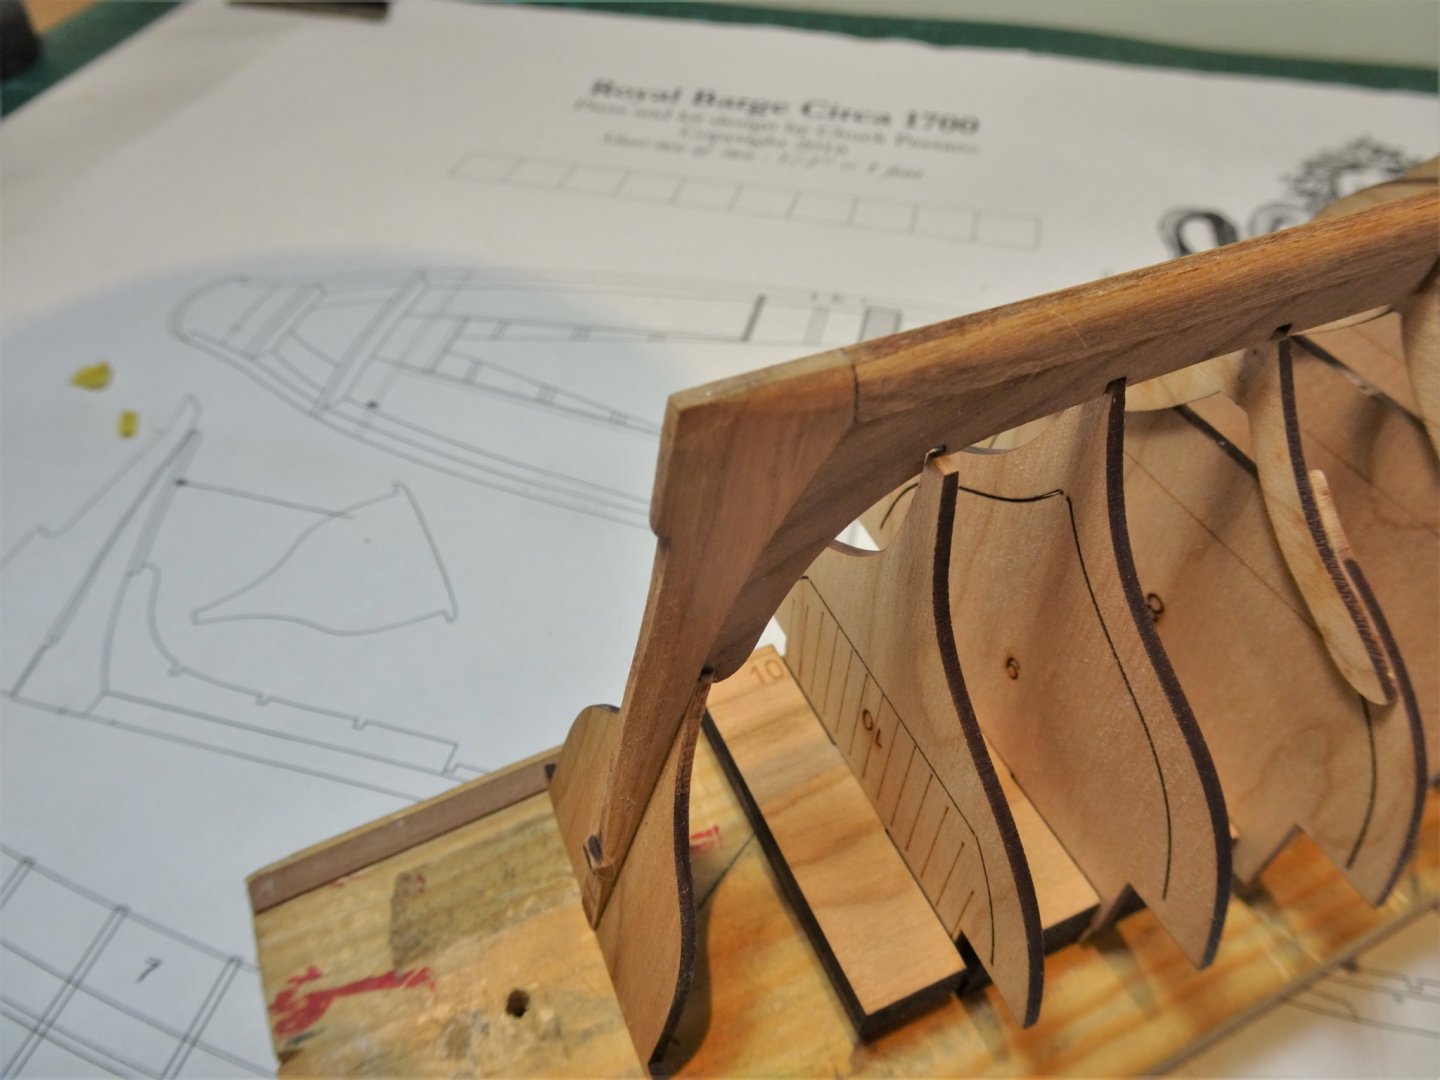
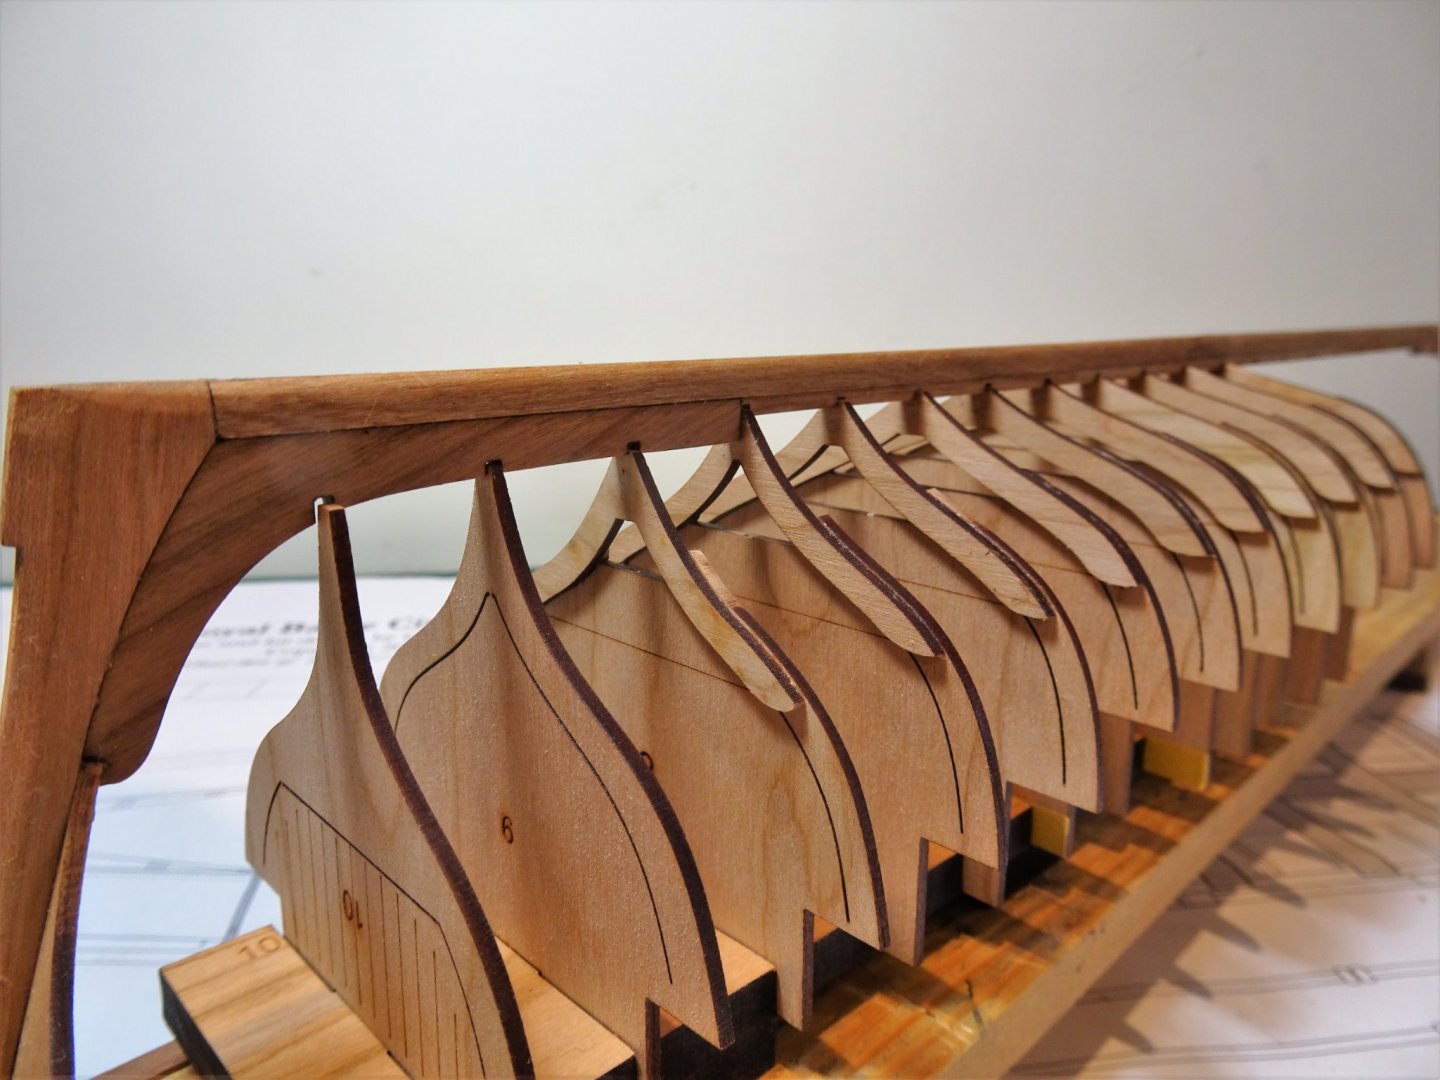
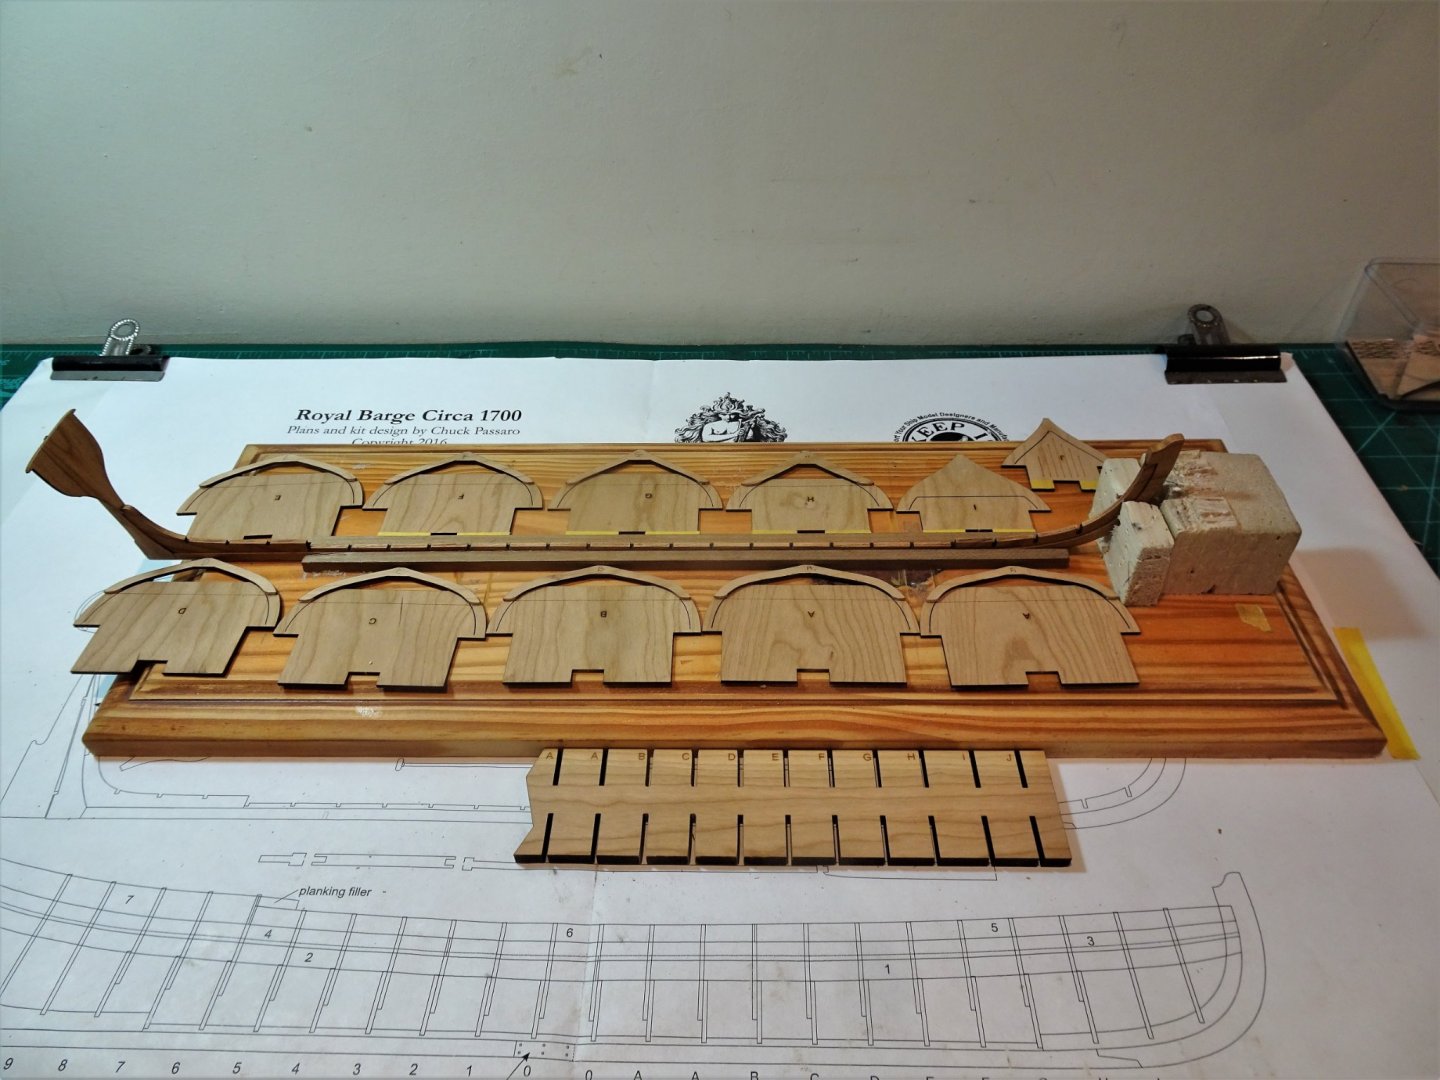
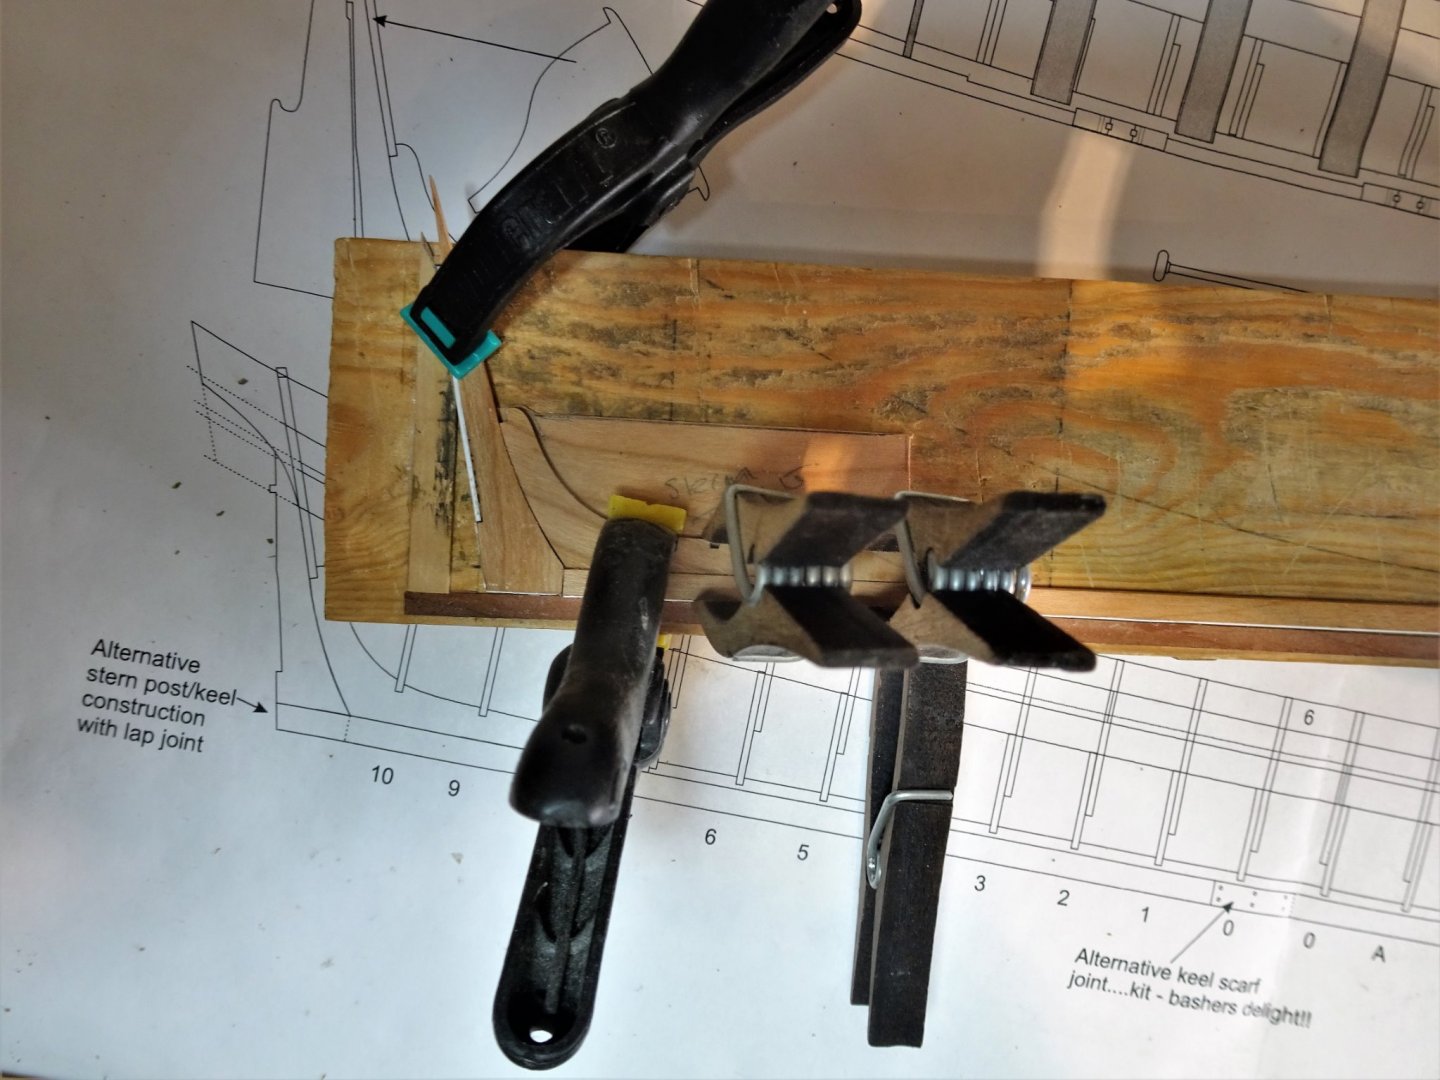
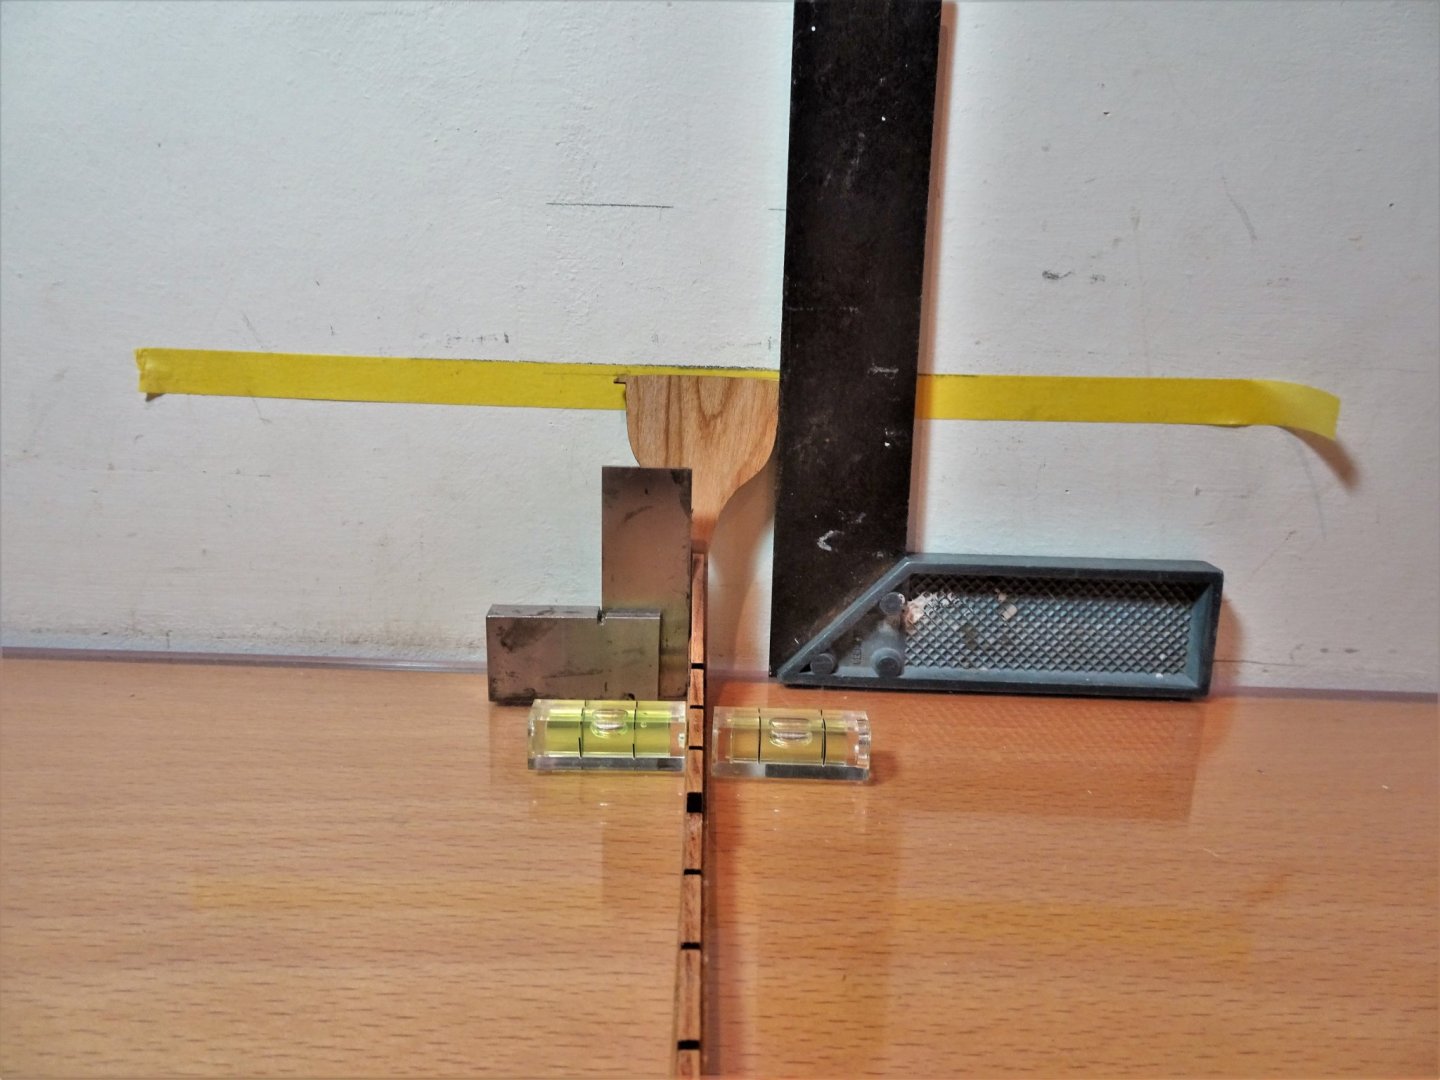
Post One This involves the keel assembly and I was happy to follow the leads of JpR62 (Jean-Paul) and Chuck Seiler, by using scrap 1/32” sheet to assist the alignment of the inner keel pieces. 0681(2) 0697(2) I utilised the fret cut out to hold the bow section during keel gluing and the inner keel sections. 0690(2) The stern section is likewise fitted in a jig for gluing. I also agree with Chuck Seiler’s approach of assembling the keel pieces as two separate sections and bringing them together only after tapering and the addition of the inner bow and stern keel pieces. 0703(2) This is a long keel secured initially only by the central scarph and I share his concerns about the risk of breakage. 0709 Gluing the bow inner keel piece. 0713 …and the inner stern keel piece. The stem, keel, and Sternpost require tapering. The pieces are 4mm thick and will initially be reduced to 2.5mm. Final finish 2.38mm or thereabouts. The taper runs down the stem, starting 18mm down from the head, and from inboard to outboard. The taper continues along the keel from top to bottom and is also applied to the lower sternpost. To this end I have pva’d a styrene strip 0.25mm x 2.5mm along the parts to be tapered to give me a guide to the thin end point. With the two sections joined the centre inner keel piece can be fitted which adds security to the structure. 0721 Initially I used pieces of scrap 1/32” sheet to centre the piece along the keel, but this didn’t give a good result; something must have been off, probably me, so I resorted to placement by eye which worked better. Chuck mentions that the piece was made long on purpose and that sanding the after end may be required. In my case it did, reducing the keel slot size, the implications of which I have yet to find out. The final tweaking of the tapering is now done making sure the inboard edges of the keel remain untouched so as not to affect the rabbet. The final task of this part is to attach the transom piece. Chuck makes the point about ensuring the transom is perpendicular to the keel. 0735 There are etched lines to assist centring the transom, but I then used my eye and diverse methods to try and check that the piece was vertical to the sternpost. 0746 One of the diverse methods I used to check the transom was level. 0741 Not quite as simple as may seem given the inbuilt flexibility due to the length and relative thinness of the structure. 0756 A coat of w-o-p and I can move onto the next part. B.E. 01/03/21
.thumb.JPG.a73fab3db9dcac34fbba2f0728c8ed3a.JPG)
.thumb.JPG.c322d335116112f6f47256efdfeee897.JPG)
.thumb.JPG.16f8379a8d4e4d7830da35107858edf4.JPG)
.thumb.JPG.30143450fb34151bb7fc222c134e3bcf.JPG)


- 185 replies
-
- 14
-
-
- queen anne barge
- Syren Ship Model Company
- (and 1 more)
-
Neat work on the yokes, the swivels look good. I'm a big fan of RB guns, nicely proportioned and economically priced. Well done Tim. B.E.


.JPG.09c09369cf18fb3bc2a386785f543b8d.JPG)

.JPG.293d3ac6ead2efc699f7366c173c13a6.JPG)


.JPG.7d64bab75d4676d98b8ddc84e9f2f00e.JPG)


.JPG.a4c4d5b0fab7d4cfb14e97688c166bf6.JPG)
.JPG.53afbd4c851788f44ca0d267926d2f96.JPG)
.JPG.6a8ee8a9f773485b12965ade670f8253.JPG)

.JPG.e9020923397edce4ec3cf4d4273a2afe.JPG)


.JPG.f245b62a91756c3c0586949c9cbc388a.JPG)
.JPG.e31775774bb7c28474efd1740ff45c33.JPG)
.JPG.b0edab72ad3a4628fb3bf675d9cc3667.JPG)


.JPG.cc793d1566ceb1a6b8364fbf7bc934c5.JPG)


.JPG.fb6446ca7df8c8c00ff458e3f38003d0.JPG)
.JPG.64988a1c1097b50b1010d01cd474f075.JPG)
.JPG.6dd615f36006d89c669b7b9505412230.JPG)
.JPG.6f84b9fa58f56dc930387b50d84f6a85.JPG)
.JPG.9507f2273a272337a0fde8682fb14e45.JPG)
.JPG.9fe24dafb32380575a73159c8a7b93c0.JPG)
.JPG.017a64369b404fa229c1219d5078e185.JPG)
.JPG.93157a80b2fc05d770f4264f8dc52981.JPG)
.JPG.8d26c9bfd536355c77c3f9029380b6a7.JPG)
.JPG.fb91e1a7b8262f90cade08b29735e885.JPG)

.JPG.e05a25f2cb1f7126db706e771069dccd.JPG)


.JPG.6c666fa8bf133443e40c803a2ca9fbc2.JPG)

.JPG.e8831b6783c0b51bacc61893814cadf7.JPG)
.JPG.3cfc213e9ebb66e3f2ca0e3eca4cd33f.JPG)
.JPG.a5fe30037c2cdbd06470b43b42f1ef36.JPG)
.JPG.bf2880aa440fe51f2ca1553c851c1ff6.JPG)