


Landlubber Mike
-
Posts
4,549 -
Joined
-
Last visited
Content Type
Profiles
Forums
Gallery
Events
Everything posted by Landlubber Mike
-
 I haven't used gloves, but good idea - I better start!
 -
Thanks Nick - that’s very helpful on the pens. I noticed that also. The finish is pretty amazing when done right - reminds me of the liquid terminator from Terminator 2 with the vibrant metal color.
-
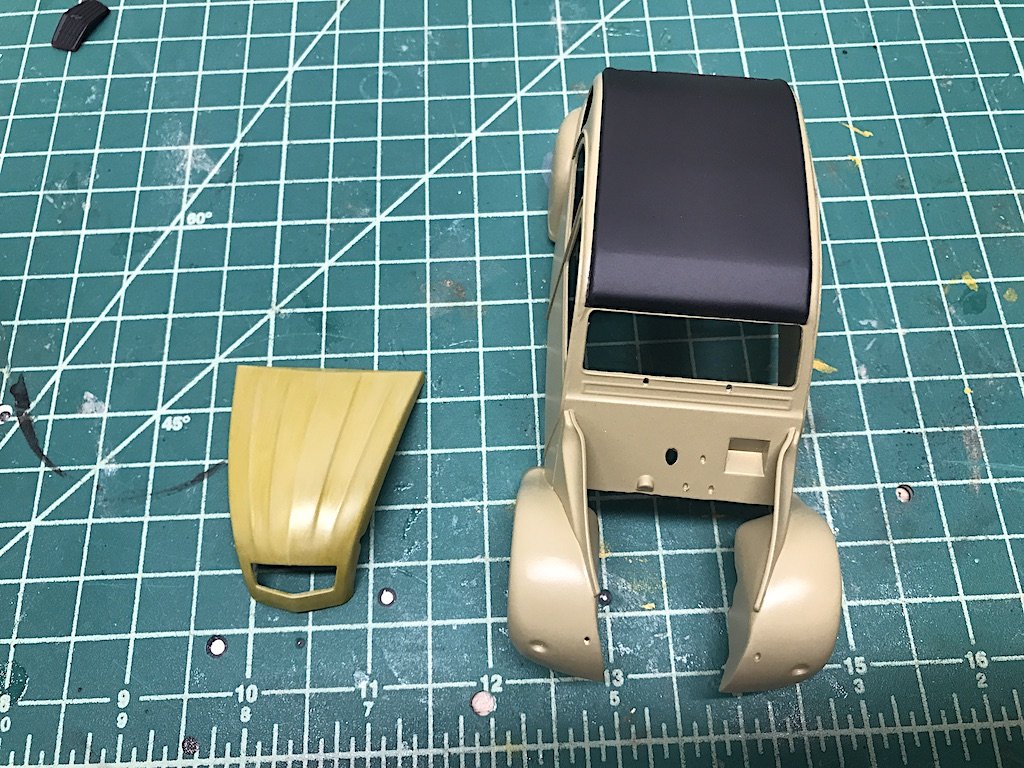
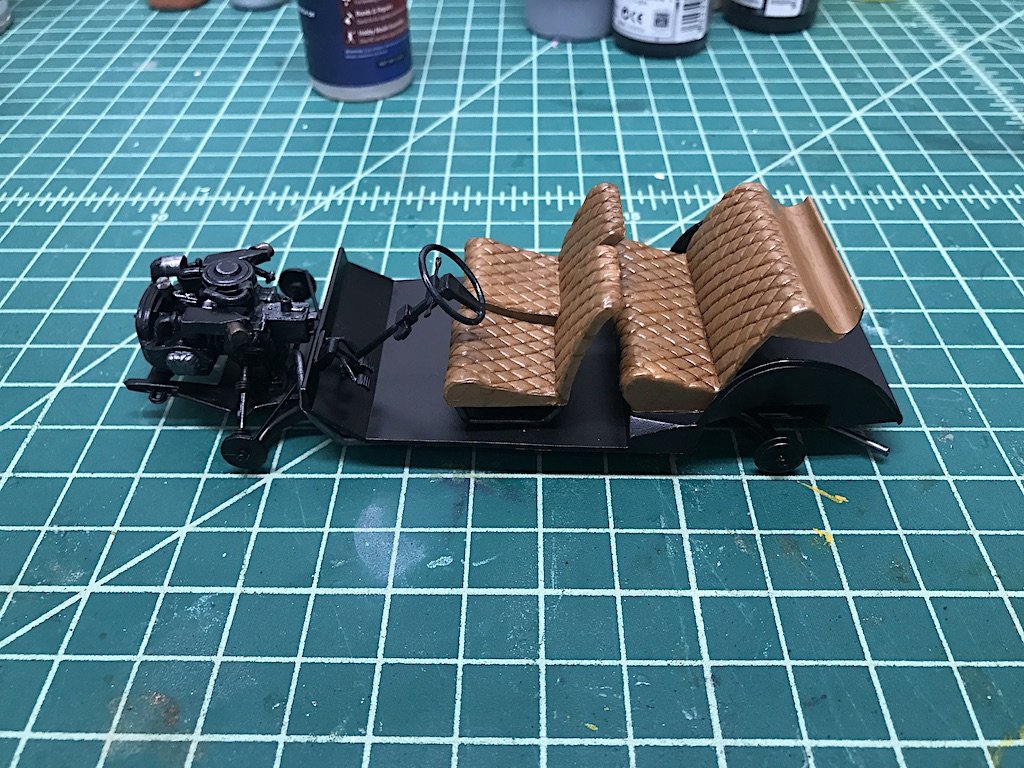
Thanks for the kind words everyone. I've made good progress on the Duck, and am on the home stretch. Chassis, and engine are complete: Also painted the exterior of the car body. I started with Tamiya Dark Yellow (rattle can) as you can see on the body, but it was more tan that I would have liked. So, I added a couple of layers of Vallejo Yellow Wash which you can see on the hood. Looks much closer to the yellow color I was looking for: I don't have pictures, but I've been playing around with some Molotow markers that I have. I used black to outline the doors, which worked nicely. Only problem was I applied the wash thinking the black markings had dried, and ended up with some black smears that I needed to paint over. Now I know that the Molotow black markers need time to dry. 🙄 I also tried using the Molotow chrome pens on some of the accents, including the mirrors. The color is absolutely incredible, but I found the markers a bit tricky to use. Will have to try them again. At this point, I'm close to being done with this kit with everything being painted - just need to stage things including touch ups which takes more time than I usually think. Even though this kit is fairly simple, and not the crispest in terms of the details, it's been a fun first car kit since I was a kid. I have the Tamiya Citroen 2CV kit as well that I might build after this one. Looks a little better in terms of crispness of details, etc., so it should be interesting to see how they compare.
- 126 replies
-
- 15
-

-
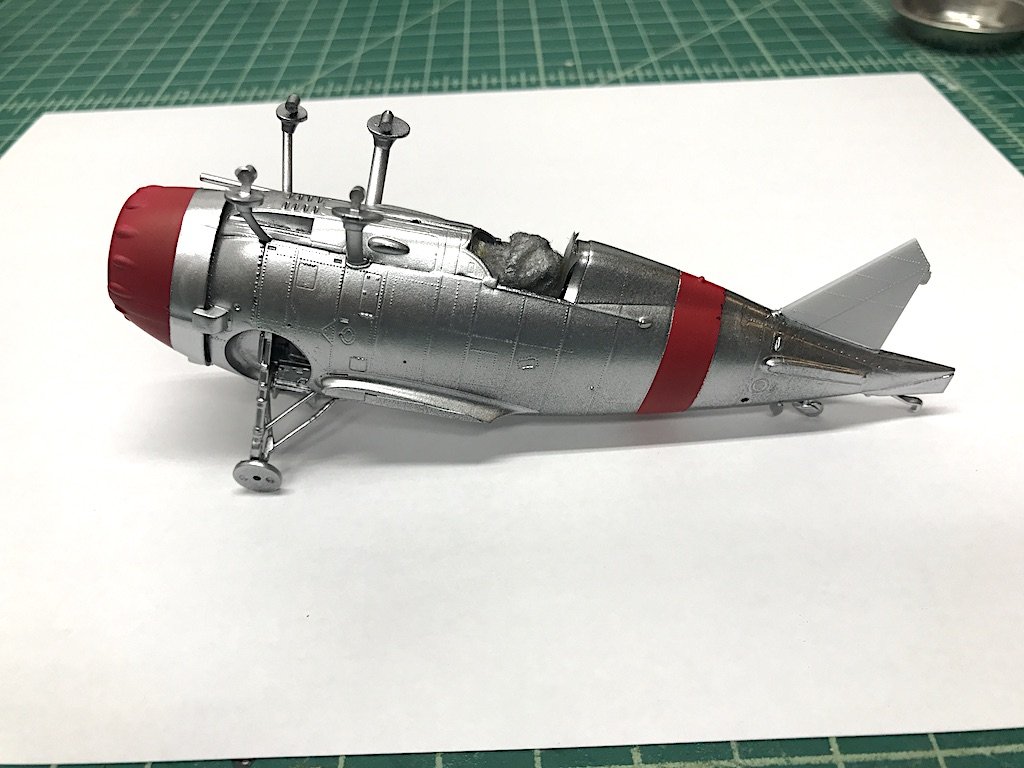
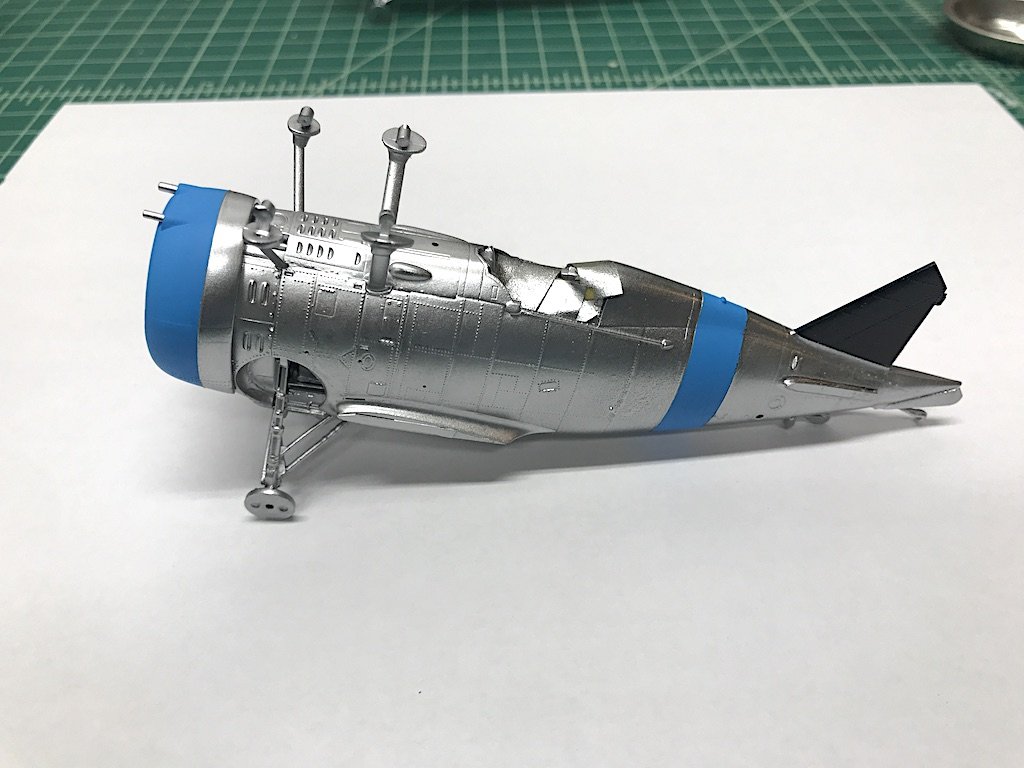
Well it's been a month, but I've slowly made some progress on the F3Fs. On one of the models, I dropped the model maybe 3" to the table, and one of the landing gears became disengaged and with one of the support breaking. The kit has you insert a piece and then flip it 90 degrees and then 180 degrees which helps put pressure to keep the landing gear and supports at the right angle. However, there's enough tension that dropping it can be problematic as it was in my case. The landing gear also only has a slight depression at the top where it's supposed connect to the fuselage body - it is very hard to keep that in place while glue sets given all the tension with the lower pieces. Eventually I got things fixed - required some epoxy and cutting out and replacing a couple of the supports so all is good until I drop it again. 🙄 I also had to work through some issues with the belly bands - first time I painted them, they were a touch too narrow. I tried to repaint, but I sprayed too heavy and lost detail. 😡 So, I had to strip a bunch of the paint off and try again. Time consuming on the red because I realized that if you paint red, the underlying color will affect how the red turns out (at least using Vallejo Model Air). So, because I wanted a brighter red color, I used Tamiya's white primer straight from the rattle can as the base coat, and then painted the band on top. Tip to pass along - Tamiya's Lacquer Thinner is great at removing Vallejo acrylic paints! Dip a Q-tip in, rub a little, and it comes off fairly well. To redo the bands, I made them wider the second time around, given that I would eventually be using gloss black primer as the undercoat for the aluminum body. Stupid me, why didn't I do that sooner? Would have saved me days of time (I've been trying to wait at least 24 hours for the paints to cure before masking). Speaking of masking, I found using Tamiya's white curve masking tape to mark the edges worked very well. Then I used the Tamiya yellow tape to mask the remaining items. Then I used Vallejo Gloss Black followed by Vallejo Metal Color Aluminum - am very happy with how things are looking thus far! Need to do a few touch ups on the red and a bit on the aluminum, but the colors are beautiful. The Vallejo Metal Color series really puts on a gorgeous metallic color. For next steps, I need to figure out if I want to paint the identifying numbers along the belly band using the Montex stencils. For the F3F-2, there is also a small US insignia above the landing gear that I can paint using the Montex stencils. I could instead use decals, but I've already tried out the stencils to add the US insignia to the wings and and am fairly satisfied with the results. It's a pain though, as you first paint the white disk, then add a stencil for the star in the middle while adding the blue background, and then add a third stencil to add the red center dot. The Montex stencils worked fairly well, but did get some color bleeding under the second two stencils. I used a toothpick to scrape off a bunch of the blue and red errant paint - worked fairly well, but I still need to touch stuff up. Makes me think I might have just been better using decals from the beginning, but thought it would be a good learning experience. Otherwise, I've got pretty much everything but the canopies painted at this point, so I'm on the home stretch. Thanks for looking in!
- 128 replies
-
- 15
-
-
Wow, looks incredible man! Very good job!!!
-
Those sails looks fantastic, really nice job!
-
Nice stash! Those Gotha G.IVs are worth a fortune now. I was fortunate to pick up a few kits at retail just when Wingnut announced they were closing. Now that they indeed seem to be done, the prices have really gone up the last few weeks.
-
Miniature Russian carving tools
Landlubber Mike replied to druxey's topic in Modeling tools and Workshop Equipment
Excellent! They are fantastic! -
I started with this lathe years ago on my first build. I really enjoyed it. Ended up selling to upgrade to a Sherline, but it's a great mini lathe for small wood turning. Worked a treat when it came to sanding taper into masts.
-
Hi Henrik, many thanks for your thoughts and observations. Just to be clear, I didn’t mean to imply that the Euromodel kit was of the Venus. Clearly they are different ships. All I meant was that Chapman’s Architectura diagram - which the Euromodel kit is based - looks very similar to the Venus which Chapman designed. In zu Mondfeld’s book, he shows the stern of the Architectura kit (again, the subject of the Euromodel kit) and calls it the Jupiter. Whether there indeed was a Jupiter I don’t know and can’t find any evidence of such a ship. But, I think based on the fact that it was in Architectura and bears so many similarities to the Venus that it is likely a Swedish ship and not a French ship as Euromodel suggests. All that being said, I think this is one of the most beautiful kit subjects on the marketplace, and the kit itself is fantastic when it comes to the plans, materials, etc.
-
MRAP ATV by CDW - FINISHED - Rye Field - 1:35 Scale
Landlubber Mike replied to CDW's topic in Non-ship/categorised builds
Wow lot of very cool detail in this kit. Nice job! -
For me personally, the least guesswork in a kit the better. For example, I'm enjoying building the Euromodel La Renommee, but having to mark out the gunports and make sure they were aligned, proper sweep, same run on both sides of the hull, etc. ended up being many hours of extra work. Maybe I'm a bit of a perfectionist, and maybe this is not an issue for others, but it was a real drag on my overall positive experience with the model to the point that I was burned out by it and put it aside to work on other things. While I'm fine with doing some research on things like colors and potential bashes to add more detail to a kit, I'm there to build, and I really don't want to have to spend the time figuring out the basics. So, I think this is the right approach (at least for people like me), and I can tell you put in a lot of thought on other kits you've designed (I believe you did the Pegasus, but I could be wrong).
-
Micromark scroll saw?
Landlubber Mike replied to jeffBoats's topic in Modeling tools and Workshop Equipment
I'd look online on Craigslist. Lots of saws there that were barely used in one off projects that are now for sale. I picked up the Dewalt a few years ago that had been barely used, with stand, light and extra blades, for like under half of retail. I think you'd do better going that way than buying a Micromark tool (which generally don't have great reviews). -
Fantastic work!!! Great modeling, and the diorama really brings the subject alive. Excellent job my friend!
-
That looks fantastic EG - thanks for taking the time to experiment and share the highs and lows. Seems to definitely have promise... Would adding a clear coat help seal the wax, etc. in to help with the masking? I know that with bare metal foil, paints like Alclad, etc., adding clear coats ends up dulling the finish. Ends up being a catch 22. For my F3Fs, I'm probably going to add a gloss coat after painting with the Vallejo Metals in order to put on decals/paint insignia and eventually weathering. I've noticed that in taping the canopy interior, a bit of paint came up from some of the taping. 🤬 And I didn't tape very hard, so I'm a bit nervous taping without a clear coat of some kind. *EDIT* Just saw that you were going to call it a day on this one. Again, many thanks for sharing the experiment with us. I've learned a lot! Certainly understand moving on.
-
Thanks for sharing your work on this. Did you consider insetting the walls into the deck as opposed to having the walls sitting on top of it? It's a little tricky as the kit doesn't have a sub-deck on which to add the planking. I have been working on other projects, but have been thinking about how to handle the deck and various deck items.
-
Really amazing work Patrick. Beautiful!
-
Ship in a Bottle by knightyo (Alan) - FINISHED
Landlubber Mike replied to knightyo's topic in Card and Paper Models
Fantastic video, thank you for sharing! -
I built the Caldercraft kit a few years ago and enjoyed it. It's a nice subject, good luck!
- 64 replies
-
- 3
-
-
- badger
- caldercraft
- (and 1 more)
-
I'm on a Mac, but Apple has a number of different preview options that enable you to scroll through a folder (thumbnail views, etc.) without having to individually open each file. Not sure if Windows has comparable functions. I agree with this 100%! Not only to be able to get everything back in the box, but this is especially important for some kits like the Rolls Royce Phantom kit where the body shell needs to be supported (many times the body is either warped or broken in my case). Paul sold me a replacement for a very reasonable price.
- 224 replies
-
- 10
-
-
Grant, really nice job on the wheels! To me, the wire wheels is what really sets these (and other models where the builder scratches them to replace overscale plastic rims) apart. Excellent! The steering wheel is fantastic. I've seen the Model Motorcars upgrades and while expensive, they do look amazing. With the incredible job you're doing on this model, In the end, you'll be glad you bought the upgrade I've thought about whether I could scratch build the wheel, but I am not confident I can pull it off. With all the alcohol and swear jar deposits, my guess is I'll just be better off buying the upgraded part. Speaking of expensive, they offer wooden rims for the Pocher FIAT. They look amazing but not cheap! The end cost is close to what I paid for the kit
-
My confusion mostly related to the bottom drawing - it seems to have a sharp drop in taper, but maybe that's because where the bottom of the "U" hits (in the middle top portion of piece 7), that area is much thinner than, let's say, the top of part 5. When I did my stem, I created a gradual taper from the hull to the tend of piece 7. My guess is that it looked fairly close to the bottom drawing in the end.