


Landlubber Mike
-
Posts
4,093 -
Joined
-
Last visited
Content Type
Profiles
Forums
Gallery
Events
Everything posted by Landlubber Mike
-
 Nicely done! Not easy to do all that framing in PE, but you make it look easy. Great job!
 -
My other Hobby by Javlin - Tabletop/Nightstand - 1/1
Landlubber Mike replied to Javlin's topic in Non-ship/categorised builds
Nice project Kevin! Do you ever rest?? Your building prowess is really impressive. -
This is a really cool project KD - very interesting and you're doing a wonderful job! By the way, did you sneak into my basement and take a picture of my stash?? I recognize a lot of those models
-
Just catching up with your log Rob - wow, you're really outdoing yourself again, and that is a high bar! Looks spectacular! The rivet decals make for a very nice touch.
-
Happy belated birthday Denis! Glad to hear you're doing well
-
Love it OC!! Nice job!
-
Nice to see you back Mugje. I hear you on losing interest in models and wanting to jump to something else. I've got a lot of models on the shelf. To keep myself building, I'll pick up a new one or go back to one I had started earlier when the mood and motivation hit me. For me, it's always been about the building, not finishing a model. By the way, that kit looks fantastic! The way the framing locks in like that is amazing. A lot different from older kits for sure. Looks like the fit of the parts is very precise.
-
Airbrush Paint
Landlubber Mike replied to CLovehitch's topic in Painting, finishing and weathering products and techniques
I'd probably stick with paints made for airbrushing, unless you pre-test and the paints airbrush to your satisfaction. I airbrush with Vallejo, Tamiya, Mr. Color and other airbrush paints all the time, and never have a problem. Specifically, I've never had any of the problems airbrushing water-based acrylics from Vallejo that Bob has mentioned - the paints are specially designed to be airbrushed and are already pre-mixed/thinned so you just put it in your airbrush and go to town (I usually add a drop of Vallejo Thinner and sometimes Flow Improver, but that's it). I will note that while Vallejo says that Vallejo Model Colors (the non-airbrush line) can be used in an airbrush after adding their thinner, they do note that certain colors may not airbrush very well, so I typically stick with their Model Air and Game Air line for airbrush work. Unless Model Expo paint has changed, I found it to be very thick (and frankly, not very good) and wouldn't bother trying to make it work in an airbrush. You can get Vallejo and other brand airbrush paints for a relatively low cost and they offer tons of colors. Regarding cost - not to appear insensitive to expenses, but sure you can get a big jug of craft paint for a relatively low cost, but how much paint do you really need? My guess is that eventually one will throw out most of the bottle after it dries out since you don't need much paint when painting models (as opposed to doing canvas paintings or other larger scale painting projects). The small Vallejo dropper bottles for example cost about $3, and have excellent coverage per drop of paint. I don't think I've finished a bottle yet after a few years of airbrushing. You can't beat the convenience. -
Amazing paint job Dan. Thanks for showing your step by step photos - good learning experience for me too.
-
Wow, nice job OC! I love it!
-
Oooh, me likey Rob!
-
Great job Scott! Love it!
-
MiG-3 by Javlin - FINISHED - Trumpter - 1/32
Landlubber Mike replied to Javlin's topic in Non-ship/categorised builds
Another great work Kevin! Nice job! -
Wow nice build Ken!
-
Me three!
-
Great job Chris! I can't believe what you are able to do with these card models - so impressive! And don't worry about the internet wet blankets
- 150 replies
-
- 11
-

-
Welcome back Dan - sounds like a great trip. Love the Tempest! Coming along great! Very nice birthday present too - I saw people were excited about this 1/32 release.
-
Wow, what an amazing piece of work Rob! I'd say you've outdone yourself, but hard to say that with your stellar portfolio of amazing projects. Did you use paint for the spoiler? Or bare metal foil? That reflection is really cool, I didn't think one could get that with paint.
-
Great start Craig! Looking forward to seeing this one come along. Looks like a nice kit of a cool subject.
-
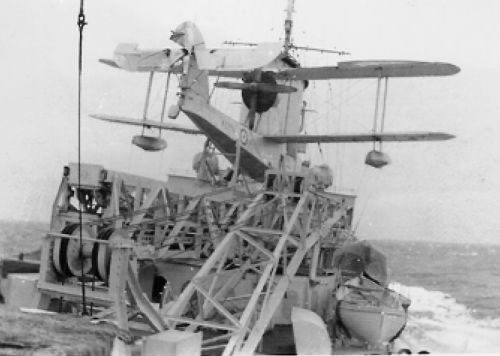
Thank you @Egilman and @Danstream! EG, when I started this project, I was thinking of something similar, with a larger higher rectangle with the Walrus display, and then a smaller, lower rectangle attached to the front of the Walrus display that would display the Albatross. That was before I realized how close in size the two models are. I like your diagonal side-by-side idea. I'll have to think on that a little more. While I had originally thought of displaying the catapult on a deck, I came to realize that the catapult frame actually sits on a superstructure which, depending on the ship, can be a turntable, a battleship gun, or a structure that's below deck with the launch rails at deck level (found in later versions). The Albatross had what appears to be a circular, above deck superstructure. There aren't too many pictures out there, but here is something similar: I can't really model that as the catapult frame in the NeOmega set is only about 1/3 of the actual deal - NeOmega sells additional frames, but I think you would need to modify the middle third, and then there is the need for completeness sake to model the hydraulics. At that point you are better off just scratch building the whole thing, which I wasn't planning on doing. I have the HpH 1/32 kit in the stash, so maybe that's something to consider then. So for this model, maybe I'll just sit the catapult frame on top of the base, and not try to model it as if it was on the deck of the Albatross by adding deck planks to the base. In case anyone is interested, here is a really cool Royal Navy instructional film using a Walrus on how the catapult launches worked, along with recovery of amphibious ships. It's very impressive how many people and safety steps were involved along the way, and shows how complicated these activities were. https://silodrome.com/royal-navy-wwii-instructional-film-catapult-ships/
-
Thanks Alan! Hoping it all works out. Speaking of the catapult, I ended up attaching the rear extension add-on to the main frame, and added the rigging. I'm really happy with how this is looking. I ended up taking off the wheels on the carriage as they won't be seen, and this is what the combo will look like: I ended up testing out my display idea. I was thinking about a squarish rectangular base, putting the Walrus on the back side towards one corner, and the Albatross on low brass rod pedestals towards the front side opposite corner. Something like this: I didn't realize the Albatross was almost as long as the catapult/Walrus, so I'm possibly rethinking how to display the two models. An alternative would just be to put the two models on a longer skinner rectangular base, side by side rather than stacked front and back. That might be a better approach so the Walrus doesn't get hidden by the Albatross as might be the case with my first idea. If anyone has thoughts or suggestions, I'd love to hear them!
- 75 replies
-
- 10
-
-
Hey Andrew, the rear extension instructions tell you exactly how to build it using plastic sheets of various thicknesses. One thicker piece (I think 2mm) for the base, and thinner piece to make the triangular and square frame pieces (they give you the dimensions for each). I think it's a pretty cool way to display a Walrus. I'm hoping they re-release their Hurricane catapult, which looks super cool. I reached out to the owner and unfortunately it didn't sound promising. Apparently it's not exactly inexpensive to produce.
-
I've managed to put together the sub-assemblies for the NeOmega catapult. Seems like something that should take a day or two, but took me the better part of a week plus! Part of that involved cutting the resin parts off the plugs and cleaning them up, and part was having to go back to the NeOmega site for clearer pictures. All that said, the instructions are pretty clear in retrospect and this goes together very nicely. You can see in the background the jig I put together as recommended by NeOmega for the rear extension. At this point, I'm going to rig the cabling and assemble the main frame with the rear extension, add some filler here and there, and the prime the assembly. I'm having a bit of trouble with the wheels fitting into the combined main frame/rear extension when dry fitting, so I'll probably remove the wheels that will be hidden anyway (someone else seemed to have similar issues). Thanks for looking in!
- 75 replies
-
- 15
-
