


ccoyle
-
Posts
10,050 -
Joined
-
Last visited
Content Type
Profiles
Forums
Gallery
Events
Posts posted by ccoyle
-
-
35 minutes ago, Richmond said:
Finally I thought I would note that I have classified this topic in the 1901 + section which aligns with the existing builds on this topic - however its my belief it should be classified in the previous era.
She was completed in 1900, but not commissioned into the IJN until 1902, so an argument could be made either way. But as the one who would probably be tasked with moving all the build logs, I might be willing to turn a blind eye!
-
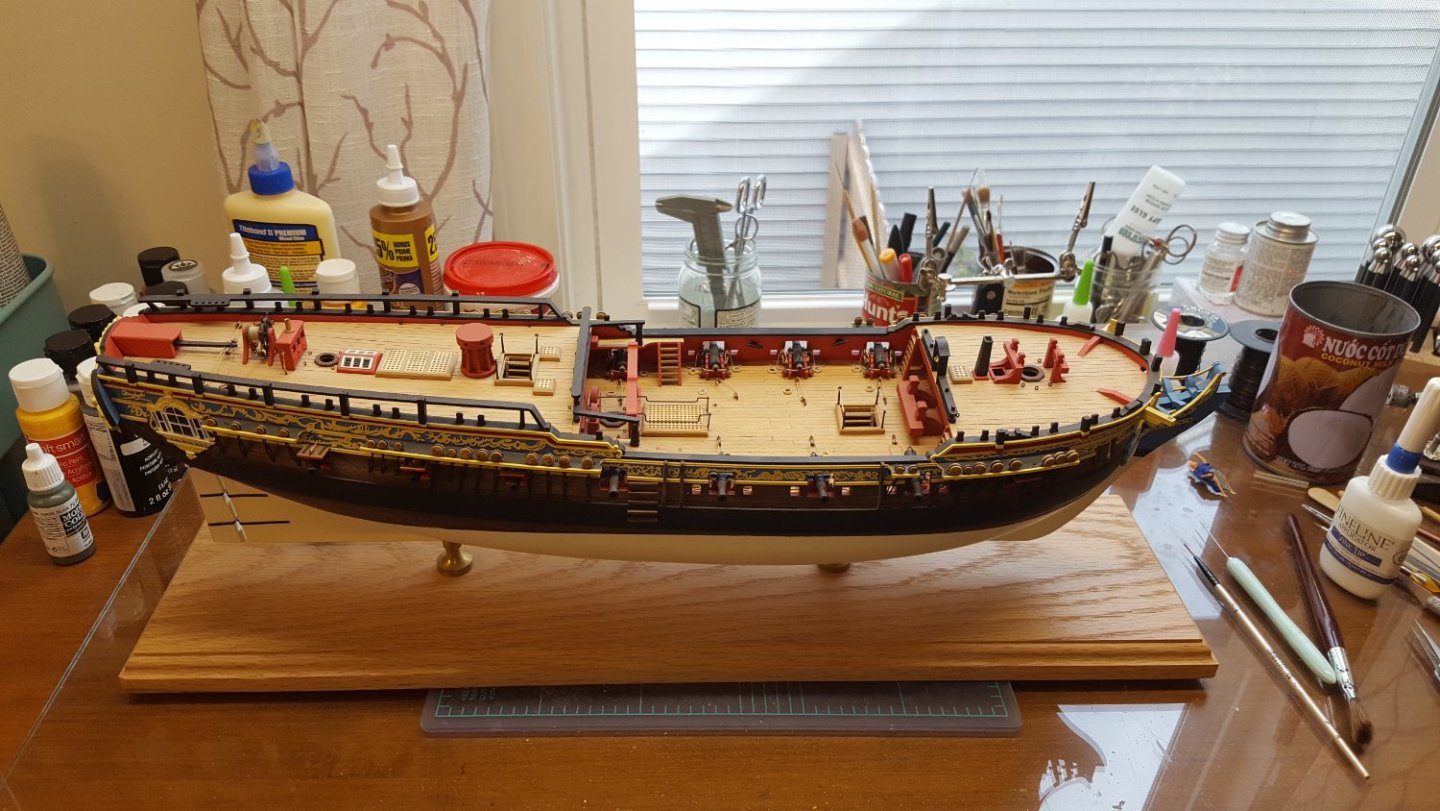
I added stump masts today. I think these make a huge visual difference, as now the knowledgeable viewer knows this is supposed to be a hull model and is not simply an unrigged model.

BTW, I did not glue the masts in, just in case I ever get a wild hair and decide to add real masts -- an unlikely event, I feel, but one never knows.
-
Congratulations, Paul! Gonna take a break, or plunge right into the next one?
- pwog, Ryland Craze and Knocklouder
-
 3
3
-
-
2 minutes ago, Knocklouder said:
Hi, I can't seem to see the pictures either 😕.
Check again. It's there for me.
3 minutes ago, Knocklouder said:As for space, put grin on your face , build it , start a raffle 5 bucks for one ticket, 3 for 10 bucks.
Tain't never gonna happen. The effort required would far out-strip my enthusiasm for the project.
- Canute, mtaylor, popeye the sailor and 1 other
-
4
-
7 minutes ago, jfhealey said:
I'm reluctant to post any pictures of my own far more humble - but perhaps more accessible to the majority - efforts
Fred, your work holds up very well to close scrutiny!
- Knocklouder, mtaylor and Ryland Craze
-
3
-
1 hour ago, Beef Wellington said:
for some reason I'm not seeing the photo (?)
Fixed (hopefully)!
- mtaylor, popeye the sailor and Canute
-
3
-
First thing to do was to re-secure all the guns and tackles that had been knocked loose. Six of the eight guns in the waist needed repair of some kind. Fortunately, none of the other guns had come loose, because those would have been impossible to reach.
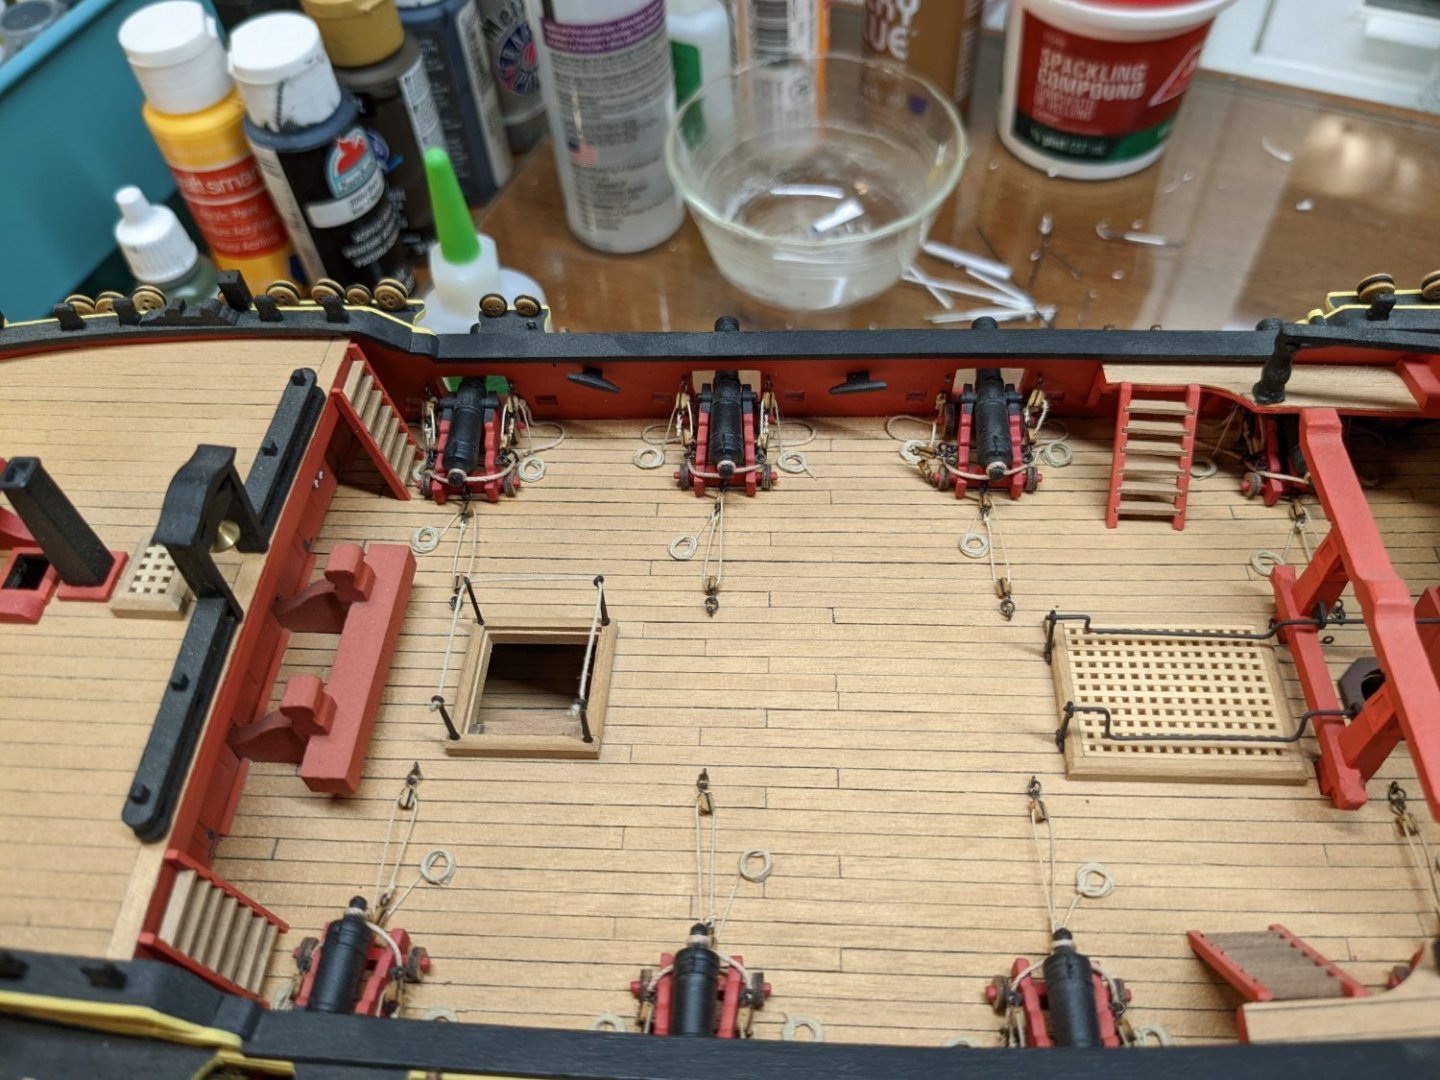
There were a number of holes in the deck for eyebolts that needed to be filled. These were originally left off because they needed blocks attached first. Since I'm not going to rig this model, I went ahead and added the eyebolts sans blocks.
-
1 hour ago, ChuckP said:
One last note when I say Central New York, I am not talking about near Manhattan. We are near lake Ontario in the middle of snow country.
Welcome aboard! I'm a California ex-pat myself, and I often tell people that I'm from the "other California", i.e. the parts that no one hears about.
- Keith Black, Ryland Craze, Dave_E and 2 others
-
5
-
The most important piece of information regarding your kit is this one:

Which, admittedly, you could only find by tracking down the seller's info. Terrible Chinese kits like this one have flooded the market in recent years. These kits are "hobby killers," i.e. people who buy them are quite likely to give up on the hobby before ever really getting started. My advice to you is this: toss this kit aside -- it will only cause you frustration and grief. Spend a few dollars more and get a real kit from a REPUTABLE manufacturer that is specifically designed for beginners, e.g. Midwest Products, Model Shipways Shipwright Series, BlueJacket Shipcrafters, or even one of the fishing boats from Vanguard Models. All of these have well-written instructions IN ENGLISH and quality materials and, in most cases, the kit designers are members of our forum. You will have a far more satisfactory building experience and a much higher probability of actually finishing your model.
Cheers!
-
The blocks you describe are known as internally stropped blocks. I can't tell you exactly when these came into widespread use. Chuck has some available through Syren Ship Models.
https://syrenshipmodelcompany.com/internally-strapped-rigging-blocks.php
- thibaultron, Oldsalt1950 and mtaylor
-
3
-
Don't Get Too Excited
Yes, I have decided to resurrect this long-dormant and neglected build log. First, a little back story: I corresponded with Chris Watton during the development of this kit and was thus was one of the first to buy it when it hit the market all the way back in 2006. I got started on it right away and made pretty good progress at first. Now, even during my most prolific modeling outbursts, there are times when a kit just doesn't get the juices flowing like it used to and gets moved to the back burner. Being a square-rigged ship and all the work that entails, Fly has suffered a number of stints on said back burner, and the current spell has been very long indeed -- going on ten years. 😯 In addition, she has endured six moves (including one cross-country), and -- as might be expected -- she hasn't come through all of those moves completely unscathed.
So, why has Fly never got around to being finished? The primary reason is one that I'm sure some of you can relate to: I'm simply not satisfied with the way she has turned out so far, and that kind of puts a crimp on any desire to complete a model I know I won't be completely happy with. The two things that I particularly dislike about my work so far are first of all that I didn't do a good planking job, and as a result the model has quite a few gaps between planks. Second, I don't like the color. The kit came with dark walnut strips for the second planking, and for reasons that I can no longer recall, I stained those even darker. Since that time, I have decided that I like lighter-colored hulls better. Oh, well. Lastly, there is the not-insignificant consideration that a finished Fly would take up a lot of display space, and why devote precious space to a model that doesn't make you proud?
So, after much thought I decided I would eventually finish Fly as a hull model, and now seems as good a time as any to finally tick this task off my to-do list. The first things to do will be to dust the model off, repair the present damage (notably to guns and their rigging), figure out where I left off in the build sequence, and then decide how much detail I will add before finally deciding that Fly will be done enough to call done.
So, enjoy what is left of this journey!
-
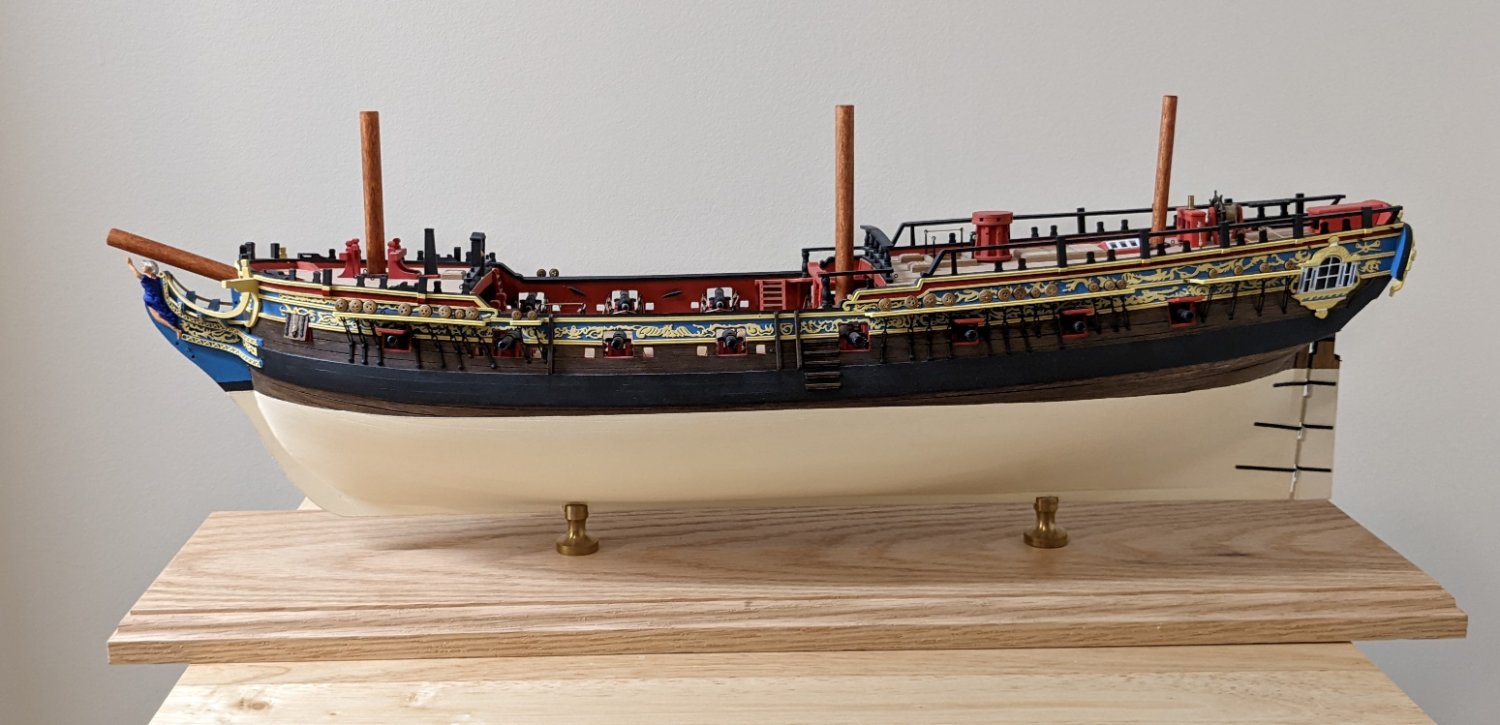
The Big Reveal!
Yes, three weeks to the day and she's finished - another fantastic model from Kartonowa Kolekcja. I can't say enough good things about Pawel's designs -- they very nearly fall together by themselves. Anyways, on to the pictures!


I noticed as I was posting this next shot that the entry step got knocked askew -- gonna have to fix that.


Thanks to everyone who has followed along, liked, and commented. I hope you have enjoyed this quick build, and we'll see you on whatever is next!
- bruce d, Captain Slog, FriedClams and 25 others
-
17
-
 11
11
-
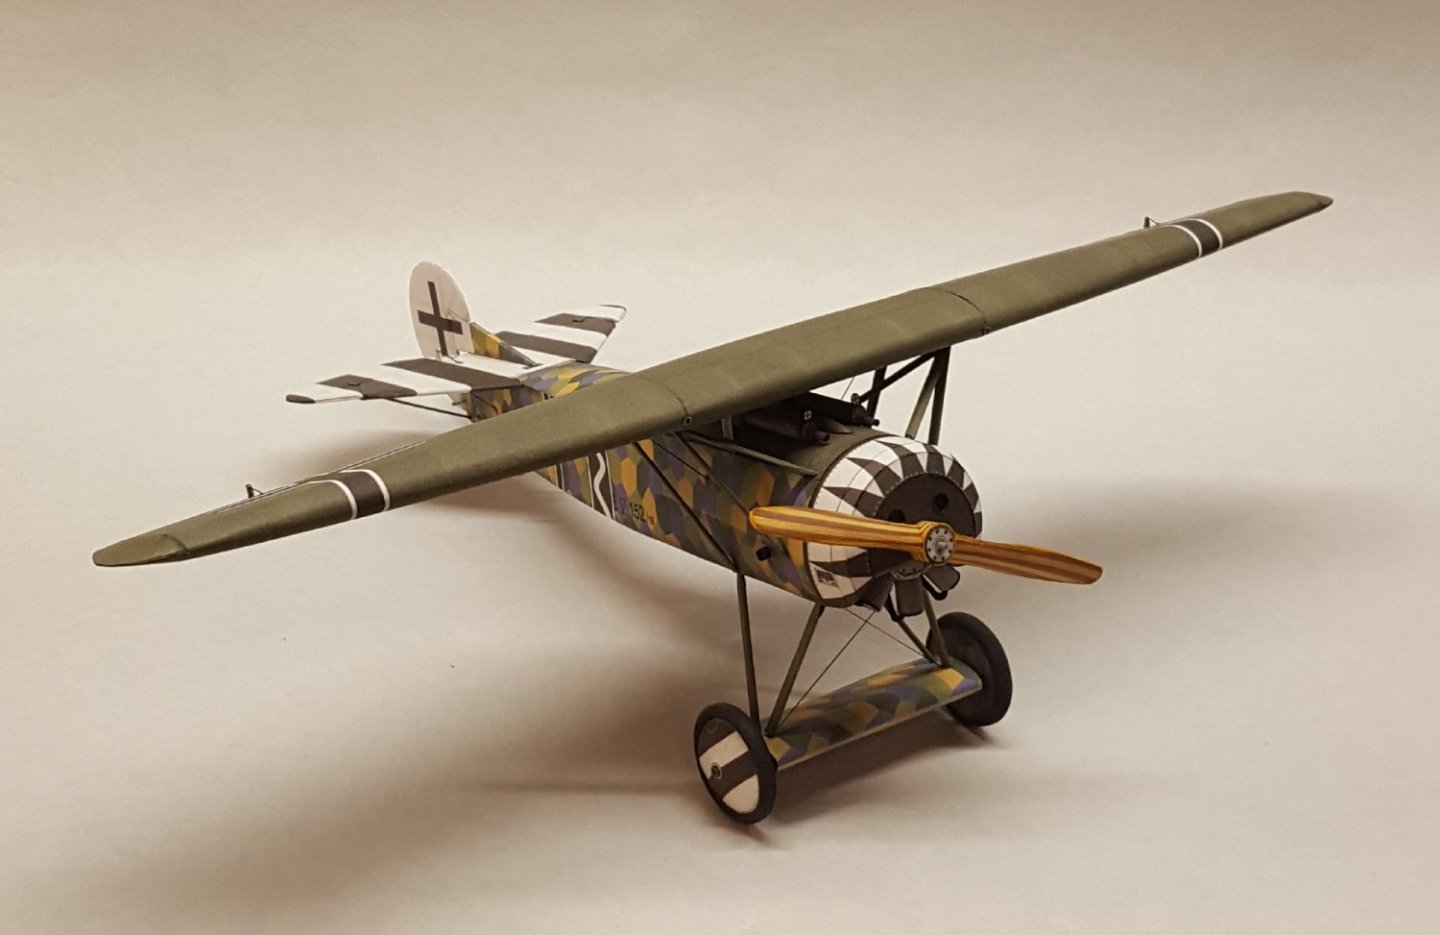
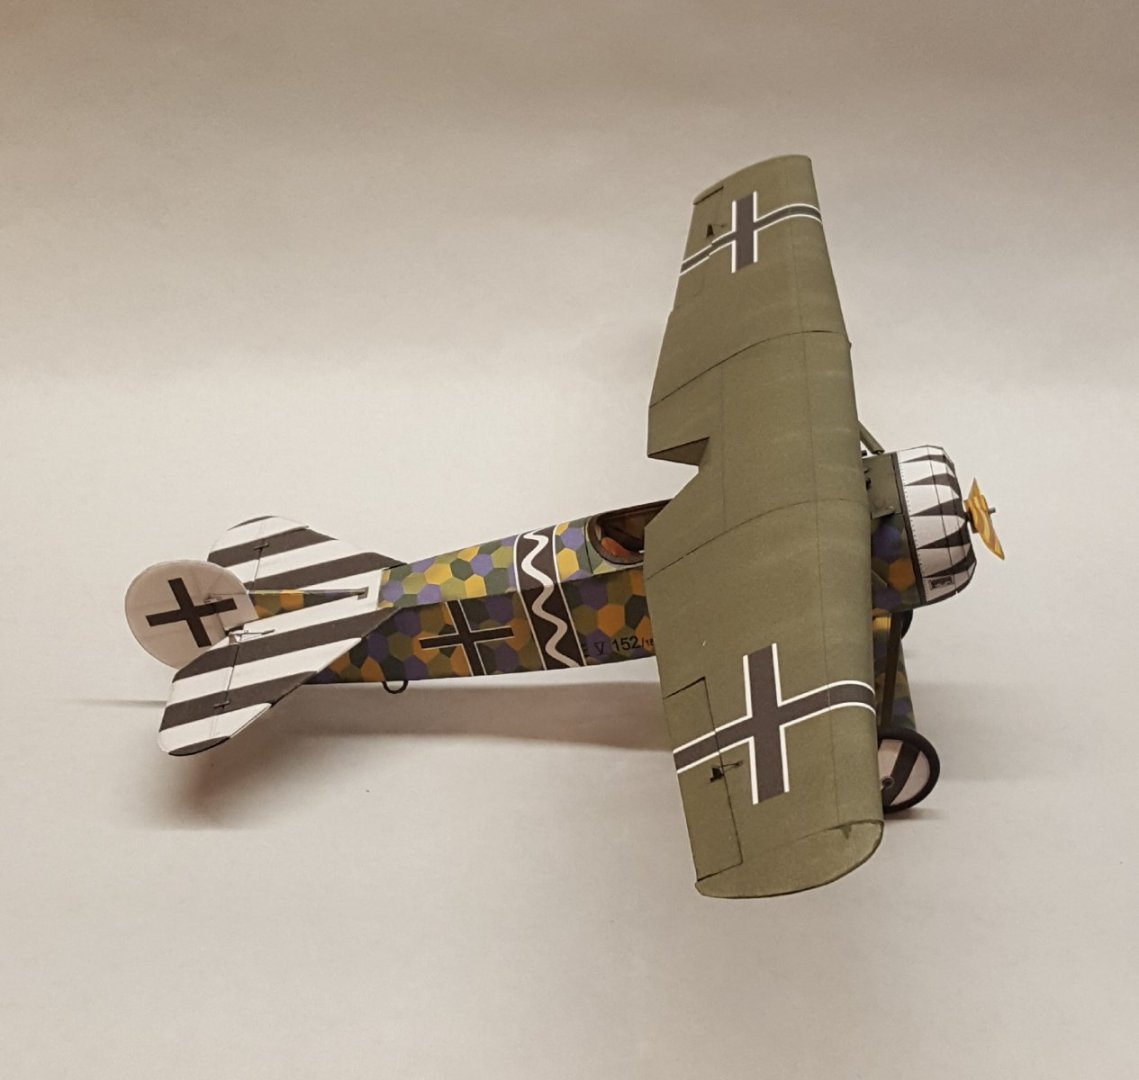
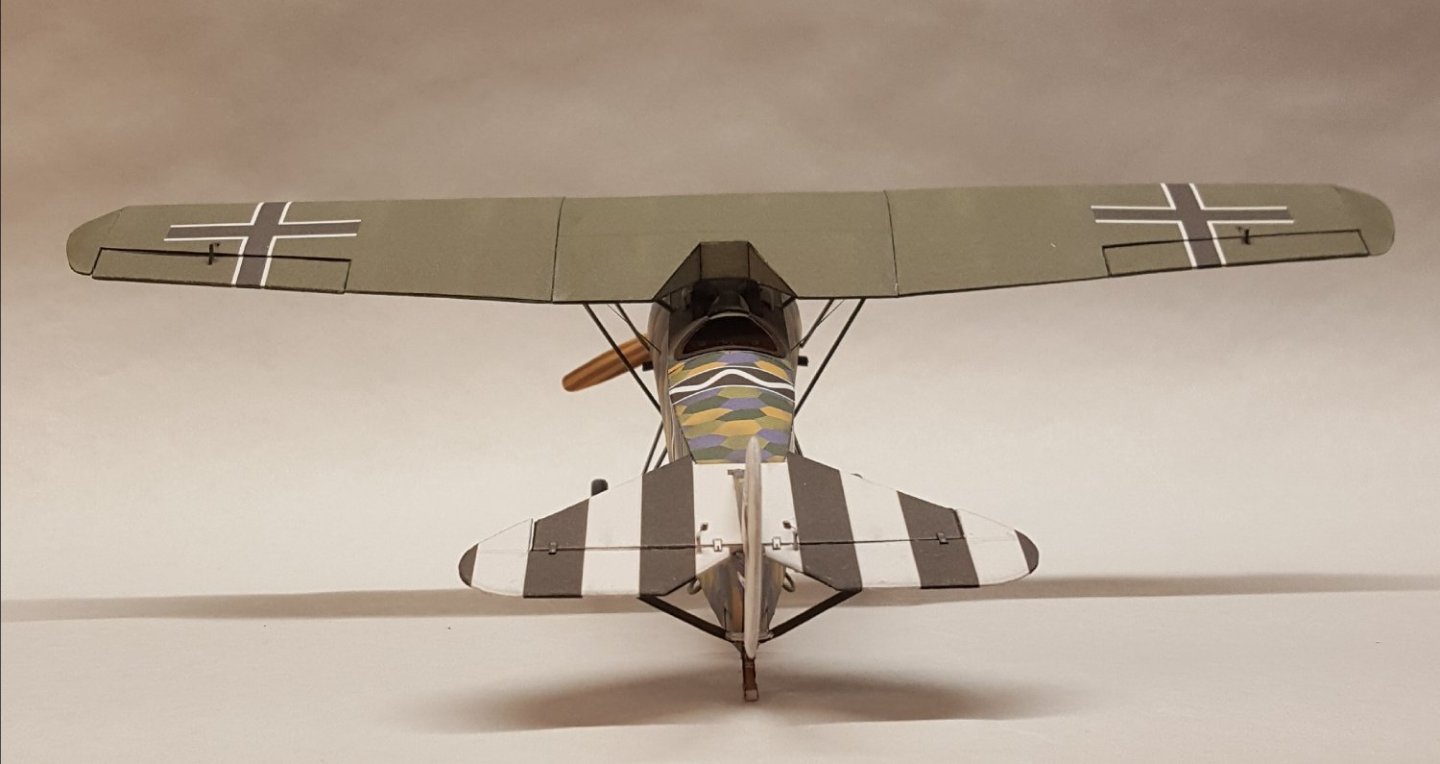
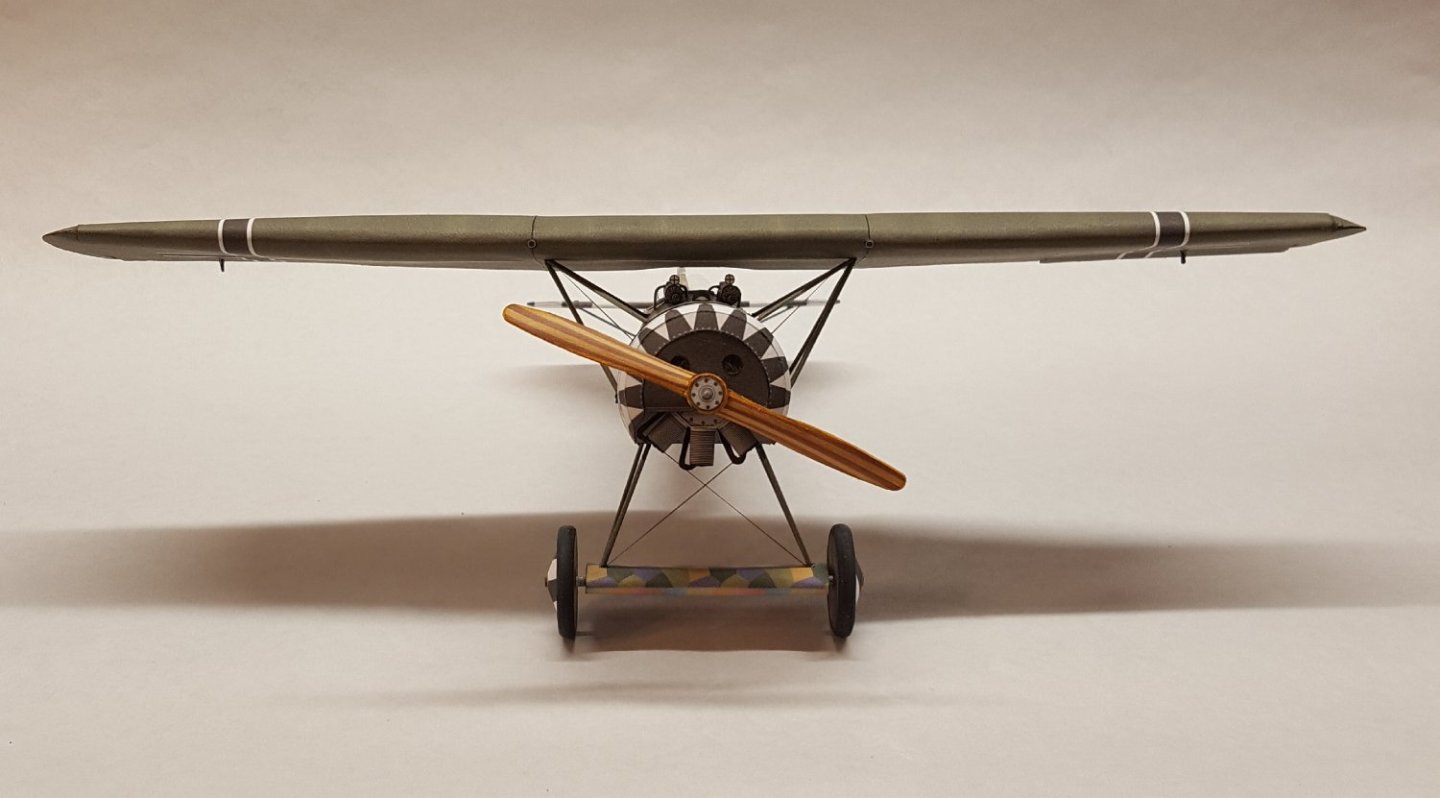
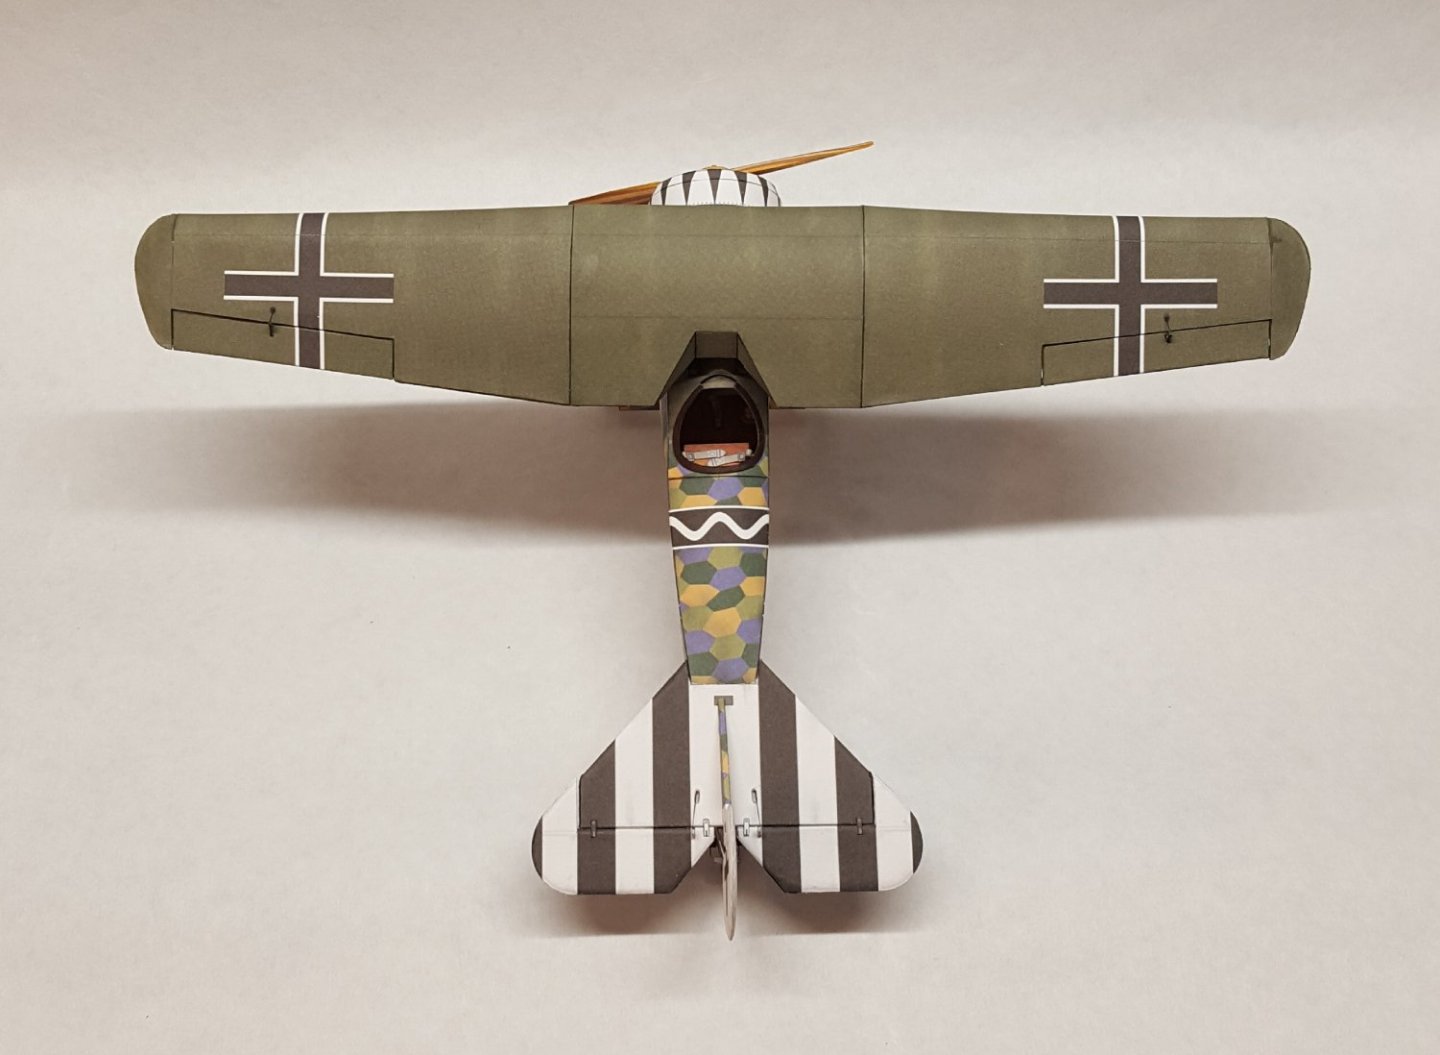
Empennage under way. Hard to get any work done with so many World Cup games to watch. 😆
- Edwardkenway, Dave_E, Jack12477 and 11 others
-
14
-
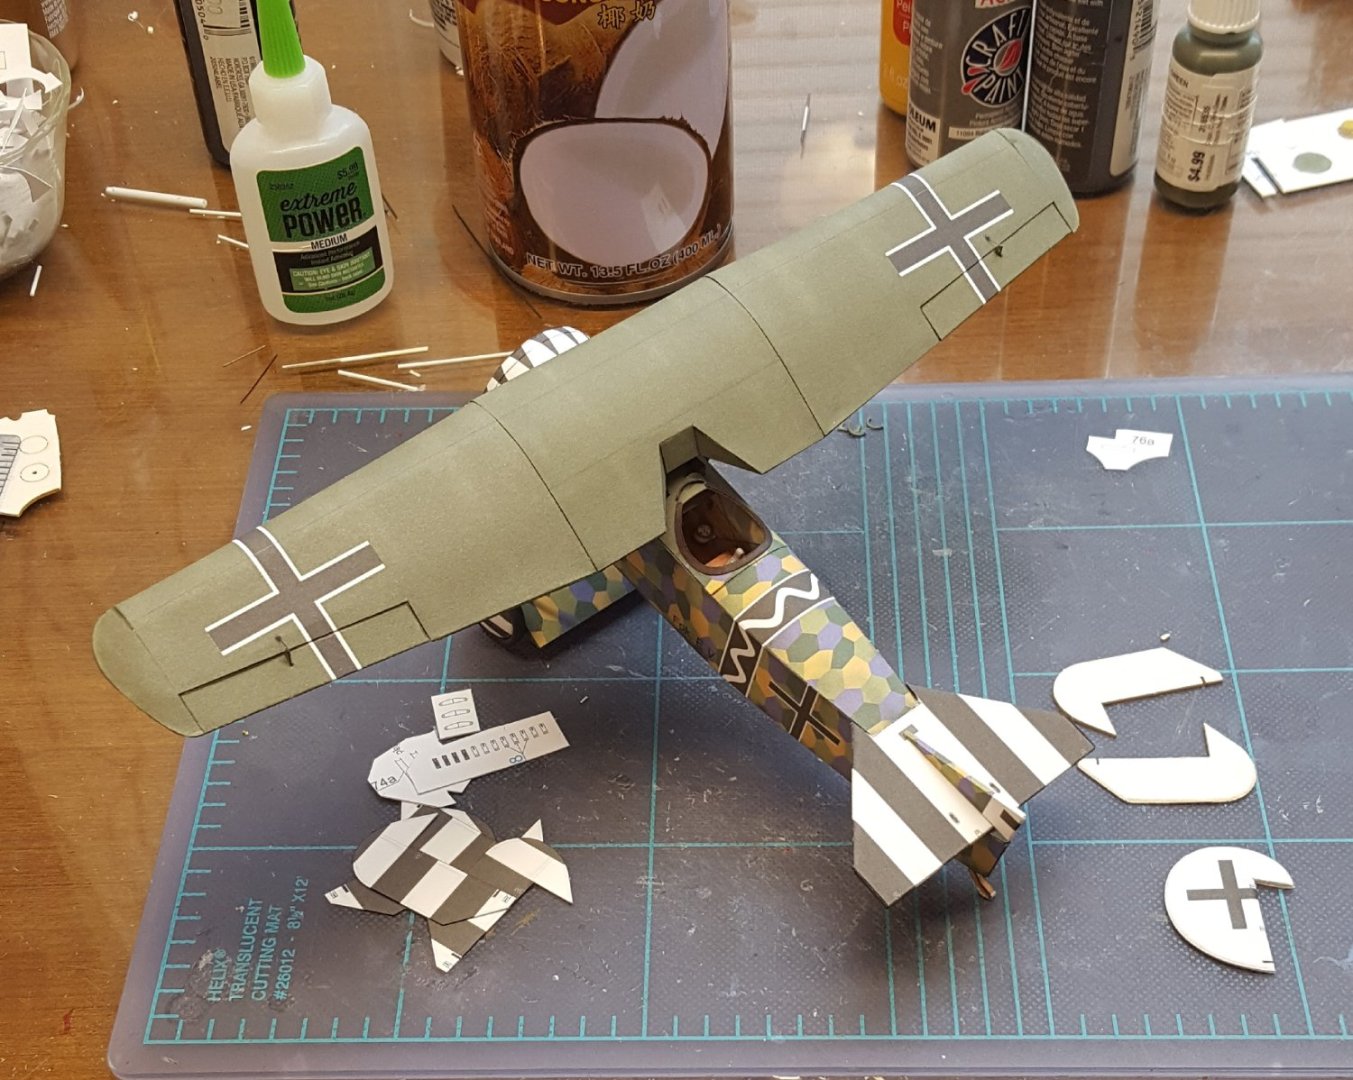
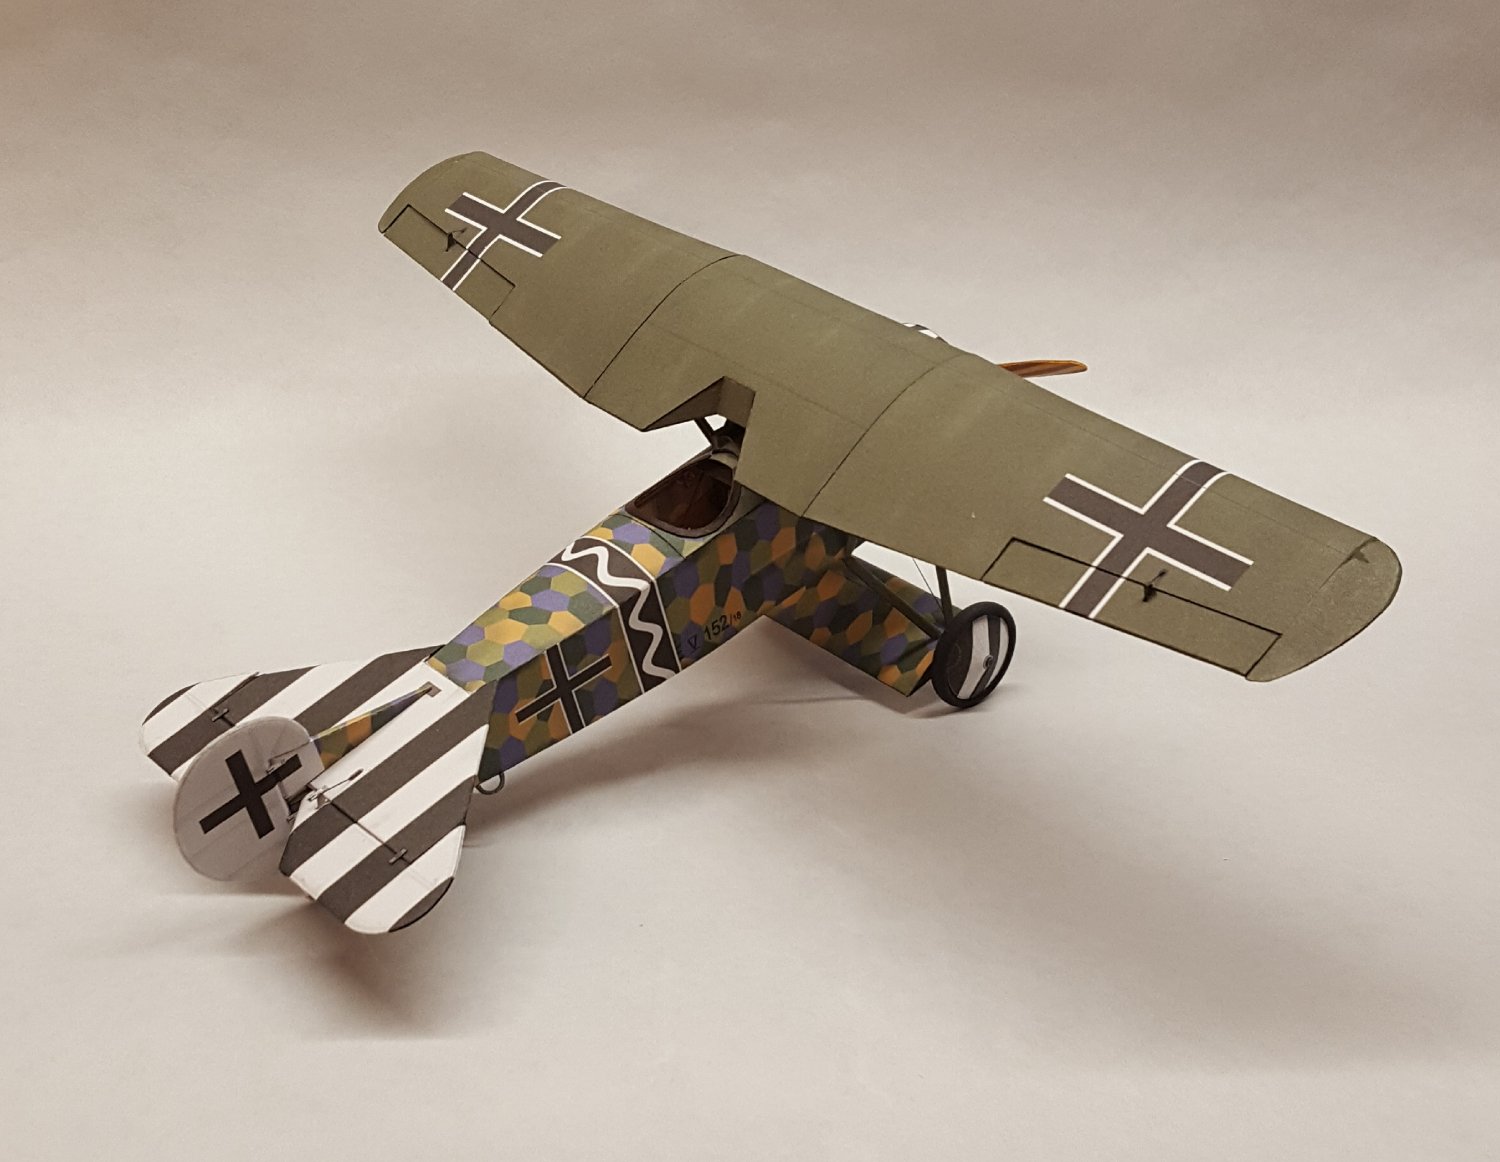
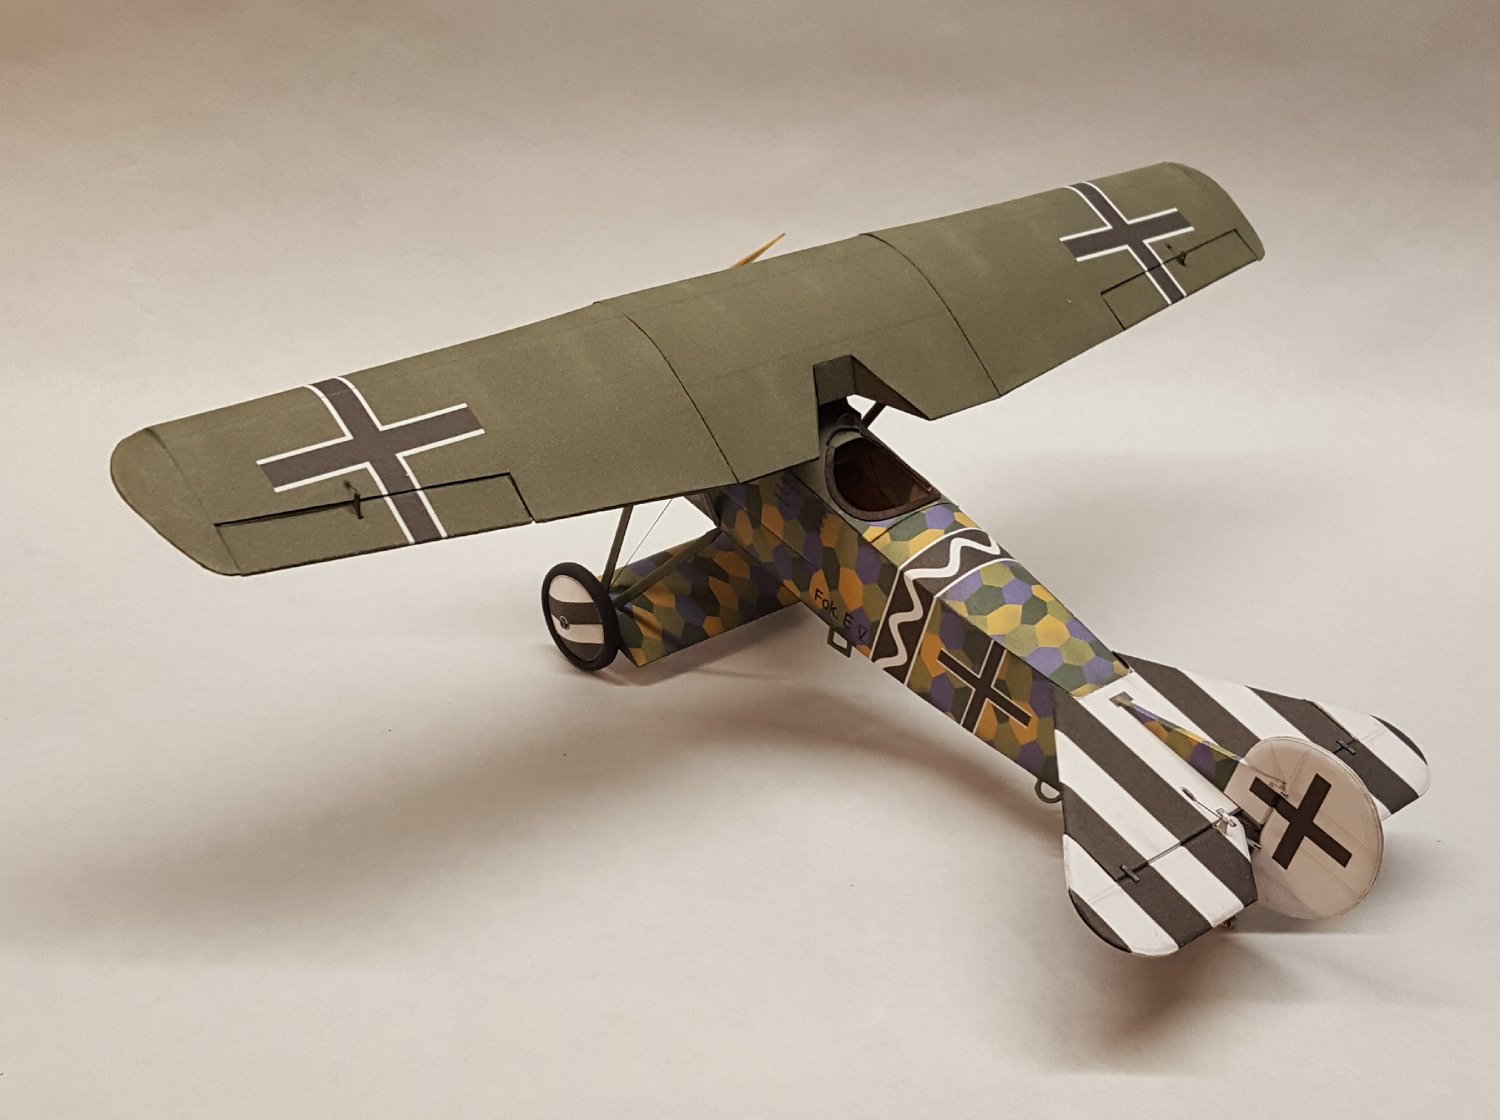
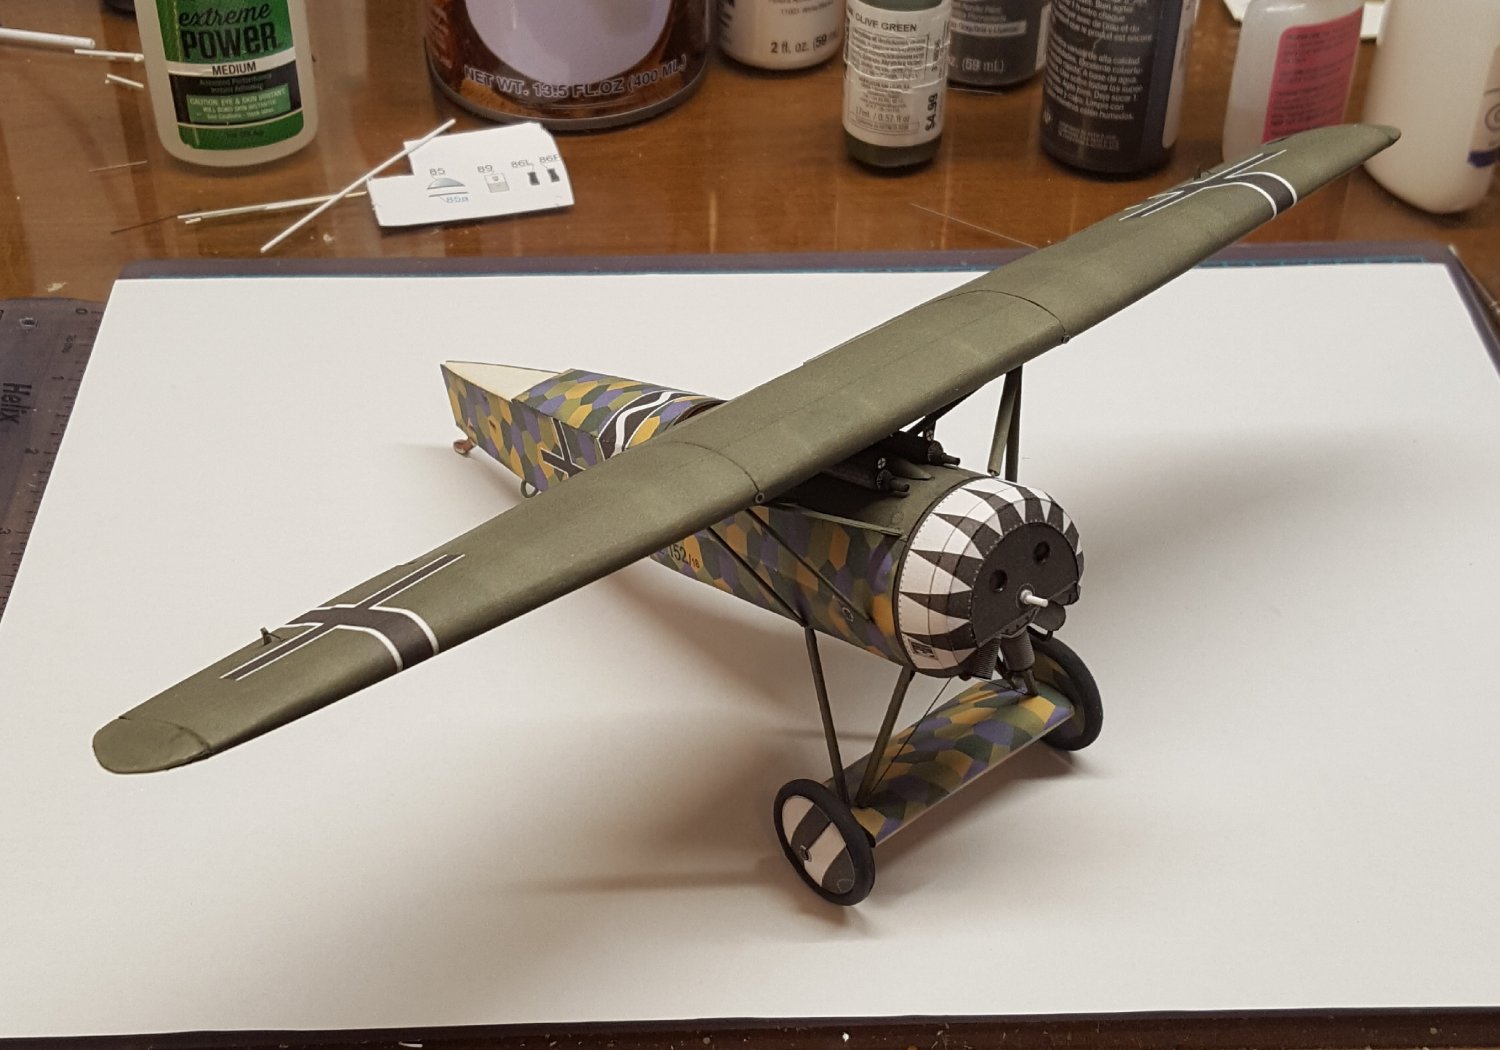
Moving quickly along . . .
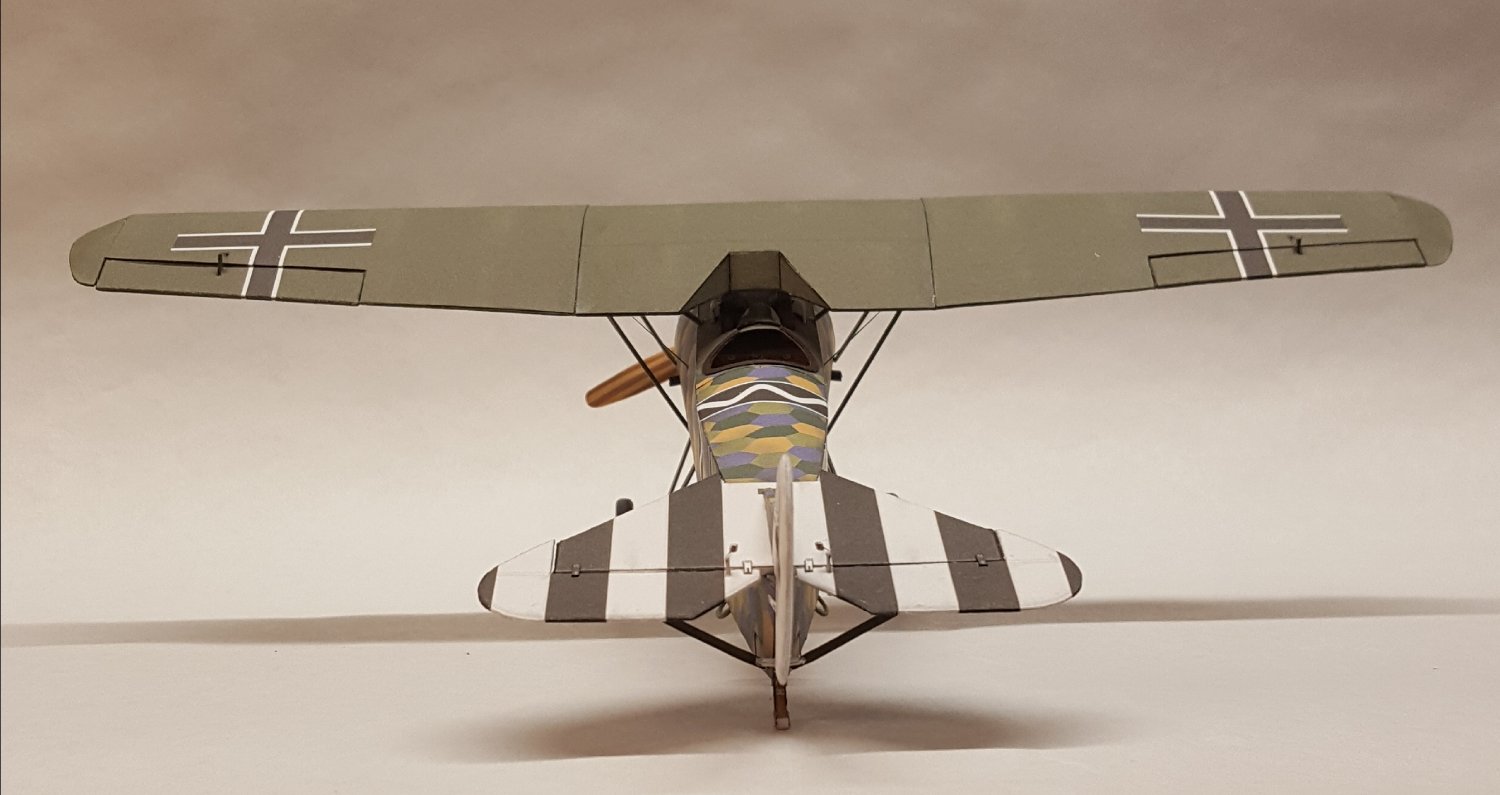
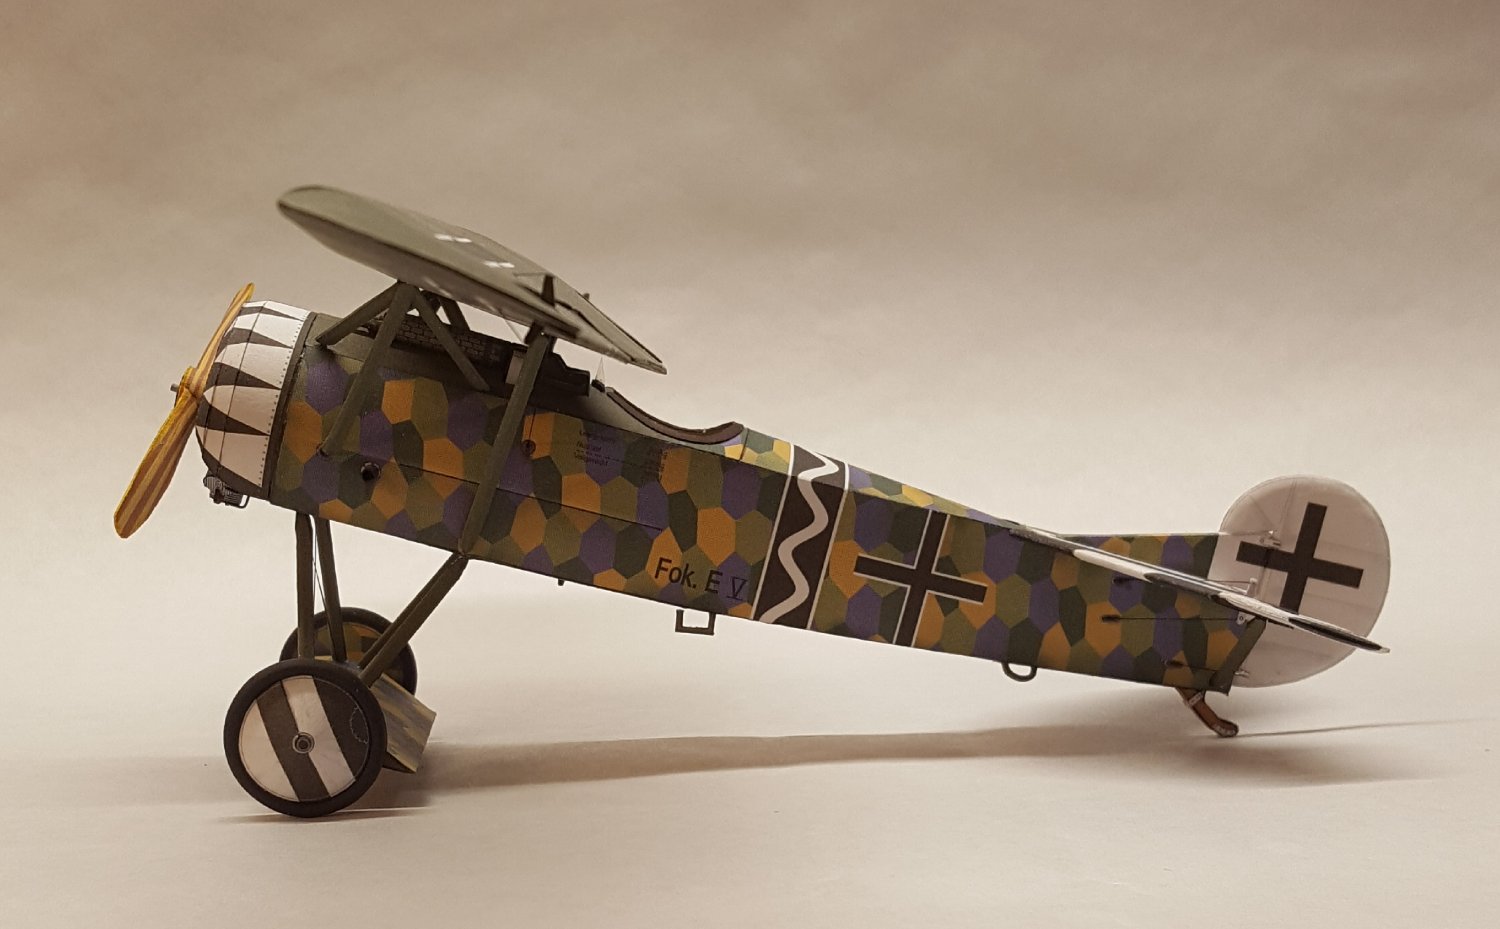
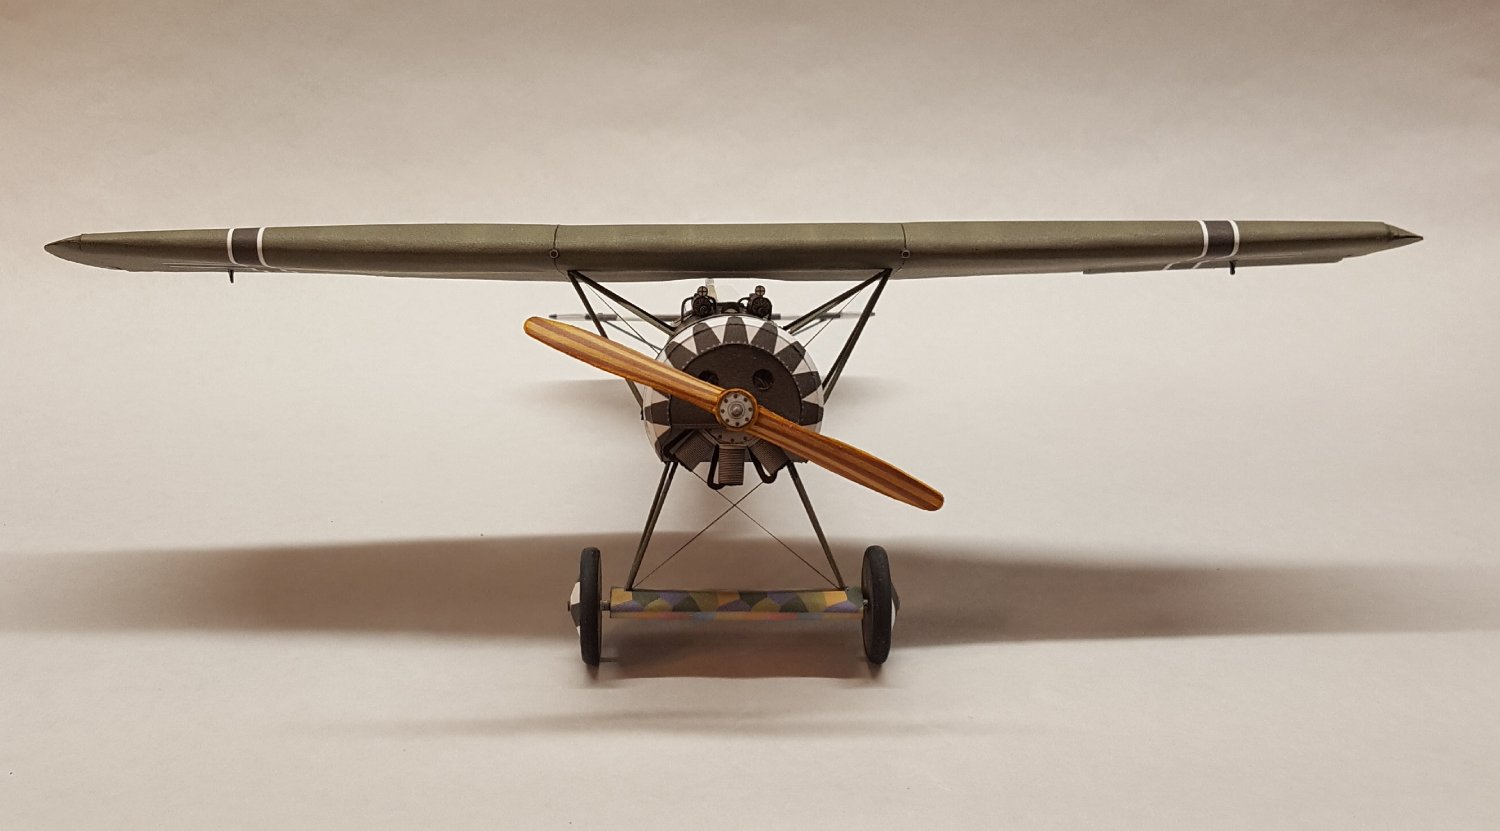
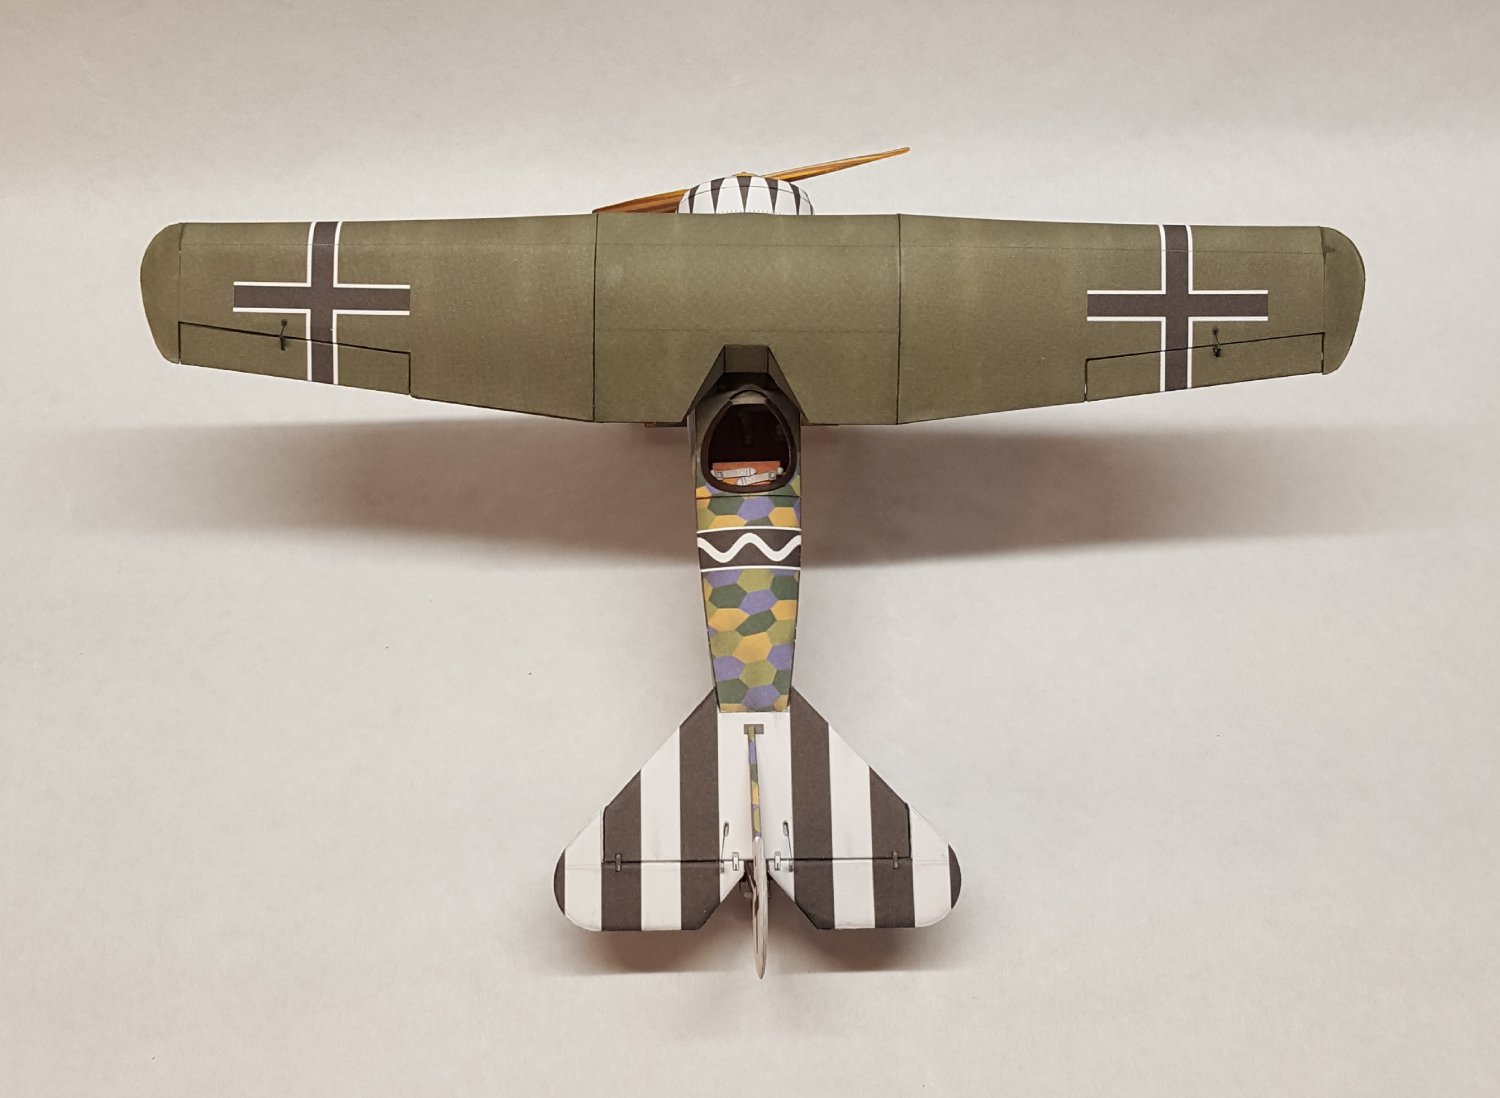
The wing was finished off by the addition of ailerons and control horns with their cables. Struts were made by wrapping the paper parts around 0.020" steel rod, then glued to the fuselage. Finally, the wing was mounted, bringing the model to its present state.

For future reference, I should note that some of the struts, both for wings and for undercarriage, appear to have been misnumbered when compared to the diagrams, but a careful study of the diagrams reveals their correct placement on the model.
Cheers!
-
1 hour ago, popeye the sailor said:
I built the Guillow's P40.........had a nasty run in with a palm tree.
I built one, too. Mine connected with a mailbox on its very first flight. 😬
- Edwardkenway, Egilman, mtaylor and 6 others
-
9
-
5 minutes ago, Spooky spoon said:
Any advice would be appreciated.
First question is, does your kit include a sail plan? It's not 100% necessary, but takes the guesswork out of making sails with the proper dimensions. Making your own is not terribly difficult, especially if you glue them instead of sewing them (my preference).
-
I have probably seen pictures of it. I didn't realize that the Old Rheinbeck Aerodrome was in New York -- I just assumed it was in Europe somewhere. 😬 I've never been to New York. 😬😬
- Keith Black, Canute, Egilman and 7 others
-
10
-
Welcome aboard! Dedicated shrimpers are rare in kit form, as are modern workboats in general, at least if you are looking for US examples. Several kits for European/UK boats do exist, though these tend to portray older, sort of 'classic' boats. What kind of vessel did you have in mind?
- mtaylor and Keith Black
-
2
-
Garlic and apples -- an interesting combination. Welcome aboard!
- mtaylor, Dave_E and Keith Black
-
3
-
-
That's a very handsome model, Jeff. Well done!
-
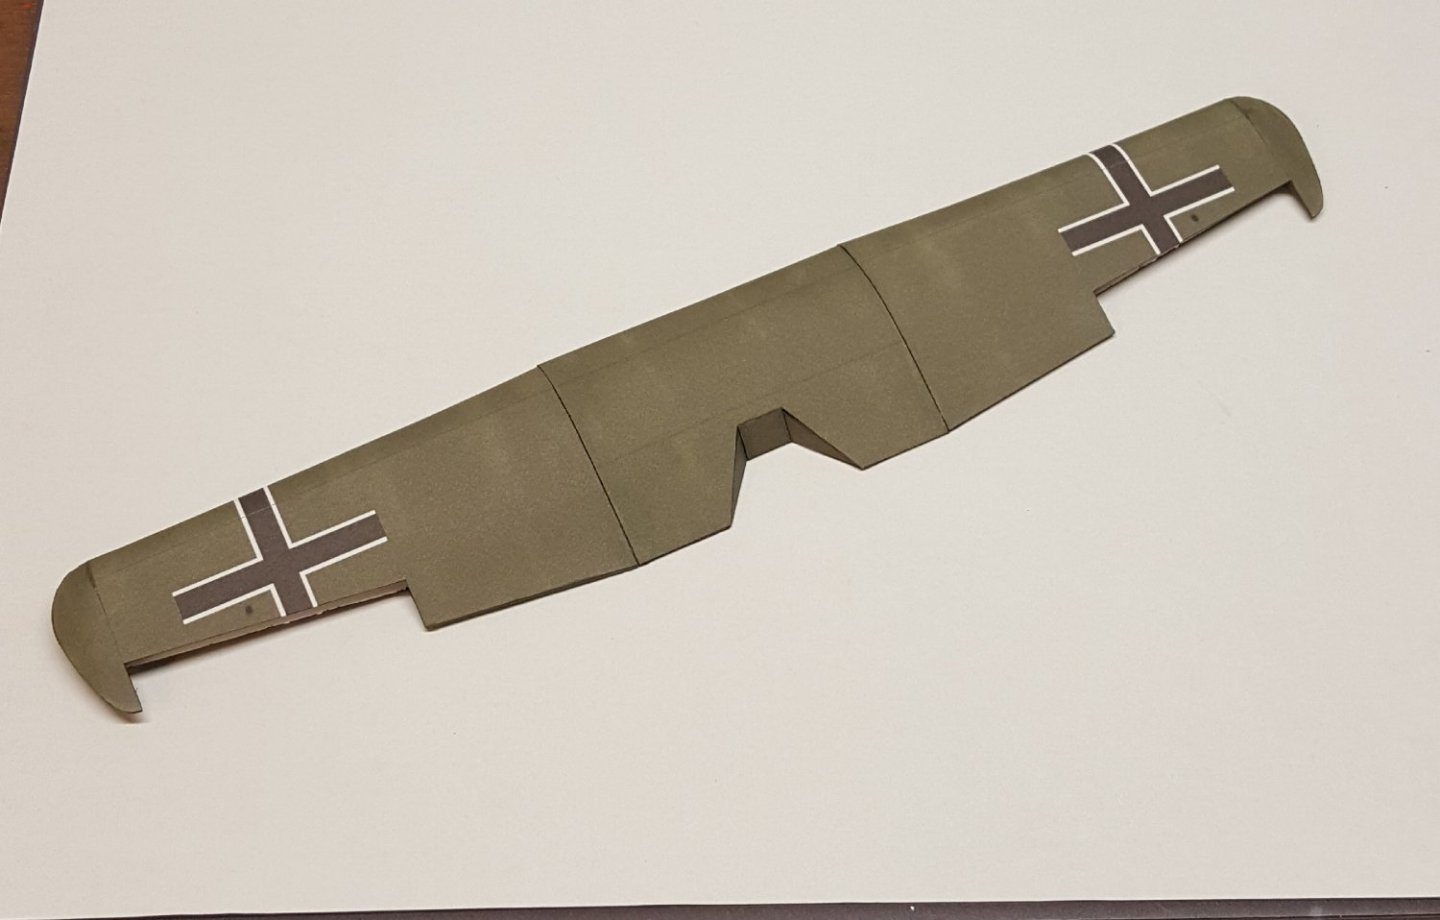
Wing. I opted for separate control surfaces (still in progress).
-
An outstanding finished product -- well done!
- Knocklouder, AJohnson, hollowneck and 1 other
-
4


Info on attic find
in New member Introductions
Posted
This definitely has the look of a folk-art model, but as to what the subject might be I can scarcely guess.