


Chuck
-
Posts
9,703 -
Joined
-
Last visited
Content Type
Profiles
Forums
Gallery
Events
Everything posted by Chuck
-
 I was going to do that but after a few days I realized my phone's camera just wasnt good enough. So I splurged on a new Cannon. I am very happy so far with it. Chuck
- 1,784 replies
-
- 1
-

-
- winchelsea
- Syren Ship Model Company
- (and 1 more)
-
Just trying out my new camera guys. Really crisp photos now I just have to get the color and settings correct.


- 1,784 replies
-
- 19
-
-
- winchelsea
- Syren Ship Model Company
- (and 1 more)
-
Nicely done......great looking puzzle. Do you have a link to that one. I would love to build that puzzle. Where did you get it? Chuck
-
I actually chisel out the big stuff. Less mess. Easier to breath. Then I sand with 120 grit to clean it up. Chuck
- 1,784 replies
-
- 1
-
-
- winchelsea
- Syren Ship Model Company
- (and 1 more)
-
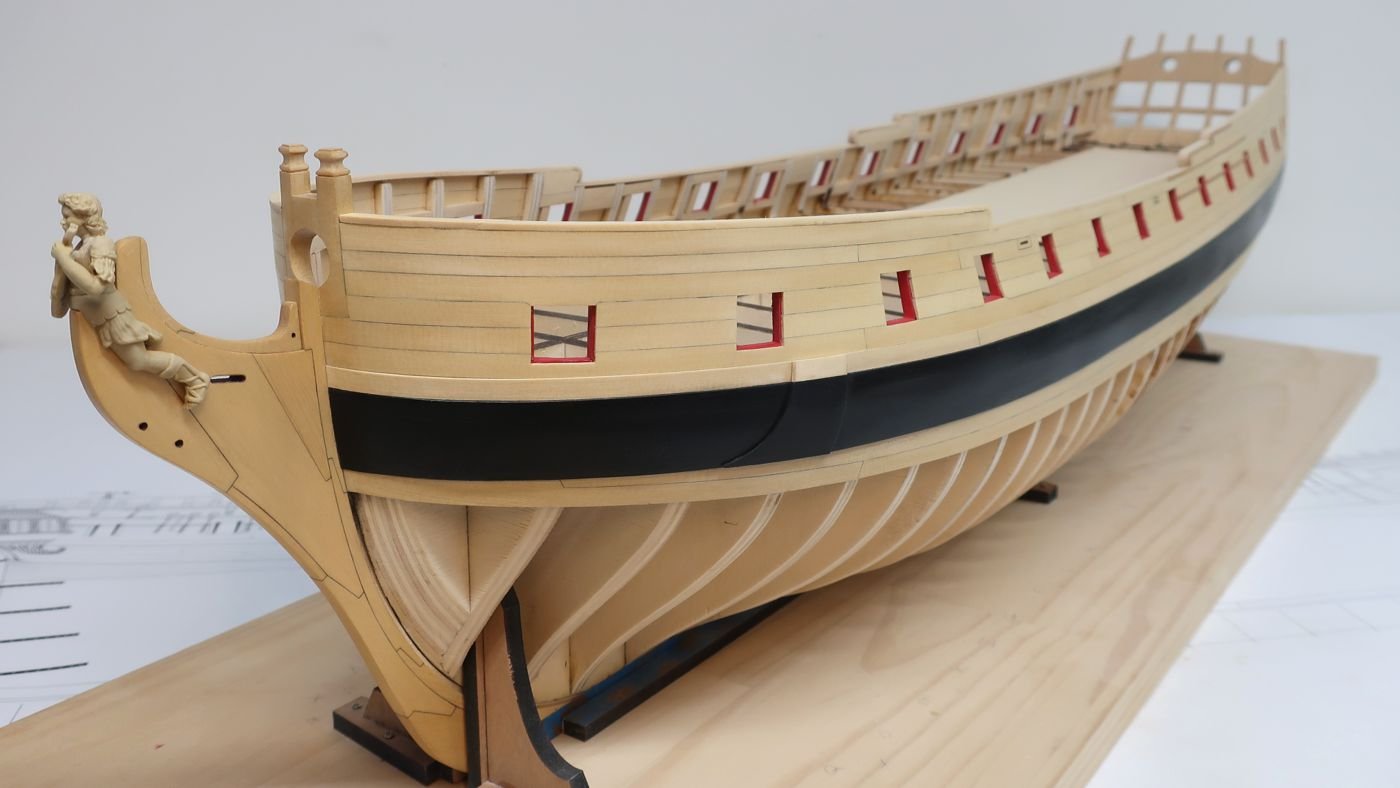
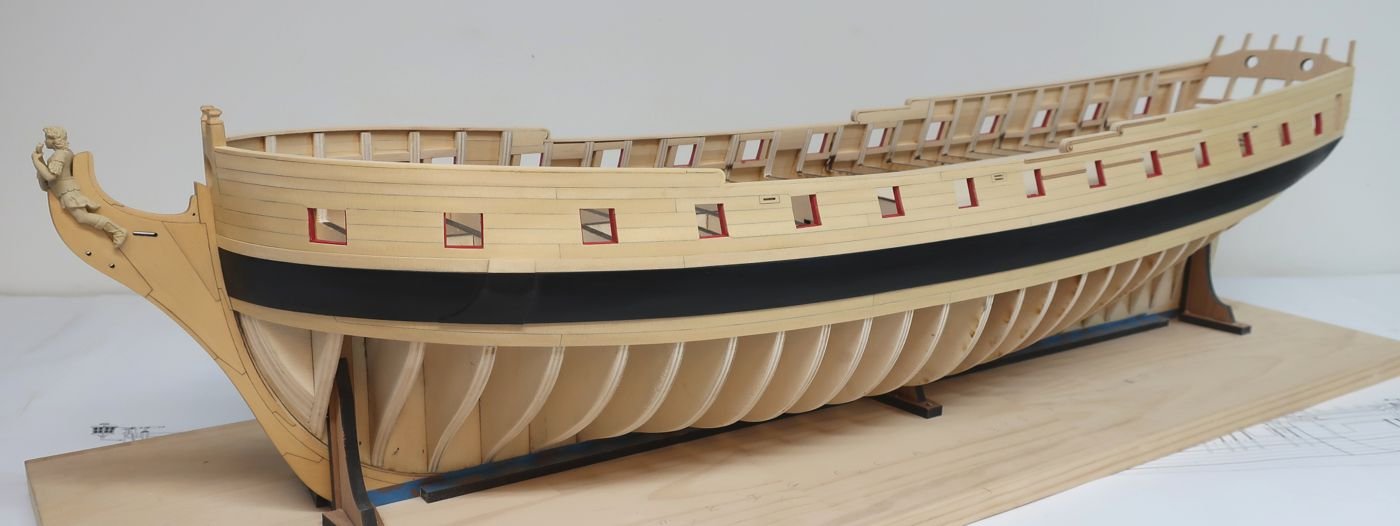
HMS Winchelsea (1764) 32 gun frigate GROUP PROJECT INFO
Chuck replied to Chuck's topic in Group Projects on Model Ship World
You got that right....If this looks familiar to you guys building the model shipways Confederacy kit.....my design, it should. This is the Chinese pirated version by Snail, a banned company from China. If it isnt nailed down they will rip it off. They have no morals at all. Snail is one of the worst companies out their with the owner blatantly stealing. This is the guy who ripped off the Triton plans as well. So he will certainly be prowling to get his hands on the plans for Winnie. These guys are members of other forums who promote Chinese pirated kits. So even if you have friends over there, I know many of you are dual members of these sites. Please do not share the Winnie plans with any members of those other sites. Build it for yourself only....and if your friends are interested, have them sign up here to join the group. Dont share them. The owner of Snail has made this comment about it and where they got the plans on a Chinese website....not to hijack this thread. But its nuts. I give it six months before the Winnie shows up in China. So please do not share or post these drawings....stick to the scroll saw. Here is what he said pasted right from the Chinese forum..."Thank you for your continued care and attention watching our kit developments. This time, we want to produce a 1:64 appearance (non-full rib) federal sailing ship. This legendary kit is developed according to foreign drawings by a master kit designer in America. We reproduce it for you" Compare with my design below.....yet some sites and forums believe it isnt a copy and this is OK......so please do NOT distribute these plans at all. If the Winnie plans get out and I see this happen, then yes it will probably be the last project I develop.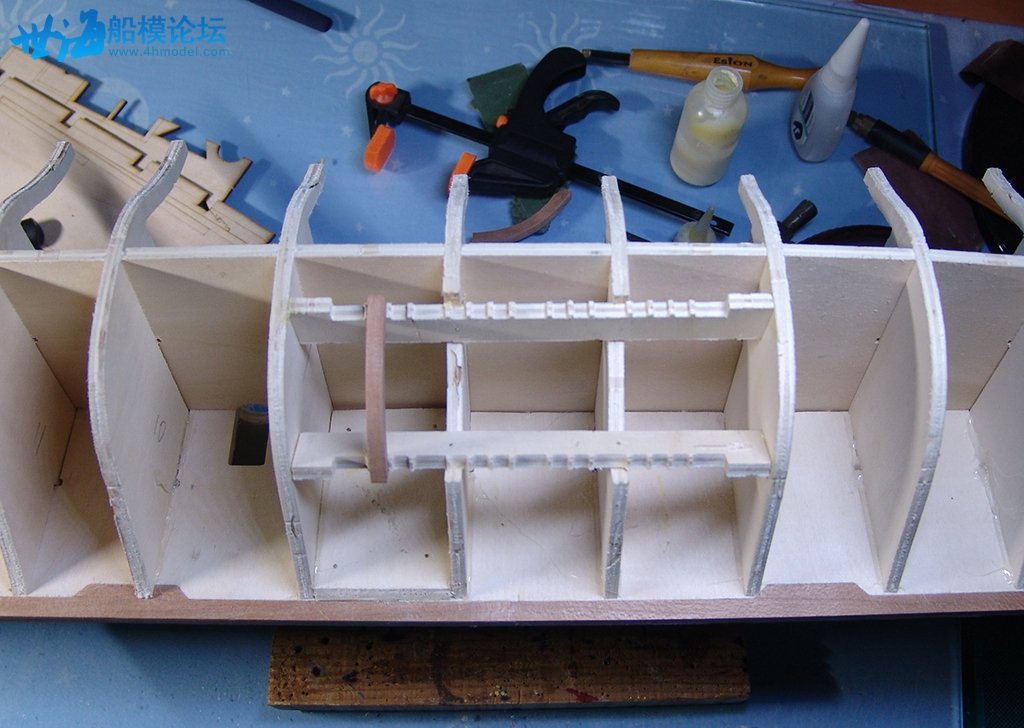
-
That looks great Ryland. Its so great to see you up and around. Patti and I have been thinking about you and we were quite worried. Time to slow down and get more shop time in. Hope to see you guys real soon. Chuck
- 263 replies
-
- 3
-
-
- Medway Longboat
- Syren Ship Model Company
- (and 1 more)
-
She is looking really good. Great progress.
-
Awesome...time to start putting that stem together.
-
HMS Winchelsea (1764) 32 gun frigate GROUP PROJECT INFO
Chuck replied to Chuck's topic in Group Projects on Model Ship World
No sorry I cant supply those. -
Nope but that shouldnt stop you from getting that stem put together and sanded with the proper bevel. Maybe another week or so.
-
That looks pretty darn good. Once you clean up the rough spots with some fine sandpaper and apply a finish it is goong to look famtastic.
- 221 replies
-
- 1
-
-
- queen anne barge
- Syren Ship Model Company
- (and 1 more)
-
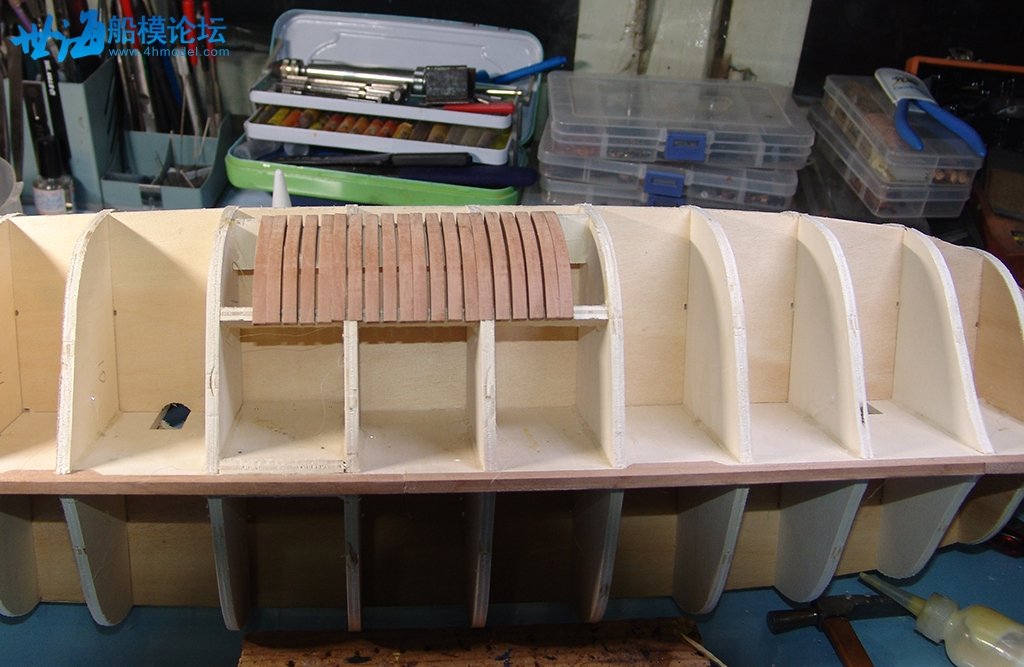
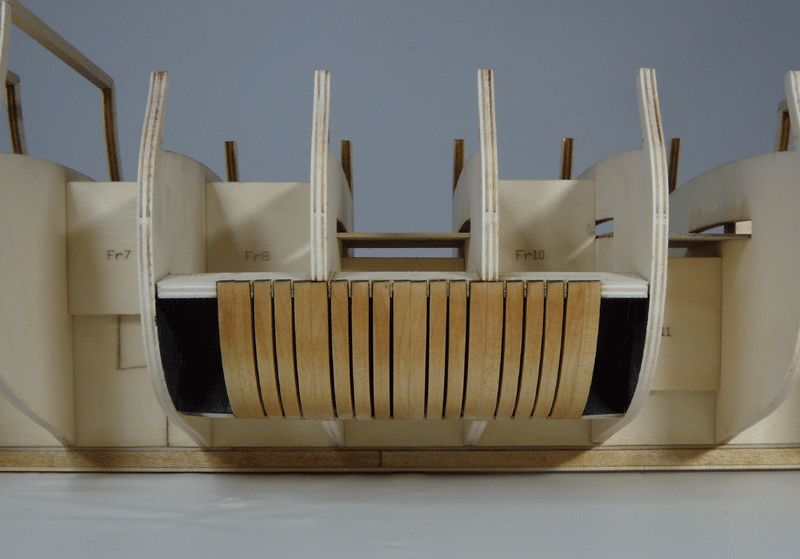
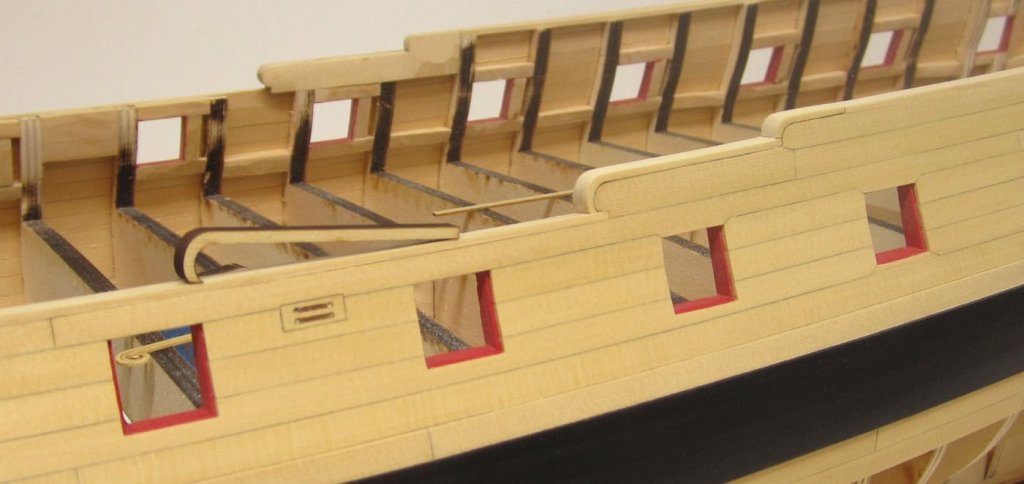
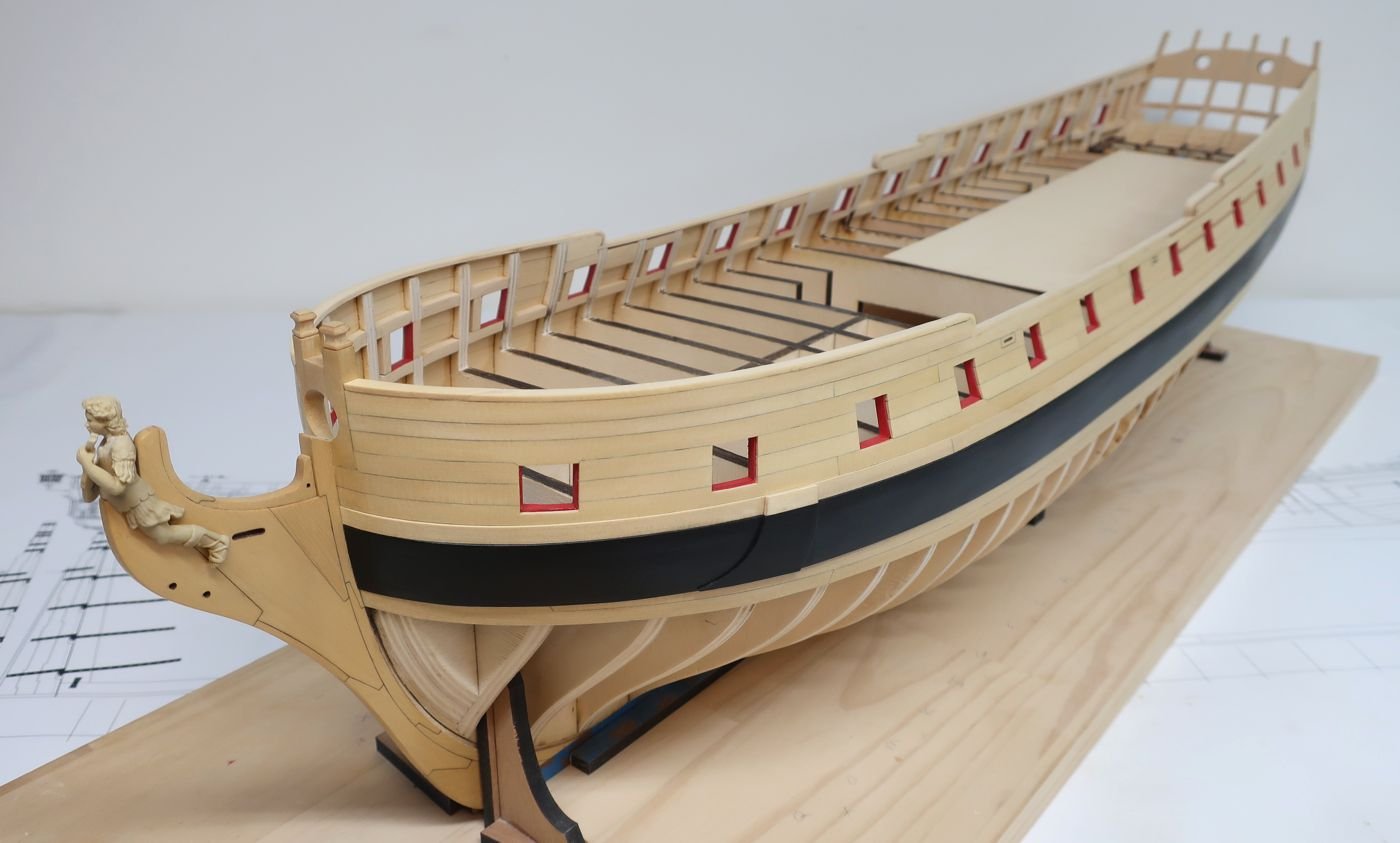
A small update after a lot of work and elbow grease. The fairing cap is completed. I am calling this the fairing cap only because it is an aid to help you fair the bulwarks inboard to a consistent thickness. It is 3/16" wide and 1/16" thick and sits atop the sheer. It really finishes off the sheer nicely. It will be completely covered up so it doesnt matter what type of wood you use. You should start in the waist and lay down a length of stripwood along the sheer first. Keep it flat and level and make sure the outside edge is flush with the exterior hull planking. Then work your way towards the bow and stern adding the laser cut hance caps if you bought them....and then finally finish it up with more 3/16" x 1/16" strip along the quarter deck and at the bow. At the bow because it is curved, you will need to cut it from a 1/16" thick sheet. I pressed this on top of the sheer and simply traced the outboard shape of the bow up to the bollard timbers. Then I drew another line to indicate the inboard edge so the piece would be 3/16" wide. Cut it out with a sharp #11 blade. Once done, you can fair the bulwarks inboard. This will take a while but its best to get it done now so all of that dust and mess falls away rather than collect inside your hull. One thing to consider while fairing....look at your gunport sills as a gauge and try to keep them consistently deep from bow to stern. I am about 95% of the way faired which is good enough for me at this point. Now I will start lining off the hull so I can plank below the wales. Notice how clean and free of laser char the bulkheads are inboard in comparison to the photo below which shows the hance fairing caps. Nice and clean. That sheet laying on deck is just scrap and helped me keep my knuckles from getting scraped up on the top of those bulkheads as I faired inboard.
- 1,784 replies
-
- 25
-
-
- winchelsea
- Syren Ship Model Company
- (and 1 more)
-
You are welcome. I am waiting on a large order of Cherry from Ethan as I write this.
-
I wish Jim Byrnes had these.....just thinking out loud....
-
The paper cutter does work but its a real pain when you want accuracy. It really doesnt work perfectly, especially with the thicker stuff. It messes up the edge of the strip too. Cutting a 3/64" wide strip is not easy. You would need a Guillotine Shear cutter that jewelry makers use. They are expensive. With the paper cutters, it will want to pull the sheet in so if you want a perfect 1/16" or a 1/32" wide strip 12" long that is not the way to go. If you can settle with less accuracy and curling then its fine. I may have to buy a good Guillotine shear in the future but when you need 100's of these strips for kits and parts, its not an efficient way to go. Much better to buy 250 strips from K & S bulk wholesale. I dont think Model Expo or Bluejacket can stand in front of a paper cutter making brass strips, LOL. They use far more than I do. I just talked to K & S on the phone....its not the tarrifs. Its just low demand. Nobody is doing the crafts and models like they used to. They are still doing the tubes and other parts. They just discontinued making these because nobody buys them. For you tool guys...This is what I will eventually have to get. But probably a bigger one. They had about 250-300 of the three sizes I use left in the warehouse so I just bought them all. That should last me a few years....Worth it for me as it would take hours to cut those.
-
So I shipped out about 30 sets of the first installment of laser cut cedar parts over the last two weeks. Many of you have probably received them by now. Has anyone started to assemble those stem parts yet? I would love to start seeing some build activity in those build logs. Anyone start yet? I used Titebond to glue the stem pieces together. I am eager to see some progress from the group. Shipped out 30 sets but only half of those have started a build log. I would also love to see some more of those lurkers start a log as well. Nudge ....nudge.... Just doing a little prodding!!!! Chuck
-
That is looking excellent!!! Just as its supposed to at this stage of the project.
-
Yes you can.....and for the record, I used 6mm ply for my model. Its all good. You may of course have to check and tweak the slot size because all 1/4"/6mm ply is not actually 1/4" or 6mm. It doesnt matter though as long as your slots are snug.
-
Yupp....everyone is stopping MFG which is so weird. Chuck
-
Most of these guys all get K & S stuff and they are all out of stock. I need to buy 40- 50 packages. Nobody has them any more. Its more of an FYI for you guys so you can buy a few packages if you need them. The prices on the remaining stock is also going sky high so I noticed that they did have a few left of some sizes you guys should by them.... Otherwise K & S will still make the wider strips like 1/2" wide by 1/64" but you would need to cut your narrower strips from those which isnt easy unless you have a press break.
-
Just an FYI K & S has discontinued making many sizes of strip brass and other items. These are staples for us model builders. For example... They are no longer making 1/64" x 1/32" brass strips 1/64" x 1/16" strips 1/64" x 3/32" strips 1/64" x 1/8" strips ect.... Does anyone know of another source for brass strips? I just bought all of their remaining inventory of these strips in bulk....but there wasnt much left. If you know you will need them, find a hobby shop that still has them on the shelf and buy them now while you can. Chuck
-
I actually have no idea. I never used it before so I couldnt say. Try not to over think it Lou. I realize there are a lot of choices but if you deliberate every tiny tiny detail you will probablu never make any sawdust. Just go buy some and give it a try. You will know pretty quick if its not gonna work.
-
You guys are so lazy....LOL. Just cut the pieces on a scroll saw. Those pieces were cut so poorly on that laser cutter I think a blind guy could do a better job on a scroll saw than that. It would be a huge mistake to try and use my templates on a harder wood (Pear or Box) as well and have them laser cut. The parts wont fit and you will waste a lot of money and wood. Lou....the scroll saw is waiting for you!!!! Those templates and plans are made for my tight tolerances. I have never seen a laser cutter come close to replicating it. So trust me when I tell you ....you will just end up wasting your money and wood. Either use my laser cut parts or cut them with a scroll saw. Chuck
-
Indeed that is what happened. So your print outs are just fine. I mistakenly shrunk the scale bar when reducing the size of the plan sheet info or logo above it. I have fixed that up so all sheets printed will have correct sized scale bars. But your plan sheets are just fine otherwise. Sorry about that. So dont worry about reprinting them. Chuck
-
I think you guys will be just fine. If you got any laser cut parts, just place them on top of the parts on the plan and see if they match up. Or as you said....if your 8 1/2 " x 11 sheets also match the plans then you are good to go. Its the exact file i used to laser cut the parts. It could just be that i stretched the scale bar by accident as i moved them and made room for the NRG logo. I had to shrink that text above it in some cases when I decided to do this as a group build and add the Nrg logo. Then i copied it to the other sheets. I may have grouped the scale bar in with it when I did that. I will check my original file and let you know. But I am pretty sure that is what hapenned.

