
HOLIDAY DONATION DRIVE - SUPPORT MSW - DO YOUR PART TO KEEP THIS GREAT FORUM GOING! (Only 13 donations so far - C'mon guys!)
×

rdsaplala
-
Posts
602 -
Joined
-
Last visited
Content Type
Profiles
Forums
Gallery
Events
Everything posted by rdsaplala
-
 Lovely work on the anchors and bouys, Mike, they look great!
 -
The stern timbers look great, Augie, very precise work, the overall framework looks great too, well done!
- 2,191 replies
-
- 1
-

-
- confederacy
- Model Shipways
- (and 1 more)
-
The stern is looking great, Augie, very nice work, thanks to for sharing the technique of using a pencil sander.
- 2,191 replies
-
- 1
-
-
- confederacy
- Model Shipways
- (and 1 more)
-
I'm afraid WD40 or spraying alone won't easily reach all the crevices of the ship. If a large freezer isn't accessible, you could go with Andy's suggestion of using a garbage bag, filling it with substantial amount of mothballs (about 3-4 large bags of balls should do it), closing it tightly with rubber band, then waiting about 2 weeks. The vapors produced will penetrate virtually all areas of the ship and kill all bugs. A word of caution though, the fumes of mothballs can be irritating so you may need to let the model sit for a few more days before touching it. Note also that these bugs tend to recur so you may need to repeat the process once every few months and like I said, place mothballs in your display case once you finish the model.
-
I forgot what species those little bugs are but they indeed love boring into wood, the freezer technique or placing the model in a sealed bag with mothballs for a few days will kill the present dwelling ones. They are however bound to return so fumigation of the work area is advised. I would also suggest that once you're finished with the model, just place it in a sealed display case together with some mothballs. Don't forget to replace the mothballs once consumed
-
Beautiful work on those frames, Augie, your choice of stain will make a perfect contrast with the color of the planking
- 2,191 replies
-
- 1
-
-
- confederacy
- Model Shipways
- (and 1 more)
-
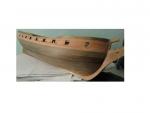
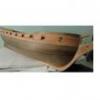
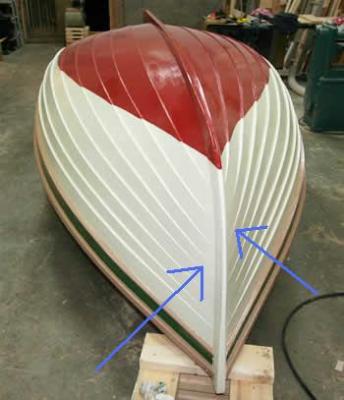
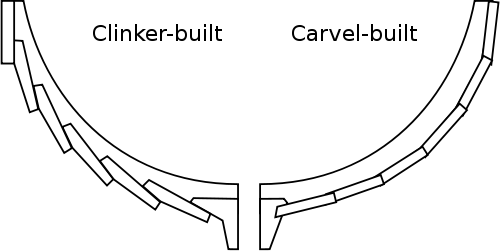
There are many books dealing with planking, but before investing in one, you may want to have a look at the many excellent articles in this website that basically eliminate the need to invest in such books, I will list some of them in my explanation below. The problem with using straight planking strips provided in kits, especially for clinker planked models, is that it is difficult to get the proper shape of the plank. One solution is to edge-bend the planks as seen in the link below: http://modelshipworld.com/uploads/monthly_02_2013/post-2-0-22527600-1361668290.gif Another solution is to spile the planks. Spiling basically means shaping the plank in such a way that it lies properly on the hull. To do this, you may need to get a wider wood sheet from which you can spile the plank to its proper shape. Have a look at the articles below on how you could spile your planks from wood sheet: http://modelshipworldforum.com/resources/Framing_and_Planking/Planking%20primer.pdf http://modelshipworldforum.com/resources/Framing_and_Planking/Lining%20Off%20your%20hull%20for%20planking.pdf http://modelshipworldforum.com/resources/Framing_and_Planking/plankingfan.pdf The examples used in the articles are carvel-planked hulls, but spiling for a clinker-planked boat follows the same principles with the following additional work: 1.) overlapping the planks in such a way that the upper edge of the lower plank is covered by the lower edge of the plank immediately above it by 2mm in your particular boat (see cross section below): 2.)Another task to be done is blending together all the planks at their fore and aft edges so that the clinker effect disappears at the fore and aft ends of the boat (see example below). This is done by gently sanding the fore and aft edges of all the planks. If despite the above articles, you still wish to get a book, then you may want to try "Planking the Built Up Ship Model" by Jim Roberts. Good luck on your endeavor.
- 3 replies
-
- 1
-
-
- strake built
- clinker built
- (and 1 more)
-
Very nice work Sjors, excellent fix on the gap too, don't worry about the foremast's backward rake my friend, adding the rest of the forestays usually evens out the backward pull of the shrouds and back stays and should pull the masts a bit more forward
-
You're really flying Mobbsie, barely a few months into the build and you're nearly finished arming and fitting Aggy, excellent job as always my friend, the lids and ropes, figurehead, and rudder details are very cleanly done PS: thanks very much again for the info on making the quarter galleries my friend, I really appreciate it
- 1,279 replies
-
- 1
-
-
- agamemnon
- caldercraft
- (and 1 more)
-
Ratlines are coming along very nicely, Sjors, splendid work!
-
Very nicely done, Popeye, shrouds and stays are all looking great!
-
Wow! considering that you just got back, you sure work fast Andy, splendid work as always
-
She's simply stunning, Sjors, excellent rigging work!
-
Good choice on keeping the safety timbers, Augie, I'll borrow that technique as I've already managed to snap a few of my frigate's antlers
- 2,191 replies
-
- 1
-
-
- confederacy
- Model Shipways
- (and 1 more)
-
I think the original main stay looks OK Sjors, but this new one looks even better, excellent redo Sir!
-
Hi Mario, I'm so sorry about the incident with the cat, take your time my friend, the house work should give you some breather until you're in the mood for shipbuilding again.
-
Very clean cutting work, Ben, hope you had an enjoyable vacation, looking forward to more updates.
-
I'm pleased to know that your finger has now recovered, Patrick, I'm looking forward to seeing your rigging work.
-
Excellent fix on the bulkhead planking, Popeye, and very nice and clean deck planking Sir
-
Splendid work on the breast beam, Danny, that is one very clean rabbet there, Sir, excellent joinery!
-
Neat work on the gunport linings, Vitus.
-
Take your time, my friend, once you're done with the ratlines, everything will be smooth sailing and easy as pie
