

tlevine
-
Posts
1,937 -
Joined
-
Last visited
Content Type
Profiles
Forums
Gallery
Events
Posts posted by tlevine
-
-
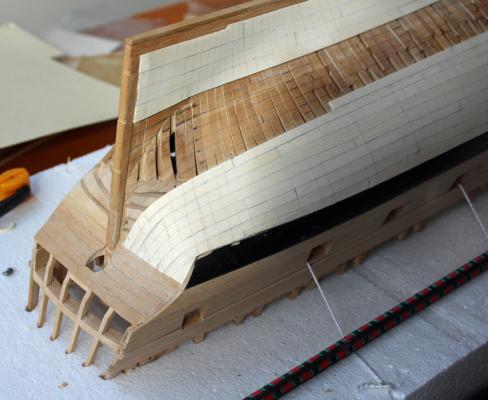
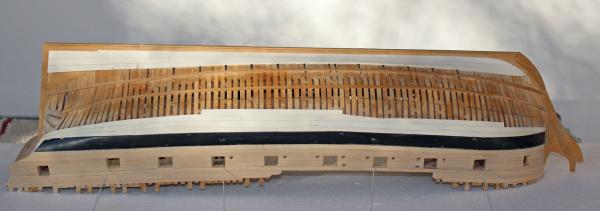
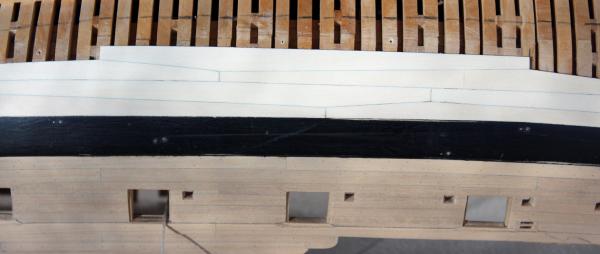
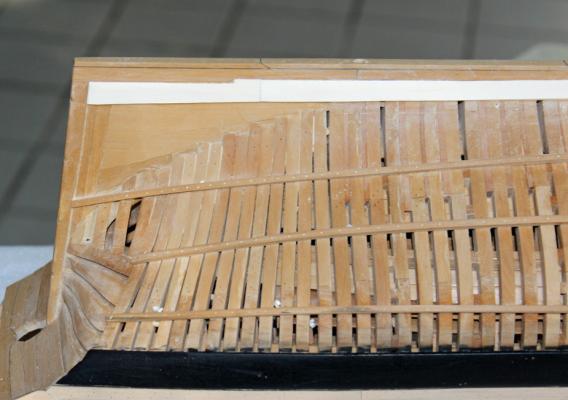
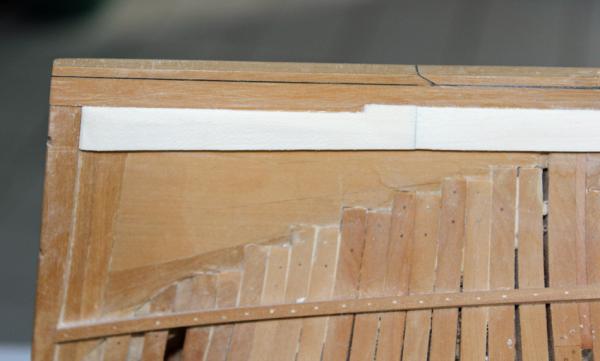
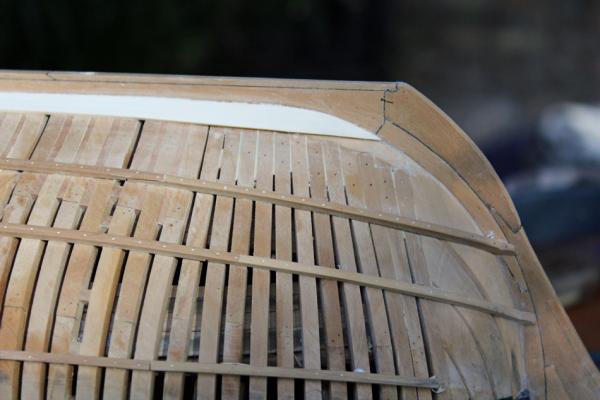
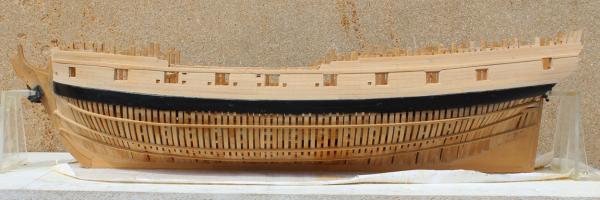
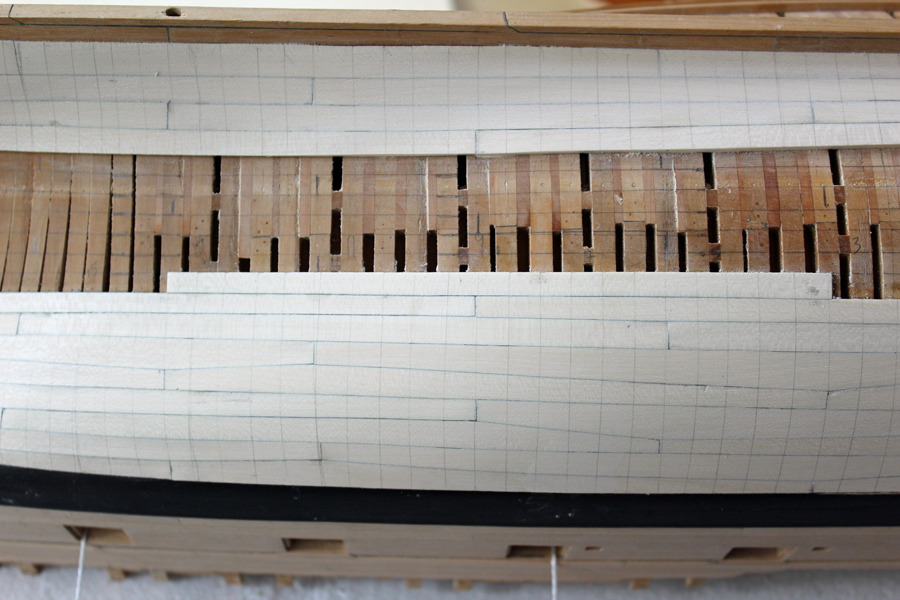
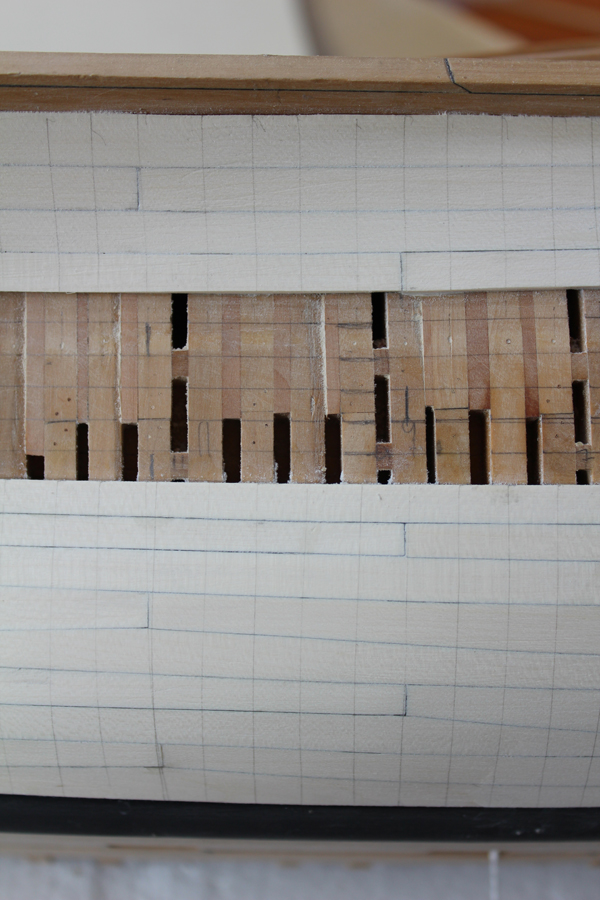
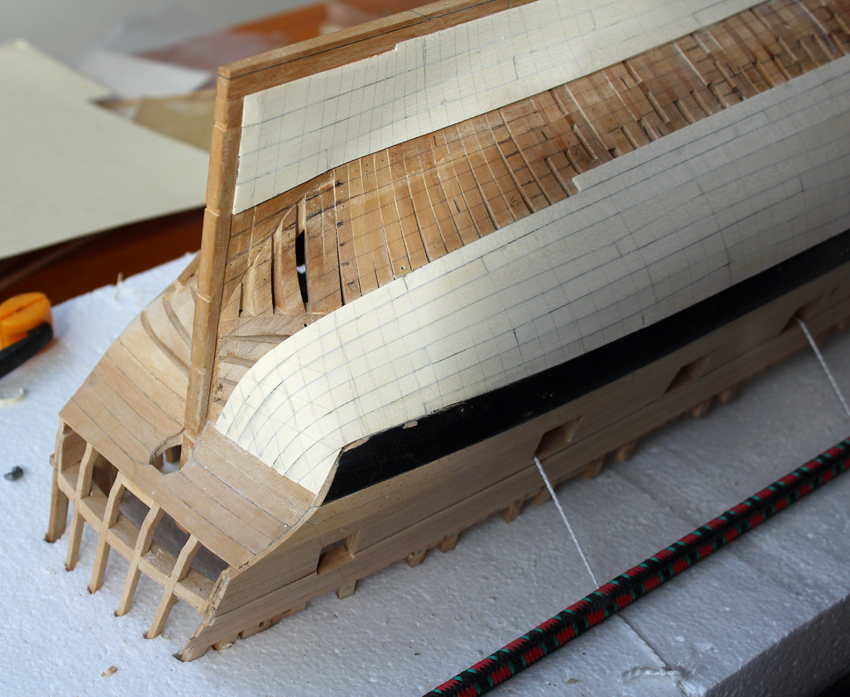
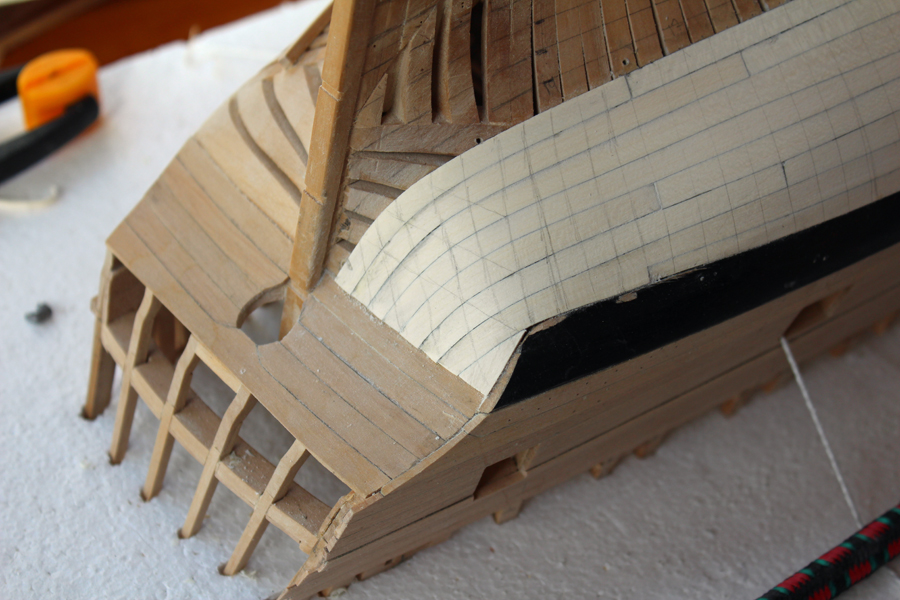
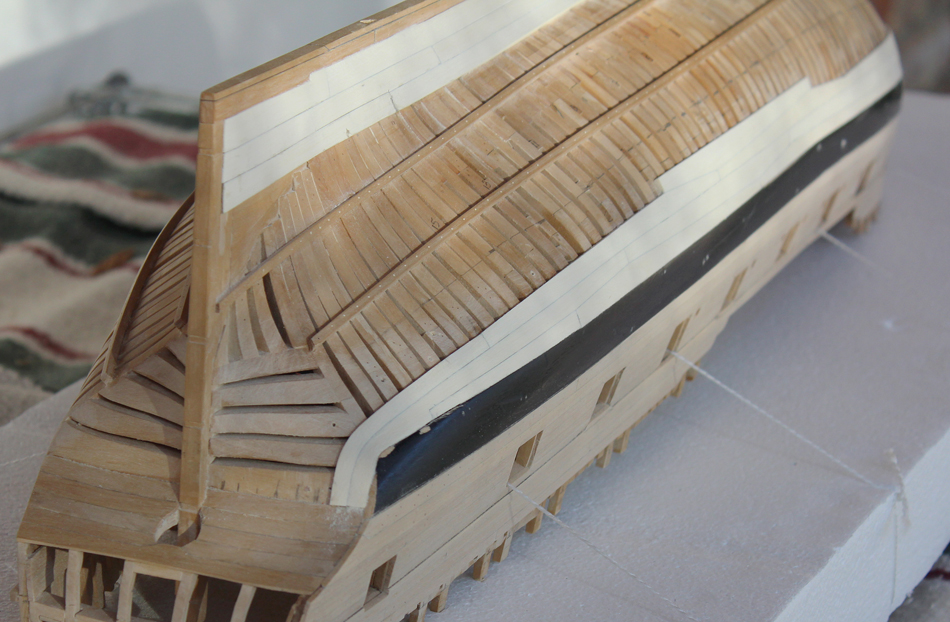
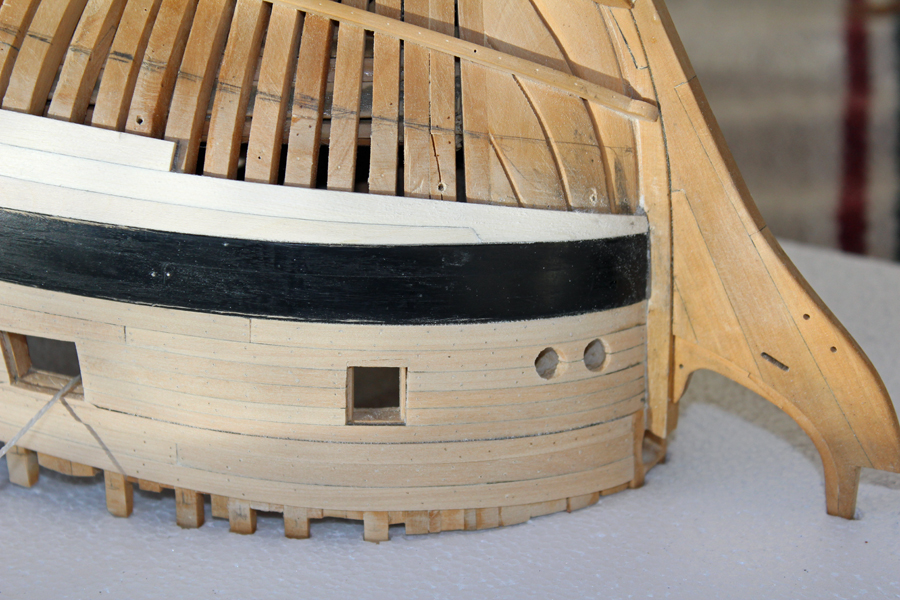
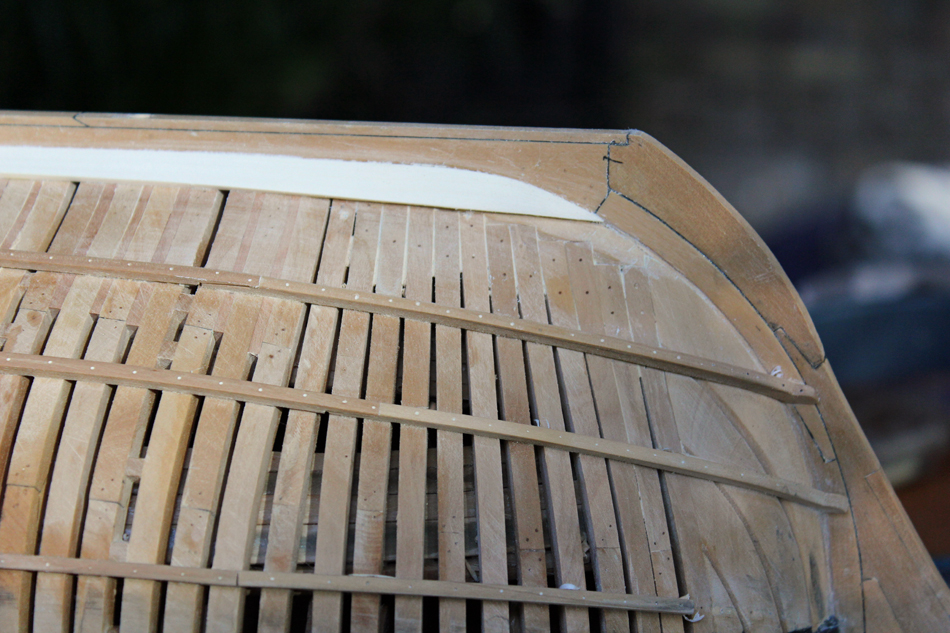
Thanks to everyone for their input regarding the planking below the transom. Obviously, somewhere along the way, a measurement was off by about 1/8" (6" full size). I decided to make up for this by making the planking below the transom look like it was designed to have a filler piece and not a correction for an "oopsie". I am pleased with the look so far. The same number of planks end on the wing transom as shown in TFFM. The difference is that there is no need for a slight flare at the end because of the filler piece. After installing the first row of planking below the "gang of six", I decided to lay out on the hull the rest of the runs of planking. Tick strips were used at every station to obtain the remaining width. This was divided by nine (the remaining number of rows) and the width was transferred to the hull with calipers. After all the station marks were drawn in, the marks were connected in a fair line to show the run of the planking. I also marked out the butts of the planks. This makes the rest of the job much easier. While there was a significant amount of framing visible, I decided to mark their locations on the planking so the lines of treenails would be fair. At the stern this involved also marking out the fashion pieces and the location of imaginary cant frames going up towards the wing transom. Everything looks a little rough at this stage, having only lightly sanded with 100 grit.


-
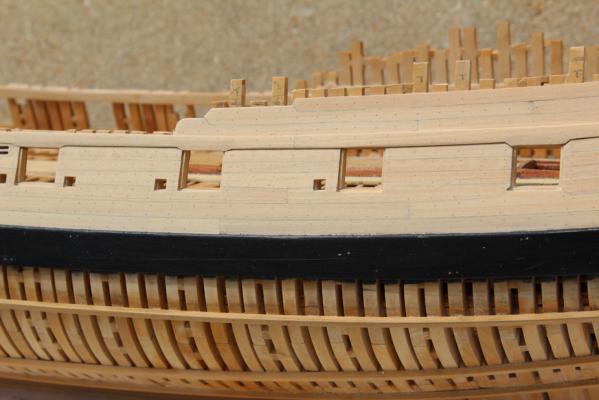
Ed, thanks for clarifying. The most inferior row of lower counter planking extends to the margin line of the wing transom, so the bottom planking ends below that point. The black paint (and marginal photography) does obscure some detail. The other thing is that I have left the aft end of the wale long until I am happy with how things look. I do draw the line at replanking the wale! It may not end up perfect but it will look ship-shape.
Good to see you posting again David.
Juergen, I am happy Ben alerted us that it has been found. It is interesting to see what items are shown and which are omitted. For example, the only scupper shown is the large one for pump discharge.
I was looking at a contemporary model of Atalanta in the NMM collection and noticed that the friezes have a red background, not the blue I had expected to see. How common was this color palette? I certainly want to be true to the original ship but I find the red to be cheap looking and ugly. Any direction would be helpful.
-
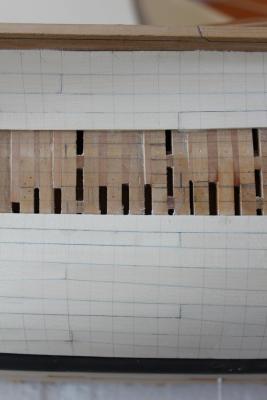
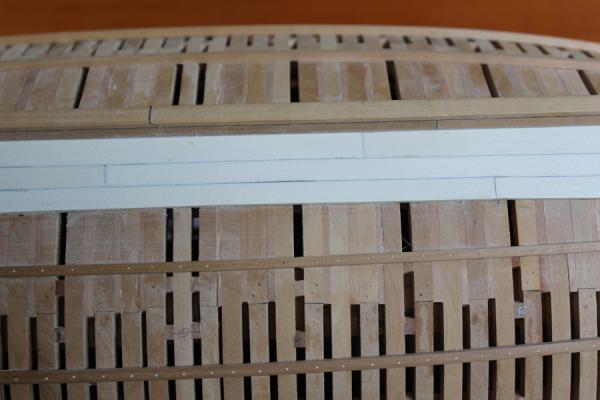
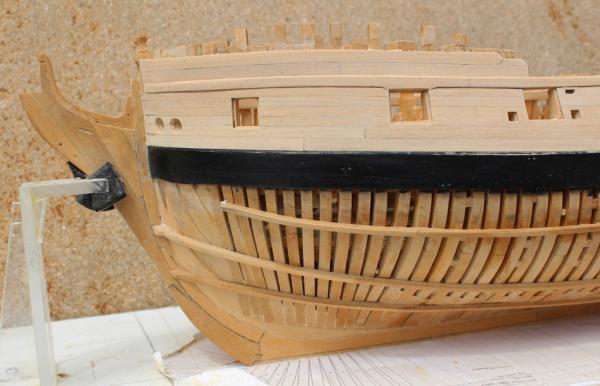
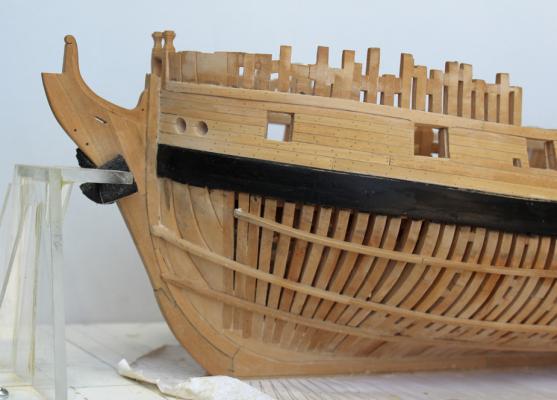
I may be misinterpreting what you are saying, and if so feel free to correct me. The horizontal planking on the counter does go down to the wing transom. I went back to the plans as well as to some photos of other Swan class models. In a lot of ships the lower edge of the main wale is close to or at the same elevation at the inferior edge of the wing transom. And in fact, Hahn's model of Kingfisher is built just this way. On Atalanta, the inferior edge of the wing transom bisects the main wale so there is going to be some moderate bending of the plank as it comes up the stern. This is seen in the contemporary model of Atalanta at the NMM. In that model it appears that the filler has been painted black to simulate the upwards sweep of the main wale. I am including a link to the model. http://collections.rmg.co.uk/mediaLib/317/media-317109/large.jpg I have just installed a new plank (pictures this weekend) and with a filler piece there is only a gentle bend required.
-
-
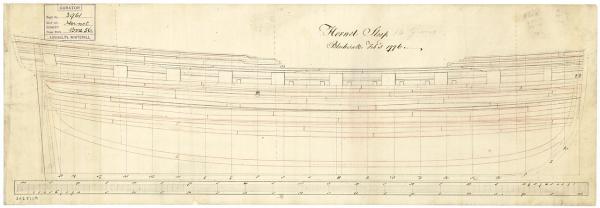
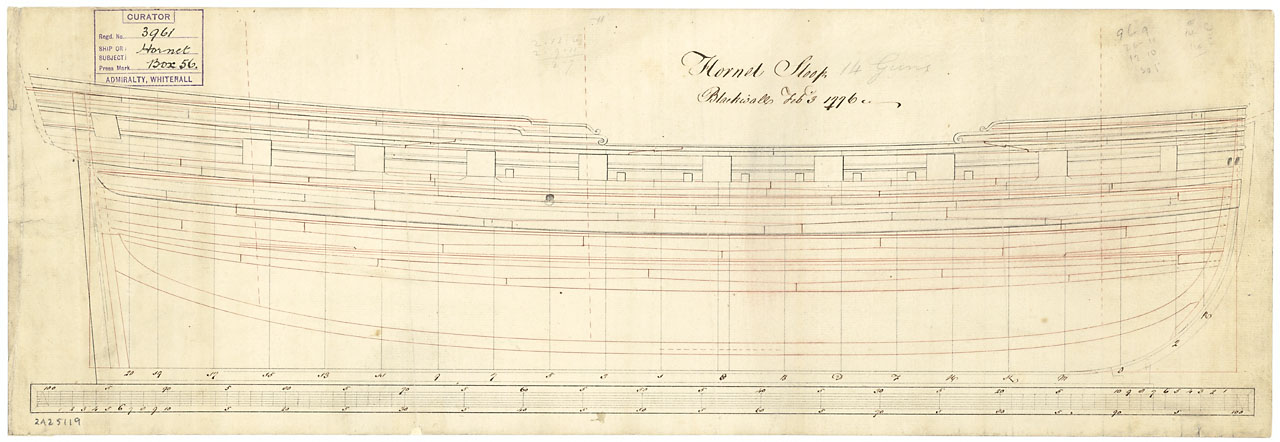
Tom, you'll see the filler piece in a few days. I have attached the Hornet planking scheme from the NMM. It is plan ZAZ5119.
- jaerschen, 10Playname, mtaylor and 3 others
-
 6
6
-
Hi Ben. Funny thing about the tuck of the stern... It's wrong. Druxey was kind enough to point out that there should be a filler piece between the outer wale and the first full plank. This would result in a 45o angle where the counter and the planking meet. So I have debonded all of the planks aft of dead flat, remaking a few planks and hopefully salvaging the rest. Unfortunately, I had already installed five rows of planking, not the three rows seen in the photos. I did not know that the Hornet planking scheme was available. I am using the one from TFFM. For these six rows of planking, all you need are three measurements, the fore and aft width and the width at the widest spot. One side is essentially straight and the other is two straight lines intersecting at the widest point.
-
Thank you, Druxey. Maury, I wasn't too sure about the holly at the beginning. I was afraid it would be too stark a contrast. But now that there are a few strakes in place I really like the look. The finish will also tone down the "whiteness". Its handling characteristic is what I am surprised about. It bends very nicely and keeps a good edge.
-
Not much to show for the last few weeks. Last week was devoted to the NRG meeting. It was great to put faces to some new names. Hope to see you again next year in Mystic.
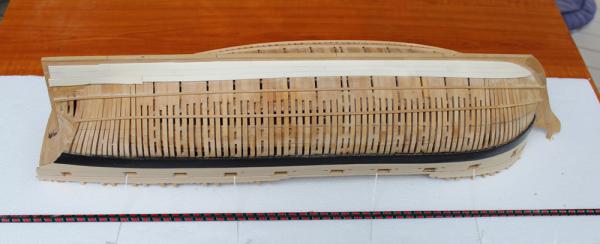
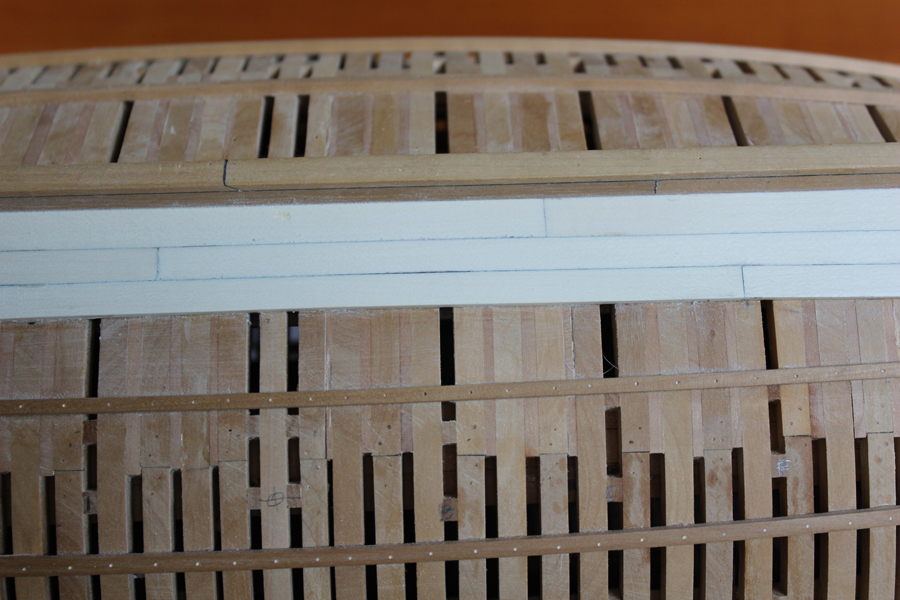
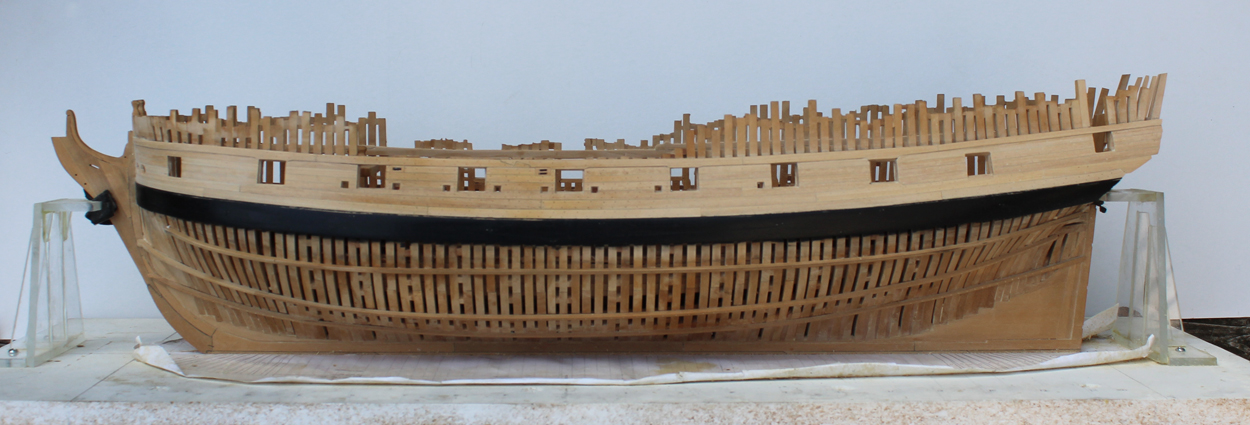
I started the planking below the wales. The first 6 rows of planking are anchor stock and the rest is standard planking. The first strake is 3" thick at the wale, tapering down to 2". The rest of the strakes are 2" thick. I laid the first row of strakes full thickness and then tapered the lower edge after the second row of planking was completed. The extreme fore and aft planks are dropped. I marked out the landing spots for the planks terminating at the counter to prevent any uneven plank widths. Holly is a pleasure to work with for the hull planking. Gentle curves can bent by hand. The extreme bends require a 30 minute soak in water and are pinned in place with clamps and planking screws. After they are completely dry, final shaping is done and the plank is glued in place with almost no pressure. I like to rough sand the planks every few rows to check for any problems. It is a lot easier to pop one or two problem planks now rather than several planks after the hull is completed.
The wale has gotten scuffed with handling and sanding. It will get a re-paint after all the planking has been installed.


-
I received my autographed copy of Comet this weekend at the NRG show and have made it through the first few chapters. As one would expect, the book is well written with numerous sketches and full-color photos of the completed hull. There are six sheets of plans which include all of the frames fully lofted. A great addition for anyone interested in 18th and early 19th century military ships.
-
I'll be at the registration desk Thursday evening. See you all at the bar.
-
I went back to the build log and found the following:
May 23, 2012. I have finished the filling pieces. I used Swiss pear to give a little contrast with the boxwood. In contrast to the pear that Danny is using in his Vulture build, this is less pink. Maybe it is the age of the wood; these billets are 25 years old. I initially installed port and starboard pieces simultaneously to prevent warping of the keel (thank you Danny for that lesson!) but once everything felt solid, I removed the hull from the building board and added them where ever they would fit. I deliberately left out the filling pieces on the frames that had spacers for aesthetics and to allow a little light to enter the lower hull. The pictures show them roughly faired in. They will be finished after the gunports are completed.
There's your answer Ben. Don't mind the hijacking at all. We all learn from it and isn't that the point of MSW?
-
-
Thanks for following this build, Christian.
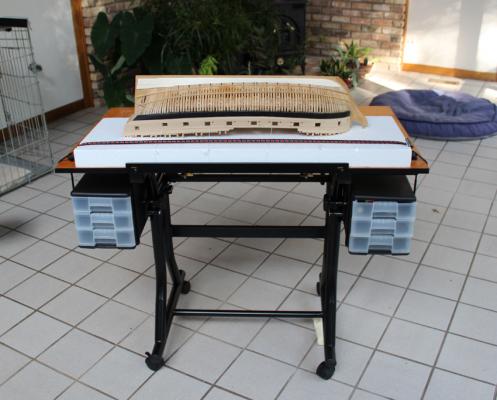
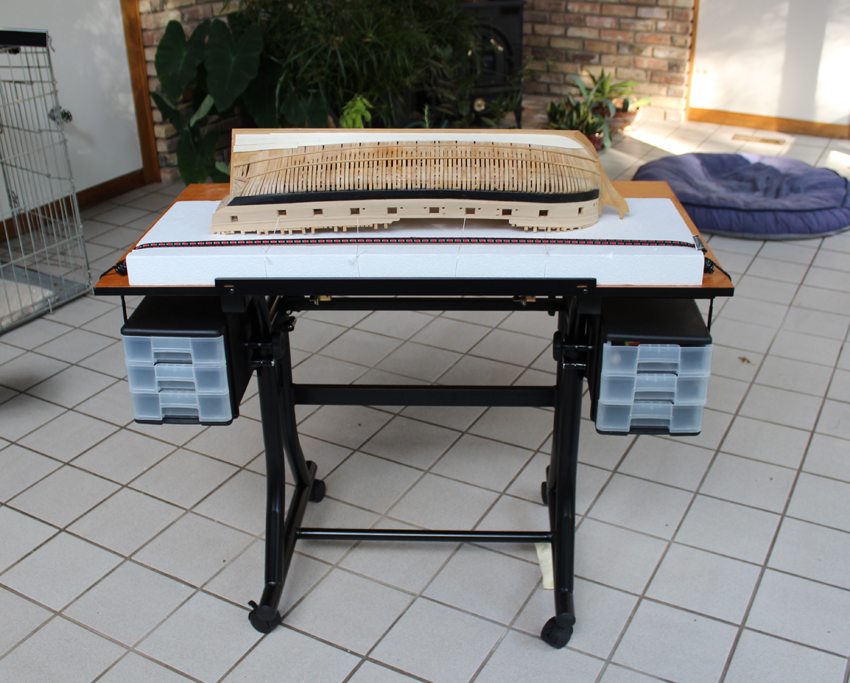
Not much got done this weekend, between Fall cleanup and getting my Hannah cleaned up to take to the NRG meeting next week, there was not much time for building. When I bought the styrofoam for the base, I found a hobby-quality drafting table. It elevates and tilts, important to me since I prefer to work standing up (I guess it's the surgeon in me). And at 30% off, what girl could say "no"? A bungee cord across the base keeps everything in place, even at an angle. And the casters allow me to follow the sun.


The second two rows of planking are almost completed. When I return, I will start the planking below the wales.
- Jason, mtaylor, harvey1847 and 15 others
-
18
-
Looking good. The rabbet is no more difficult than the aft deadwood. Mark it out first and then take your time. If you find yourself getting hurried then stop and come back later. I start my rabbets with an 11 blade that the tip has been broken off of and either a steel ruler for the straight sections or a french (or ship's) curve for the stem. You can grind the angle for the rabbet into a straight-edge razor blade and use that as a scraper to deepen the rabbet and avoid oopsies.
-
-
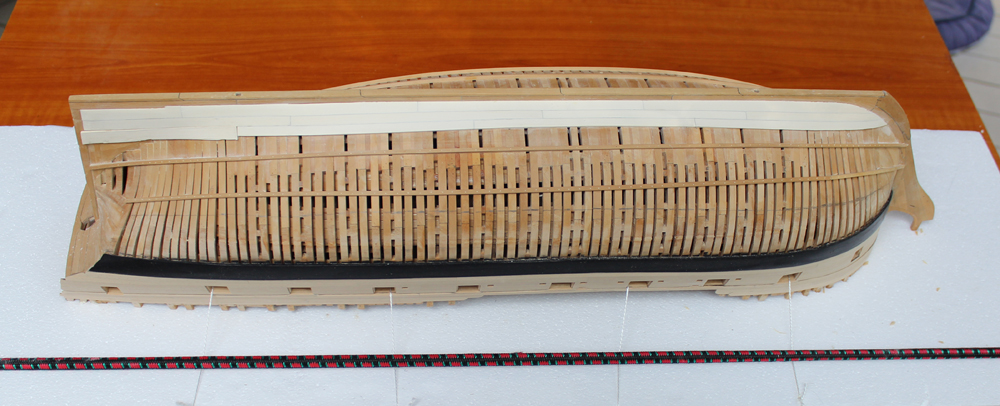
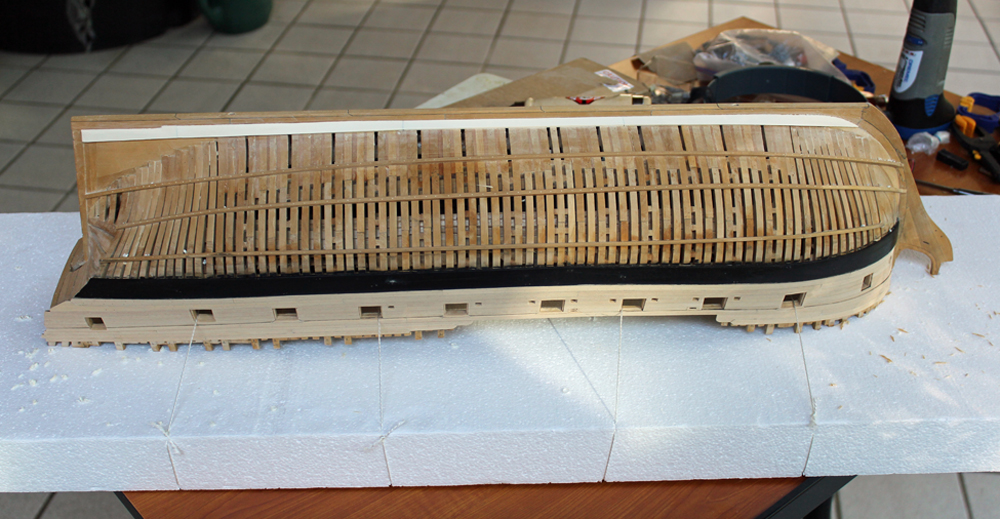
It is time to work on the lower hull. I pressed the top timbers, stem and counter timbers into a 2" thick slab of styrofoam. I then threaded butcher's twine through the gun port openings and secured the hull to the styrofoam in four places. This allows me to comfortably work on the lower hull while having the ship securely attached to a flat surface.
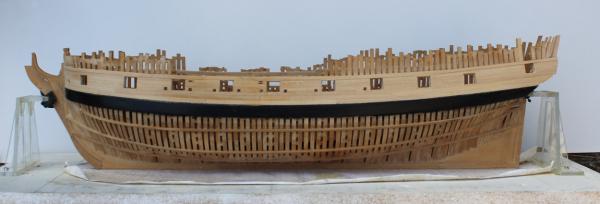
The lower hull planking is holly. I am using a different holly for the hull planking than I did for the decking. That wood was more grey and had some color imperfections which became apparent after the finish was applied. This is a whiter wood without any visible flaws. (Thank you Hobby Mill.) The garboard strake was installed first. When you look at the plan, you are tempted to say "Oh, a straight line with the keel. Easy." Well, because of the twists in the plank fore and aft, that straight line is anything but. The key is to make templates of everything and then transfer the outline of the template to the wood, leaving a little extra for fine-tuning. The fore end of the garboard was terminated per the layout in TFFM. Prior to gluing the planks in place, the keel rabbet was cleaned up.

-
Looking sweet, Maury. What kind of fishing line did you use?
-
Thanks for the clarification, Druxey. It's the perfect thing to fix while waiting for the hull planking to dry. Danny, I am afraid you are right...but I will post occasional updates so you know I haven't given up the ship.

-
Ben and Mark, thanks for the support.
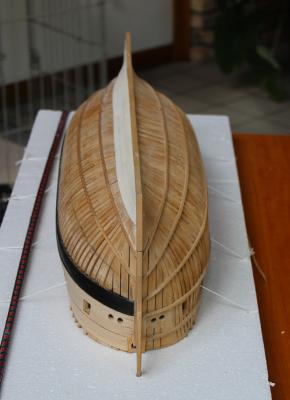
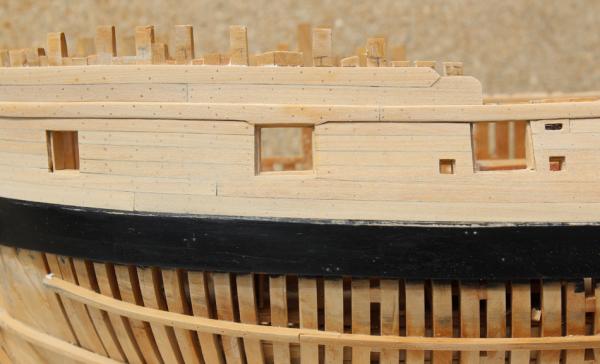
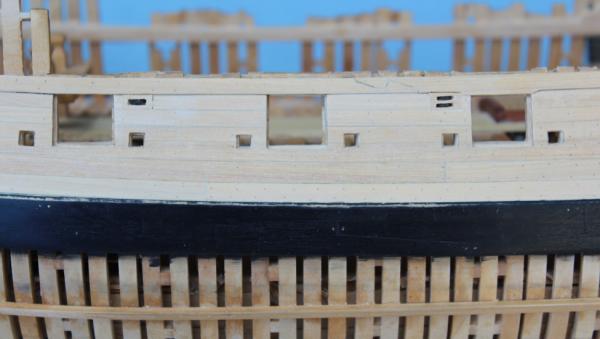
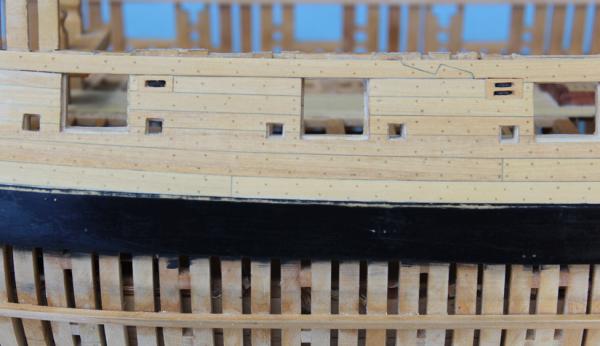
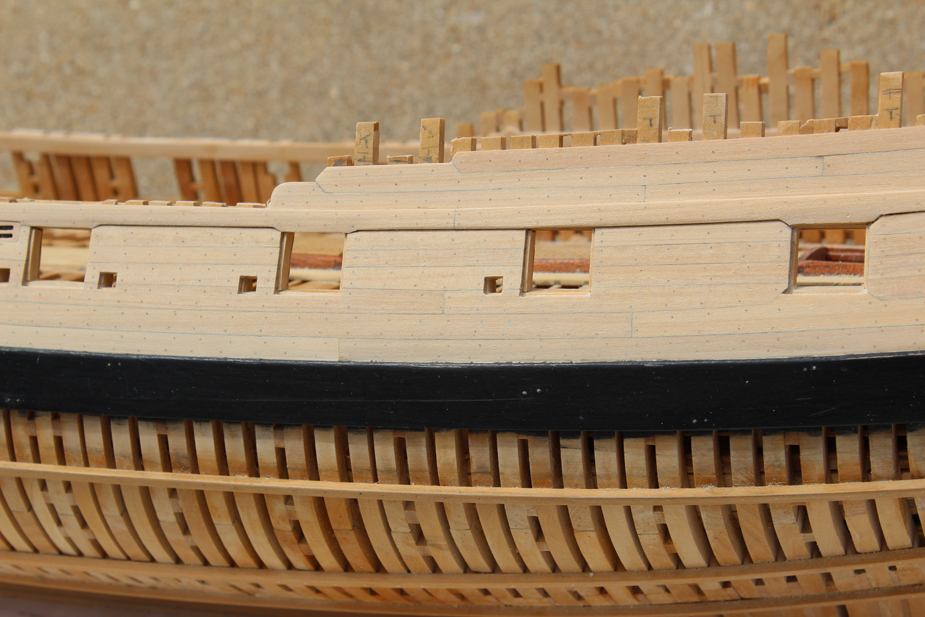
I have reached a milestone...the upper works' planking is completed! I left the frame ends protruding above the level of the top rail to protect the upper edge of the planking. Now you can even tell which frames have timberheads associated with them. Because the only things keeping the starboard frames in line are the ribbands and the filler blocks above the top of the frames, this side was not cut down. Now I have a question. In TFFM it states that where the sheer strake "...widens down to the ports there is a change in surface level to produce a smooth, continuous chamfer line..." I interpreted this to mean a smooth chamfer to the top of the port. Another interpretation would be to make the lower part of the strake the thickness of the hull planking and the top part the thickness of the sheer strake. Looking at a contemporary model of Atalanta did not show enough detail for me to tell which direction to go. If someone could give me some direction, I would appreciate it. I left things so that it would be easy to convert if my interpretation is wrong.
On to the lower hull planking.
- gjdale, robin b, Mirabell61 and 19 others
-
22
-
-
Thanks, Kees. We are usually our own worst critics.
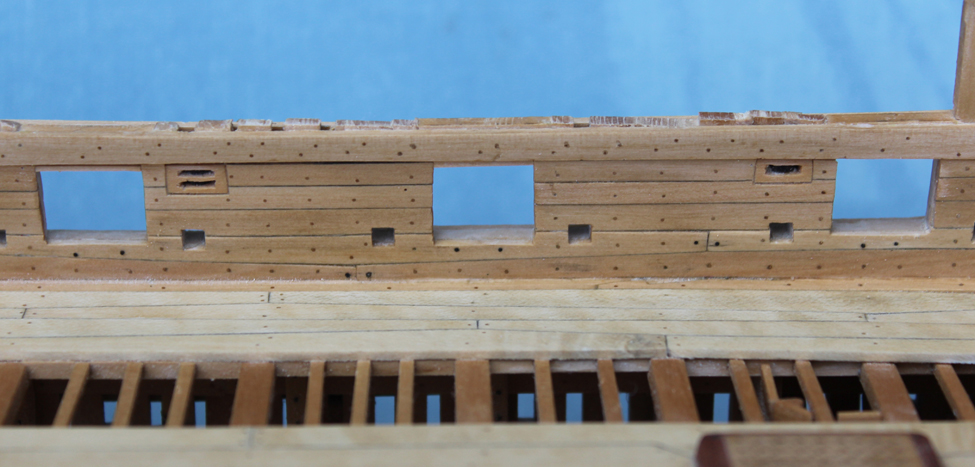
Now that the sheer strake is installed, it is time to attack the fixed blocks. There are two fixed blocks that pierce the hull. One of them has two sheaves and the other only one. They are pretty straight-forward in construction. First the block's shell is cut and dry-fit. Next the slots for the sheaves are marked out, drilled and then finished with needle files. The hole for the pin is drilled and the block is put back into the hull. It is much easier to drill the slots for the sheaves prior to shaping the sides. The inner and outer faces are sanded to conform to the shape of the tumblehome. I made the sheaves from ebony that I drilled out and shaped with chisels and sandpaper. Finally, they were sawn to thickness and installed. In the pictures there is too much contrast between the woods to actually see the sheave withing the slot. The blocks were removed, the sheaves and pin inserted and glued with CA, and the assembly was glued in place in the hull.
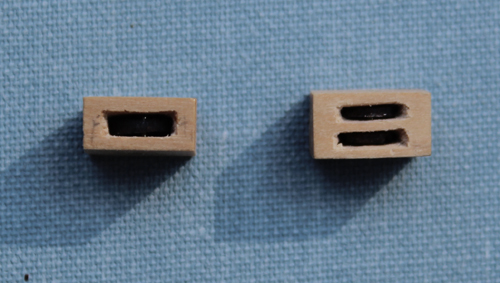

The first photo shows the blocks glued and sanded in place. In the second photo the wood has been wiped down with a damp cloth to highlight the treenails. The slots on the inboard face need a little more cleaning up.
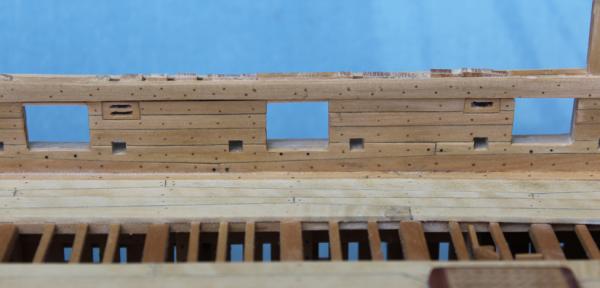
The final appearance. I still have to insert some of the gun port liners but overall I think it looks pretty good.
-
I have a suggestion. Make your holding jig a "V" rather than a "U". It will hold the wood more securely. You can also use that jig to sand or plane down the spar to the correct dimensions. I always get worried when I put long pieces of wood into a drill chuck. Unless you can keep the speed very slow the wood whips about madly. Get some good poplar dowels from your favorite craft or DIY store for the other spars. Since you are into organization, make yourself some storage containers for leftover wood strips. Take some PVC pipe (I used 4" diameter) and cut off 18-24" lengths. Stack and glue them together with PVC cement to keep your wood organized.
-
Either a Metz or curved tonsil scissors would give you the reach without excess blade length. I am sure you could pick up either of these on EBay or a a used medical supply house. Please remember that these scissors are designed to cut tissue, not thread. The largest diameter thread these types of scissors would cut without the end looking ratty is 3-0 (0.2 mm).
-
Greg and Danny, thanks for the encouragement. Like so much of what we do on these models, the mistakes are only going to be visible to ourselves and the few other "crazies" of like mind. Hope to finish the treenailing this week. One thing was reinforced with this little escapade. If David's drawings to not exactly match the model...STOP. If I had done that at the time I installed the black strake, the rest would not have occurred.


HMS Atalanta 1775 by tlevine - FINISHED - 1:48 scale - from TFFM plans
in - Build logs for subjects built 1751 - 1800
Posted
Thank you Druxey, Maury and Ben. And thank you everyone for the likes. You're right, Danny. In laying the hull planking, the tendency is to make the planks too wide. This becomes a cumulative error which would result in one or two rows of skinny planks. Hopefully, only a few more weeks to go before the wood worms go to work.