Captain Slog
-
Posts
904 -
Joined
Content Type
Profiles
Forums
Gallery
Events
Everything posted by Captain Slog
-
 Hi Ken, sorry to clutter up your log but Greg if you look here http://modelshipworld.com/index.php/topic/2745-pt-iii-shopping-for-card-models/for where to purchase kits. Also Chris (ccoyle) has a whole series of threads on building card models in the card section of this forum. cheers Slog
- 80 replies
-
- 4
-

-
- choctaw
- heinkel models
- (and 1 more)
-
Hi Chris, Just catching up on some logs. Your planking is coming along. I hated doing the second layer on mine. With regards to planks, can't really help on actual widths but I remember reading somewhere that they never cut them more than half the width. Includes deck planks also..but I may be wrong. Cheers Slog
-
I agree 100%, but you are obviously missing the point of my counter argument, so will leave it there. Enjoy your modelling and weather as much or as little as you think appropriate and it will still be welcome on this site and enjoyed by many. Cheers Slog
-
Correct there is room for both but it comes to subject matter. In the scratch section there is a guy who builds contemporary fishing vessels and he weathers them superbly. The praise he gets for it is immense. He is not looked down on because he weathered his models. They look like the real old beat up thing. They don't look poorly done they look real. Why? In my opinion because they are steel vessels where rust and paint damage can be replicated realistically. This forum is more directed to wood models of wooden sailing ships. Built as nice and sharp and clean as possible. Why? because again in my opinion making a wooden ship from wood can easily look like poor workmanship although there are good examples on this site. If there were more steel ship builders then more weathering would take place I guess. Metal cars and military vehicles in larger scales take weathering far more easily in my opinion. For museums, they do have a choice as I would imagine they commission ships models to be built. Fact that most or all are 'clean' suggests they want them that way. With regards to real weathering I visited the local harbour where the Dufyken (spelling) was moored and a couple of workmen were on it. What a mess, it looked decrepit and falling apart. This is probably after only one season of sailing as well. To replicate that most viewers would think it should be thrown on the fire.
-
My 2 cents and not having a go, but this and a handful of other topics come and go like the rising and setting of the Sun. If you had performed a search this same question would come up at least 3 times I can remember. And generally concludes with "its your ship, build it how you want to' You must be confusing MSW with some other site because this in general is far from the truth. My usual response to this question is that in my opinion making a ship look weathered and realistic runs the risk of looking more like poor workmanship, might be due to the scales or subject, don't know. Until the next time. Slog
-
Hi Joske, Looking forward to following another card build. Cheers Slog
- 2 replies
-
- 1
-
-
- enterprise
- shipyard
- (and 1 more)
-
Hi Greg, Enjoying following this build. Got an observation though, looking at the 3rd photo in post #36 with your brass prop shaft, they appear to splay outboard at an awkward angle. I would imagine they would be closer in line with the 'hump' they exit from. I am not an expert just looks weird unless they used universal joints! Cheers Slog
-
Hi Dashicat, Nice to see another Caldercraft Endeavour. Using a compass is a good idea. I messed up here and my wales are 1 plank width too low, which I didn't notice until it was time to mark the waterline for the white stuff. Bow filler blocks are a must for the bluff bow, it will be difficult to get a nice round curve without them as the planks want to go straight across the gap of the bulkheads. Cheers Slog
-
French Pre-Dreadnought Battleship Carnot
Captain Slog replied to dgbot's topic in Nautical/Naval History
I had this one and a couple of her sister ships on my wish list to build. David, as I mentioned above these are available in 1:200 scale card models along with several Russian and Japanese ones of the same era. They certainly have a certain appeal to them. Cheers Slog -
French Pre-Dreadnought Battleship Carnot
Captain Slog replied to dgbot's topic in Nautical/Naval History
I love these oddball funky looking pre-dreadnoughts. There is a 1:200 scale card model of this available. Cheers Slog -
Hi, I'm with Paul on this one. I have always uploaded all my photos in one hit and then just insert them where ever I want and in what ever order I choose. Usually I have a speil of what the photo is showing, insert the photo and then the next speil and next photo etc. I don't understand how you can upload photos out of order? Cheers Slog Edit: sorry forgot to mention your progress is looking really great, nice work.
-
Hi Dirk, Those images are incredible. Cheers Slog
-
Impressive non-ship models (link)
Captain Slog replied to Keith_W's topic in Completed non-ship models
Thanks for bringing his work to our attention. Here is the YouTube video for the hummingbird above. Very impressive. Cheers Slog -
Hi Andrew, You first planking bands look nice and flowing, curving in the right places especially shown in the first photo but before progressing to far you might want to go and correct the 2 individual planks where it appears that they are concave between the bulkheads around the midships area. If the second layer of planking follows these you are going to have hollow spots or if you get the second planking to bridge the concave areas they won't be secured down properly and might be springy. Just an observation. Cheers Slog
-
I wish I had done this on my build. Will make stepping the mast spot on instead of spending time trying to line it up plumb. Cheers Slog
-
Thanks Ron, been in the new place for 3 weeks now but modelling stuff still boxed up until I can sort out work table/s. The house build was a comedy of errors on the builders part but as usual lessons for next time, if there is one! Cheers Slog
-
Proposed purchases to start my first wood kit
Captain Slog replied to BobSki's topic in Wood ship model kits
Hi Bob, I don't think its been raised but I would double check buying the additional brass photo-etch set. As far as I am aware the kit will come with the required photo-etch as standard and all you may be doing is buying an additional duplicate set. Unless of course the individual set is an upgrade to the existing. Either way I would double check. Cheers Slog -
Ah okay, in that case what I would have tried was to minimize the depth of field so the background wasn't in focus to make it softer so it isn't fighting with the details of the masts and rigging. I might also have tried going lower and shooting slightly upwards as well to eliminate the fence outside and possibly the window sill. Then it would have the ship in focus against the nice soft coloured foliage and reduced distracting things like fences. But thats only my opinion, everyone has their own ideas about the what the shot is about. Look forward to seeing more pictures. Cheers Slog
-
Hi Tom, A pro-photographer (I forget who) said "The best camera is the one you have with you" Would it have been possible to move the ship back so the picture could have been taken with you between the ship and the window to your back so the light is falling onto the ship? An office wall might then have served as a less cluttered background. The problem as you know shooting it against the window is the camera light meter is going to see the average exposure as being quite bright with the result that the ship is under exposed and a correctly exposed sky. Thats a nice ship to have in your office by the way. I wish I had something in my office like that to look at! Cheers Slog
-
I wouldn't have thought so. I would say the vast majority of posters only use photography to document their log (myself included up to this point) and nearly all logs from this perspective are fine. The criticism has only been directed at the blurry shaky images and in defense of that there has been a lot of good advice, tips and techniques posted here to help improve picture taking in general. The intent of the thread was initially for macro photography and to bring attention to focus stacking in particular as I have only recently discovered this myself and think it would be an idea to apply it to build logs in certain instances. The general hints and tips I threw in were as an example of how a few relatively easy and at no cost techniques could improve peoples build log photos. Indeed some of you posted real examples of this in practice. I would hope no one is offended or hold back from starting or continuing their log. I think the only person who will be a bit skittish in posting photos to their build log will be me as got a lot to live up to now Will post some more stack examples tomorrow. Cheers Slog
-
In my opinion you got it. Very nice. To prevent blowing out the highlights I think its a case of under exposing as the shadows are more recoverable than the highlights in post processing.
-
Hi Daves, Thats a nice looking ship and good example of the technique. Is that another scratch hull in the background? yeah can imagine that would be an impossible shot. Even if you were allowed to use flash the glass case would obscure/distract from the image. Only thing I could think of to try would be to really crank up the ISO but then gets 'noisy' which I couldn't live with. Cheers Slog
-
Hi Tom, I have wondered that myself. From what I know it compensates for 'focus breathing' This is where the image size changes slightly with in the focus range. The image might grow or shrink when changing focus depending on the lens. I saw this happen slightly with my trial stack and it didn't seem to be a problem. Doing it hand held might be different. Perhaps if the images where slightly skewed from each other it might still be able to combine them but would require cropping of the edges where not all images aligned. I came across some amazing insect images consisting of a considerable amount of images and caption says they were hand held but I can't remember for the life of me where. Probably a YouTube video. In that case I think the technique would be to turn the lens down to its minimum focus distance and then slowly move forward until the front part of subject just comes into focus, take the shot, move slightly forward, take the shot etc etc until full coverage obtain. Using the tripod I went minimum focus distance on the lens and moved the camera and or object about until the point of focus was the tip of the boat and then left everything where it was and then only wound back the focus slightly after each shot. I am hoping to head out to the in-laws at the weekend, who have lots of flowers and therefore insects and try some stuff out. I will do hand held shots where again I will turn-off auto focus and set at minimum distance and focus by moving the camera hand held. Cheers Slog Edit: Okay opened up Helicon and looked at the preferences and clicked on the help button which took me to their site. Can't get the link to work so pasted below. It looks like can tackle quite a bit of variation. If you go to the link to Heliconsoft posted above you should be able to find the help/FAQ pages. Autoadjustments Focus Stacking Autoadjustments Even if you shoot a stack from a tripod and the subject is completely still, the images in the stack will not be perfectly aligned. It means that even with good shooting conditions, the subject will slightly change its size on the image every time the focus is shifted. So during focus stacking the program has to somewhat scale and sometimes rotate and shift images in order to align. This group of controls allows to fine-tune the alignment properties if needed. Adjust vertically - sets maximum vertical shift between two consecutive images of the stack in % of their width or length, whichever is greater. Adjust horizontally - defines maximum horizontal shift between two consecutive images in % of their width or length, whichever is greater. Rotate - defines maximum angle between two consecutive images in degrees. Usually not needed for microscope and tripod shots. Scale - defines maximum difference in subject size between two consecutive images in % of their width or length, whichever is greater. Adjust brightness - defines whether brightness of consecutive images should be equalized.
-
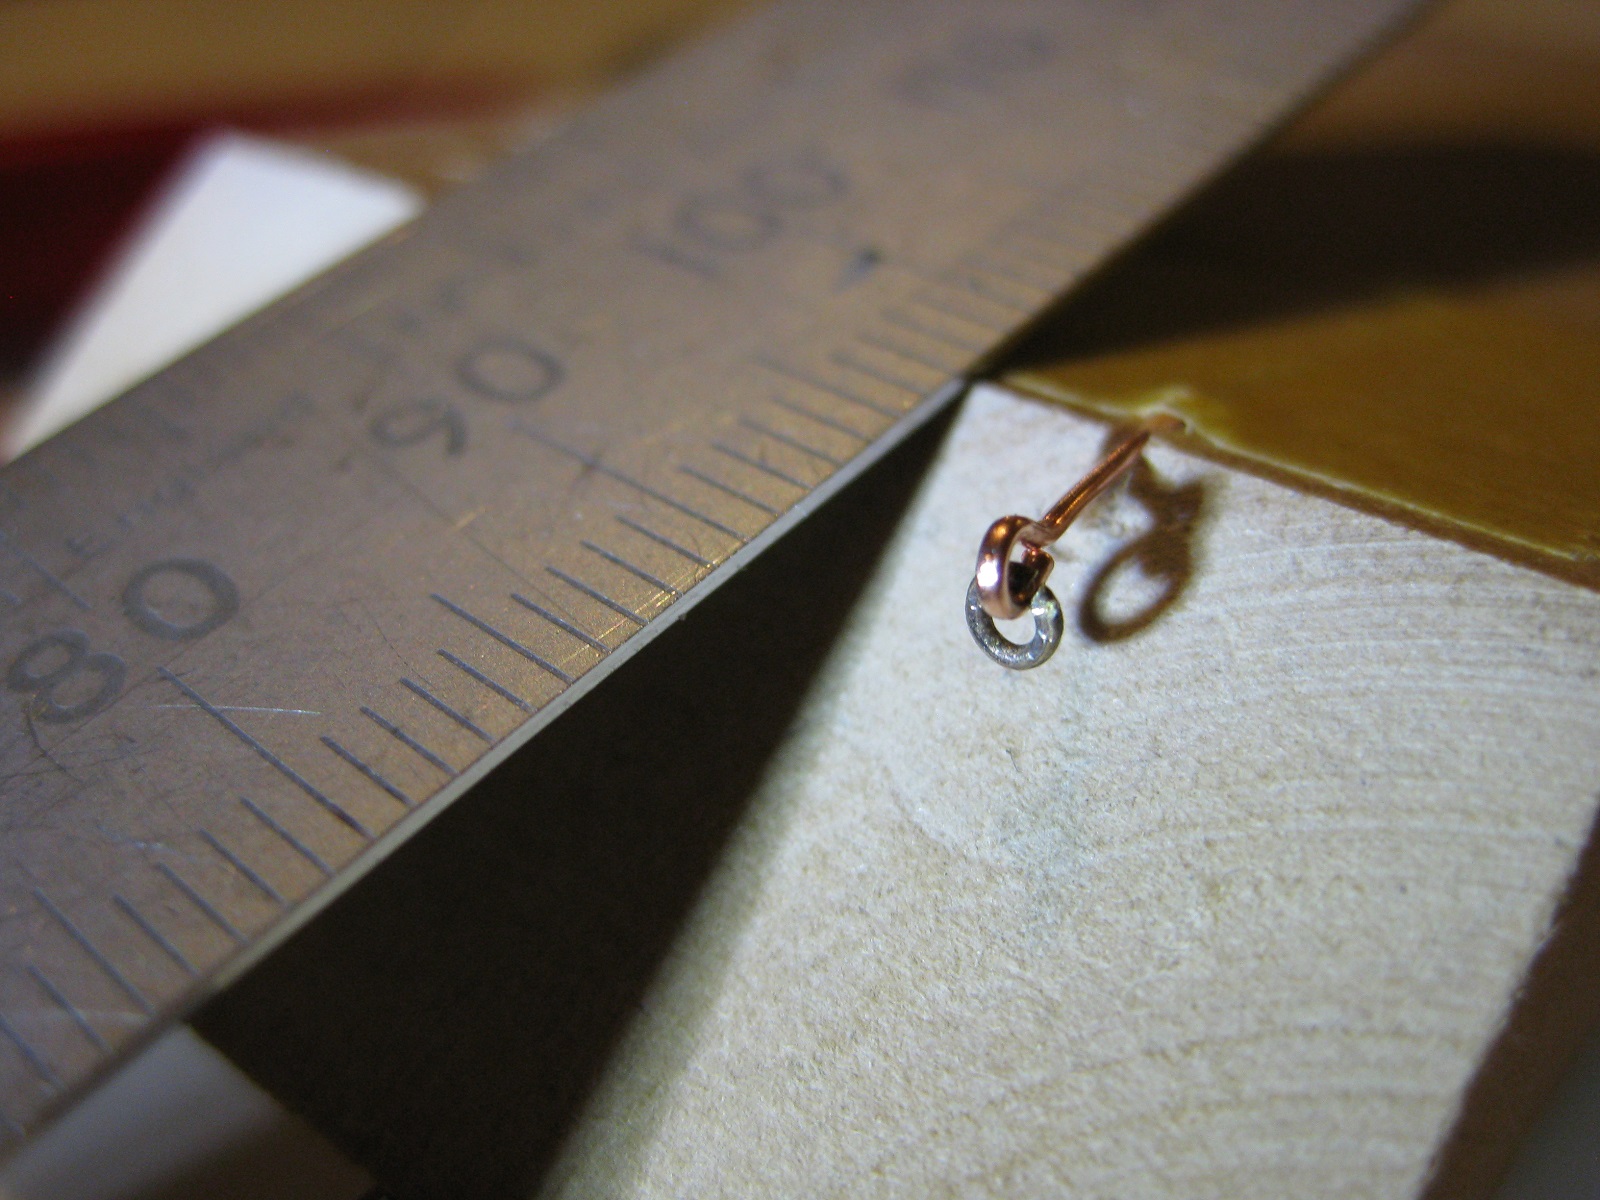
Thanks everyone for posting what are all great shots of your work and I can see why you would be proud of them. The discussions going on are great also. A lot of knowledge and experience out there to share. Hi Keith, My build photos like you are for documentary purposes. The biggest thing is trying to get viewable images across to show what was done. The art part of it I would like to start trying to incorporate it more for my own enjoyment but likely to eat into the time from modeling but to me both equally enjoyable. Should have mentioned in first post. I am using Heliconsoft focus stacking software. http://www.heliconsoft.com/ I have been looking around and seems to be popular with lots of good images to be found and also YouTube tutorials. I downloaded the free 30 day trial (only started stacking at the weekend) but will purchase it when the trial period runs out. The trial version appears to be missing the DNG RAW converter plug-in so it can export a RAW back to Light Room for developing after the stack! It is fully integrated into Light Room also so all images can be exported directly from LR and Heilconsoft opens automatically. It is a one click action to start the stacking. There are three different methods of stacking A, B and C which is dependent on the size of the stack, subject etc but I render using each method and use the one which worked the best. Also can be used for general photography and not just macro as can focus stack any images. It can also stitch together multiple shots for panoramic photos. Hi Henry, Brian makes some good points above which you have probably seen already. Another relatively low cost option is a set of macro extension tubes. Come in a set of three and can be used in combination or even with a dedicated macro lense to give crazy magnification. They are simple tubes which fit between the lens and body moving the lense further from the sensor. The good thing is they are hollow so don’t introduce further glass or distortion. There are basic tube ones and also ones which maintain the electronic contacts between the lens and body so metering, aperture control and auto focus still operates. I thought I had but must have deleted it when I purged what my original post was going to be as went into a lot of details about each of the exposure settings etc and how they interact. If there is any interest in the principles I can post later as have saved it all. All my build log photos to date was using a Canon IXUS80 hand held which was great also. The macro function let me get in real close although DoF was an issue. Here is a photo of a 1.6mm eye bolt taken with the point and shoot on the macro setting. I don’t have a separate flash and like you don’t have much luck with the built in flash. I used natural light or desk lights for all my modeling photos to date. I agree, it doesn’t have to be a master piece but a clear sharp image will show your modeling skills if not your photography skills ( I don’t have much of either LOL) . I am almost ashamed to say if I look at a log I haven’t seen before and the images are blurry or shaky I hit the back button without any further browsing and rarely will return later to see if the pictures have improved. Sad as I may be missing out on a great build. It’s not snobbery but I don’t see the point, it doesn’t show or promote your hard work as a modeler. LOL I am very similar. I love the hardware side of photography! Brian has done an excellent demo on cropping what shows better than I can explain. Wow, thanks Brian for putting in the effort to detail this. Shows perfectly what can be achieved. Cheers Slog

-
Hi Daves, Thanks for posting some images. They look great. This is an interesting question. My thoughts are if you understand the principles and know the camera and good composition etc then you are more likely to produce nice interesting photos. I follow some youtube channels and on one they get professionals on and give them crappy or novelty cameras and a brief and most of them turn out some great shots because they understand the 'art'. Also reminds me of a joke; A woman bumps into an old photographer friend at one of his galleries and says 'wow these pictures are great, you must have a really good camera". Well he is a bit miffed but doesn't say anything and the woman invites the photographer back to dinner that night to catch up on old times. After the meal the photographer exclaims to the woman "that was delicious, you must have a really good oven" I also think having great equipment will help make the picture look 'correct' but any emotions it instills in the viewer is definitely down to the 8" behind the viewfinder. I think my general photos are pretty boring although they may be technically good. All my build log photos were on an 8meg canon point and shoot. But now have a Nikon D7100 which I love. Cheers Slog