Captain Slog
-
Posts
904 -
Joined
Content Type
Profiles
Forums
Gallery
Events
Everything posted by Captain Slog
-
 Looking nice and straight Brian, good foundation for the planking is half the battle. Slog
 -
Nice work on the puddening Mike. I gave up after doing 2 of the 4 just couldn't get it right despite several attempts, yours look sweet. Slog
-
Hi Sam, The blackening turned out well. I like the finish of the buffed barrels. Cheers Slog
-
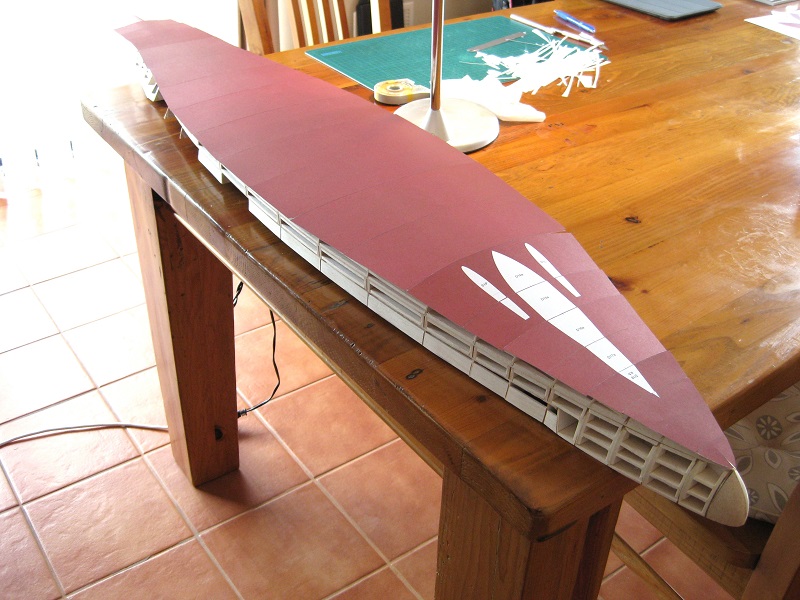
Thank you for all the likes, really encouraging. Thanks Sam, card models are certainly interesting. The local hobby store was quite limited in what they had metal stock wise. Will stick with the brass as I have it now and know if it works, the sharpening doesn’t take long and can do it easily enough just using my fingers. Great idea about slipping in a strenghener, I had a look and 0.8mm slips into the hole perfectly so will try that and leave it a few millimeters short of the tip so I can still resharpen it. The tube is self-centering for sharpening which I think I would lose with the solid rod in the centre. Will report how it works out. Okay, finished sanding and have cut out the lower hull skins ready for fitting. I think this must be the most difficult part of a card ship and not looking forward to it really. Worst comes to worst I could fill, sand and re-spray but would prefer not to do this. Couple of points, I hate free hand cutting and cutting petals for forming round curves. Each panel overlaps the preceding panel which I don’t like as there will be strips of double thickness paper ridges. I was going to try and fit and trim the panels flush but after playing around with the first few panels I decided this is beyond me and will fit them as is. Going to try some different edge colouring now before forming and gluing the skins. The PITT pen is to red and the Tamiya hull red is to brown (in fact it is brown). I have a set of water colour pencils which I will try and a cheap set of watercolours (the solid block type) also. I haven’t had much success with these in the past but will give them another go. Cheers Slog

-
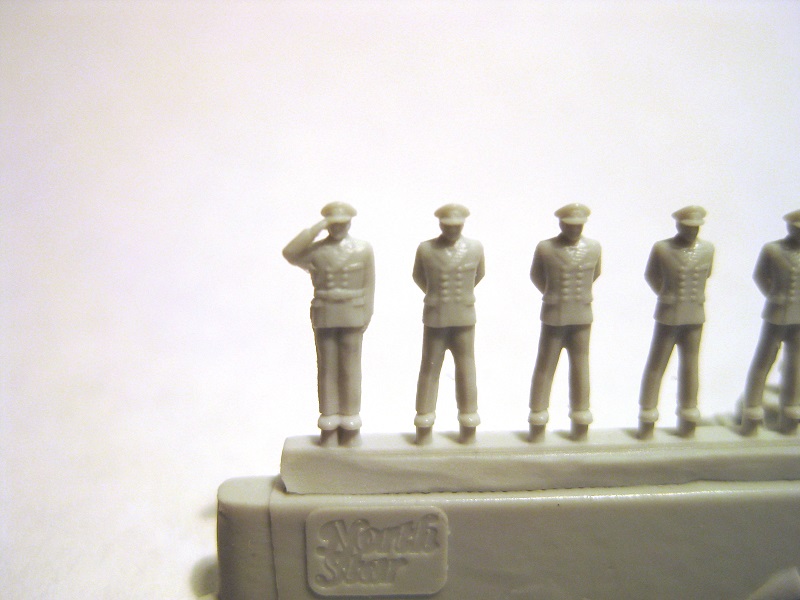
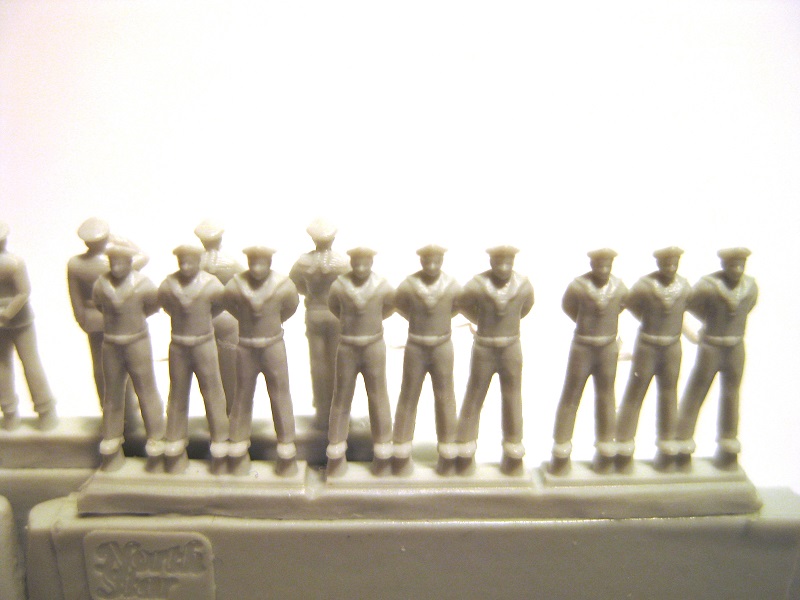
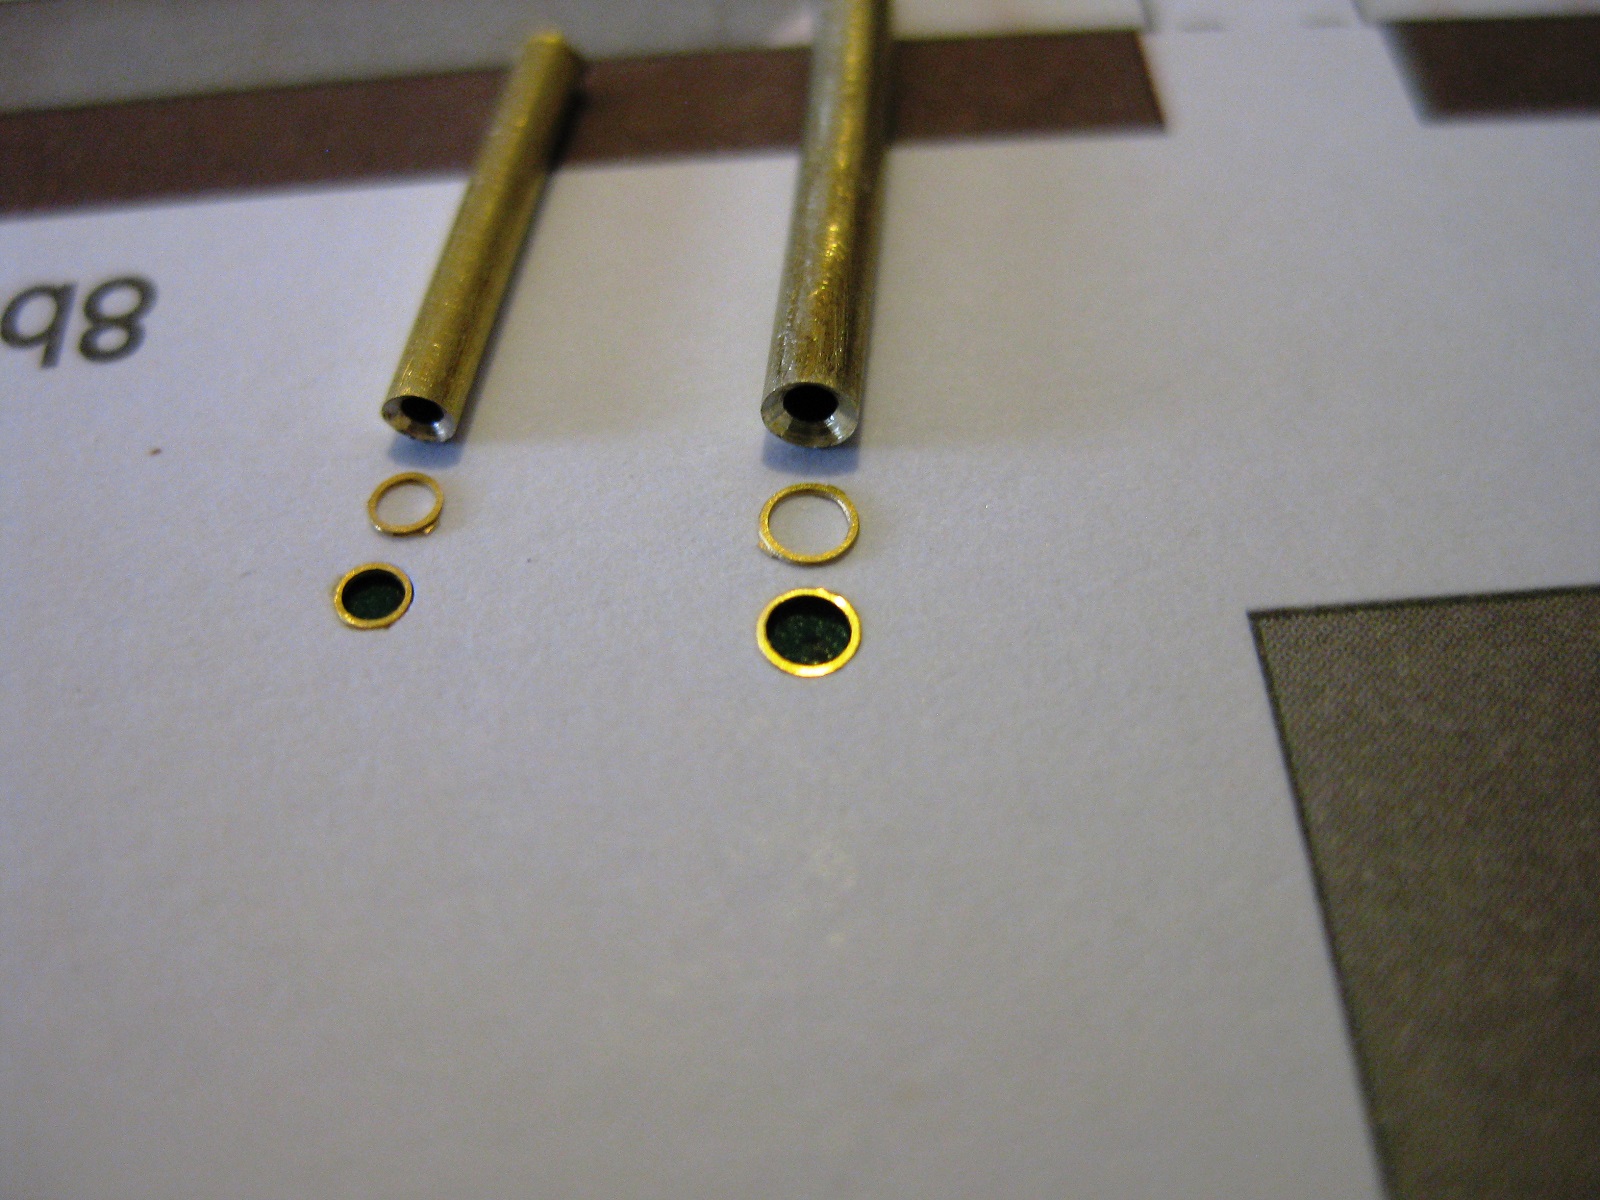
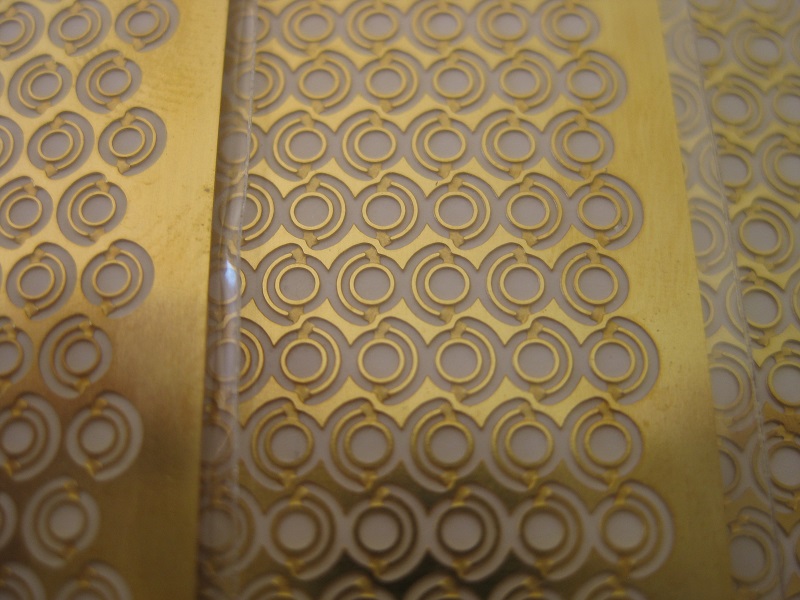
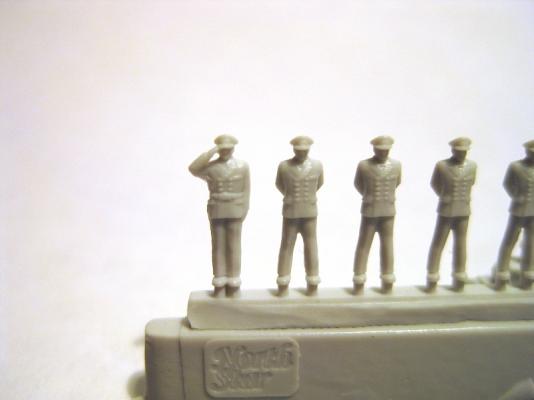
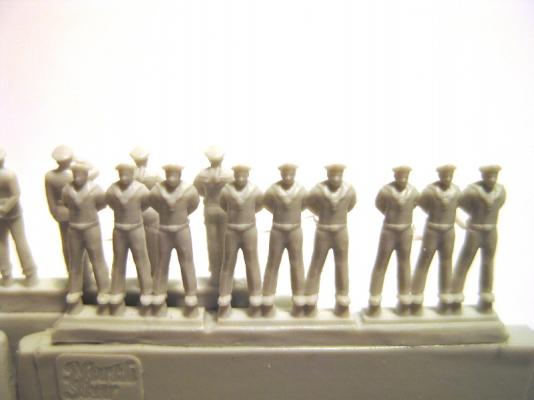
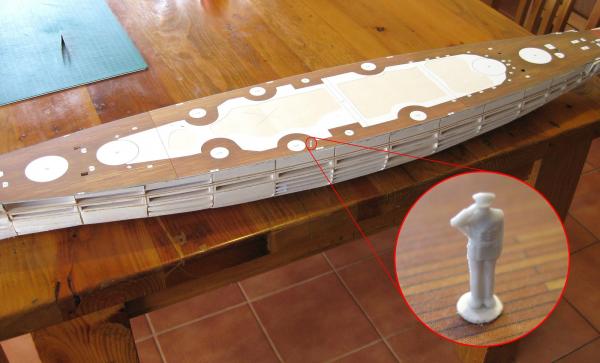
Hi Brian, just using what I have previously purchased as shown on page 1 of the log. I may buy bits and pieces as I get to them but will see how I go with that for now. Hi Brian (Gunther) these 1:200 battleships are certainly big, but whilst building the models of them you forget what monsters they were in real life until you have a reference to see them against. The scale figure shows how big they are and for me at least it was a real wow! moment. The figures in the photos above and below are 1:200 scale Kreigsmarines and got 50 odd in a pack (there are 4 different packs available). They are pretty detailed but very limited poses and unfortunately the regular crew are in groups of 3 being joined at the shoulders and feet although some careful slicing should be able to separate them and get at least one of the 3 free. I measured them and the figures are 9mm high giving a full size of 1.8m or just under 5’11” in the old money which is pretty good and they have depth also. Going to have to primer them though as Tamiya acrylics did not want to stick to them even after scrubbing them with soapy water and an old toothbrush. Haven’t progressed much but was experimenting with bits and pieces. I mentioned previously I wanted to make the portholes instead of leaving the printed detail and obtained 1.6mm, 1.8mm and 2mm brass photo etch ones from GPM in Poland. The problem was how to punch out the paper portholes to replace with brass. I had a 2mm punch but the cutting edge is on the ‘inside’ which means the paper round the outside of the cut gets compressed down. I need a punch with the cutting edge on the ‘outside' to leave a clean cut if that makes sense. I went to the local Hobby shop and managed to get 1.6mm and 2mm brass tube and then used a 2mm drill bit to bevel the inside edges. This was done by hand and it shaved the thin wall brass very quickly. I then cut the tube to small lengths and tapped them down on scrap model paper and they left a very clean cut hole. The photo etch brass portholes where a perfect flush fit into the punched holes. The 1.6mm and 2mm trials are on the left and right respectively. The 2mm is a perfect match for the printed hull portholes. I would imagine I will have to keep ‘sharpening’ the tubes quite regularly as well as making new ones (the tube bent quite easily when tapping the ends) but worth the effort for clean cut holes. Better get back to hull sanding Cheers Slog

- 107 replies
-
- 12
-

-
Shipyard H.M.S. Alert, 1777, 1:96-scale Paper Model kit
Captain Slog replied to catopower's topic in Card and Paper Models
Hi Clare, looking very clean and crisp, looking forward to more. Hi David, I have used GPM in Poland several times and a search of 'Shipyard' brings up several pages of products including ship models, sails, blocks, fiddles blocks etc. http://sklep.gpm.pl/en/search?cc_pg=1&cc_sort=id&cc_sort_type=desc&query=&cc_s_0=&cc_s_1=10&cc_s_2= Cheers Slog -
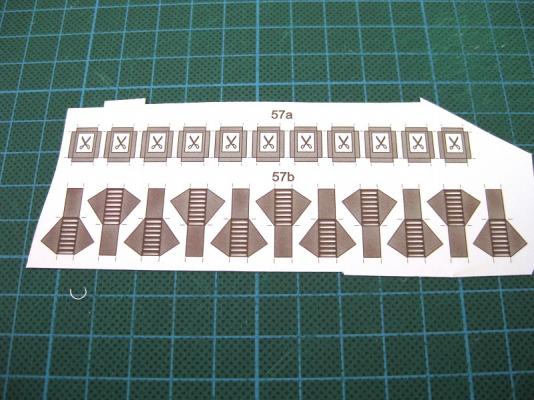
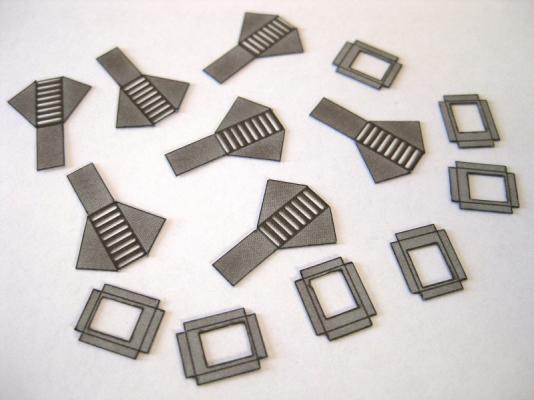
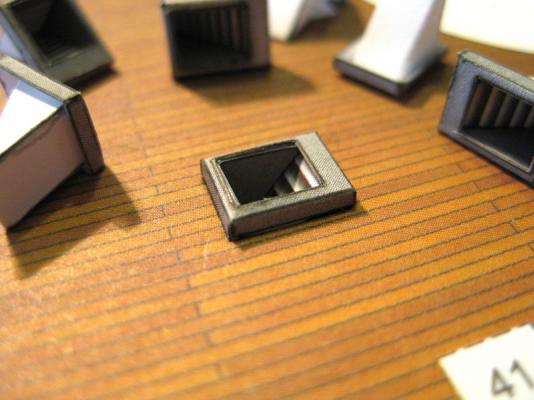
Hi, Thanks for the comments guys. A small bit of progress. I trimmed the decks to size and coloured the edges and then placed and aligned them on the deck to mark the perimeter for sanding. Unfortunately pretty squally here at the moment so can’t get out to sand. As I don’t want to jump around to much with the build decided to do the deck openings. These consist of top hatch surround and the stair well. Pretty straight forward with the cutting out and edge colouring of the parts reading for scoring the bends and gluing up. Forming the hatch surround with the bends was simple enough but trying to hold them to glue was a struggle. Ended up forming a jig to squeeze the sides together in place then placed the glue into the inside edges with a needle held in the pin vice. The deck has several holes marked out that need cutting out and the hatch and stair well drop in to this. I won’t glue any down yet until the deck is fixed to the hull. There are a couple I might redo as not fully happy with them but will see as the AOTS show a canvas covered frame work over the hatch. So if I can scratch these out of 0.2mm wire and tissue successfully they will be more or less covered up anyway. Cheers Slog

- 107 replies
-
- 13
-
-
Hi Steve, The Endeavour has been put into ordinary for the time being (i.e. packed away in a big plastic storage box ) Because I don't have a permanent work area I didn't want to start the masting and rigging as it would be quite vulnerable and didn't want any dust on the rigging issues and would be a bit unsightly covered up in the living areas . Once we get our new place sorted I can keep it out and covered when not working on it so no dust issues. Hopefully around next April will have a dedicated modelling room. Slog
-
Hi Steve, very nice metal work. Cheers Slog
-
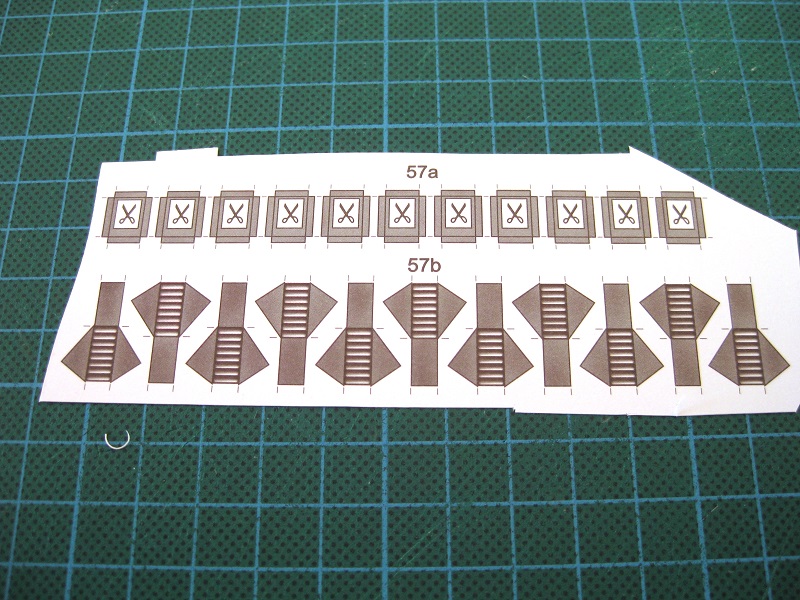
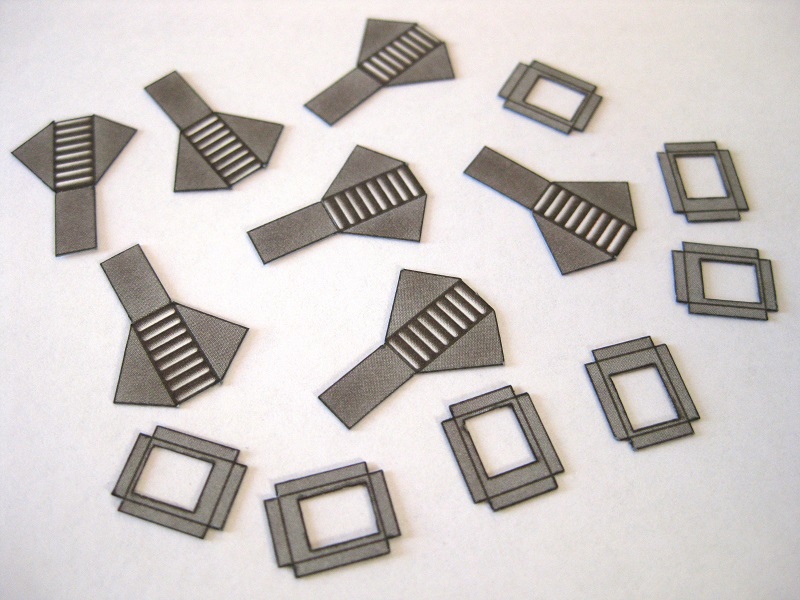
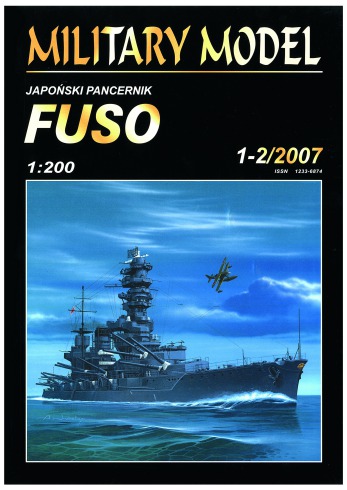
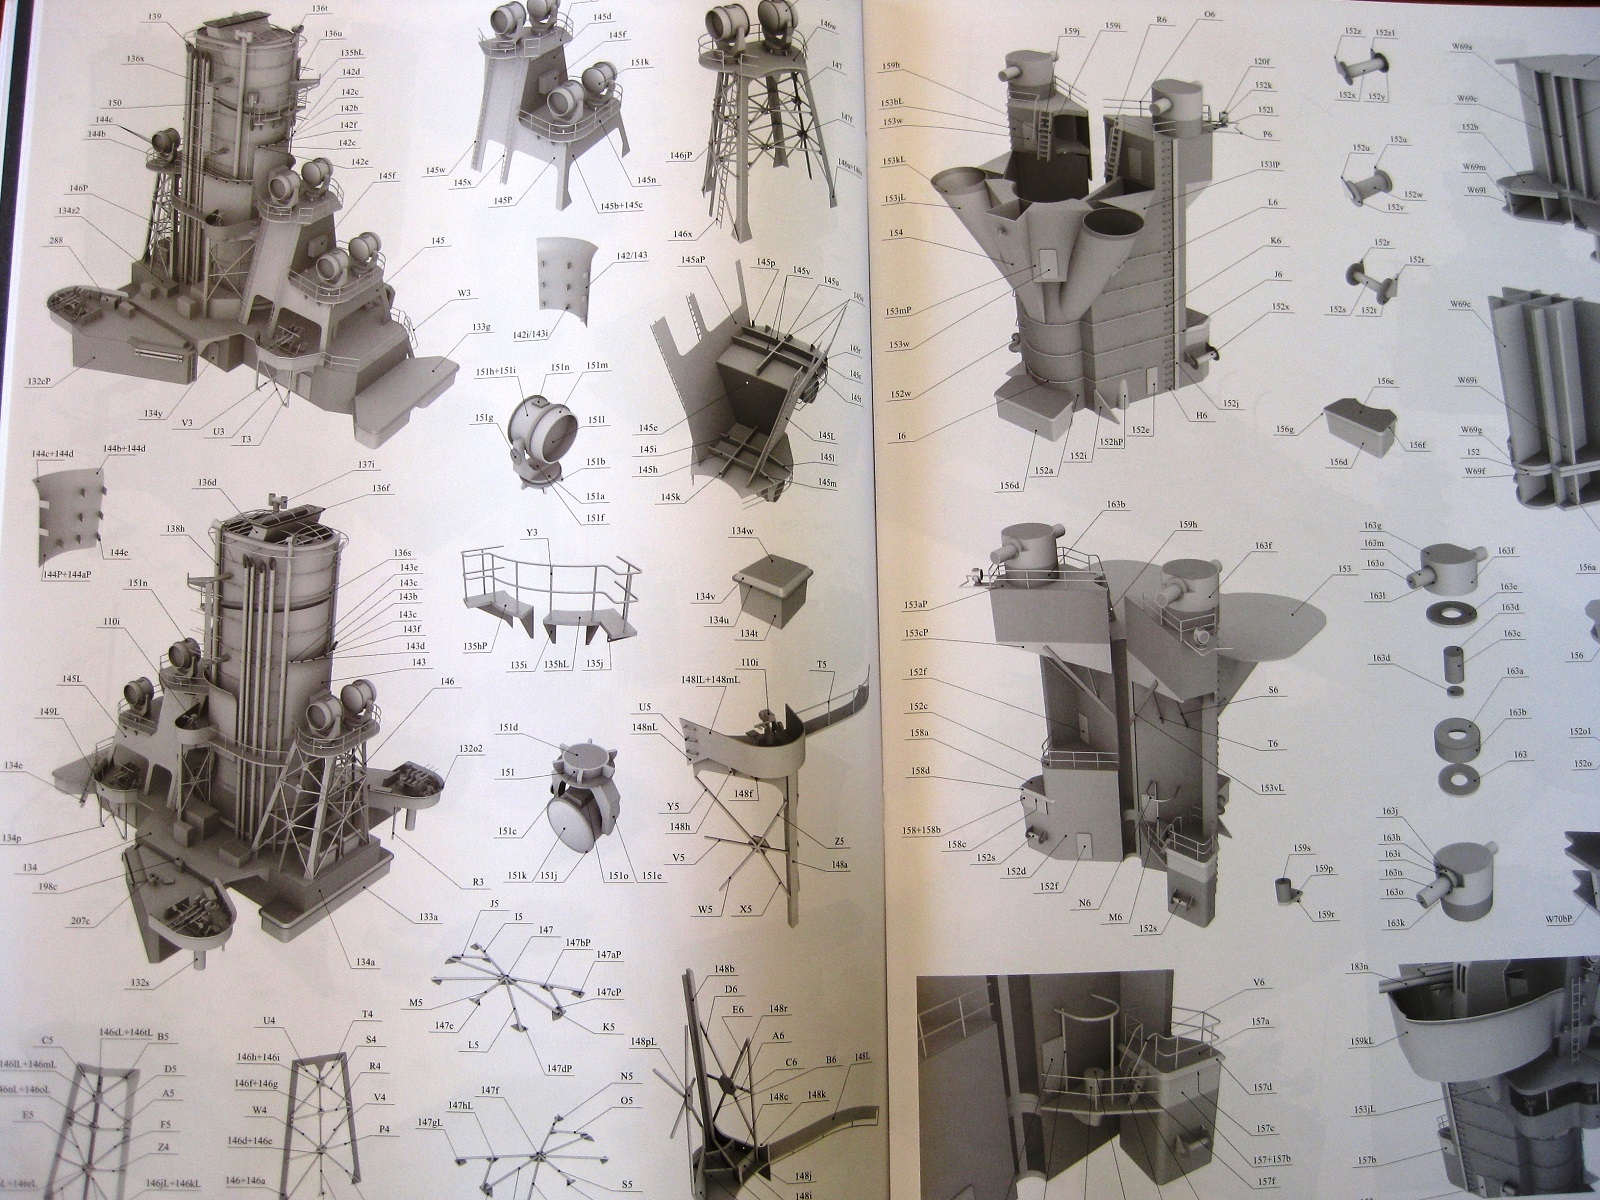
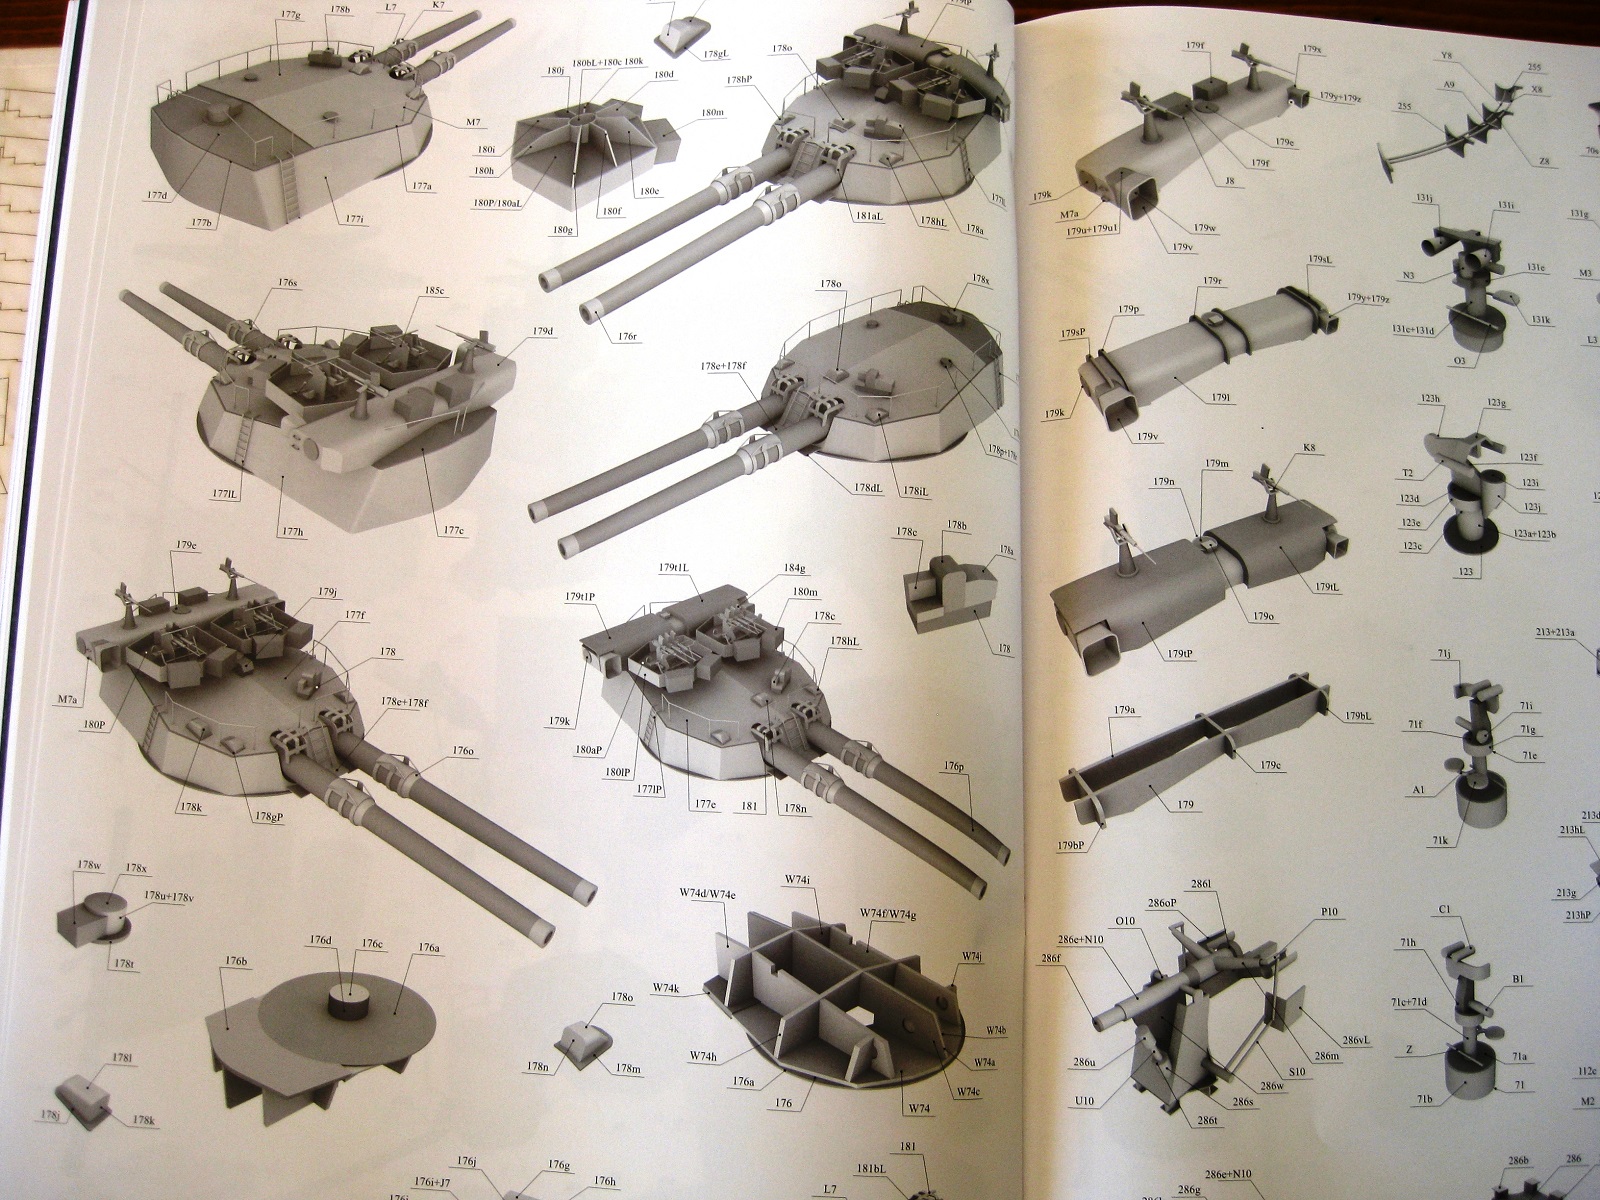
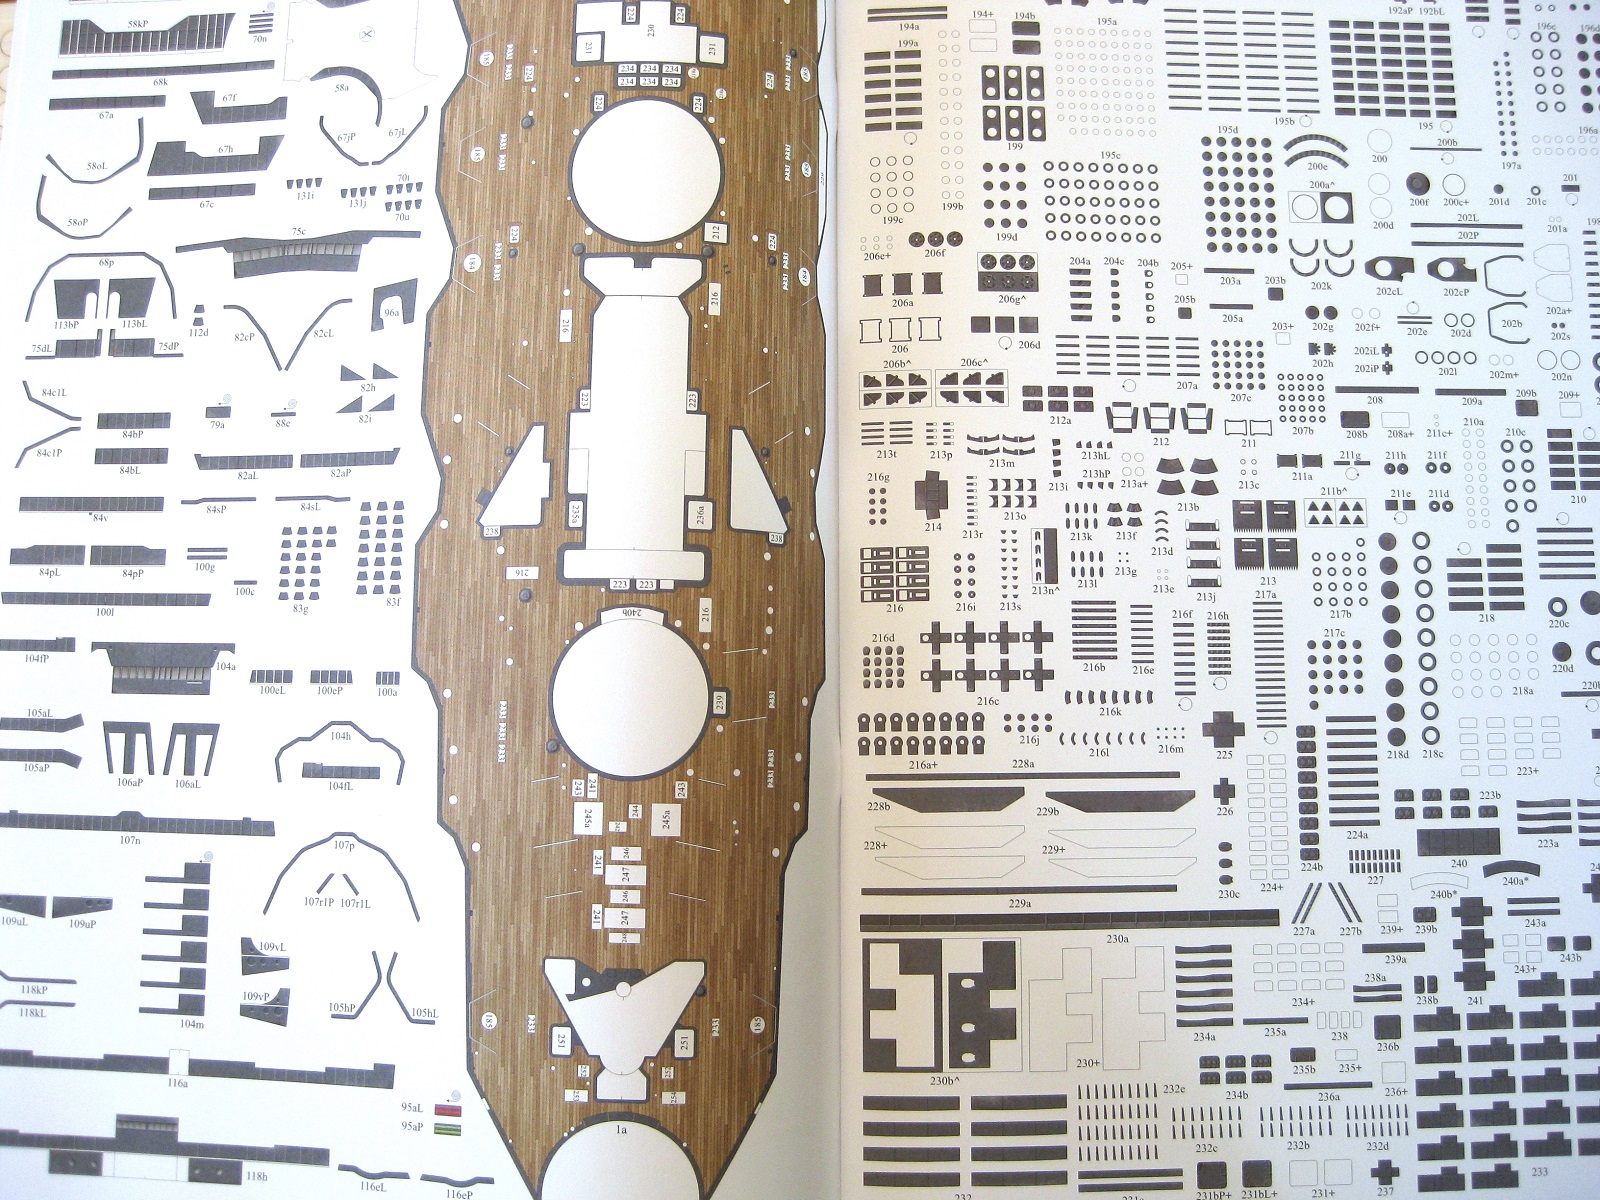
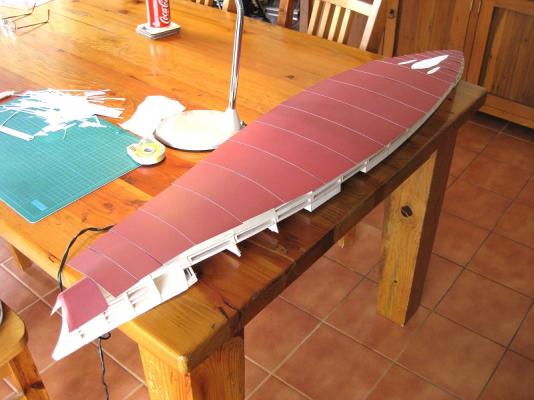
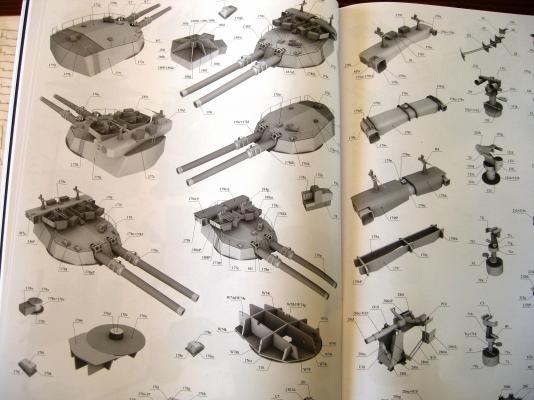
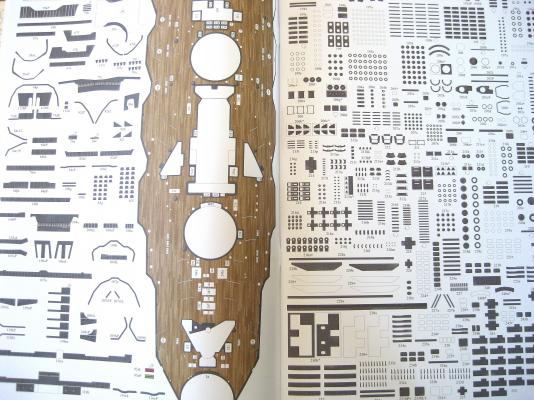
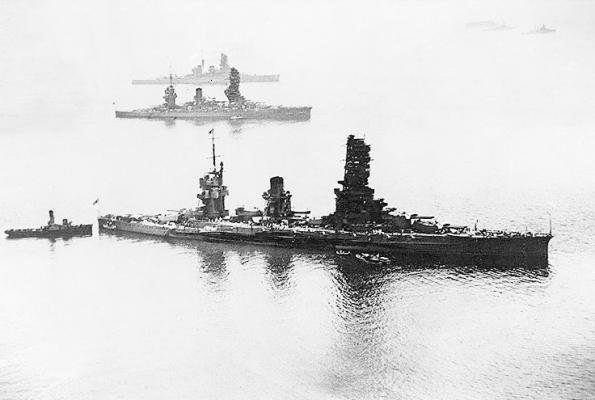
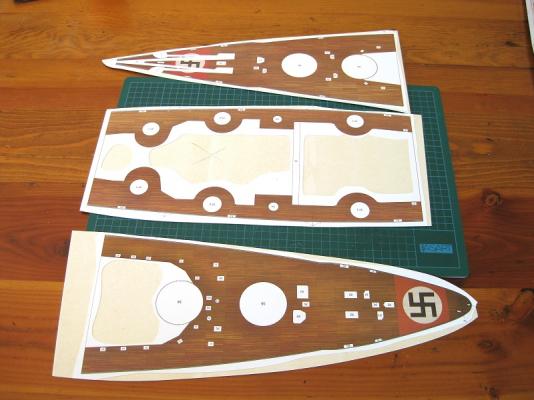
Yesterday I received another card ship model for my stash. It is the IJN Fuso by Halinski in 1:200 scale. Why the Fuso? I have lusted over this kit for a few years now after following a build log here in MSW 1.0 and since found several more on other sites. The level of detail in all the build logs are incredible and I wasn’t sure if the kit came this way or was extra details added by the modeller. After pouring over it again and again I can say the detail is in the kit. There are very few items on the Halinski Fuso which could or would be improved with further detailing although more experianced people would probably disagree. Compared to the GPM Bismarck I am working on the level of detail to be added is considerably more than the Bismarck which has a lot of items printed directly on to the paper and can be further detailed by the modeller if desired. The Halinski ship provides the detail or provides the info to include them such as step irons and ladders for example. Later published models from Halinski definitely deserve the praise they receive on the detail of their kits which I will discuss later. Until I came across card models the Imperial Japanese Navy ships were never on my radar but since then found them incredibly interesting. I love the complicatedness of the Pagoda masts as multi-layered structures with access ways and ladders and passages really appeal (that’s why I am not a fan of modern boring slab sided vessels). The distinctive tall pagoda masts, which were ridiculed by other nation’s navy’s as being top heavy and unstable were developed for the Japanese strategy of night time engagements. They initially left the ship yards with traditional tripod masts but slowly got added to and climbed higher and higher with refits and upgrades over their life. The theory being that the higher platforms would be able to spot the enemy at longer distances first with powerful search lights and get the jump on them. The pagoda’s absolutely bristles with binoculars and search lights. Of course all this potential height advantage was lost due to the introduction of ship borne radar. I love this photo of the Yamahiro, Fuso (middle) and Haruna for reasons I can’t explain. The towering pagodas give a kind of impression of ‘on your steps’ ‘get ready’…I don’t know the image is so Japanese, like an old wood cut print or something with Manga & Anime imagery all bundled together…like I say hard to explain. Okay enough waffling , on with the kit. Halinski’s reputation of being the Premium of card models is well deserved and include a few well thought out ideas. The kit book is roughly A3 size with multiple pages of varying types and weights which is interesting. The parts on the photo below are printed on to thin paper which of course for the deck needs to be stuck down to a thicker form. The detail of printing is exceptional with a lot of detail although printed flat have a 3D look about them which I haven’t found on the Bismarck. Some make you run your finger across the page to verify that is just printed. There appears to be only very minimal weathering on some of the parts. This next point I think is incredible and although it would add to the cost of the kit it would be minimal compared to the advantages and other publishers should take note. Many of the parts pages are coloured on the reverse. Simple but the benefits off not having to colour reverse sides on exposed services add to the finished quality of the model in my opinion. The majority of parts are printed on what appears typical weight Bristol paper to me but the lower red hull panels appear to be printed on pretty thick paper. I can see both advantages and disadvantages to this. Since no one mentions this in other builds then must be okay. Another nice touch is the assembly drawings are printed on quality glossy paper and appear to be rendered computer images which very clearly show how things are assembled. The shading and rendering shows parts relationships very clearly compared to line drawings. A couple of pictures showing this below. Now the details (and this can be seen in the assembly drawings above) the amount of ‘iron work’ to be made is awesome. There is a full A3ish page crammed with all the rails, braces, pipes, foot and hand holds etc necessary to fully detail the ship. In comparison the Bismarck has a few of jack staffs shown and the rest could be done with generic photo etch as no details are given. The Fuso wins hands down on this alone as these are the details which although tiny are many and really brings the structures to life. As my philosophy is now to get laser cut forms where available also applies to the Fuso. There are 15 sheets of laser cut details and as can be expected the majority of these are for the hull. Although the hull is very roughly the same size as the Bismarck I would say the mount of forms used to build up the Fuso hull up is at least 50% more. I have no doubt the laser cut forms will fit perfectly. I have used others for Bismarck and a vehicle and they always seem to fit right. Being Halinski I have no concerns there. Problems/Issues: Major one, I can’t start it . I physically don’t have the space with the Bismarck going as well so will put it away for the time being and bring out to pour over now and then, sad as that may seems . Finally cost; not a great deal more than Bismarck in fact the forms were the same. With conversion costs it worked out around to A$80 for the kit and A$50 for the laser cut forms. Now the kicker, shipping from Poland to Australia was around the A$80 mark. It was bought directly from Halinski and took around 11 days door to door. Pretty good as the other 2 Polish places I buy from are usually bang on 14 days every time. Cheers Slog


- 10 replies
-
- 12
-
-
Hi Steve, Glad to see you making progress again. She's looking real good. The decking in the second from last shot looks so real! Slog
- 625 replies
-
- 1
-
-
- bounty launch
- model shipways
- (and 1 more)
-
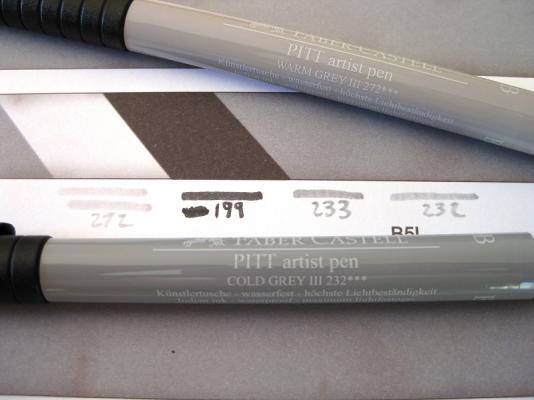
Hi Grant, I went to Officeworks today to pick up some more PITT pens (see below) and noticed they had Coptic markers. These initially looked good as they come with a large chisel shaped nib on one side and a sharp pointed nib on the other. Unfortunately the one I got bleed into the surface when tested on the edges and also showed through the other side on the thick bristol the models are printed on. We won't know these things until we try them. They are also expensive being twice the price of the PITT ones. Hi Chris, the thin balsa stringers weren't too bad (2.5 - 3mm) but the 8mm ones and especially the slabs I put in are hard going. I think I may just stick with thin card or balsa stringers in the future as I believe just covering the rib edges with strips of paper will just be to difficult for me. With regards to the PITT pens I think it was Don Boose (spelling?) from Papermodellers that mentioned them in which case they should be available in the US. Maybe on-line art stores will stock them. I have used Tamiya acrylics up until now and get decent results but I need to keep thinning and/or shaking the bottle as after a few minutes the paint starts to thicken to the point it starts dragging and clumping on the edges so becomes time consuming. I have wondered about finding a home decor paint store who can scan colours (take the model down) and mix up home painting acrylic but not sure how this type of paint will work on model card/paper? I got a few more colours of pens today and scored 2 out of 3 shots. The brown and green match pretty well but the blue is well off. Hi Sam, never realised the 'product placement' shot when I took the photos LOL. My Bismarck lives on top of the computer desk hutch for the moment. Currently live in a small house and wouldn't be able to display a finished model but hopefully by the time I finish the Bismarck our new place should be built with a whole modelling room to myself. Hi David, I need to try artists oils and watercolours but not sure how to use them has prevented me until now. Do you use them from the tube, mix with water or solvent etc so many questions about alternatives. Cheers Slog

-
I also use Selleys Aquadhere. Not sure if its just me but I started using it as I had some exterior grade of it in the shed when I started wood ship modelling and found it great, but when it ran out I saw the interior grade in Bunnings for half the price and bought that. I hated it so much went back to the shops same day and got the exterior stuff again. I use the interior grade on the card models which works well, better than the exterior. For CA I am slowly trying out different brands, types (although not a fan of the gel ones) and package sizes as I go as well as the clear gel stuff from Tarzan. Also use Araldite 2 pack epoxy but the long cure time bugs me. Slog
-
Hi Brian, Your ears must have been burning. I was cursing you for bringing that model shop ( http://www.bnamodelworld.com/ ) to my attention, so much goodies I was barely able to hold off blowing the credit card on all the photo-etch goodies, thankfully at the time most stuff was out of stock I wanted the Pontos advanced set but at $385 I can’t justify that. I did think about just getting bits and pieces separately and also wondered about the wood deck but may cause issues with the superstructures etc as they are designed to fit on the card model although same ship I think there might be minute differences in sizing/positioning which may cause grief. The cost would allow me to get another card ship so just going to build the Bismarck as is with the accessories I have. I did order some 1:200 scale Kriegsmarines though Thanks Grant, I will try and check them out. Yeah, just going to leave them on. I believe when the ship broke out to the Atlantic they painted the whole area a light grey with the Swastika still kind of showing through but dulled out. Can't be sure though as can't remember where I saw or read that. Cheers Slog
-
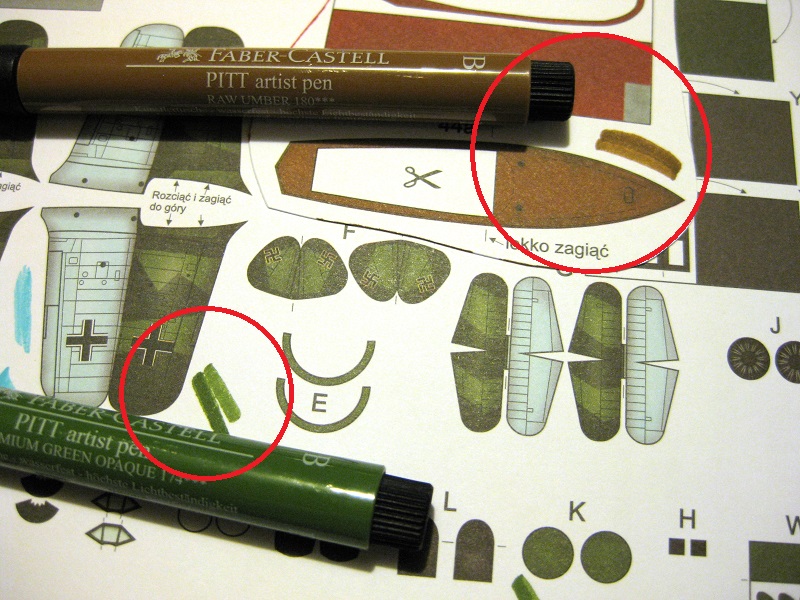
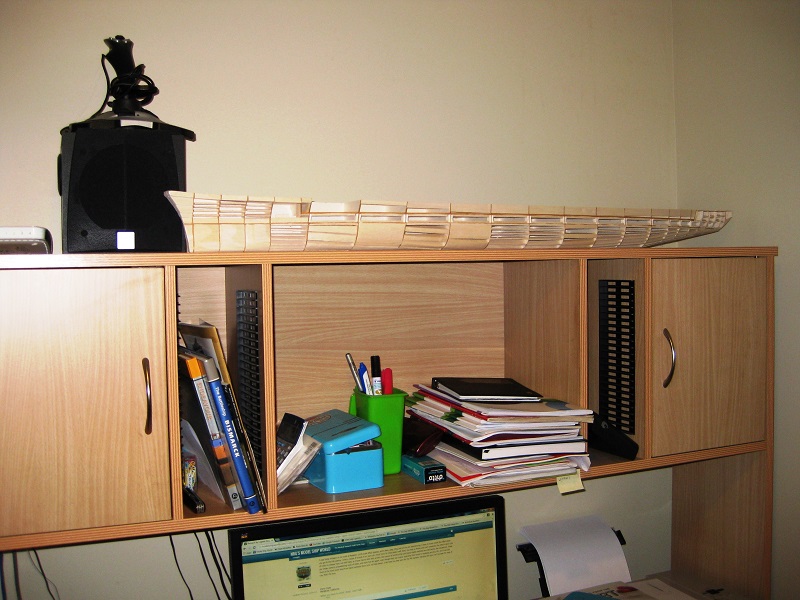
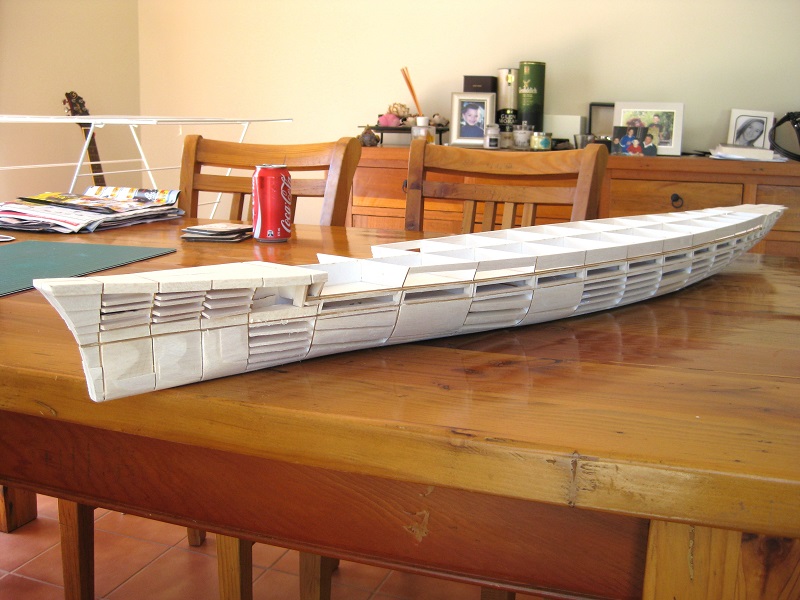
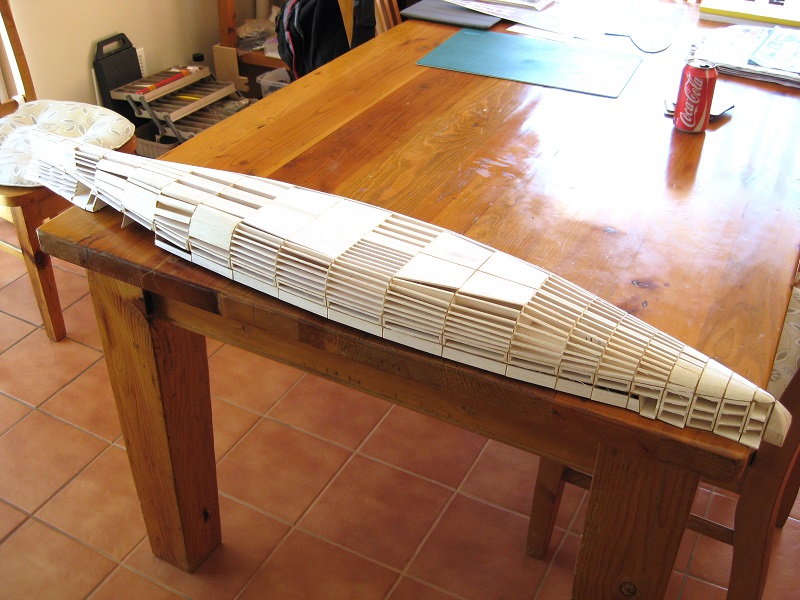
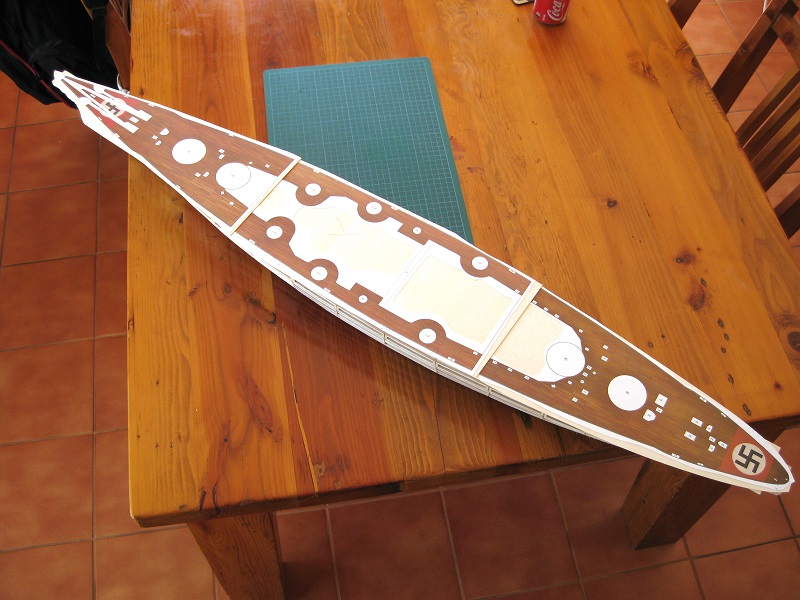
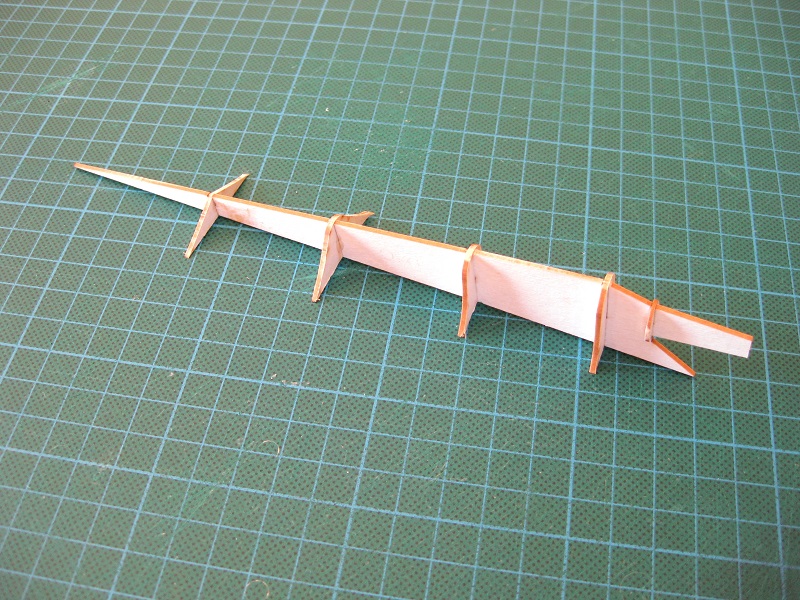
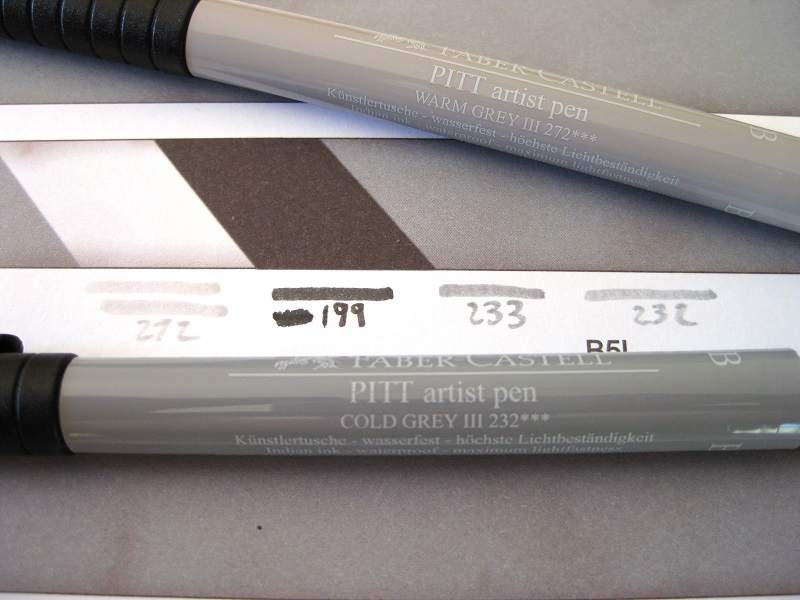
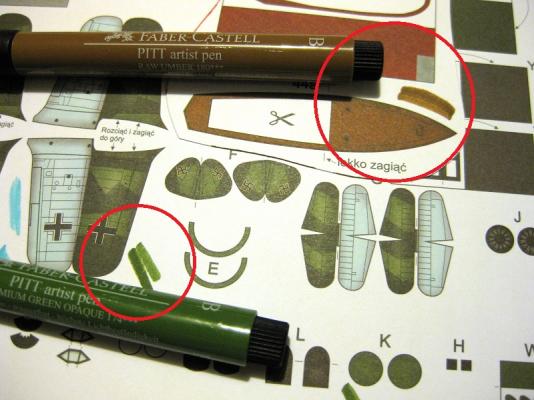
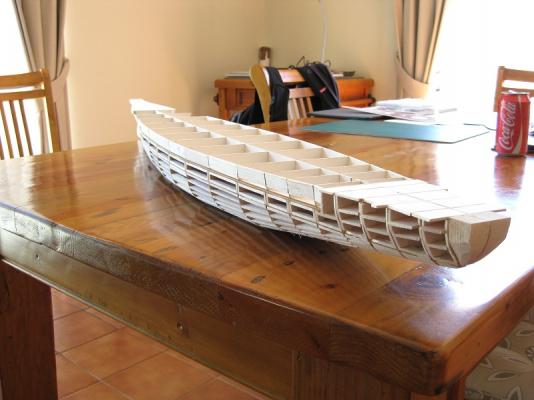
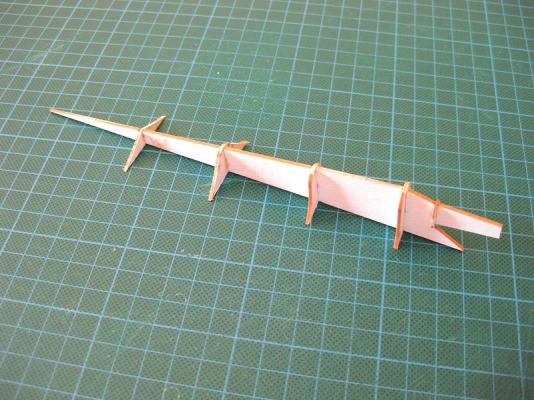
Hi, A bit more progress. In my last progress post away back in April I assembled the hull using the laser cut card forms and decided to infill between the bulkheads to provide more support for the hull skins. Well I got a selection of balsa sheets, strip and blocks in various thicknesses and sizes and as can be seen tried different combo's of shapes along the hull. Firstly I spent ages fitting each infill perfectly. This soon drove me nuts and ended up gluing unshaped parts in place knowing I would have lots of sanding later . This seemed the lesser of two evils and came to the conclusion I hate infilling card hulls as much as planking wood ships. Here is a few photos of the first pass gross hull sanding. I took the majority of hull ribs down just short of the forms. The bow will need a crap load more sanding as this was built up and is more or less solid block of balsa. I couldn’t sand to much as I need the finished deck to mark the perimeter so I have a line to sand to. First sand photos. To prepare the deck I had to first edge glue sheets of 1mm card so I had a large enough surface to glue the deck to. I just used PVA glue and rubbed the edges together then left with some weights on the join. The joints are pretty strong and can be handled fine. I rough cut out the deck and then used Elmers spray adhesive to coat the card and then pressed deck down on to this giving it a good rub to ensure it contacted the full card underneath. I remembered the last time I used Elmers I wasn’t to happy with it and same again. In future I will try Scotch 3M 77 spray adhesive as this is supposed to be the best according to hard core cardists. I will trim the deck to size after at least overnight as several hours later some of the card is still a bit tacky but couldn’t resist placing the deck on the hull to get a feel for the look of it. I also glued up the central prop shaft housing. I can’t stress how easy and fuss free the laser cut forms slot together perfectly. Edge Colouring: A general note of interest on edge colouring. I have never been satisfied with this; I have tried water colour pencils, water colours, enamel and acrylic paints and for one reason or other each I was never fully satisfied. Well I think my edge colouring prayers have been answered :im Not Worthy: . On a card forum someone mentioned Faber-Castell PITT Artist pens and since my local Officeworks sold them I bought a set, which contained 3 blacks but more importantly 5 different warm and cold greys. They also sell them separately. These are amazing; dry instantly so can’t smudge or smear them and they don’t bleed at all even when I messed around with them on cheap thin printer paper. As can be seen the greys in the set almost match the hull greys perfectly although saying that they are slightly darker on the edges. I think the range has 64 colours so will check out the reds (for lower hull edges), greens for the ships aircraft (and card vehicle I am working on) and pale blue for the aircraft again. Cheers Slog


-
Looking really nice there Ron. Personally I would have painted them or blackened them. Not a fan of bare brass but you are the Captain. Although like Popeye says going to be tricky painting them now they are in place. I only flush mounted the larger hatches, the smaller ones were 2 annoying to trim out so used 0.5mm so they didn't stick out to far. Cheers Slog
-
Hi David, Your turrets and guns look great. I think doing paper gun barrels must be the most difficult to do...I chickened out and got turned barrels, although might still do the paper ones for practice. Looking forward to more. Cheers Slog
-
Hi Dave, Sorry, didn't notice another Endeavour build log appear. Another one to follow. Looking real good so far. I like how you left a space in the planking for the channels to fit in to, should provide a strong fit. I used brass rod to 'pin' my channels in place. Had a the same issue with the hawse holes on my Endeavour also although the Caldercraft version. Cheers Slog
-
That makes sense. Thank you all gentlemen for the input. Painted it is! Thanks for that link Brian ( http://www.bnamodelworld.com/ ) that's a great site. I can see it getting plenty of custom from me. I assume you are a happy customer with them? Cheers Slog
-
Hi Brian, the Pontos set is beautiful here is a link to a webship where the thread covers the development of the set by Pontos http://www.shipmodels.info/mws_forum/viewtopic.php?f=16&t=123012&start=120 I have some photo etch porthole in 1.6mm, 1.8mm and 2mm diameters. There are 500 portholes per sheet and works out around A$7.50 for each sheet. Hi Mark, my thinking was heading down this track also. I have read that prior to WWI painting was also a favourite past time as was cleaning away coal dust Appearances to keep up etc, it's a pity gunnery practice was lacking, apparently dirtied the ships to much Slog

-
Hi, I am nearing the stage where I will be skinning up the hull of my card Bismarck. I plan on punching out the portholes on the hull and superstructure sides and using black film behind but I also have tiny brass photo-etch portholes to place round the hole. My question is were the portholes on real ships left shiny brass on both the hull and superstructure or should I paint them gray to match the ship. I can imagine the ones on the superstructure were but not sure about the hull sides. Most photos are black and white and hard to tell and the models where they were replaced and left brass appear jarring to the eye sometimes. I would think having the crew polish brass would be a good way to keep idle hands busy but... Cheers Slog
-
What a wonderful work area. Slog