


realworkingsailor
-
Posts
3,274 -
Joined
-
Last visited
Content Type
Profiles
Forums
Gallery
Events
Everything posted by realworkingsailor
-
 Always disassemble the airbrush when you clean. Especially the needle and nozzle. Dried paint will clog it up and is virtually impossible to get out at that point. If you have paint in the airbrush cup, dispose of it, wipe out the cup and cycle some thinner (or water if using acrylic) through the brush. Repeat until the spray is almost clear (check by spraying onto some paper towel). At this point, you can start to disassemble the air brush (of course turn the air off first). You should also look into getting some cleaning brushes to help scrub paint out of the harder to reach areas. Badger makes a set of very fine brushes that will penetrate the needle way almost to the nozzle. Andy
 -
Xuron tools are top quality, probably some of the best. The price is higher for a reason. Andy
-
I'm getting way to much credit here.... Popeye did all the work....
-
Kevin, do you have a set of these? http://www.micromark.com/professional-sprue-cutter,9277.html They will help immensely. Andy
-
For sprue cutting: http://www.micromark.com/professional-sprue-cutter,9277.html These things work great. Always keep the flush side towards the part and you'll have minimal part cleanup Andy
- 94 replies
-
- 1
-

-
- santa maria
- revell
- (and 1 more)
-
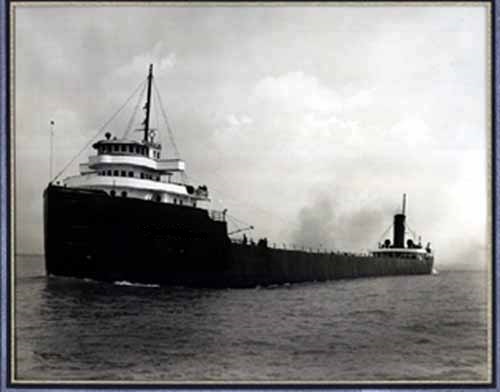
Well, it's not the schoonmaker. But it is the Snyder. Still sailing today as the St. Mary's Challenger. The oldest continuously working laker currently. Andy
-
Wash and paint the pieces first. It may seem tedious, but it's worth it. As for a working cradle, I use one of these: http://www.bowser-trains.com/foamcradle.html Andy
- 94 replies
-
- 3
-
-
- santa maria
- revell
- (and 1 more)
-
Ok, ok.... no need to go all mushy on me, buddy..... I'm sure you're have done it sooner or later on your own. Andy
-
There's nothing really wrong with MS paints. I just find they need quite a bit of thinning to be usable. You'll need to mix them about 2 parts paint to 1 part thinner, for brush applications (airbrushing would almost need 1:1, you'd have to experiment). Although they are acrylic, don't use water, use clear Windex (as opposed to blue) or something similar if you can get it down there. Andy
-
That really looks good, Popeye! Hundred times better then the kit "rails" Andy
-
As promised. Any of her names may do.
-
I've got one lined up, just hang 'til 20:00 EDT
-
Good luck with this one. We'll all be here to answer questions as best we can. Do you think you'd ever work up the nerve to try a wooden ship some day?
- 94 replies
-
- 3
-
-
- santa maria
- revell
- (and 1 more)
-
RMS Empress of Asia, 1913 Thought I recognized a CP steamship.....
-
See... there's your whole problem.... regardless, you should have kept up with the flowers... that way when you REALLY do something "wrong" (like buy a 1:64 model Victory or something)... she's not going to get suspicious at all....
- 1,873 replies
-
- 3
-
-
- occre
- san ildefonso
- (and 1 more)
-
Not to hijack Remco's thread, but if Royal Shipyard has no plans to produce those kits, it would be nice if someone with the resources could buy up the CAD drawings and re-jig for laser cutting and start making the kit again. Andy
- 1,215 replies
-
- 1
-
-
- sloop
- kingfisher
- (and 1 more)
-
I never mentioned a piano...... (that was Augie).... Do you think you need a piano? I'd be careful with that ping pong paddle near the vase... wouldn't want to break it and have no place to plant your "spare wood" flowers... Or flowers you could buy for Anja, for that matter...... Andy
- 1,873 replies
-
- 3
-
-
- occre
- san ildefonso
- (and 1 more)
-
I think he's already there.... remember the second lobbsie twin? The M&M boat? Then there's that trawler thing.... oh yeah... let's not forget the infamous and enigmatic "multi-build" dun dun duuun...... (that's supposed to be "ominous" music... ) No... he's just teasing us with these kit builds.... trying to make us think he's still "one of us"
-
Didn't Sjors mention, he put them in a vase or something? I wonder if they've flowered yet.......
- 1,873 replies
-
- 6
-
-
- occre
- san ildefonso
- (and 1 more)
-
The easy part is over... Time for the tough stuff Looks great Andy
- 2,191 replies
-
- 1
-
-
- confederacy
- Model Shipways
- (and 1 more)
-
Yeah... It's going to be "fun" the hull... Easy... Modifications to the superstructure....no problem... Scratch built unloading gear.... I'll get back to you on that one...
-
The kit is already waiting at the hobby shop for me to pick up....after I get home.... in December..... I hope.....
-
Ah ha! Now that's what I call an improvement... Now I don't feel so bad about pointing out the old rails... Knew you'd come up with something even better... Whew
-
"I swear.... it looked a lot smaller in the catalogue" Hooo Boy! Are you in for some fun with that one...