Mirabell61
-
Posts
7,406 -
Joined
-
Last visited
Content Type
Profiles
Forums
Gallery
Events
Everything posted by Mirabell61
-
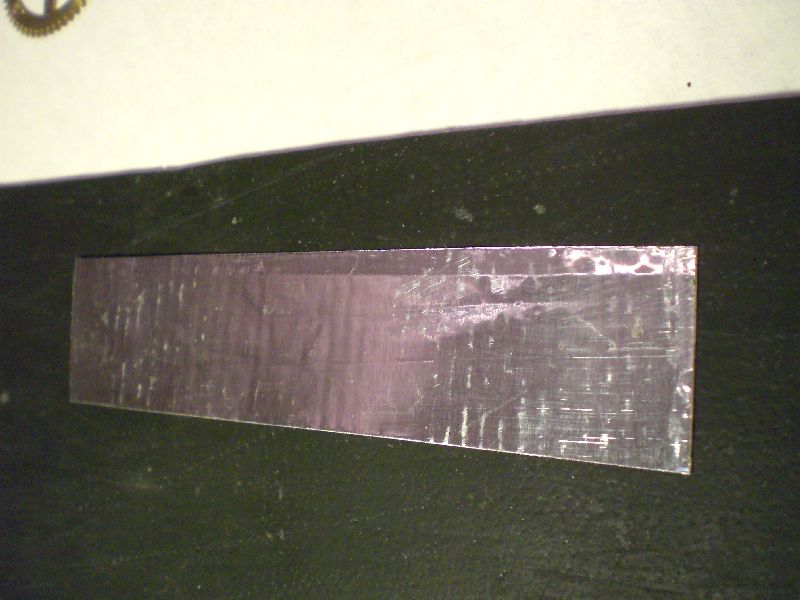
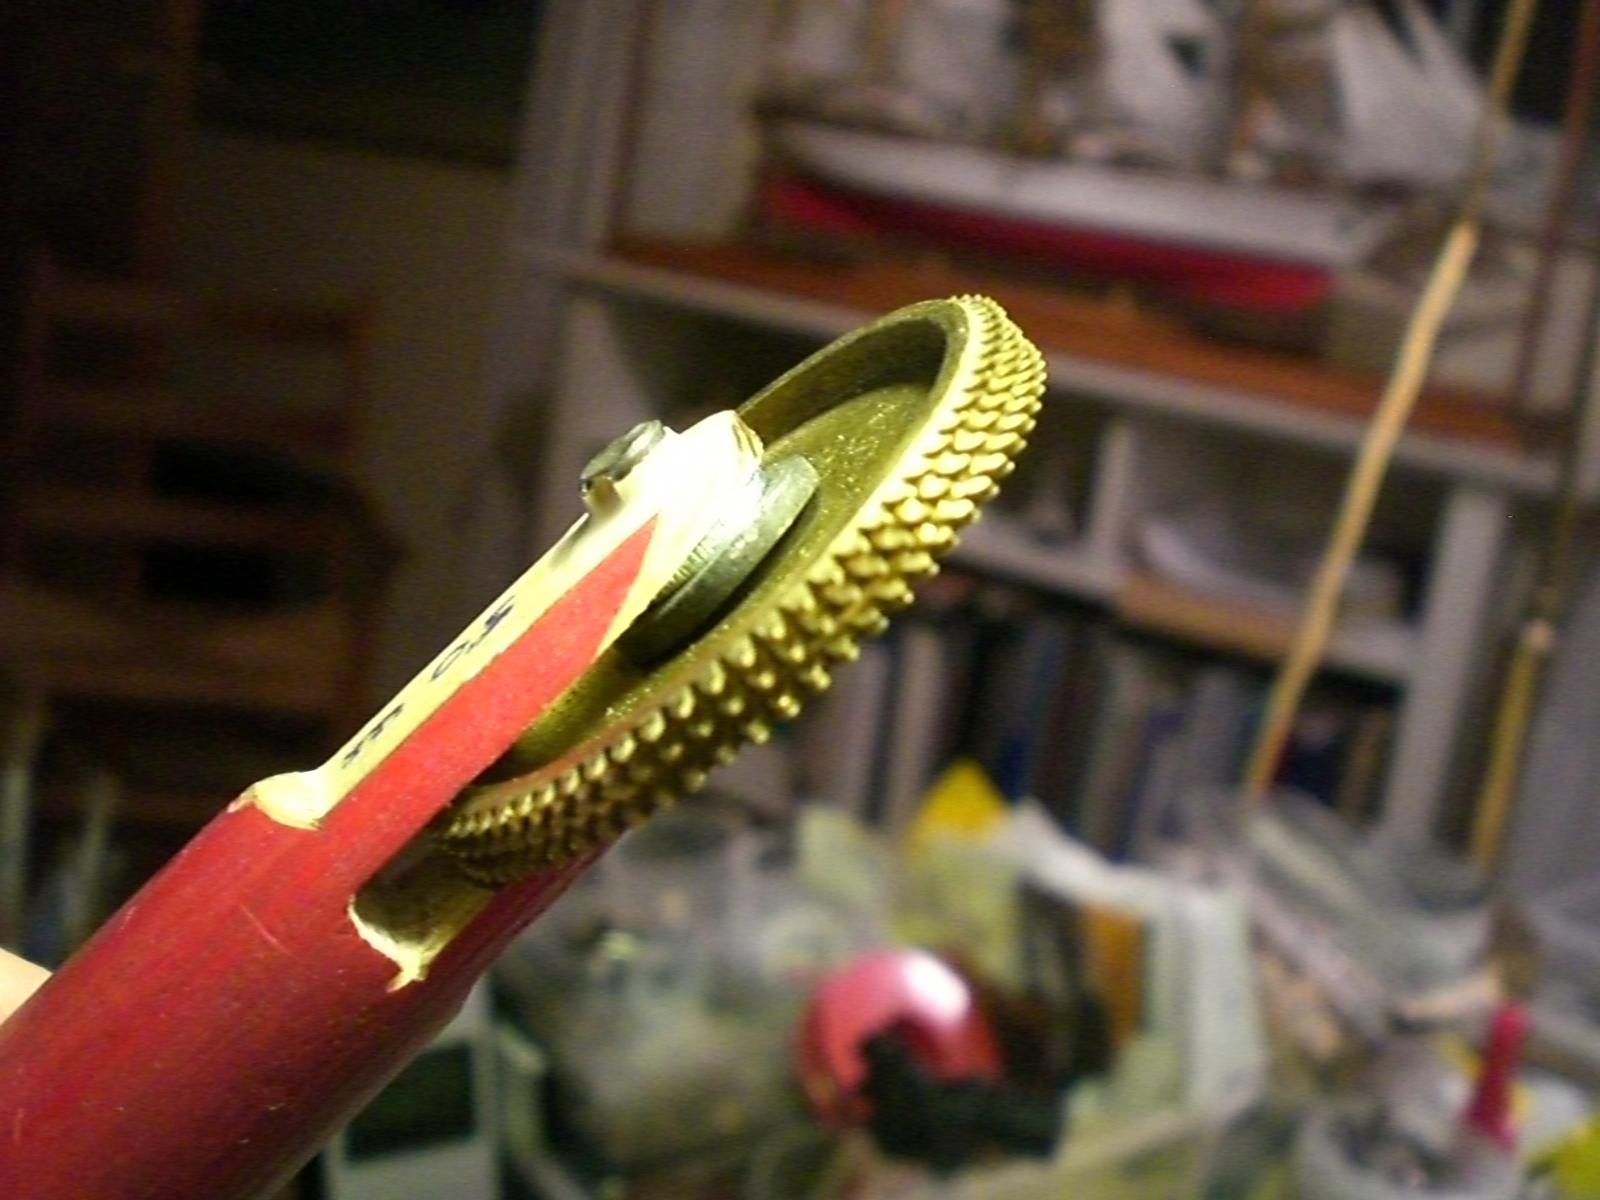
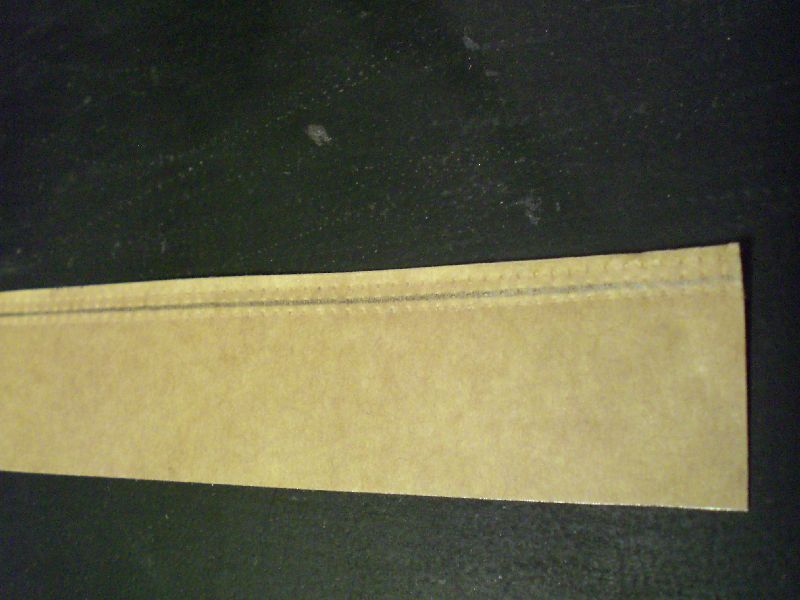
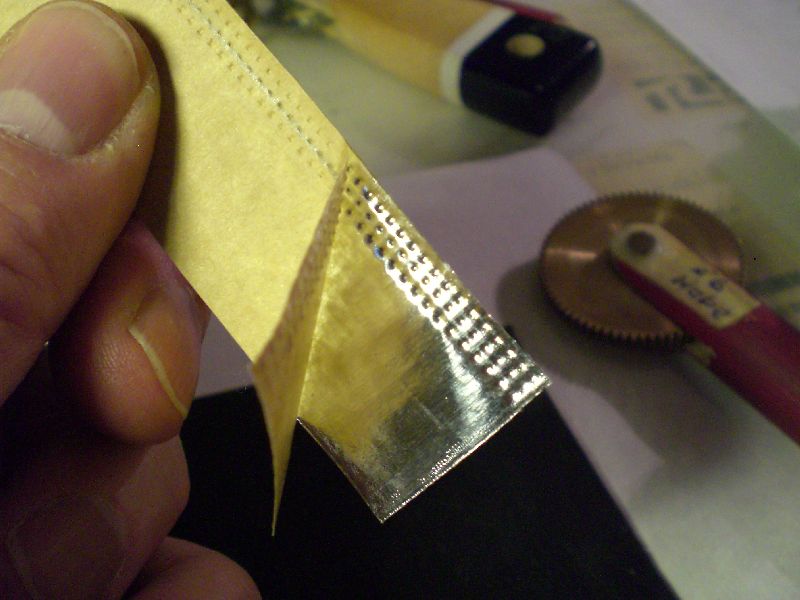
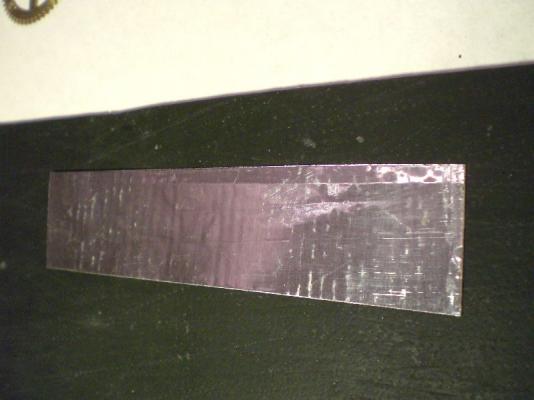
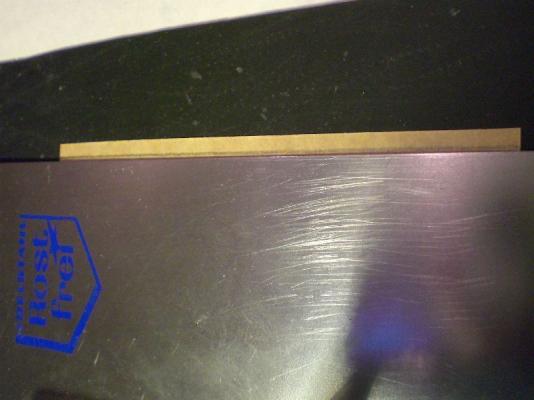
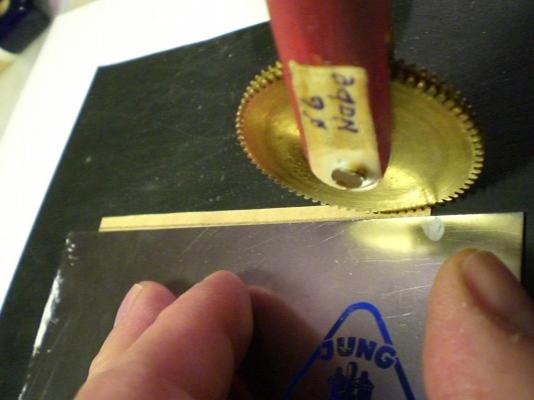
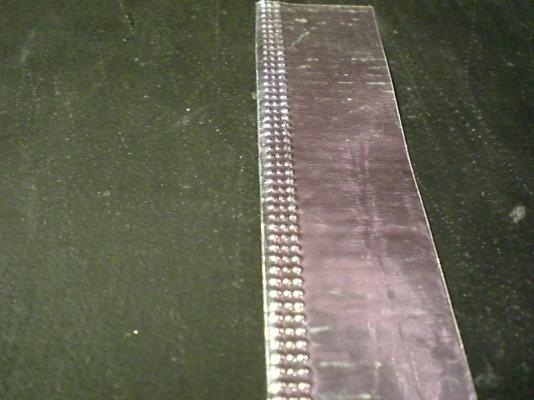
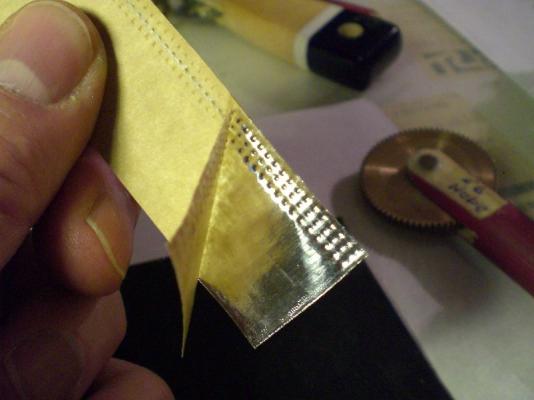
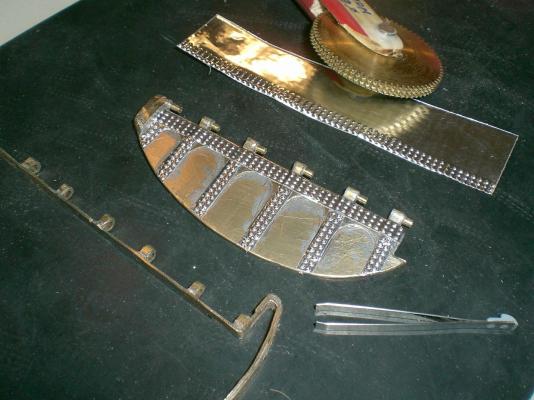
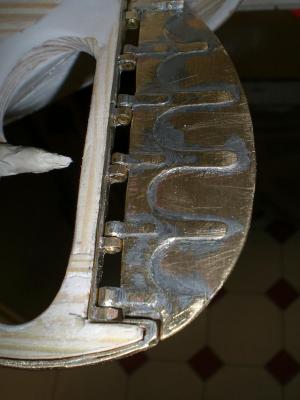
 Bugra, upon your request, here a short intercourse and self explaining use of the plate marking tool. By the way, I use this method on all model hulls that are of rivited structure, only the tooth modul sizes differ acc. to the appr. scale Chosen. The holders for the toothwheels are made from old paintbrushes that would go to the bin otherwise. Cheers Nils different wheel (toothsizes, and toothnumbers, also requires a semi soft rubber plate underneath and of course the precut plate (turn around the plate, so the protection foil is up.... use a metal ruler, or like here a masons tool, leave plate edge free the roller tool, use Dremel with circle sawblade to cut in the two circular grooves for obtaining 3 toothrows instead of one press tight down the roller tool and move swiftly Forward in one move. Same time press down the ruler looking at the marked edge from the rear side looking at the result of the rivit resembling, (here 3-row riviting) remove the protection foil, Keep the gluefilm side free from dust and debris Happy exercising and good success Nils
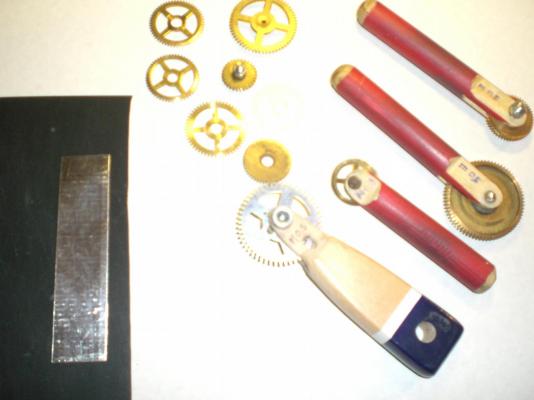


- 113 replies
-
- 11
-

-
- heinrich kayser
- steamship
- (and 1 more)
-
Thank you rpeteru Nils
-
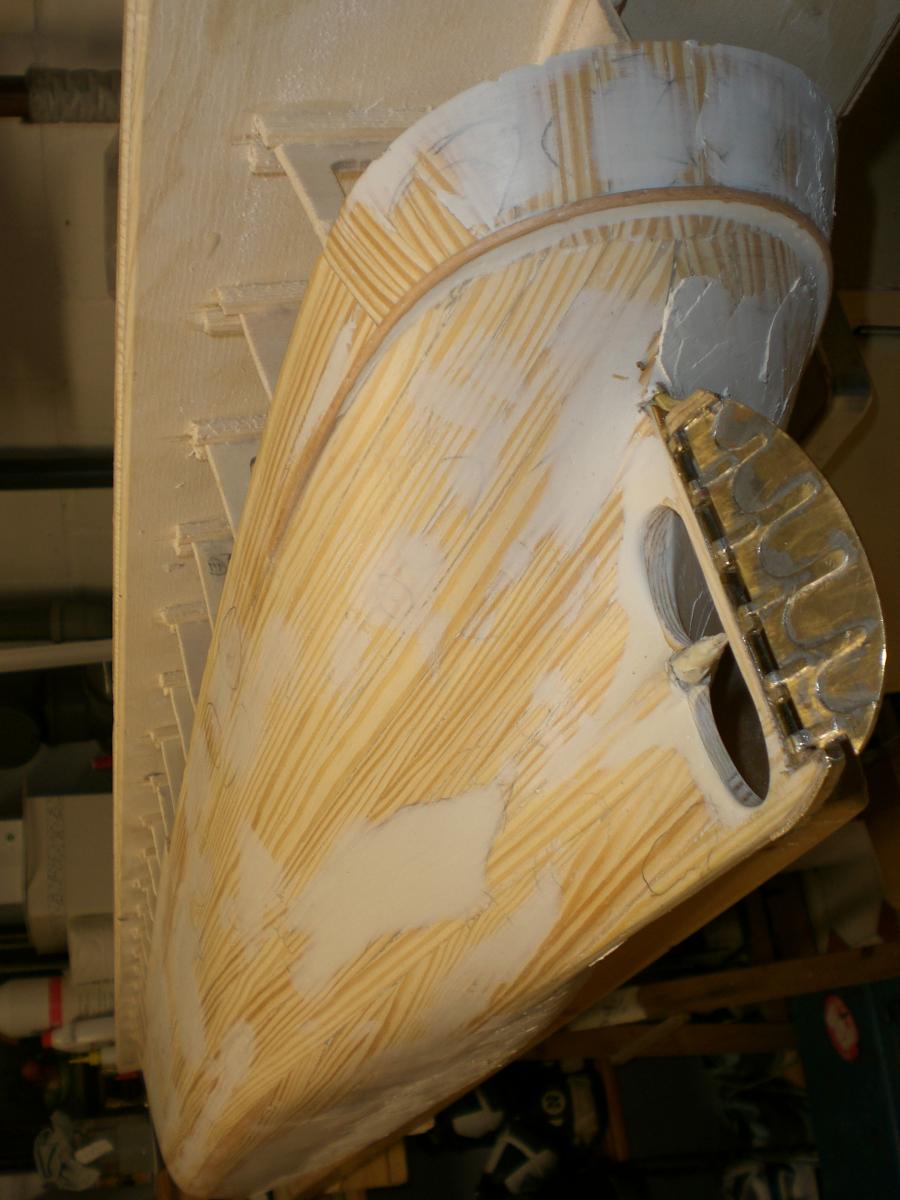
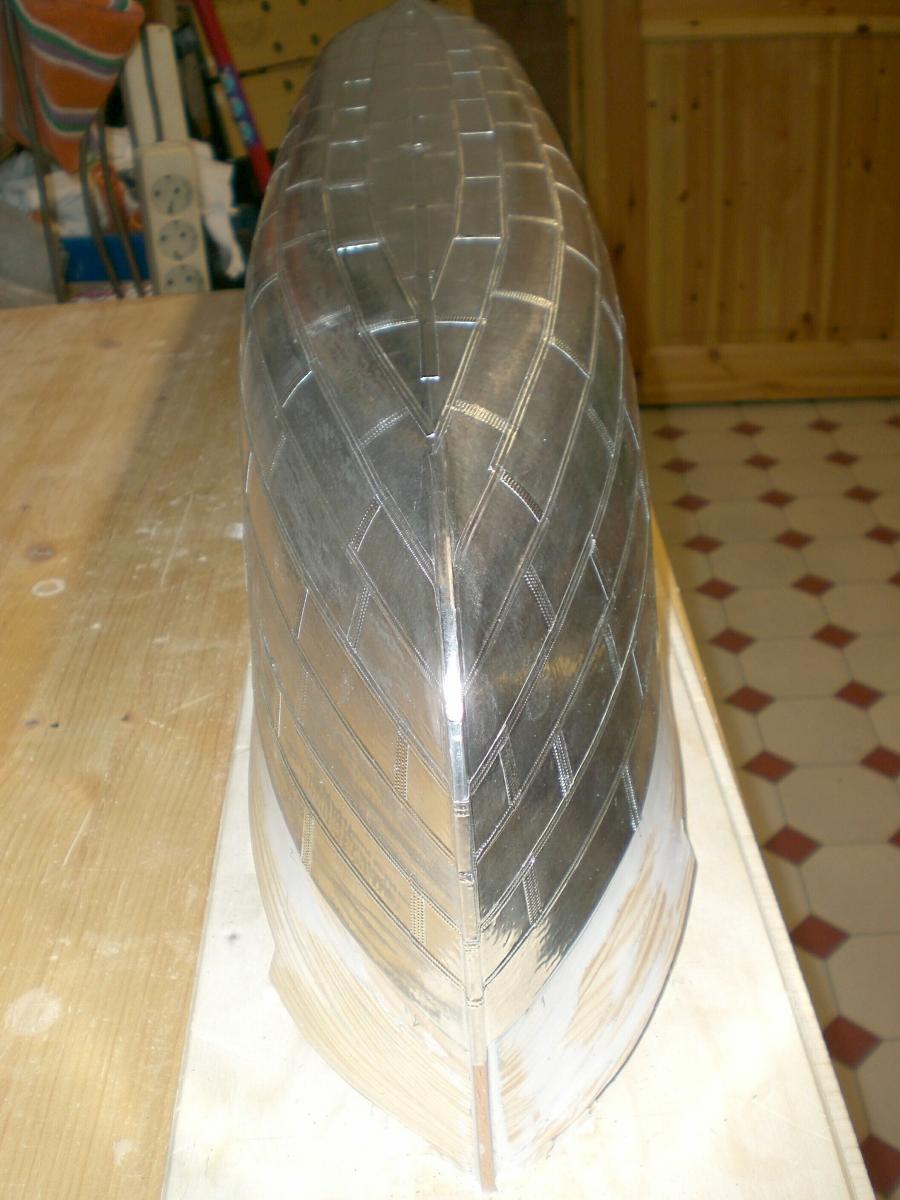
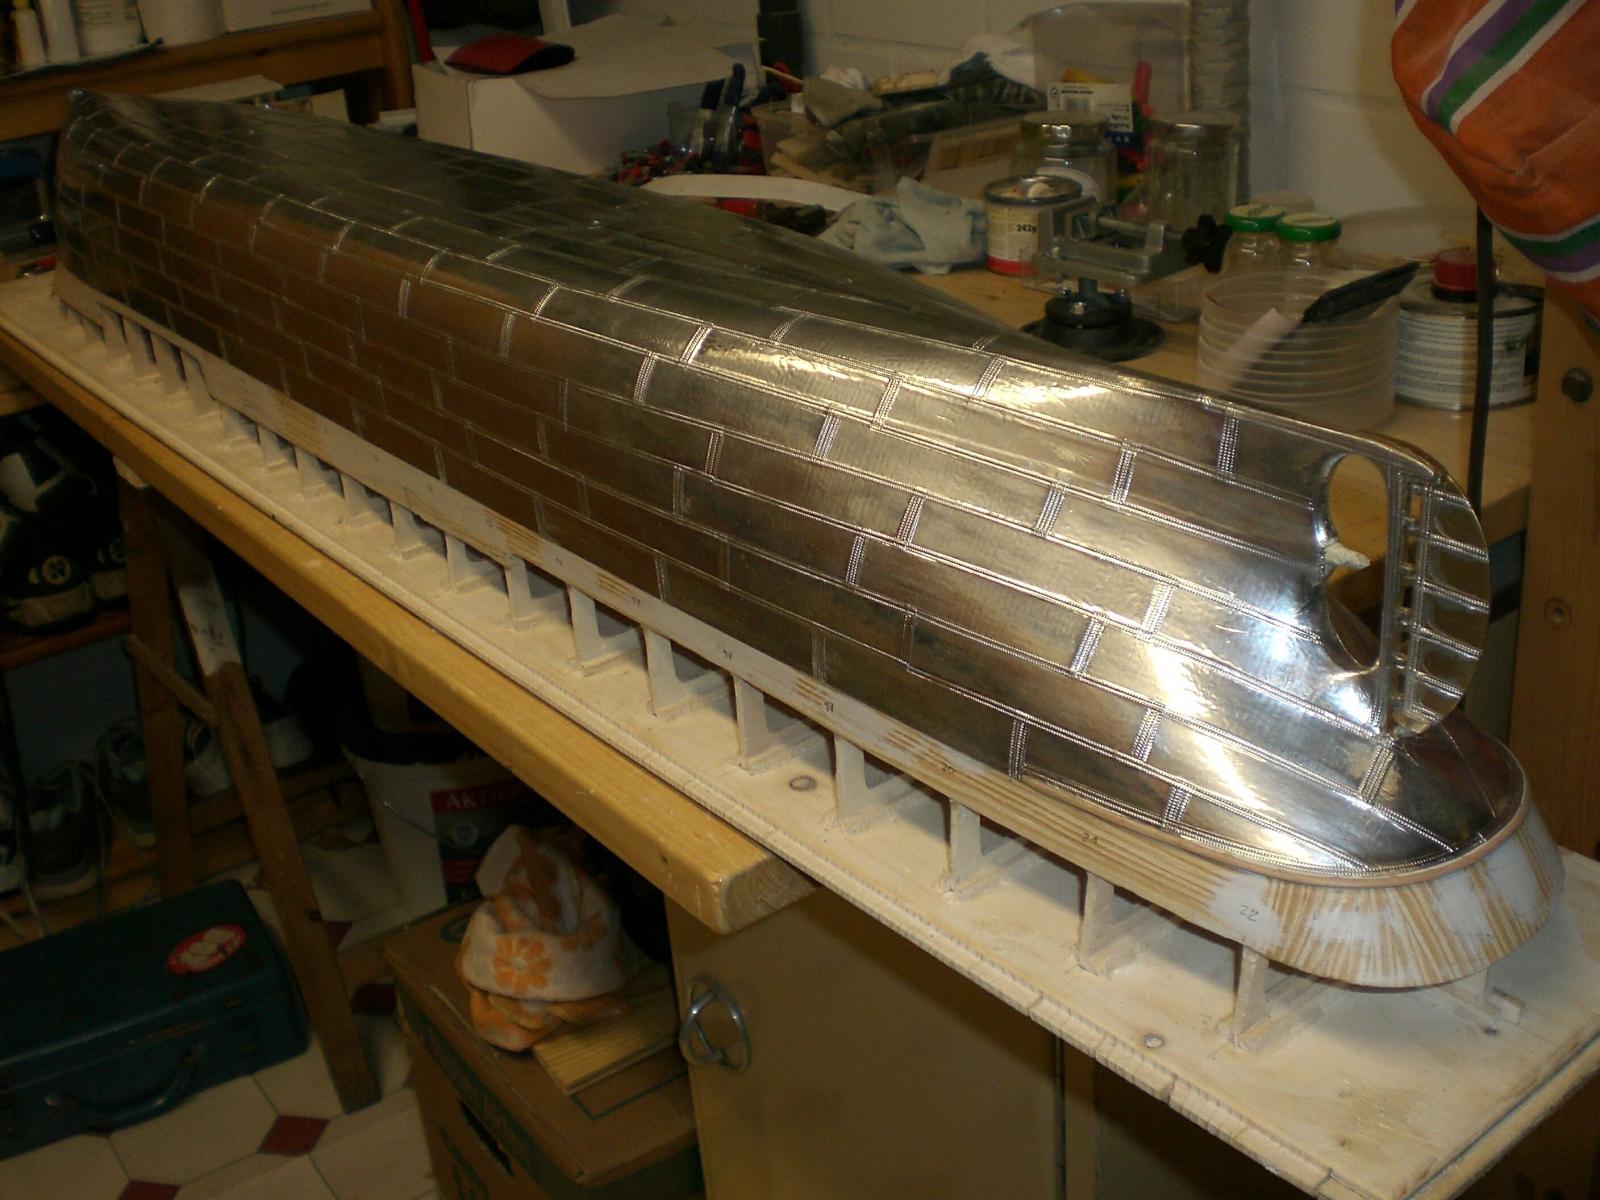
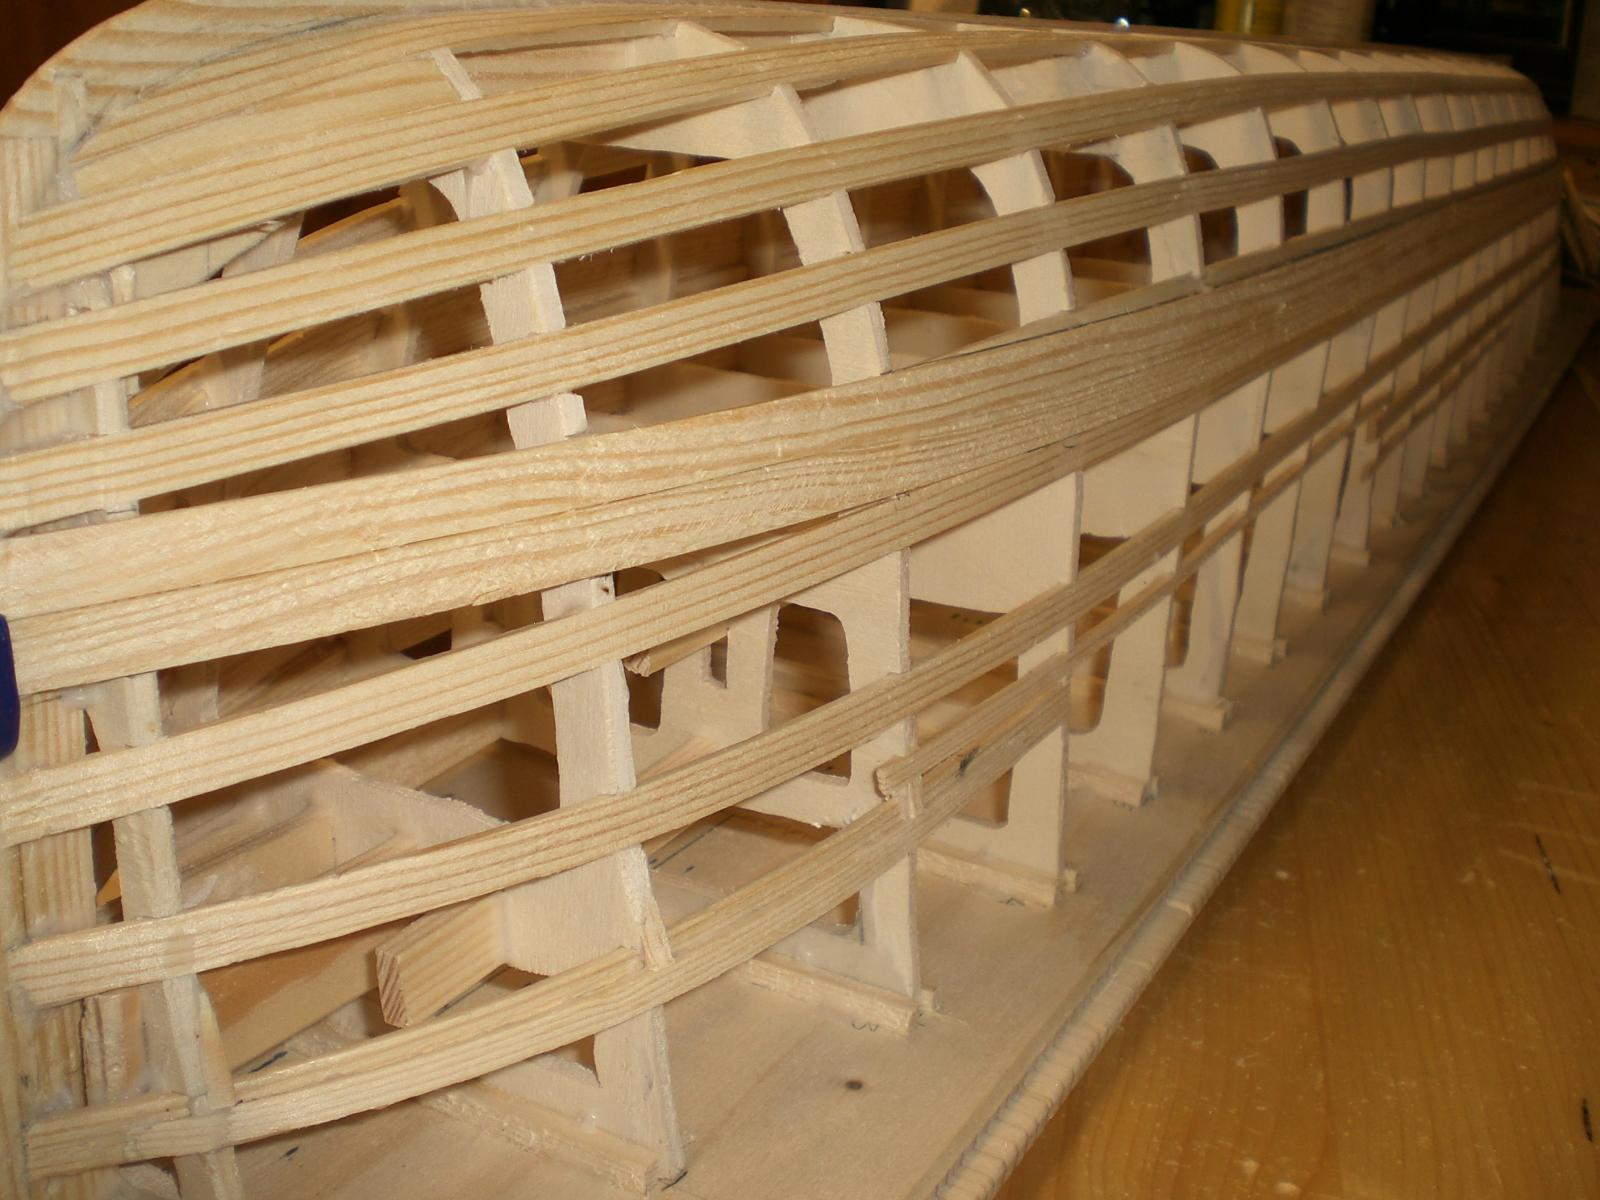
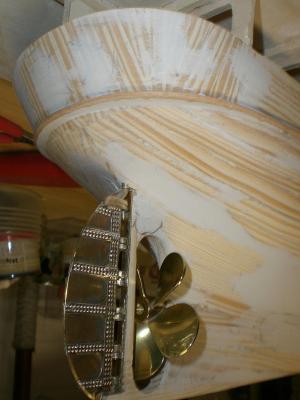
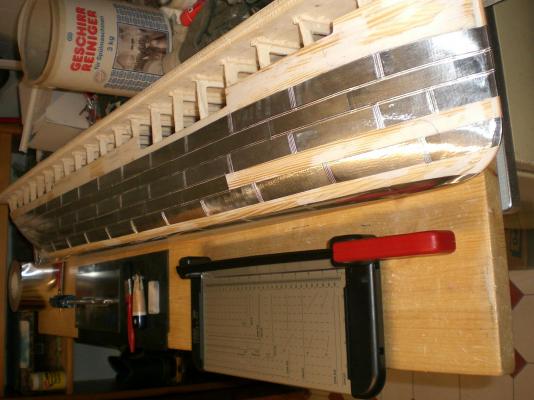
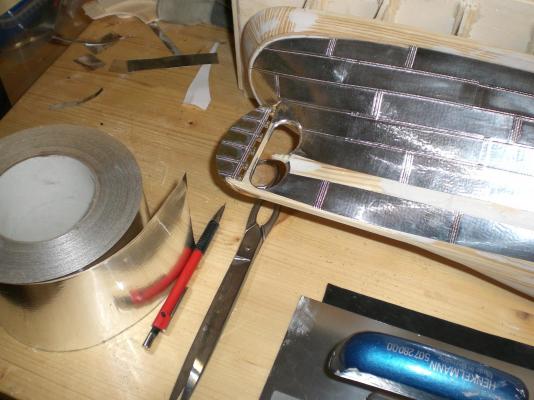
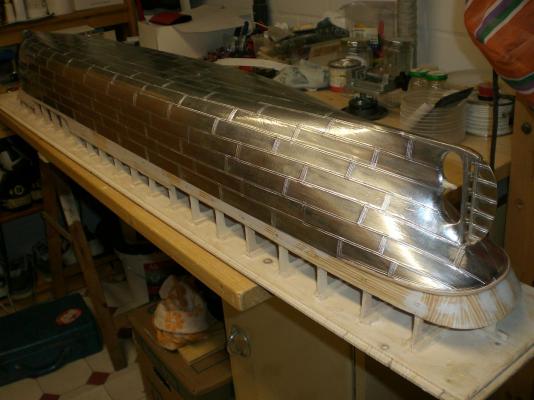
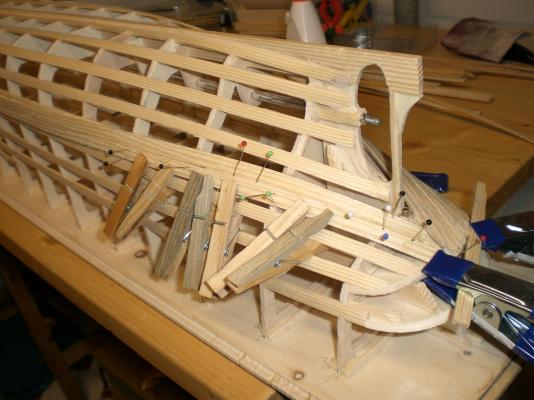
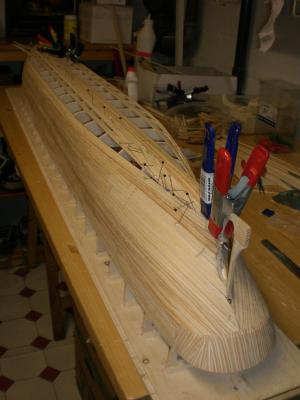
Build log part 2 planking completed, rudder and sternpost reinforcement mounted, minimized Polyesterfiller where necassary, and poopquarter knee-whale attached impressions of rudder making components the five blade prop is only an interim solution, a four blade historic prop with blades bolted-on the central hub is to follow later here first time experience Begins with metal plating for hull The hull wooden surface is sanded smooth and fixed with quick dying transperant liquid filler, which drys off quickly leaving a real smooth and shiny surface on which the self-adhesive Aluminium foil sticks like hell. No Problem with roll-embossing the foil plates from the rear plate side, because the rivit immitations are roolled-in before the protection foil on the plate rearside is removed, giving free the glue film. Workstation for making the plates leave a gap between first and second plating line, the third plating line is set by overlapping the edges of first and second line Note : vertical rivit Joints have 4 rows of rivits, horizontal Joints have 2 rivit rows plating nearly done, the whole hull is still mounted to the shipyard baseplate Mounted into the keel are two reinforced M5 female threads for the later to be mounted stand-bolts the upper hull portions have not been plated yet soldered, full functional mounted rudder before plating, shaft going through to poop deck here the upside down 135 cm Long hull is nearly ready for seperating from the baseplate, it is very stiff, riged and of lightweight


- 113 replies
-
- 18
-
-
- heinrich kayser
- steamship
- (and 1 more)
-
Thanks for looking in Richard, the sails were quite common to the steamships builds around the turn of the century, ( remember the plan Shows the 1898 Version),you can see this on many oilpaintings of that time. They had been removed on most Steamers as the engines became more reliable. Nils
-
Hi Bugra Thank you for looking in, and I`m glad you like this old Steamer Nils
-
Druxy thank you for your words, yes it is not usual to have a personal relation a subject like this one, the pitty is that before I started my own Research most of the late and still living Family members did hardly know anything about the ship, its Crew, and nothing at all about possible passengers. Nils
-
Thanks for your Kind words Tom, Keep up your interest for the following Posts Nils
-
Thanks John there are quite a lot of further Posts still in the pipe... Am glad you like the build log, stay tuned... Nils
-
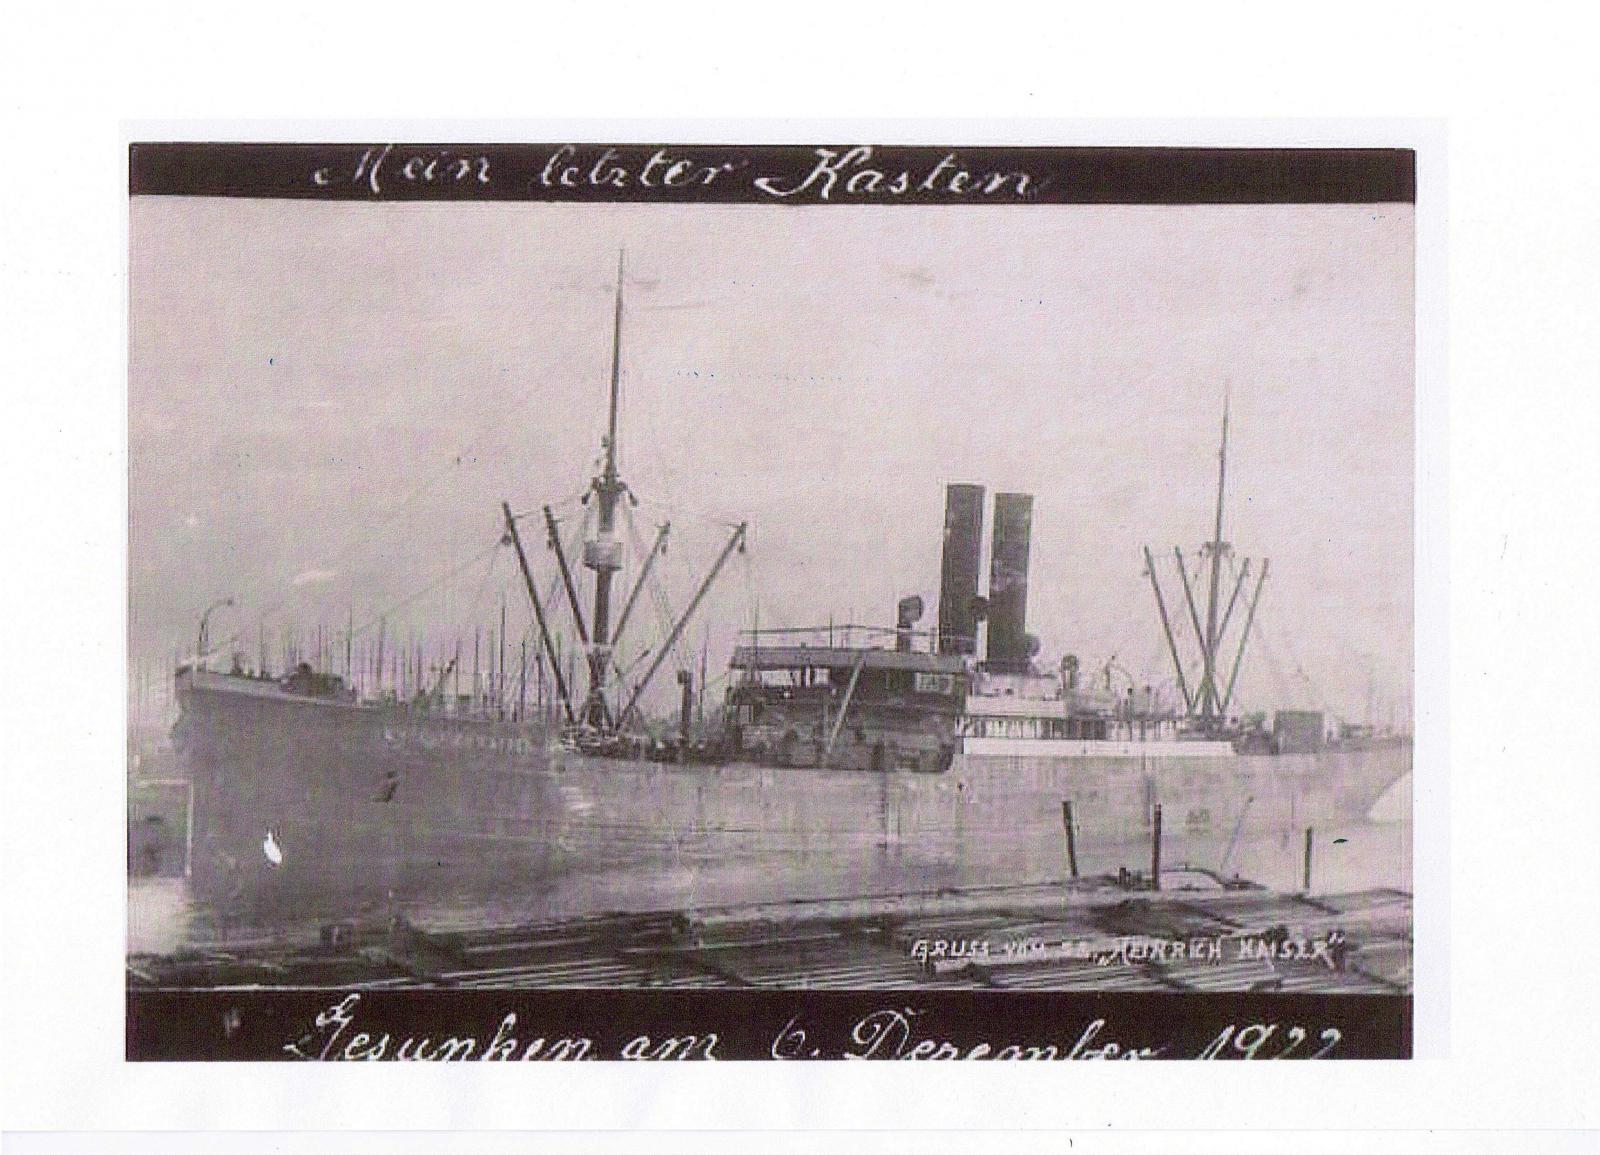
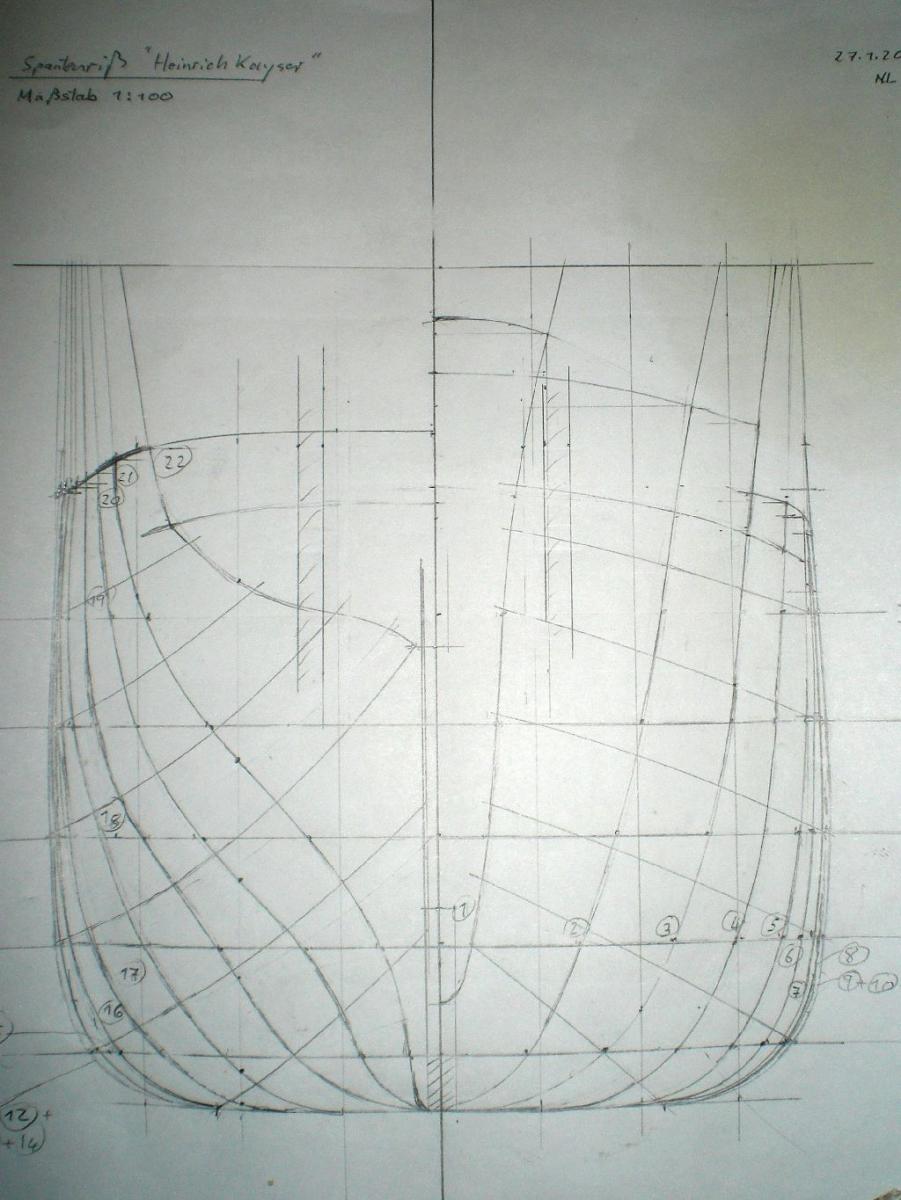
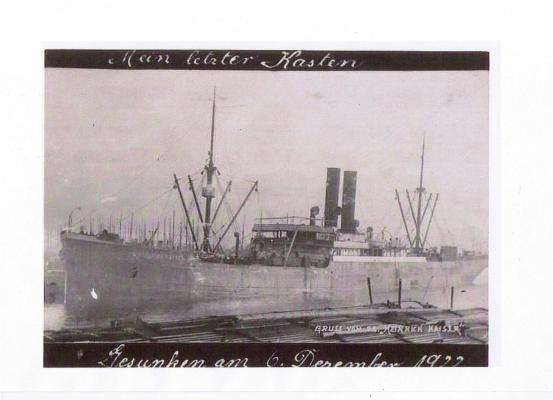
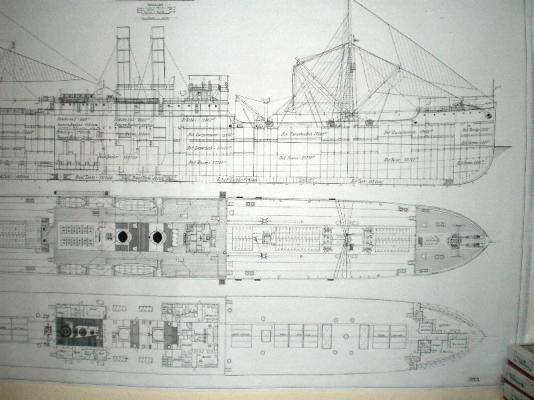
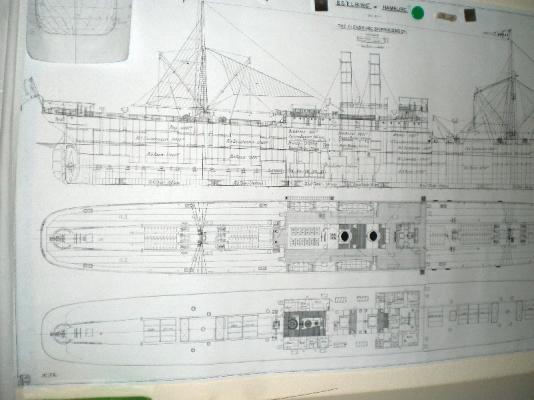
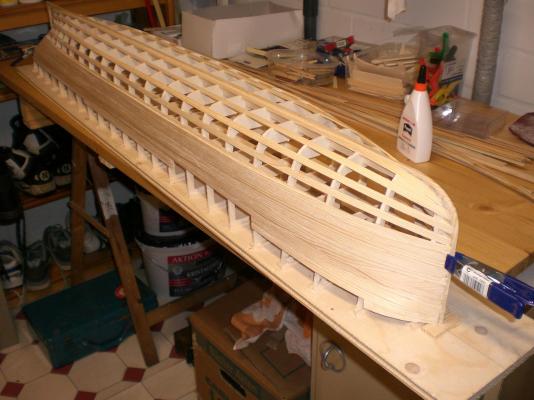
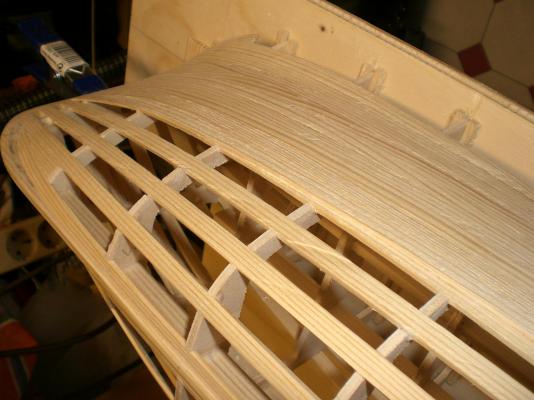
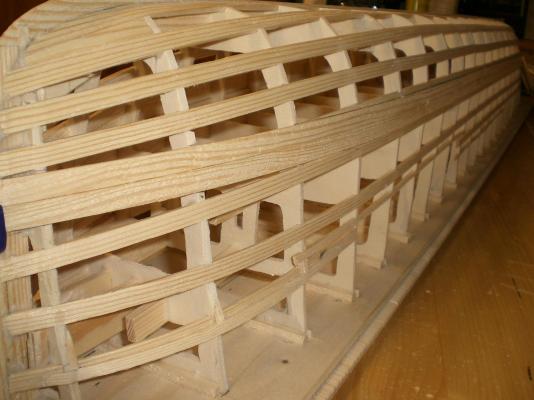
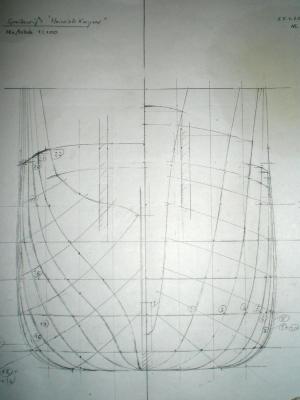
Steamship Heinrich Kayser Introduction to this build log, by Nils Langemann The steamship Heinrich Kayser was launched in 1898 baptized to its birthname „Elbing“ and was one of the typical new fast merchant vessels built for the D.A.D.G. (Deutsch Australische Dampfschiffahrts Gesellschaft) shipping company at the FSG shipyard in Flensburg, northern Germany. It served the trade route Europe via Cape of Good Hope or via Suez Canal and the red sea and across the Indian Ocean to several Australian Ports together with her sister ships on regulary basis for many years. After WW1 and in compliance with the Treaty of Versailles demands the Elbing went under command and management of a british shipping controller, from which the “Elbing” was bought back again by the Hamburg based Kayser & Sohn shipping Company in 1921, which renamed the vessel to “Heinrich Kayser”. In 1922 my grandfather was appointed as the master in command on its last fatal voyage from England to the US eastcoast, down to Florida and back touching Norfolk Virginia as last port and thereafter went down with all aboard her in a heavy full gale and with broken rudderchain and broken hatchcovers. The last SOS radio signals came from position of the New England Seamount Chain, some 500 miles off the US eastcoast where the Atlantic is 5000m deep. No survivers, not a trace was ever found. This type of ship was a mere cargo steamer of 5600 tons, which may have been able to accommodate 2-3 passengers, midships. The Heinrich Kayser was capable of cruising at max. of 12 knots with her twin-boiler arrangement in tandem setup, and having appr. 20 firemen (stokers and heaters), working in shifts to keep the boilers at pressure accordingly. I built this model, which is already completed to date, after a shipyard overview plan in honor to my grandfather and all its 43 souls crew and three passengers. It is only a couple of weeks ago that per incidence, and 91 years after that foundering, on a raised web forum thread I was able to take up contact with an american lady, who`s great grandmother as well as her great aunt have been on board the Heinrich Kayser at that time and lost their lives as passengers way back in 1922 The build log shall comprise probably 21 individual parts due to limit of pics per post, and shall document all building sequences in pictures. Comments, questions, etc. shall be welcome and answered along with the build log as it grows. The model took me appr. 1800 manhours to build over 2 years including the search for a plan, new modeling techniques like metal- plating /”riveting”, soldering, glass-case making, all trials, etc. The fully completed model can be viewed in my album (steamship Heinrich Kayser) under topic : Gallery of completed scratch built models Have fun and enjoy whilst studying this oldtimer steamer of 1898 in its buildup Nils Here it Begins..... Build log part1 this is one of the ship under its birthname "Elbing" this is one of the very last Pictures of the Heinrich Kayser overview plan frontsection overview plan aftsection stringers and single-layer planking in pine planking under way, propshaft built in Frame plan, self drawn, not included in overview plan planking nearly completed Part 2 to follow....

- 113 replies
-
- 21
-
-
- heinrich kayser
- steamship
- (and 1 more)
-
Very nice model Ken, also good idea of doing the inner bulwarks prior to planking the outside for many reasons.... Nils
-
Beautiful build Toni a real delight to watch this fine model as it is further fitted out Nils
-
an outstanding model Alexandru !!! Well done, beautiful handcraft work Nils
-
ROYAL CAROLINE 1749 by Doris - 1:40 - CARD
Mirabell61 replied to DORIS's topic in - Build logs for subjects built 1501 - 1750
Doris, your work is candy for eyes and Soul and causes admiration pure. One sits back in a comfortable chair and breaths in the pics whilst the atmosphere provided by the art, arrangement, figures, furniture, etc. creates the wish in ones mind to take walk on board, in a Long back laying century. Nils- 883 replies
-
- 1
-
-
- royal caroline
- ship of the line
- (and 1 more)
-
Lovely work Robert ! beautiful guns and gun Tacklings with Barrels blocks and hooks Nils
-
ROYAL CAROLINE 1749 by Doris - 1:40 - CARD
Mirabell61 replied to DORIS's topic in - Build logs for subjects built 1501 - 1750
Breathtaking art Doris ! All the furniture and other details are inviting to take a walk around on board... Nils -
What a delight to study your build-log Johann ! The accureness you bing into details, (amoungst many others....klincs on capstan for instance...)the composition of brass and Wood everywhere and the feeling for 18th century shipbuilding,... outstanding !! Nils
-
Top Pictures Uwe !, can highly recommend for all Bohuslän modelers to share this link with you, Who knows how Long the old Lady will still be afloat in such remarkable condition many thanks Nils
-
SS Vinal Haven by TBlack - FINISHED
Mirabell61 replied to TBlack's topic in - Build logs for subjects built 1851 - 1900
A lovely built Oldtimer Steamer Tom These typ boats have real character, and yours has an interesting hull for shallow Waters, probably a river Steamer Looks great. Nils -
Outstanding Danny ! wonderfull Wood composition, a really impressing build Nils
-
Excellant work Jan ! thanks for sharing your build-log, shall be looking out for more to come Nils
-
Wonderfull model Johann ! well done Nils
-
Beautifull Model Richard, I like these classic lines so much that I decided many years ago to scratchbuild the Endeavor and make her raedy for RC control. So into the lowest keelportion was integrated appr. 3KG lead (non removeable)as deadweight. The model was very Long and although it was a lightweight hull contruction, Balsa diagonal stripes on ply Frames, and coated with glass rowing Cloth and sealed with epoxy Raison it was very heavy because of the lead. Halfway completed and with lateral-testing in water, I found it would take even more lead to compensate and withstand the windpressure on the high mast ans sail. The model was too heavy now to have fun in handling the whole Thing, so it went into the dark Basement and out of the mind. After moving homes for 2 or 3 times I decided to sell the hull, and so someone else may complete it or not. As you are building a stand model, that sure should have been my decision as well in the beginning. Wish you very much pleasure in finalizing your wonderfull model, and shall follow your further build with pleasure Nils
-
Good work Richard ! looking at the fine and neat structural planking, why are you aiming for a second planking at all? I like the lines of your Brigg Mercury The kit seems to be a good choise, what one can see so far cheers Nils
- 55 replies
-
- 1
-
-
- mercury
- victory models
- (and 1 more)
-
A pleasure for eyes and Soul Karl ! Wonderfull Nils
- 662 replies
-
- 1
-
-
- bonhomme richard
- frigate
- (and 1 more)
-
beautifull build Keith I have seldom seen such an interesting an good looking viking boat. Also very nice Details on the stand and ist Arrangements Nils