BANYAN
-
Posts
5,958 -
Joined
-
Last visited
Content Type
Profiles
Forums
Gallery
Events
Everything posted by BANYAN
-

HMCSS Victoria 1855 by BANYAN - 1:72
BANYAN replied to BANYAN's topic in - Build logs for subjects built 1851 - 1900
Thanks Patrick - I am sure I reserved a special place of punishment with my 'oaths' when doing these small pieces cheers Pat- 1,013 replies
-
- 3
-

-
- gun dispatch vessel
- victoria
- (and 2 more)
-
Simply beautiful! ..... and functional. cheers Pat
- 714 replies
-
- 2
-
-
- lady nelson
- victory models
- (and 1 more)
-
Nice to see the update UV; some good progress made there. cheers Pat
- 786 replies
-
- 3
-
-
- Royal Louis
- Finished
- (and 1 more)
-
Jeffery, a little later than what you need for your period build, and Gregory for info, the only formula/rule-of-thumb I have found is for clippers (I knew I had seen something somewhere in my reading ) . E. Armatage McCann in his series of articles published in the Model Ship Builder magazine (originally in the The Ship Modeller magazine), titled "Rigging of Clipper Ships" - part 3, page 10 provides: "The steeve was 4 to 5-inches to the foot" using the length the bowsprit extending from the bed to the cap. Note this was for clipper ships of the 1850s. cheers Pat
-
Those knightheads look very crisp. Nice work. cheers Pat
-
Thanks for the feedback and confirming my thoughts Rob; much appreciated. Now I just have to settle on the final positions but I will leave that until I am well into the rigging plan. cheers Pat
- 1,208 replies
-
- 1
-
-
- great republic
- clipper
- (and 1 more)
-
HMCSS Victoria 1855 by BANYAN - 1:72
BANYAN replied to BANYAN's topic in - Build logs for subjects built 1851 - 1900
Hi Rob, this is being built at 1:72. I just noted an error in the build title, thanks cheers Pat- 1,013 replies
-
- 3
-
-
- gun dispatch vessel
- victoria
- (and 2 more)
-
Now that's the way to 'get back into it' - double whammy it great to hear you sounding enthusiastic about it too Mark. cheers Pat
-
I didn't think these old salts were that well dress-coordinated Stunning detail Michael, I love the brass lamp. cheers Pat
-
A silver lining can be found in everything (well almost), glad you can get some 'bonus' detail from the rebuild. cheers Pat
-
She's looking great Ben, you must be pleased to see her taking on some of her 'finish' now. cheers Pat
-
Very clean work Vossie; looks very crisp. cheers Pat
- 714 replies
-
- 1
-
-
- lady nelson
- victory models
- (and 1 more)
-
I am glad you asked as I seem to have gotten myself confused (reading far too many books at the moment while sorting the spars for my build). I am building a Gun Despatch Vessel steam-screw sloop which had an Aberdeen style bow and the steeve , when measured from the horizontal of the WL, was 15 degrees. It was Goodwin "The Construction and Fitting of the English Man-of-War" page 174 that provided the guidance I wrongly attributed to Underhill (memo to self - check before posting next time ) - basically, 25-30 degrees for ship-rigged vessels - smaller classes closer to horizontal. I dare not state more as this book is still in copyright and, sorry, I will need to check with moderators how much can be cited re copyright. I used underhill to get averages of the steerve angles, and angles of the caps for the 1850s, as he has many accurate drawings of clipper ships of many designs; hence my subliminal association. cheers Pat
-
Getting a tight finish to a rope
BANYAN replied to Marco R's topic in Modeling tools and Workshop Equipment
No problem Marco, hope the info helps. WRT kinks, sometimes they are caused by one of the stock/source threads not being at the same tension - one of the most important things before starting to twist/turn is to ensure that all stock threads are equally tensioned. cheers Pat- 14 replies
-
- 1
-
-
- finishing rope
- domanoff
- (and 1 more)
-
Holding small parts for soldering
BANYAN replied to BETAQDAVE's topic in Metal Work, Soldering and Metal Fittings
Thanks Eberhard, that clears up my separate query to you cheers Pat -
Underhill also discusses the angles of the bowsprit in his book "Masting and Rigging the Clipper Ship and Ocean Transport"; may be worth a read. cheers Pat
-
Byrnes Table Saw Tips (requested)
BANYAN replied to Matrim's topic in Modeling tools and Workshop Equipment
Hi Joe, if I recall correctly (but please check this as I may be confused with something else), the fence is set up/designed with a very slight taper away from the centre of the blade/arbor to minimise (not stop) binding; that is why Jim suggests tightening the inside lockdown first. BUT, that should not be effecting the cut as that should be at the leading edge of the blade not the back. I can only suggest that you have some saw blade flex either from the density or thickness of the wood or, induced by the feed speed. The only other possibilities, but I am sure you will have checked these is that the blade is not sitting parallel to the saw or the back end of the fence is moving while cutting. I invested in a dial indicator jig from Jim for checking this. I found that once or twice I have not seated the blade on the arbor correctly, but from what you have described you can probably discount this point. cheers Pat -
Getting a tight finish to a rope
BANYAN replied to Marco R's topic in Modeling tools and Workshop Equipment
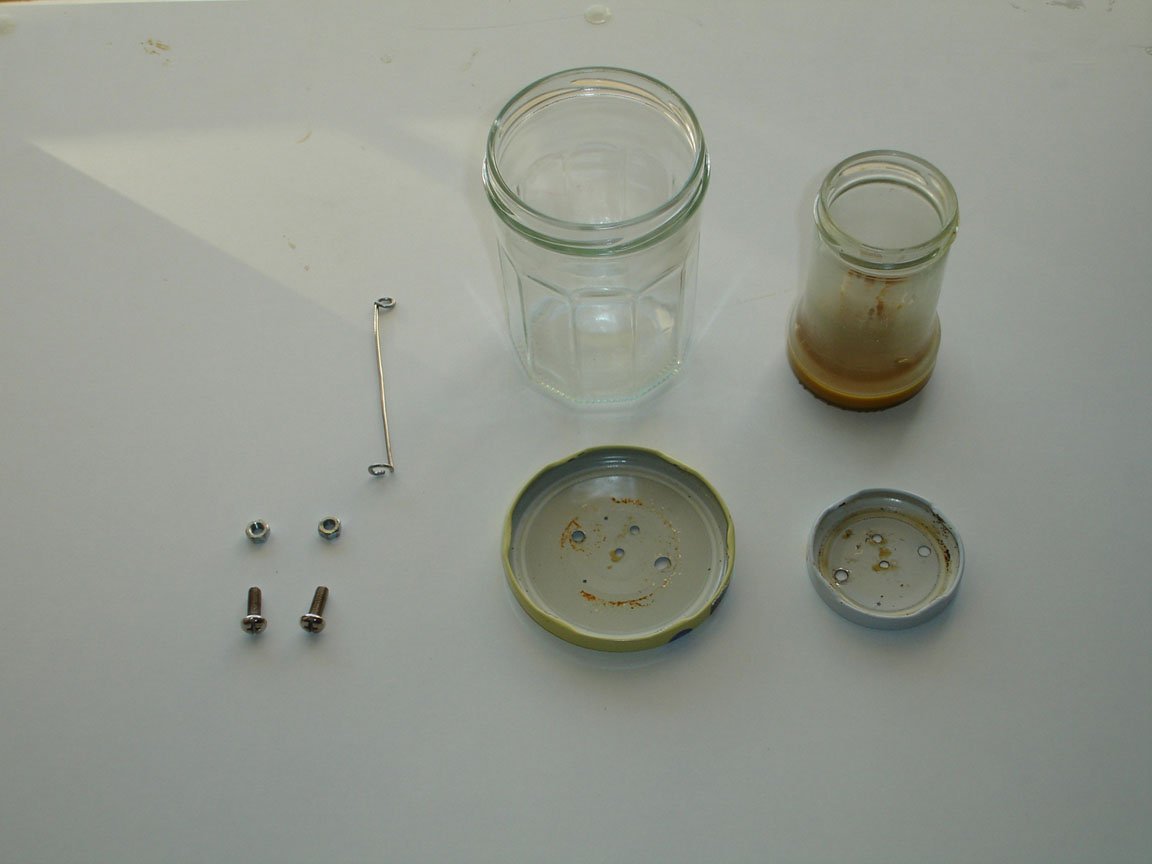
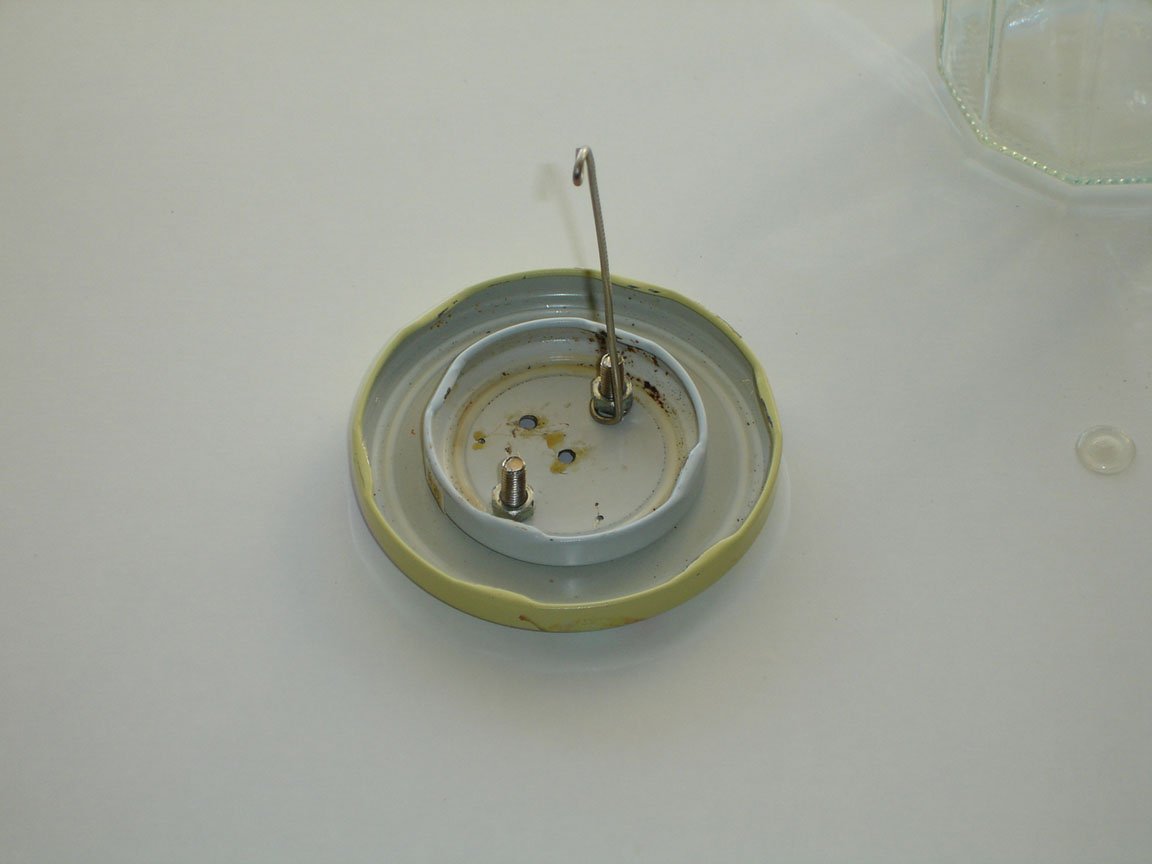
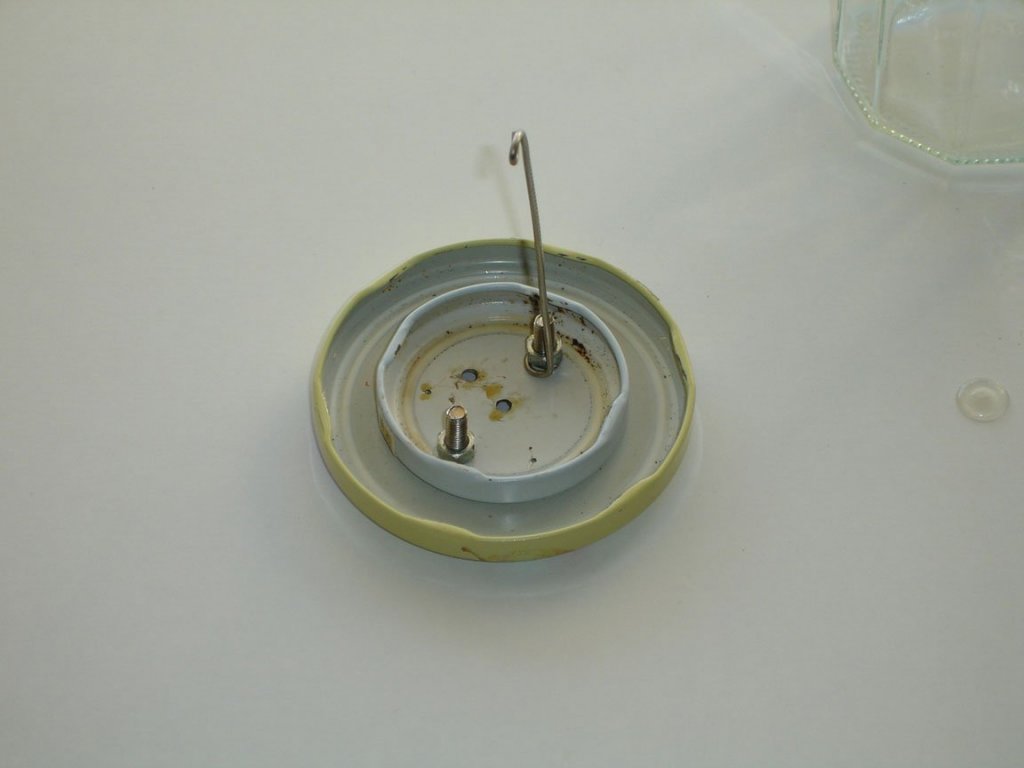
Hi again Marco, Some do, and others don't like the use of wax ( I am a don't) If you wish to use it there are several ways, and please think about a 'conservator's wax rather than beeswax. I have found the latter remains sticky and holds dust especially in our hotter climate. Try something like Renaissance Conservators wax if preserving the natural cordage is important - beeswax tends to be too 'sticky' (but you may get valid counter-point debate on this topic). If applying as a 'solid' wax after making up the rope, you can either pull the rope through the wax a couple of times rotating the rope then rub in by pulling it through your fingers or lint free cloth with light pressure to warm it and get it to sit into the crevices better; or, apply the wax onto a lint free cloth and pull the rope through the waxed cloth. The other method is to make a jig (discussed somewhere in the forums) that allows you to melt the wax and pull the rope (or threads before making up the rope through the solution. Basically comprises two glass jars with tin lids that sit one inside the other and has wire guides protruding from the top of the inner jar as guides. The outer jar is filled with hot water and the inner the melted wax - the hot water keeps the wax in solution much longer. You may also find you need to dilute the wax with denatured alcohol or the like to get it to penetrate properly; beeswax will not penetrate unless highly diluted. These photos are from a member "Stelios' version of this jig. cheers Pat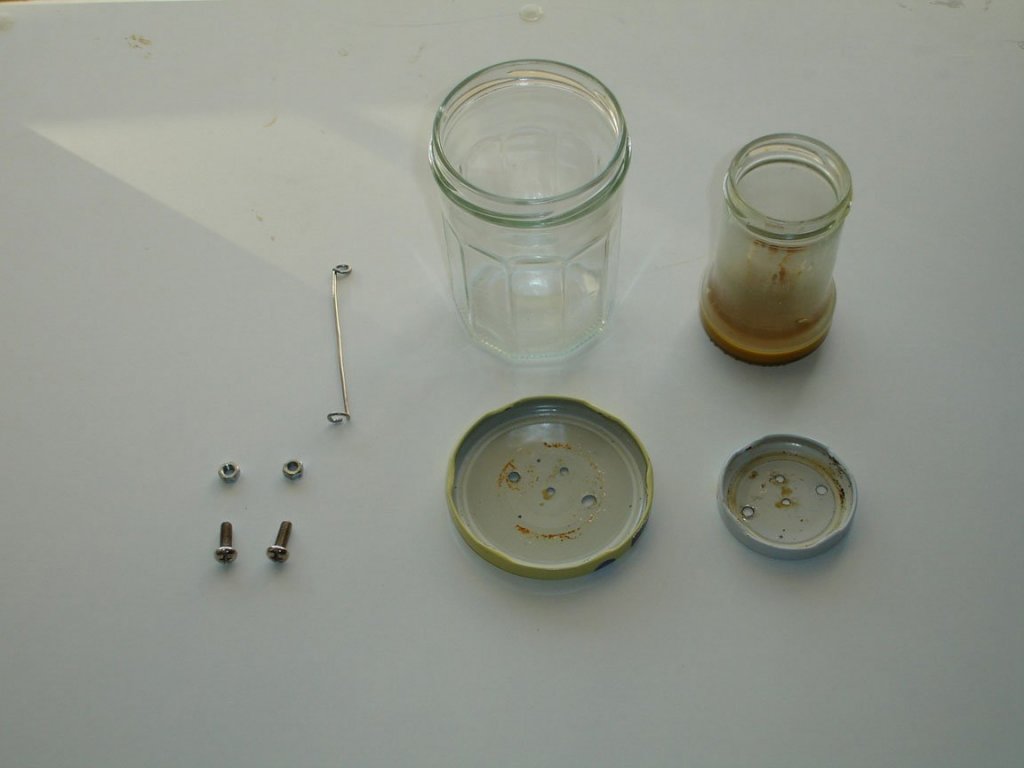

- 14 replies
-
- 3
-
-
- finishing rope
- domanoff
- (and 1 more)
-
Hi Rob, only what is in the build log; I have no images (or plans) of the upper deck arrangements save that of the photos showing the quarterdeck and a very partial midship bulwarks. The Contract called for 'a' (singular by my interpretation) purchase winch to the fore and main masts. I have interpreted these (based on Underhill) to be used for the topsail and topgallant halliards with the wire rope taken to and left on the winch (labour saving). Apart from that I have no idea where they were fitted but trying to interpret the profile view photo of the ship to see if one of the lines I thought to be a backstay is actually the halliards as I was wondering why the backstay had a tackle (similar to your arrangement). I will PM you with the profile photo. cheers Pat
- 1,208 replies
-
- 1
-
-
- great republic
- clipper
- (and 1 more)
-
Hi Steven, if I may suggest that first you try and remove the legs and arches without damage (may be too difficult) so that if shortening the fore castle does not look right, then you have them there to reattach? My 'leaning' is to lowering the castle height as first option. I think the two mast version (based on your research that you have discussed) here is the better if you can preserve it? But, either way sounds plausible and is down to your choice (and the amount of rework you wish to do). cheers Pat
-
Looks good Rob and quite timely for me as I grapple with "Victoria's' purchase winch locations. I will now have to revisit my decisions to ensure I have thought it through enough as your solution may change my plans also. cheers Pat
- 1,208 replies
-
- 3
-
-
- great republic
- clipper
- (and 1 more)
-
Getting a tight finish to a rope
BANYAN replied to Marco R's topic in Modeling tools and Workshop Equipment
Hi and welcome. I am assuming you wish to make RHL rope (even though you ask about Cable laid)? To make rope tight, sometimes (depending on what way you make the rope) it needs to be set. This means overtightening at the end (additional twisting without lengthening) or pre-tensioning by unlaying the rope initially. From what you are describing there are a few points, and a few things you could try. 1. Cable laid is stronger but makes-up more stiffer. 2. You are correct in saying that if you start with RHL then make it up LHL, so if possible source some LHL stock (harder to find), or make it up LHL if the small amount of extra stiffness or direction of lay is not an issue - you may hardly notice the stiffness at this scale especially if using softer stock threads. 3. The angle of the lay (which really equates to the number of winds per inch/cm) also helps; somewhere around 60 degrees is optimum (but more knowledgeable people may help here). I am not familiar enough with Alex's ropewalk but you may be able to adjust this using different tension weights. 4. I think you are connecting the source thread properly. You could try adding some diluted PVA/Water to the end of the rope where it starts to lay-up before removing the made up scale rope - let it set before cutting - this will help stop it unravelling at that end. HOWEVER, a better practice may be to simply tie a knot at both ends at this point so that you can 'set' the rope off the ropewalk. (see next) 5. Some more experienced folk can make up rope (from practice and experimentation) that does not unravel - Chuck's is a good example). One thing that I have found helps is that after making up the rope, I 'set' it. I first stretch the rope manually (pulling between my hands in about one-metre lengths - arms distance where I can still apply tension comfortably) - as soon as you 'feel' that little bit of over tensioning - feels a little like a small strand has broken - STOP - this will take a little experience but comes naturally. Once I have completed this step, I hang the rope from some spread out hooks in the ceiling (at height) with large fishing weights on fishing line swivels, at both ends for a couple of days - the swivels are to assist with removing twist). I find this takes much of the 'elasticity/stretch out of the scale rope and minimises the tendency for any twisting when using the scale rope. The amount of stretch to be removed really depends on the source stock. (see next). 6. My last point would be to use a stock that suits your needs. Is the rope used on the actual drum a natural, man-made or mix of cordage - and is this aspect important (authentic replication)? I prefer where ever possible to use natural fibre, and preferably long-staple cotton thread. I have had some success with a poly-cotton mix also (needs a little more 'after-stretching' due to the poly but tends to lay up just a little better ) but cotton can lay nicely also, just look at Chuck's rope. If a mixed source thread, I try to stay at under 30% poly content if possible. So if you have DMC already, which I think is RHL, and cable laid is no issue to you as to looks/authenticity, make it up into cable laid (LHL/'S') scale rope. If you do need RHL final product, either source or make up your own LHL stock. There is a 'tatting' thread made by Milford which is cotton and does come in LHL. Not sure where you would get it but I found it here in a chain store called "Spotlight". I hope this helps rather than confuses you further? cheers Pat- 14 replies
-
- 1
-
-
- finishing rope
- domanoff
- (and 1 more)