Snug Harbor Johnny
-
Posts
1,500 -
Joined
-
Last visited
Content Type
Profiles
Forums
Gallery
Events
Everything posted by Snug Harbor Johnny
-
 Rob's right, since direct sunlight - and even reflected sunlight - transmit damaging UVa and UVb (high energy) radiation. Just expose your unprotected skin to the sun for an hour, and you'll get a nasty sunburn (with a chance of future skin cancer). Skin can generally heal itself, but not a model. Rigging line or sail cloth of any material will become brittle with sunlight, and will fall apart over the years. The last clipper model built by my dad (which I offered to restore for my brother, who had the model) became so fragile (it was made entirely out of natural materials) that the rigging simply disintegrated and everything fell apart - according to my bro. Sad thing, the wooden parts still could have been rebuilt and re-rigged ... but it was thrown out as a 'hot mess'. Painting every plastic surface is a great protectant, but even the paint might not fare so well under UV. The solution? House windows can have a thin film applied to the glass on the inside of the pane that will reject bot UV and infa-red (heat wave) spectrum to make them more energy efficient. There are companies that do this, and if one is handy, one can apply the film (with practice) oneself. The home interior will benefit. Modern 'efficient' windows have this feature built in. Attics are terrible places for even cased models, since high heat will in crease the aging of materials as much or mose than some UV. I suppose that UV excluding glass can be used for a case the same way fine art is protected within a frame.
 -
Remove Tamiya paint
Snug Harbor Johnny replied to JoniP's topic in Painting, finishing and weathering products and techniques
I Googled 'how to remove acrylic paint', and a result was that denatured alcohol (methanol) will work better than 90% isopropanol (IPA or 'rubbing' alcohol) ... note that 70% and even 50% is also sold as the watered down version is less irritating to skin. My admirable Admiral was pulling her hair out trying to remove dry acrylic from a formed plastic mixing tray used for a project, as she was only using soap and water. I applied some hardware-store methanol on a paper towel and SHAZAAM, much of the residue came off - only the thickest and oldest blobs remained. So pouring some denatured in the pockets of the tray to let them soak (plus a little prying later with a dull 'dinner' knife), and most of that came off. I left the clean tray, soiled paper towel and the can of methanol out on the counter to give her a pleasant surprise for her later when she comes down form the sewing room. I suppose you could soak the parts in a deep tray of denatured alcohol if they don't come cleaner with IPA (the first recommendation of the Google search). It is possible that 20 year old paint may not be removable ... so in that case, you can paint over the parts where needed. -
Look closely at Rob's photos, and you can see that he used 1:96 Revell blocks on Glory of the Seas (and some others), which can be had from Revell C.S., Thermie or Connie kits (and a couple others). There are still a fair number of new or partially built 1:96 kits to be found on line. The molded eyes are single & double becket single blocks, and double becket double blocks - convertible into a single becket. They are good enough representations of internally stropped blocks (one can ignore the slight side rib on them, or even file them off) - the type used on later clippers. By leaving the side rib on the Revell blocks, they can double as externally stropped.
-
'Saw a fairly large Bluenose 2 model where the sails had 'just started' to be raised ... lending an 'action' element to the presentation (that might have even been improved with a few scale figures). I could see plenty of rigging and construction details since they weren't blocked by fully extended sail cloth ... they were still mostly gathered.
- 184 replies
-
- 3
-

-

-
- Bluenose
- Model Shipways
- (and 1 more)
-
Necessity is the mother of invention, and you've done well mate !
- 46 replies
-
- 1
-
-
- Mayflower
- Artesania Latina
- (and 1 more)
-
Spanker/Gaffsail Boom Rigging
Snug Harbor Johnny replied to Mark Paulhus's topic in Masting, rigging and sails
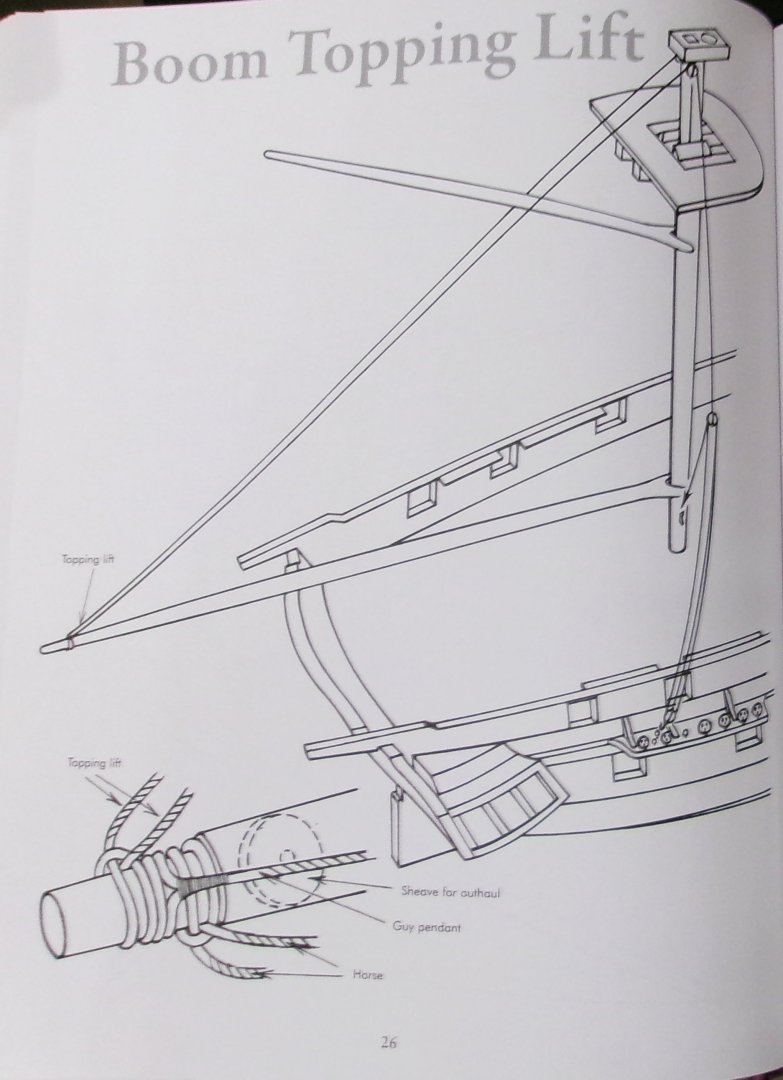
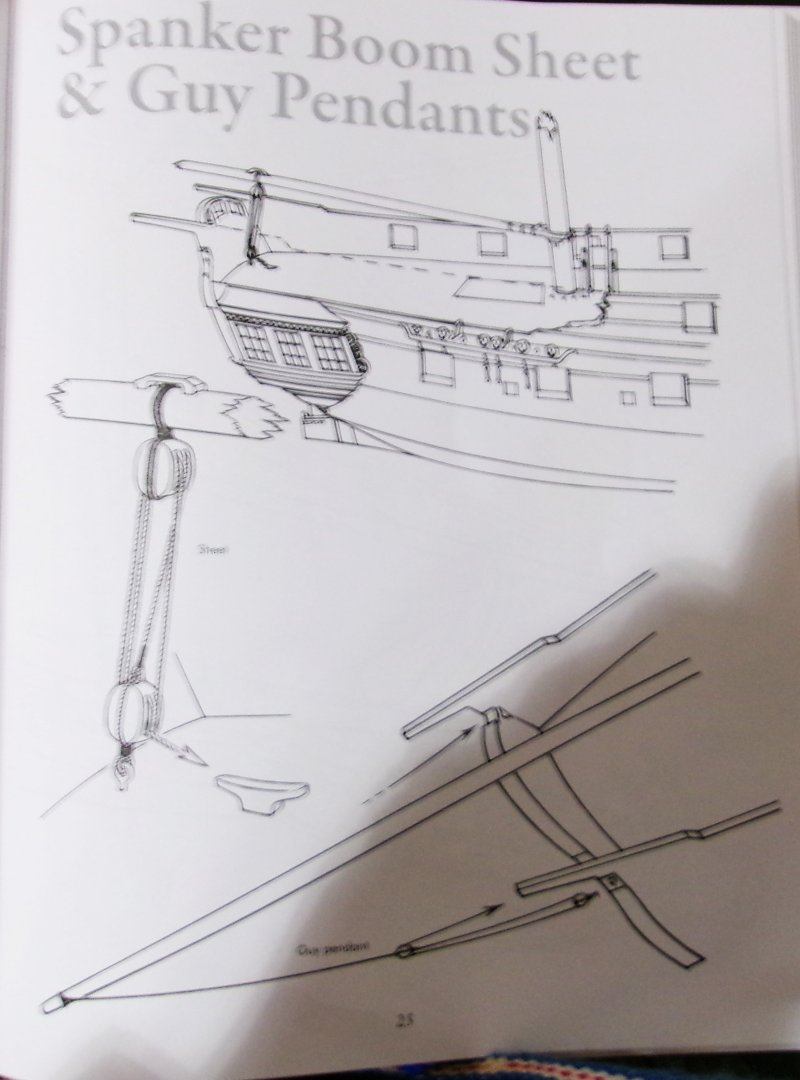
So not to be superfluous, the sheave could be used for the ensign - not sure where it belayed. Petersson p.27 (w/o sheave) uses a small block attched to an eye at the ehd. -
Spanker/Gaffsail Boom Rigging
Snug Harbor Johnny replied to Mark Paulhus's topic in Masting, rigging and sails
You have a good approach, and I've copied your drawing for reference ... thanks ! As has been said elsewhere, the captain could have the ship rigged to his orders - and you are captain of this ship. There are often multiple ways to accomplish each task with lines and tackle. For example, I'm enamored of the two ways to combine a leech line with the outer bunt line by use of a 'bulls eye' shown on p.169 of 'Masting and Rigging the Clipper Ship & Ocean Carrier' by Harold Underhill (you may have this already). When coupled with the method of controlling two buntlines on p.163 (and I'll use just 2 blocks, a & c, rather than the three pictured) - what would have been 3 separate lines needing belay points below can be combined into a single haul line ! Eliminating 2 lines on both sides of a sail (4) x at least 12 sails on a square rigged ship, and there will be 48 less lines to route through fairleads and belay. These and other reasonable simplifications will be used on a Winter project of mine (delayed by summer landscaping ... and the resulting hernia surgery I've undergone as a result of an older guy still thinking he can do what he could at a younger age). A model ship is an art form representing the tastes and judgement of the builder. Work to please yourself in your own time frame. One get find pleasure even thinking or planning what course of action to take on a project (while busy with other tasks). Your ship in dry dock will patiently wait for you without complaint until you can get back to it. Be assured, I'm not laughing (as in retirement, I'm something of a newbie myself ... and intermediate level is as far as I'm likely to achieve) - and I highly doubt that any other builder on our forum is laughing either. At worst, it may pleasantly remind them of the path they have already trod to wherever they are. I expect that there will at least two unfinished projects when I pass over the bar, and figure that someone else might just take them up sooner or later. Like someone said, "I've worried about a lot of things in life - most of which never happened. Fair sailing! Johnny -
The A.L. 1:75 Bluenose II may be a good compromise - enhanced for accuracy with the Jensen book on the Bluenose II. Check out the various builds at various scales that are on MSW ... you'll get a LOT on information to help you decide ... sort of ,'look before you buy'.
-
Spanker/Gaffsail Boom Rigging
Snug Harbor Johnny replied to Mark Paulhus's topic in Masting, rigging and sails
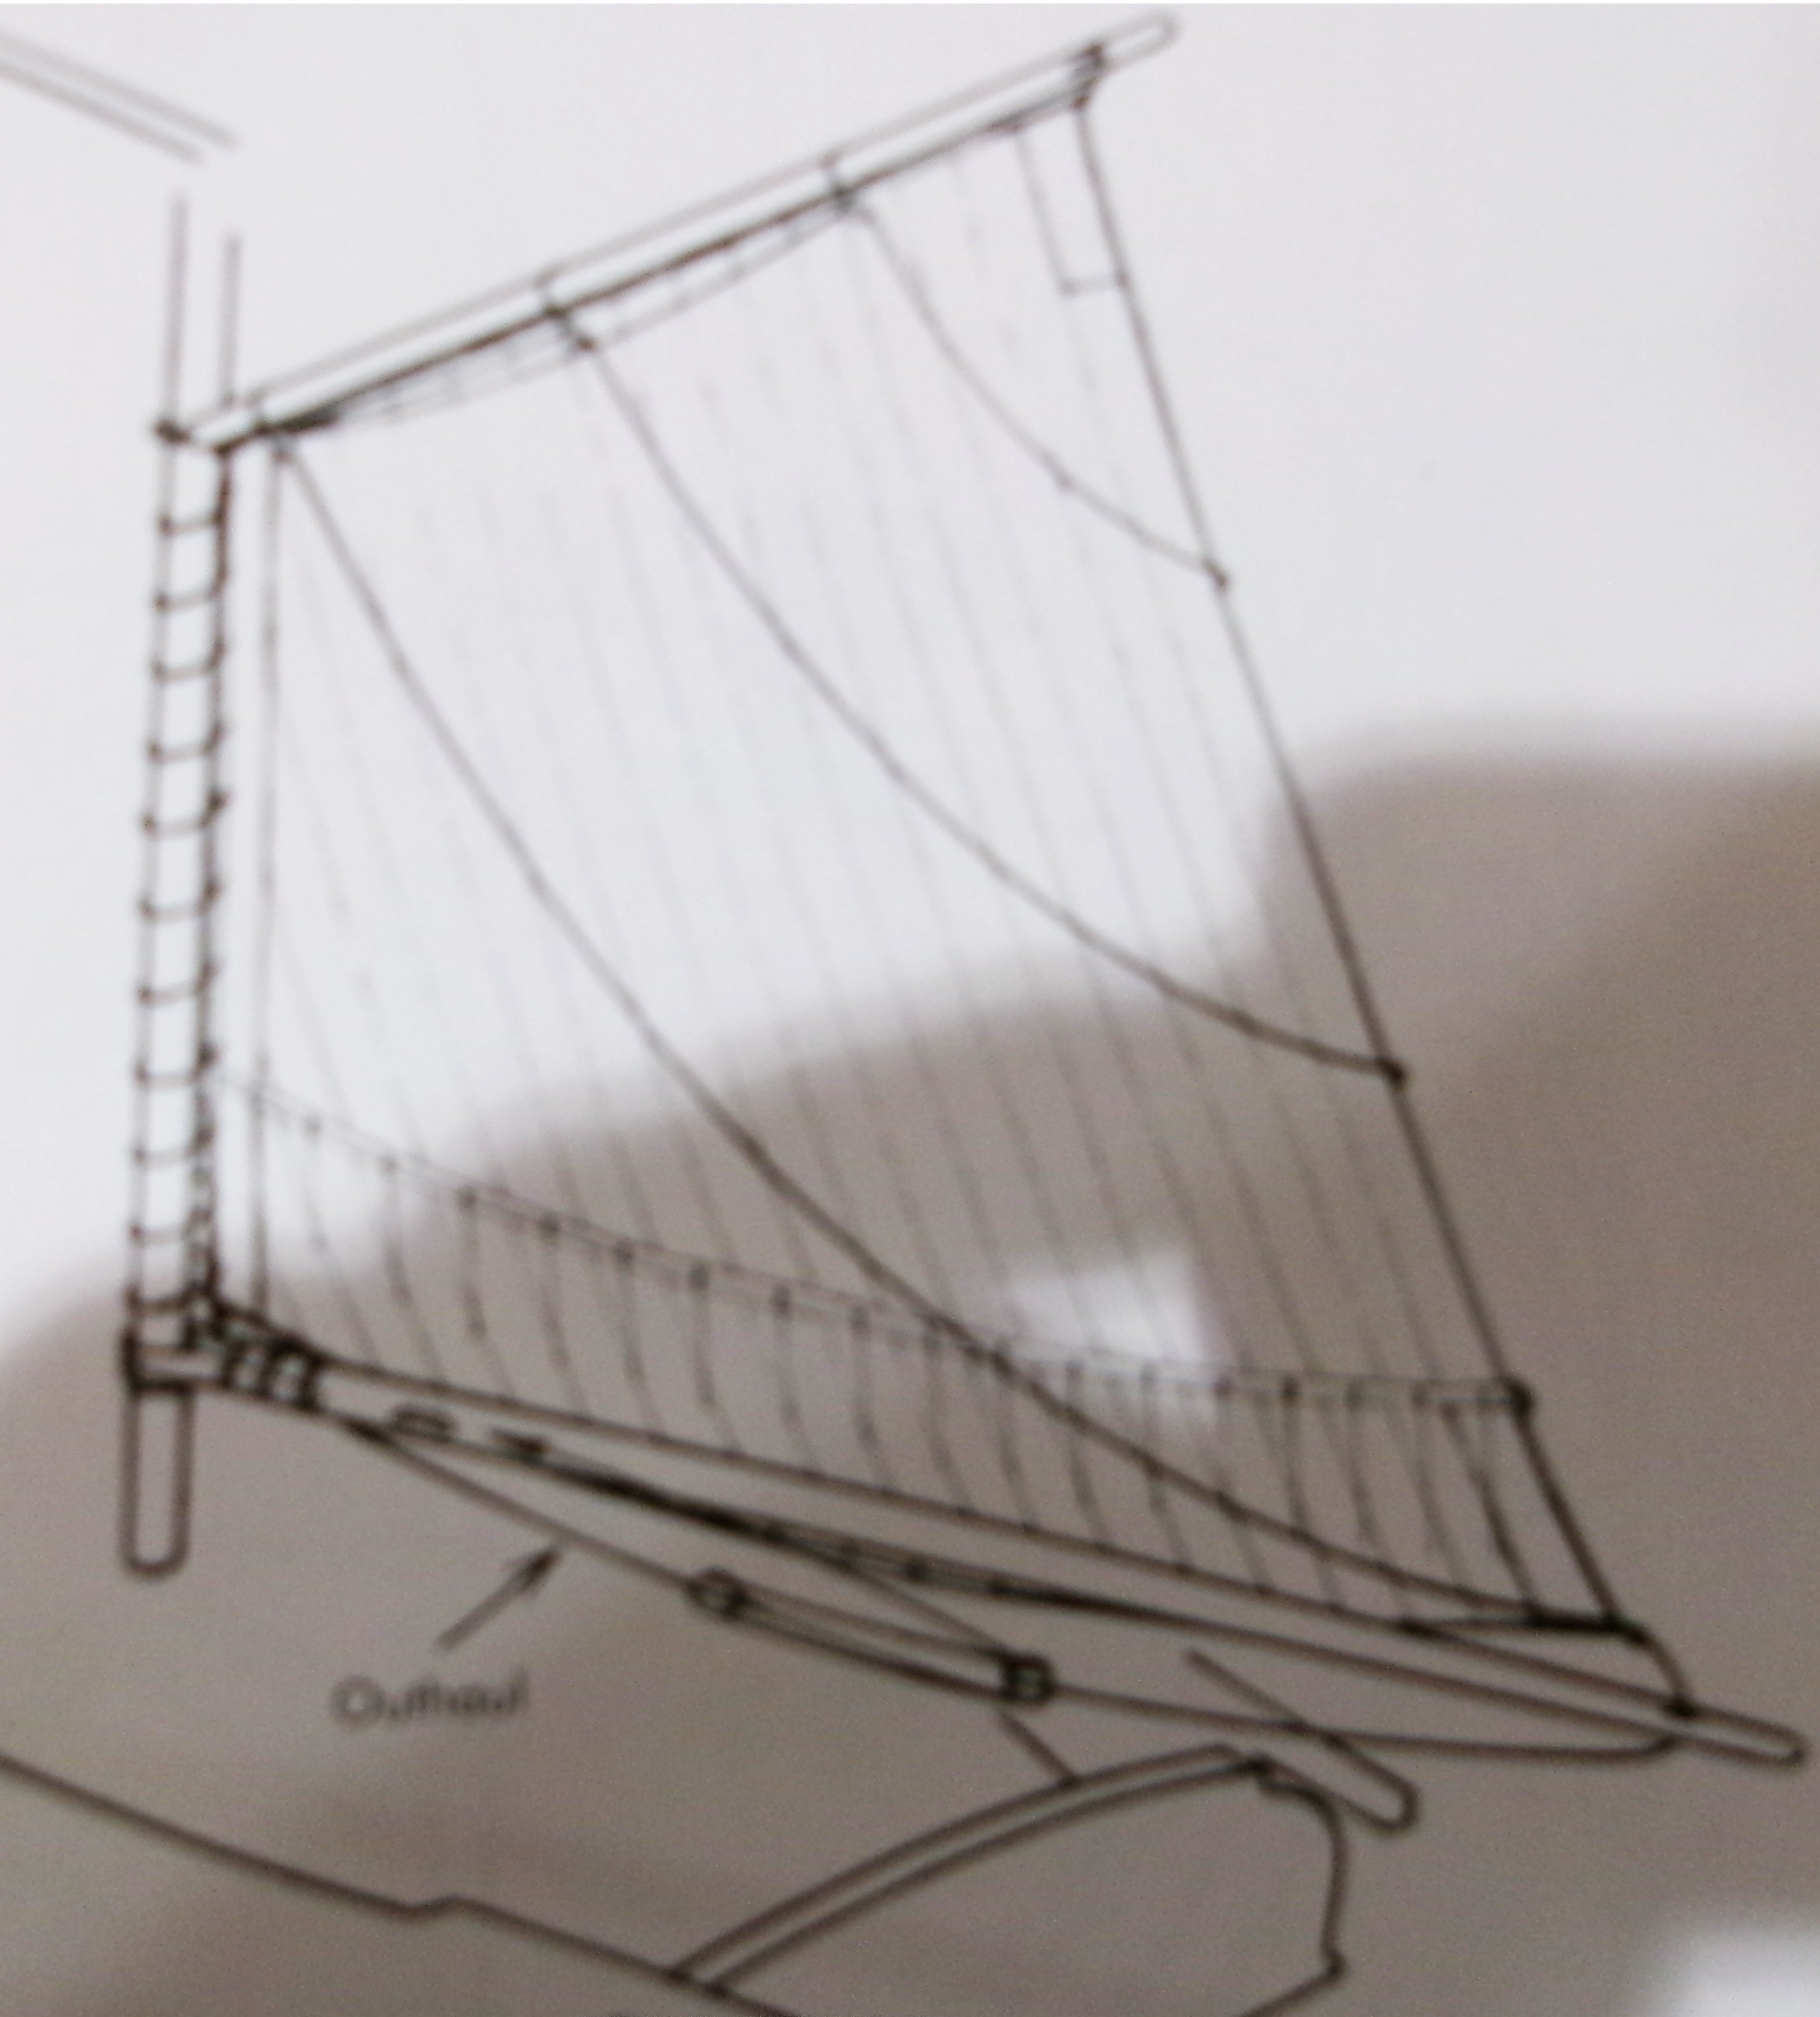
I'm still learning about rigging, where every line has a purpose, and thought to defer to a more experienced MSW builder. Yet I'm intrigued by your post, and consulted 'Rigging Period Ship Models' by Lennarth Petersson - a book dealing exactly with warships of the Bounty period. I'll include somewhat out-of-focus images for 'use in a book review' , and suggest you buy yourself a copy to se ALL the fantastic details in pictorial form regarding masting, rigging and sails for your Bounty. Kit makers often simplify or modify instructions in this area for an 'out of the box' build. The # 805 image you question appears to be a confusion of the outhaul for the spanker (with an inhaul on the other side), on p.81 of the book. The spacing of the elements is not necessarily exact to provide more clarity of function. There are three purchases on the tackle, so the space between them will be slightly more than 1/3 the length of the distance the spanker is hauled out along the gaff (before hauling out), and once hauled out - the blocks will be closer together. The inner block (which will likely be closer to the yoke than as pictured) appears to be attached (not clear) to the underside of the gaff yoke, with the haul line is belayed on a cleat on the gaff. Models without sails likely omit the in and out haul tackle. The inhaul (on the other side of the gaff boom) works in a similar manner to bring the lower corner of the spanker in. The only lines attached to control the gaff boom are the topping lifts, the gaff pendants, and the sheet. While there are peak (boom) and throat (yoke) halyards for the upper boom, the lower boom is not raised, nor does it go lower than the support collar allows.
-
It's like you're making your own 'ship kit' ...
-
The Canadian government seems to have more sense on the 'penny issue' than the Yanks ... and I think some factions will oppose it based on either "tradition", or the inability to grasp a 'rounding' scheme. So my suggestion to Uncle Sam is this: Since it costs 3 cents to make a penny in the U.S., why not offer a 'bounty' of 50% for pennies turned in (with monthly limits). For every dollar of pennies surrendered, the person would receive $1.50 ! So that would REDUCE the cost of 'minting' pennies by 50%, and the monthly limit would be needed because all sorts of folks would be emptying out penny jars, shelves and drawers, looking under car seats, etc. to 'cash in' on the bonanza. Noting motivates most Americans as much as money or a bargain.
-
A lucky builder can use a dental drill ... it can get into tight spaces and uses fairly small bits.
-
Didn't Canada get rid of the Canadian penny?
-
We all 'pick our passions', and I had a number of different ones over the years depending on finances, fitness and circumstance. Ship modeling at my stage in life is a good outlet for my OCD tendencies, which is typical for good Pharmacy workers - I work per-diem as a Technician (formerly a manufacturing engineer for aircraft parts ... another exacting career). The idea is to continue learning and doing any way one can to extend the years of a relatively healthy mind and body.
-
The illustrations are awesome, Phil ! Two pictures (plus a few notes) = thousands of words. This is JUST the sort of thing I want to eventually put on my Vasa ... always wondered how they'd do it, and once again, form follows function - and according to Occam's Razor, the simplest explanation is often the most likely. Another "Ah-Hah" moment came when I saw illustrations on how the davits worked on Shackleton's Endurance - where the distance between the davits is clearly LESS than the length of the boat hung from them. When both davits pivot in the same direction inboard, the boat shifts to that side enough that one end of the boat will clear it's davit. Then that davit continues rotating in the same direction (to pull that boat end outboard) WHILE the other davit reverses rotation to let the far end of the boat 'follow along' (the boat now being somewhat diagonal pointing outboard) as the boat moves outboard until the other end clears its davit. Then only that davit continues turning until both ends of the boat are outboard (and parallel to the gunwale), then both davits pivot to re-center the boat between the davits in the fully outboard position. Before reversible motors, I suppose cranks and gears would pivot the davits as needed.
- 27 replies
-
- 2
-
-
- capstan
- small boats
- (and 1 more)
-
Ahoy Captain! You don't need to post any logs to enjoy and learn all about the hobby (and historic ships as well) at MSW. I dare say your Unimat should come in handy for turning small parts in brass or wood (as I have done with a 3-jaw universal chuck on mine).
-
'Looked over builds of both the M.S. 1:64 Bluenose I and the A.L. Bluenose II 1:75, and concluded that the A.L. kit has somewhat easier hull construction. The bulwarks are a single applied piece ... the build by Travis notes the slight bulkhead correction needed in one place, as well as the addition of a small triangular piece at the bow (later hidden by a larger piece of trim) that will better secure the bow joint of the bulwarks. This feature permits the application of correct sized stanchions along the interior of the bulwark where they need to go. I noted how Travis applied the thin fore keel during the planking process, and other helpful aspects of the build. The model is a good compromise size. The builder needs to download the instructions and there are no drawings. The M.S. kit makes a somewhat larger model (ergo larger case required later), and has planked bulwarks against extensions of the bulkheads. Many kits have it this way, and requires shaving to get the correct size of stanchions that will not stand out from added stanchions in between. The kit has better instructions and there are drawings, but the level of difficulty is somewhat higher overall. I decided to go with the A.L. kit (now in my stash) in conjunction with the Jensen book (to use as a guide - making up for the lack of information connected with the kit) for a future retirement project. There are smaller scales of Bluenose kits available that I wanted to avoid, since the 1:96 projects I have to finish get fiddly with correct sized rigging blocks, belaying pins, etc.
-
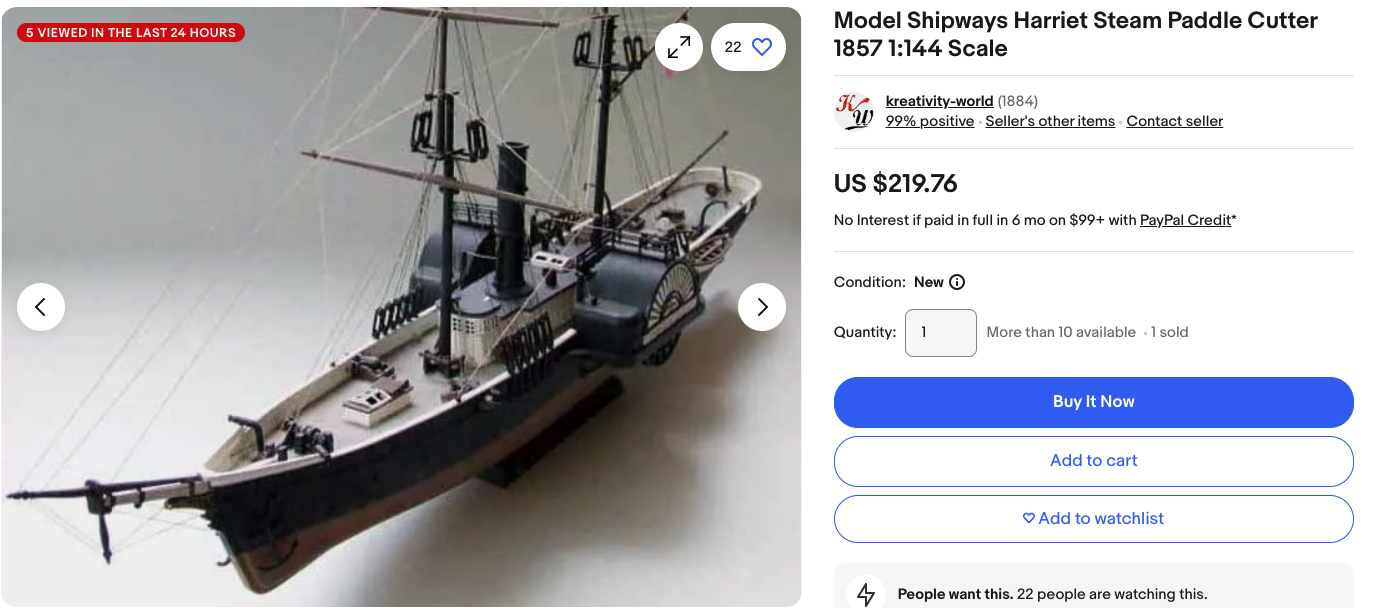
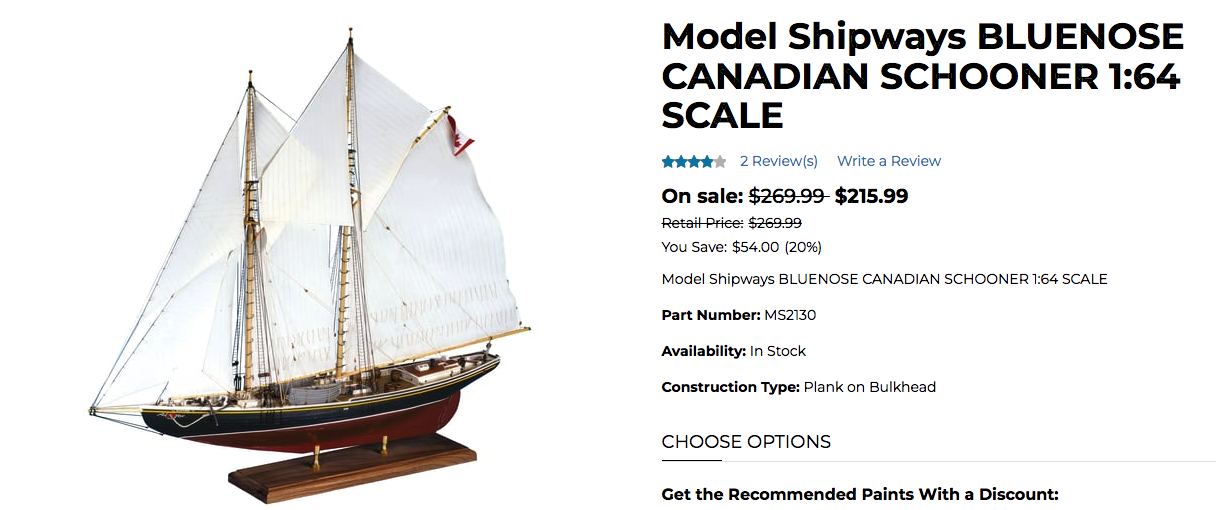
I've gone through the builds of the Harriet Lane available on two forums, and it has several things going for it ... an interesting transitional Coast Guard Cutter with both steam (side wheels) and sail - but not too much sail; there are guns - but not too many of them; a decent size model - but not too large; decent plans and instructions from Model Shipways - a well thought-of kit maker. The only oddity I've seen is that most builders find that the guns hit the top of the gunport (bottom of the gunwale) and tilt slightly downward. 'Not sure how this anomaly occurred, and the gun barrels have been verified as being to scale. The easiest 'fix' deals with the height of the gun carriages - and the bottoms can be sanded down (just run over sandpaper on a flat surface) before fixing the axles (with the notches for the axles deepened accordingly). That will lower the front of the gun carriages enough so that the gun barrels will point horizontally. Forewarned is forearmed, and other than this small fix, the kit look appropriate for your trajectory. Pricing and availability vary, but I attach a picture (below) of one on eBay just now. Another suggestion is Artesania Latina's Bluenose 2 1:75 (with caveat). They've simplified a number of details to make it appropriate for a fair spread of ability. The 'fix' is to get a copy of L.B.Jensen's hand drawn book "Bluenose II", which has everything needed to vastly improve the details and rigging from an 'out of the box' build, and you are capable of doing upgrades. OR, Model Shipways has a 1:64 Bluenose (original) ... slightly larger and of the original ship built in 1921. And the Jensen book has diagrams of that as well, plus the rigging is virtually identical. She's a schooner but (with the book to supplement instructions) you'll learn a lot about fore-and-aft rigging without having do deal with the well over 100+ lines of a clipper.
-
Wow, the water door appear to be simple plates (with a pair of small hinges at the top) with a low profile that simply close against openings in the steel bulwarks. Gravity keeps them closed, or nearly so, but a slight tilt of the hull will open them a little. No scuppers are seen (or needed), and a CS modeler can imitate them by gluing a thin square of material to the outside, with a rebate on the inside (square hole in the first planking layer) to represent the opening in the bulwark that the water door covers on the outside. Thermie had wooden bulwarks, so I suppose the rebate would deeper.
-
Very impressive - a veritable compendium of sources ... The most recent (and more easily accessible) are still those by Anderson Petersson and Underhill.
-
For warships from the mid 1700s to the 1850s, check out 'Rigging Period Ship Models' by Lennarth Peterson ... first published in 2000, and reprinted in 2011, 2014, 2016 and 2018 (so is likely still in print). After the introduction, every page is a generous line drawn illustration of some aspect of rigging (labels and terms in English) from the standing rigging on out through full sail. There are other diagrams for belaying points, etc. This is the clearest, concise guide I've yet seen, and indeed - one picture is worth a thousand words. The scale of detail is varied as needed to convey pretty much 'how to do it', and I suppose that many of the elements can be applied to non-military square rigged ships of that era. I dare say that if one were allowed only ONE reference book for rigging a ship in the subject period this would be the one I'd pick ... virtually no text, but they show you in pictures - thus suitable for non-English speakers (who can likely use a translation app on their smart phone for the labels). Samuel Clemens (aka Mark Twain) said to would-be writers, "Don't tell them, SHOW them."
-
Thats a cool lantern and a well built model ... Kudos!
-
I love the bead at the mast top ! ... something I'll copy later. Now you are embarking on the "other" half of building the model ... the rigging. Have you considered using scale rope? Several sizes and colors are easily available and can really make rigging look sharp (way less fuzz and realistic look). Some builders also run kit blocks a few seconds in a block sander to 'round' the sharp edges somewhat, as well as use a fine drill to be sure the through hole is clear for ease of rigging ... or consider Syren blocks as an upgrade.