

Gregory
-
Posts
3,168 -
Joined
-
Last visited
Content Type
Profiles
Forums
Gallery
Events
Everything posted by Gregory
-
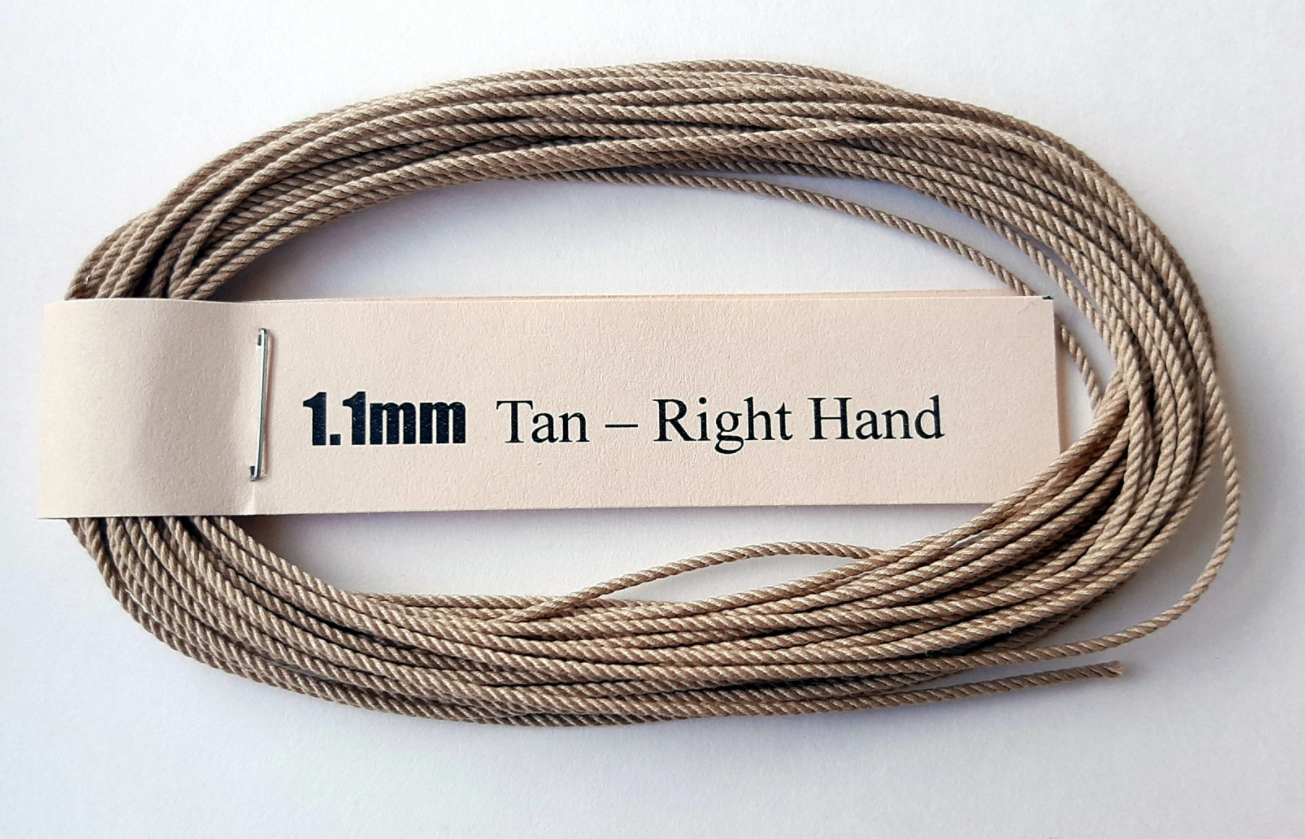
To take the discussion a bit further, archjofo makes rope from silk. It looks good, but I wouldn't know about overall performance.. There has also been discussion about linen but it seems to be relatively expensive and hard to source.. It was Chuck's preferred thread at one time, and I believe the go-to standard for museums..
-
 When I think boxwood these days, I'm thinking " Castelo " ...
 -
Thinking it's probably China.. I'm going to check it out.. Next day, free shipping..
-
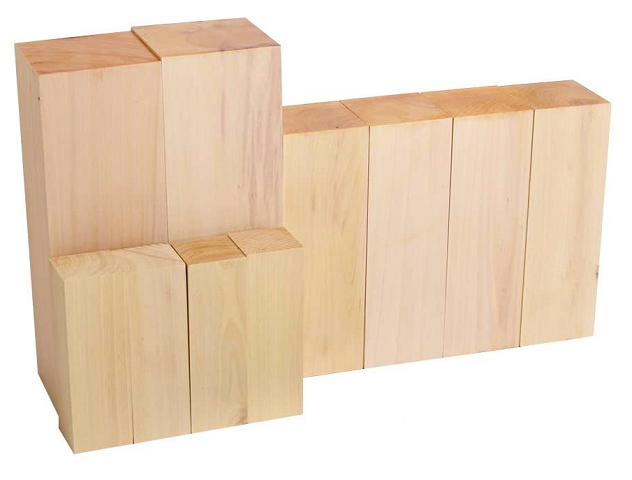
If this really is boxwood. is it a good price? The total is 12 pcs.The size of 2 large boxwood carving blocks is 2x2x6 in.The size of 4 medium blocks is 1.5x1.5x4.5 in.The size of 4 small wood blocks is 1x1x3 in. At Amazon $30
-
It's a matter of personal preference once you realize that model rope is what you want and not the stuff that usually comes in kits and looks pretty much like string, or thread. Here is some of BenD's rope.. The different types will behave differently as far as flexibility and their ability to retain moisture.. Nylon is probably not a good idea IMO as it is generally more rigid and glossy.. I have come to prefer polyester and make my own rigging line. Lot's of rope discussion here: https://modelshipworld.com/forum/82-discussions-about-rope-making/
-
I'll PM you..
-
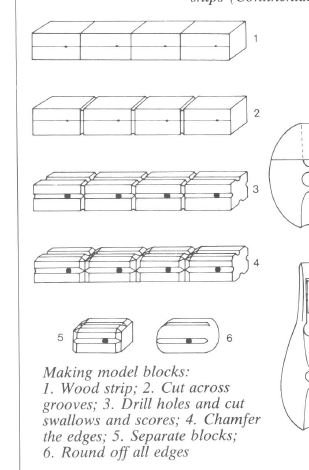
What is a few? What size? ( 3mm? ) Are you concerned about the blocks matching the ones you already have? I have a stash of typical kit blocks and I could possibly send you a few.. As far as cost, my time and trouble would be worth more than 10 bucks, but I have been known to help fellow modelers without expecting any more compensation than the knowledge they will pass it on should the opportunity present itself. With regard to Allan's suggestion, here is a simplified process for making your own blocks.. The quality would be superior to most kit provided blocks, and you would have a process to take forward in your modeling endeavors.
-
Sphinx would be a great preamble for Winchelsea..
-
Are you going to leave the hull un-painted? I think it will finish well with WOP..
-
That new molding looks exceptional!
-
How to seize a block to an iron band
Gregory replied to Laggard's topic in Masting, rigging and sails
Really nice technique.. I grabbed a snip for my reference and will post here.. Let me know if you would rather I not share, and i will delete the picture..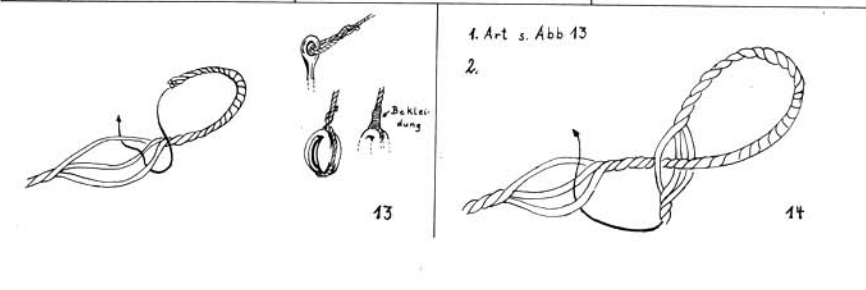
-
How to seize a block to an iron band
Gregory replied to Laggard's topic in Masting, rigging and sails
I'll Post an example in a little while.. -
How to seize a block to an iron band
Gregory replied to Laggard's topic in Masting, rigging and sails
What is the size of the block? -
How to seize a block to an iron band
Gregory replied to Laggard's topic in Masting, rigging and sails
Not to mention, " a picture is worth a thousand words ".. When people suggest something should be done a certain way, it doesn't mean much if they can't provide an adequate illustration of how it is accomplished, or at least a nice picture of the end product. Several such pictures are posted in page one of this topic. Those pictures can be saved and printed for future reference.. Search for " strop " or "stropping " in the forum, and you will get more information than you can deal with in a lifetime.. -
Isn't it always?😁 I am experimenting with making small moldings with a tabletop CNC, but still learning the software. I'll share when I have something.. Another option is to make your initial grooves with a (small ) table saw then round off the profile with files, sandpaper etc. You would not be starting with the final molding dimensions.. It would be strip or sheet wood, that you would cut from the stock once the rough shaping is done. I will try to put together a visual if you could share the profile and dimensions of your molding..
-
You have CNC skills.. Have you considered doing moldings with CNG?
-
They really look pretty good. We know the difference, but how close is your target audience going to be, and will they know the difference? I struggle over details that I know are important to me, but at some point I have to let it go..
-
I discovered BS when I ordered some ModelExpo branded CA to fill out an order to get free shipping. Discovered it was re-branded BS.. I use the medium and it is the best I have found.
-
This will be great practice for your Sphinx..
-
The rigging is exceptional, along with the rest of the build..
- 263 replies
-
- 1
-

-
- Medway Longboat
- Syren Ship Model Company
- (and 1 more)
-
Oops.. My bad.. I have the plans, but haven't built.. They call for 5 carronades per side ... You would have to ask Chuck why not 6.. I'm sure he was following some reference he has.. (I see chuck has spoken while i was composing )
-
Check the plans! They call for two long guns in the forward ports, but there is some debate about this.. I'll get you the discussion from the prototype build.. Discussion starts here:
-
How to seize a block to an iron band
Gregory replied to Laggard's topic in Masting, rigging and sails
Many of us started with plastic but became infatuated with wood model ships.. Enjoy the ride and learn as you go.. Don't get bogged down by the rivet counters.. I'm reminded of the cliché about asking someone for the time, and getting a lecture about how to make a watch..
