

Gregory
-
Posts
3,079 -
Joined
-
Last visited
Content Type
Profiles
Forums
Gallery
Events
Posts posted by Gregory
-
-
I see you answered your question, but keep in mind, you can do as much or little as you see fit.
While my decking would not survive a test of realistic accuracy, I got everything as close as I could within a mm or so, then used the waterway to fill any gap.
P.S.
Let me add one more thing.
When I glued my off the deck planking onto the false deck, I used yellow glue. I had to take few minutes of smoothing and pressure with my fingers until the glue started setting up,
which it did pretty fast - 5-10 minutes
-
You mentioned you have a kit.. Which kit?
Does it have a rigging plan?
-
-
You might consider planking the deck off the model on card stock, or your file folder stock.
I do it on tracing paper, but this is when there is a false deck in place.
-
Take a look in this index for Enterprise logs.
https://modelshipworld.com/applications/core/interface/file/attachment.php?id=644868
Consistent, rather than " various " scale lengths would be found most often and also look best..
Here is a pretty good example of some deck planking.
-
7 minutes ago, VTHokiEE said:
I apologize for all these minor updates,
Apologize? It's your log..😁
-
-
If you look in this index of logs, you will find about 20 for Lady Nelson.
https://modelshipworld.com/applications/core/interface/file/attachment.php?id=641465
Several of them are finished and should give you a lot of information to work with.
- mtaylor and Old Collingwood
-
 2
2
-
-
1 hour ago, shipman said:
Makes $0.99 for 20 look pathetic.
Not sure why you say that.. 920 hooks for 47 euro. & $56 US.. What is shipping?
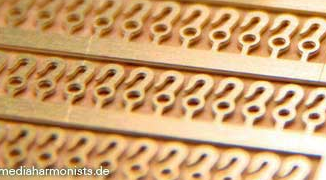
This is a snip from Dafi. Largest size is 2mm
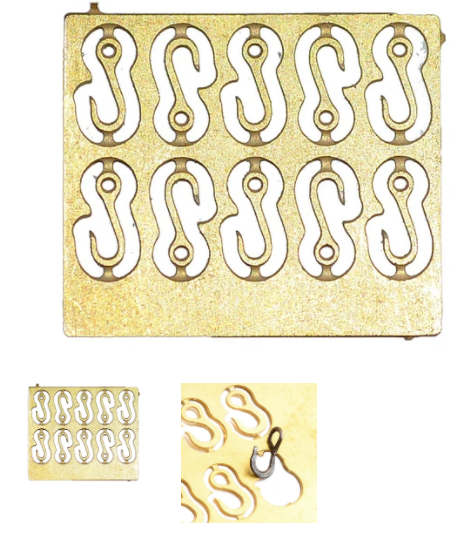
These from Crafty Sailor ( Falkonet )
The ones from Crafty Sailor look better IMO and are available in six sizes from 2mm to 5mm..
You can get 1,120 for $56..
I'm sure Dafi's are good stuff, and a better price if you count the eyebolts and don't need anything larger than 2mm, but maybe not the best option for the US.
-
My time is worth more than $.05 per hook.. 🙂
-
2 hours ago, mtdoramike said:
I don't see how they can make them for 99 cents.
But I'm hooked on both counts.
I stocked up on them a while back.
They look just like the picture, and the 2mm ones are as good as you could make at that size.
I think they will be great for ~1:48 cannon tackle.
-
Look nice, but not priced very competitively..
Check these out at one of our sponsors:
20 Pieces $0.99
- Archi, Wacom, Ryland Craze and 5 others
-
8
-
I'm rebooting this because I recently came across this five part documentary..
SS United States: Made in America
A nice walk down memory lane.
I remember seeing the Revell kit at the five and dime in the 50's... It's price, probably less than $5 at the time was way out of my budget..
- Ryland Craze, lmagna and mtaylor
-
3
-
-
I believe it's common to do as much as possible off the boat ..
Of course, shrouds and stays will be done on the boat, having attached as much related hardware, blocks, eyebolts etc. before mounting the masts.
Most of the rigging for the yards can be done off the boat..
There are many good examples in the build logs.
- mtaylor and Jorge Hedges
-
2
-
FWIW, I like the AYC ...
- FrankWouts and Rustyj
-
2
-
I apologize. Just realized my link to Tower Hobby shows back-ordered..
How about this:
It could be refined a little bit, but this was about a 10 minute effort with my Proxxon FET, a little filing and sanding.
- BobG, GrandpaPhil, mtaylor and 1 other
-
4
-
-
-
On 8/19/2020 at 8:16 PM, Sheerline said:
Would it be better to buy sheet and spile them or would that make them look a bit wide compared to the rest?
Very nice work so far!
Spiling might be something to consider at this point if you feel up to it..
Have you looked at Chuck's bending techniques?
For the stern just a small increase in width at the stern post for most of the planks is hardly noticeable, as seen here for Chuck's Cheerful. It would only require slightly wider strips, tapered from the stern forward to midship.
For the bow, you might consider a drop plank. There is only one on Cheerful.
Whatever you decide, it will be good experience for you.
-
46 minutes ago, Edwardkenway said:
Unfortunately I don't have a Byrnes saw, but will be using a Proxxon fe
Edward,
I recently replaced my old microlux with an FET.
I'm still getting familiar with it, but all of Glenn's tips work as well with the FET.
I haven't determined if there is increased clearance at the rear of the fence, but it should be easy to make that happen.
The micrometer-like fence adjustment on the FET is very precise and allows for making fractional mm adjustments.
Hopefully you will be able to get a fine tooth .030 or 0.20 kerf blade for plank ripping. The included carbide blade is good, but wasteful..
- Canute, Ryland Craze, Edwardkenway and 1 other
-
4
-
Looking at their instructions I linked to above, it doesn't look like a kit I am familiar with..
It may be a re-packaged Constructo kit.
It's definitely their own plans.
It looks like the 1927 configration.. The actual plans for the 1927 restoration are available.
-
Topsail schooner sail plans and rigging
in Masting, rigging and sails
Posted
Now, if you would kindly show all the lines and their belaying points...😁