allanyed
-
Posts
8,071 -
Joined
-
Last visited
Content Type
Profiles
Forums
Gallery
Events
Everything posted by allanyed
-
 Old Salt, Great idea. If the builder wants to end up with an Admiralty style model without rigging it will save some money in not paying for materials that will not be used. By the same token they can order the rigging set later or get/make their own blocks, rope, &c. as some bulders like to do. Nothing wrong with having choices and it seems to work for Syren. Allan
 -
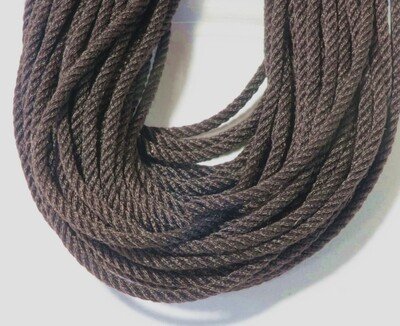
Dave, I am with the replace everything you can if it is not right crowd. Be picky though, some things may be fixable or good as they are. I assume you are referring to Chuck Passaro's Syren Ship Model Company. Regarding rope, as you are no doubt aware, for standing rigging 18th century ships were most often coated with Stockholm or similar pine tar thus dark brown, not "road" tar black like seen in some kits. Chuck provides it in this color as well as typical tans for running rigging. There is a long thread here at MSW from 2017 on the subject of standing rigging color and coatings. https://modelshipworld.com/topic/15655-stockholm-tar/ As to blocks, many members replace kit blocks with more realistic looking ones for obvious reasons, but as normal it is your choice. As explained above cost is always a concern for the kit maker as well as the end customer, as it should be, so the decision to spend extra money comes down to the individual's desires and budget. Below is the color of Syren's great looking rope.
-
Welcome from another Florida member!! Allan
-
Totally understood. There are great videos out there and lots of discussion here at MSW by those that have tried and succeeded so you are in good hands when you decide to give it a try. Allan
- 476 replies
-
- 2
-

-
- sphinx
- vanguard models
- (and 1 more)
-
Glenn, serving the shrouds at the bight or for the entire length of the foremost shroud is very easy. A simple serving machine helps but it is not so difficult to do by hand. Syren makes a nice unit and alternatively it is not so difficult to make one with a few simple gears and scrap wood. I would think that if no kit maker currently explains or shows these servings, one of them will see it as an opportunity to improve the product and beat the competition. Allan
-
Glad to help Lyle. We're all here to help each other as best we can. After serious ship modeling for near 50 years I still have questions and seek advice with great responses from members here when I cannot find it on my own. Unfortunately sometimes questioning and/or advice are not well received, especially by some kit designers when you point out an obvious error, even when it would be easy for them to correct it. Looking forward to your next installment. Allan
-
Druxey When you say very thin paper, are you speaking of tissue as gift box stuffing or something else? Do you think silk span would be too thick? Thanks Allan
-
I would look at contemporary models of most any ship as well as the Victory as she stands today. While today she is still a wealth of information, with the many rebuilds there are likely differences between what she looked like in 1805 and in the 21st century. Maybe the stop on the top sill rather than the bottom sill is one of those things. Always a good idea to do some research on every part before installing it. As you no doubt know, there are thousands of photos of contemporary models on the RMG website to name just one source with multiple views of each vessel that are often very helpful. One other example that I would question is that she has her name on the stern today which she (as well as the rest of RN) did not have before 1780 or after 1790 by order of the Admiralty. I have seen exceptions on contemporary models but this might have been the model builder's idea depending on the purpose of the model presentation. Allan
-
Good points gentlemen. As with any model, the builder can do as they please even if it is non-conventional. My apologies for bringing it up, just thought it might have been of interest to some folks. Allan
- 473 replies
-
- 2
-
-
- Indefatigable
- Vanguard Models
- (and 1 more)
-
The kit looks great! Where do the curved name pieces go? By the shape I am guessing the stern. By order of the Admiralty names were not permitted on the sterns before 1780 or after 1790 and well into the 18th century. We have seen exceptions but the only two contemporary paintings I could find of her do not have the name on the stern that I can see so I am assuming (I know, that is not usually a smart thing to do) that in 1794 there should be no name. https://www.rmg.co.uk/collections/objects/rmgc-object-109649 is one example. Allan
- 473 replies
-
- 2
-
-
- Indefatigable
- Vanguard Models
- (and 1 more)
-
Work Table Recommendations ?
allanyed replied to DanB's topic in Modeling tools and Workshop Equipment
As has been said, space is the determining factor. I have a deep garage where we opted for a two deep car space on one side rather than a third bedroom. (Too many bedrooms invites company to stay too long 😀} In that relatively small space I have a home made table, a six foot desk table from an office that was replacing furniture and throwing out some desks, and my favorite, a heavy bench that my grandfather bought about the time my dad was born in 1919. t still has the wooden screws for the wooden vices and probably 1/8" thick layer of shellac and such. My favorite story with "Didi" was when he was doing some antique restoration work for Joe and Rose Kennedy and got to meet them at their home in West Palm Beach. Now if I can only get someone like that as a client!!! Go with whatever fits, you cannot have too many work surfaces. Clutter??? In my case, somewhat perpetual unless another model builder or potential buyer is coming buy. I have seen one relatively small space that was as organized and clean as a hospital operating room though and absolutely over the top superior models coming from it. I will not mention any name (Druxey) .....oops, did not mean to Iet that slip. Allan -
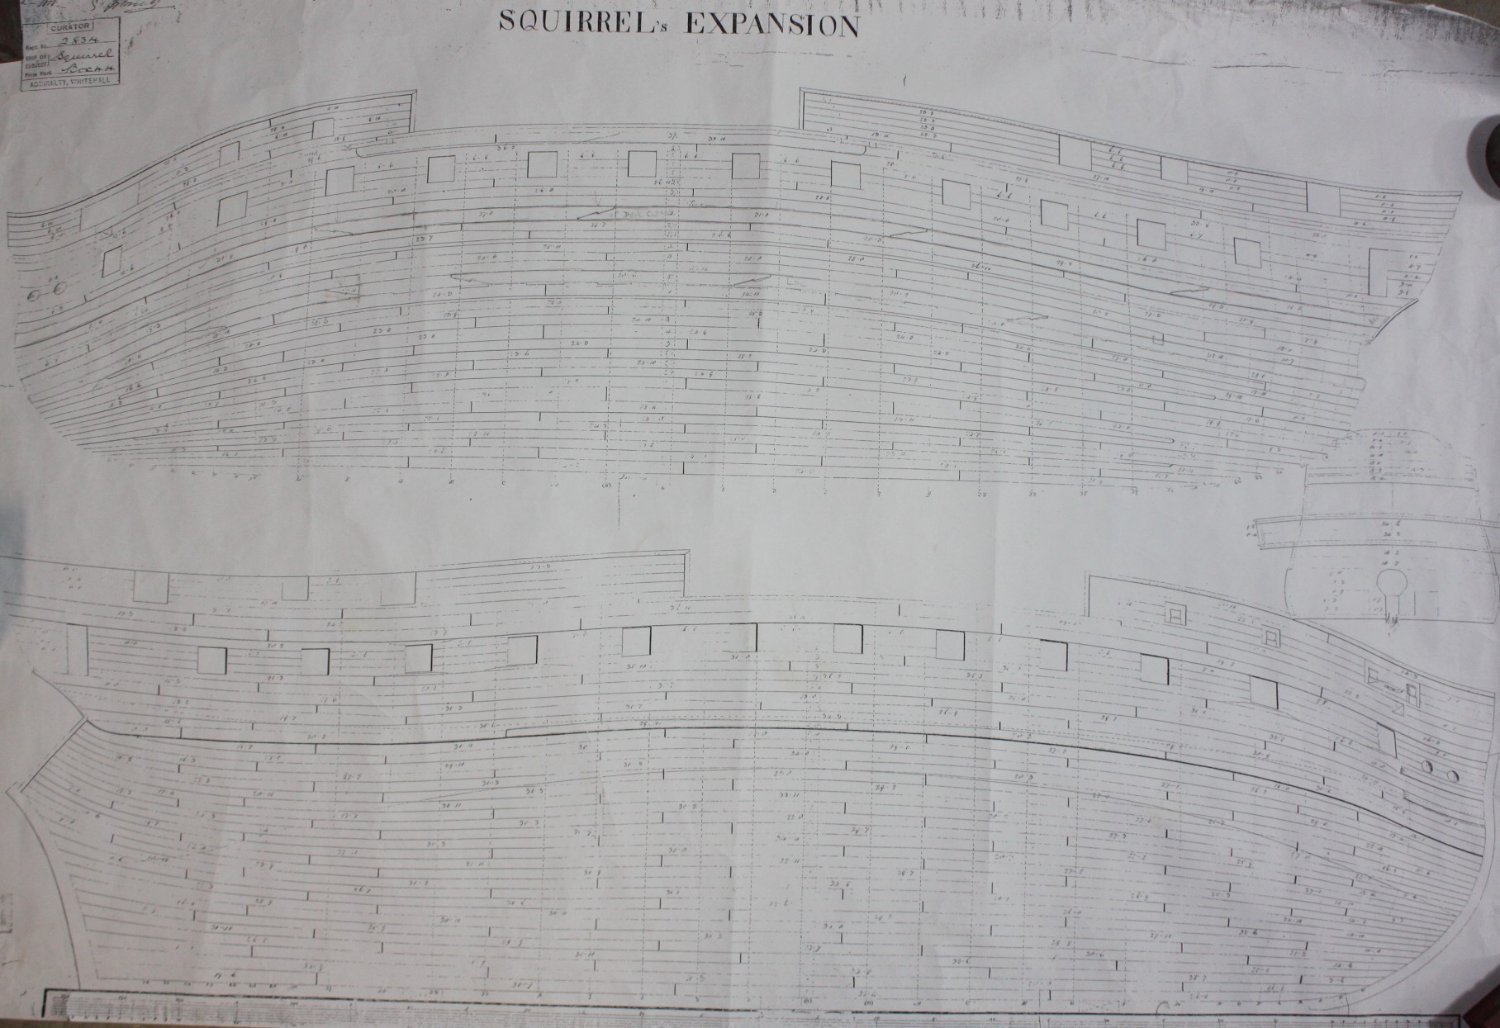
Clementine, You may want to consider removing the planking below the wales before going further then study the great tutorials in the articles data base on how to plank a hull here at MSW https://thenrg.org/resource/articles and Chuck Passaro's four part video on planking (modelshipworld.com/topic/22975-chuck-passaros-planking-videos-where-are-they) I know it easy to say remove the planks and not so easy to do, but what you have done is going to have planks coming to a point and not reaching the rabbet as they should. They are sweeping up like on a Viking ship. Look at some planking expansion drawings as well and you will see every plank lands on the rabbet at both ends. In the drawing below the lower drawing is the outboard planking, the upper the inboard. On the other hand, if you are happy with it as it is, go for it 😀 Allan
-
Hi Glenn, Based on your build I find this kit to be interesting and well thought out with some nice attention to detail. Does the kit supply the rigging line and does it explain about the foremost shrouds being served for their entire length to protect them from chafing? Many thanks for sharing your build with us. Allan
- 476 replies
-
- 2
-
-
- sphinx
- vanguard models
- (and 1 more)
-
As ships in the 17th, 18th and into the 19th century had capstans that were made of wood I "wood" go that route for a 15th century ship. I would not assume accuracy on replicas of any ship that are not based on contemporary plans or paintings for information. Unfortunately I do not believe there is such contemporary information available specifically for the Nina. Allan
-
MONTAÑES by Amalio
allanyed replied to Amalio's topic in - Build logs for subjects built 1751 - 1800
Your photography is to be as greatly admired as your woodworking. Beautiful Allan -
Hi Starlight There is a detailed drawing on how the strakes of the main wale end on the Fly and other Swan class vessels on page 17 of the Fully Framed Model series volume 2. You can also see some detail if you research some the many photos of contemporary models on the RMG site. One model that has a number of photos including a stern view is at https://www.rmg.co.uk/collections/objects/rmgc-object-66422 There are hundreds more. There are also Swan class drawings on the RMG site as well that may help. One includes https://www.rmg.co.uk/collections/objects/rmgc-object-84445 Regarding the tapering the thickness of the wale at the bow, once you add the missing two strakes to complete the main wale a sharp chisel makes this a very easy process followed by a little work with a sanding stick. It looks intimidating but really is not at all difficult. Hope this helps. Allan
-
Robert, your work continues to be very impressive and offers some great lessons and should be an inspiration to others wanting to build Victory. In that vein, one thing to keep in mind for the future is that there were normally three port stops rather than four in the gun ports. One on each side and one on the bottom sill, but none on the top sill. I looked at a good number of photos of contemporary models at the RMG website, at the Preble Hall Rogers collection, and in the Kriegstein collection and Anderson books and so far I could not find any with stops on the upper sills. There is a detailed explanation on these in volume II of The Fully Framed Model books. Allan
-
Questions Before I Buy My First Ship
allanyed replied to Magarkus's topic in New member Introductions
Magarkus WELCOME TO MSW!! It great to see another "youngster" join this motley crew of oldsters. I second and third the recommendations above for the David Antscherl designed shipwright series. https://modelexpo-online.com/Model-Shipways-Shipwright-Series_c_815.html After learning many very important basics with one or more of these beautiful models, if you are interested in a realistic looking larger vessel that is a more complex project, Vanguard has a good reputation for your next builds. Pay heed to what Chris posted about Albatros. Basic hobby tools are pretty much all you need for the shipwright series. You will then see what additional tools you want to add to your bench. Be aware, tool acquisition can be very addictive. Look at the various build logs here at MSW and study the tutorials. (https://thenrg.org/resource/articles) Allan -
Techtonic, Totally understood and thank you for the warning by pointing out another example of poor quality materials from this kit maker. Allan
-
I totally understand Glenn. I was not questioning your preference but rather whether any member has any information based on contemporary sources on actual practice of the dark brown color of tarred rope on the seizings on the shrouds or other standing rigging for that matter. Many thanks! Allan
- 476 replies
-
- 2
-
-
- sphinx
- vanguard models
- (and 1 more)
-
Lovely build Glenn, Your photos bring up a question for which I have no answer at all. The seizings on the shrouds in the photos are untarred. Was this the standard at that time or were the seizings tarred? The lanyard was running, so untarred, but would the seizings be considered standing rigging and thus tarred? Looking at several dozen contemporary models at Preble Hall and some at RMG the seizings of all tarred shrouds are tarred. Then again there are models in both Preble and RMG where the shrouds do not look to be tarred and the seizing are the same color as these shrouds. Allan
- 476 replies
-
- 2
-
-
- sphinx
- vanguard models
- (and 1 more)
-
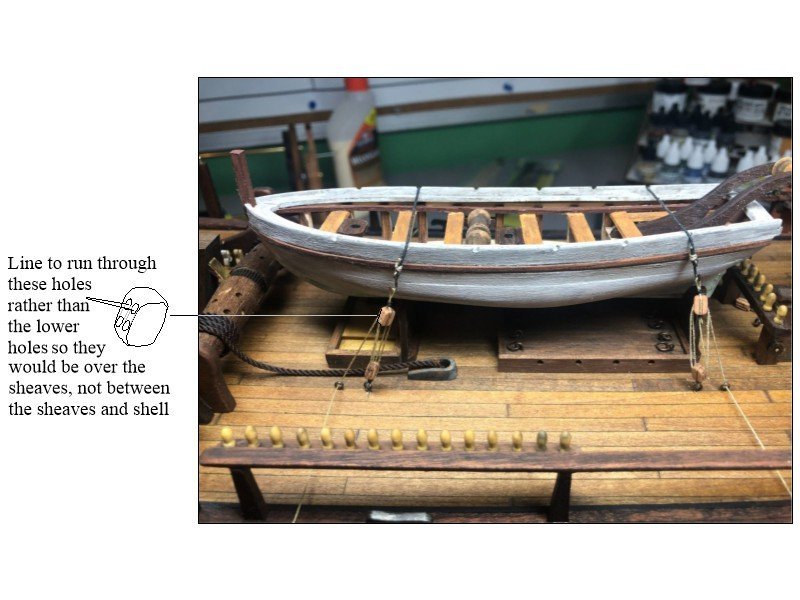
Yes they should if you want to. The line will cover where the other holes would be so not very noticeable. The first sketch shows where there would be a sheave if it were a full sized block and where the line passes through the block. The second sketch shows how you have some of the lines going. Hope this makes sense and helps Allan

-
It is super to see a build with references from RMG to compare to the modern drawings which appear to be accurate as well. Looking forward to your future entries. Allan
-
I respectfully disagree with Techtonic regarding glue. First, to many members "quicker" is an oxymoron to shipmodeling. If speed is a criteria, ship modeling is not a good hobby to pursue. From an article by the Oakwood Veneer Company. Using contact cement to adhere raw wood is a complete failure waiting to happen for numerous reasons. Do not do it. Contact cement is more suited for use with synthetic laminates, like Formica. It is best to use a two-part resin or PVA glue adhesive when working with raw wood. For me, epoxy resin is over the top for wood to wood, but PVA has a long track record for use with wood. If the planking is spiled or otherwise tapered and shaped, finger pressure on the plank with PVA for 30 seconds will work. If the plank is being slightly forced into place, PVA and a clamp of some sort for a few minutes will work. If a lot of force is necessary, the plank has is not properly shaped. Depending on what is important to you, study the planking tutorials here at MSW that will yield beautifully laid planking where every plank ends at the rabbet as they should, not coming to a point short of the rabbet. Allan
-
One small comment for the future. The holes in the blocks should be reverse of what you show in a couple places. Picture and a 1000 words, etc. below