dvm27
-
Posts
2,468 -
Joined
-
Last visited
Content Type
Profiles
Forums
Gallery
Events
Everything posted by dvm27
-
 Thanks for the master class in machining. May I inquire as to your source for the very smallest end mills you use? I'm curious what the smallest size end mill may be used on brass without breaking or severe deflection.
 -
Don't forget to check out the beautiful Fair American model at the USNA which served as the basis for the Model Shipways version as well as Clay Feldman's book on scratch building the FA.
-
Well thank you Kevin but all the credit goes to Denis (Herask). I never dreamed that he could do what he did when I contacted him years ago! Thanks all for your order. I am overwhelmed by the response. It will take me a couple of weeks to produce all these thumb drives but I will get them out as soon as I can.
- 18 replies
-
- 11
-

-
Correct. It all starts with the plans. SeaWatch Books now carries the plans we used to sell. They include the shear, body and half breath along with all the lofted frames. This will build you a generic Swan class model. There are differences between ships in the class and the NMM plans show these differences. Theoretically if you wanted to build Pegasus you get by with just the SeaWatch plans and the books. But the new 3D product will make the build 1000 times easier. More information on the build and wood required is available on our website www.admiraltymodels.com. You van email me at dvm27@comcast.net if you have any other questions. Greg
-
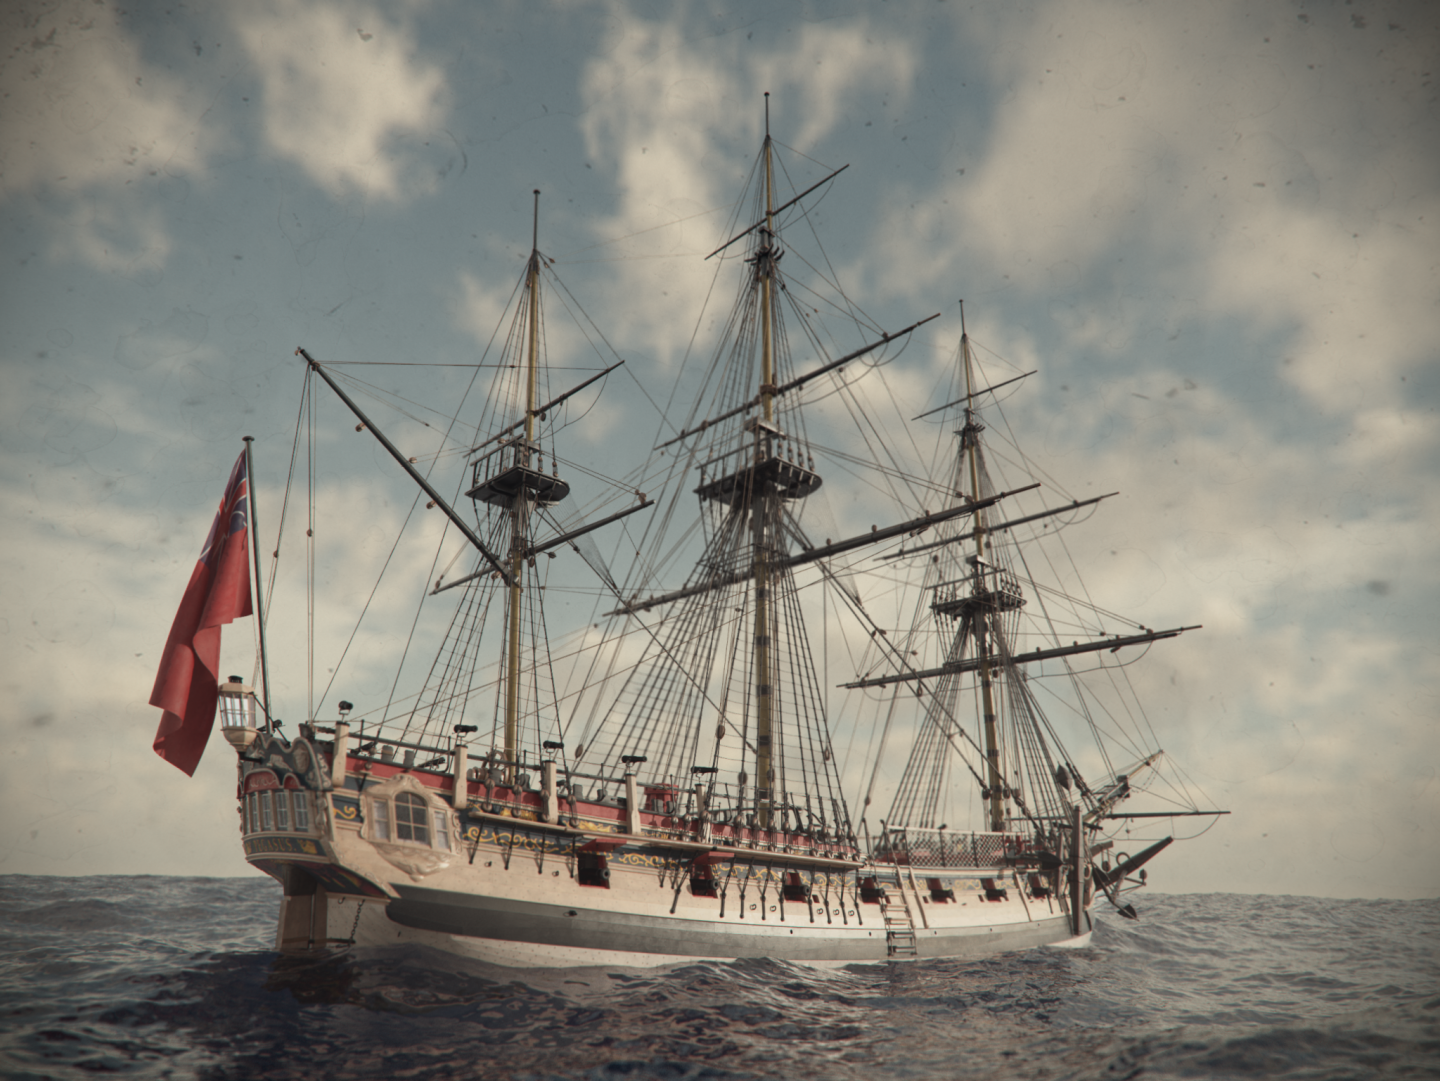
After many years in the making, our Swan class 3D model developed by Denis based on The Fully Framed Model series by David Antscherl and Greg Herbert is finally available. Provided on a thumb drive, we are now able to provide 13 GB of amazing high resolution 3D renderings including the following: Every chapter of Volumes 1-4, The Fully Framed Model, HMN Swan Class Sloops 1767-1780 is covered in meticulous detail, covering every aspect of the build. Also included: 3D video tours of the fully framed model and the completed, rigged model (including interior tours) Superimposed framing on completed model Video tutorial of Dennis's frame making techniques (just a taste - not a full instructional as that would be a CD in itself) If you are building or contemplating building a fully framed model or are just interested in the way a in a British navy vessel, c. 1770, was actually constructed then you will enjoy this product. If you enjoy The Anatomy of a Ship series but wish more detail was included this will be of great interest to you. To my knowledge this is the most complete study of a contemporary ship to date. The volume of work is too large to publish in a book thus the renderings are provided on a thumb drive. Cost of the entire compilation is $48 including postage US. Overseas customers $53. Payment via Paypal. Please direct all enquiries to dvm27@comcast.net.

- 18 replies
-
- 24
-
-
Glazing
dvm27 replied to Kurt Johnson's topic in Discussion for a Ship's Deck Furniture, Guns, boats and other Fittings
I have never had luck cutting these cover slips to shape to shape. Even took them to a stained glass shop and frustrated the heck out of them. Mica, on the other hand is quite easy to work with and is easily cut. -
Bravo, Ben! Just one of the many ways to make your version unique.
- 399 replies
-
- 5
-
-
- winchelsea
- Syren Ship Model Company
- (and 1 more)
-
Thin hull planking
dvm27 replied to Gerarddm's topic in Building, Framing, Planking and plating a ships hull and deck
Some of the Russian ship model "Masters" use boxwood and ebony veneer for their 1:48 models. But they use ply interior construction so have a very broad surface for plank adhesion. -
Echo by davec - FINISHED - cross-section
dvm27 replied to davec's topic in - Build logs for subjects built 1751 - 1800
These are the best looking I've seen: http://www.propblur.com/store/p80/RigH1.html. I ordered some of the smaller size. I would just bend the round part 90 degrees to the hook. Morope does look great but handles very poorly. Chuck's line of rope is fantastic. -
It's inspiring to see the level of detail you include in work that is essentially hidden. Imagine the delight of some distant heir cleaning the model in 100 years and discovering that the hinges actually work and what is inside. Perhaps the perfect place to secrete a hidden message? Happy New Year Micheal. We all look forward to your updates!
-
Swan class 3D model in progress
dvm27 replied to dvm27's topic in CAD and 3D Modelling/Drafting Plans with Software
Thanks Mark. The work has been finished. I just need to sort out the easiest way to get the enormous data files to those wishing to purchase them. It will include some kick-*** videos as well! The complete works should be available in January. In the meantime here are a couple of photos of the model on the open seas.
- 141 replies
-
- 32
-
-

-
- pof swan series
- swan
- (and 1 more)
-
HMS FLY by cafmodel - 1/48
dvm27 replied to cafmodel's topic in - Build logs for subjects built 1751 - 1800
Not very obvious at all! But those diminishing futtocks, along with the shifted and cast toptimbers make this sort of modelling both fun and challenging (midships photo of my Swan class Pegasus attached). I wouldn't include them in any scale smaller that 1:48 though as I don't think the human eye could pick out the 1" differences in width. Happy New Year, CAF (don't know your name). I very much enjoy your innovative work in ship model kits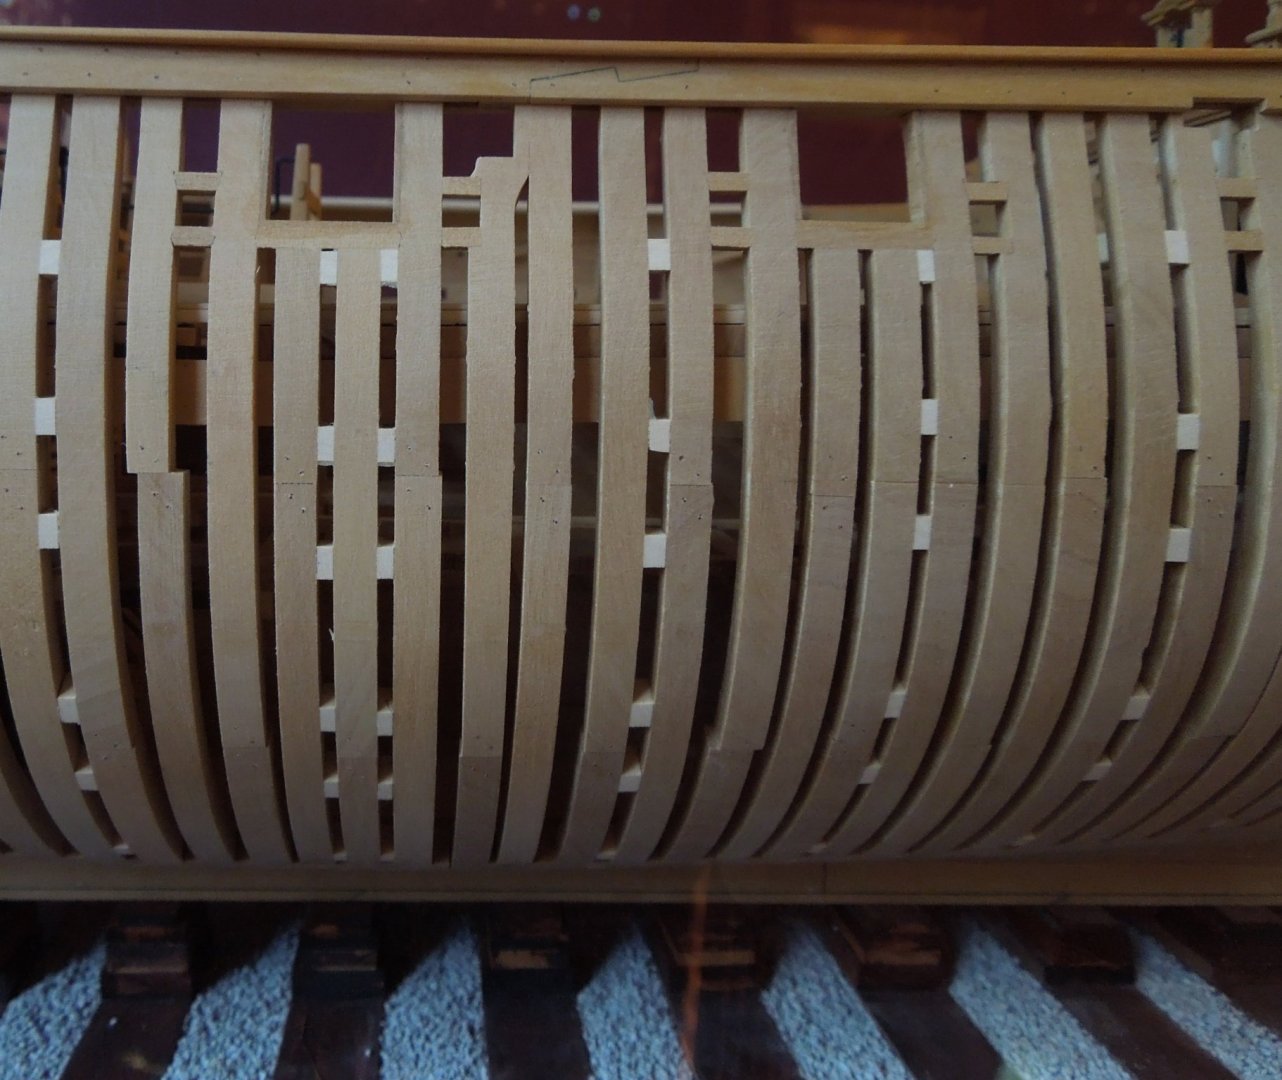
- 59 replies
-
- 12
-
-
Echo by davec - FINISHED - cross-section
dvm27 replied to davec's topic in - Build logs for subjects built 1751 - 1800
Lovely work Dave. Can you imagine repeating it for anything larger than a sixth rate? Fully agree with you about Kudin’s videos. They’re a treasure. -
I hope you had the Model Shipwright indexes when you did this! The published two over the years.
-
HMS ROYAL KATHERINE 1664 by Doris - 1/55 - CARD
dvm27 replied to DORIS's topic in - Build logs for subjects built 1501 - 1750
Thank you for the early Christmas present, Doris! We'll all be happy with just periodic updates. No need to add time-consuming captions. I'm amused by the main shroud going into the seat-of-ease. Must have been crowded in there!- 1,035 replies
-
- 5
-
-
- royal katherine
- ship of the line
- (and 1 more)
-
Great start on your model Chris. As a Midshipmen I'm sure you were inspired by the incredible Robert Cook model in the Naval Academy Museum. A nice history of the ship and photos of both models may be viewed in an article by naval historian Grant Walker at https://www.usna.edu/Users/oceano/pguth/website/shipwrecks/sailing_ships/Construction_lecture.htm.
-
Welcome aboard Tom. I just placed an order for your finger planes. Great carvings as well!
-
Damn, Chuck, those volute scrolls are as nice as any I've seen on contemporary models. I think you've got this laser printing thing down pat! I wonder if you'll be able to do complex moldings like the main rail when you get to the bow. It's difficult even with scrapers.
- 1,784 replies
-
- 4
-
-
- winchelsea
- Syren Ship Model Company
- (and 1 more)
-
That's a lovely model, Toni and I love the details of the launching cradle. I look forward to your approach to clinker style planking
-
HMS ROYAL KATHERINE 1664 by Doris - 1/55 - CARD
dvm27 replied to DORIS's topic in - Build logs for subjects built 1501 - 1750
I believe Chris is correct. Our Doris is quite famous worldwide. There are so many ship model forums throughout the world with unbelievably talented model makers. Doris can't possibly post to them all!- 1,035 replies
-
- 5
-
-
- royal katherine
- ship of the line
- (and 1 more)
-
HMS ROYAL KATHERINE 1664 by Doris - 1/55 - CARD
dvm27 replied to DORIS's topic in - Build logs for subjects built 1501 - 1750
It's been awhile since we've had an update from Doris. If anyone follows her on a different forum please send her a PM saying we miss her!- 1,035 replies
-
- 10
-
-
- royal katherine
- ship of the line
- (and 1 more)
-
Personally, I like the Minerva look of the natural shingles. The painted version clashes a bit with the background frieze color in my opinion while the natural shingles complement the lower finishing piece. But you know what they say about opinions... Have a great time in New Orleans. You may more closely resemble that Chuck figurine after a few days of Louisiana cuisine!
- 1,784 replies
-
- 3
-
-
- winchelsea
- Syren Ship Model Company
- (and 1 more)
-
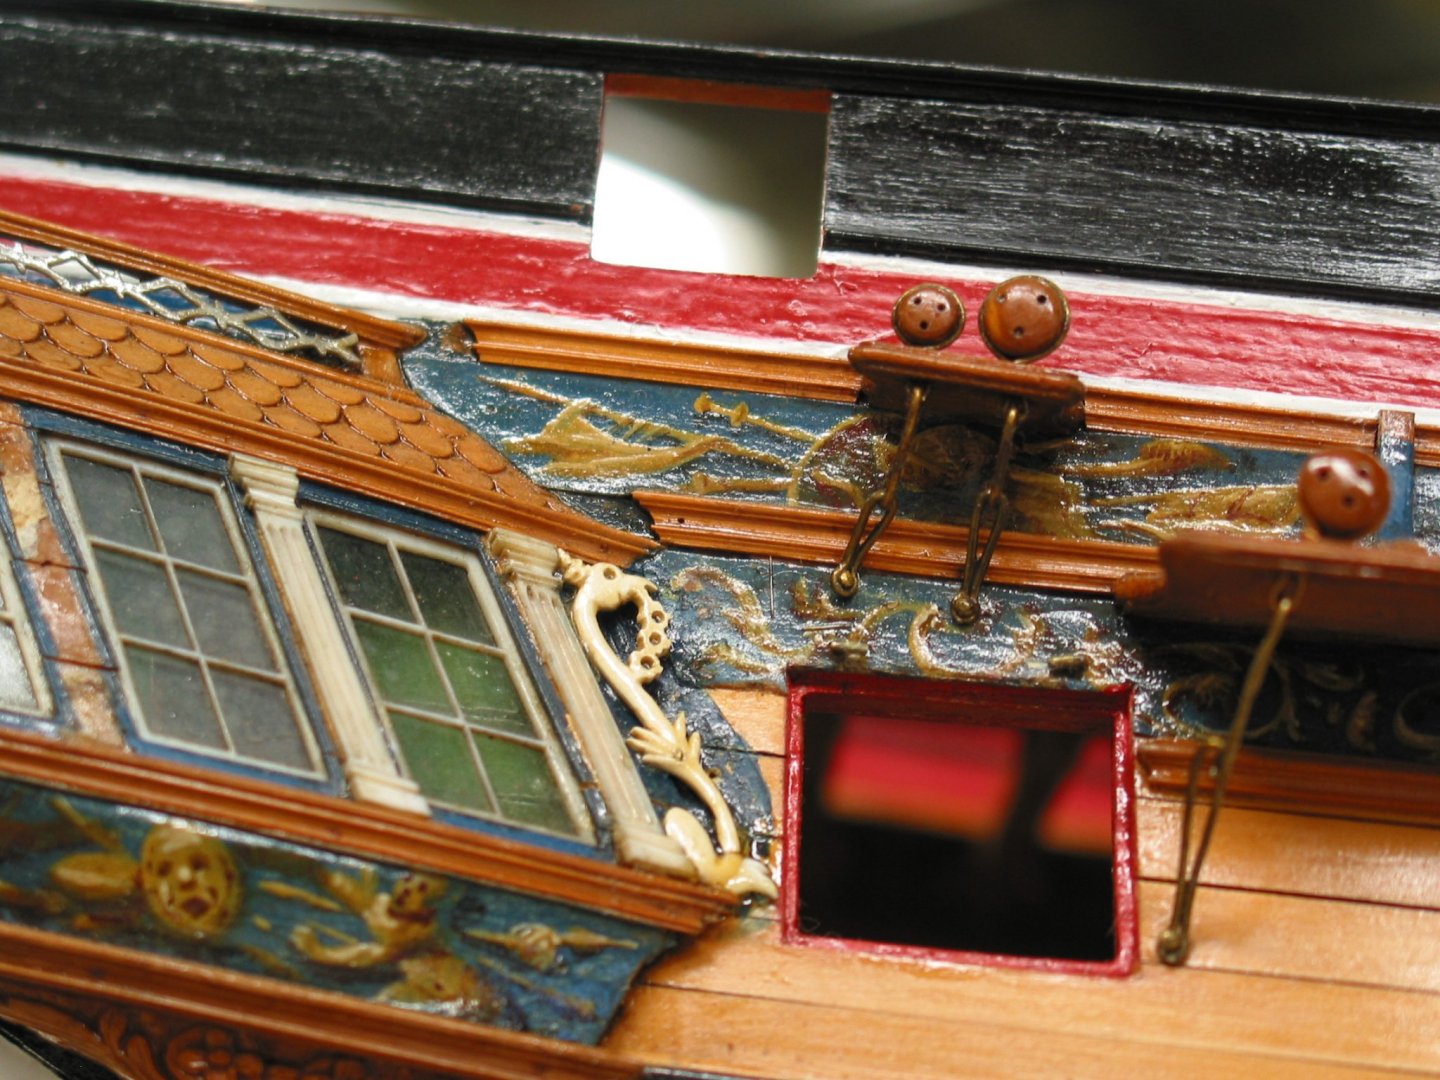
Here's another view of that area. Grant Walker gave me a CD of hi-res photos of the model. Note the crazy lime green color of the interior. I also note the molding ends are beautifully shaped to reflect the profile. I wonder if they were left short intentionally or an upper carving might have been lost? I've seen contemporary models with the blue frieze, slate gray shingles, white fluted columns and red windows (matching the port linings). It's a striking combination! So many choices...
- 1,784 replies
-
- 13
-
-
- winchelsea
- Syren Ship Model Company
- (and 1 more)
-
Sherline 5400 versus Micro Mark Milling machines
dvm27 replied to allanyed's topic in Modeling tools and Workshop Equipment
I have used it Mike. But I found it difficult to use with a tapered round as most masts are. Just to much work to keep adjusting the holders to the different widths. In addition, the diameter of some spars was smaller than the smallest retaining diameter of the steady rest. I have had success using my gloved finger as a steady rest. It follows the opposite side of the piece, applying steady pressure during the cutting operation. Takes some practice to prevent over deflection but it's really not too difficult. But I have gone through a couple cheap pairs of work gloves! My current model Speedwell has some challenging masts. The main mast starts as a tapering octagonal, proceeds to tapering round then ends up square at the mastheads. Not a shape readily amenable to the lathe.