dvm27
-
Posts
2,468 -
Joined
-
Last visited
Content Type
Profiles
Forums
Gallery
Events
Everything posted by dvm27
-

Sherline 5400 versus Micro Mark Milling machines
dvm27 replied to allanyed's topic in Modeling tools and Workshop Equipment
Nobody loves the Sherline lathe more than me but for masts and spars I believe it's easier and more accurate to do them the old fashioned way. Most masts and yards on naval vessels were not round over their entire length (octagonal yard centers and square mastheads). Besides, the problem of deflection is significant especially over a long fitting like the lower mast. Starting with square stock then proceeding to octagonal then round is simple, fast and fun. The process is well described in David Antscherl's Vol. 4 of The Fully Framed Model. -
Not 100% sure I understand the entire process but you have excellent jewelry skills in addition to your woodworking abilities. I especially appreciated the hi-resolution video on a large screen television.
-
Proxxon Planer DH40 Issue
dvm27 replied to ChrisLBren's topic in Modeling tools and Workshop Equipment
Happy to hear that, Chris. Mine leaves a perfectly smooth surface, finer than the 180 grit papered disc sander. See if you et the same result on another hardwood. -
Proxxon Planer DH40 Issue
dvm27 replied to ChrisLBren's topic in Modeling tools and Workshop Equipment
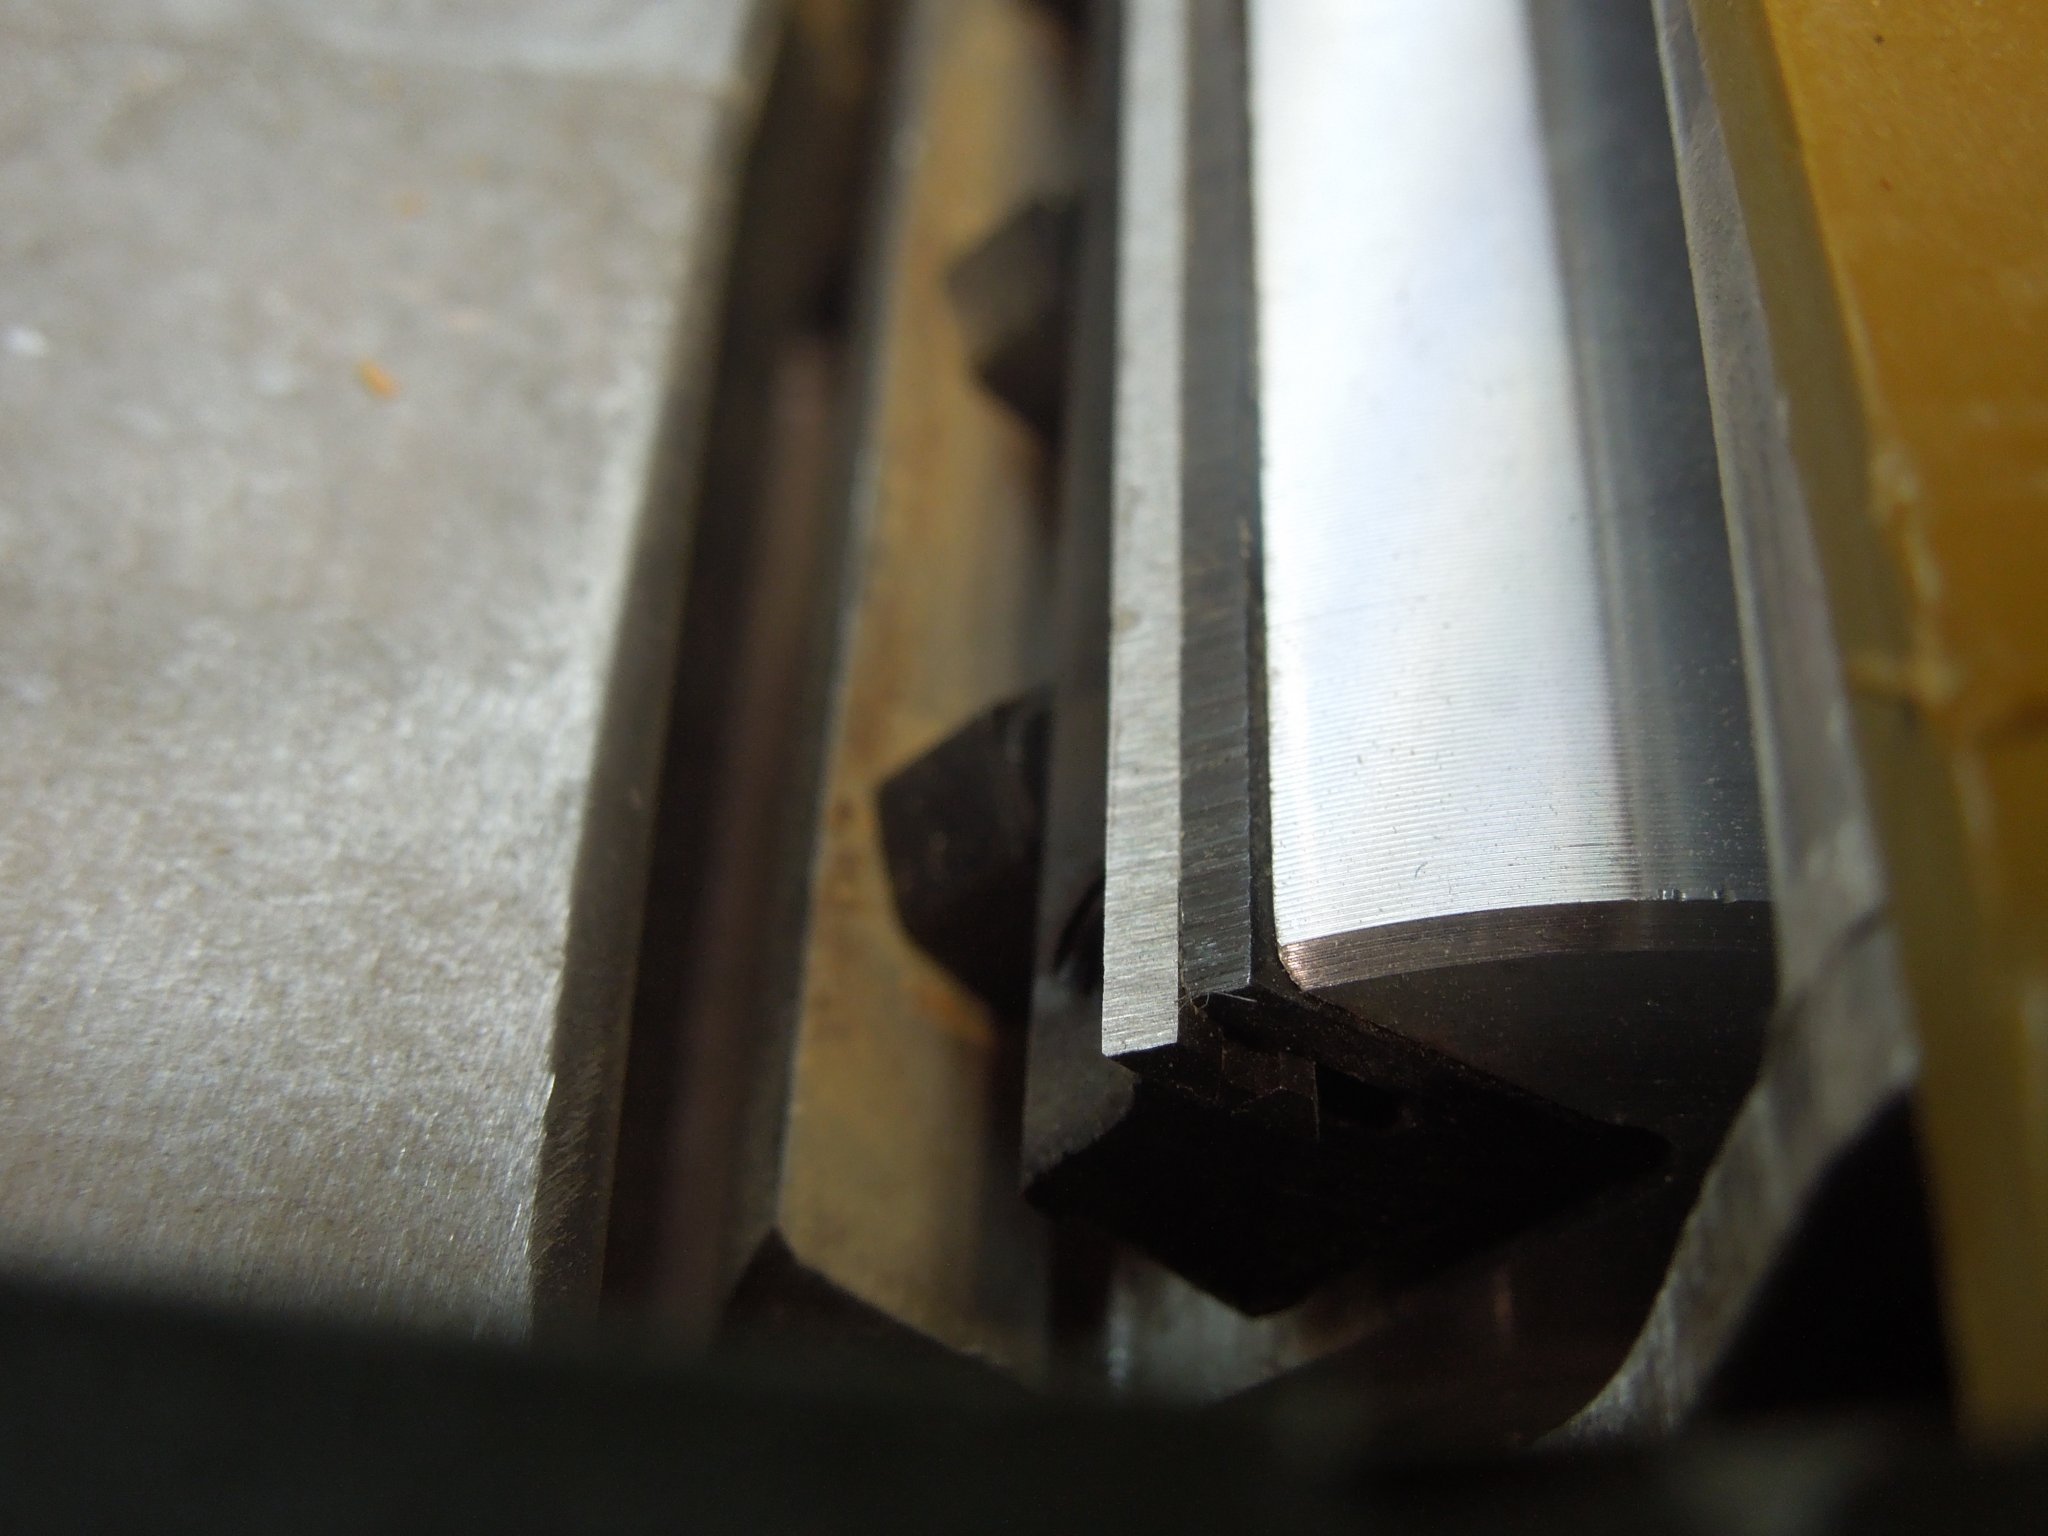
Chris, the cutting edge of the blade should be flush with the fore edge of the piece holding it in place. Should be a continuous angle from edge of cutter to holder. Photo should make it clear. The cutting edge protrudes about 4 mm from the holding piece. Hope this does it for you!
-
Proxxon Planer DH40 Issue
dvm27 replied to ChrisLBren's topic in Modeling tools and Workshop Equipment
Chris - have you tried the Proxxon service center? They were responsive to a previous service issue: https://www.proxxon.com/us/service/technical_request.php. If they can't help let me know and I'll photograph the blade positions. They're also reversible so, technically, you can just reverse them. -
Proxxon Planer DH40 Issue
dvm27 replied to ChrisLBren's topic in Modeling tools and Workshop Equipment
Sorry, Chris, can't help. I have my new blades but was holding off changing them because of the problems you're having. Hope you get your planer back to spec! -
Personally, I think it would be awesome for Chuck's figure to be seated on the seats of ease, holding a miniature set of plans. Imagine future historians peering through the lights and trying to make sense of that one!
- 1,784 replies
-
- 15
-

-

-
- winchelsea
- Syren Ship Model Company
- (and 1 more)
-
Very nice result! I wonder if you could pressure wash the char off those windows without breaking them? Sorry about the fretwork. Makes it all the more impressive that model shipwrights did those 300 years ago with a jewelers saw and files!
-
Looking forward to the publication. Ed. If it weren't for the rigging it would be on my build list one day ; -) We all wait with baited breath for news of your next project (assuming it is ship-related)
- 3,618 replies
-
- 2
-
-
- young america
- clipper
- (and 1 more)
-
Proxxon Planer DH40 Issue
dvm27 replied to ChrisLBren's topic in Modeling tools and Workshop Equipment
HI Chris. After ten years my Proxxon Planer transfers a very small longitudinal line on the wood. I assume one of the blades is nicked. I seem to recall there are two if them and swapping them out was a pain. But I can't be without my planer so I shall order a new set as well. I see they're only $10+ on Amazon. -
Model Shipways Fair American vs Syren US Brig
dvm27 replied to WalrusGuy's topic in Wood ship model kits
If you do decide to build the FA you may wish to purchase the book written by Dr. Clay Feldman on his construction of the model: https://www.amazon.com/Eighteenth-Century-American-Plank-Frame/dp/0961502118. -
Is there a Beginner’s Guide to Metal Work?
dvm27 replied to VTHokiEE's topic in Metal Work, Soldering and Metal Fittings
Thanks Kurt. Recently I have been using this paste/flux combo. It is easy to apply through the syringe and flows quickly at very low heat: https://www.beaducation.com/p/3906-jewelry-making-tools-silver-solder-paste-soft-1-4-oz. I think the most important thing I have learned is to slowly warm the entire piece first then focus the flame on the joint. This makes the solder flow towards the joint. -
Is there a Beginner’s Guide to Metal Work?
dvm27 replied to VTHokiEE's topic in Metal Work, Soldering and Metal Fittings
Just to clarify, Kurt, you still need a torch for Stay-Brite solder? -
Don't you just hate over-sanding, Keith? One second of inattention leads to a couple hour fix. Very sweet line now.
-
If you fret the quality of your close up work the rest of us are doomed, Mark!
-
It is quite difficult do have properly sized mutins as well as consistent pane symmetry across the transom. Not to mention all those changing bevels over the transom. My hat's off to you, Sir!
- 1,784 replies
-
- 3
-
-
- winchelsea
- Syren Ship Model Company
- (and 1 more)
-
Your work is seriously lacking...in resolution. Seriously Mark, work of this quality demands higher resolution photographs so we can better appreciate those minute details. Your planking runs are lovely!
-
I used to think the camouflage scheme was silly and wouldn't fool anyone but your contrasting views of the model set in a sea make a convincing argument for it!
- 238 replies
-
- 2
-
-
- leviathan
- troop ship
- (and 2 more)
-
Great video Kevin. Shows the importance of planning one or even two decks ahead to make sure all aligns in the end. Most important is to make sure your coamings, hatches and bitts are properly aligned from top to bottom. The other beams can be fudged a bit if needed to accomodate.
-
Great photos, Chris! I especially note the lovely run of planking diminishing into the bow (for those following Toni's series on planking), the beautifully worked anchor stock wales and wash cants in particular. Bonus question - what is the small fitting on the port stem just below the cheeks?
-
That's a beautifully planked hull, Chuck. I almost wonder if trunneling will detract from those lovely lines. Many of the Georgian style models at the academy are not trunneled.
- 1,784 replies
-
- 5
-
-
- winchelsea
- Syren Ship Model Company
- (and 1 more)
-
Had you thought of debonding the piece with isopropyl and replacing? Paring that piece back around the curve to a uniform thickness could prove challenging. But then again the new surface would be hidden by the cheeks anyway so perhaps it doesn't have to be perfect.
-
Duplicates for Sherline Lathe
dvm27 replied to John Rose's topic in Modeling tools and Workshop Equipment
I purchased the Vandalay duplicator for the Sherline lathe many years ago but had poor success duplicating parts. The link is https://www.vanda-layindustries.com/html/duplicator.html Perhaps you'll have better luck. I know of no others. -
Perhaps I missed it in the videos but where did your cannon come from? I assume they were cast.