dvm27
-
Posts
2,449 -
Joined
-
Last visited
Content Type
Profiles
Forums
Gallery
Events
Everything posted by dvm27
-
 Lovely oar Druxey. Quite a dilemma with regards to displaying the full set. I vote for bundling them up and laying them inside the hull. To me, the other two options obscure the fine lines of the hull. We should start an MSW poll ( to coincide with our current obsession with polls).
- 641 replies
-
- 10
-

-
- greenwich hospital
- barge
- (and 1 more)
-
Yes, Mike, we plan to include both plank on frame and plank on bulkhead plans for Speedwell. In addition, we are working on supplying the figurehead and carvings for this vessel as well as the three pounder cannons. Thanks for all the likes!
- 345 replies
-
- 11
-
-
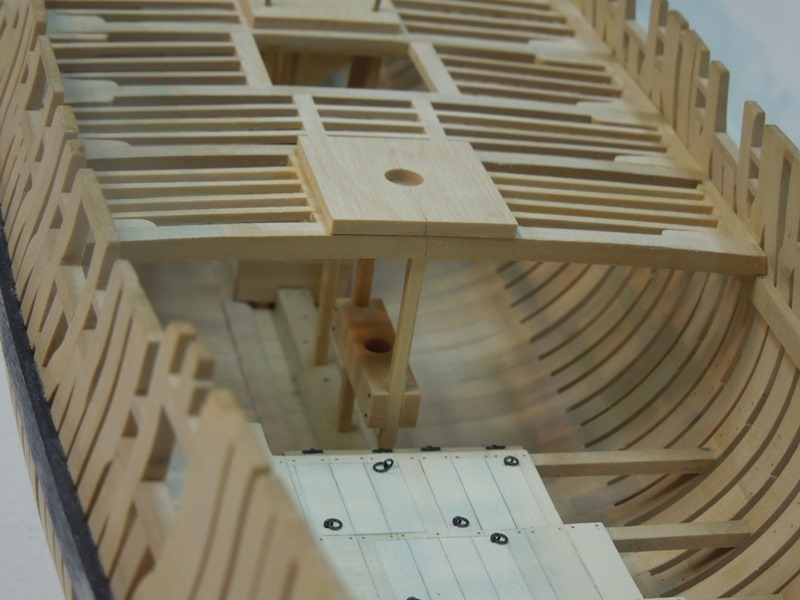
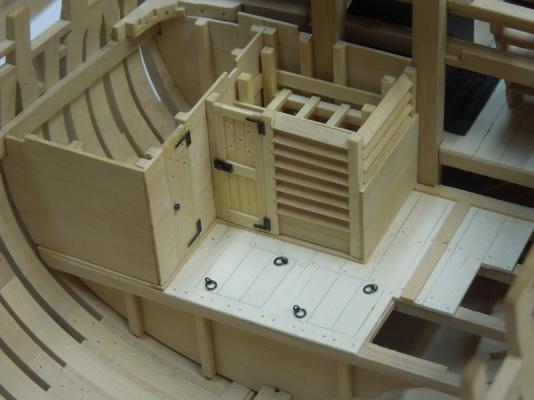
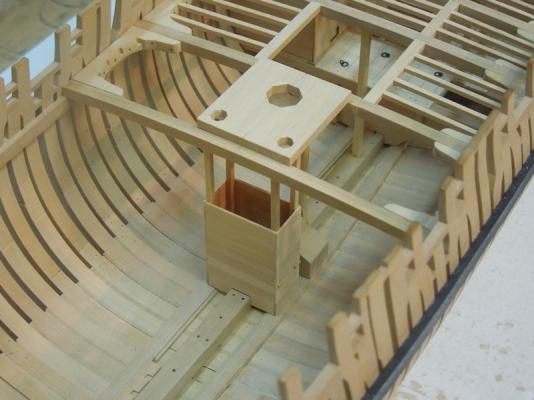
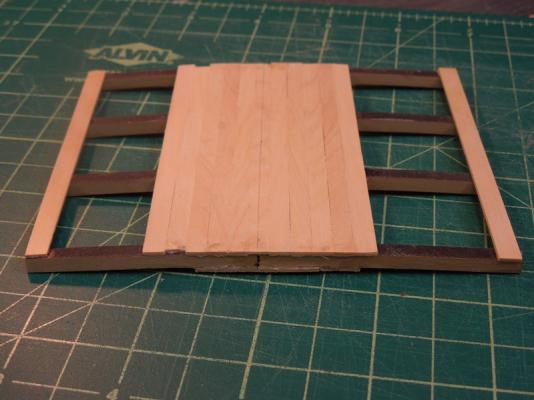
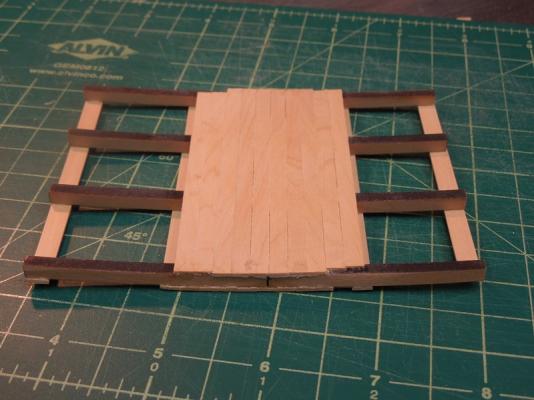
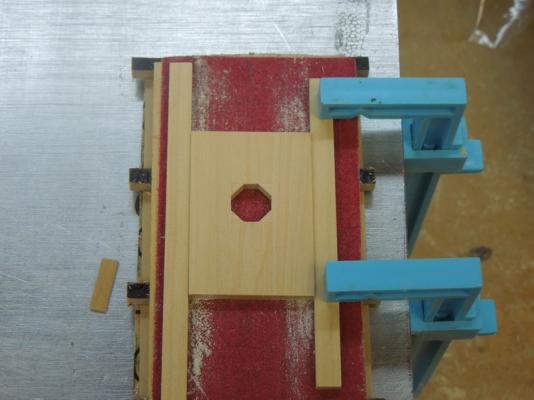
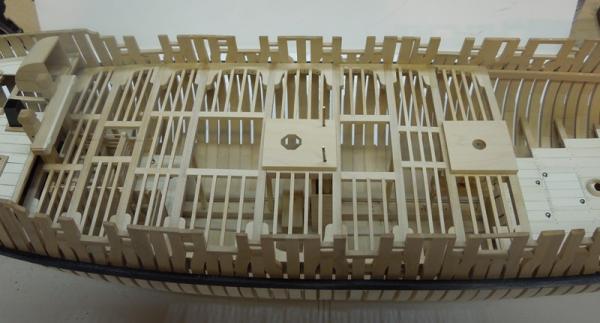
I see that it has been awhile since my last Speedwell update. Here are some current photos. David Antscherl (of Greenwich barge fame) and I are currently working with SeaWatch books on a book featuring her construction in both plank on frame and plank on bulkhead versions. She's a sweet little vessel and will be fully rigged. At 1:48 scale she won't take up a lot of space in my study. The fore platform with the boatswain's cabin and sail room. There is a properly tagged and stowed sail on the lower sail rack but it is no longer visible. The well sitting beneath the main mast partner with it's two octagonal pump openings. there is a small cleanout door at the bottom of the well. I made a jig to shape the round-ups of the various deck elements. Basically, I have connected several properly shaped deck beams (laser cut by Chuck) with planks on the convex and concave surfaces. I then affixed 150 grit garnet paper with rubber cement. Adding the round-up is then a simple matter of moving the piece up and down the paper. i use a small plank to keep the pull straight. You know when you are done as the dust spreads entirely across the paper above and below and the bottom of your thumb is raw. The upper deck back to the aft platform has been framed. It is a fairly tedious job adding each new beam with it's lodging knees, hanging knees, carlings, ledges and bolts. Depending on the amount of deck planking one plans to add, some of these elements could be omitted. I plan on adding very little deck planking so most of it will be visible. In the final photo, the capstan upper and lower partners have been added. Speedwell's capstan is a bit curious as it is designed to be raised and lowered. It seats on a removable spindle cup on the lower partner. Neither David and I have any idea why it was designed this way. That's it for now. Next will be the framing of the aft platform and quarterdeck.

- 345 replies
-
- 52
-
-

-
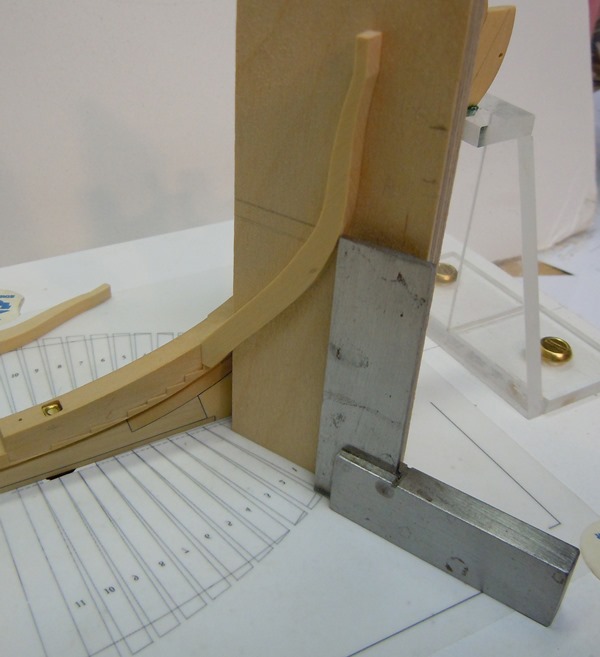
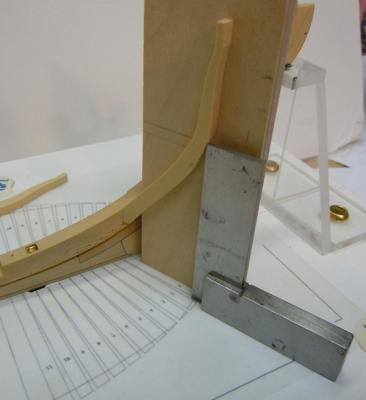
Great video, Kevin. Well done on the challenging bollard cross-chock. Took me a couple of times too. I'm impressed by your ability to understand and fix discrepancies as they occur. As you have identified, it is very difficult to set a cant frame in three different planes. It is imperative that the aft part of the heel aligns vertically with the plan on the board. If not, you will get creeping error that will show up in an ugly way a few frames down the road. When setting cants or other frames I use a ply-90 degree jig to insure verticality and a steel machinists square to insure the half-breath location while the glue is setting. You can simulate the chock joints on the outside of the frame with an exacto knife if you like. I'd also strongly recommend PVA glue due to it's ability to be debonded. I used almost two bottles on my first POF model! Keep those videos coming. It's something I wished I had done while building my Swan prototype.
-
The transom support piece is a very nice addition to the building board. Should make installing those pesky transom timbers a breeze.
-
If there's dust in the photo it must be scale dust because I can't see it. Could you please share how you came to be a professional ship model maker with TAMU? Did you make model airplanes and ships as a kid? How'd you get to be so damned good? Enquiring minds want to know!
- 701 replies
-
- 10
-
-
You are one talented SOB to turn that boxwood ring into the mast coat you've shown..without a lathe. My hat's off to you.
- 1,051 replies
-
- 7
-
-
- cheerful
- Syren Ship Model Company
- (and 1 more)
-
Great start Tim. Stern deadwood looks spot on and the tabled boxing joint is seldom seen on models. Is your keel and rising wood milled from one piece? If so, I don't believe I've seen that approach before.
-
Great work, Gary. I'be be conservative with fairing the fore face of the foremost aft cant and aft face of the last fore cant until the first full frames are test fitted. For some reason this transition has caused me problems on a couple of plank on frame models.
-
Nice work, Frank. Who makes that razor saw? It appears to have teeth on each side.
- 649 replies
-
- 5
-
-
- dunbrody
- famine ship
- (and 2 more)
-
That's beautiful work, Ryland!
-
Cutter Cheerful 1806 by rafine - FINISHED
dvm27 replied to rafine's topic in - Build logs for subjects built 1801 - 1850
A beautiful model accompanied by beautiful photography. What more could we lurkers ask for? Looking forward to your next build.- 525 replies
-
- 6
-
-
- cheerful
- Syren Ship Model Company
- (and 1 more)
-
Now you're just showing off Druxey! Gorgeous work.
- 641 replies
-
- 6
-
-
- greenwich hospital
- barge
- (and 1 more)
-
The sheer excellence of your woodwork and metal work makes this one of the most enjoyable logs on MSW. It looks like this could be a working model with the proper engine.
- 701 replies
-
- 14
-
-
I am enjoying your build Vitaly. It looks like you are using the methods developed by Dr. Mike and featured on his video. Is this correct?
-
Now she looks like a ship, Mike. The next huge reveal when you cut the frame extensions and free her from the jig but wait as long as possible to do this. Have fun with that internal fairing. I foresee some bloody knuckles!
- 967 replies
-
- 6
-
-
- hahn
- oliver cromwell
- (and 1 more)
-
Don't feel guilty, Glen. I have been using simulated nuts from Scale Hardware http://www.scalehardware.com/simulated-micro-hardware-c-47. You can't fake it any better than this.
-
Those gentle sweeping curves are poetry. Michael.
-
Looks terrific, Toni. I also notice in the last photo that you have hung some hammocks between the battens. Must have missed them before but they look really good.
-
Wonderful Giampiero. You rarely see the rudder coat included on models. I suspect that fitting and nailing it over the tiller opening is not easy!
-
They look great, Chuck. I think one of the hardest things to do is create realistic looking rope, along with it's natural tendency to drape properly. It's most likely a scaling issue I believe. Oddly enough, it seems in order to achieve a realistic catenary, like the gentle drooping of the stays, a wire core seems to work best (at small scales). Many of the models in Annapolis show this graceful catenary but most of them were rigged with silk, a material which naturally drapes over time.
- 1,051 replies
-
- 7
-
-
- cheerful
- Syren Ship Model Company
- (and 1 more)
-
Doc, check out the document by David Antscherl on our website "Tips" page, bottom. http://www.admiraltymodels.com/Tips.html While I can't provide a PE sheet at that scale it does explain the basics of lantern construction.
-
We can't help it Druxey. We have cabin fever after a long winter!
- 641 replies
-
- 7
-
-
- greenwich hospital
- barge
- (and 1 more)
-
Your weathered wreck is truly fine craftsmanship, Glen. It's so convincing it's hard to believe it's not the real ship.
-
Pandora by marsalv - FINISHED - 1:52
dvm27 replied to marsalv's topic in - Build logs for subjects built 1751 - 1800
Splendid work, Marsalv.! I usually fit the hanging knees after the beams are installed but I may rethink that after seeing your photos.