dvm27
-
Posts
2,449 -
Joined
-
Last visited
Content Type
Profiles
Forums
Gallery
Events
Everything posted by dvm27
-
 Looking great, Gary. You 're obviously very comfortable working with wood. The scarph joint between your upper and lower apron appears to be S-shaped on your mock-up. I believe the actual scarph joint consists of three flat surfaces, much like the upper apron, but much shorter.
 -
THE 74-GUN SHIP by Jeronimo
dvm27 replied to Jeronimo's topic in - Build logs for subjects built 1751 - 1800
Wonderful work, Karl. What sort of jig do you use to transfer the heights for the platform beams inside the hull? Happy Holidays to you also and we all look forward to 2016 updates fro you! -
Holy crap you're good! What secret blackening recipe do you use? It's a source of never-ending frustration for most of us mere mortals.
-
Fantastic, Nils! Can you sneak one of those little guys into the hold so people can see how cramped it really was?
-
Echo by Maury S - FINISHED - Cross-Section
dvm27 replied to Maury S's topic in - Build logs for subjects built 1751 - 1800
The planksheer rails, associated moldings and volutes are the icing on the cake and, to me, one of the more difficult projects on the ship. Among violin makers the shape and precision of the carved volute are big factors in their value. -
Very nice Mike. Fittingly, you've moved over to the Dark Side - power tools (Star Wars being released this week in case you've been living in a convent). Enjoy your lathe/mill and all the fun things you can do with them. Hopefully you'll get over the "making beautiful wooden pen and pencil sets" phase for relatives and neighbors quickly.
- 967 replies
-
- 6
-

-
- hahn
- oliver cromwell
- (and 1 more)
-
Happy belated Birthday Wishes Remco. May you age as slowly as your progress on Kingfisher!
- 1,207 replies
-
- 9
-
-
- sloop
- kingfisher
- (and 1 more)
-
That's a beautiful hull Mike, even in her rough form. Can't wait to see her filled and sanded and ready for prime time. .
-
You should donate her to MSW to auction off. You get a million dollar tax deduction, MSW gets a boatload of money selling her and the buyer gets to spend the rest of his/her life rigging her. A win-win-win situation all around!
- 191 replies
-
- 12
-
-
- young america
- clipper
- (and 1 more)
-
I'd never really paid much attention to the Adelaide model when visiting the collection. I can understand how those old timers espoused form over function as the round stern is not aesthetically pleasing compared to those of the prior century. But it is an exceptionally well crafted model and I look forward to spending more time studying her on my next visit to the Academy.
-
Great job, Toni. I don't believe there's a more difficult job then framing the stern and getting all the curves right (except for the head timbers and rails...and carving...and louvered windows...and...)
-
Beautiful job on planking and painting your hull, Mike. Looks perfect.
- 452 replies
-
- 4
-
-
- cheerful
- Syren Ship Model Company
- (and 1 more)
-
"Wasn't so easy as it looks"? That's an understatement as it looks bloody difficult Siggi. Lovely job!
-
Echo by Maury S - FINISHED - Cross-Section
dvm27 replied to Maury S's topic in - Build logs for subjects built 1751 - 1800
Nice job Maury. i think the fenders are one of those items that would be easier and cleaner to install before planking but that requires planning way above my pay grade! -
This block making machine was discussed at Western ship model conference several years ago. It was indeed a wonder.There was talk of a commercial version but I never heard anything more of it. Perhaps the AAMM has more information.
- 728 replies
-
- 1
-
-
- le fleuron
- 64 gun
- (and 1 more)
-
Lovely job on your ship's boat, Ryland. It shows a lot of care and attention to each and every detail.
-
Tool for Sanding Inside of Curved Pieces
dvm27 replied to ChrisLBren's topic in Modeling tools and Workshop Equipment
If you're building a fully framed model there is a lot of sanding on both surfacess of the frame. One could cut close to the line with a scroll saw and hand-finish it with files but I find the oscillating spindle sander increases both speed and accuracy 100%. You want one with several different drum sizes. The oscillating function minimizes the possible burning you get with a stationary drum sander. For the outside of the frames I use the Byrnes disk sander and oscillating spindle sander. -
A simple "Like This" will not suffice for a wheel of this beauty. I'd love to see the brass tubing in use. Not quite sure I get it 100%.
- 1,207 replies
-
- 5
-
-
- sloop
- kingfisher
- (and 1 more)
-
Echo by Maury S - FINISHED - Cross-Section
dvm27 replied to Maury S's topic in - Build logs for subjects built 1751 - 1800
Looks great Maury. I often am displeased when I look at my work with a macro lens. But since these minor imperfections are not visible to the naked eye we need to learn to ignore them. -
One of the conundrums of plank of frame building is that the more difficult areas of construction, the cants and hawse timbers, are addressed before the relatively easier full frames. Setting the cant frames at the proper angles as well as aligning with the half-breadth can be very challenging. I'd use the lucite jig on the fore face of the cant to insure the angle and a machinist square (http://www.amazon.com/Grizzly-H2993-Machinists-Square-4-Piece/dp/B0000DD4EE) to align with the haft breadth on the plan. I also leave a little extra wood on the fore face, as over-bevelling prior to fairing can cause major issues. Finally, don't be afraid to use isopropyl alcohol to remove a cant or hawse timber that doesn't look right. I don't know many plank on frame builders who have not had to redo one (or multiple) cants or hawse timbers.
- 504 replies
-
- 5
-
-
- washington
- galley
- (and 1 more)
-
Greg H., I'd go with a good quality disk sander, such as the one made by Byrnes model Machines. Another Greg H.
-
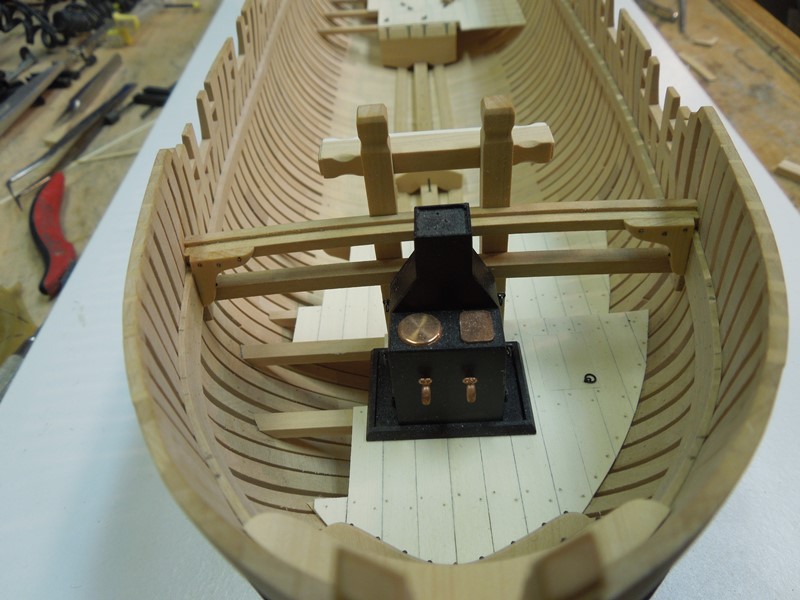
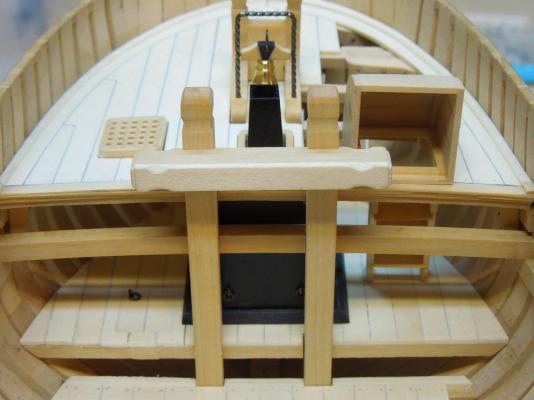
I've not seen it before on any model, Tony. The width and shape of the belfry match the Navy Board plans but one can't discern if it is twisted iron or not. The model is contemporary so I would assume the detail is accurate. I form very small loops with a jewelers round nosed pliers such as this http://www.all-spec.com/products/RX7590/image.viewer. You can form loops less than 1mm with these.
-
Thanks or the many comments and likes. Nils - The forecastle ventilation scoop on the starboard side is the access to the fore platform. There is a small ladder in place. I imagine the scoop was removable for easier access to the platform. The forecastle also has a small access grating to load coal. Note that on the port side of the fore platform has a small scuttle or "coal hole" in load it into the hold. Remco - shockingly, I seem to have forgotten to photograph the completed galley stove prior to installation. I didn't overdo it as it will only be visible through some omitted planks on the forecastle.

- 345 replies
-
- 30
-
-