


Wintergreen
-
Posts
940 -
Joined
-
Last visited
Content Type
Profiles
Forums
Gallery
Events
Posts posted by Wintergreen
-
-
-
-
1 hour ago, rlb said:
After gluing the tiller to the rudder head, I realized I need to drill some holes for eyebolts for the tiller rope. Of course, this should have been done before gluing the tiller on--
Yes, of course, but now you got the opportunity to show off your drilling skills 😉
-
4 hours ago, Robp1025 said:
And yes there was an accident with the bow cause it sticks out a lot lol. It's glueing back up with some wood glue but it's quite fragile regardless.
Ouch! Those pokey bits. Mast and spars and bowsprits, always there to catch a wayward sleeve..
It has happened to most of us, I'd say.
And your gun ports looks alright to me. Well done!
Keep it up!
-
Definitely a challenge. I see that coming too.
A lot templates I guess.
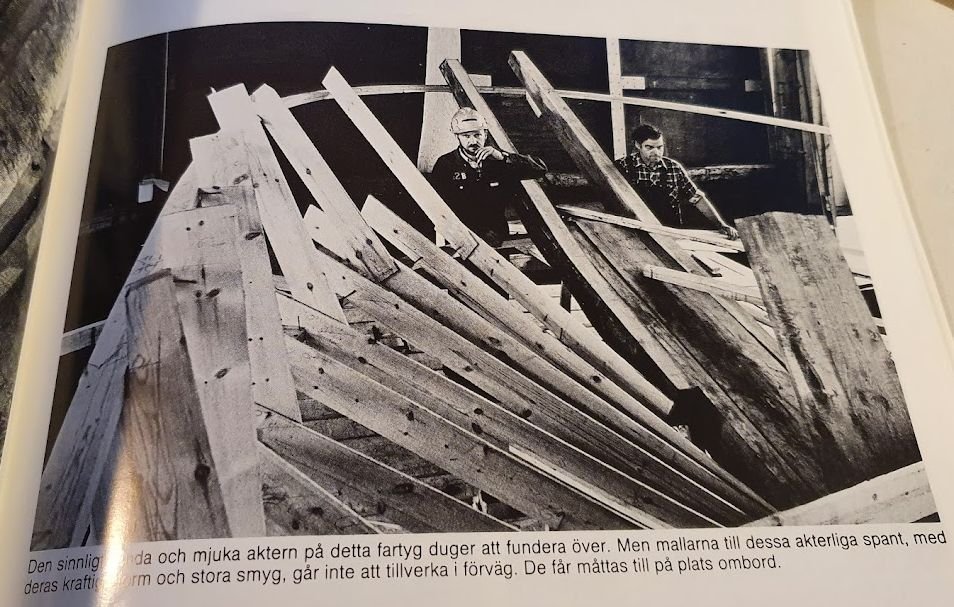
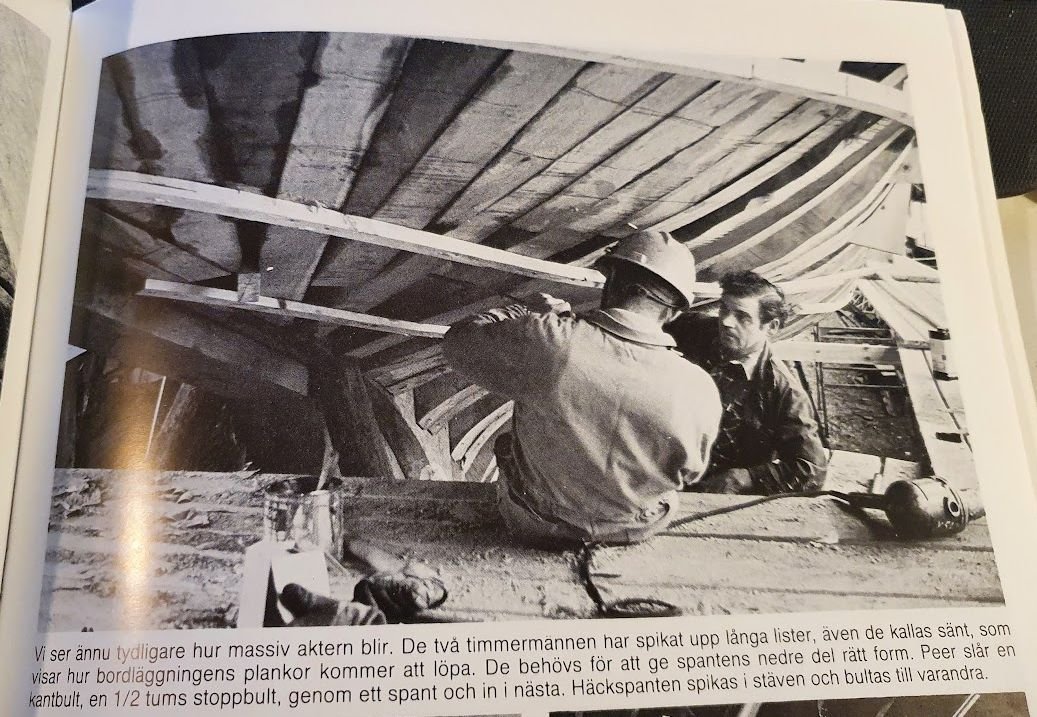
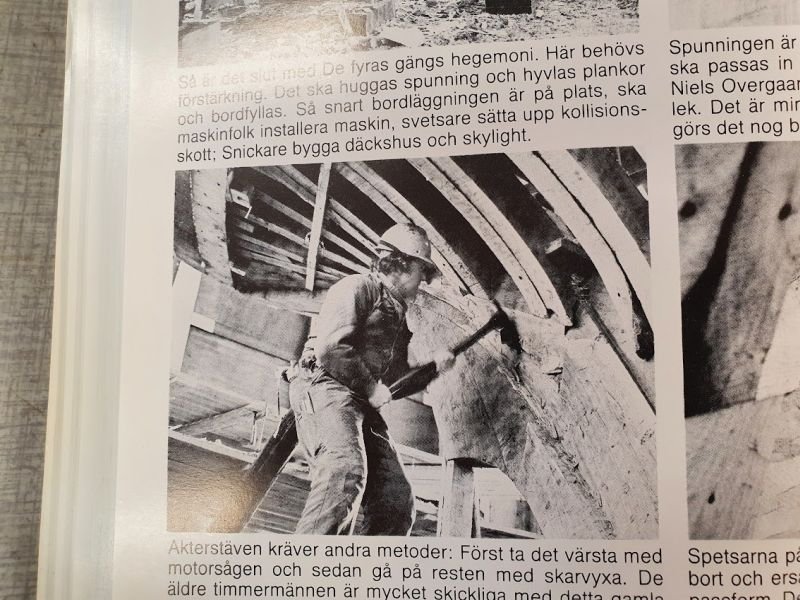
Pictures from the book on the real thing gives me guidance. They almost fill the entire stern with timbers to have the planks to meet timber at all times.
Templates.
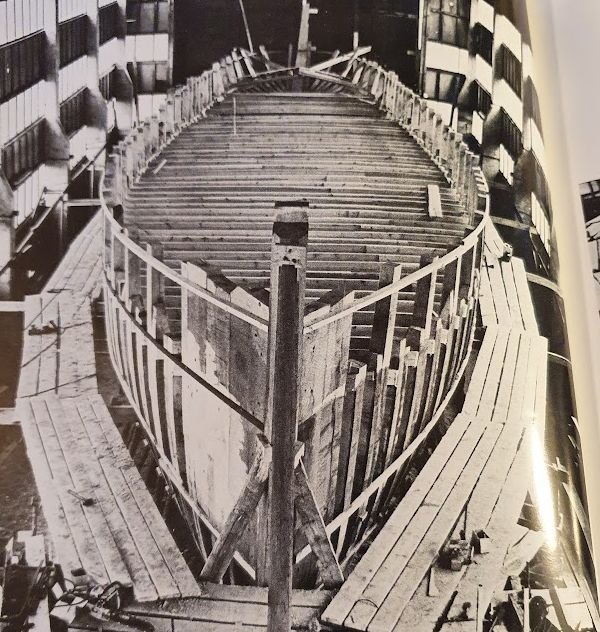
Ready for planking. All timbers are in.
Waiting for the first planks to steady the hull.
-
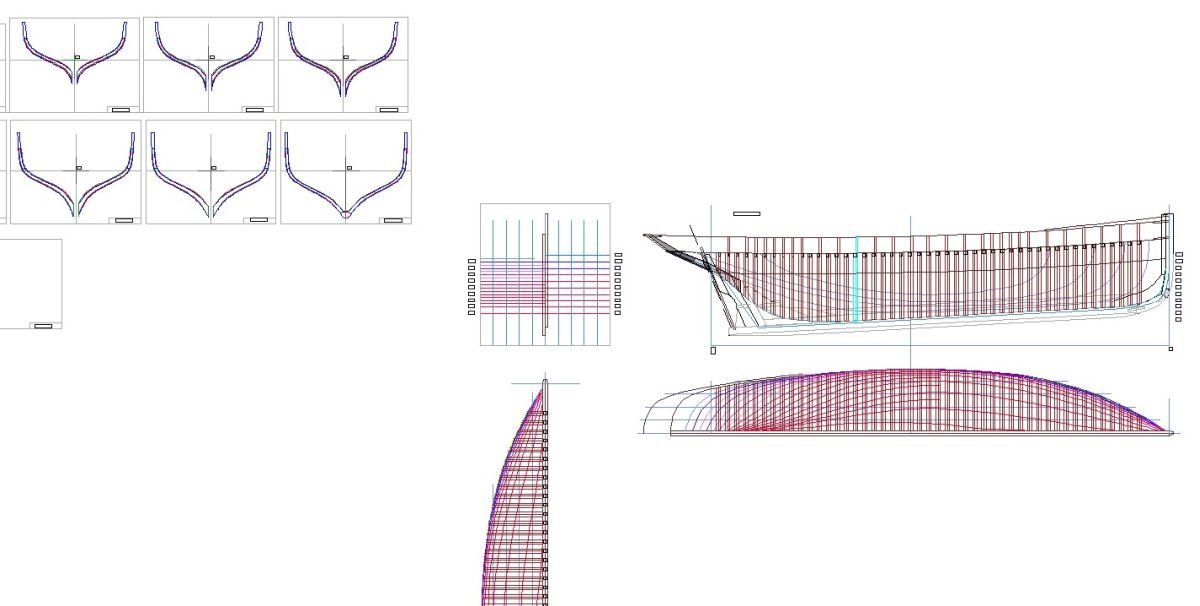
So, this is where I'm at now.
Full set of cards... or frames rather. 31 of them.
I will shortly put together a more elaborate post about the progress, but just thought I had to share the progress with you.
I scrapped the 5-6 frames I already did a good while back to get to a working flow. And it payed out. Using different colors for aft, middle and front phase as well as setting the frame in question in a bright color (cyan) helped to keep track of where in the process I was.
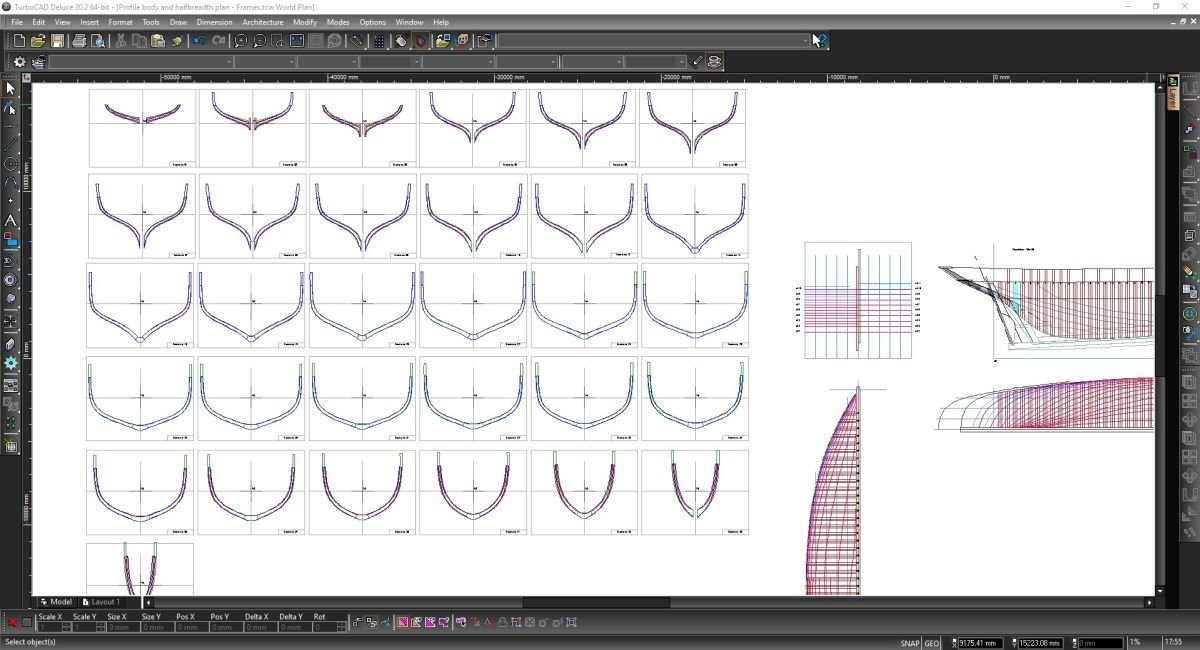
Next up will be to explode each frame into separate members and organizing them on A4 for printouts.
Thanks for likes and comments! Always appreciated.
Til next time, ta!
- GrandpaPhil, wefalck, KeithAug and 5 others
-
 8
8
-
What Albert said.
I need to get myself a lathe, a disk sander, a mini table saw, a, a, a... never mind. Lack the funding.
Lovely work Siggi!
- FriedClams, Keith Black, Siggi52 and 2 others
-
5
-
Redo and redo again. I admire your focus.
And 14 kgs! That's a lot to get rid off, congratulations!
Keep it up, mate!
- FriedClams, mtaylor, druxey and 1 other
-
4
-
The remark about the spelling of the name was not a value statement, just at fact. It is the moderators that can change the title but I see no reason for that. The kit was Wasa when you started it. Much later historians deemed it should be Vasa.
Regardless of spelling, we know which boat it depicts.
Looking forward to the stern planking.
About photos, with good ambient light you can prevent the phone from using the flash. It will require a steady hand since the shutter time will be longer. (Shutter time - really? that is digital now noob! Yes, my bad).
Keep it up!
-
Ouch! Why did you do that?? Sounds unnecessary to me.
Jokes aside, accidents happen of which I'm all too familiar with.
The benefits of a surgery with some spiling of the fractured bone (done well) is that you will probably be back building sooner rather than later.
Take care!
- mbp521, mtaylor, Keith Black and 1 other
-
4
-
Thank you guys for your support 🙂
The yard will be quiet for some time now. Reason? Well, now that I've (almost) figured out the tricky stern section it is back to the drawing board.
On the agenda is framing and decking. I also have to admit that it will not be a fully framed model. Instead it will be ca 66% framed model. Apologies if that brakes any ones heart.
I have had some thoughts about framing and whether do go for bulkheads instead of built up frames and if built up frames would be the choice, how much detail do I put in?
The plan has 47 frames. To not bore myself to death I have come to the conclusion to fully frame the stern and then only go for the frames that have bulwark stanchions attached. That will reduce the tediousness down to 31 frames. This will still give me plenty of options for scale length planks in regards to fastening.
What about internal members of the hull? Well, since I'm looking forward to the deck build an obvious choice is the sheer clamp (that's what it's called, right?). And that will be it, I think.
Initially I planned on going for apple for the frames. But I realize now, that if I do I will spend the rest of my life trying to fair the hull 😄 it.is.super.hard.
So birch it is bar the stanchions, they will be apple.
Here a screenshot of where I am at the moment. Frame 14. Ten frames done of which six are visible in the picture. I can quite easily explode the frames into members. In the real build each pair of frames consist of eight pieces plus the stanchions. I will probably cheat here and go for four plus the stanchions. Unless nature calls for more pieces like the double curved or so. We will see.
Tomorrow I'm in for a refill of the chemo. It will be the third of four doses and hence I'm halfway through this experience. Can't wait to be through it all together.
That's all for now.
Cheers!
-
About the waterways... from my build of Atlantica they state clearly that the waterways were thicker than deck planking and usually not cut down into the deck beams. Hence the ledge or step. On Atlantica deck planks are given at 60mm and the waterway 80 mm and they are cut down into the deck beams. On a working boat it will probably look like your last picture above.
The reason they are cut into the deck beams on Atlantica is the inconvenience of standing water on deck. On a work boat with a limited life span I guess they didn't care that much.
And the bulwarks are also thinner than the planking. I haven't the numbers, but about half the thickness. Planking on Atlantica is 65 mm thick as reference.
- Keith Black and bolin
-
2
-
Edit: I wrote almost this entire post until the answer dawned on me... lets see if you catch it. I will continue this edit at the end.
Time for a question, or discussion if you like. And quite a lot of pictures.
It has to do with the stern buildup, rabbet and bearding line in combination with future planking.
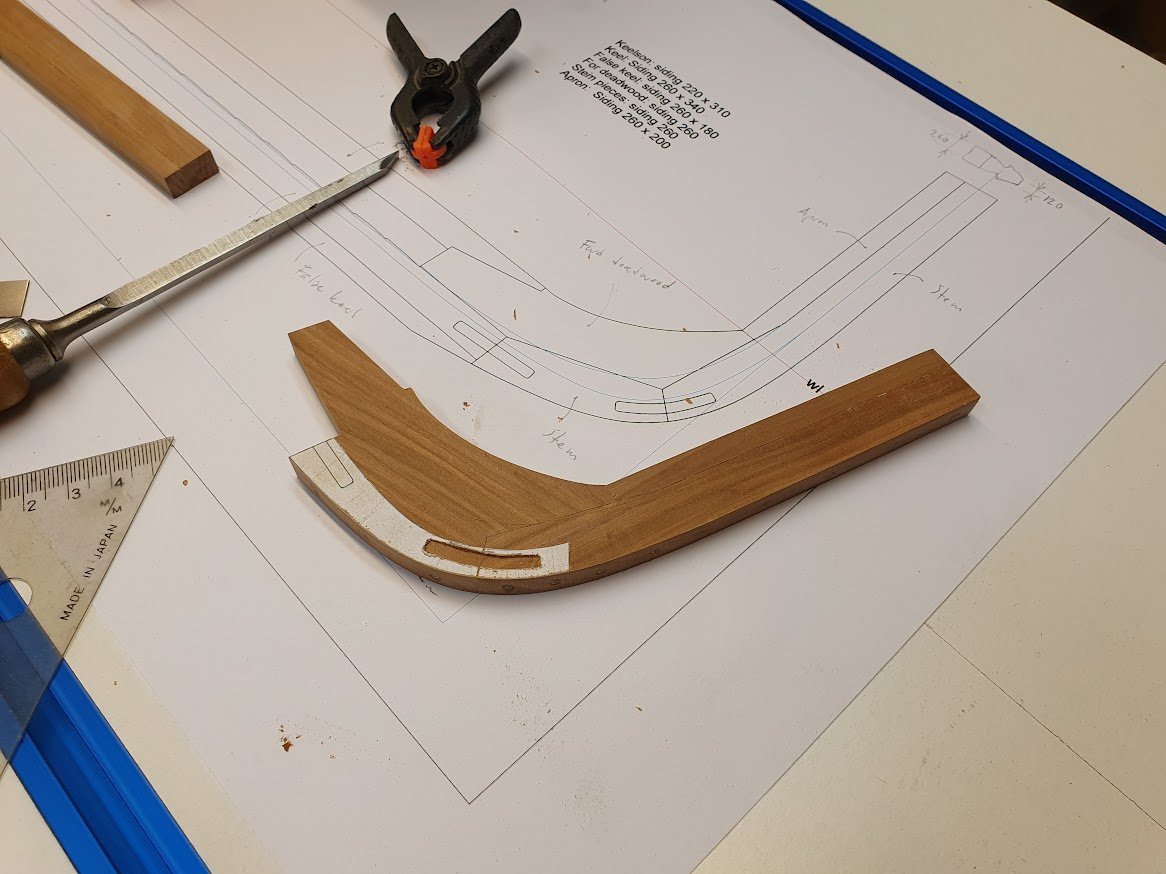
In the screenshot below the text is quite unambiguous. "Siding: 440 in way of sterntube, to be streamlined aft of rabbet to rule siding 260".
The rabbet is clearly marked and the bearding line is sweeping down in gentle arcs.
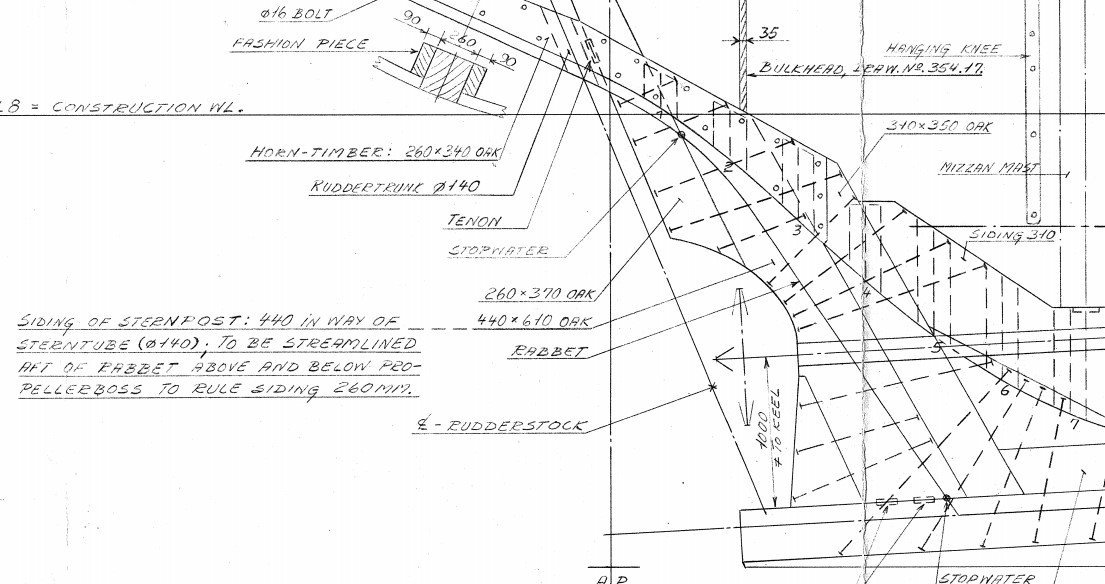
However, the difference between the rule siding of 260 and then 440 is 180 mm, right? But the planking is only 65 mm, hence 130 mm for both sides. Is it really plausible to leave a gap of 25 mm on each side between the planking and the deadwood? The other members of the stern build has quite clearly their dimensions given, 310 mm.
Some pictures from the book to add to the equation.
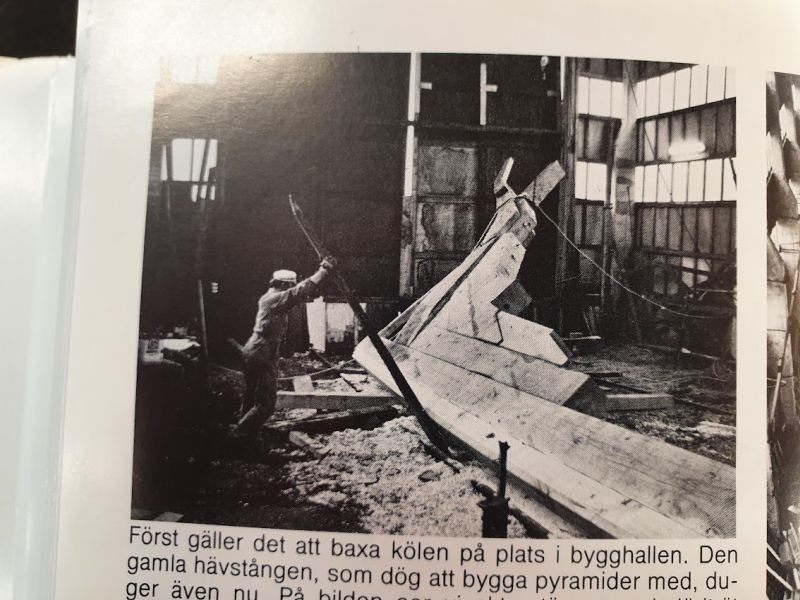
And what I've filed down to so far.
I have penciled in the rabbet and bearding line. But it still puzzles me what to do with the gap of 25 mm. The planking will cut in to the deadwood for most of it thanks to the "streamlined to rule siding". But still. From the book I can't really see anything else either.
Edit: Well, the key-words are "aft of rabbet to rule siding 260". Because, forward of the sternpost the member has a siding of 310 mm, which deducted from 440 is...yes, 130 mm, which also by coincident equals the planking thickness.
It is funny how you sometimes have to post pictures to see the imperfections (or areas of possible improvement) or, as in my case above, a tricky question, that turned out to be not so tricky.
After all, its a tricky business trying to understand a 2D building plan and translate it to a three dimensional piece of timber.
Now, that I've solved this mystery it is back to the yard again. Ha!

- Tony Hunt, GrandpaPhil, druxey and 6 others
-
9
-
And I forgot, if you haven't already, check out the Museum webpage. Quite a lot of photos of both the real deal as on the 1:10 model.
It will give you inspiration to continue 🙂
-
Nice progress bolin!
Funny that, that it isn't until you post your photos you realize how much more there is to sand/scrape 😄
- Keith Black and bolin
-
2
-
I enjoy following along I must say.
The close up photos are a pain in almost every case. But for your build one must remember that the scale is 1:100, which by any standard is small. Therefore, as you say, you will get away with the imperfections. The clamps in the second photo really shows how small you Wasa is.
About sourcing stuff. I think you still can get anything you need, albeit not from the local crafts store (that closed some years ago due to failing customer visits...) but from the internet. The problem with sourcing from www is that you don't really know what quality it is until you receive the parcel and open it. Well, unless you buy tools from known vendors off course. They usually can't sell inferior things since it would harm their brand.
Edit: About currently available kits of the Royal Ship Vasa. (they changed from W to V some years ago).
Billings offer a 1:75 kit. This was my choice back in the day. Billings is on the less expensive end of the scale. My kit had plastic blocks and deadeyes, but I think they now offer wooden ones instead. All ornamentation is still plastic, which really is the only reasonable option.
It appears that Mantua/Sergal offers a 1:60 more costly one with metal ornamentation. I found quite a lot of images of the kit online.
Corel also offers a kit, at the same scale as Bilings, 1:75. In cost it is between the other two. But still brass/metal ornamentation and wood fittings.
My perception is that Billings is closest to the original ship. But the other two looks like good choices also.
Hopefully, there will be others that can say yay or nay about what to go for.
Anyway, onwards and upwards!
-
If I'm not mistaken Bolin replaced the kit supplied planks with beech instead. Billings kits usually contains full length planks of inferior wood.
Looks good Bolin. I also see you have used a four-shift for butt ends. Nice!
- bolin and Keith Black
-
2
-
Those mouldings on the bitts are really impressive Siggi.
Well done!
- FriedClams, druxey, Siggi52 and 5 others
-
8
-
-
Plodding along slowly. But better slowly than not at all.
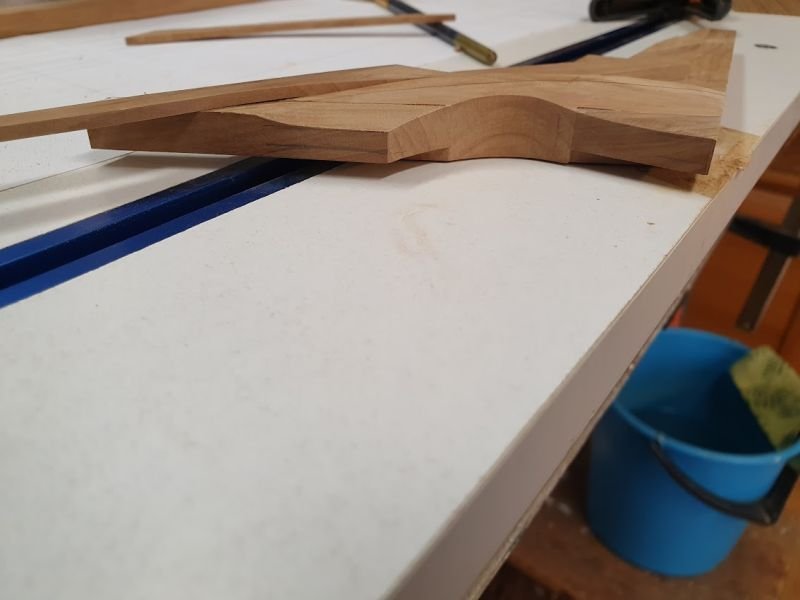
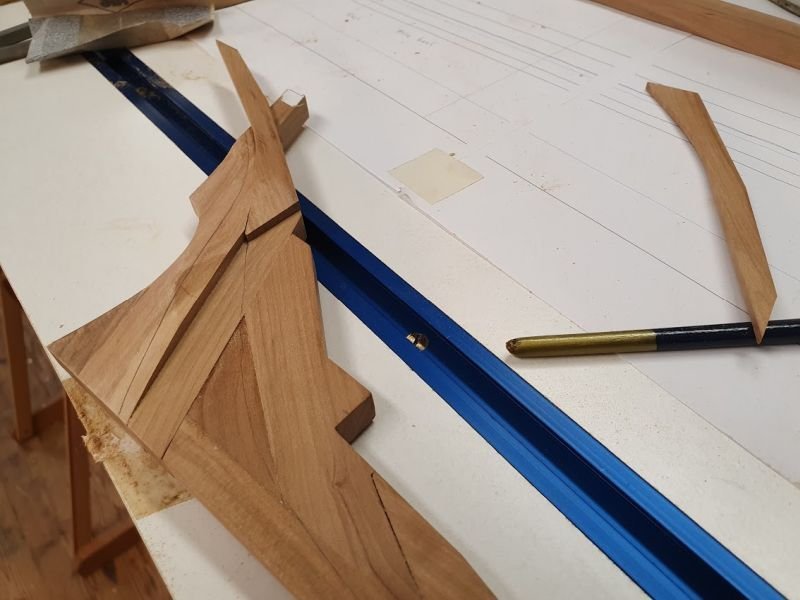
Working on the stem build and details. Horse shoe on old ships, here a simpler form. Still, it takes some tries to get them right.
First, using the template as... template, cutting along the lines.
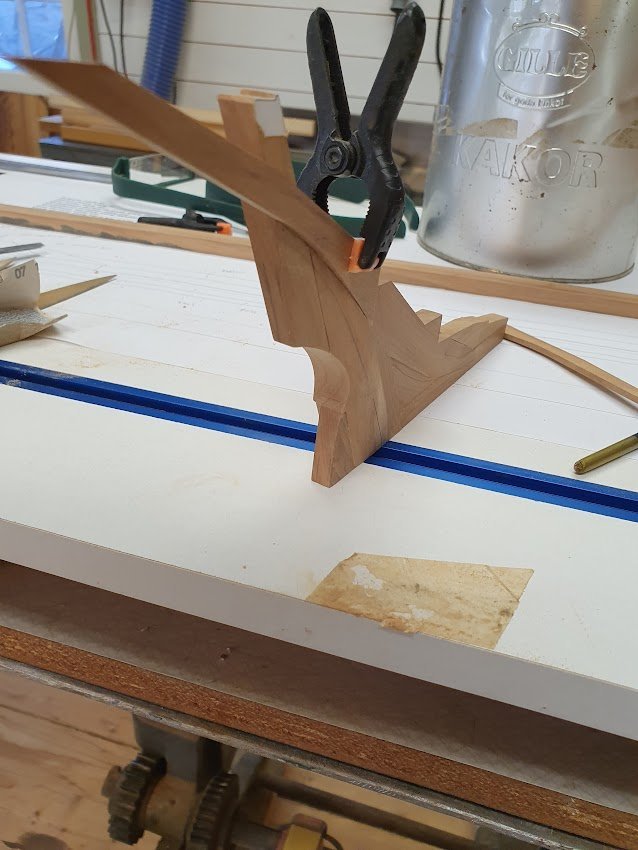
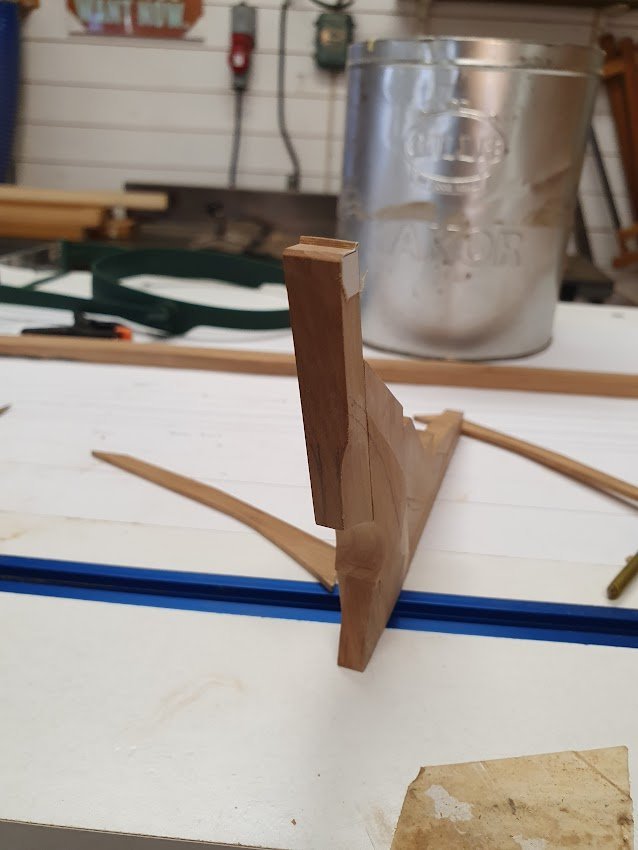
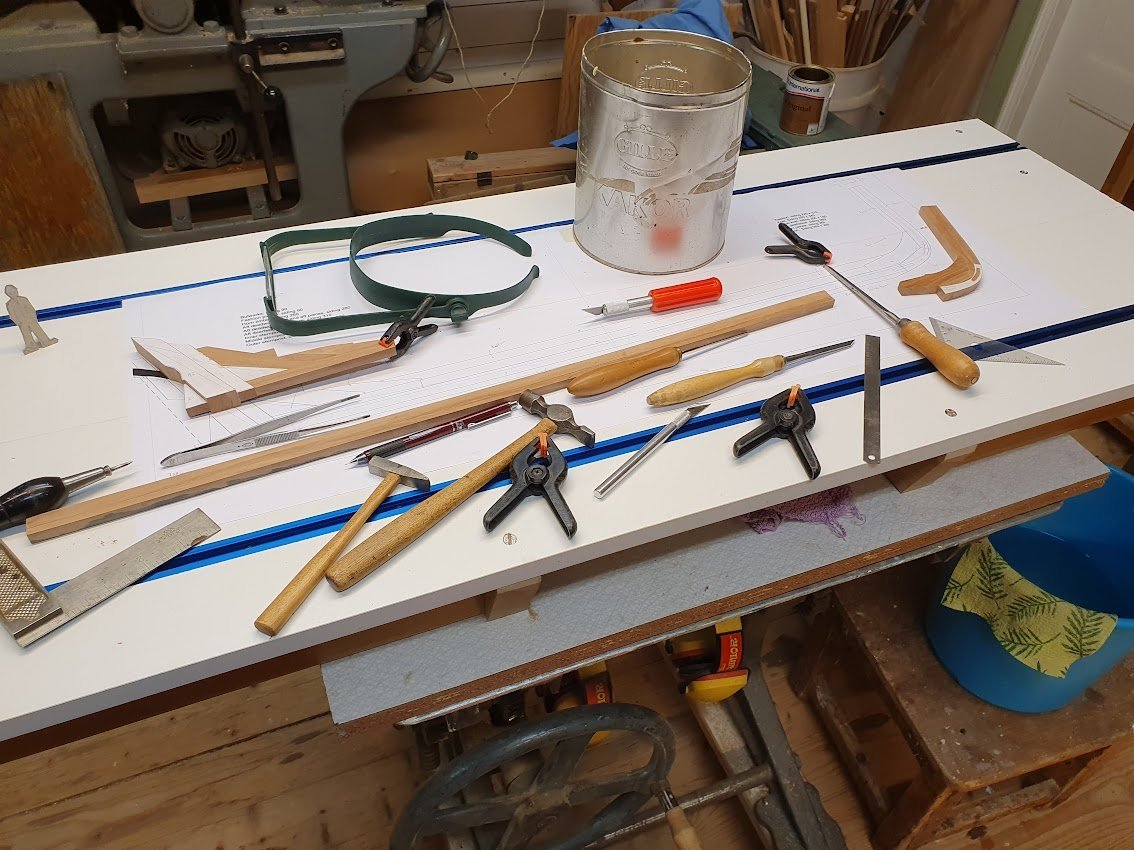
Then, no matter how big your bench is, it gets crowded in no time at all.
Here are the blanks for the plates. I cut the wide and filed down. Seems the most common approach, which also makes sense since the cutting with pliers distorts the pieces.
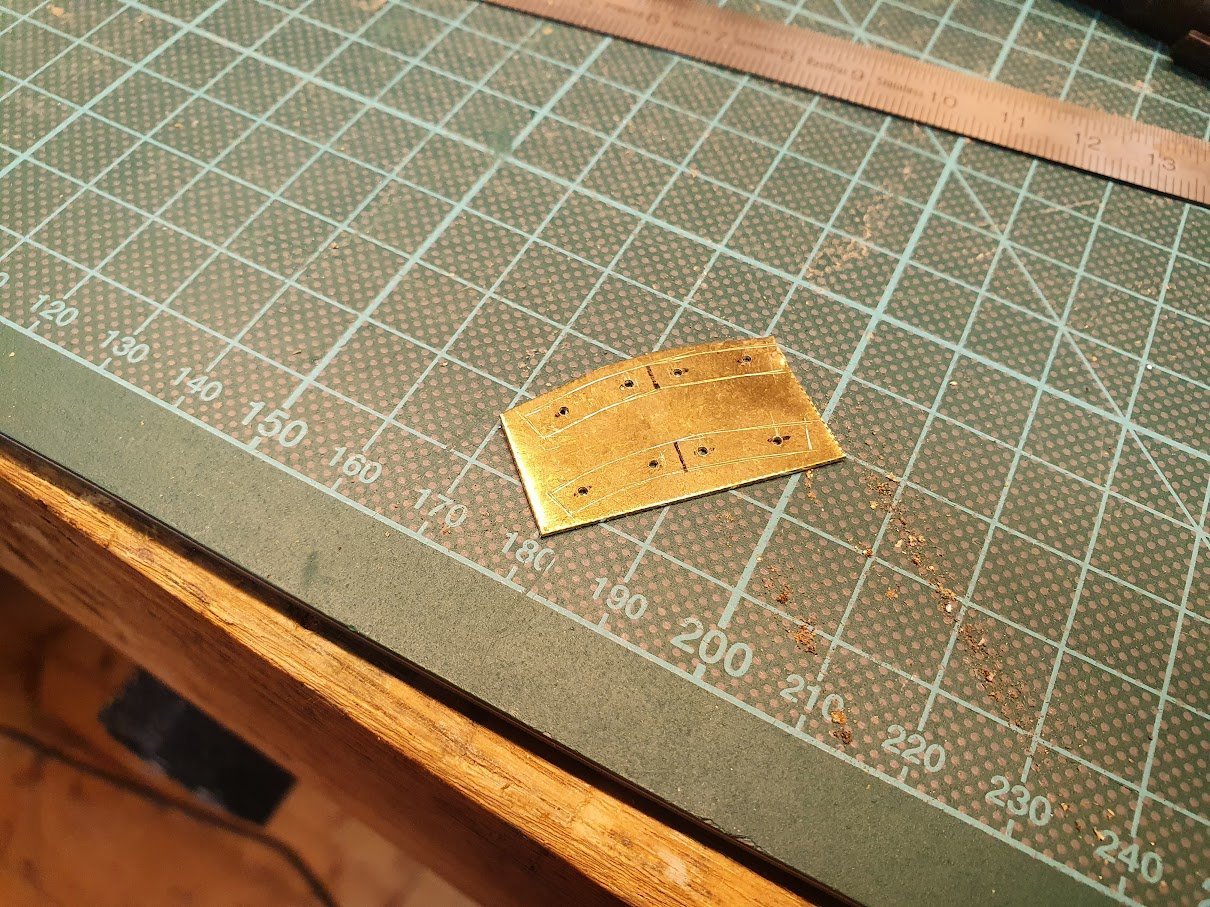
After some careful and tedious scraping the brass plate fits. Nailed in place with CA glue and copper rivets.
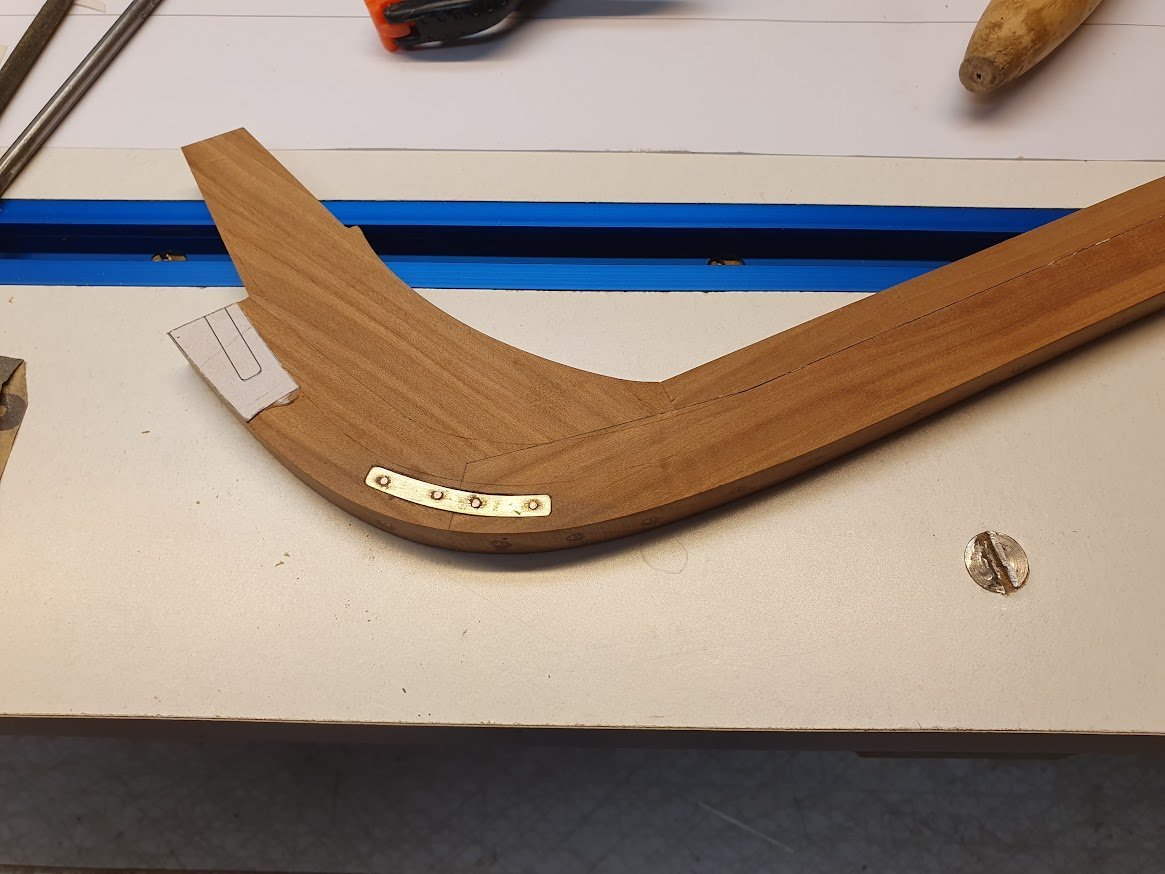
I plan on painting the hull according to the real vessel. Therefore I'm not too bothered about small imperfections or glue spots from CA.
Thanks for likes and shown interest in my build 🙂
- KeithAug, Mirabell61, Tony Hunt and 13 others
-
16
-
Hi Rob,
I built this kit a long time ago.
About painting all the plastic parts. Back then I used Humbrol enamel but if I were to do it today I'd go for the type of paint used by those Warhammer dudes or their alike. Water soluble and sticks equally good I think.
And the hull and deck color? It was built of oak, that is as far as I know. White lead seems plausible for the bottom. But the topsides and deck I have no idea. Go for some weathering I'd say. Maybe no 3 in your picture above.
-
Thanks for the update Johnny!
You are brave man cutting in to you model like that. But I'm sure it will look splendid when done.
I have also pondered over the display option of models, No masts, lower masts like you plan or fully rigged. There are pleasing pros for every choice.
I'm glad those decisions a fair time off in my case.
Keep it up!
-
Just found this log of yours.
Nice build and I look forward to you alterations.
Yes, Billings used (use?) to supply abachi and mahogany strips for planking and details. Same with my Wasa from mid 1980 and Regina that I bought 1989.
Vaddoc also planks his launch with Beech, but you probably have seen that?
Keep it up!
-
Germania Nova 1911 by KeithAug - FINISHED - Scale 1:36 - replica of schooner Germania 1908
in - Build logs for subjects built 1901 - Present Day
Posted
Paint, as druxey suggest, but I've also seen here people using silkspan (?). I never really got an exact translation of that to swedish, but isnt it that thin papery stuff?
Wet it with glue and you can form it to match the saddles. (of course a saddle needs some leather, aye?!)
Excellent metalwork Keith.