


Wintergreen
-
Posts
993 -
Joined
-
Last visited
Content Type
Profiles
Forums
Gallery
Events
Posts posted by Wintergreen
-
-
8 minutes ago, Jorge Hedges said:
thickness or width
I meant thickness. The width and overall appearance is very good. I especially like how you have thinned the handle 🙂
-
3 hours ago, SJSoane said:
Your painting on the friezes and headwork is masterful. And inspiration for us all.
I was about to mention that myself, but you beat me to it Mark. Splendid Siggi 🙂
- Siggi52, mtaylor, FriedClams and 1 other
-
 4
4
-
2 hours ago, Jorge Hedges said:
Slowly, but surely
You know what they say... slowly but surely wins the race.
Well, it's not a race, but I think you get the point 😉
Looking good they do, your oars. Maybe try to thin the blades of the oars a little? It would enhance their appearance I think. Just a friendly suggestion 🙂
Keep it up!
-
Just silently following along here. Well, not silent now though...
Mark, your attention to detail is remarkable. Fascinating, in fact. Also knowing how long you've been on this project.
I don't know how many of you that keep tabs of spent hours? I don't, and that is because it is irrelevant to me. Even if my current project is light years away from what we see here, it is the journey that counts for me. Not how many hours or the cost of accessories.
Bellona is looking wonderful, by the way. 🙂
Keep it up!
From one leftie to another 😉
-
I guess there are as many ways to do blocks as there are builders 🙂
Your way I haven't seen before, with the strop done that way. Other laminated ones I have seen, like KeithAugs.
My very limited experience of block making is that I struggle to get the correct roundness. Mine, this far, always has been to squarish.
Those two piles of pre-production block are a promising start I think. A bit more oval and there you have it.
Keep it up!
- bolin and Keith Black
-
2
-
-
14 hours ago, wefalck said:
Nice shipwrighting btw
Thank you wefalck!
My first tell-tale of time for a break is when I start to loose patience. Then I know I should really take a break and have a snack of sorts.
- Keith Black, mtaylor and James G
-
3
-
I find it interesting that quality of work is direct opposite proportional to level of blood sugar. 🤔
- mtaylor and Keith Black
-
2
-
Oh, wait, what?!
I was dozing a little here in the back row. Sorry bout that.
Nice to see you back here Siggi 🙂
- Siggi52, Keith Black, mtaylor and 2 others
-
5
-
Never realized it before, but those frames are delicate!
I also like the tone/colour of the keel, such nice wood. Makes me think I need to experiment with finishers on my apple-wood.
Btw, the cutting mat is impressive in all its humonguousness 😉 (don't know if that actually is a word, but it sounds right 😄 )
Keep it up!
- Blue Ensign and mtaylor
-
2
-
-
1 hour ago, oakheart said:
Sorry - I could not get the phone to focus on the end of the plank, but you can see what's going on.
Tim, try tapping the area on the screen you want focus on. A frame then appears and stays with the area even if you move your phone.
- Keith Black, oakheart and mtaylor
-
3
-
-
13 minutes ago, Jim Lad said:
Happy to send you some iron if you're a bit short
Excellent John!
A'thoug, what would postage and package be? 🤔
- Keith Black, mtaylor and Jim Lad
-
 3
3
-
Ah, so that's the reason for the absence. Don't think that we didn't notice 😉
Makes sense of course. Better to walk away than doing something irreversible stupid.
Hm, they say the bollards and the stern timbers are some of the hardest parts to figure out. But on the bright side, when you have mastered it, you have taken a step up the skill stairs 😉
Keep it up!
-
-
-
Thank you Per! 27, again, can you image?! (for the 27th time actually 😄)
6 minutes ago, Nirvana said:What made you to choose birch?
In general or specifically for the deck beams?
Why apple and birch from the beginning? Because I had it 🙂
Then, in general, I have used apple for frame and keel, the topmost outboard plank and the beam shelf.
Planking and deck was always going to be birch and I thought, why not birch for deck beams as well? I confess to being a bit lazy since it is much easier to mill and sand to spec.
Next build will probably be apple for all structural parts.
For mast and spars I have some very fine grained pine that I will try.
So, no religious or political reason for any of my choices, just chance and opportunity 😛
Thanks for asking.
-
-
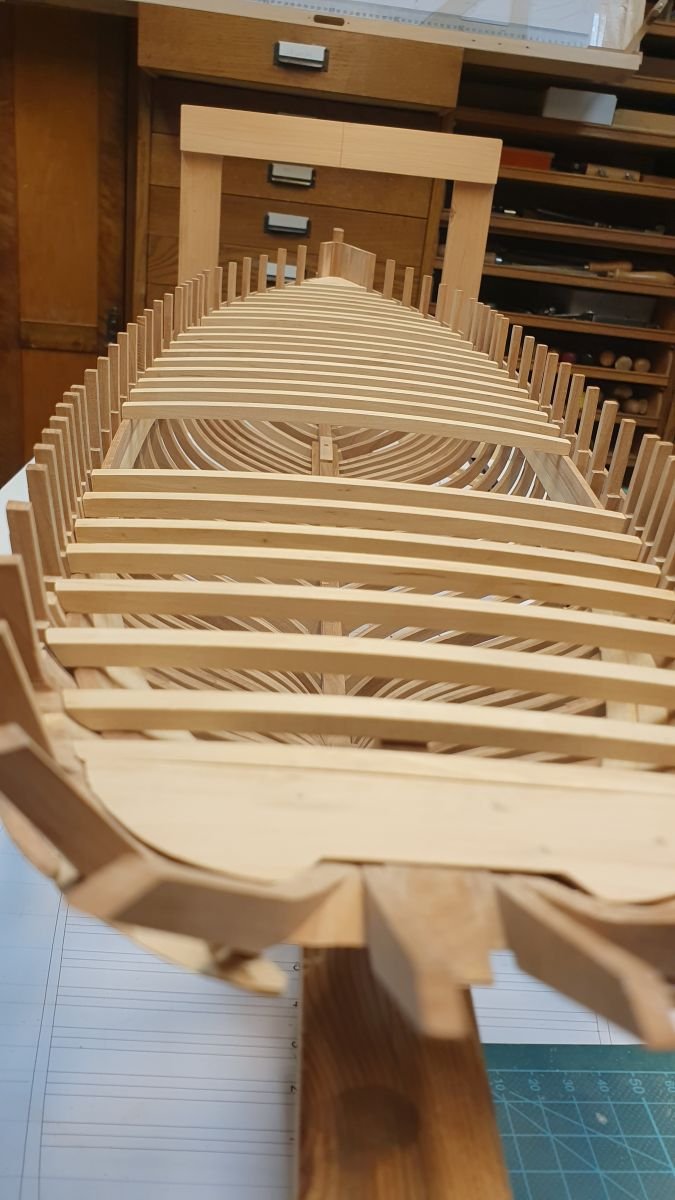
A'hoy! Time for another update. I was constantly being interrupted out in the shop today so I finally gave up.
(Annoying, but it might have something to do with it being my birthday today).
So, deck beams.
I came to think that a drum sander with a fence could have been used for final thickness of the beams. But, I don't have one (yet).
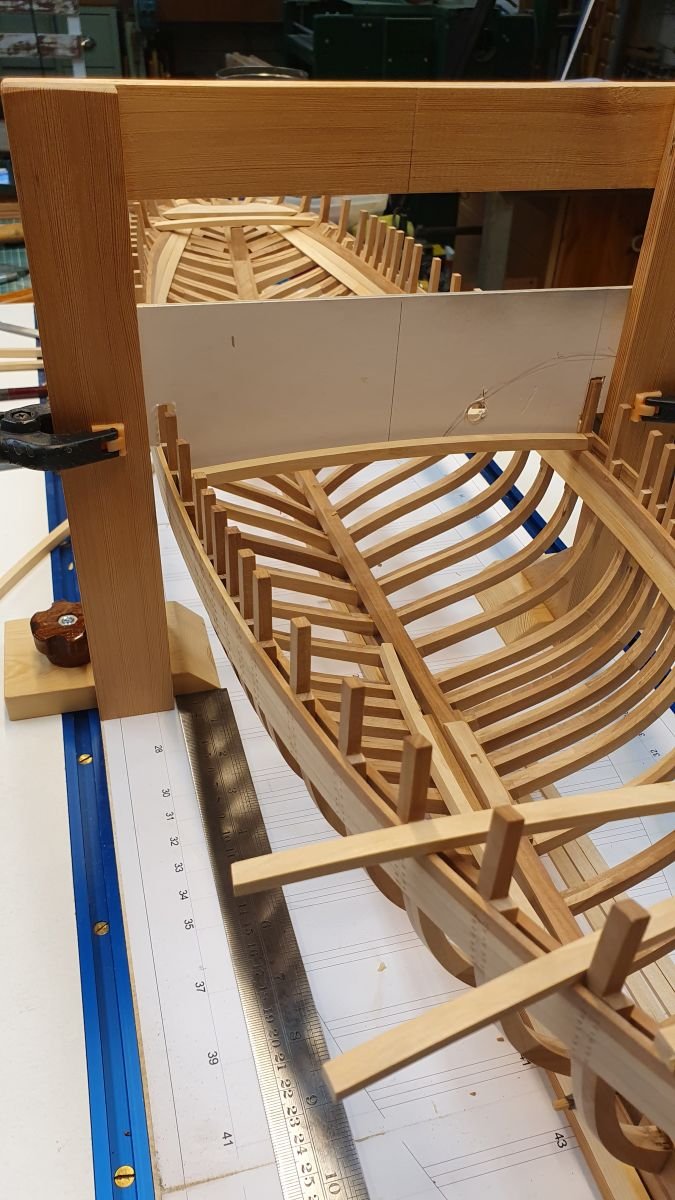
All beams are in place. On the real ship they are fastened with a single bolt in center, so I intend to mimic that with a tree nail. 0.8 or 1.0 mm, but have decided yet.
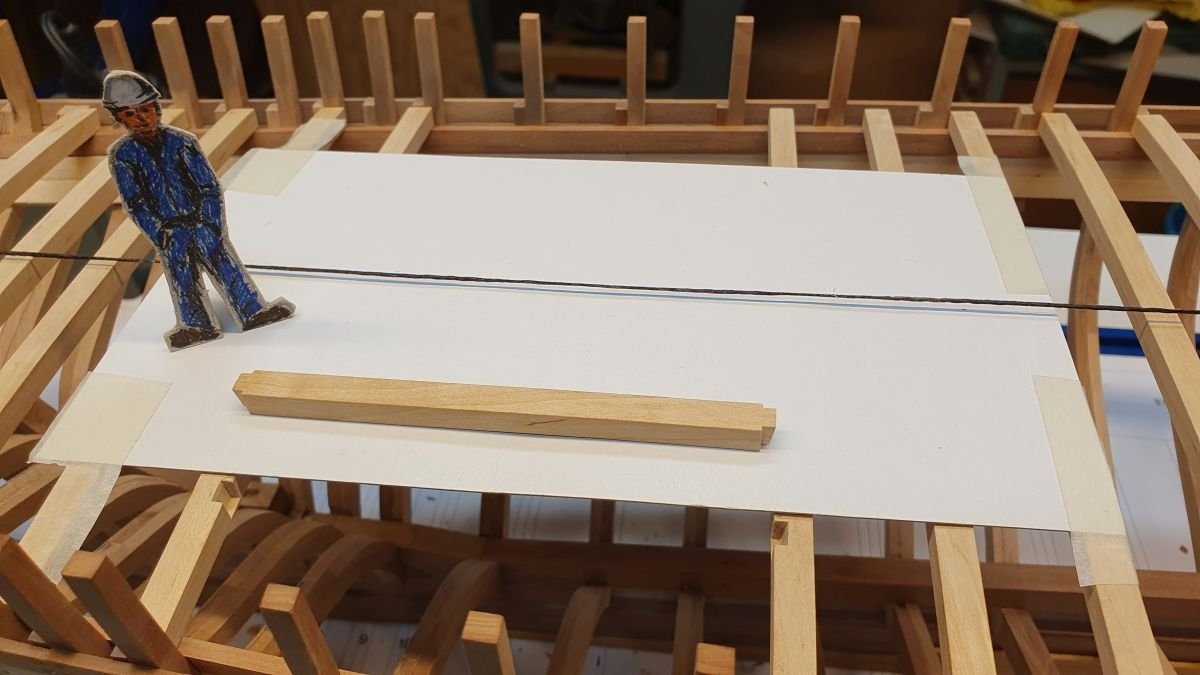
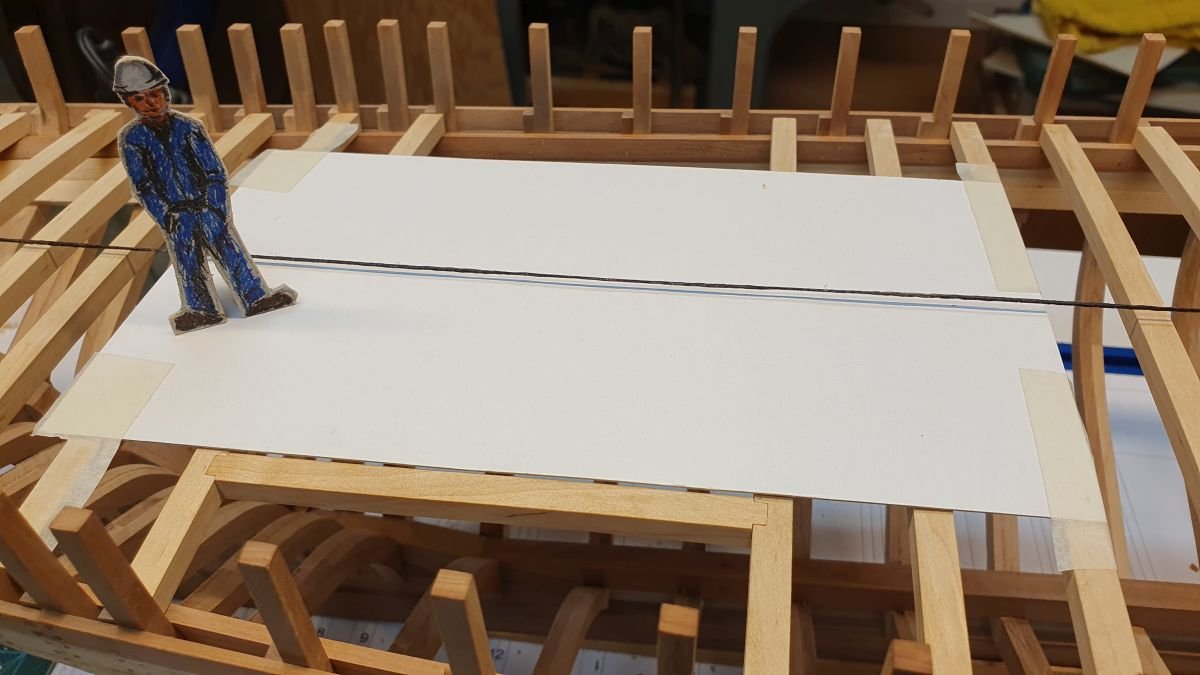
Care was taken so the beams sat perfectly 90 degrees to center line using the gantry and a stiff paper board as reference. The scale gave the distance to forward perpendicular line and that measurement was taken from the elevation plan.

It payed off, the eye is sensitive to misalignment and there is none. 🙂

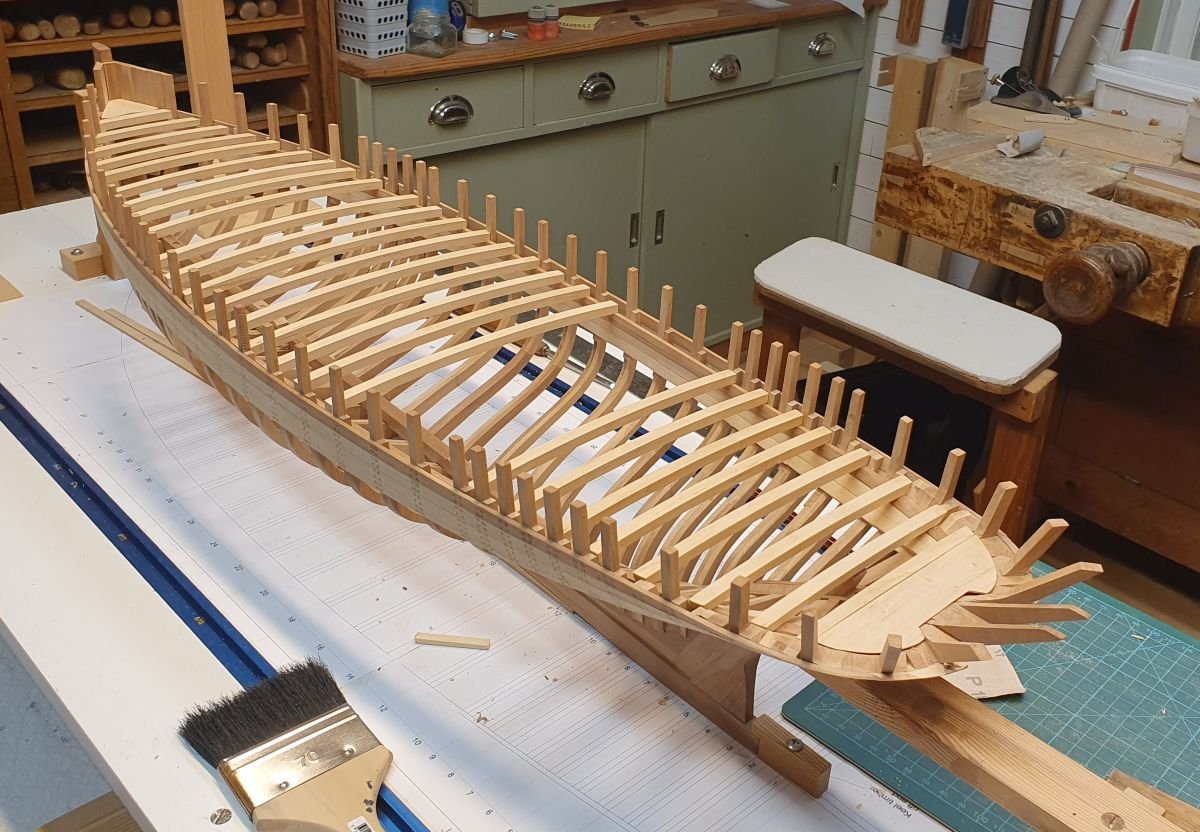
Next up are carlings surrounding the hatches and mast openings. I started with the main hatch. The original drawing calls for dove tails, but that is above my current skill level, so I aimed for a recessed joint instead. Also, birch is kind of soft, and apple would probably been easier, but that is for next project.
It was around here today that all interruptions came so I'm more than happy with the outcome 🙂
Thanks for likes and comments! Always appreciated 🙂
-
Exactly @KeithAug, what would fun be in that???
Also, it was a deliberate action on my part, that about starting making sawdust 😄
- mtaylor and Keith Black
-
2
-
10 hours ago, FlyingFish said:
Looks to me like the stern post was measured to the sheer line not the deck line.
That's possible Andy since I didn't cross check the stern assembly with the elevation/deck plans. I also realized that I couldn't take the deck beam length from the plans, instead I measured on the hull and cut thereafter. It's a learning process this ship building stuff 😁
Of course it would help to invest some more hours into the drafting, but that is not entirely clear either, what is important and what is not. But I'm learning.
And thanks, the clouds cleared today and I felt much better. It's the upcoming surgery that haunts me and how day-to-day life will be post-op.
- Keith Black, FlyingFish and mtaylor
-
3
-
Tim, it's a learning process and looks like you're doing good.
I also use regular PVA glue instead of the fast-tack model stuff. That model -glue is too stressful to use when it comes to certain tasks, like planking. For other applications it is perfect with its fast tack and hold.
Keep it up!
- oakheart and Keith Black
-
2
-

HMS Bellona 1760 by SJSoane - Scale 1:64 - English 74-gun - as designed
in - Build logs for subjects built 1751 - 1800
Posted
I would suggest that you build all the launches to her. But maybe you already have?
However, I like your attitude, you are finished when you say you are finished. A little like the wizards... they are never late, nor are they early, they arrive exactly at the time they decided upon.
Time will tell how far we came on our journeys 🙂