
HOLIDAY DONATION DRIVE - SUPPORT MSW - DO YOUR PART TO KEEP THIS GREAT FORUM GOING! (Only 13 donations so far - C'mon guys!)
×


popeye the sailor
-
Posts
16,007 -
Joined
-
Last visited
Content Type
Profiles
Forums
Gallery
Events
Everything posted by popeye the sailor
-
 amazing job on the stands Doris.....your attention to detail is fabulous! I know that you like to make all your decorations from scratch, but imagine what a time saver it would be if you worked from molds. especially the ones that can be used on other models.
- 1,035 replies
-
- 6
-

-
- royal katherine
- ship of the line
- (and 1 more)
-
I'm flattered that your bringing something out of mothballs on account of 'lil 'ol me I would suggest though, that you post it where I have my car build. folks might get distracted from the Hannah. it appears that you did away with the chrome.....I think it looks better I hope your planning to post it........looks like you were off on a very good start.
-
I hadn't thought of that J............most of it will be covered with decals......just various spots along the rockers will show. thanks for the firing order, there is a illustration of it in the instructions. I'll compare the two, to keep them honest I haven't done much......been dealing with work, snow, and sub zero temps. perfect to be inside......wish I could be....☃️
-
yea....just a little I still have some paint left..........might just remask her and redo that side.
-
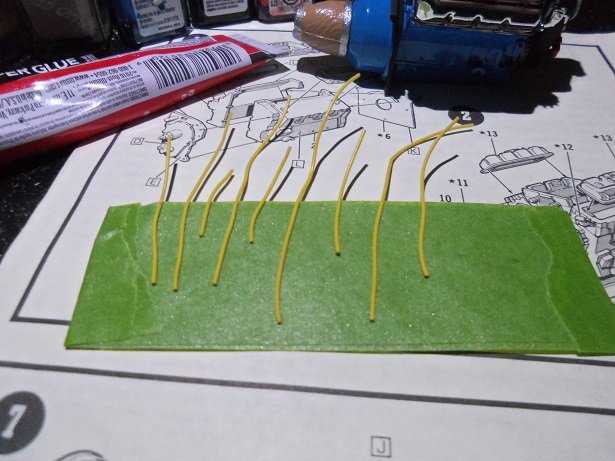
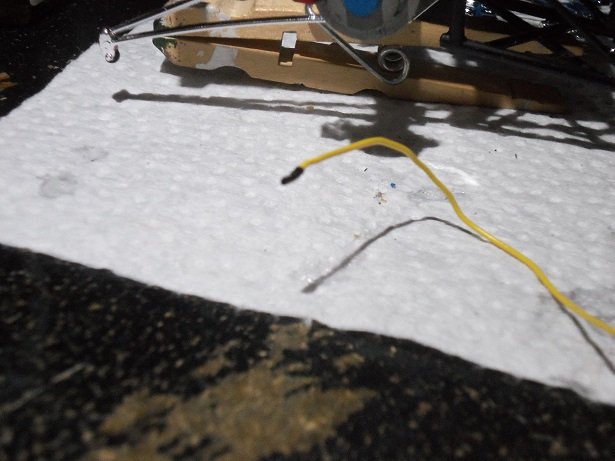
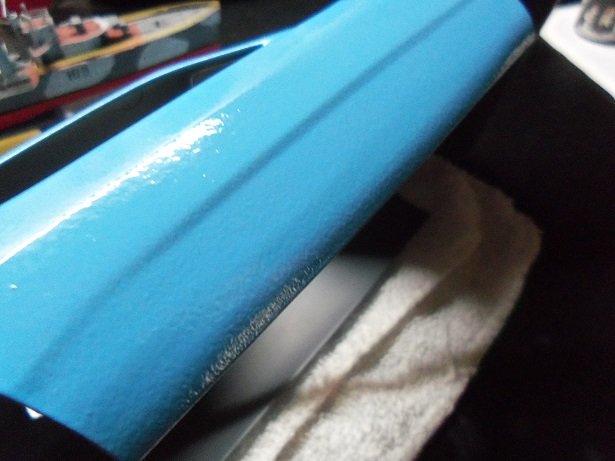
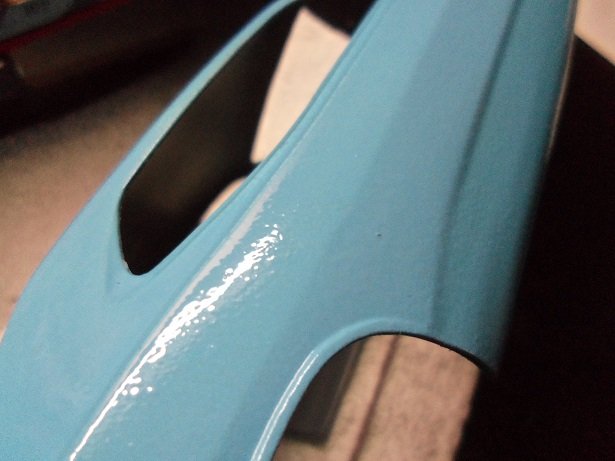
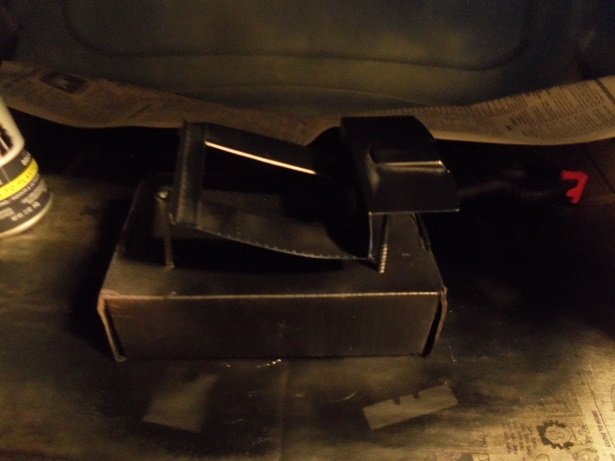
I recalled from having built the English Leather car, the hoses and wires were the biggest pain to do. the diameter of the rubberized tubing is vastly inconsistent with the pins that they need to be pushed onto. the ends need to be stretched out to accomplish this. I've been using one of my picks, since the end is tapered........it works, but you need to be quick about pushing the hose on the ignition wires pose a different problem.......black rubber ends need to be fitted on, so they can be pushed onto the distributor........the magneto wire need to have them on both ends, to be routed where it need to go. the wire is metal cored.......the kind of wire you would find in toys and such. if it had some body to it, would be a big help, but it is pretty flimsy. this adds to the problem of assembling these pieces. the black ends I need to put on the wires are 1/8 of an inch long. I cut the wires and arranged them on a piece of tape, from the magneto , to #8. after futile attempts to fit one of the black 'boots' on the wires, I tried it with what was left of the wire material, and I managed to get one on. no glue.......it's just pushed on there...........not only that, from all the mess'in 'round I've done, it looks distorted. I have a thought about a plan B, but I want to try a little more before I go drastic with this. as for the body........I took a couple of pictures of the passenger side, to show the paint imperfection.
-
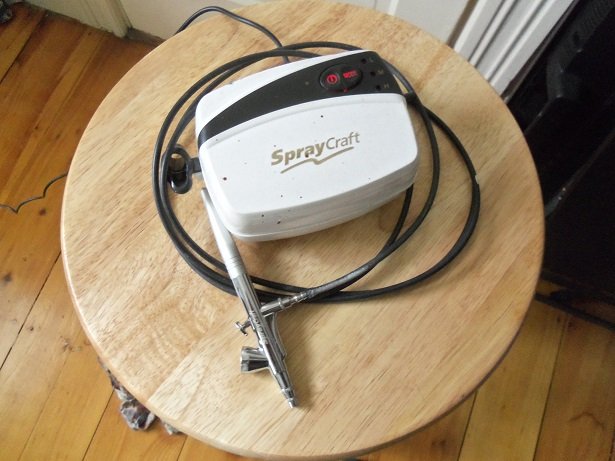
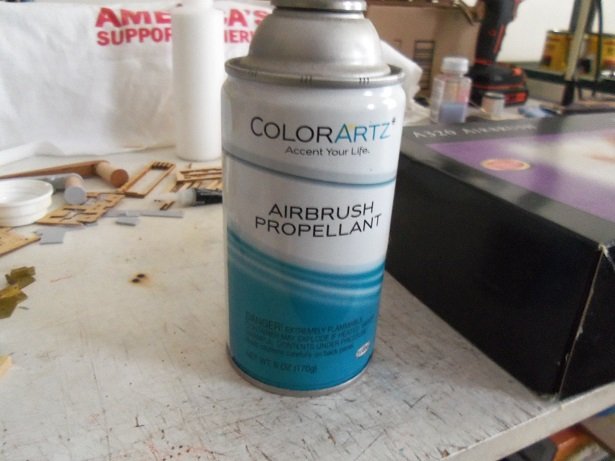
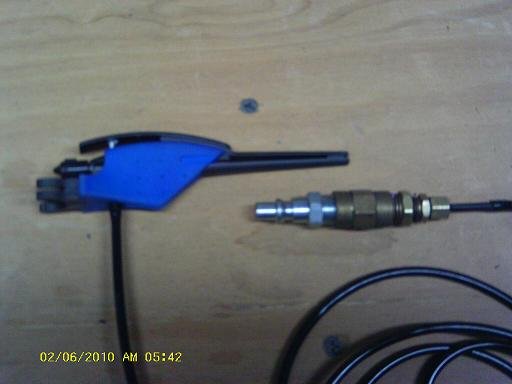
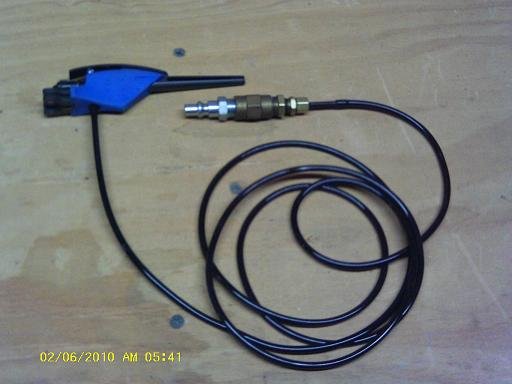
me neither.......that's why I modified the fitting on the EZ brush to run off my compressor. for a person who doesn't have the room for a compressor...... ......even a small one, they may be a fair substitute........but having to stop frequently must make it a long drawn out process. I have a friend...Don Wheeler, who has tried and evaluated many different types of airbrushes....some good......some not so good. I guess there is a love/hate relationship for the Testor brushes.......Aztek in particular. haven't spoken to him for quite a while now, but his blog site is still up. https://sites.google.com/site/donsairbrushtips/home the pressure coming from a can is unpredictable, I think
-
very nice Vossie.....windlass looks the treat. as long as it looks functional.....that's my goal
- 714 replies
-
- 1
-
-
- lady nelson
- victory models
- (and 1 more)
-
ship's boats look awesome Greg........I use the sprue method, like Carl, when painting as much as I can. the only drawback is flash.......trimming and cleaning the part before painting can null that thought out real quick superb job detailing her out!
-
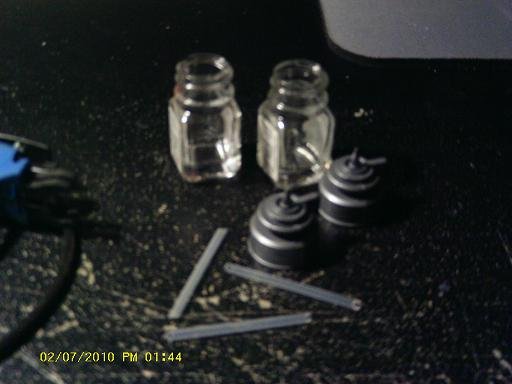
thanks for the kind comments gents........I did make a mistake. it's the passenger side that saw the goof up, but I looked at it a few moments ago, and a lot of it has actually disappeared since it's had time to fully cure. it's passable.....most of it will be covered with decals anyway. I'll just need to fix any overs prays and stuff. even I'm impressed with how glossy and smooth the finish is.........a website I used to belong to, swore by Future floor wax! I'll show the flaw CDW.........it's really not that bad I've built a few of those cars too Lou.......they are neat if the paints are good, they should still spray fine........I think it's just that the caps for the EZ brush are getting worn. I use thin wire to clean them. time for a new system, me thinks......I will continue to use the Spray Craft for the time being. that was an older bottle of light blue....to tell ya the truth, I think I thinned it a bit too much. it all worked out though.......so I'm happy. no......I haven't tried the A3205 yet. pulling out the paper work for it, I found that there was more stuff added to it. it comes with the airbrush, two glass bottles w/caps and siphon tubes, 1 side bowl {turns it into a gravity feed I think} and 1 general nozzle. the A3208 has the same, but includes a second nozzle and a can of compressed air. you can find it on E-bay for around $40.00 https://www.ebay.com/p/Testors-Aztek-A3205-Workhorse-Airbrush-Set/1000018725
-
the Testor's site has a selection to choose from CDW http://www.hobbylinc.com/htm/tes/tes9326.htm http://www.testors.com/category/136949/Airbrushes I never used them much either........I bought one a long time ago.........got to be a pain setting it up for a small job, just to spend double the time cleaning it. when I started working on wooden ships, I felt that it would be good to have one......so many large areas to paint. the EZ brush was a big help........I painted many models with it. I'm not as good as others here on the site........I'm just lucky I get the results that I do
-
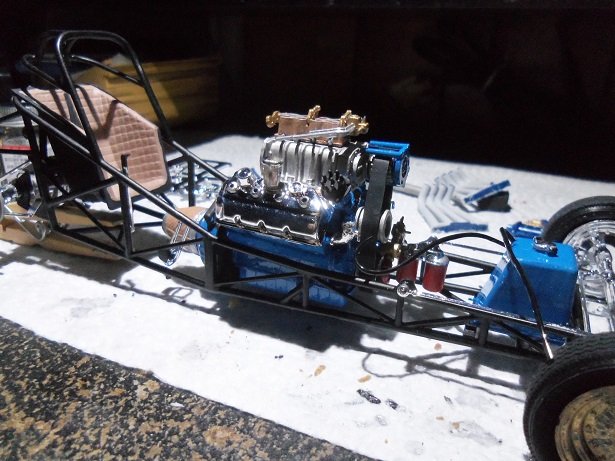
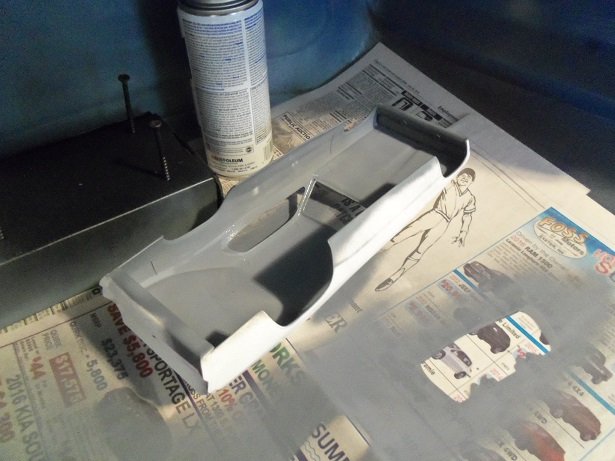
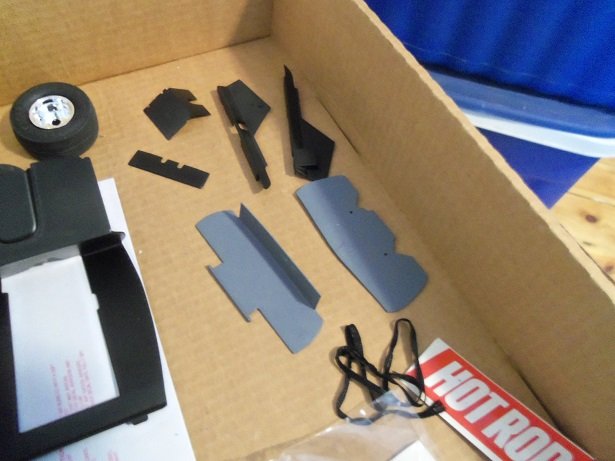
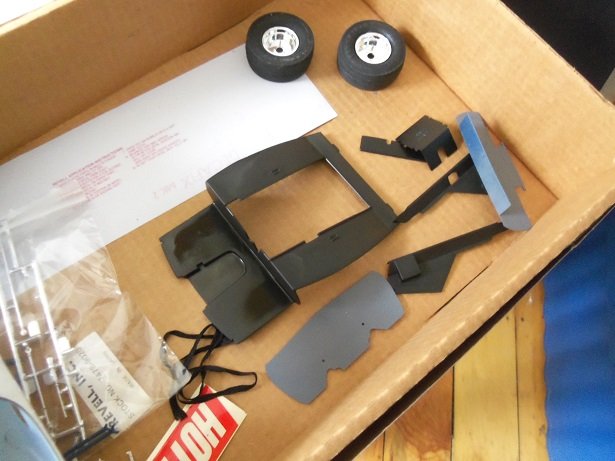
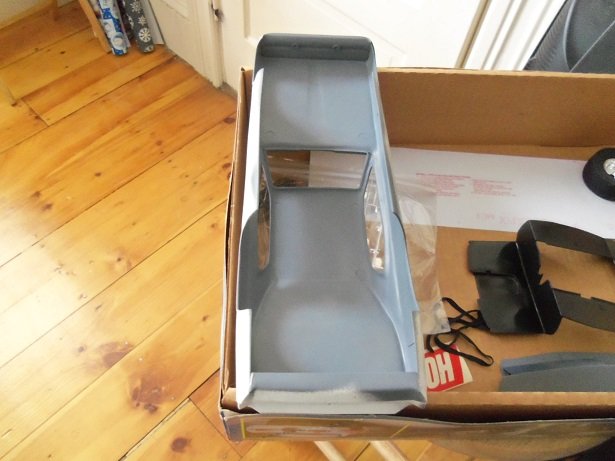
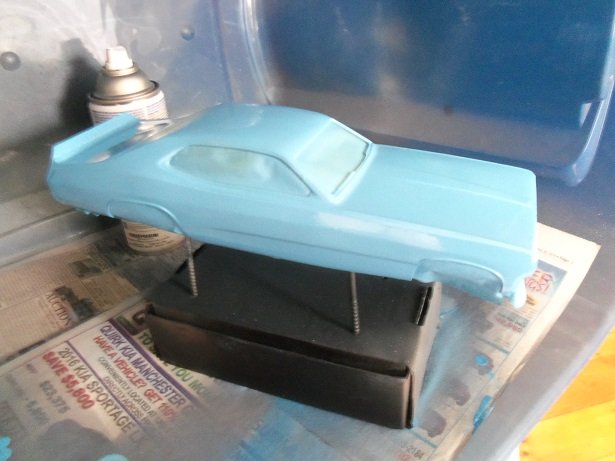
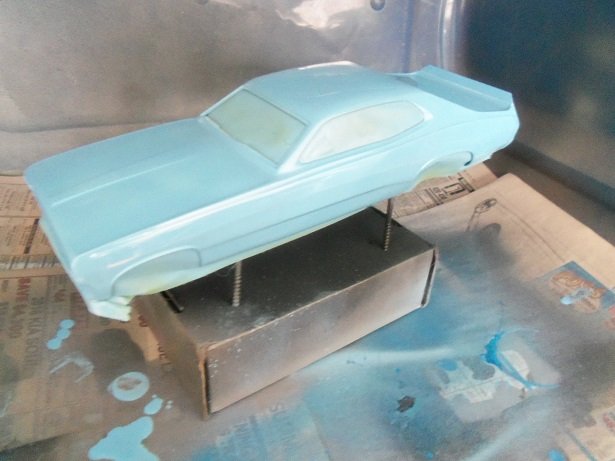
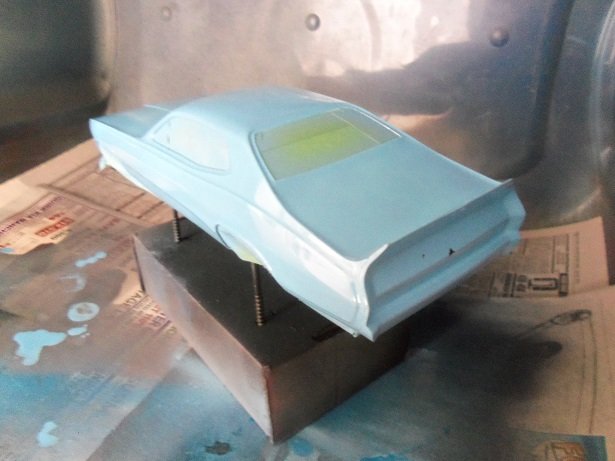
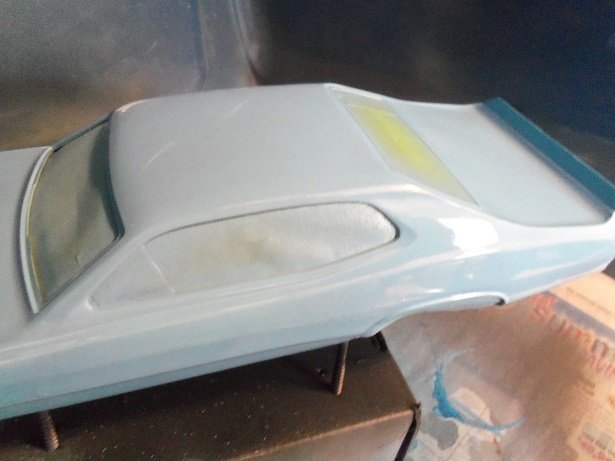
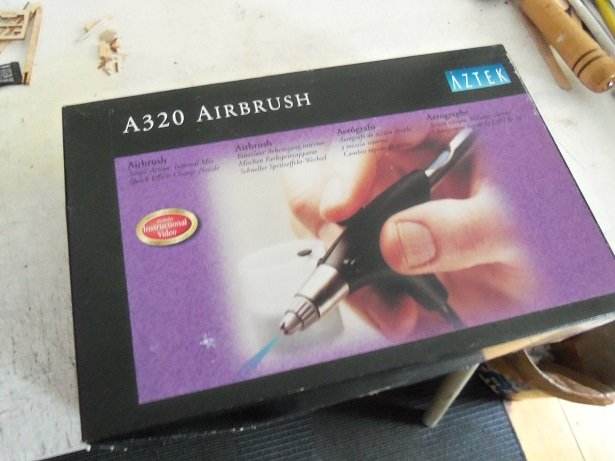
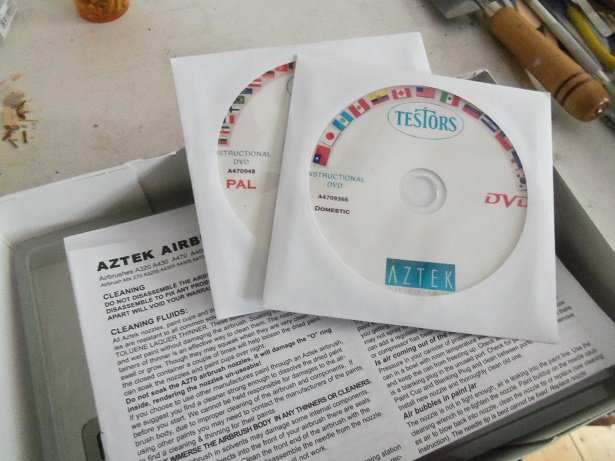
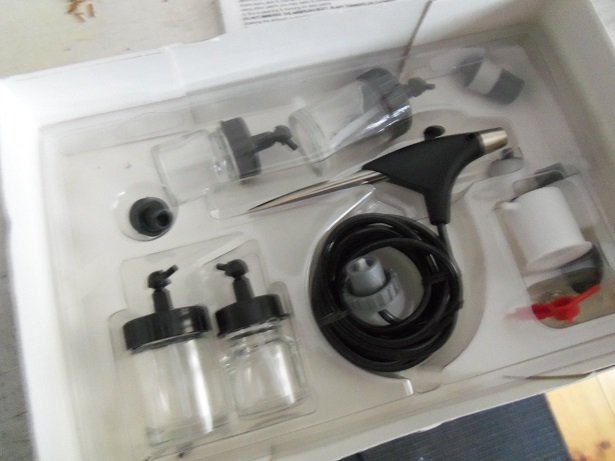
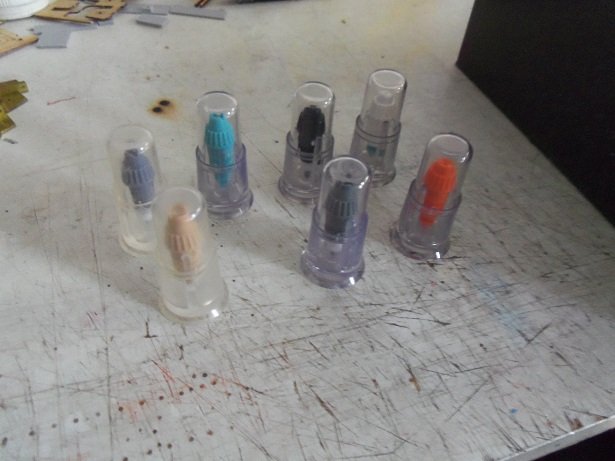
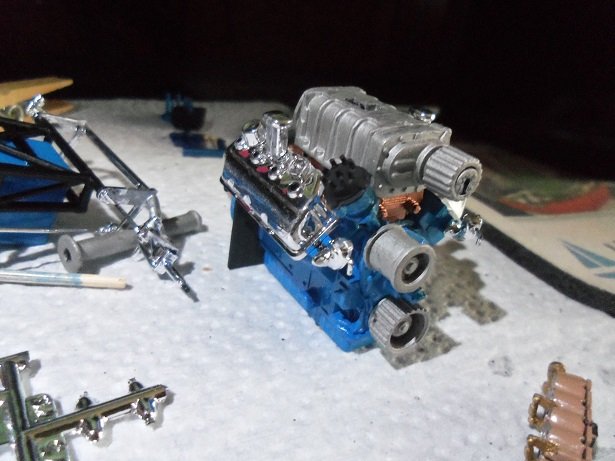
I neglected to show a thing or two that has already been added to the chassis....one is the wheelie bars. I added them the other evening, before I ended the session. then, just for fun.........I dry fitted the engine in it's place... this morning, I though I'd start working towards painting the body. I've already painted a few of the parts for it. the body is supposed to be blue exterior, with flat black for the interior. I wanted to do something a bit different, so the interior will be gray, with flat black for the cockpit shroud. I was going to do flat black on one side, with gray for the other side.....but I later opted to go completely flat black. the interior of the body was painted gray. the shroud is still a little wet at the moment.........the body is pretty dry for the exterior of the body, I chose to leave the rear window white........I'll give it a shot of clear gloss when the body is painted. I gave it some more drying time, before the windows and interior was masked up for painting the exterior. it took some time to do it {the tangent that I spoke of} so I could spray in the spare room, I had modified the EZ airbrush to run off of the compressor for the Spray craft airbrush. it's a small compressor.......I haven't used the Spray craft outfit { I got it new.....long story}, mainly because it's a gravity feed and a lot more cleaning is involved. I was initially going to paint the body in Grabber Blue........I have what's left of a small rattle can of it {its the same paint I used to paint the Nordkap....tells ya how long I've had it}. that quickly became a bust........it wouldn't spray right, and leaked all over the place........even on the floor! well........after cleaning up that mess, I was left to choose another paint, since I don't have any small bottles of Grabber Blue. I chose a lighter color blue.....it's still within the Chrysler / Plymouth spectrum, that and I like the color......should be good. if your looking in Lou.......it came from the lot I bought off you thinning it down........setting up the airbrush........I was ready to go.............NOT! goshdarn thing wouldn't spray, if it's life depended on it! not only that, I was getting really bad results to boot! thinned the paint some more........no good........traded caps.......even worse! now I'm getting angry and running out of things to try! with things look'in quite bleak....there was only one thing to do.......try out the Spray Craft airbrush! the only saving grace here, is that the bad area that I did with the EZ brush, will be covered over with a decal. I thought about redoing it, but I don't think it needs to be done. so.......it is what it is light has a lot to do with this color........I think it will darken a little as it cures. the driver side is the skeptical side....more toward the rocker panel. the bin doesn't help either.......light is bouncing off from every angle. I have another airbrush that I haven't tried yet...surprising since it's a siphon feed. it's an aztek A320 airbrush set. comes with instructional videos and other literature now.......I'm not sure, but I think there are more parts here than there should be........like two extra bottles and other parts that are floating 'round in here.......I haven't looked at anything about it. it also came with several tips.....the colors indicates the spray, I believe. keen to note that it's set up to run off of an air canister.......same type that can be used with the EZ airbrush. as I read...the canister needs to be placed in warm water when in use, to prevent moisture and freeze up. I will need to order the caps from Testor's, if I want to continue with the EZ airbrush. for now, I guess I'll use the Spray Craft, since it is now set up. it looks like it did a decent job
-
the Testor's EZ airbrush hasn't been a bad investment for me........I bought my first one back in 2010. set up to be used with an air canister, it appeared to be a cheap alternative...think I bought it for 24.99 or something. later on, I saw another one in the clearance bin...I bought that one too. I modified it to run off of my 25 gal compressor in the garage. it is able to use the 1/4 oz bottles of paint, sold by Testor's. the siphon tubes and caps came with the kit. you can also buy the empty bottles, if your local craft or model store stocks them. I just buy the small bottles of thinner and dump them in the bigger bottles..........I have plenty kick'in 'round. the sprayer has a clip on it that locks onto the caps. once modified with the new connector for the compressor, I'm in business. the spray is adjustable by turning the air outlet nozzle. I normally run it with 15 to 25 PSI, depending on how much push it needs. it's a very simple siphon feed set up and doesn't require a lot of clean up......just the caps and the siphon tubes.
-
this is only because I have them setting out in the open Ken. I usually have them in the closet......in the closet that I use, there are hot water pipes for the second and third floors......keeps it rather warm inside. it hasn't been too bad here so far.....temps outside have been mild.....but I think all that will change very quickly I used to do that with the compressed air can for the Testor's EZ airbrush that I use. it's a cheap airbrush.......look for the 'Amazing Air' airbrush kits sold by Testor's. originally, they are set up to be used with these air cans.......you lay them in warm water, so they don't create their own moisture or freeze up, as you use them. I said the heck with all that, and modified it to run off my compressor. ....and so..........while typing this, the entity known as Popeye, trotted off on another tangent. what is he getting into now?
-
awesome looking project CDW........your off to a real good start I didn't gt no Tee shirt... {see what happens when you tell kids not to do something!!!! } kudos to Richmond for listing those links.........very nice eye candy I'll be following what looks to be a real fine model
-
errrrrrrrrr......I don't have a cat progress today.........pictures later
-
thanks Carl and thanks to those who hit the like button. not much done today.......errands and stuff. we're supposed to get hit with a good snow storm this week end, and the admiral wanted to make sure we were ready. I suggested spam and crackers........and she almost hit me perhaps a better day tomorrow
-
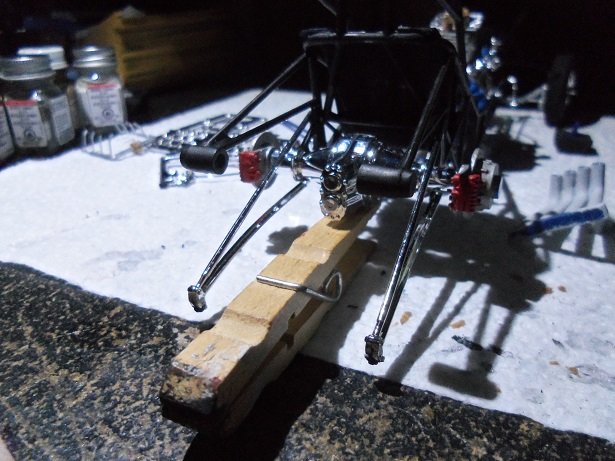
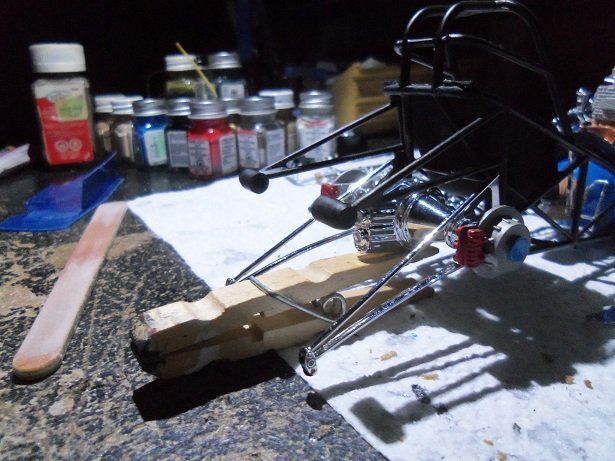
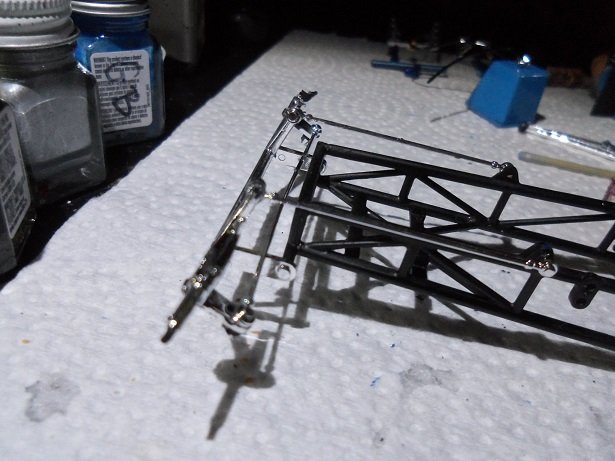
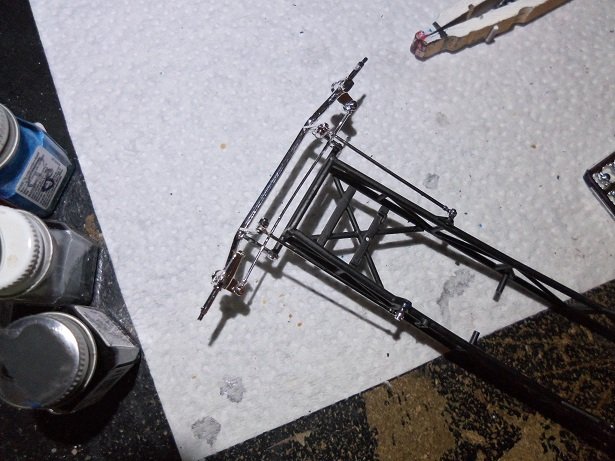
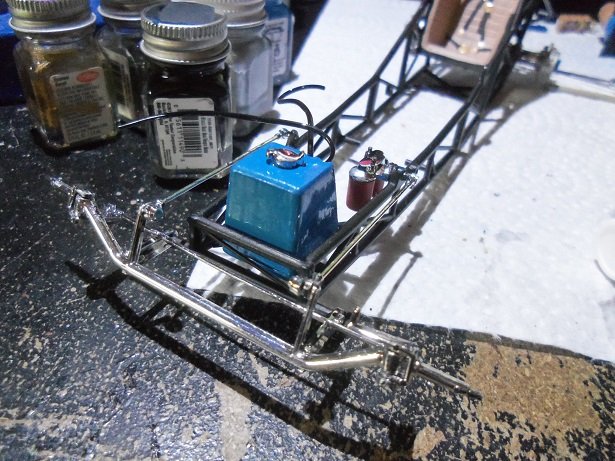
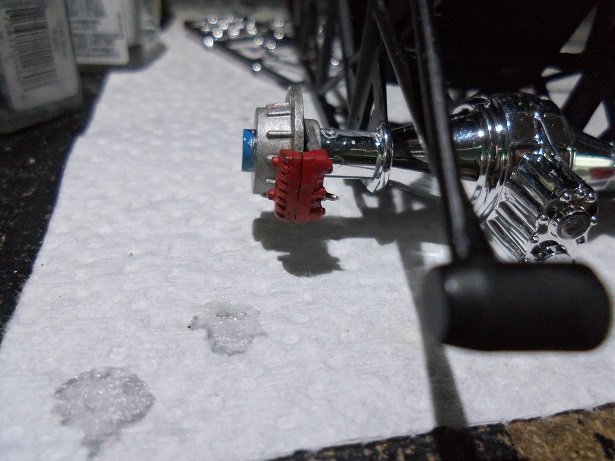
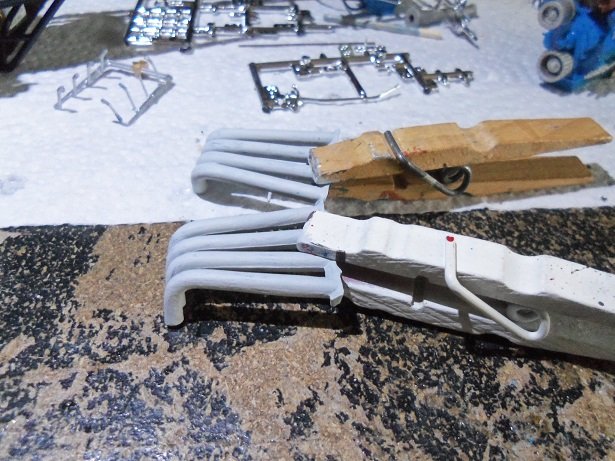
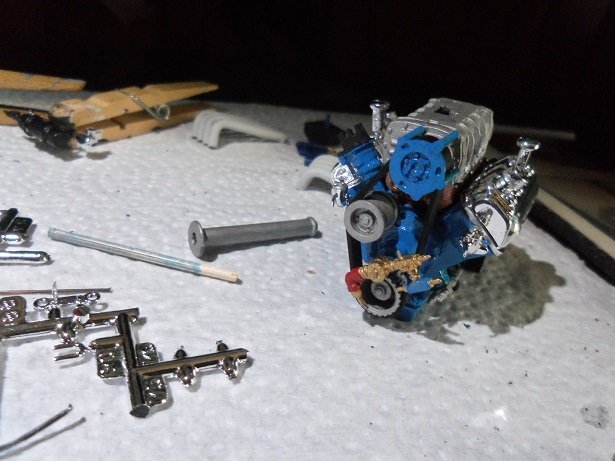
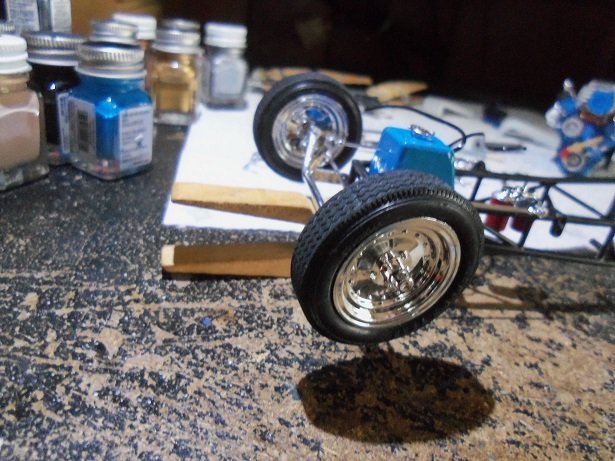
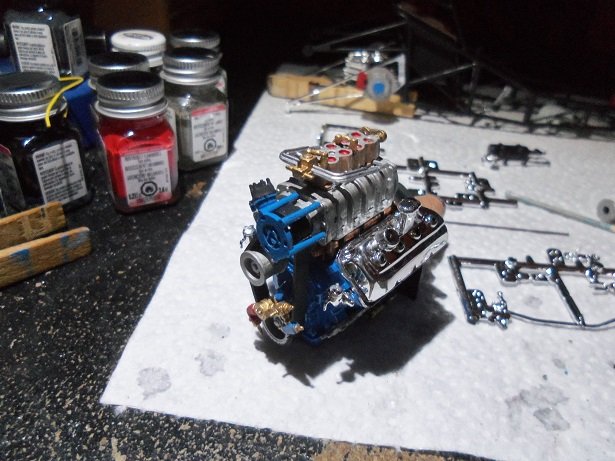
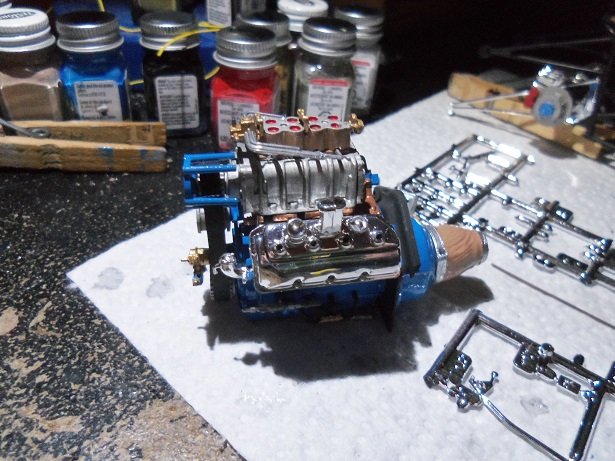
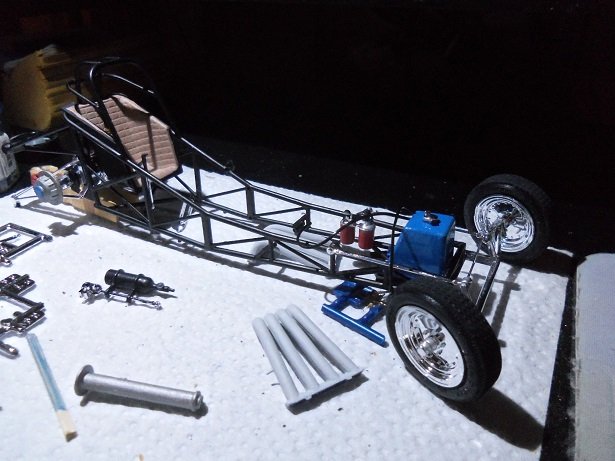
so now.........the update {before anything else happens} so........I'm trying to assemble the front suspension, so it was movable. the tie rod was added to the assembly...... it's pretty flimsy........the rod bends very easily when moving the spindles......but it does move just in case some cement did get in there, I would move it back and fourth. seeing no reason why not, the fuel cell was cemented in place. the oil filters were also cemented in place..... next, was time to fix that brake caliper......the left side does not have a hose connector on it, so a hole was drilled and a tiny piece of wire was cemented in, to act as the pin. figuring out to assemble the extinguisher and steering wheel shaft together wasn't that hard either. a razor blade was inserted in between the bracket halves and spread far enough apart to get the shaft in there. once dry, the extinguisher can be painted. the exhaust headers are supposed to be painted gun metal.......I don't have any. instead, I painted them a light gray, which I think will look just as good. assembly on the engine need to continue.....the distributor was cemented in place. after it had dried for a short time, the drive belt, supercharger pulley guard, and pump plumbing was added. the front tires were sanded to rough up the tread...they were added next. this next part was a pain........adding the fuel rail to the induction plate........one of the rail lines broke off. after it was fixed and allowed to dry, the completed assembly was added to the engine. now to get the lower fuel rail on. I started to add the rubber hoses to the left side of the engine {an oil line}..........it was terrible when I did the English Leather.......it's still a pain now. the hose supplied in the kit.......really weak and prone to getting crushed by the use of tweezers.........also really stiff. really should have gone 'plan B' on it. you can hardly see it, but it's down near the oil pan. I use an awl to flare out the ends, so it will slip over the pins....CA to cement the connection. setting the assemblies aside for some much needed drying time, the attention was turned towards the body. painting the sheet metal for the frames was done in flat black. the part that surrounds the cockpit area, will be done in flat black and gray........the underside of the body will be gray. I think the outer body is to be blue and white.......love to do something exotic I have some dragon images......I could do the ChiTown Hustler! that was an actual funny car back in the 70's........I'd have to look it up to see how it would look. I also looked up the Accel wires logo.....I may look up a couple more 'sponsors'. the frame's metal parts came out of the booth.........it was a bit cold in the room......the flat black does show a hint of 'white'. the best temperature to paint is anywhere above 70 degrees...ambient, without humidity. lacquer is much more strict, but I love the finish it lends to a model usually the room is pretty comfy......the admiral must have turned the heat down without my knowing it {she's sneaky like that}. anyone who has wielded an airbrush, knows what 'white' is all bout. in some cases, the paint doesn't dry properly, but in a lot of cases, it shows how much moisture there is. in both cases, the paint takes on a 'whitish hue' and looks clouded. the cockpit canopy was paint the flat black first, and viewed a bit later, it had to be redone, because it has visible blotches in places. when I do the outer body........I will make sure the temp is set for spraying.........I don't like to redo paint work you can see some of the 'white' in this picture.......here is how it looks now after respraying it. {note: I used a rattle can.....the can was cold to the touch} this is much better 👍 hopefully I can get more done today.


-
I'm back..........turned out to be a small problem. he had replaced his own starter a short time ago. I was quite proud of him that he did it all on his own, but he needs to make sure he covers all the bases. he called me complaining that the car loses power and shuts down........by power, I mean electrical. upon hearing that, I thought that the problem may either be a breaker {relay} in the main power supply from the battery, or a bad connection somewhere. the admiral at this time was looking up the problem online.........you should see all the silly scenarios posted there I went over to his house and went on a test drive with him........it did it twice. all power kicks out, and the car shuts down. convinced that it was a connection problem, I started at the source....the battery, where I could pull the positive cable off the battery without tools! I took a guess that it was the cable he removed to do the starter........it was. it was tight.......but it was tightened all the way, which indicates wear........as I pointed out, I asked him if h checked to be sure that it was tight.....no that's what I meant about covering all the bases, I told him...........be sure that everything you do is tight. he's doing alright........he's learning my automotive side..........my other son learned my carpenter side...he's off on his own.....totally revamped his house, and it looks great! I'm very proud of them........these two aspects can bankrupt you, if you don't know how to do it yourself anyway.....after a fruitless jaunt trying to get post shims {most positive posts on these new cars are a nightmare....can't just replace the clamp anymore}, we went to my house and I cut a piece of hose clamp to lodge in there to act as a shim...........went over to his house and reconnected the cable. the road test showed that the problem was solved.......all it cost us was time
-
yepper.........I've built a few formula 1 cars too HOF...glad your liking the log never built that one before...........I'll have to look that one up I think the Hemi under glass would be a neat one too! why they made them roll was always the big question......not likely that you could play with them after I'll check that link out J........thanks a heap! I didn't do much surfing to find what I posted I have an update.........but I have to go and check out a car related problem at my son's house {go figure}. see you all when I get back.
-
will the missing props be noticeable? great job on them........in spite of the problems they caused.
-
it's OK about the flag EJ..........I never saw it before you corrected the mistake I've gotten the discoloration from the Ca as well.......I use white glue instead
-
amazing how you excel at this scale.........such phenomenal detail! the structures look sweet!........really nice rigging