


popeye the sailor
-
Posts
16,007 -
Joined
-
Last visited
Content Type
Profiles
Forums
Gallery
Events
Everything posted by popeye the sailor
-
 thanks to all of you for the kind comments, and to those who hit the like button. the work week is over.........playtime tomorrow YIPPIE!!!!!!!
 -
you have been busy........the beams look great! are you thinking that the planking will level it out, by the time you reach the transom? I wish I had more savvy with these types of ships...... but you've really done some nice work there
-
thanks Piet.........appreciate the kind word
-
glad to hear you got into the program..........sad to hear that it didn't help. hope you make some progress soon.......and get better. can't wait to see more of your wonderful build
- 434 replies
-
- 6
-

-
- pelikaan
- beamtrawler
- (and 2 more)
-
hello Gerty! thanks for the good word
-
thanks to all the kind comments and those who hit the like button. oddly enough, this does seem to fall into the typical Maine lobster boat color schemes, although it is just little loud there is a bit more for the outside........but for the inside, I'll tone down the color, still keeping with the two color scheme. you'll see what I mean soon they do make a Miami Vice boat model Rob....Monogram makes it. few decades old though...not sure if it can still be had. three different kits saw one once.........told I couldn't have it........WAAAAAAAAA!
-
you got me speculating too much.......I gotta see where your going with this. very interesting Piet!
-
Cutty Sark by NenadM
popeye the sailor replied to NenadM's topic in - Build logs for subjects built 1851 - 1900
with me , it's my son's budgeting skills.........I try to give my 2 cents..........but I see no change one does what one can.......but when they leave, you hope they come by for refreshers- 4,152 replies
-
- 5
-
-
- cutty sark
- tehnodidakta
- (and 1 more)
-
......or....if you wanted to be totally nutz, simply make new yards and save them for another build. yes....I know......you had to mention this to someone whose nutz already however you go my friend.........I will follow along
-
I can see why you'd be having such fits! the decking construction is different than the Billing kit. mine has the platform, which will be planked with thin strip. the margins are what.........3 mm.......pretty thin to start with...and I see you've scarfed them together. really nice work there! I recently received some old planking wood from Mark......it was from an old Billing kit he built {wasa...Vasa}. in the bundle was quite a bit of unfinished basswood thin strip..........I have been looking all over for it! normally, I buy the Annegre strips....I got some 3 mm wide strips. the bag Mark sent might be mixed.....they are 5 mm. anyway......if I should use it, it will be nice to be able to give my decks a different hue. when I gt around to them.....it will be interesting how they will come out. I had to dismantle the original hull, due to some problems.....so the kit build will become a semi scratch project. are you going to scrape the decks, or simply sand?
-
super looking hull Sjors!
-
I could use a few..........if anyone asks, I can tell them they are imported boats from the Netherlands! sweet looking boat Sjors
- 1,616 replies
-
- 7
-
-
- caldercraft
- agamemnon
- (and 1 more)
-
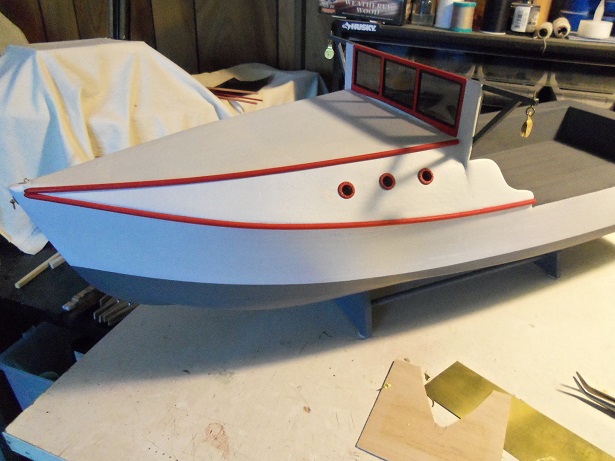
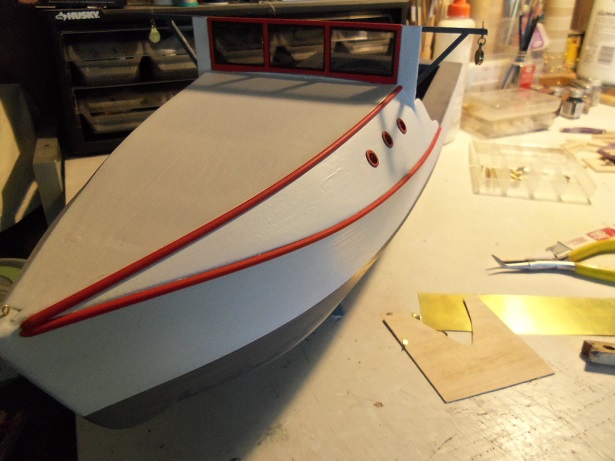
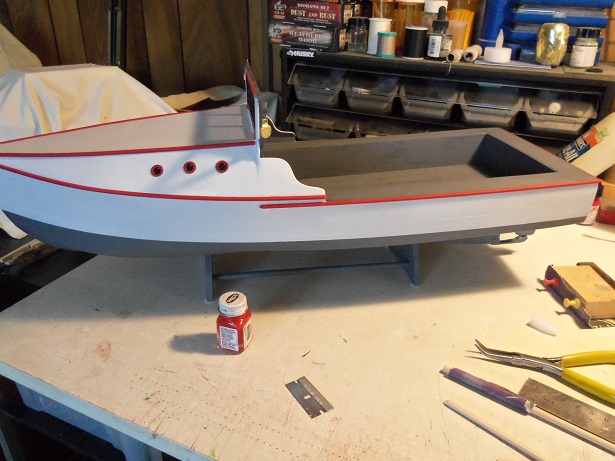
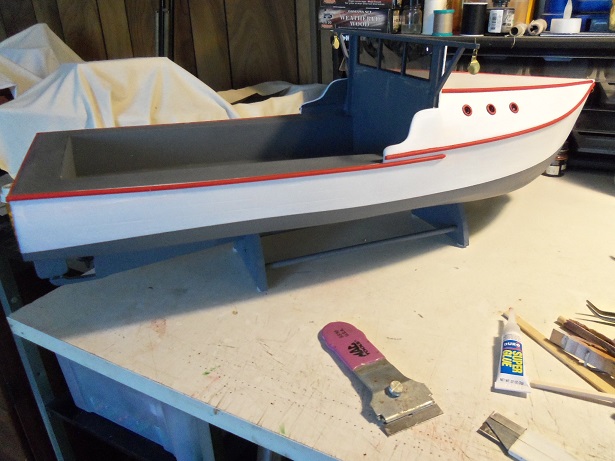
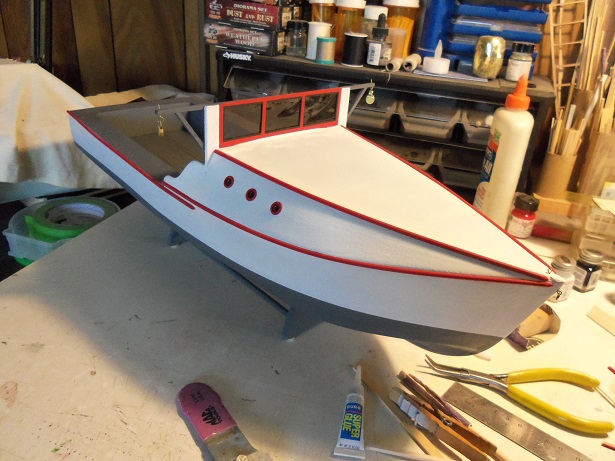
thanks for the likes folks....still a lot more to add like this, for instance............. it's time to further introduce the third color.....get a bit more on the boat. since the Jingle Belle is basically red, I wanted to paint this one green. but, the admiral saw the pictures and thought it looked cute white. I'll still have a chance to throw some green at it..........later, of course the half round dowel strips are more than dry by now......I started on the port bow. upper strip........lower strip and the portholes starboard bow.....same process. since the line to the aft is faulted, I could not continue all the way back......I had to have a break. I continued it on a new line, with an inch or so overlap. port side and transom starboard side.... I need to adjust the transom end of this side....hard to see, but it's there. I also painted the prop and cemented it in place as well. I do believe I've pretty much caught up with the Jingle Belle
-
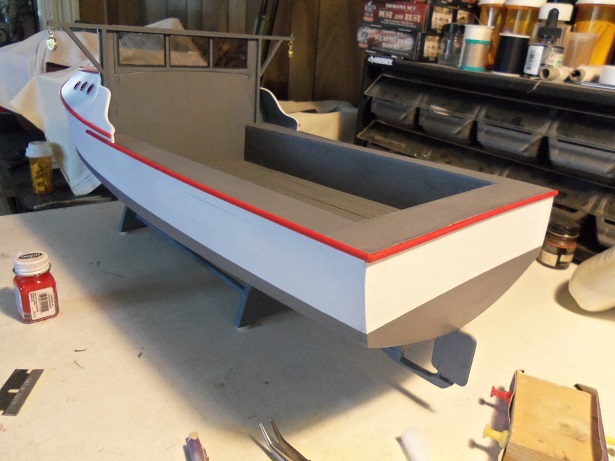
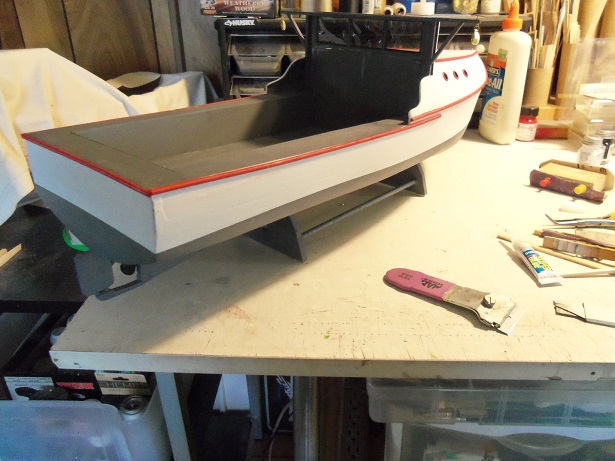
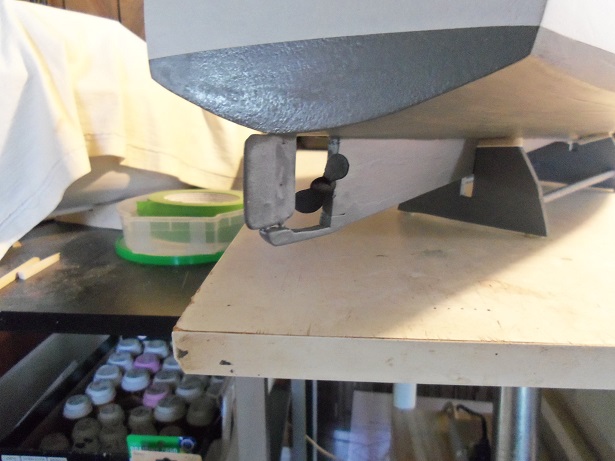
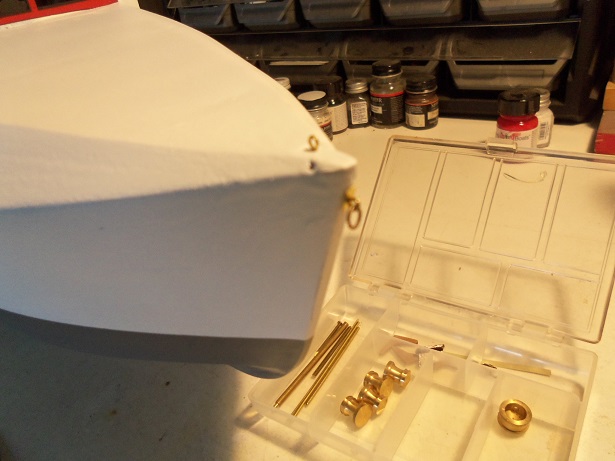
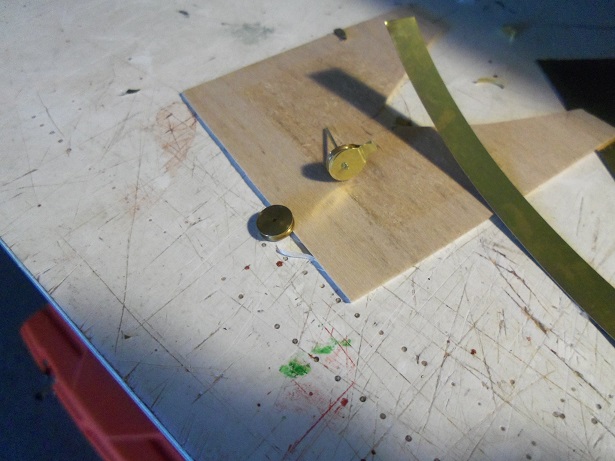
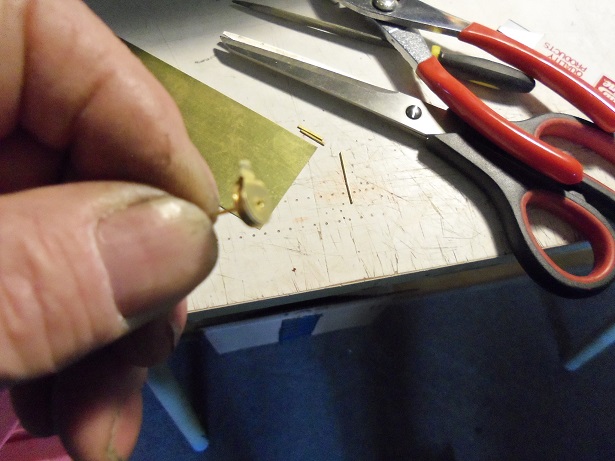
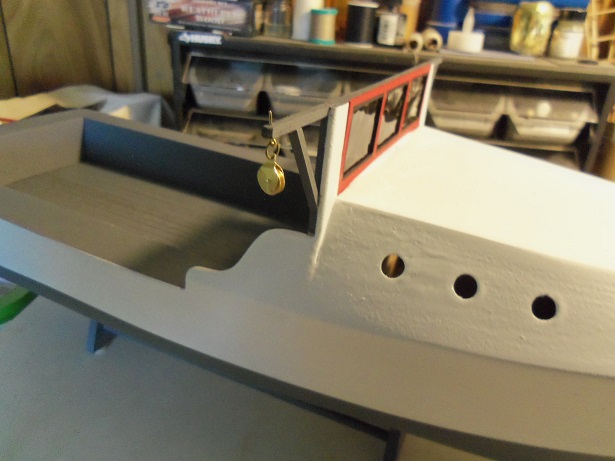
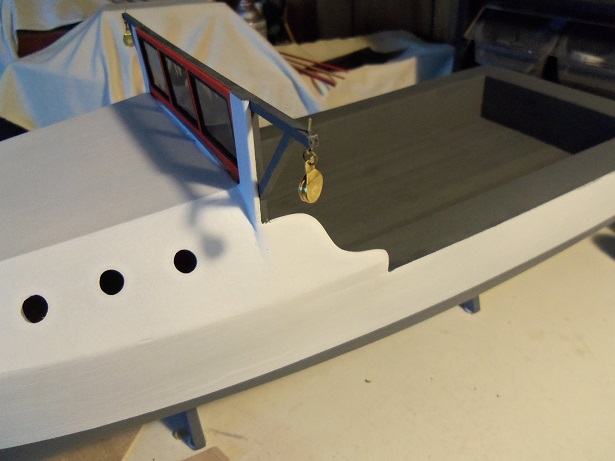
thanks Frank and Piet....now that the base colors are on....it will only get better adding more I have a bit of progress from yesterday....a wee bit more. I started to put some of the decorative hardware on, beginning at the bow. for the blocks I spoke of earlier, I thought I had some of the 7 mm single blocks {plastic}....all I have is 5 mm. now, I have some 7 mm double blocks in plastic, but they wouldn't look right. I then thought of the metal reel blocks that used for the Andrea Gail {I got 'em out of the Boulogne Etaples kit}. I didn't even bother looking.......I need to make some anyway, to make up for what I took.........so I figured I'd get a little practice in. I have a package of 8, 6, and 4 mm reel pulleys...I'll use the 8 mm. a strip of thin brass was cut, sectioned and folded. then with a pair of Hurk-u-scissors {these are my narly pair of scissors......strong like bull.........never get dull!}, the folded piece of brass was cut to the shape of the reel pulley. the pulley was then put in between, and the center hole was drilled.......brass rod was run through it and CA'd. not too shabby for a first try. another hole was drilled in the top tab.......it and an eye bolt was threaded on a small metal ring, closing it up afterwards. here is what it looks like on the Gallow. the second one was a bit harder.........since I didn't use a template.......had a few rejects. I did finally get the second one made though. the windshield is cemented in place as well.........still a couple touch ups to do. hope to have more soon
-
nothing 'bumbling' about some of the stuff I've seen you do gotta see what this is gonna look like! defective tape?!?!?!?! aren't you suppose to peel off the 'white backing'?
- 1,208 replies
-
- 2
-
-
- great republic
- clipper
- (and 1 more)
-
ditto! great work on the railings and center board
- 250 replies
-
- 3
-
-
- willie l bennett
- model shipways
- (and 1 more)
-
never thought of that for flooring........consider that one 'filed'! the dash looks great.......very nicely lit. very nice progress indeed!
- 339 replies
-
- 4
-
-
- dumas
- Chris-Craft
- (and 3 more)
-
good to see your back at the table Marc.......you've made some great progress here I did the same with the Revell United States when I built her the first time....I was a lot younger. sails are a matter of personal taste........I liked the full sail look. it's a very large model.......and the sails added so much more to her. how ever you set them, I'm sure they'll look great not sure about the anchors........most models I've seen have them stowed at the catheads. there may have been an extra anchor lashed to the rail along the bulwark.
- 525 replies
-
- 1
-
-
- cutty sark
- mantua
- (and 2 more)
-
I would....but the admiral would skin me alive, if I started to plank another hull besides, I still have to get my butt in gear with the Half moon.......ya left me in the dust good buddy! too many projects......so little time. your doing a great job so far..........I figure you'll have made quite a bit of progress, before I'm ready to go. I'll look forward in seeing more of your fine work
-
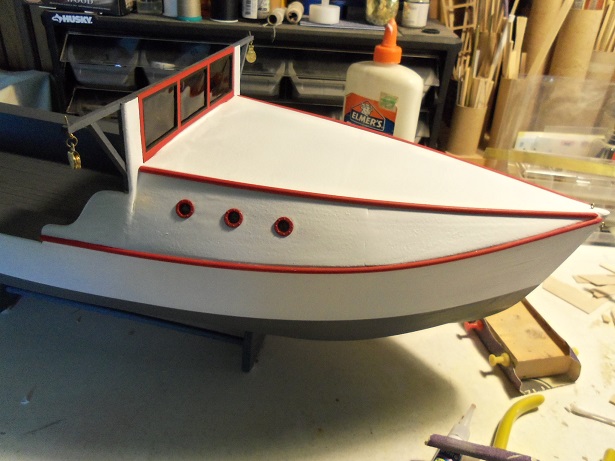
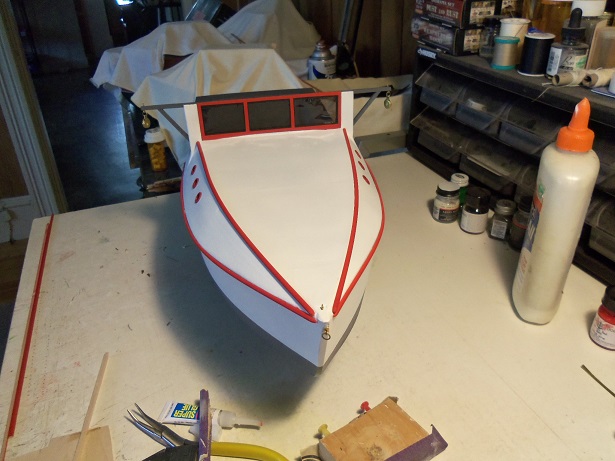
thanks to everyone....and all who hit the like button. I really like that tinted cello.........really neat that I have a rather large piece too as in the pictures show, harder to look in, than to look out the smear is port side, lower corner Carl........this stuff is amazing. it dries so clear that it blends in very well... ...you really have to look for it. I found this method, the best way to do windows {that I've done before}. today, the portholes should be dry and I can install them..........and perhaps get the trim on there. we'll see what else I can add thanks again for indulging in my madness
-
as long as you keep it under 33 1/3 very nice....I like third and second from the last, myself. really shows the size of the model. I'll bet your finding this to be the hardest time........do a little here.......then do a little there............and perhaps I should add....... the moment you put down the x-actor for the last time, and you say those two last words {it's finished}......well, it should be too bad, with all the models you've finished. cripe, I remember when I finished my first wooden ship.........felt like I lost my best friend the only thing that cheered me up, was to get another kit! yippie! it's coming my friend, there's no denying there will be laughing, there will be crying but then you'll put 'er on the shelf then you can truly be proud of yourself
-
Cutty Sark by NenadM
popeye the sailor replied to NenadM's topic in - Build logs for subjects built 1851 - 1900
it happens Nenad........little specks and spatters. didn't they tell you that your not suppose to be looking under the cap rails with a magnifying glass? I get it too........others are not immune. a lot of the parts I add are painted first and touched up last but there are the areas of concern,,,,and masking. your doing a really super job........she really has come a lonnnnnnnnnnng way.- 4,152 replies
-
- 6
-
-
- cutty sark
- tehnodidakta
- (and 1 more)