druxey
-
Posts
13,395 -
Joined
-
Last visited
Content Type
Profiles
Forums
Gallery
Events
Everything posted by druxey
-
 I agree that, on a model, pure black caulking is a little harsh-looking. Your model is looking very sweet.
 -
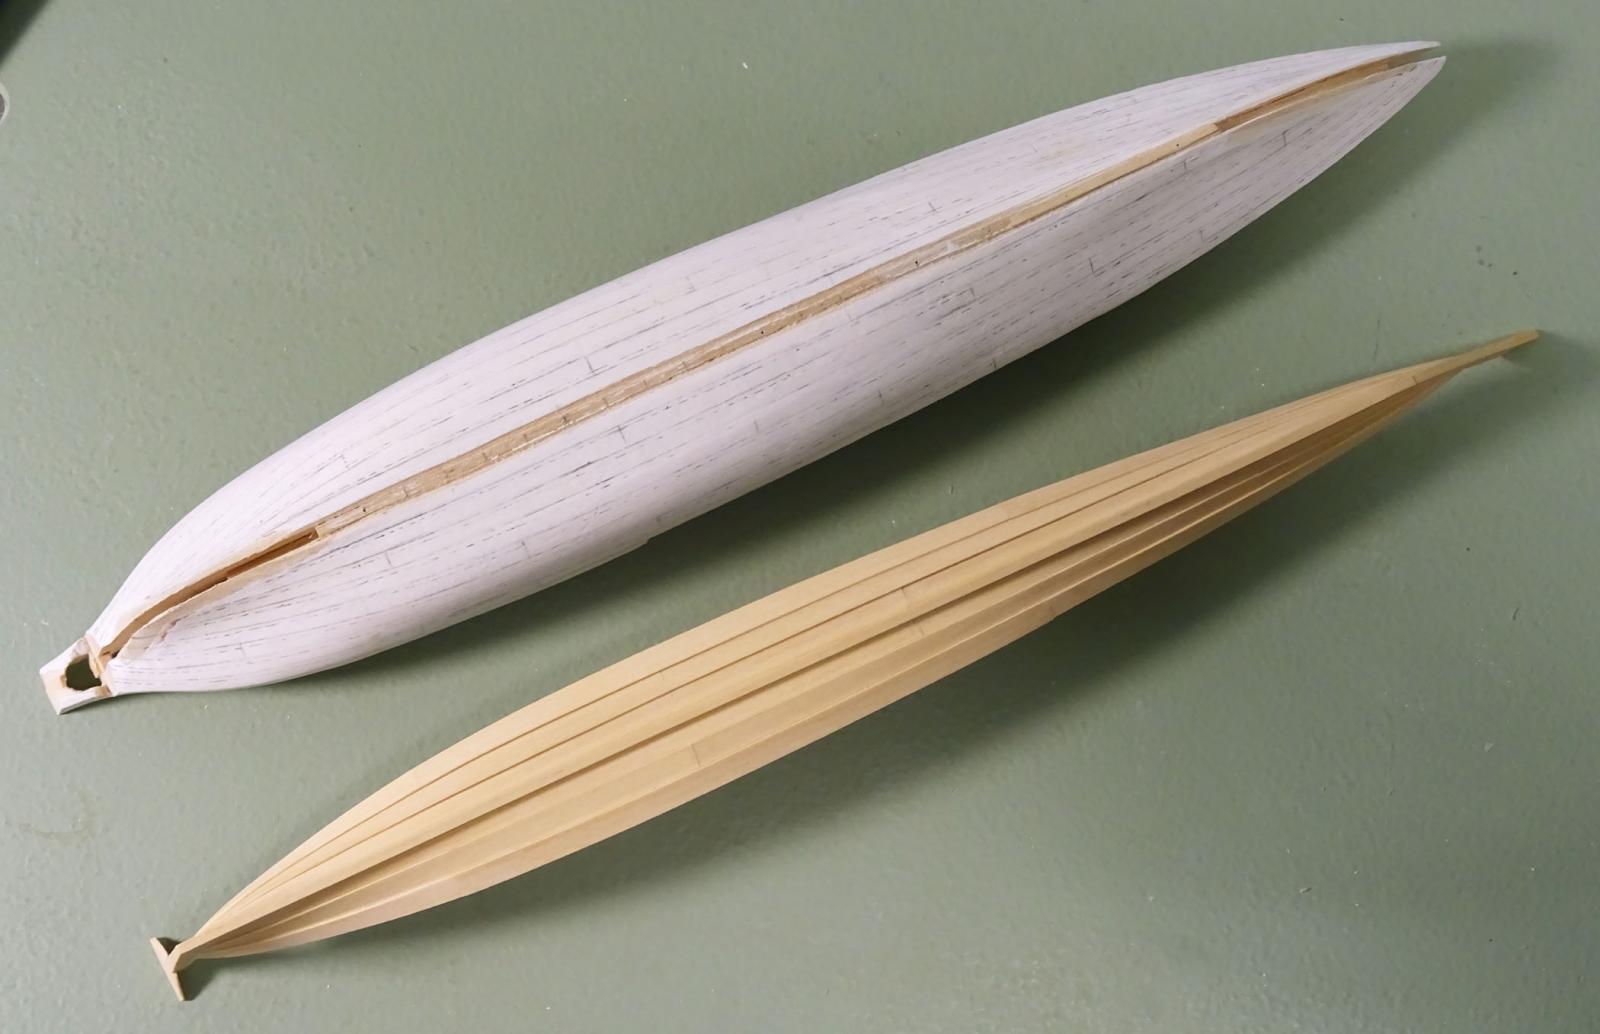
A thought, Steven: put in every other frame on the plug, then bend in the alternate ones after the shell comes off the plug. Would that make life easier? Thanks for the compliment. Speaking of lightly built, the hospital barge is 37' 0" long with a keel 3" square before the rabbet is taken out and the frames will be a mere ¾" square.
- 641 replies
-
- 9
-

-
- greenwich hospital
- barge
- (and 1 more)
-
Welcome back, Tom. We wait, agog.
-
Aeee! When I was playing with SketchUp, I never got as far as figuring out strategies to defeat its defaults. That is a great example of fooling the program to submit to your will. Thank you.
-
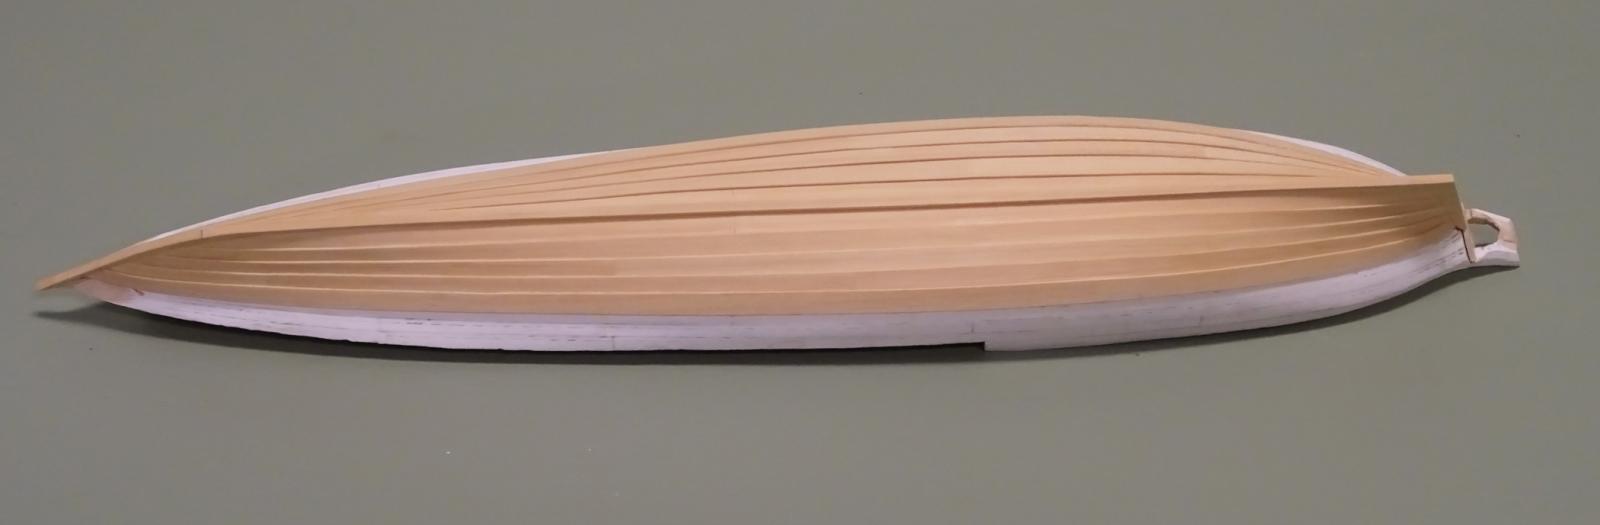
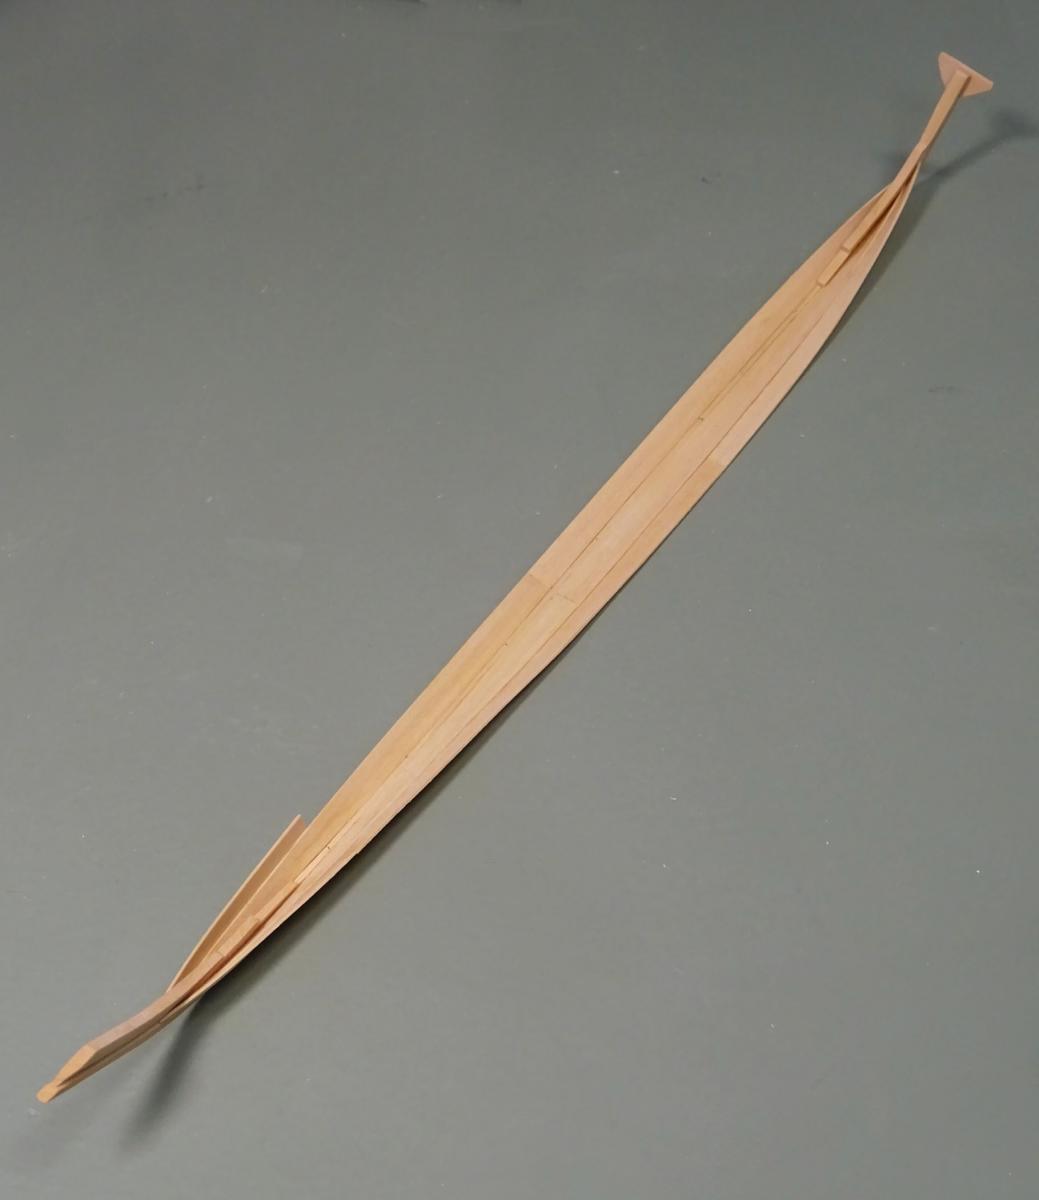
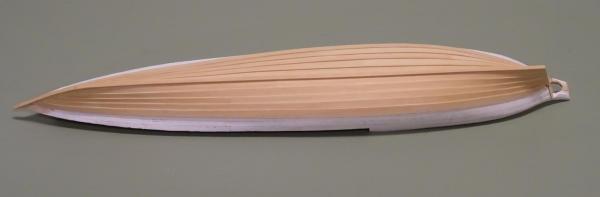
Five strakes a side are completed now. Note that I had to pare back the extreme ends of the plug so that the planks would run smoothly into the rabbet fore and aft. With this hull form the spiled planks are only slightly curved, except at the stern.

- 641 replies
-
- 51
-
-
- greenwich hospital
- barge
- (and 1 more)
-
Gluing planking
druxey replied to DocBlake's topic in Building, Framing, Planking and plating a ships hull and deck
I'm with Chuck. No stress on the plank, no stress on you! -
Dick: I had no trouble planking with the frames recessed in the plug when the plug was well waxed.
-
Thanks for the explanation, Michael. That all makes sense to me now!
-
Steven: see my comments in my Greenwich Hospital barge log. With carvel planking, edge glued planks will not hold together as they do in a clinker build! There is insufficient gluing area for this. You'll also need to devise some method to stabilize the thin keel to keep it straight until the planking is on.
-
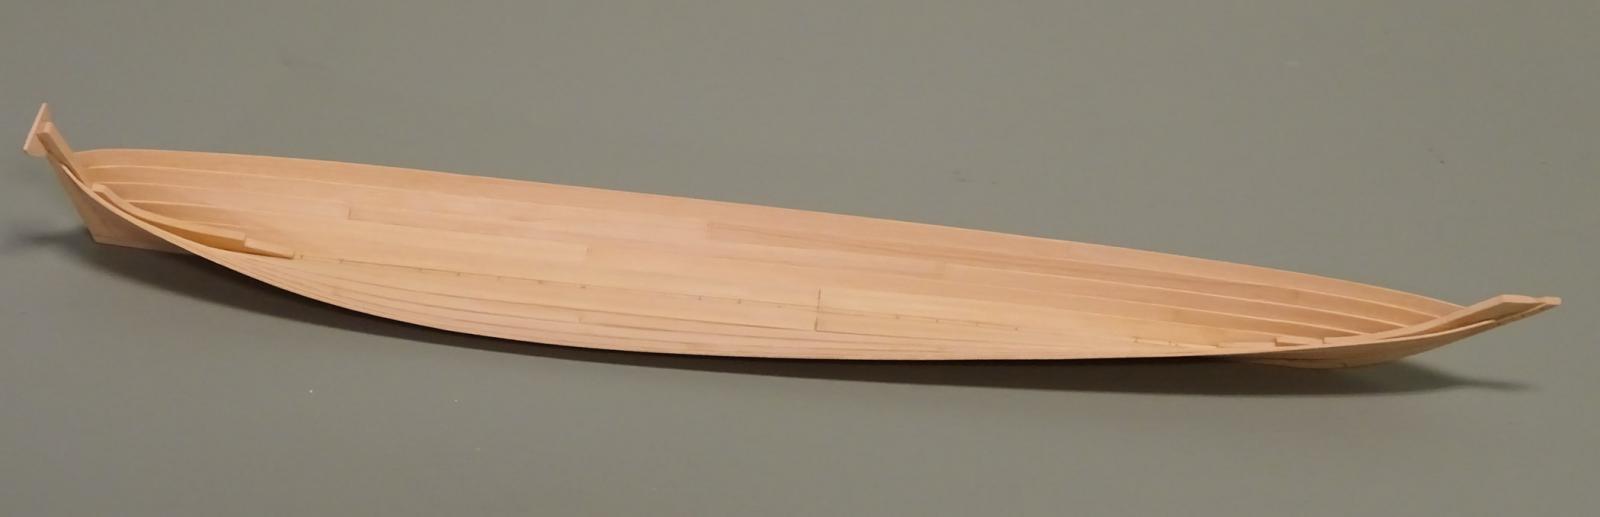
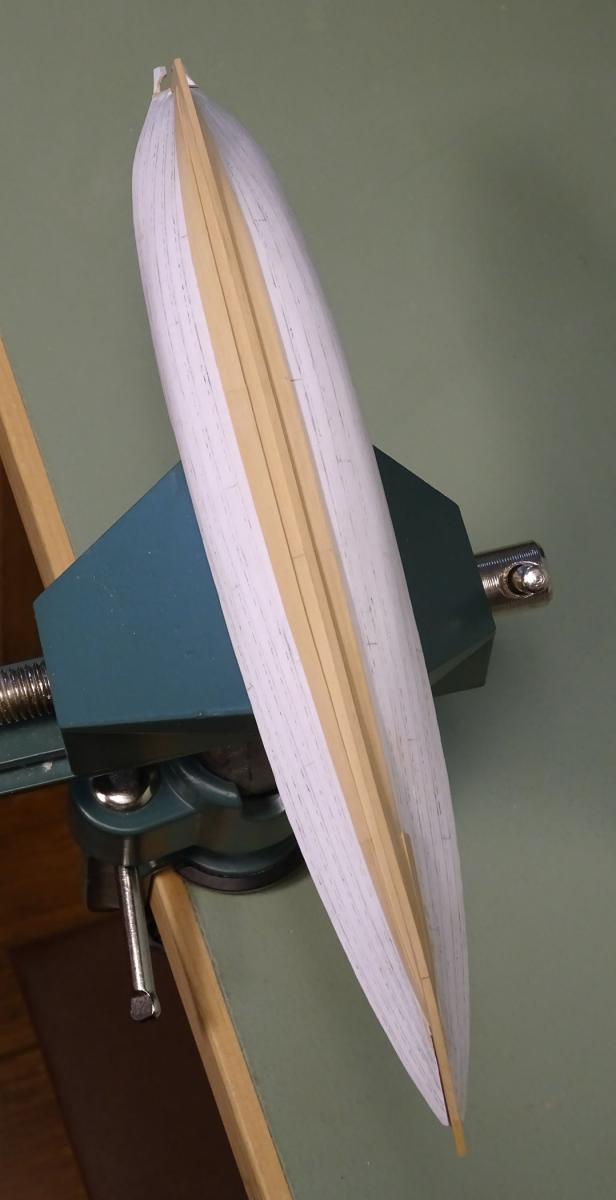
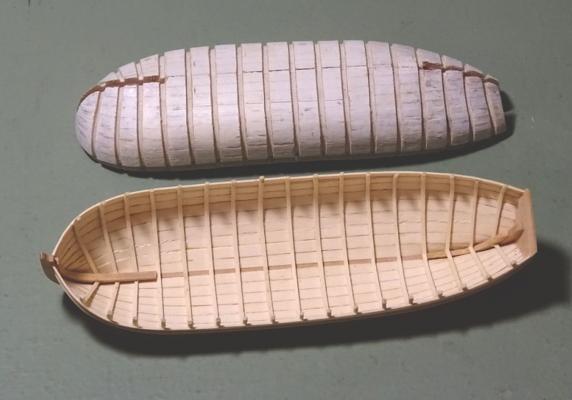
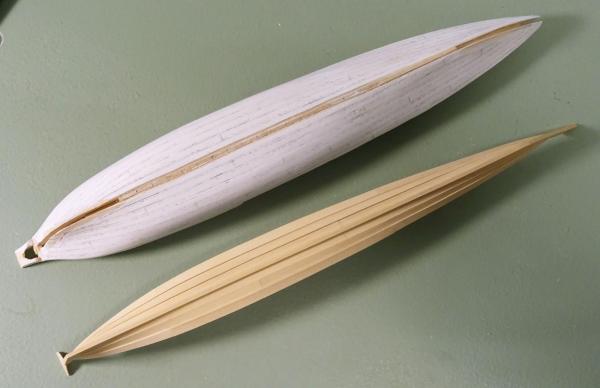
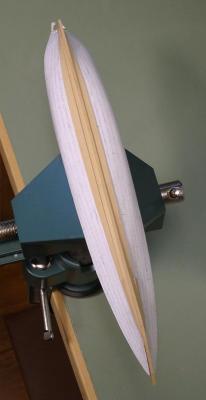
Thanks, everyone, for your comments. Steven: I've used this method with carvel construction, but with one difference: frames first. You can either file grooves in the plug for the frames and bend them in, or form the plug to inside of frame. I use the first method. In both cases the plug is made deeper and extends above the sheer line. (You can see this set back area in shadow in the photograph.) This area is used to spot-glue the frames to. Just make sure everything is well waxed to prevent sticking! The boat looks a little rough when first taken off the plug, but cleans up nicely as you can see.

- 641 replies
-
- 37
-
-
- greenwich hospital
- barge
- (and 1 more)
-
Frégate d'18 par Sané , la Cornélie
druxey replied to JohnE's topic in CAD and 3D Modelling/Drafting Plans with Software
Looking more and more respectable each time, John. Bien fait, monsieur! -
So you saw 'in the air', without fixing the ring? I would think it difficult holding it in one hand while sawing with the other. Also, I'm not clear how the round 'L' shaped gizmo works. Would you mind explaining, please?
-
Off to a flying start, Jerry. And good lighting helps a lot!
-
HMS Naiad 1797 by albert - FINISHED - 1/48
druxey replied to albert's topic in - Build logs for subjects built 1751 - 1800
Superb work, Albert. Keep those progress photos coming! -
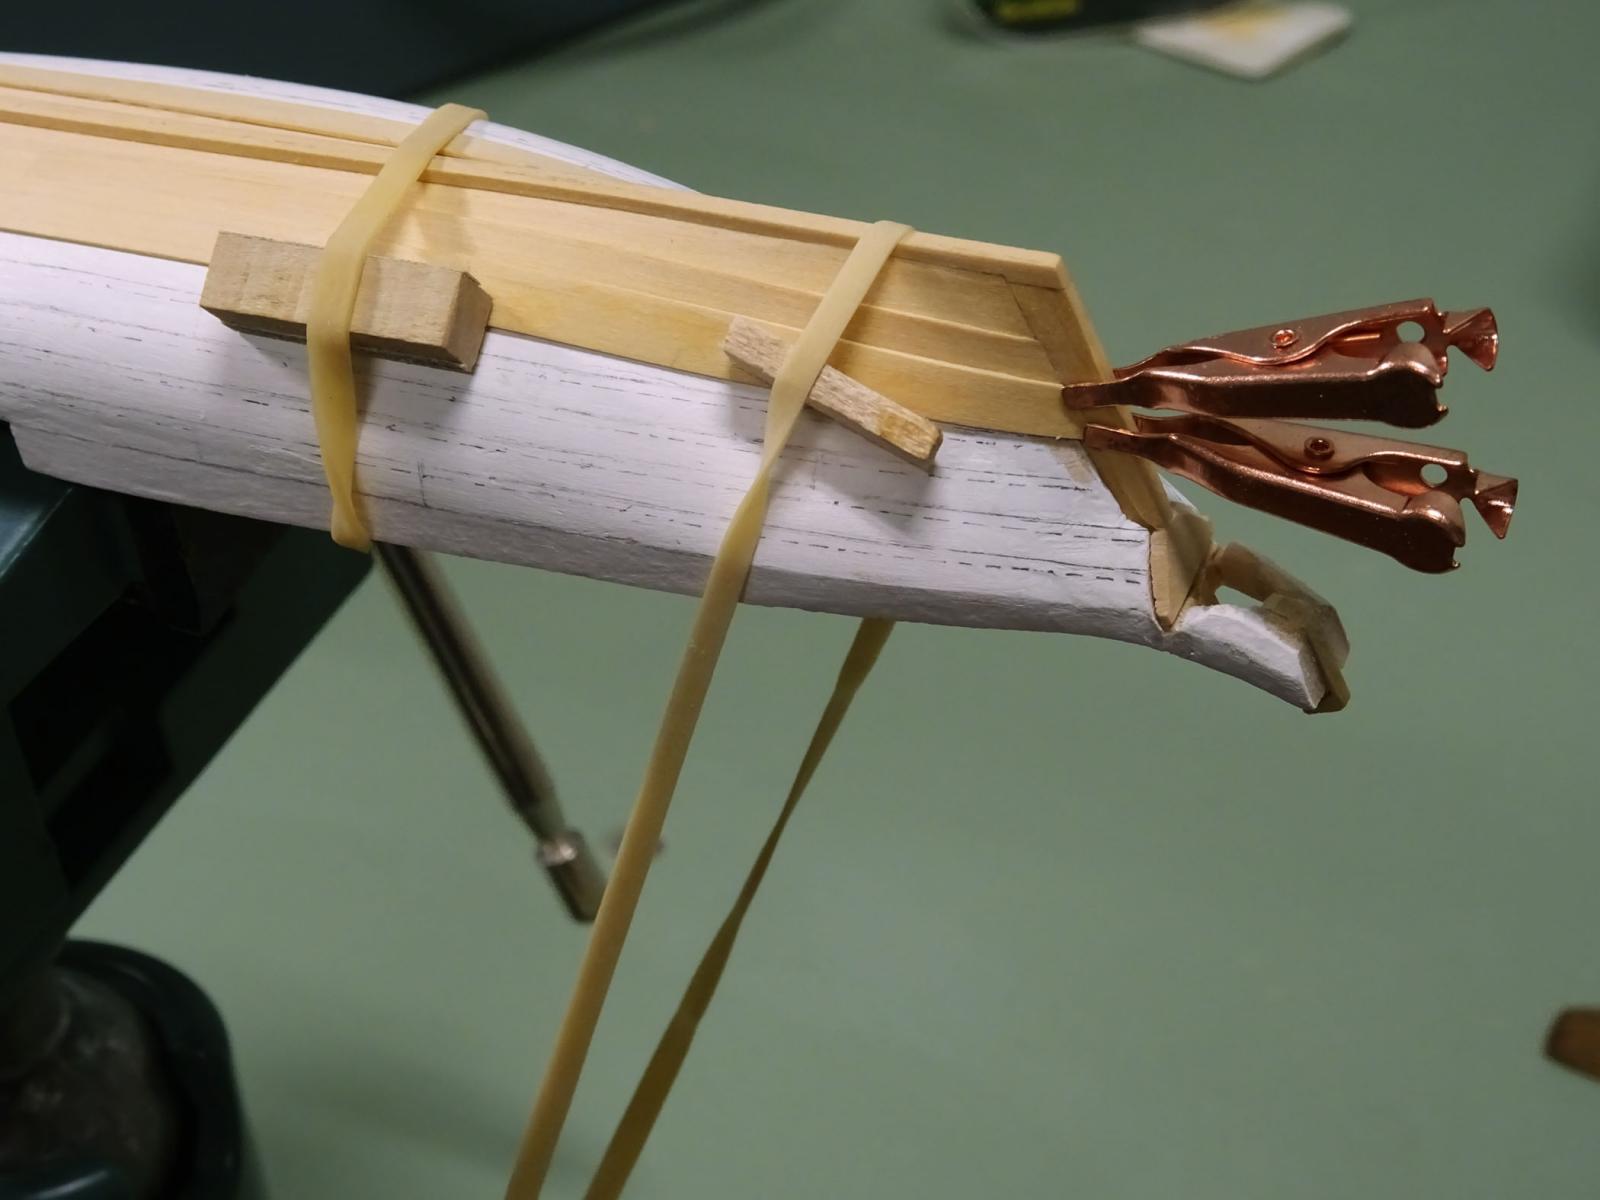
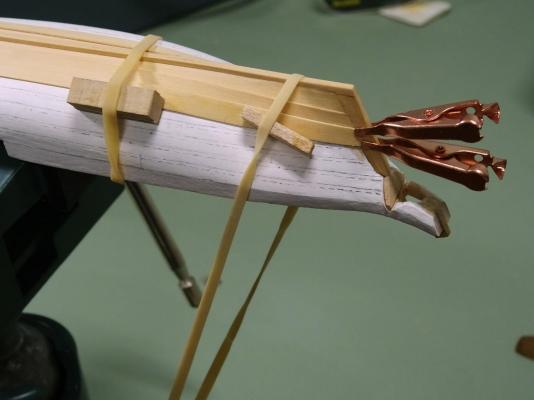
Three strakes a side completed now. Rubber bands and small soldering clips make fine hold-downs while roughly shaped planks are drying out.
- 641 replies
-
- 43
-
-
- greenwich hospital
- barge
- (and 1 more)
-
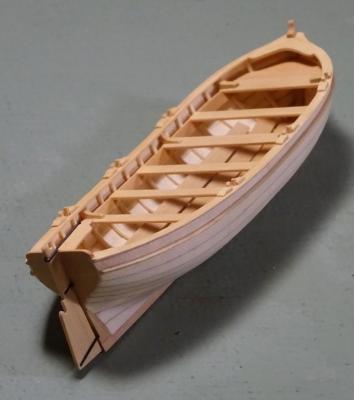
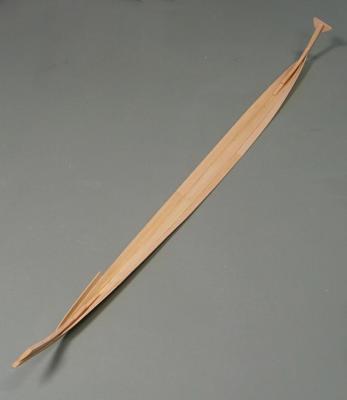
Thank you, Mark! Jim: the strength of the assembly at this stage is surprising, even though the individual parts are so flimsy. If the planks are cut accurately so that there is no stress in the hull, it will not distort. In past experience, sometimes the breadth will expand slightly when the shell is complete, but this is easily corrected when the internal elements are added, producing a very strong model indeed. The barge I'm modelling is not the Prince Frederick's one in Mark's photos: this one, while similar, has far less carved work. However, it will be a lot of fun to do when I get there!
- 641 replies
-
- 7
-
-
- greenwich hospital
- barge
- (and 1 more)
-
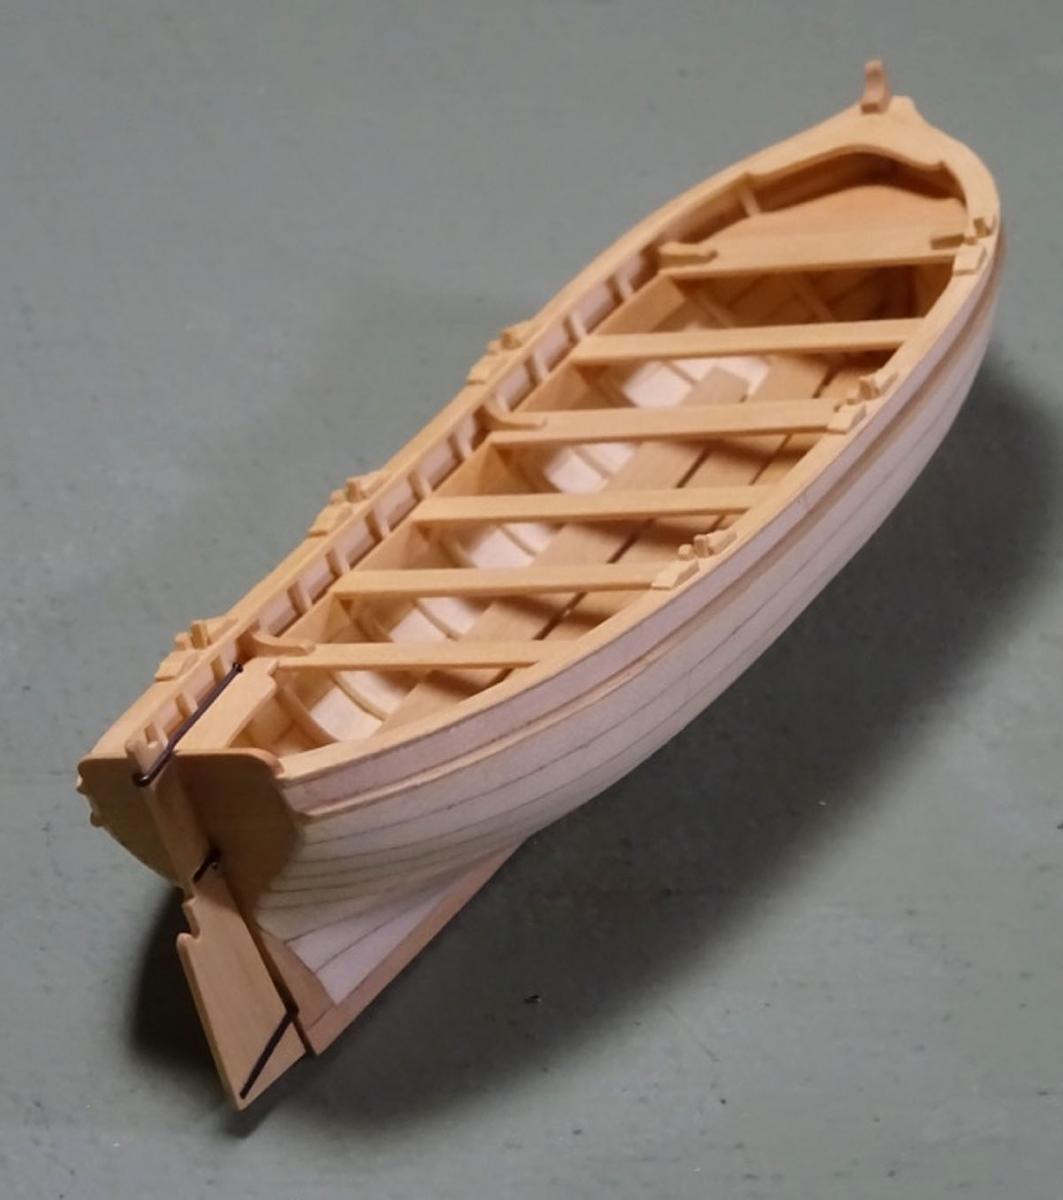
Nice details, Mark. Thank you. The carved works are wonderfully executed. The rowing benches on these barges do have a central element to them. The items I'm particularly interested in are the standards supporting the ends of the thwarts and whether there are also supporting standards above the transom. These cannot be seen on the usual photographs of the barge.
- 641 replies
-
- 2
-
-
- greenwich hospital
- barge
- (and 1 more)
-
I smiled at the mention of gummed brown tape. This material was used to 'plank' a bulkhead style model I made when I was about ten or eleven years old. The result was much less successful (the bulkheads were too far apart) than your use of it in making some very nice mast hoops.
-
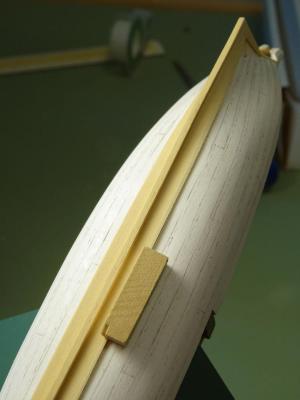
The second strake is in on the port side. One can see the gain at the bow and stern, as well as how the boat keeps its shape when taken off the plug. From here on it is simply a matter of spiling and shaping each plank as I work up (down!) to the sheer strake. All one need do is make sure to conform to the mark-out on the plug.
- 641 replies
-
- 36
-
-
- greenwich hospital
- barge
- (and 1 more)
-
Frégate d'18 par Sané , la Cornélie
druxey replied to JohnE's topic in CAD and 3D Modelling/Drafting Plans with Software
Only switch from x if there is compelling and overwhelming evidence from y! That set of lines looks very nice, John. -
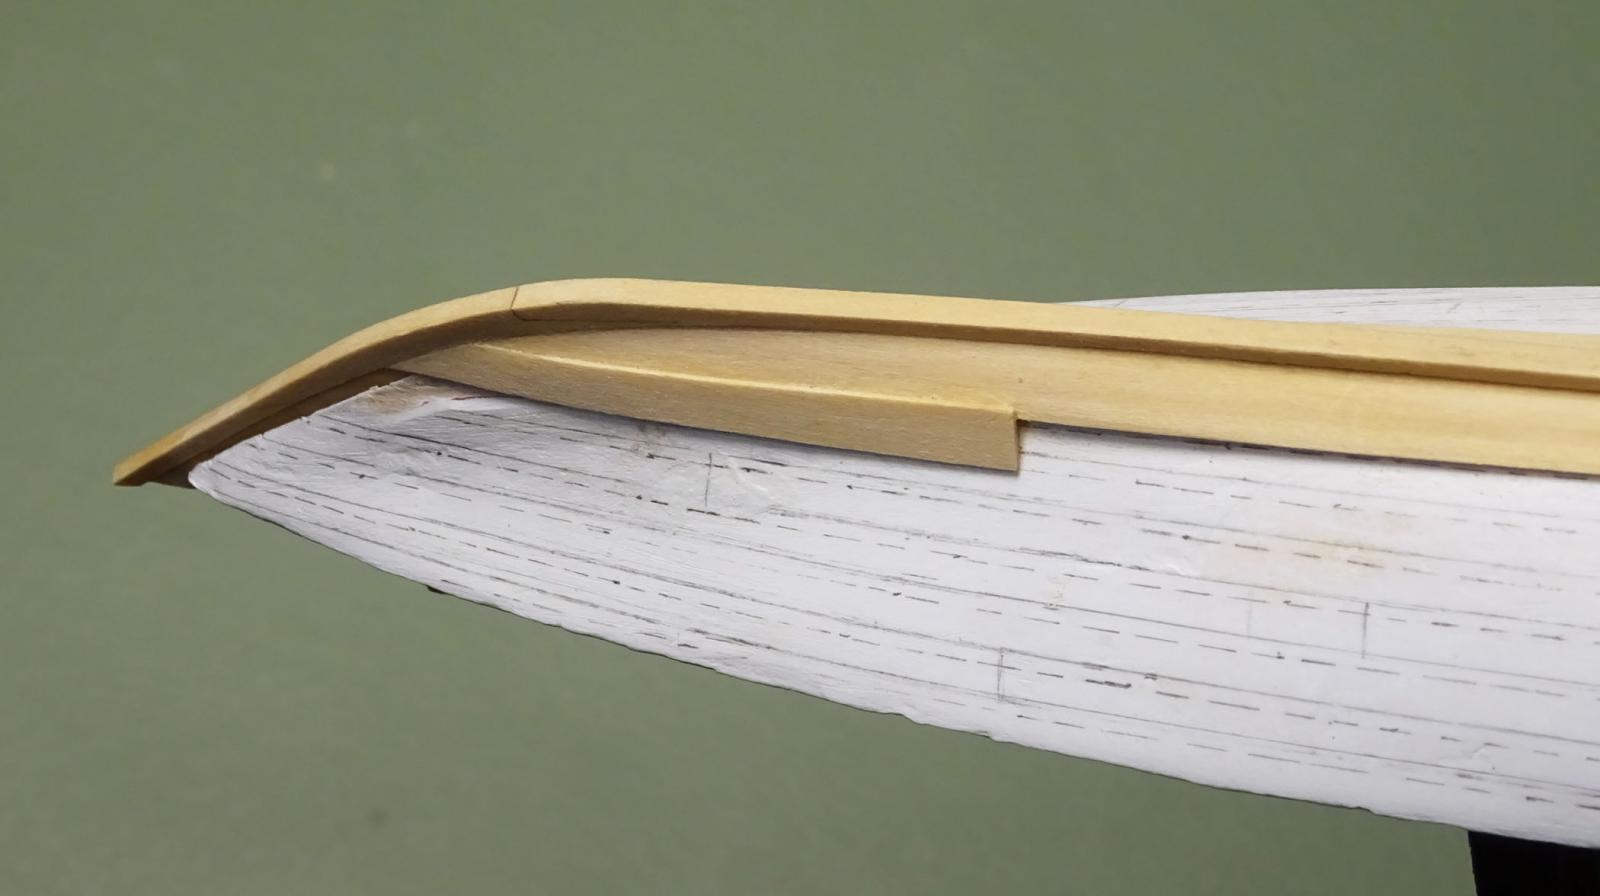
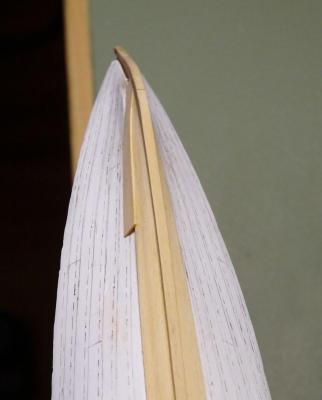
Mark: if you have detail photos of the interior of the forward part of that vessel and near the tiller, posting those would be very helpful. Thanks for the kind offer. Yes, these crafts were very lightly built but surprisingly strong. Think of them as predecessors of today's 'eights' rowing shells. These two photos show how the lap disappears into the rabbet at the bow. The second strake also has a rolling bevel that fits the one on the edge of the first strake. You can also see that there is no gap along the lap, as the bevel that was sanded in takes care if this. PVA glue was applied with a very small brush and any excess cleaned up immediately.
- 641 replies
-
- 31
-
-
- greenwich hospital
- barge
- (and 1 more)
-
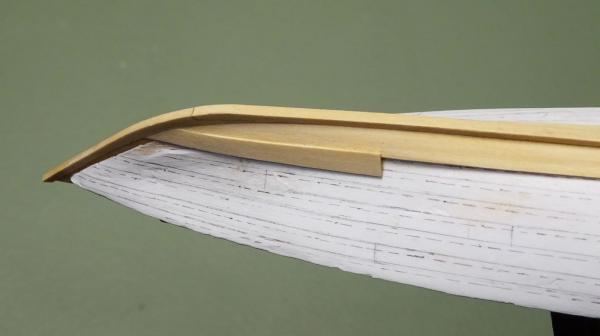
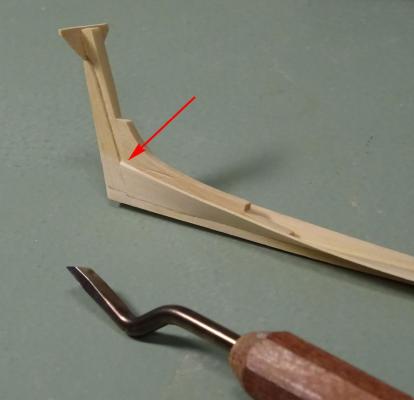
Here are a couple of photographs of the land - the bevel - being sanded on the edge of the garboard and of the gain at the end of the rabbet (arrowed). The gain is basically a rolling bevel. It ends at 45 degrees so that the next plank will come in flush at the rabbet. Essentially clinker becomes carvel over the last 9" or 12" of the strake.
- 641 replies
-
- 29
-
-
- greenwich hospital
- barge
- (and 1 more)
-
Great stuff, Glenn! The original designer of these flywheels was very ingenious. To reproduce these in miniature you also had to be!