mtaylor
-
Posts
26,273 -
Joined
-
Last visited
Content Type
Profiles
Forums
Gallery
Events
Everything posted by mtaylor
-
Beautiful and detailed work there. I'd be detoxing for a few days after that.
- 197 replies
-
- 1
-

-
- santa maria
- carrack
- (and 1 more)
-
Indeed it is, KP. Seems I spend more time figuring out how to do something while keeping in mind what has to be done later than anything else. But, good exercise for the brain.
-
angle of attack of my blade
mtaylor replied to agamemnon9's topic in Modeling tools and Workshop Equipment
That would work but I don't like the idea of metal things anywhere near the saw so I use cheap chopsticks. -
Messerschmitt bf 109G-6 by cog - Eduard - 1/48 - PLASTIC
mtaylor replied to cog's topic in Non-ship/categorised builds
I'll be the odd man than... I like them all. Build the one you like, Carl. -
Welcome to MSW, PJ. What Edward says applies... do start a log.
-
You or someone else didn't gather "rags" up for laundry or garbage did you? Don't ask how I know and why I don't do sails.
-
JD, just keep adding posts,, the software does the pagination automatically. As for adding photos.. upload them in the same window you use for text. Look to the lower left and you'll see "drag file to attach or choose files". Then type in text. If you want a photo before more text, hit the lower left side of the thumbnail where a "+" will appear. Then add text, rinse and repeat as needed. Nice planking work.
-
As I recall, the rotary motor did some things that if the pilot wasn't ready it could kill him. If they revved the motor to fast, it just about flip a plane on the ground which once airborne gave them an advantage in combat as it could roll and turn faster in one direction than the other. Dives were apparently a problem with tearing the skin on the upper wing off which they never did solve. There was some research done after the war by the Brits and moving the seam on the upper wing forward stopped the shedding of skin. I've seen this bird fly in airshows and models and just love it.
-
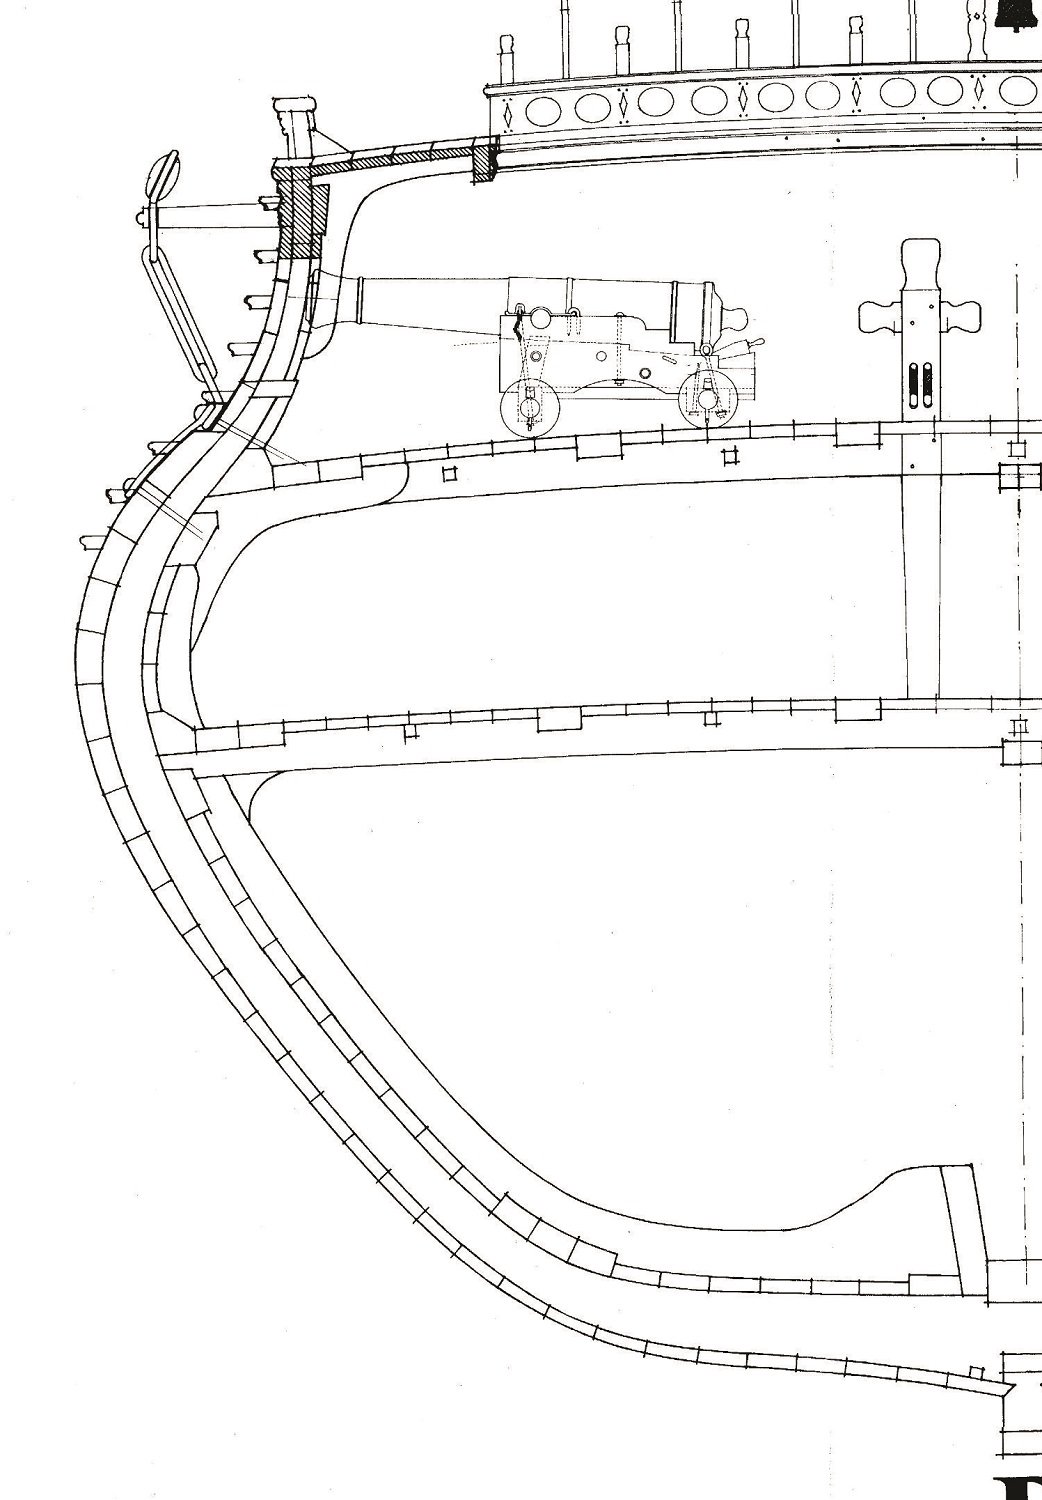
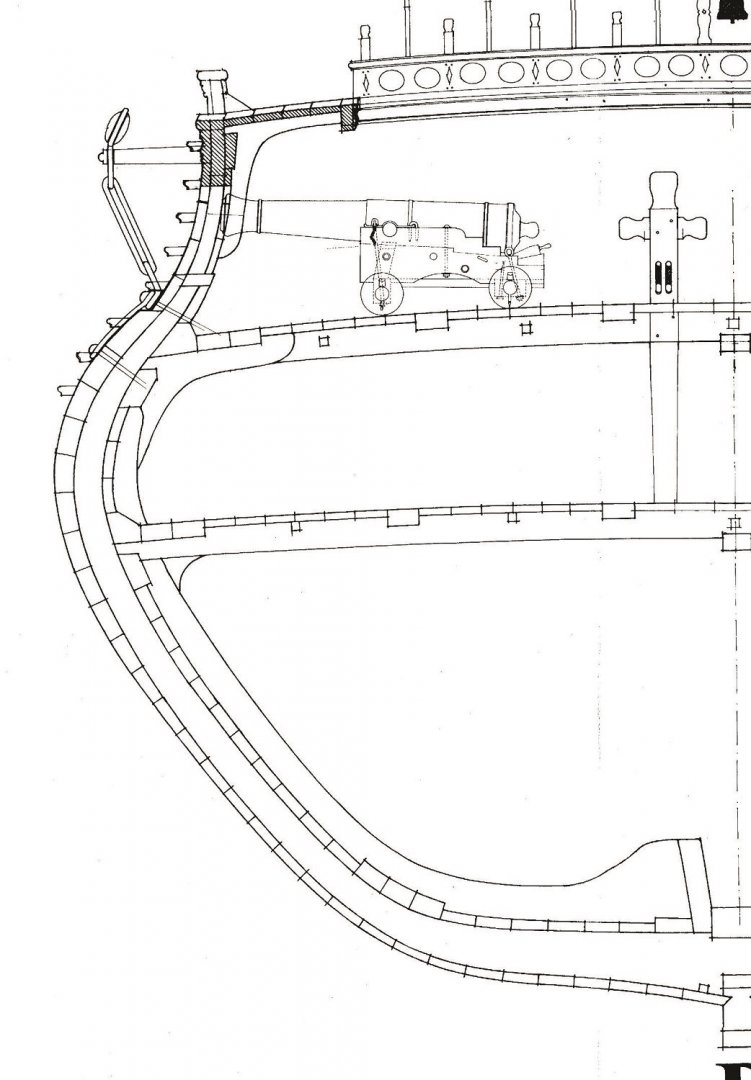
If you look at a cross-section of any of those, you'll see that the hull planking gets "thicker" as it comes up the hull. There is a point where the planking gets thinner from just below the gun ports up to the bulwarks. I think you can see this in the drawing from Belle Poule. To my knowledge this something only the French did.
-
Keith, once again you prove that this log should be in every modelers hands as a "how to". Love that ladder.
-
angle of attack of my blade
mtaylor replied to agamemnon9's topic in Modeling tools and Workshop Equipment
Ah.... attached is a copy of recommendations for a Byrnes saw. I find those recommendations (there's a section of what blades to use for different thicknesses). Byrnes Saw Operation.pdf -
M4-A1 Sherman Tank by Osmosis - Italeri - 1:35
mtaylor replied to Osmosis's topic in Non-ship/categorised builds
I'm not into paints, Art but the bogies look good and ready for paint. -
Welcome to MSW, Gordon. If you'll go to the Scratch area and search it with the key word "Radio", there might be something. You can also ask your question here: https://modelshipworld.com/forum/32-rc-kits-scratch-building/
-
If you haven't done it, while you're waiting, go to the kit area (pinned post). One of them is an index for the all the kit logs. Download it and browse it for logs for your kit. You'll get an idea of what's involved.
-
Chebec's are different than most other ships. You might do a search in the Scratch area and see what the builders there have done.
-
angle of attack of my blade
mtaylor replied to agamemnon9's topic in Modeling tools and Workshop Equipment
Can you show a picture of the blade and the wood? The only time I ever see the wood rise up is at the back of the blade and even then, that's rare. -
1931 Cadillac by CDW - FINISHED - JoHan - 1:25 Scale - PLASTIC
mtaylor replied to CDW's topic in Non-ship/categorised builds
It's not just kits that get hoarded. Apparently there's guys hoarding wood like Swiss pear and Boxwood and even parts. Chuck was talking about this in one of Syren Model Company posts. -
Citroen Traction Avant by kpnuts - FINISHED - Heller - 1/8
mtaylor replied to kpnuts's topic in Non-ship/categorised builds
Vive la resistance is a great title. I had to look twice a the MG's and the final pics.... almost too real. -
AH64 A Helicopter by kpnuts - Academy - 1/48 - PLASTIC
mtaylor replied to kpnuts's topic in Non-ship/categorised builds
Or rock and a meat grinder. I remember that one. There was also the rule for falling elevators... jump up just before impact. What? How would you know? I wonder if the guys who came up with those ideas on exiting every tried it? -
Welcome to MSW. Give some thought to starting a build log as it's a great way to get help and meet other modelers.
-
Welcome to MSW, Will. From here, those models look great.
-
Welcome to MSW, Matthew. Do start a build log for the Vic as it's the best way to get help.
-
Welcome to MSW, psk125. I'd rather address you by name than login name. I hope you'll start a build log for the Numa. I don't think we've seen a log for her yet.
-
Karel, Welcome to MSW.
-
AH64 A Helicopter by kpnuts - Academy - 1/48 - PLASTIC
mtaylor replied to kpnuts's topic in Non-ship/categorised builds
Right, beware the egg beaters, both the big one on top that the little at the back. We did do drops of recon troops from 1000-2000 feet up. That wouldn't be bad. It would be bad bailing out of one falling out of the sky. They did for about a year, issue all fliers in the -53's parachutes. No one ever wore them, just tossed them in the fuselage and returned them to the paraloft we we got back. They had elaborate plans on how we were supposed to do this which, if one thought about it, the pilot might as well just try to land it. The method was to pull the nose up and those that could (the crew, any passengers were up the proverbial creek) went out the back. Then the pilot would roll the bird slightly and the co-pilot would go out his window. Then the pilot would roll it so his side was down and exit his window. And then were was issue that the pilots couldn't wear chutes in the seats or get out the windows with them on. Just a few minor details.....