mtaylor
-
Posts
26,273 -
Joined
-
Last visited
Content Type
Profiles
Forums
Gallery
Events
Everything posted by mtaylor
-
I did a bit of digging on this a bit... http://modelshipworld.com/index.php/topic/270-uss-constitution-by-force9-revell-plastic-revisiting-the-classic-196-kit/ Googling "uss constitution powder magazine - seems to have only pics of the aft magazine... and a reference to Force 9's log. Very strange that there's not more out there.
- 572 replies
-
- 2
-

-
- constitution
- frigate
- (and 1 more)
-
This might get someone started... a quick Google on "ship's bell history" (without the quotes) and here's two starting points: http://www.history.navy.mil/research/library/online-reading-room/title-list-alphabetically/b/bells-on-ships.html http://www.britannica.com/technology/ships-bell Earliest referenced use is the 1600's...... Lots of links and lots of detailed information including wrecks available.
-
Deck clamp notches
mtaylor replied to Dziadeczek's topic in Building, Framing, Planking and plating a ships hull and deck
Thomas, Try fitting the clamp to the hull then drill several holes (exact size of the pin) and pin them to the hull. Removing the clamp and re-pinning should return the clamp to the exact spot. You can then mark the slots and pare them and return the clamp to the exact location. I think Danny V. and EdT use this method. I'll be giving it a shot when I get to that point. -
Congratulations on this, E&T. This is major news indeed.
- 346 replies
-
- 2
-
-
- terror
- polar exploration
- (and 2 more)
-
Amazing work, Siggi. Everyone is right.. we've all been there.. rework seems to be a part of this hobby as is leaving a few drops of blood now and then.
-
Mark, You did what I think most of us who have built from Hahn's plans have done. He doesn't give us that kind of detail. Pretty sad state of affairs but it's the best we can do. And yours look very good.
- 172 replies
-
- 3
-
-
- druid
- sloop of war
- (and 2 more)
-
Diajud, If you'll go here: http://modelshipworld.com/index.php/forum/11-scratch-build-logs-in-progress/you should see some pinned topics. They should help you get started. If it's a kit, there's pinned topics here: http://modelshipworld.com/index.php/forum/10-kit-build-logs-in-progress/ Also here: http://modelshipworld.com/index.php/forum/47-questionsinstructions-on-how-to-use-and-post-to-this-forumsite-problems-or-suggestions/ are some How-to articles.
- 175 replies
-
- 3
-
-
- washington
- galley
- (and 1 more)
-
Sorry Jeff... I fall too often into the vernacular. It's a whole new language in shipbuilding.
-
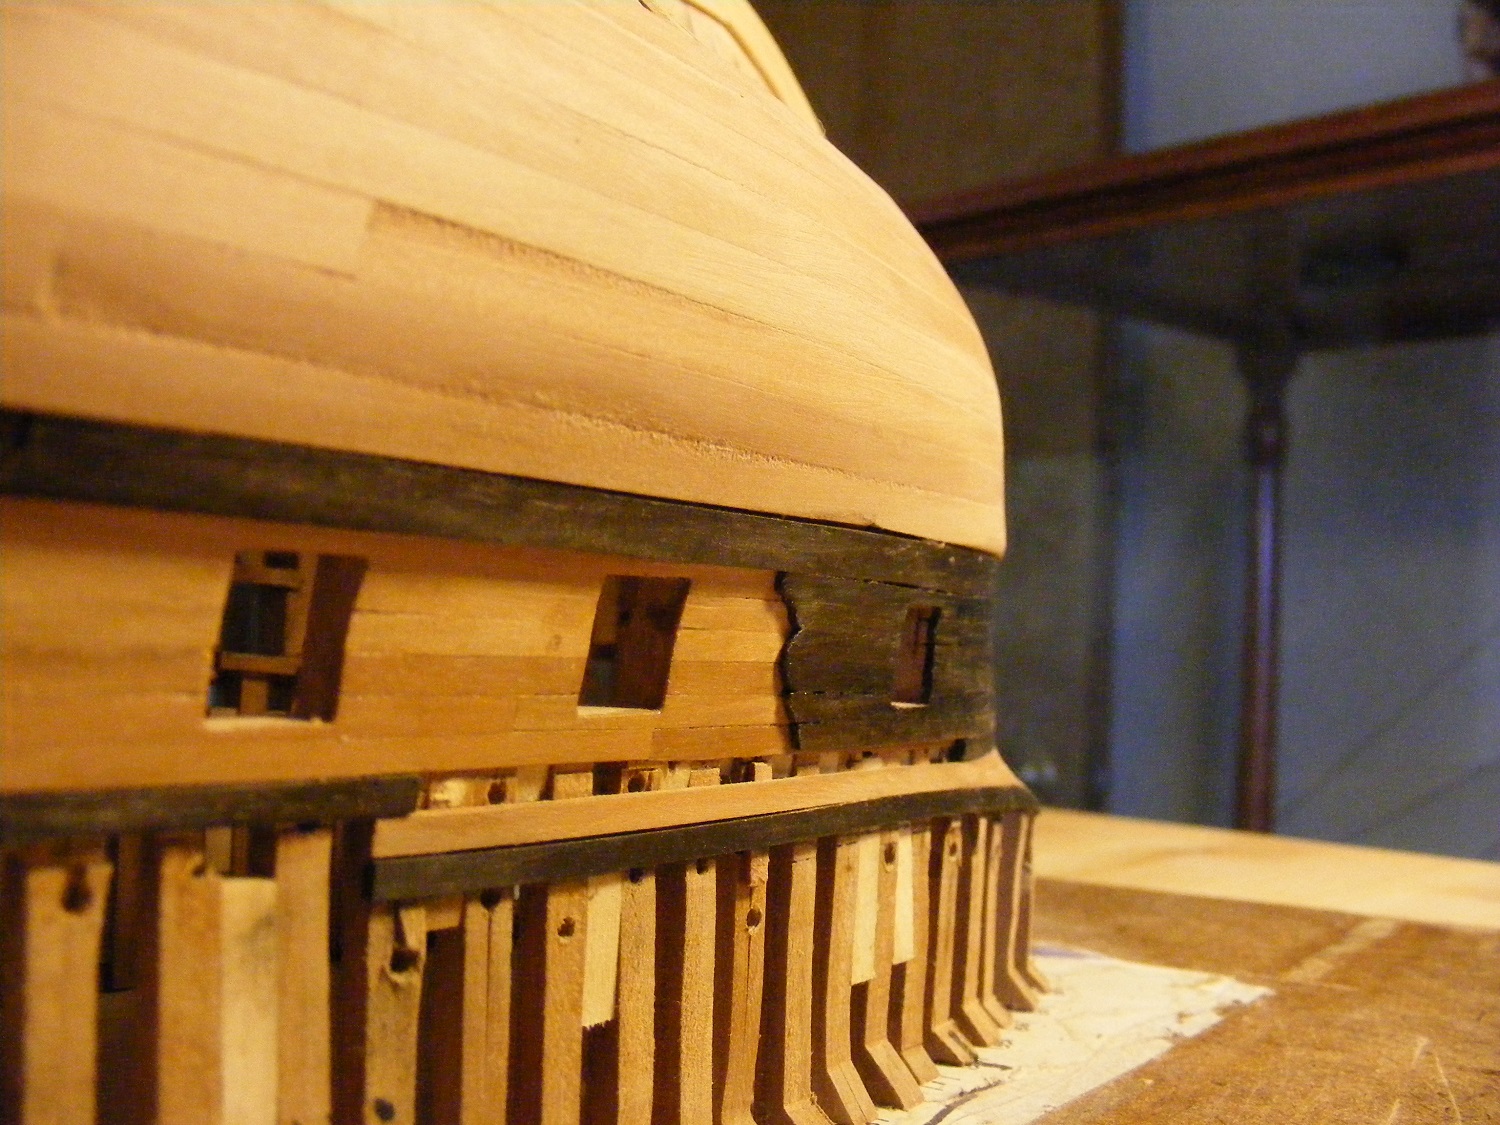
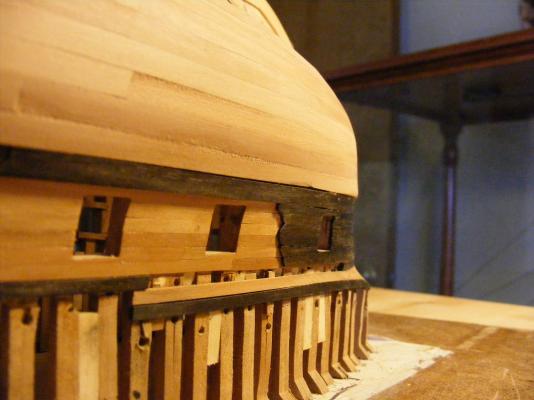
Here's the close up pic I promised.... I'm not done sanding or "caulking"/crack filling yet and there's sawdust all over... but you should be able to see how the ebony flows and fills the area between fore end of the channel (the open spot) and the main wale and how the main wale planking is all blended together. The wide planks (wale planks) are all about 1 foot wide, actually a bit more since the French foot was bigger than the English foot. The rest of the planking is approximately 9 inches wide, and again, it's slightly larger than the comparible English planking.
-
Thanks again for following, liking, and commenting. Nenad... the fire is burning and the spice is flowing. Gaetan, I'm also looking at Belle Poule along with the 8-pdr frigates of the period. I'm not convinced that pilasters shown on Hahn's drawing are 100% correct and the NMM plans are hard to make out. Later in the period, they did get "simpler". I'm still digging into the research as I go. I do have the two thicknesses of planking. I'll try to get a better picture of it. I'm surprised that the 74 has more of an English style wale and planking, though.
-
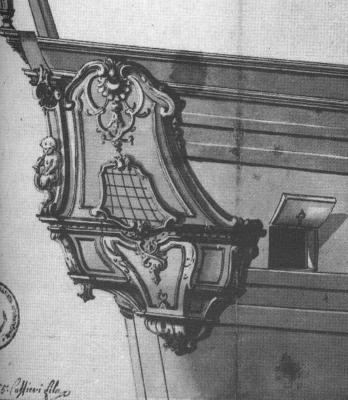
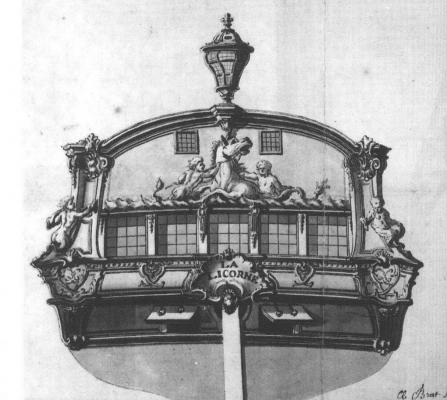
Thanks for the likes and comments. Carl, A dissertation...?? hmm... I'm not sure I can add anything to general knowledge other than what's out there already. John, Like Dan, John, my favorite one to use is "Merde"... :D Edit: G. Delacroix recommended that I use Belle Poule for the fiddly bits and rigging as they were contemporaries. Le Renommee was earlier. If I were doing "as built", then that would be the one to use. Mike, Those pics are of her "as built". I'm doing "as captured". She was, with minor modifications, take into the British Navy as HMS Licorne. The name wasn't changed as there was already an HMS Unicorn. Here's some PDF's of how I'm building her. These are from the Hahn plans which as far as decorations go are right off the NMM plans. The figurehead is very close to the Unicorn figurehead. Might even be the same one.. I'm not sure as there was/is some confusion on the plans between HMS Unicorn and HMS Licorne. bow.pdfstern.pdfstern-quarter.pdf
-
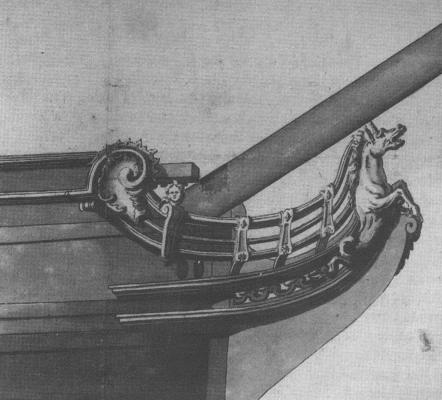
Thanks for the "likes" and comments. Druxey.. I'll try. Dan... thanks for explaining the anchor stowage planking. You beat me to it. Hi John, I have the pictures from Boudroit's History of the French Frigate 1650-1850 As built, she had wales similar to the English but her decorations including quarter galleries were typical for the period. See pictures. After a rebuild/Great Repair or whatever the French called it, she resembles the Belle Poule and it also appears the L'Hermoine is similar (same period) in galleries, planking but Licorne, has the full Arms of France for the stern decoration due to not having the chase ports on the quarterdeck level. The wales were converted to as shown and also as you explain. It's been a bit confusing at times especially since Hahn thought it was Le Venus that should be used. Le Venus was an 18-pdr of a later period and design. One big surprise was they went from 5 stern windows (4 real and 1 deadlight) to 7 windows (4 real and 3 deadlights). Also, the original design had lids on the ports. After the rebuild.. no lids. One thing I did discover from Boudroit's works is that the 8-pdr and 12-pdr frigates were very similar and the biggest difference as far as visual is that on a 8-pdr, the quarter deck stops on the aft side of the main mast. On the 12-pdr, the quarterdeck continues to the fore side of the mainmast. The more I get into this build, the wilder some things seem to get. Edit.. accidentally hit "post" while writing this.
-
Beautiful build, Anthony. Are they any more pics of the build in progress? I was beginning to think that you had given up on this.
-
Hello Santiago, I really can't offer any advice other than what Jason and Ulises said. Pick the one you want to build first and open build log. A build log is the best way to get help when you need it.
-
Jeff. It wasn't unknown for that practice but other than the French, it wasn't used much. The center line planks were thick stuff, sometimes scarfed, sometimes not (depending on the country). Generally, the English let the planks into the beams while the French for a period left them proud of the beam. There's pros and cons to either method..
-
Keith, In addition to what Izzy suggested with the alcohol wipe... use a piece of 100 grit sandpaper to rough up the surface. I'm finding that this works a charm as some of the wood I have when thickness sanded, cut, machined, etc. has a surface that just doesn't seem to like the glue until it roughened.
-
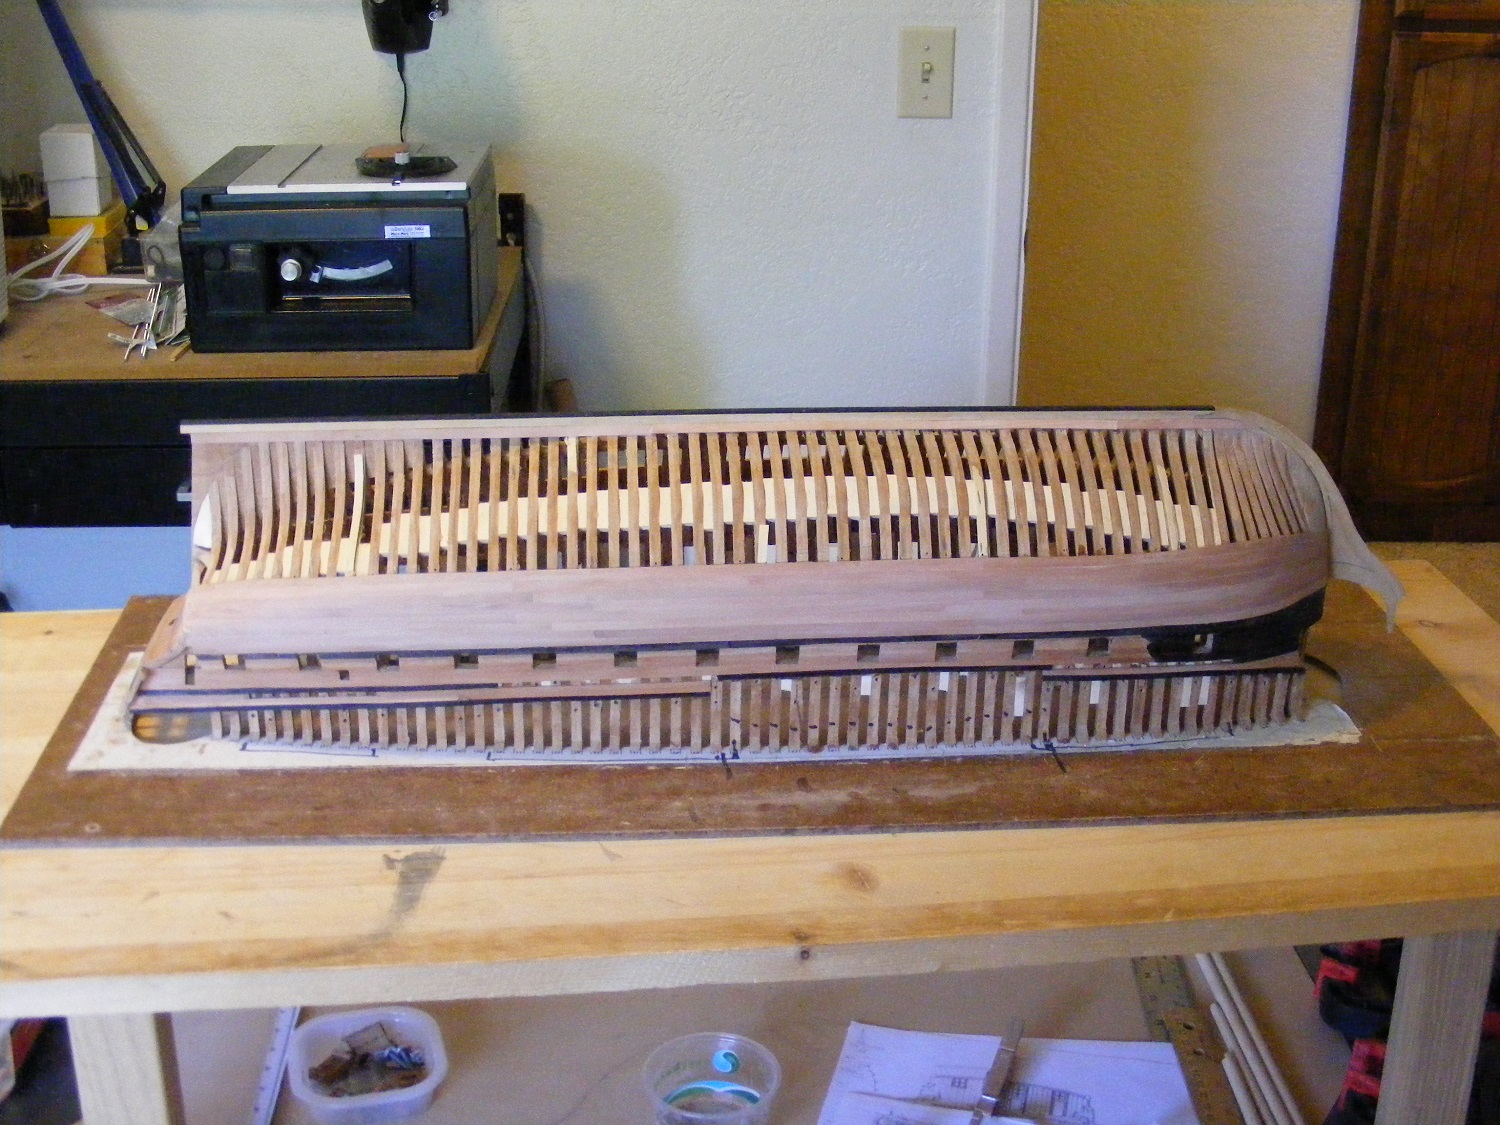
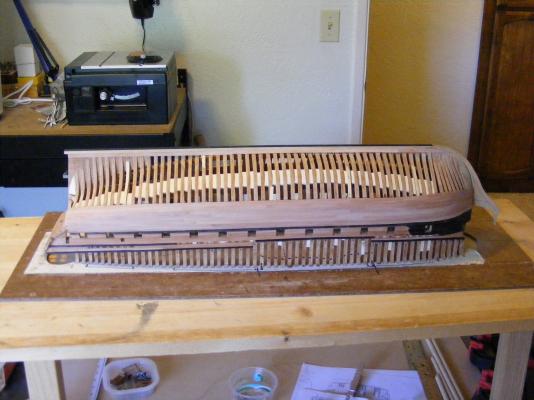
Thanks for the "like", the comments and looking.... Here's the current state... The wale (wide) planking is complete on the port side. Work is continuing on the starboard side. I've temporarily tacked in place the garboard strakes in order to measure the remaining area for the "normal" planking strips. I'm also sorting out how many battens I'll need... I'm thinking probably 3 of about 8-10 planks between battens.. At this point, I know I'm going to need drop planks and stealers since various monographs show them... I'm assuming this was the normal method for the French ships and not the monograph author's but haven't been able to verify it. Click on the image to enlarge and as always ideas for improvement are welcomed.
-
Walt, Try this... open an "new" drawing and hit "save as". It will open the "save" window at the last folder... although depending the program, it might open the folder at the default location. Otherwise, you can hit the start menu and if you remember the name of the drawing, enter it in the search bar. If not the name, then try *.XXX where xxxx is file type.
-
Ah, yes... ebony. The bane of model shopbuilders. Lots of heat as soaking doesn't do much... lots of extra wood to deal with the breakage.. I'm going to try and get away from it even though I just love how it looks. Maybe stain or dye next time around.
-
The area circled in red? Not rope but metal bands wrapped while hot and then riveted, usually. A lot of us use black paper to simulate the iron bands as it's easier to work with than brass.
-
Nice work, Mike. The planking looks to be going well. I had that problem with wales and double layers and I won't be doing that again. I'd rather fiddle with the thicker wood than trying to line everything up.
-
Now that is a scary photo if ever I saw one. To have the bowspit that close....
- 1,319 replies
-
- 1
-
-
- caldercraft
- Victory
- (and 1 more)
-
Cutty Sark by NenadM
mtaylor replied to NenadM's topic in - Build logs for subjects built 1851 - 1900
Wow.. impressive work and you did earn your beer. I'm not sure the bear would be tasty or friendly unless he got a beer also.- 4,152 replies
-
- 5
-
-
- cutty sark
- tehnodidakta
- (and 1 more)