-
Posts
4,508 -
Joined
-
Last visited
Content Type
Profiles
Forums
Gallery
Events
Everything posted by Landlubber Mike
-
Hi Joe, Really nice progress. This hobby certainly makes you think about things a few steps ahead. I really liked doing the rigging generally, but the coils were a real pain. I think we may have talked about this earlier, but I've seen some start the lines with the coils before the masts go up. I can't figure out how they ultimately got the lines run to the ultimate terminal points. Seems like either way, you have a tricky task at hand. Anyway, really nice job. It's always a treat to see your updates.
- 302 replies
-
- granado
- caldercraft
-
(and 1 more)
Tagged with:
-
Hi Frank, glad to see you're feeling better. Really great progress on your build. I still can't get over how nicely you weathered the hull.
-
Wow, very impressive! Now that you've worked with ebony, are you going to stick with it on other builds? Seems like you've figured out how to make it behave.
-
Thanks Martin, would love to see your progress too. Have you decided on your color scheme yet? I'm thinking of going black from the wales down, pear stained a darker brown for the area from the wales to the friezes, pear stained blue for the friezes, and redheart just above the friezes. The upper area is going to be tricky to avoid the stained areas bleeding over, so I'm taking my time planning things out.
-
Looking great Mark. Are you using a combination of ebony and stained pear? What stain or dye are you using?
-
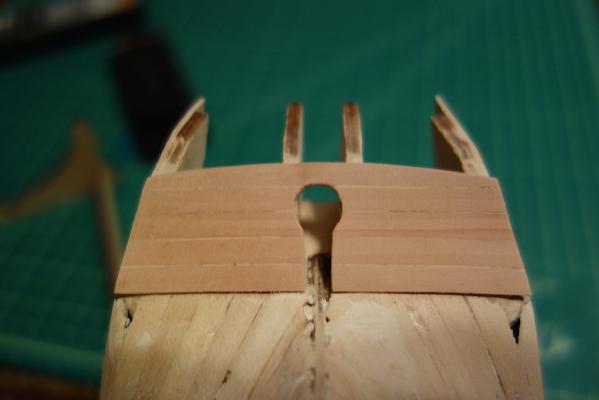
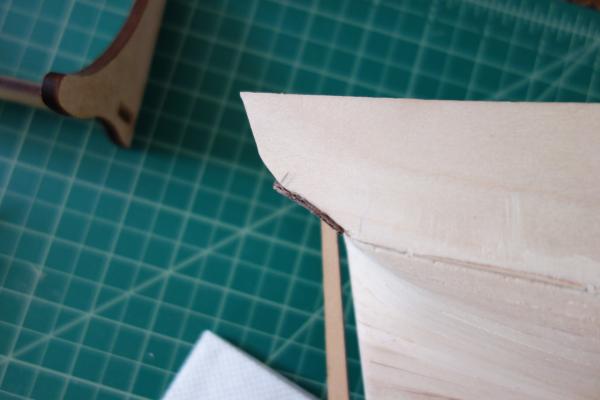
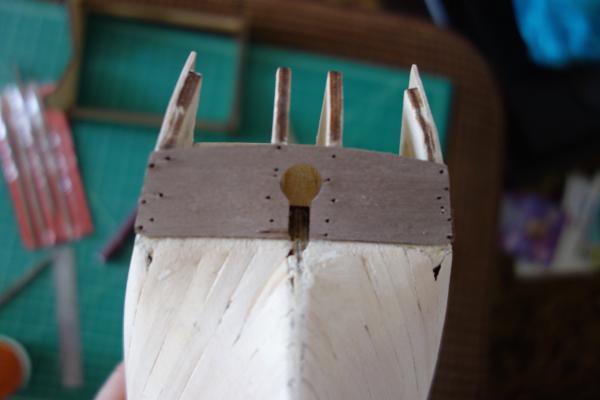
A little more progress the past few nights. I planked over the stern counter, which I think makes it look a little better than just going with the walnut ply piece. The planks are curved to match the top and bottom curves of the stern counter. So, what I did was cut the planks a little wider, then use the bottom of the counter as a guide to shaping the planks, Lots of hand sanding to get the planks to sit tightly against one another, but not too bad when all was said and done. TFFM has a slightly different shape to the stern counter opening. Rather than a circle like in the kit, it's more of a flatter, wider head to it. I thought about tweaking the stern counter in that way, but since I'll be adding the rudder coat, I think that will all get hidden eventually so I kept the shape as is. I'll probably plank the section above the stern counter next, and start lining the hull for the second planking. I'm super excited to get the planking going.
-
Hi Ian, incredible work as always. Really fantastic work with those elm pumps. For what it's worth, if I remember correctly, the Pegasus plans represented the elm pumps using the symbols marked by your blue arrow. Maybe that's why the pumps are not visible in SLR0497 (i.e., the pumps would be far back under the quarterdeck near the capstan). I just took a look at the AOTS Pandora plans, and it looks like the pumps were a touch forward of the main mast. So, it seems like the pumps can be in a number of places.
-
Very nice work Eamonn. The different colored wood on the deck (binding strakes?) is a really nice touch.
- 1,039 replies
-
- ballahoo
- caldercraft
-
(and 2 more)
Tagged with:
-
Beautiful model Nils. I've been thinking about dressing my Pegasus in full sails, and after seeing your model, I'm definitely going that route. Hopefully I can pull it off half as nicely as you did. Congratulations on your really amazing work. You are a true artist!
-
Beautiful work Joe. A really nice looking model from a skilled modeler.
- 302 replies
-
- granado
- caldercraft
-
(and 1 more)
Tagged with:
-
Thanks very much everyone. It's good to be back and working on the build. After completing my Hannah, I did take some time reading books on ship models in bottles. It can be another addictive part of the hobby - I'll probably start a scratch SIB in the next couple of months. I bought half a dozen books, along with supplies and a few bottles. The best part of the hobby of course is drinking/emptying the bottle Eamonn, you didn't miss much. I pretty much posted the full build log on day after completing the Hannah SIB. I was worried that I'd mess it up getting the ship into the bottle, so decided I would wait to see if I was successful before posting the build log. Thankfully it all worked out ok, but I had a few choice words for the project along the way Frank, sorry to hear you were so sick. Hope you're feeling better my friend.
-
It's been a couple of months since my last update. I spent most of February finishing up my Hannah SIB build, and then have been busy with work, kids, etc. This week I did take some time to continue filling and sanding the hull, and installed the stern counter. When I looked at the NMM plans for the Pegasus, the counter seems to be a little more curved than the supports with the kit. So, I sanded back the stern extensions to add more of a curve, thinned down the stern counter a bit, soaked it and let it dry against a thermos, and then installed it yesterday. It probably could have been curved a bit more, but I think it works. The curves won't be as apparent once the decorative pieces are installed anyway. I plan on planking over the walnut ply piece with some thin pear. I'll start the second planking soon. I want to take the time to line the hull the right way, as I'm planning on using multiple colors for the upper hull planking. The base color will be pear stained a darker brown color. Then I will use pear stained blue for the frieze area, followed by redheart planking for the top area of the hull. The wales will be pear stained black, and I'm thinking of using black for the area between the wales and the coppering, which I think looks great on Realworkingsailor's build. A lot to plan out when using stains, but hopefully with a little pre-planning all should go well.
-
John, your Morgan is fantastic. Every time I come to your log I regret starting other kits on my shelf than the Morgan. Really great job!
- 2,250 replies
-
- model shipways
- Charles W Morgan
-
(and 1 more)
Tagged with:
-
Like Andy, I had no problem with the swelling either. I agree with him that I don't think there is enough moisture in the planks to transfer to the MDF and cause a problem.
- 25 replies
-
Rick, I built the Caldercraft Badger, which used plywood for the keel and bulkheads. I am now building the Corel Unicorn (plywood) Amati Pegasus (MDF). Here are my thoughts. I think plywood is great, but only if it is perfectly straight. The Badger kit came with perfect plywood parts. The Corel Unicorn did not. When I went to source plywood elsewhere, the package of plywood I got from Micromark was all warped (to their credit, they refunded me the purchase price), and the next source had one piece out of five in the package that was not warped. I see people using various methods to un-warp their keel, but I have always wondered long term how successful that is if you don't also add in lots of filler blocks or other pieces to keep the keel straight - which, is a complete pain I would think. MDF, at least what is used in the Pegasus, is perfectly flat and the keel, bulkheads and lower deck all fit together like a glove. I don't know if you can get that kind of precision with plywood, and maybe Amati sources very high quality MDF. But, it was a joy to work with. I had to go through so much trouble with replacing the Corel Unicorn keel that it was a real relief to switch over to the Pegasus kit. MDF is interesting too in that it is a hard material to sand, but it's quite easy to chisel as the layers flake off if you chisel them the right way. If you chisel, you aren't creating much fine dust. Toxicity is, and should always be, a concern. I guess my take on it is that there is not much work that goes on in ship modeling with the keel and bulkheads, so your exposure is limited (I'm so slow at modeling that I'm only exposing myself every 5 or more years to the keel). That being said, like any other time I'm sanding wood or composites, I try to be good about taking the necessary precautions of wearing a dust mask, vacuuming up the dust quickly, sanding outside if a big job, etc. Plus, there are so many other toxic materials that are used in the hobby like woods, adhesives like CA, soldering stuff, blackening agents, etc. So, I just try to be smart about the nature and extent of my contact with those materials. Anyway, I'm still a relative beginner to this hobby, but these are just my thoughts.
- 25 replies
-
Fantastic Igor, very nice work. It looks fantastic in the new bottle. Are you planning to add sea to the bottle?
-
Very nice work Peter, this ship has very nice lines. Clean crisp planking, great job!
- 293 replies
-
- pickle
- caldercraft
-
(and 1 more)
Tagged with:
-
Hey Carl, very nice job! Looks like you managed to get it inserted without a hitch, congratulations! So are you going to do any other SIBs? I think I'm hooked, but I'm going to go the scratch route for my next builds.
-
Hey Nathan, it's looking great. Are you planning to add sea to the bottle? If so, consider filing down the bottom of the ship. That will help you to need less "sea" material, and make it easier to fit the ship through the neck of the bottle.
About us
Modelshipworld - Advancing Ship Modeling through Research
SSL Secured
Your security is important for us so this Website is SSL-Secured
NRG Mailing Address
Nautical Research Guild
237 South Lincoln Street
Westmont IL, 60559-1917
Model Ship World ® and the MSW logo are Registered Trademarks, and belong to the Nautical Research Guild (United States Patent and Trademark Office: No. 6,929,264 & No. 6,929,274, registered Dec. 20, 2022)
Helpful Links
About the NRG
If you enjoy building ship models that are historically accurate as well as beautiful, then The Nautical Research Guild (NRG) is just right for you.
The Guild is a non-profit educational organization whose mission is to “Advance Ship Modeling Through Research”. We provide support to our members in their efforts to raise the quality of their model ships.
The Nautical Research Guild has published our world-renowned quarterly magazine, The Nautical Research Journal, since 1955. The pages of the Journal are full of articles by accomplished ship modelers who show you how they create those exquisite details on their models, and by maritime historians who show you the correct details to build. The Journal is available in both print and digital editions. Go to the NRG web site (www.thenrg.org) to download a complimentary digital copy of the Journal. The NRG also publishes plan sets, books and compilations of back issues of the Journal and the former Ships in Scale and Model Ship Builder magazines.


