


Landlubber Mike
-
Posts
4,547 -
Joined
-
Last visited
Content Type
Profiles
Forums
Gallery
Events
Everything posted by Landlubber Mike
-
 Alan, when I did my waterline diorama, after gluing the crinkled foil pieces on the board, I then took a sheet of aluminum foil and covered the entire surface. That helped soften the sharp edges of the crinkled foil. I’d do that before the gesso, and then use gesso if you need more softening.
 -
That photo etch looks fantastic. Will turn that nice kit into a really beautiful build. On the colors and having trouble with Vallejo Yellow Ochre, consider whether it makes sense to put down a primer layer first. From my limited experience with plastic models, some colors are more difficult than others. Yellows and reds come to mind. Not only is a primer coat beneficial for even coverage, but the underlying color will affect how the yellow and red come out. Undercoat color especially matters when it comes to reds.
-
Coming along great Glen - this is going to be fantastic!
- 177 replies
-
- 3
-

-

-
- Independence
- bottle
- (and 1 more)
-
I'm in for this one Yves - this is going to be another masterpiece!
-
John, I've followed you on bottleshipbuilder, glad to see you posting your amazing work here! I have to say, your hidden hinge technique is very clever - better than the staple hinge you typically see. Gives me a lot to think about when doing my build. Thank you for posting such clear pictures of how you did it!
-
That hull with all the gunports looks really good! Very nice job!
- 177 replies
-
- 2
-
-
- Independence
- bottle
- (and 1 more)
-
I love the Belvedere. Cars had style back then, unlike the boring ones today. Looking forward to this build!
-
That looks amazing Glen, great job! Can I ask how you blackened the hardware? I really like the look of it.
- 177 replies
-
- 3
-
-
-
- Independence
- bottle
- (and 1 more)
-
F-86F-30 Sabre by Javlin - FINISHED - Kinetic - 1/32
Landlubber Mike replied to Javlin's topic in Non-ship/categorised builds
That's a really nice looking model! Great job Kevin! -
Looks good to me! It didn't impact the end grain that much at all. I would have done the same
- 177 replies
-
- 3
-
-
-
- Independence
- bottle
- (and 1 more)
-
Doesn't look bad at all from what I can tell. Did you try it on the end grain of the carriage sides? The change seems very subtle, and not so drastic as with redheart. Looks nice to me. Redheart is an extreme case. It's a very interesting wood in a variety of ways besides the end grain turning black with oil products. It cuts and sands as if it is a hard wood, but inexplicably can get crumbly and not have much lateral strength. With UV light it turns a more orange-brown color over time. Has a little bit of a rubber-like smell when being worked too.
- 177 replies
-
- 3
-
-
-
- Independence
- bottle
- (and 1 more)
-
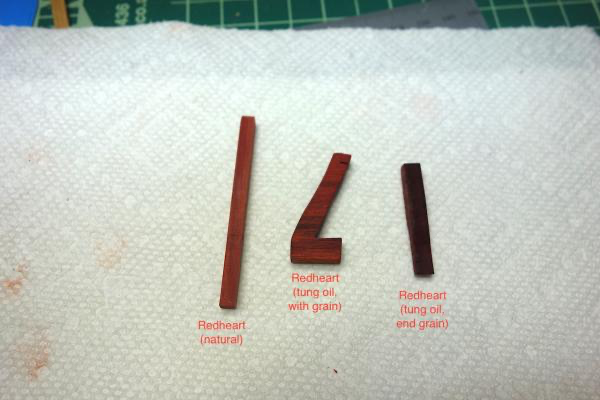
I'm not a super expert on finishes, but have tried a variety. All I can say is the best thing to do is test them out first! I really like tung oil for woods like pear and walnut. It brings out an incredible richness in the wood. I've used 100% tung oil - make sure that the bottle says it's 100% because most formulas out there are a blend. Wipe-on poly is another good one. Maybe slightly less vibrant than tung oil on certain woods, but really easy to apply and looks nice. The one reason I caution you to try out finishes ahead of time is that some woods look completely different if a finish is applied with the grain versus on the end grain. With planking for example, end-grain is not an issue. But with things like cannon carriages, deck items, etc., you might have visible end grain. This came up in my use of redheart on my Pegasus - take a look at the picture below. Tung oil with the grain is gorgeous - but when applied to the end grain, it turns the piece almost black in color! Would have been a disaster had I not known that. I tried some other finishes, and varnish was the only finish that kept the original color in both end grain and with the grain pieces. Some finishes also impart a slight yellow color to lighter colored woods. Danish oil definitely does. I also read that applying oils to holly could do the same things, ruining that pure white look that people go for. I haven't worked with holly yet, but will have to experiment because I'm building the Charles Morgan, a black and white ship, using ebony for the black and holly for the white. Some finishes also aren't able to penetrate woods. A family member put Brazilian cherry wood floors in his house, and the wood was so dense the first finish they applied beaded on the surface. Not sure if this would be the case with other woods we use in the hobby that are dense like ebony. You can always think about staining woods. Some take stain better than others. Pear is great, basswood not so much. Here is some experimentation I did with my Pegasus on staining pear a little darker:
- 177 replies
-
- 4
-
-
- Independence
- bottle
- (and 1 more)
-
That's looking really fantastic Glen. That wood you are using is beautiful. In earlier pictures it was like a golden brown, now it seems to have almost taken on a color like swiss pear. I bet when you get a finish on it it will really pop. I think the only problem is the stand will look so nice, you are now going to have to make a stunner of a SIB to match!
- 177 replies
-
- 4
-
-
-
- Independence
- bottle
- (and 1 more)
-
I'm away for a couple of weeks and Egilman turns out a stunner. Nice job!! Great work with that reflective finish, wow! If you don't mind, and forgive me if I missed it when reading your blog, but what paints did you use for the aluminum color? And for the aluminum fuselage versus aluminum painted bottom of the wings, did you use the same paint/color, and just buff out the one on the fuselage to make them different? Or did you use different colors? Alclad for example has a ton of aluminum finishes.
-
Mercedes 300 SL by kpnuts 1/16 italari
Landlubber Mike replied to kpnuts's topic in Non-ship/categorised builds
Very nice! Another beauty! -
Fairey Gannet by RGL - FINISHED - Trumpeter - 1/72
Landlubber Mike replied to RGL's topic in Non-ship/categorised builds
Nice job! Looks like you have a knack for planes as well as ships -
Great job! Love Alfas!
-
The framing of the bulwarks is a big step, really nice job. The inside face of the bulwark planking becomes the bulwark planking seen from inboard, so make suer that you are happy with your planking. Not sure that you can use filler, etc. unless you are planning to paint it all.
-
Coming along really nicely. I like how the anchors are stored on this ship, cool look to it.
-
Hey Glen, I'm in for another great ride if you'll have me. I love your ingenuity and creativity when it comes to the stands for your SIB builds - this one looks great! That wood is gorgeous, a fitting complement to the SIB build
- 177 replies
-
- 3
-
-
-
- Independence
- bottle
- (and 1 more)
-
This is such an epic, incredible project. Really nice job!
- 2,699 replies
-
- 7
-
-
- heller
- soleil royal
- (and 9 more)
-
Superb work Bob as always. Very nice!