patrickmil
-
Posts
1,209 -
Joined
-
Last visited
Content Type
Profiles
Forums
Gallery
Events
Everything posted by patrickmil
-
 Very nice Sjors! I promise that I don't have the ability to see into the future... . You are making some good progress on ship.
 -
Very nice filler blocks Sjors! I can't wait to see some planks on her.
- 1,616 replies
-
- 1
-

-
- caldercraft
- agamemnon
- (and 1 more)
-
Popeye, I think they look fine. I'm what you're noticing won't be as noticable once they are in place. If you are going to have another go at them then maybe try to construct the octagonal upper rails flat on a piece of paper and mount it as a whole to the rest of it.
-
That looks really nice. Let me ask you... Is the copper for the pintles and gudgeons more authentic? I've thought that we all reproduce these pieces in black to simulate iron and figured that they would rust away in no time if they really were made of iron.
-
Kimberly, for the white you may try Tamiya masking tape and mask off the rest of the ship and then spray the white on in multiple thin coats.
-
That ship is impressive! Your work on it so far is equally impressive. Are you going to be tackling the 1/200 Hornet next?
-
Thanks Popeye. I've got the starboard side of the fore mast to do still and then the lines that span the masts and yards. Then I will officially be done with rigging.
- 299 replies
-
- 5
-
-
- niagara
- model shipways
- (and 1 more)
-
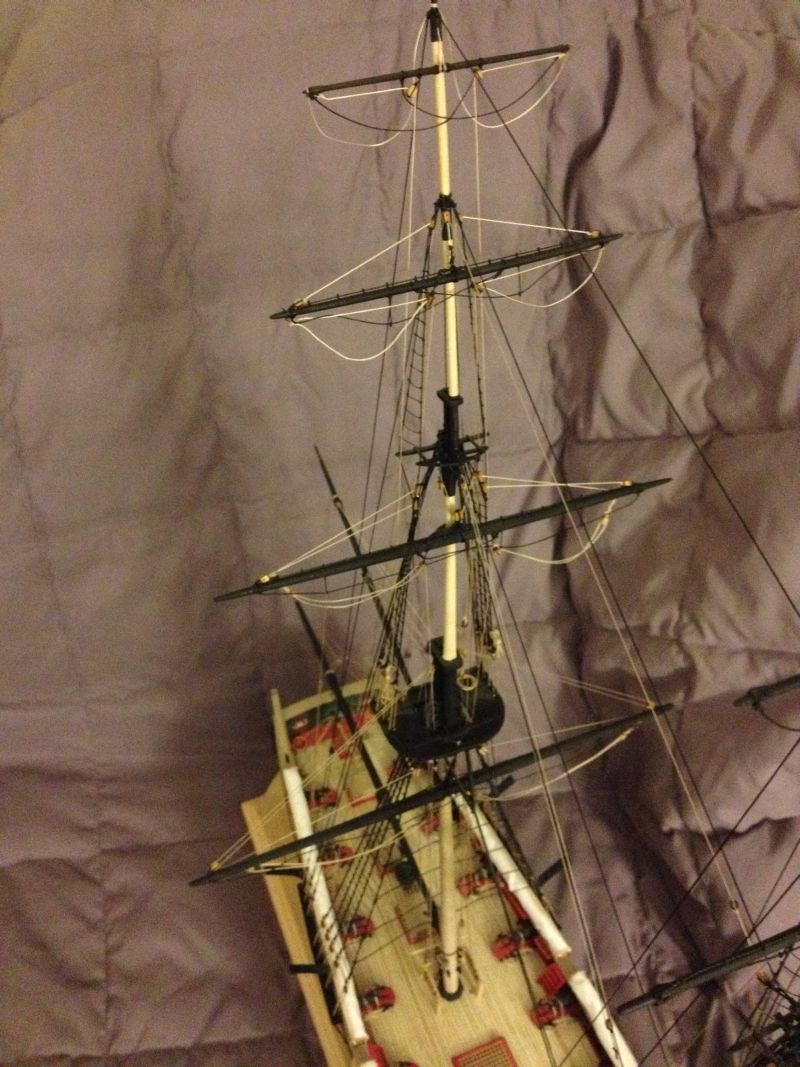
A small update... The main mast is as rigged with tan line as it's going to get without sails. Any comments will be appreciated as always. Thanks for looking in.

- 299 replies
-
- 5
-
-
- niagara
- model shipways
- (and 1 more)
-
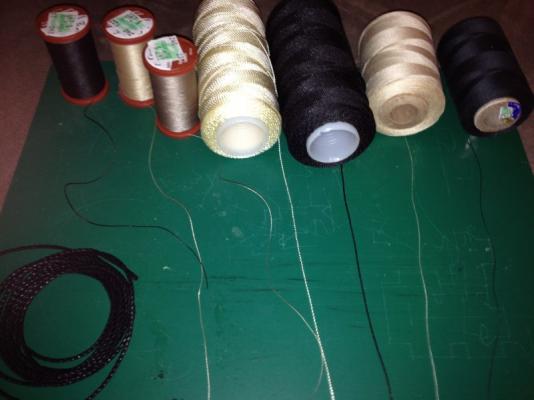
Mobbsie, I like the idea of a case but just don't think I can swing it with the available space in my home. The ships rest comfortably up on shelves. AJ, here are some of the threads and ropes I bought and have used extensively along with what came in the kit. One other thing I found to be very convenient was annealed steel wire. This was handy for making black metal objects that didn't require soldering.
- 299 replies
-
- 2
-
-
- niagara
- model shipways
- (and 1 more)
-
I'm a little late to the party, but let me echo Bindy... WOW!
-
Joesph, I definitely know what you're talking about. It is very intimidating to post pictures of your work and hold them to pictures of other's work. I decided long ago however, that my skill at this stage of this hobby wasn't going to be at the same level as others. It has helped me considerably. I know where each and every fault is with my Niagara and for the most part I'm not going to go back on them. I will keep them in place to remind myself of the learning curve in this hobby. I'm sure I'm not speaking alone when I say that we are all looking forward to seeing some progress soon with your build.
-
Popeye, the crow's nest looks good. Scratch building something circular or octagonal isn't the easiest thing to do and it looks as though you have it mastered.
-
AJ, I have purchased my own rigging thread from various craft stores like Joann Fabrics and Hobby Lobby. I used a bit of what was supplied in the kit but I always pull off too much in case of some mistakes here and there (which I make frequently). I stuck with the nylon/poly type of thread and rope as they don't get fuzzy as easily as cotton. I do use linen thread though for siezing since it's the only thing I could find that was very thin. I will try to take a picture of the lines I have used and maybe give you an idea of something that could work for your rigging when the time comes.
-
Nice tools Sjors!!! Your workspace looks entirely too clean. You need some sawdust all over the place.
- 1,616 replies
-
- 2
-
-
- caldercraft
- agamemnon
- (and 1 more)
-
Bob, I'm chomping at the bit to get started on the Constitution, so I would like to wrap up Niagara without doing a rush job on her.
-
I was leaning in the direction of doing five or six windows when I start on mine. The sterns with that window configuration are really nice.
- 1,354 replies
-
- 1
-
-
- constitution
- model shipways
- (and 1 more)
-
Tom, I definitely agree with your sentiment on the Hull model. The Constitution is my next build and I am trying to figure what all I want to go into with her. I think the Hull model stern is not the prettiest I've seen. I like the Corne painting, but it doesn't look anything like what I've seen in other pictures or in the AOTS.
-
Hey John, thanks for the word. I'd like to see your finished Morgan also so we can add another to the Niagara club. I'm trying to get the build time in where I can.
-
Hi AJ, I'm a little late in following your log, but I'd definitely like to chime in with all of the positive feedback on your Niagara. Your ship is incredibly neat and clean. Very nice work.
-
Ben, nice starting work on your Pegasus. In regards to a comment further up the page, I'm curious as to what your future build will be.
-
Kimberly, I'm anxious to see you do well on your Constitution. I have seen your other builds and am impressed. I think once you move up to the larger scale Constitution you'll notice that ship modeling is much easier with a larger scale model.
- 47 replies
-
- 1
-
-
- constitution
- revell
- (and 1 more)
-
Sjors, your deck looks outstanding. I really like the treenails. They are just the right amount of detail.
-
Thanks Sjors. I'm toying with the idea of a case for Niagara. I've got some big wood toys out in the garage that have been sitting idle with the cold weather.
- 299 replies
-
- 2
-
-
- niagara
- model shipways
- (and 1 more)
-
Sjors, your ratlines look great on the main mast. You are really making some great progress.
- 1,873 replies
-
- 1
-
-
- occre
- san ildefonso
- (and 1 more)
-
Augie, thanks for the compliment. I'm hoping I will have the time (and motivation) for regular updates from now on.