HOLIDAY DONATION DRIVE - SUPPORT MSW - DO YOUR PART TO KEEP THIS GREAT FORUM GOING! (89 donations so far out of 49,000 members - C'mon guys!)
×


hof00
-
Posts
1,650 -
Joined
-
Last visited
Content Type
Profiles
Forums
Gallery
Events
Everything posted by hof00
-
 Very nice!! The "Upgraded" version does lend itself to what looks like a straightforward Radio installation if that's the way you go. I saw a build log some time ago with a conversion of the "Old" kit to R/C. (I don't believe it was ever completed.) Cheers....HOF.
- 68 replies
-
- 2
-

-
- Sanson
- Artesania Latina
- (and 2 more)
-
Hi Rod, Yet another very nice build!! (Wots next? 😀) Cheers....HOF.
- 58 replies
-
- 2
-
-
- Robert E Lee
- Amati
- (and 4 more)
-
Hi Chap, I found the Reefing Gear the most confusing. I must admit that I used a bit of Modeling "License" to create something reasonably acceptable. Also, if you are going to use the kit Sails, my Mainsail was too short, (Luff?), for the length of the Boom given on the plans. Cheers.... HOF.
- 122 replies
-
- 2
-
-
- Artesania Latina
- Pen Duick
- (and 1 more)
-
Hi Chap, Looking very "Sharp." (Pardon the pun.... 🙂) Pedestals look the part. Agree, the Stand provided is not worth the time or effort. If I had it over, I'd turn a couple of wooden pedestals. (Which I now do for my builds.) I went with 6.0mm, (From memory), Brass Rod, looks o.k. IMO Spray Putty is an excellent solution for that really smooth surface!! I had heaps of "Fun" painting my Hull, I used Vallejo Acrylics, no problem, I then thought I'd be clever and try to get that "Mirror" finish and sprayed with automotive lacquer, looked really good until after 24 - 48 hours afterward when it all started to Craze. I had to sand everything back and start again.... and again as I had not managed to get rid of some of the lacquer the first time around. My error, I had not tested the Paint/Lacquer combination properly. In the end, I just left the paint with a satin finish. I am sure that you wouldn't make the same dumb mistake as I, a learning for myself, character building? 🙂 Cheers....HOF.
- 122 replies
-
- 2
-
-
- Artesania Latina
- Pen Duick
- (and 1 more)
-
Nice work!! Looking forward to the Yards and the running stuff.... 🙂 Cheers.... HOF.
- 89 replies
-
- 2
-

-
-
- Cutty Sark
- Revell
- (and 2 more)
-
Hi Chap, Nice work!! For the final fill and finish on my PD, I used an Automotive Spray Putty. This gives an "Eggshell" smooth finish after sanding if that is what you are after. (That was my madness to the method anyway.... 🙂) Cheers.... HOF.
- 122 replies
-
- 1
-
-
- Artesania Latina
- Pen Duick
- (and 1 more)
-
Hi Chap, Very, Very nice!! Takes the model to a much higher level. Cheers....HOF.
-
Grumman F4F-4 Wildcat by ccoyle - FINISHED - WAK - 1/33 - CARD
hof00 replied to ccoyle's topic in Non-ship/categorised builds
Ditto!! -
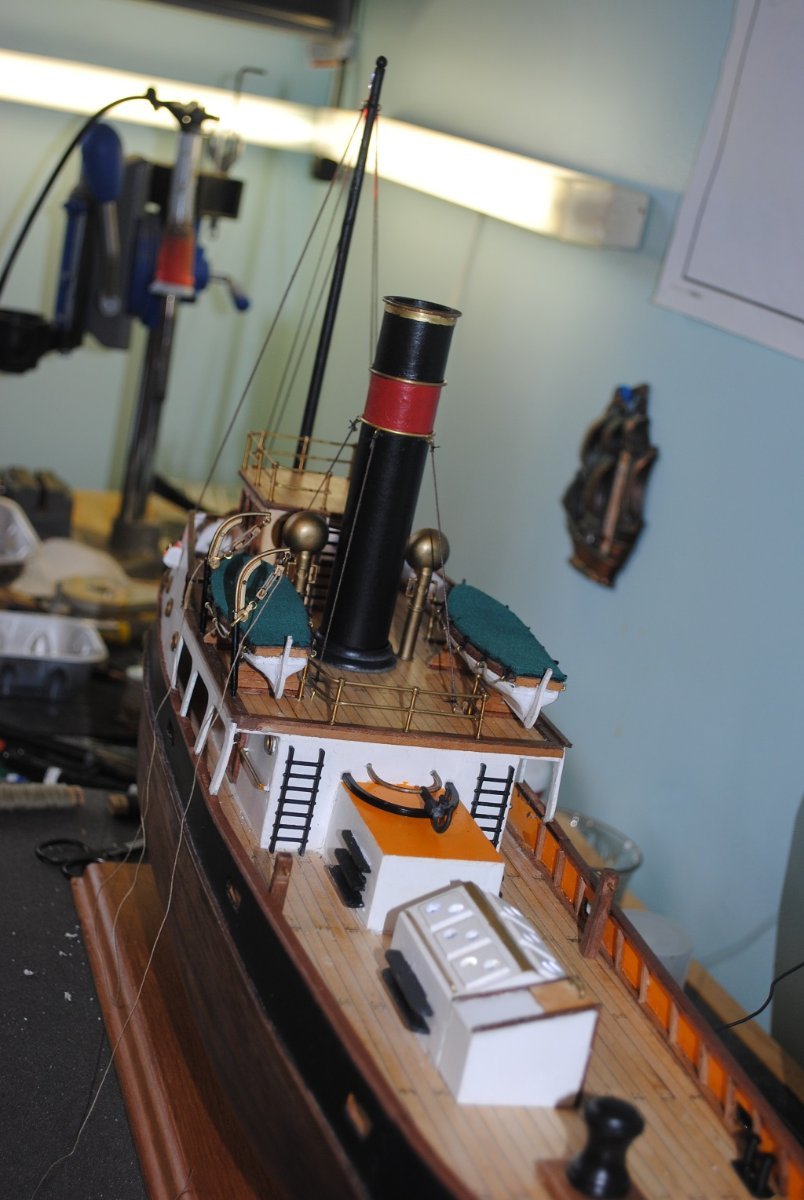
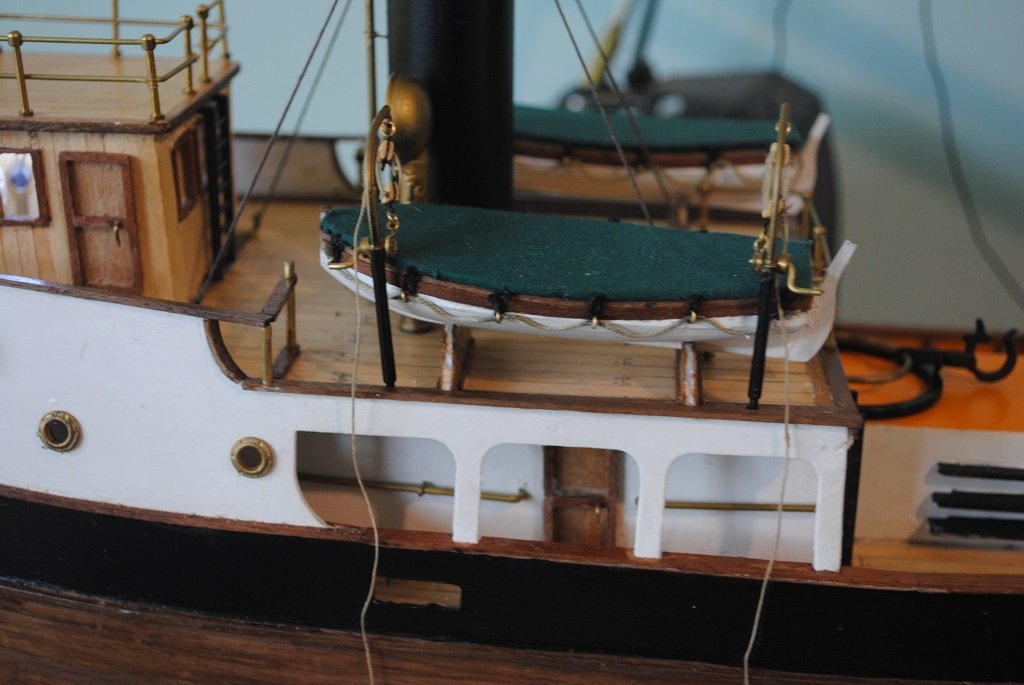
Thanks Nils, The Boats were in the kit, A/L instructions stated they were "Art Wood" (MDF?) In my instance they are White Metal castings that I was not initially, very happy with but with a bit of "Love" and the addition of some Gunwales they looked a bit better.... 🙂 I chose a Green Nylon fabric for the covers which are glued to 1/6 Ply. (I like the Green as it gives the model a bit of life. 🙂) Cheers and Regards, Harry.
- 118 replies
-
- 2
-
-
- sanson
- artesania latina
- (and 1 more)
-
Looks awesome!! I have looked many times at this kit.... Was any "Hardware" included in the kit? So, looking ahead slightly, are you going to "Glass" the Hull or use something else? Cheers....HOF.
- 57 replies
-
- 2
-
-
- Nordkap
- Billing Boats
- (and 1 more)
-
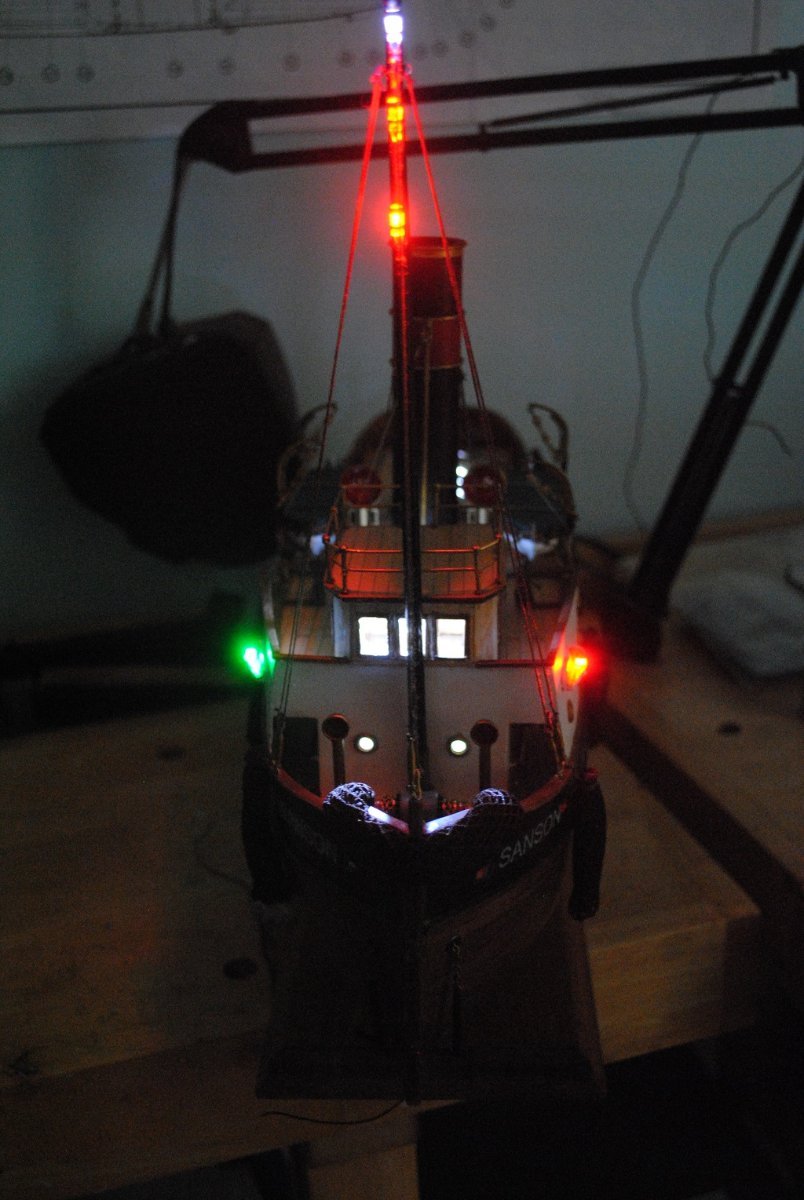
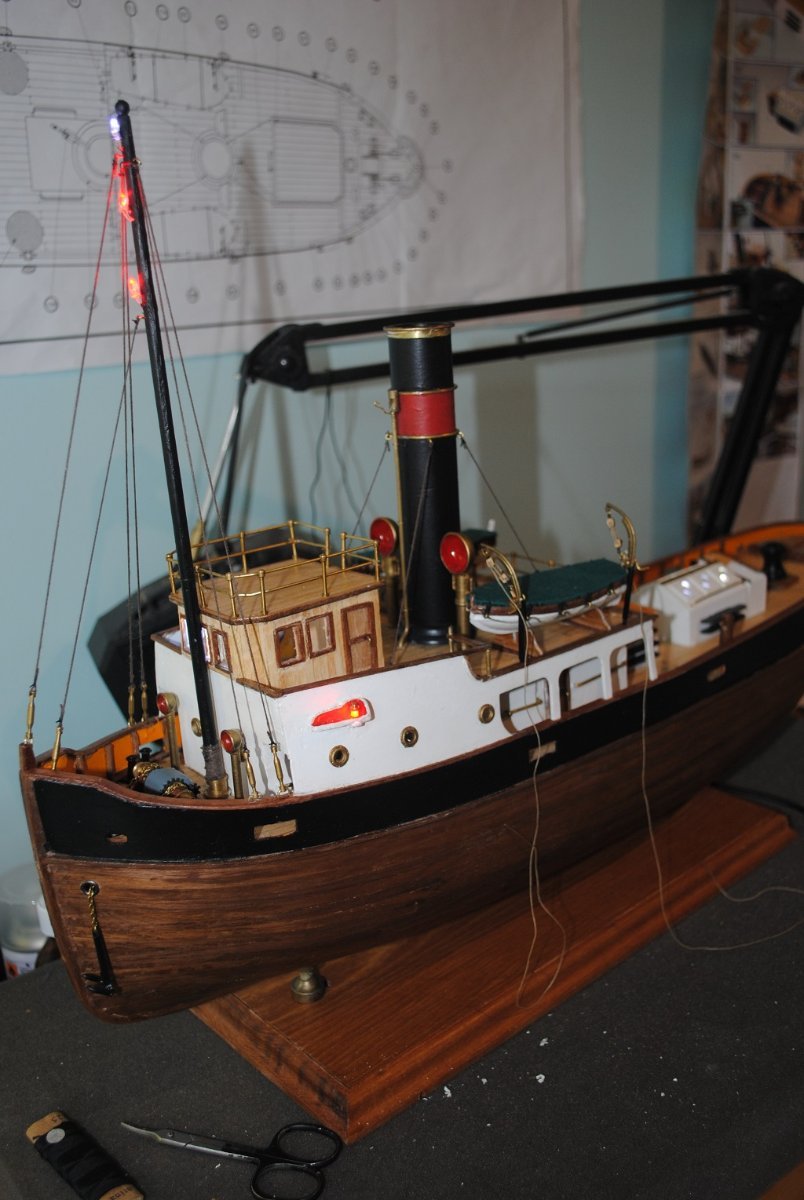
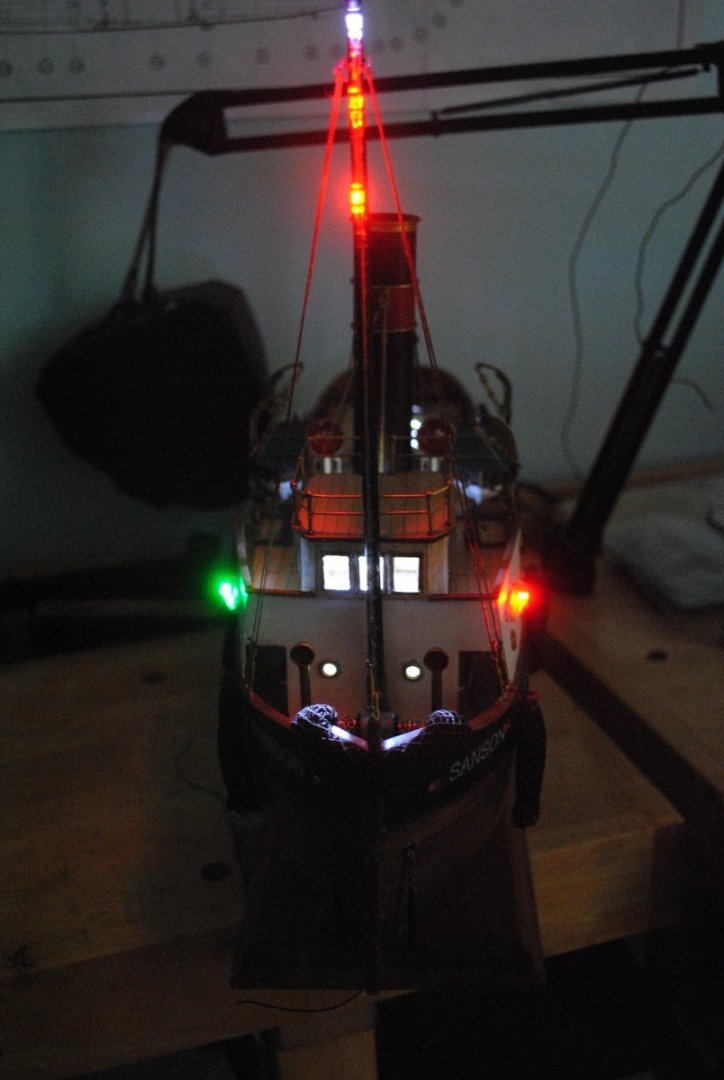
Thank you, Gentlemen, Yup, was a "Fun" build.... 🙂 I think that the only real issues I had with lighting was routing the Nav. Light wiring and the Mast Lighting required quite a bit of thought and a couple of prototypes. @Driver if you are thinking of lighting with your build, I may be able to assist with my method anyway. Cheers and Regards, Harry.
- 118 replies
-
- 2
-
-
- sanson
- artesania latina
- (and 1 more)
-
Thanks gentlemen, Much appreciated!! Cheers and Regards, Harry.
- 118 replies
-
- 1
-
-
- sanson
- artesania latina
- (and 1 more)
-
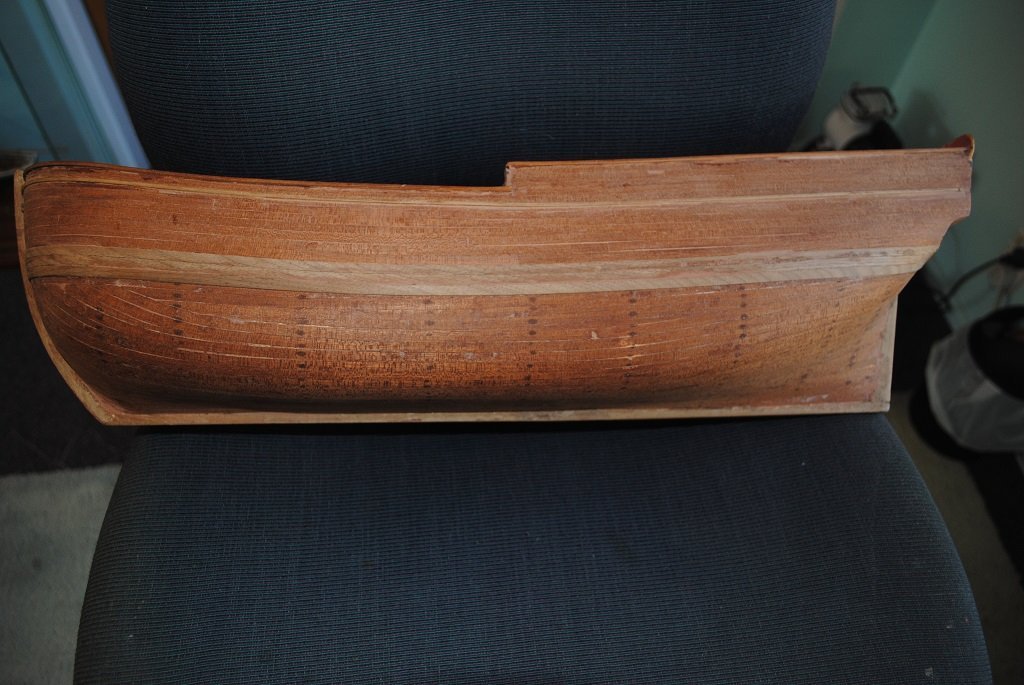
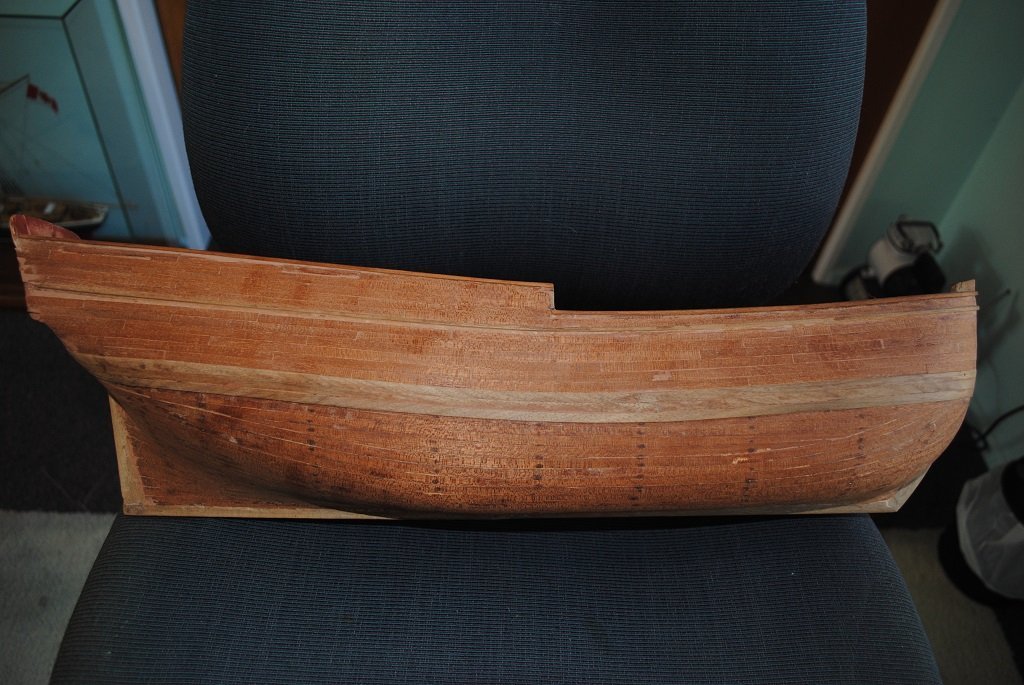
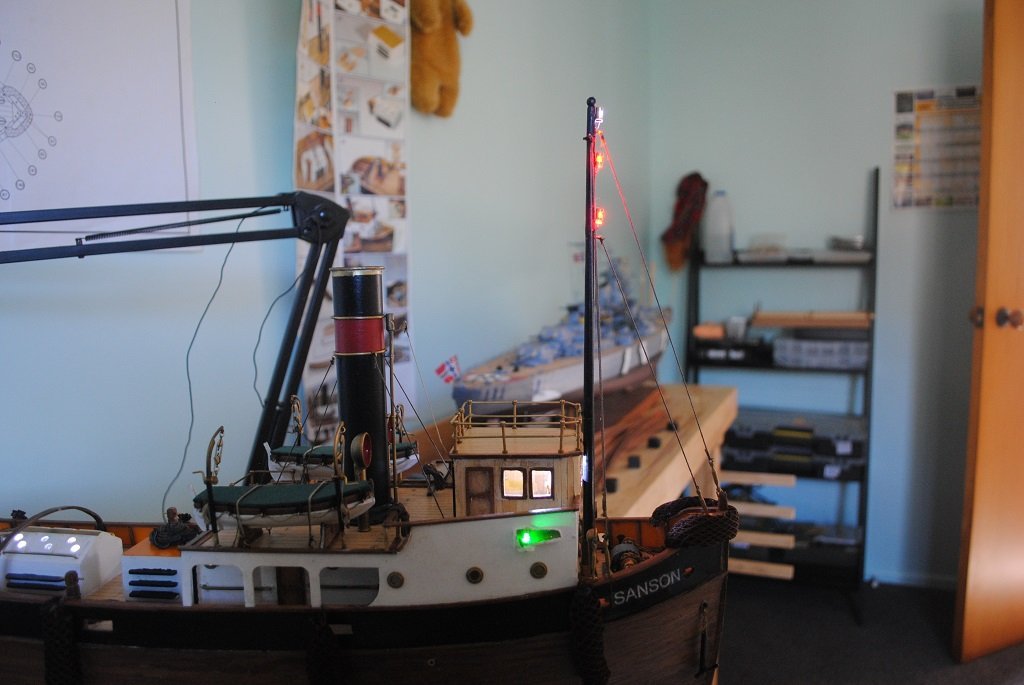
Hi All, Small update: The two front Decks, (Focsle/Tween?) are now in reasonable condition, Re-planked, Tree-Nailed and sanded. (Needs a coat of Polyurethane.) I figured the Poop Deck did not require a re-do. (Re-paint also on inside of Bulwarks.) Photos posted below also show Hull Planking that needs to be re-done below the Whales, I have the Materials so will get busy on this soonish. Cheers....HOF. Photos:


-
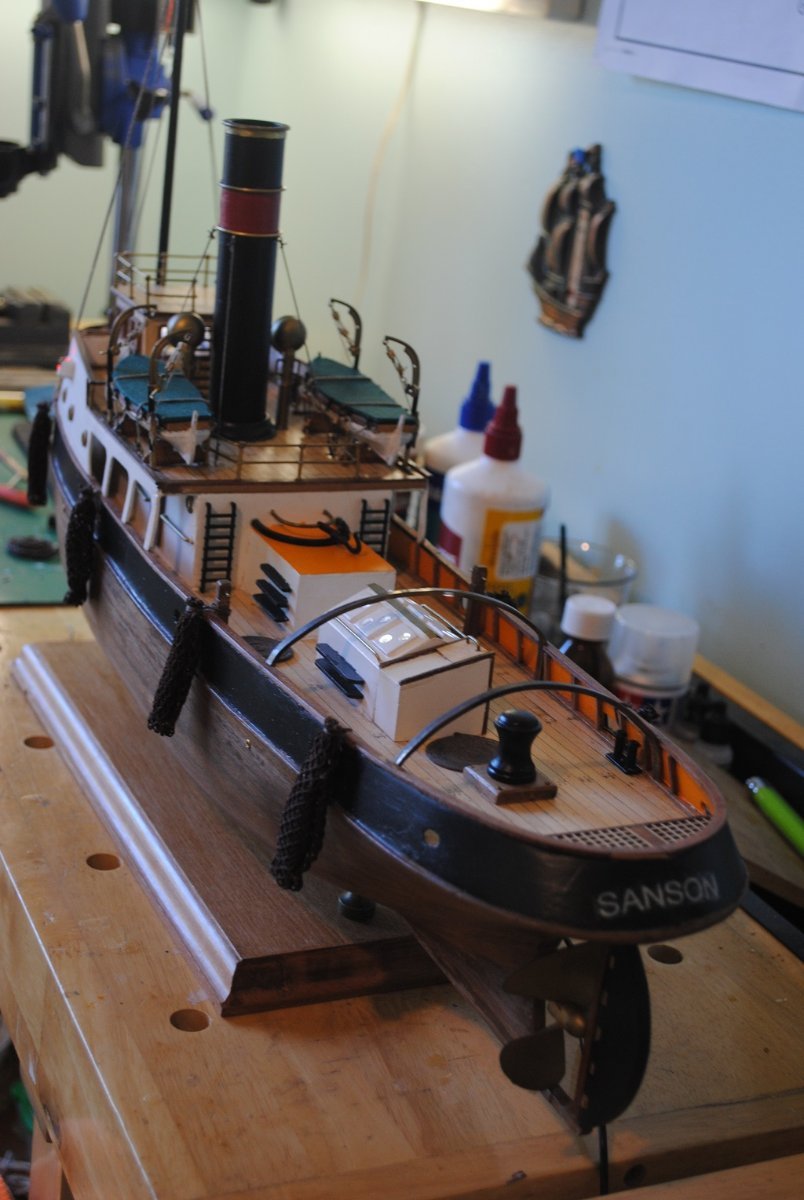
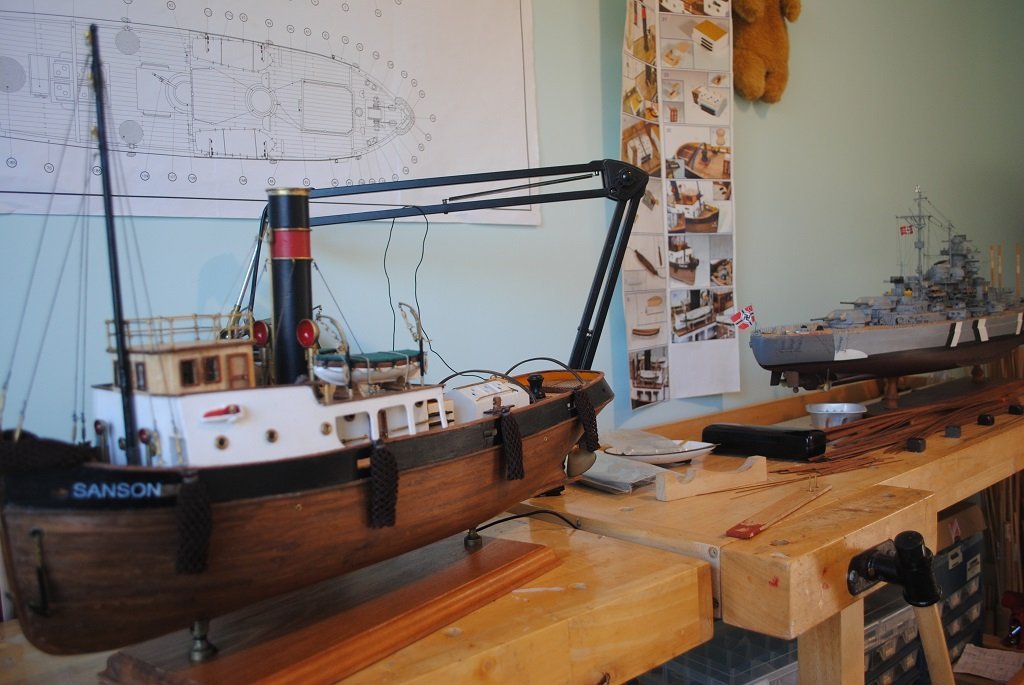
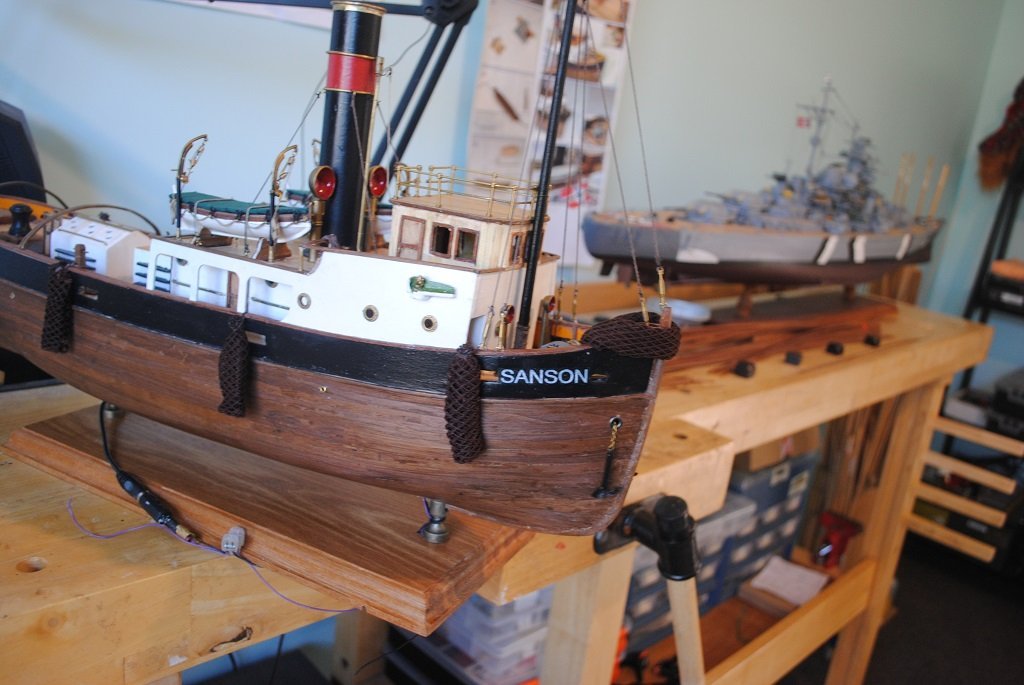
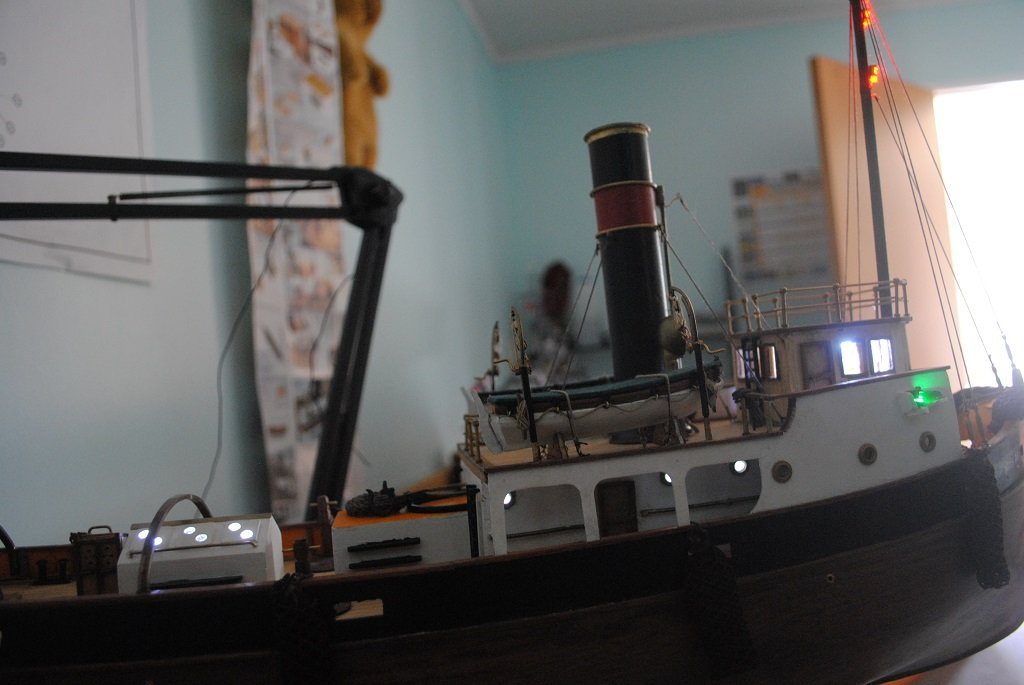
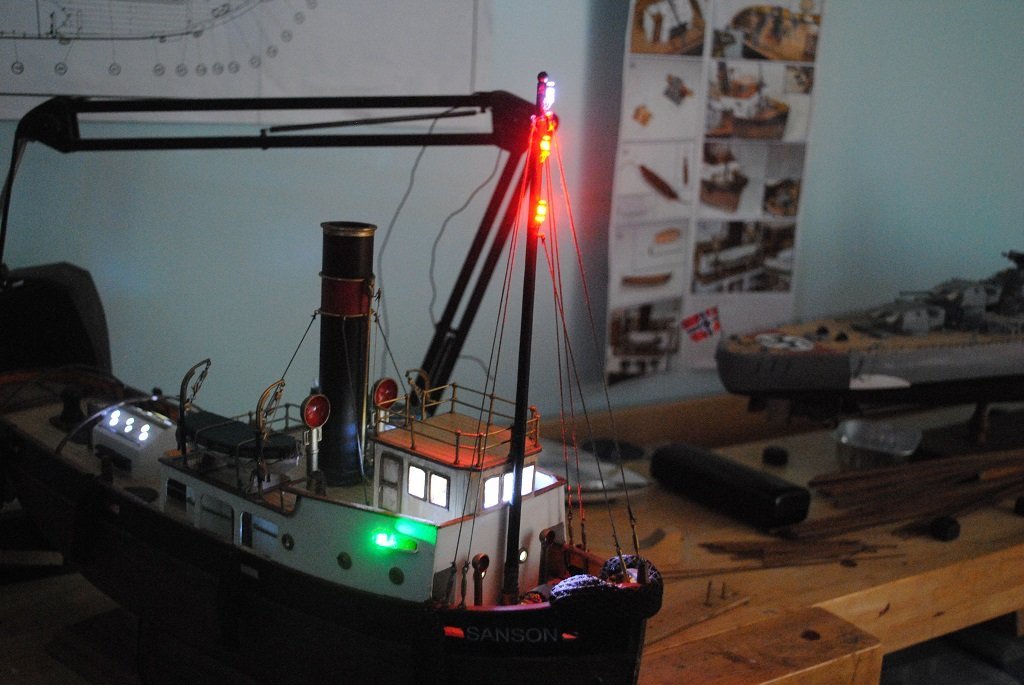
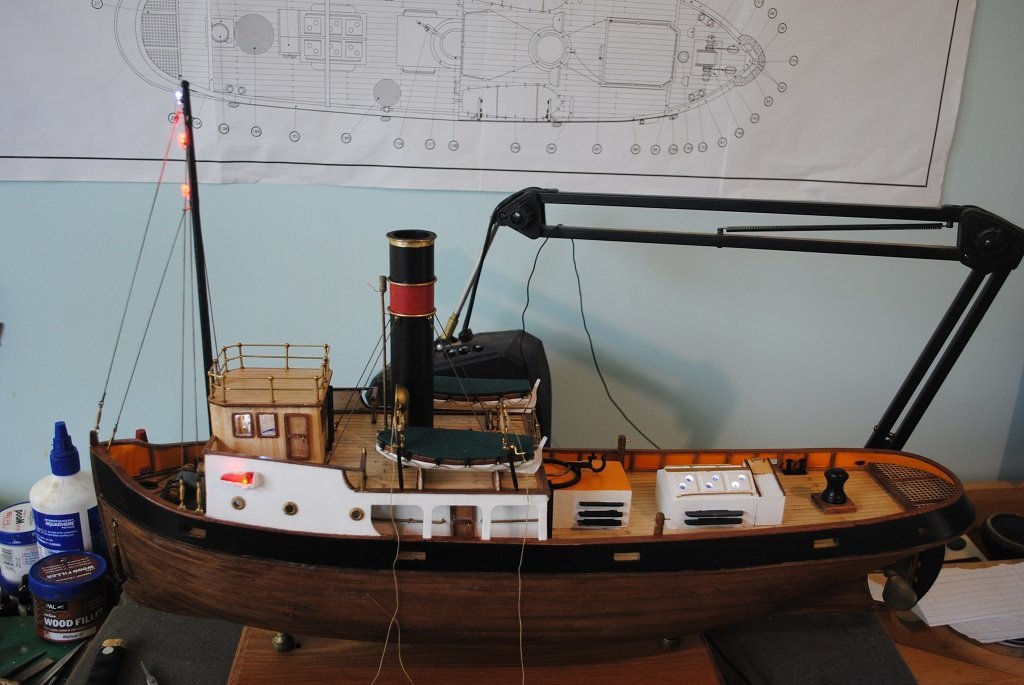
Hi All, Sanson is finally complete. From a near wreck to a tear-down and re-build, languishing in storage for quite some time.... 🙂 I was contemplating ditching it but I think I'm happy that I didn't. Anyway, I'll let some photos do the talking.... Cheers....HOF.


- 118 replies
-
- 7
-
-

-
- sanson
- artesania latina
- (and 1 more)
-
Thanks Rod, Lifeboats are White Metal with Wooden Gunwales added and some nice Green Nylon Fabric glued on to a piece of ply. I had to extend the Davits in height by about 6.0mm as the Handles/Pullies were pushed out by the Boats. Last of the Fenders to be installed hopefully today. Cheers....HOF.
-
Hi there, Maybe you could remove the broken Ring, (Carefully as they are White Metal, File?), Drill a small hole and replace with an Eyebolt attached with CA. To add strength the Eyebolt could be attached after the fitting is attached to the Mast so the Shaft of the Eyebolt penetrates the Mast also. Another idea, if the thickness of the fitting is too thin to drill, you could always mount an Eyebolt immediately under the fitting attached directly to the Mast. My guess is that these rings are for Stays so you want something that ca withstand a bit of tension. (My two cents worth. 🙂) Cheers....HOF.
-
Very Nice!! Regarding the Boat Skids, you could keep the Legs and Laminate some strip wood with a slight Curve, dill some holes in the ends of the laminated strip and fit the Legs. (If you don't have the Legs, you cold make them from Brass Wire.) Just an idea.... 🙂 Cheers.... HOF.
-
Hi All, It has been more than a few years since I posted on this particular thread. (Good things take time? 🙂) So, I have almost completed Sanson, something that I started in 2014.. While casting around for a subsequent build, I pulled out the Endeavour. (It was a toss-up between this and the Mamoli Flying Cloud.) I decided to re-boot Endeavour. An inspection first to ensure all the bits and pieces were there, they appear to be and second to inspect the Hull thus far. Not too much wrong, the two front Decks needed re-Planking to be completed and sanded and the Mahogany second planking, below the Whales needs to be re-done. Today I finished the two front Decks, sanding and will drill and install the 400 or so Treenails starting tomorrow. The Mahogany Planking requires approx. 25 full Planks per side, I did not have quite enough so ordered some from a NZ Website. The only problem is that the Kit calls for 5.0mm wide Planks, all good, but the only stuff that I could get my hands on was 3.0mm wide. Never Mind.... My plan is to Alternate 6.0 with 3.0mm wide Planks as I move down the Hull. I also plan to cut the planking to a more "Scale" Length rather than to lay the entire length of the Hull. I am also in the process of studying "Banyan's" Build, I think that this is something to really aspire to. 🙂 So, that's the plan moving forward with this. I think I'm looking forward to completing this build. (Photos after I complete the tasks above.) Cheers....HOF.
-
Hi Chap, Very nice diorama!! Many thanks for sharing. Cheers....HOF.
-
Nice photo!! Shows your excellent "Siezing." Very nice!! (Good to see the "Hermaphrodite" Spars on the Deckhouse.) Cheers....HOF.
- 89 replies
-
- 2
-
-
-
- Cutty Sark
- Revell
- (and 2 more)
-
Hi All, Bit of an update.... Mast and lighting complete (Not wi9thout issues and a re-build 🙂) Lifeboats complete Rigging complete (Lashings for Lifeboats the exception here Last six Port-Lights added All-over Satin Polyurethane Stuff to do: Lifeboat Lashings X4 each consists of 2 Double Blocks Ring-Bolts, Etc. Davit Mounting (I may need to lengthen the mounting shafts by two or three mm I can see if this is necessary after the Lifeboats are lashed down Hull Buffers/Bumpers Towing Rings (These are the slightly curved pieces that span the Rear Deck, they will be interesting 🙂 A/L supply a reasonably heavy Brass rectangular section strip for the two "Rings." I am still pondering how to accurately form these. Anyway, almost there. Cheers....HOF. Photos:


- 118 replies
-
- 7
-
-
- sanson
- artesania latina
- (and 1 more)