Louie da fly
-
Posts
7,990 -
Joined
-
Last visited
Content Type
Profiles
Forums
Gallery
Events
Everything posted by Louie da fly
-
 Thanks Pat and Radek. And thanks everybody for the likes. Radek, the idea for the deadeyes is very good, but I'm really wanting to make all my deadeyes myself, masochism notwithstanding. I'm not quite sure what else I can add - I've pretty much posted everything as I went. Is there anything in particular you'd like to see? Such as the hull shape from different angles? If there are photos I can provide I'm happy to do so. Steven
- 740 replies
-
- 6
-

-
- Tudor
- restoration
- (and 4 more)
-
Reminds me of the time I was a volunteer on an archaeological dig in the old pearling town (now a ghost town) of Cossack in Western Australia. We were excavating the town store, on the site of the first building in the town. The mining company that now owned the town had burnt the building that had been on the site, as it was believed to be the third building there, so of no historical value. Turns out what they'd burnt down was the original building . . . Steven
-
And from another Aussie! Where are you situated? (Oz is a big country - WA is three times the size of Texas). Maybe one or more members are close to you. Not us in Victoria for the next 5 days, though - back on to Stage 4 lockdown (sigh). I had the opportunity to see the Cutty Sark in 2009 when I was in the UK - only to find she'd been burnt by some Visigoth with a box of matches and couldn't be visited. Apparently all fixed now, but it was very annoying at the time. Missed out on the Mary Rose, too, dammit! Yes, do start a build log. The instructions are here: https://modelshipworld.com/topic/24705-before-you-post-your-build-log-please-read-this-starting-and-naming-your-build-log/ Good to have you aboard. Steven
-
Welcome to MSW, Fltguy! Don't forget to start a build log of your own. Just as those of others have been of use to you, the solutions you come up with to the problems you face in the build may well be useful to those who come after you. And it's also a great way for other members to give you help and advice as you travel on your journey. The instructions are here: https://modelshipworld.com/topic/24705-before-you-post-your-build-log-please-read-this-starting-and-naming-your-build-log/ Good to have you aboard! Steven
-
You did a good job. I struggled to get mine to (a) be circular and (b) stay circular. Maybe I should have used a bending iron - I just progressively and gently "kinked" mine with a pair of pliers till they were roughly circular. Probably should have taken more time and care. Steven
-
Congratulations, Cri-Cri. That's a beautiful model. Do you know what you're going to do next? Steven
-
Die Kogge Von Bremen by kentyler
Louie da fly replied to kentyler's topic in - Subjects built Up to and including 1500 AD
Click on the three little dots at the top right of your finished post. That opens up a menu so you can edit. Steven -
That's turned out very well, Amos. I built my tops up piece by piece - VERY difficult to get right, and not totally happy with the result. Yours are very nice indeed. Were those wooden "rings" part of the kit or did you make them yourself? Steven
-
This is fascinating stuff, Rodolfo. A real resource for those of us interested in 15th/16th century ships. I've bookmarked it for future reference. Steven
-
That is just so beautiful. Something to be justly proud of. Steven
- 48 replies
-
- 1
-
-
- dusek
- viking knarr
- (and 1 more)
-
Yes, I realised that after I'd gone to bed. Couldn't be bothered getting back up to correct it . . . Back to our scheduled programming. Steven
- 186 replies
-
- 2
-
-
- keelless
- reverse clinker
- (and 4 more)
-
That's fine, Tom. Take your time - it's not a race. When you do decide what to build, make sure you start a build log. It's a great way to get help and advice - and encouragement. The instructions are here: https://modelshipworld.com/topic/24705-before-you-post-your-build-log-please-read-this-starting-and-naming-your-build-log/ Don't worry about making mistakes - we all do. They become learning experiences for future models. And welcome to the wonderful world of ship modelling! Steven
-
Same data, different conclusion. Sumner Miller stated that the assgulation (? is that a word?) temperature was below the boiling point of water at the top of Everest, so you would be able to boil an egg. I'm not an expert, and I'll leave it to them to thrash it out between them. Steven
- 186 replies
-
- 1
-
-
- keelless
- reverse clinker
- (and 4 more)
-
Nice pictorial evidence, Dick. And you've got a good eye. Though I hadn't seen the top picture before, I was fairly familiar with the bottom one but had not noticed either the halyard or the "hockey stick", probably because the drawing quality wasn't all that good. And yes, that's a triangular wing, for sure. Steven
-
Sounds like it could be the same ship - name and date are right. Tom, do you have any other information, such as where your ancestors disembarked? If it was Plymouth, the chances of it being the same ship are pretty good. Having said that, the only info about the ship itself is that its burthen was 300 tons (which means it could carry 300 tun barrels of wine) and that it was sailing in 1634. This narrows it down a little - ships did evolve in design over time - a ship of 1540 and a ship of 1640 had significant differences, for example. On the other hand, merchant ships tended to be rather conservative in design and probably retained old-fashioned characteristics longer than, say, warships. And ships only had a limited lifespan - a ship sailing in 1634 probably wouldn't have been more than, say, 20 years old, but unless she was specifically described as new, she probably wasn't. So, maybe built somewhere between 1610 and 1630? Probably wouldn't have had an open stern gallery - it may have had closed-in galleries, as these were coming about this time. But probably not, as she was a simple merchant ship. From this point on, all you'd be able to do is a generic merchant ship of galleon type from about the right time. There are kits of the Mayflower of 1620 - which is the nearest ship in time and type to yours available - but nobody knows what the Mayflower really looked like, either. That's about it. Sorry not to be able to help more. Steven
-
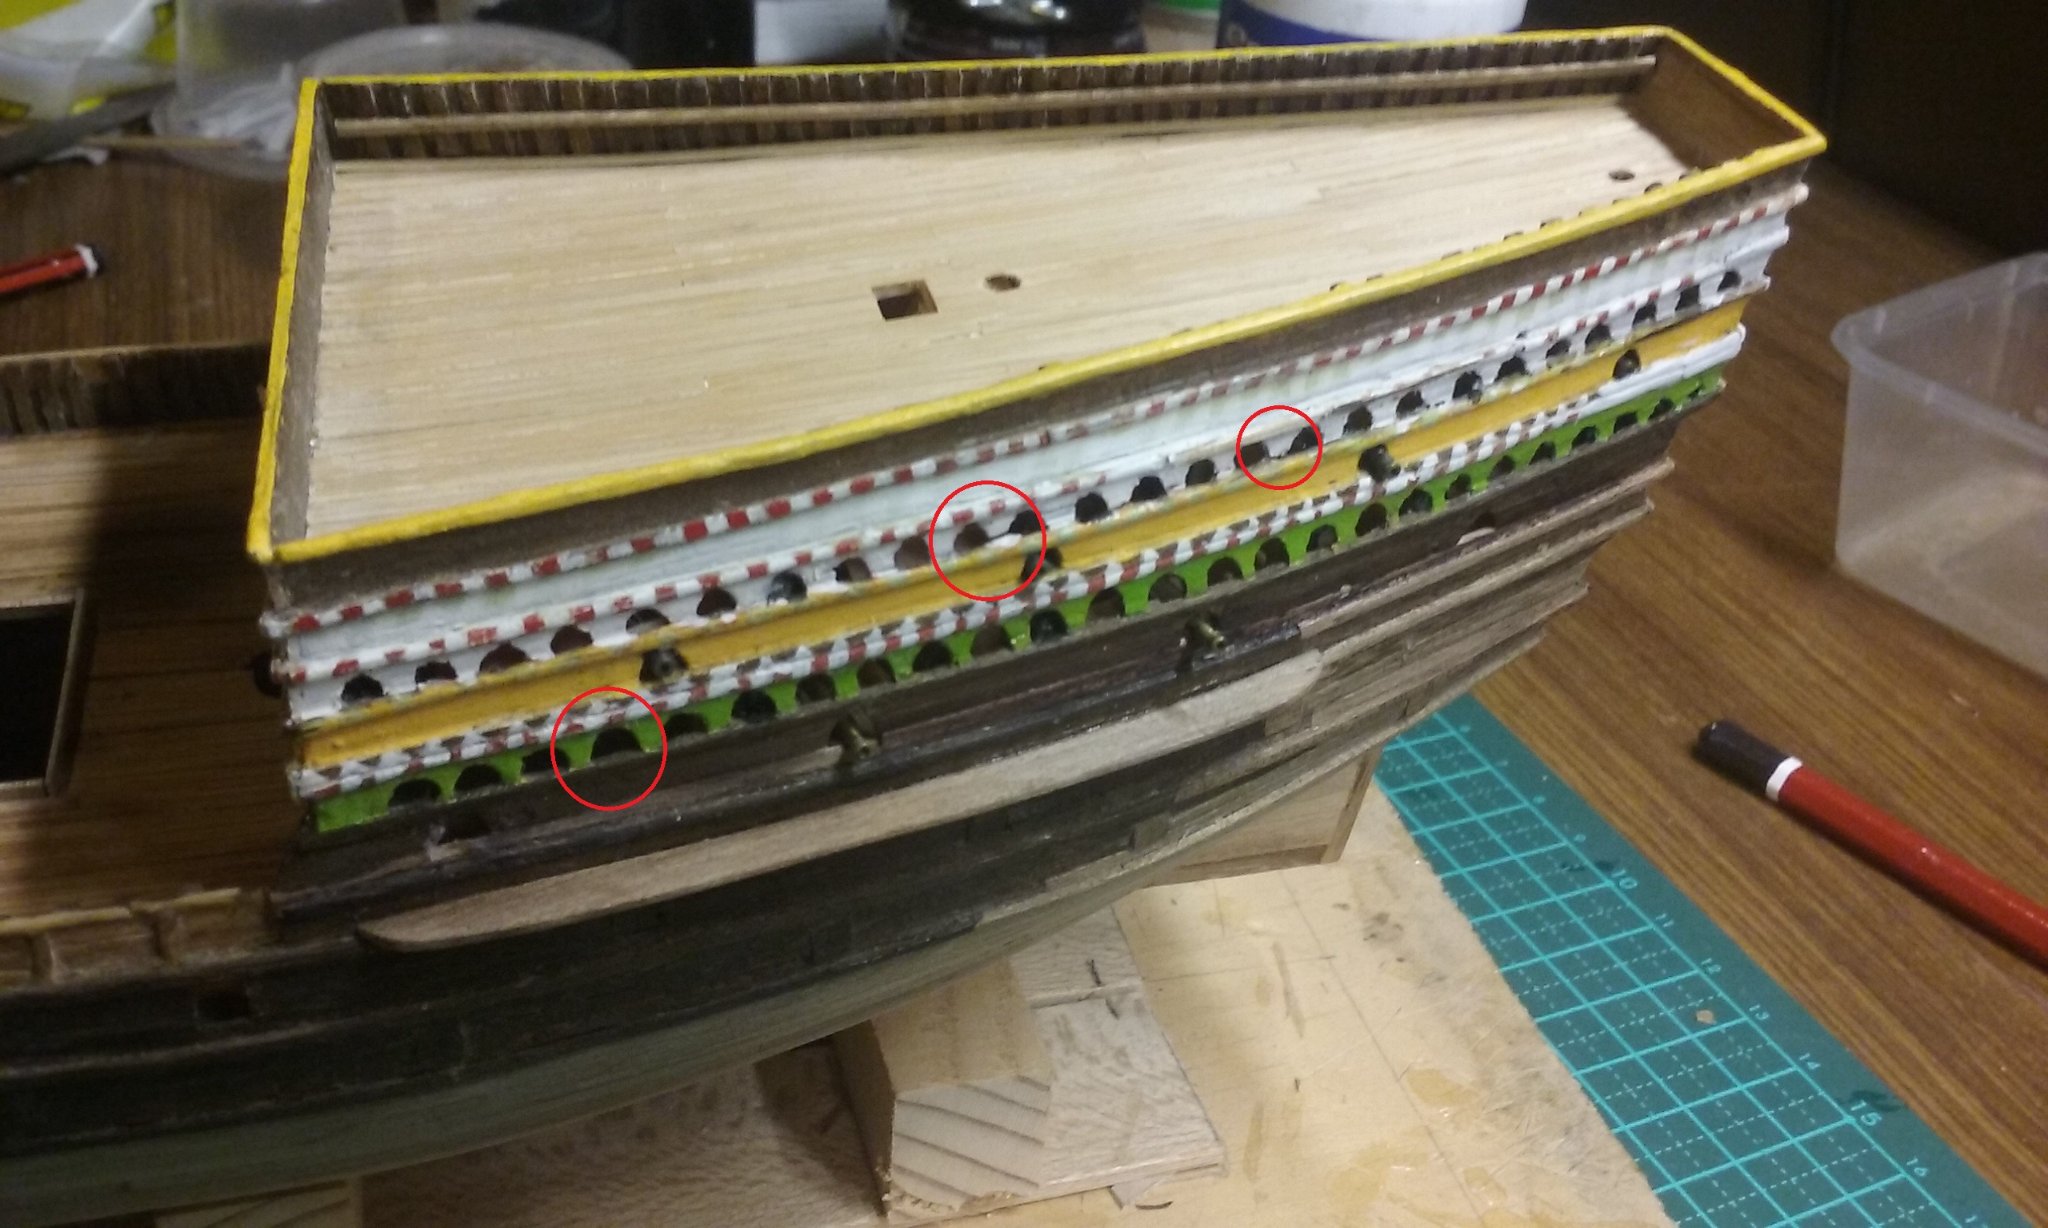
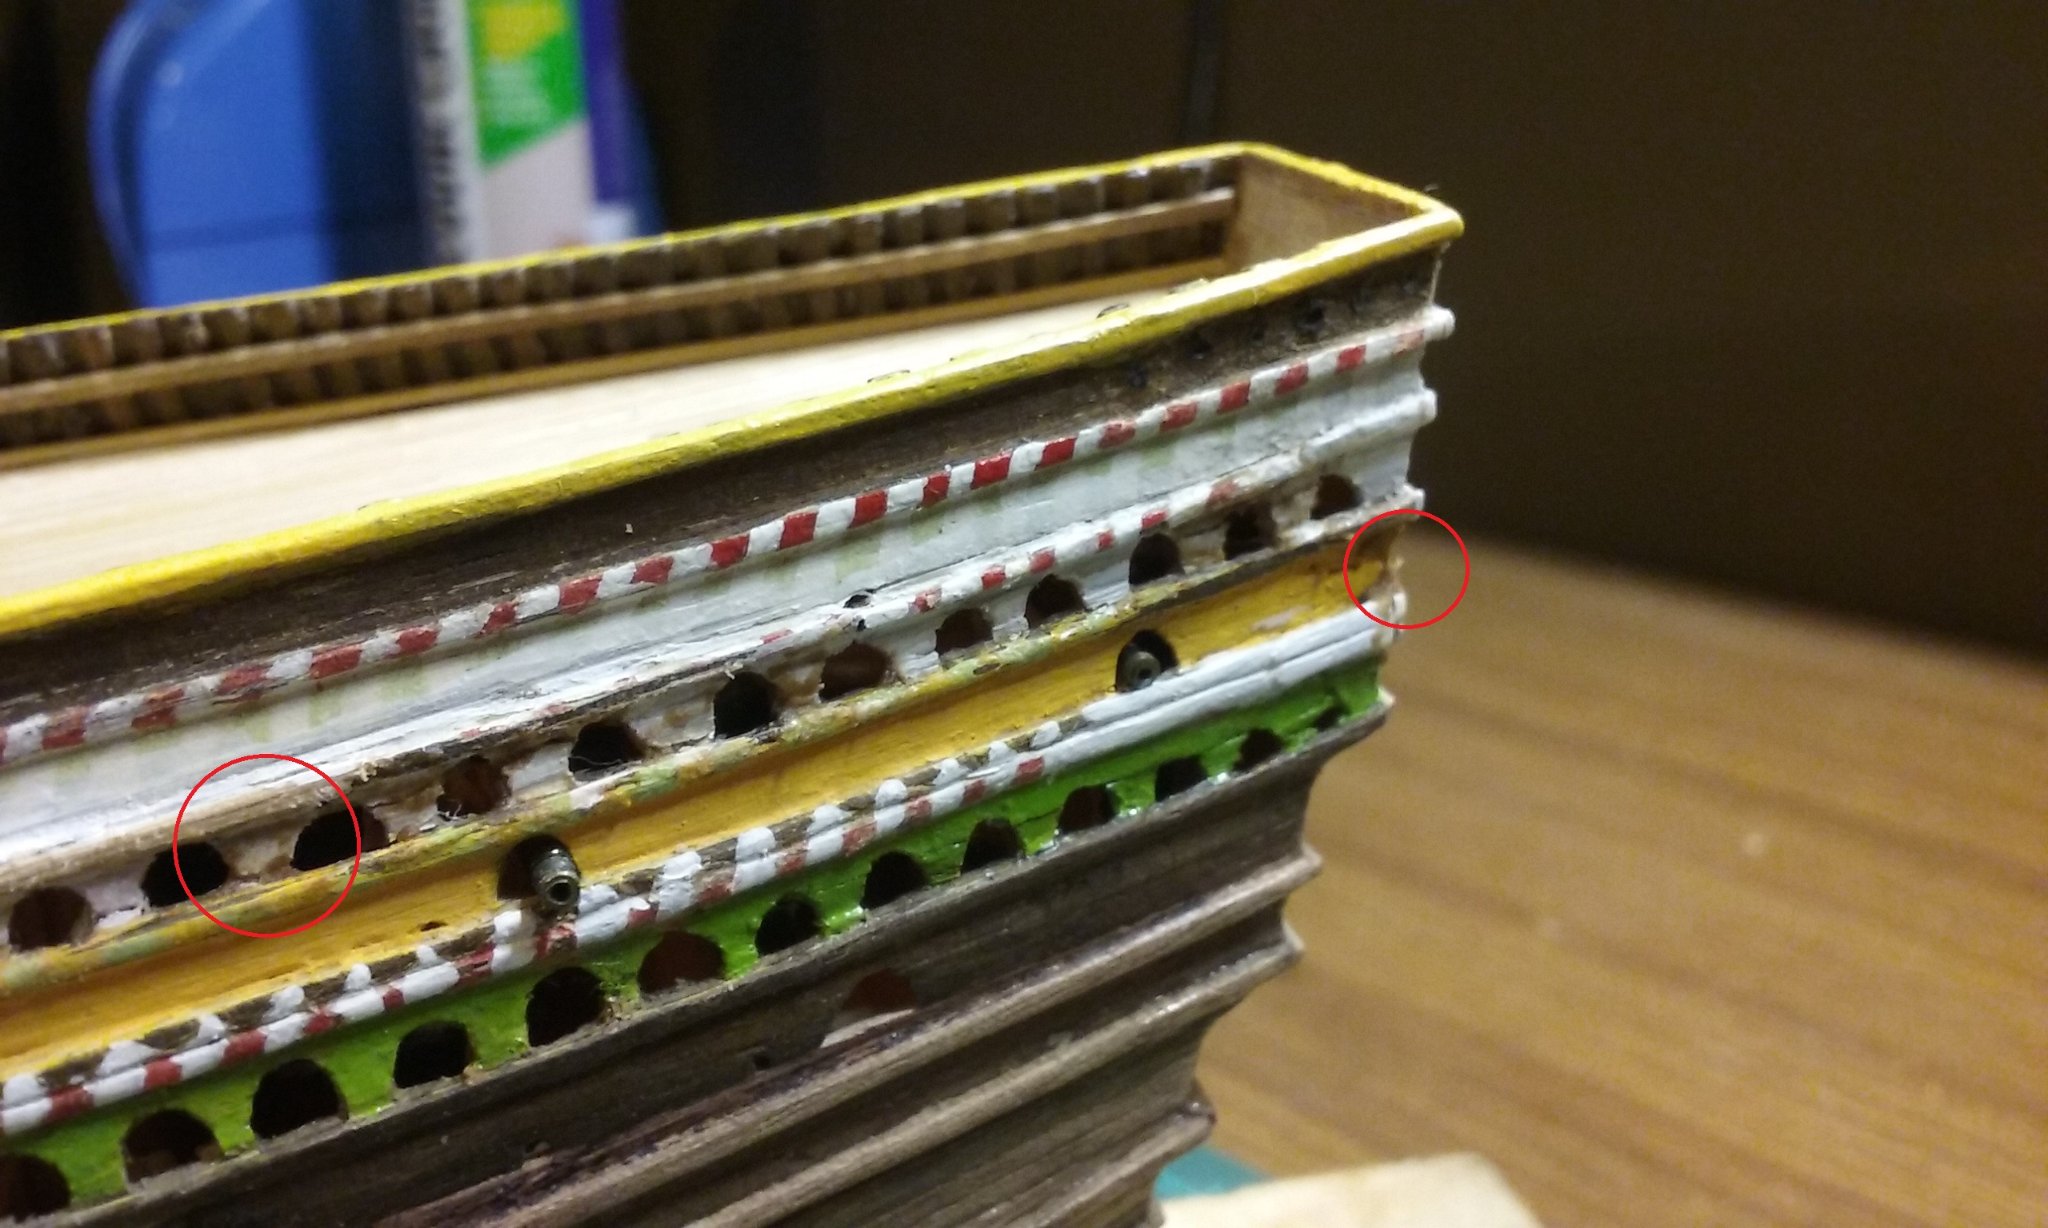
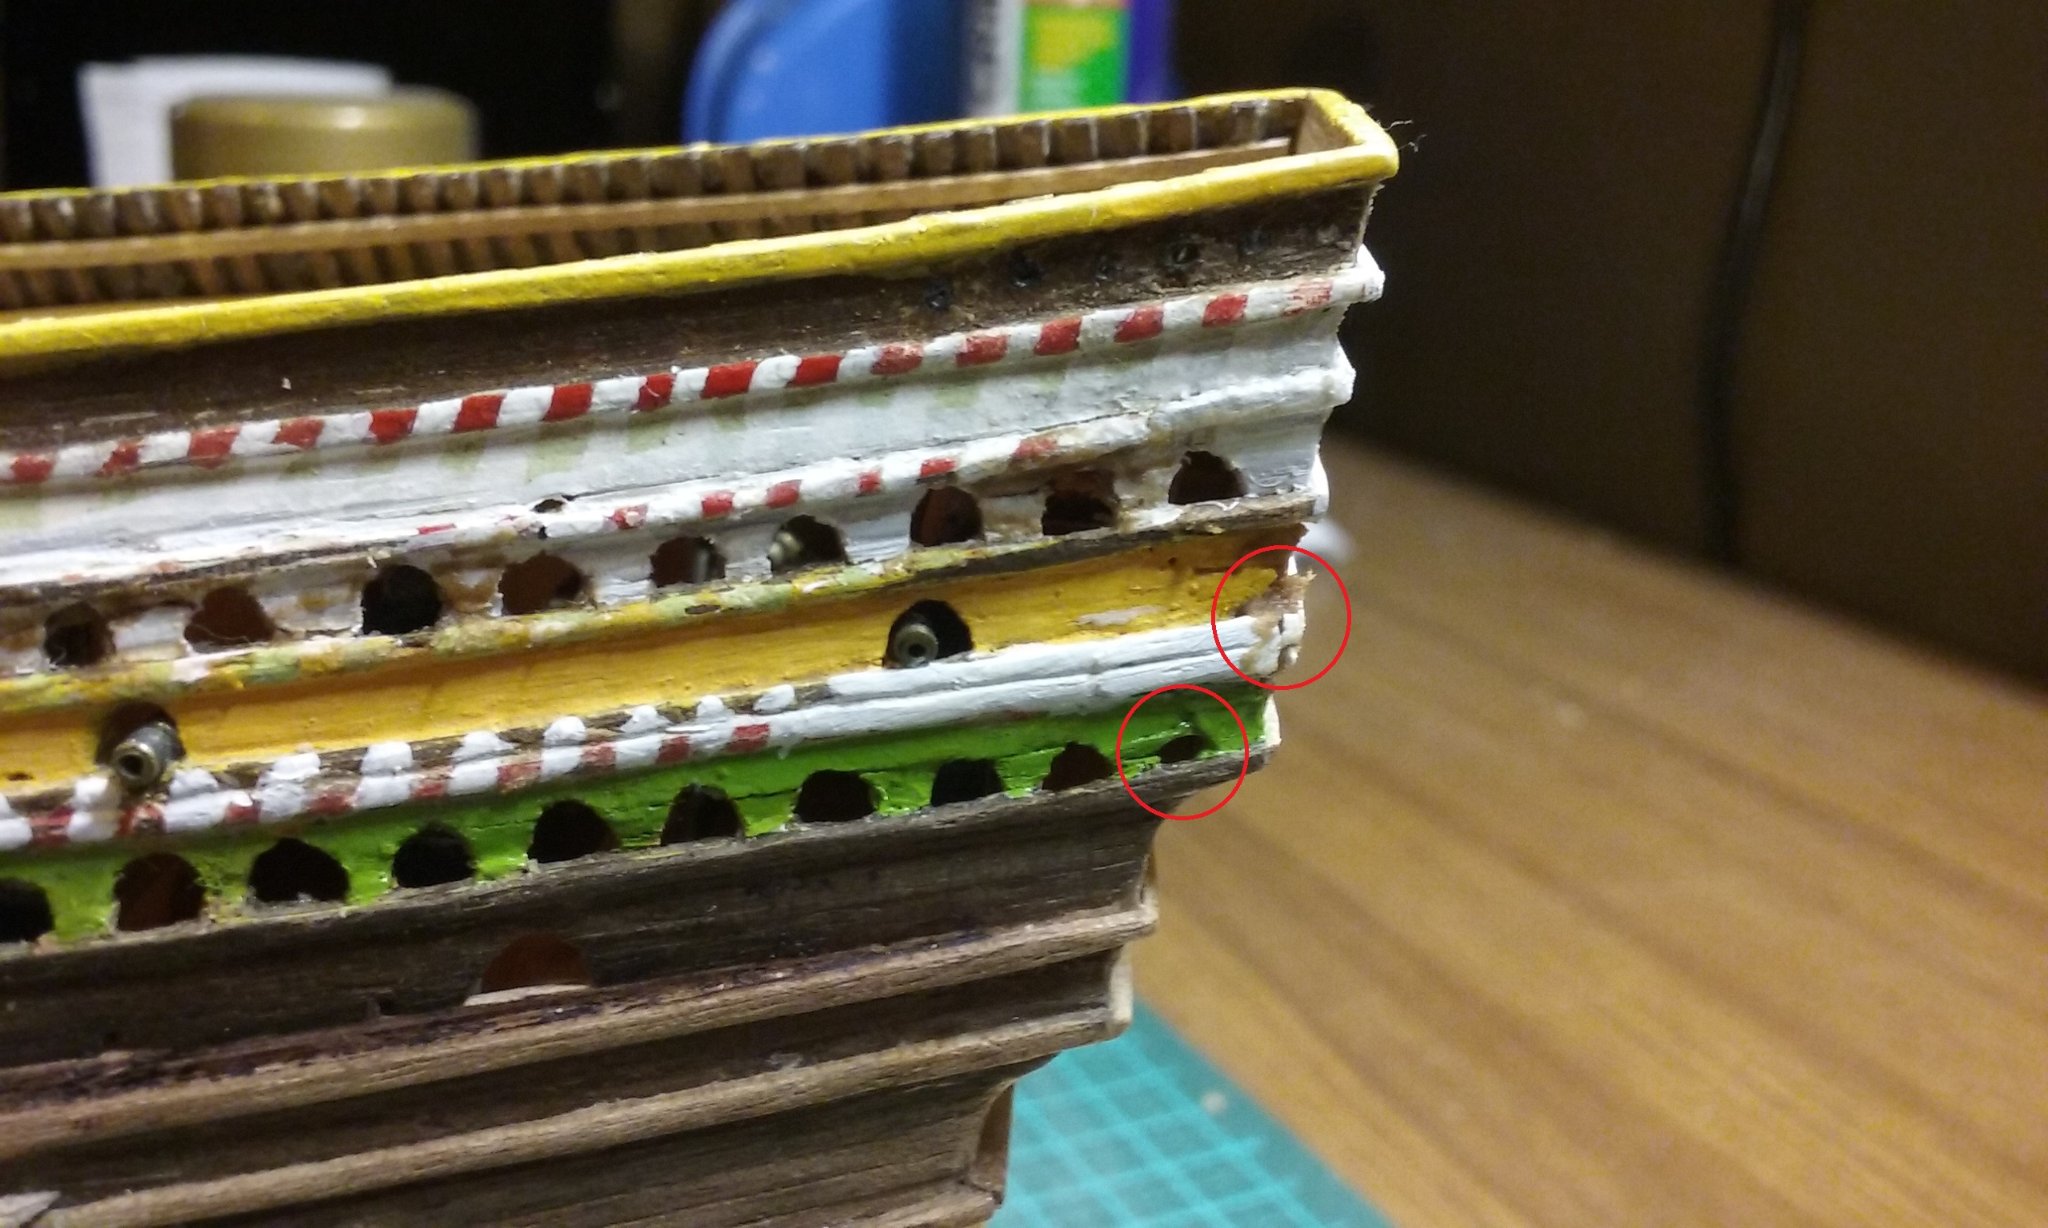
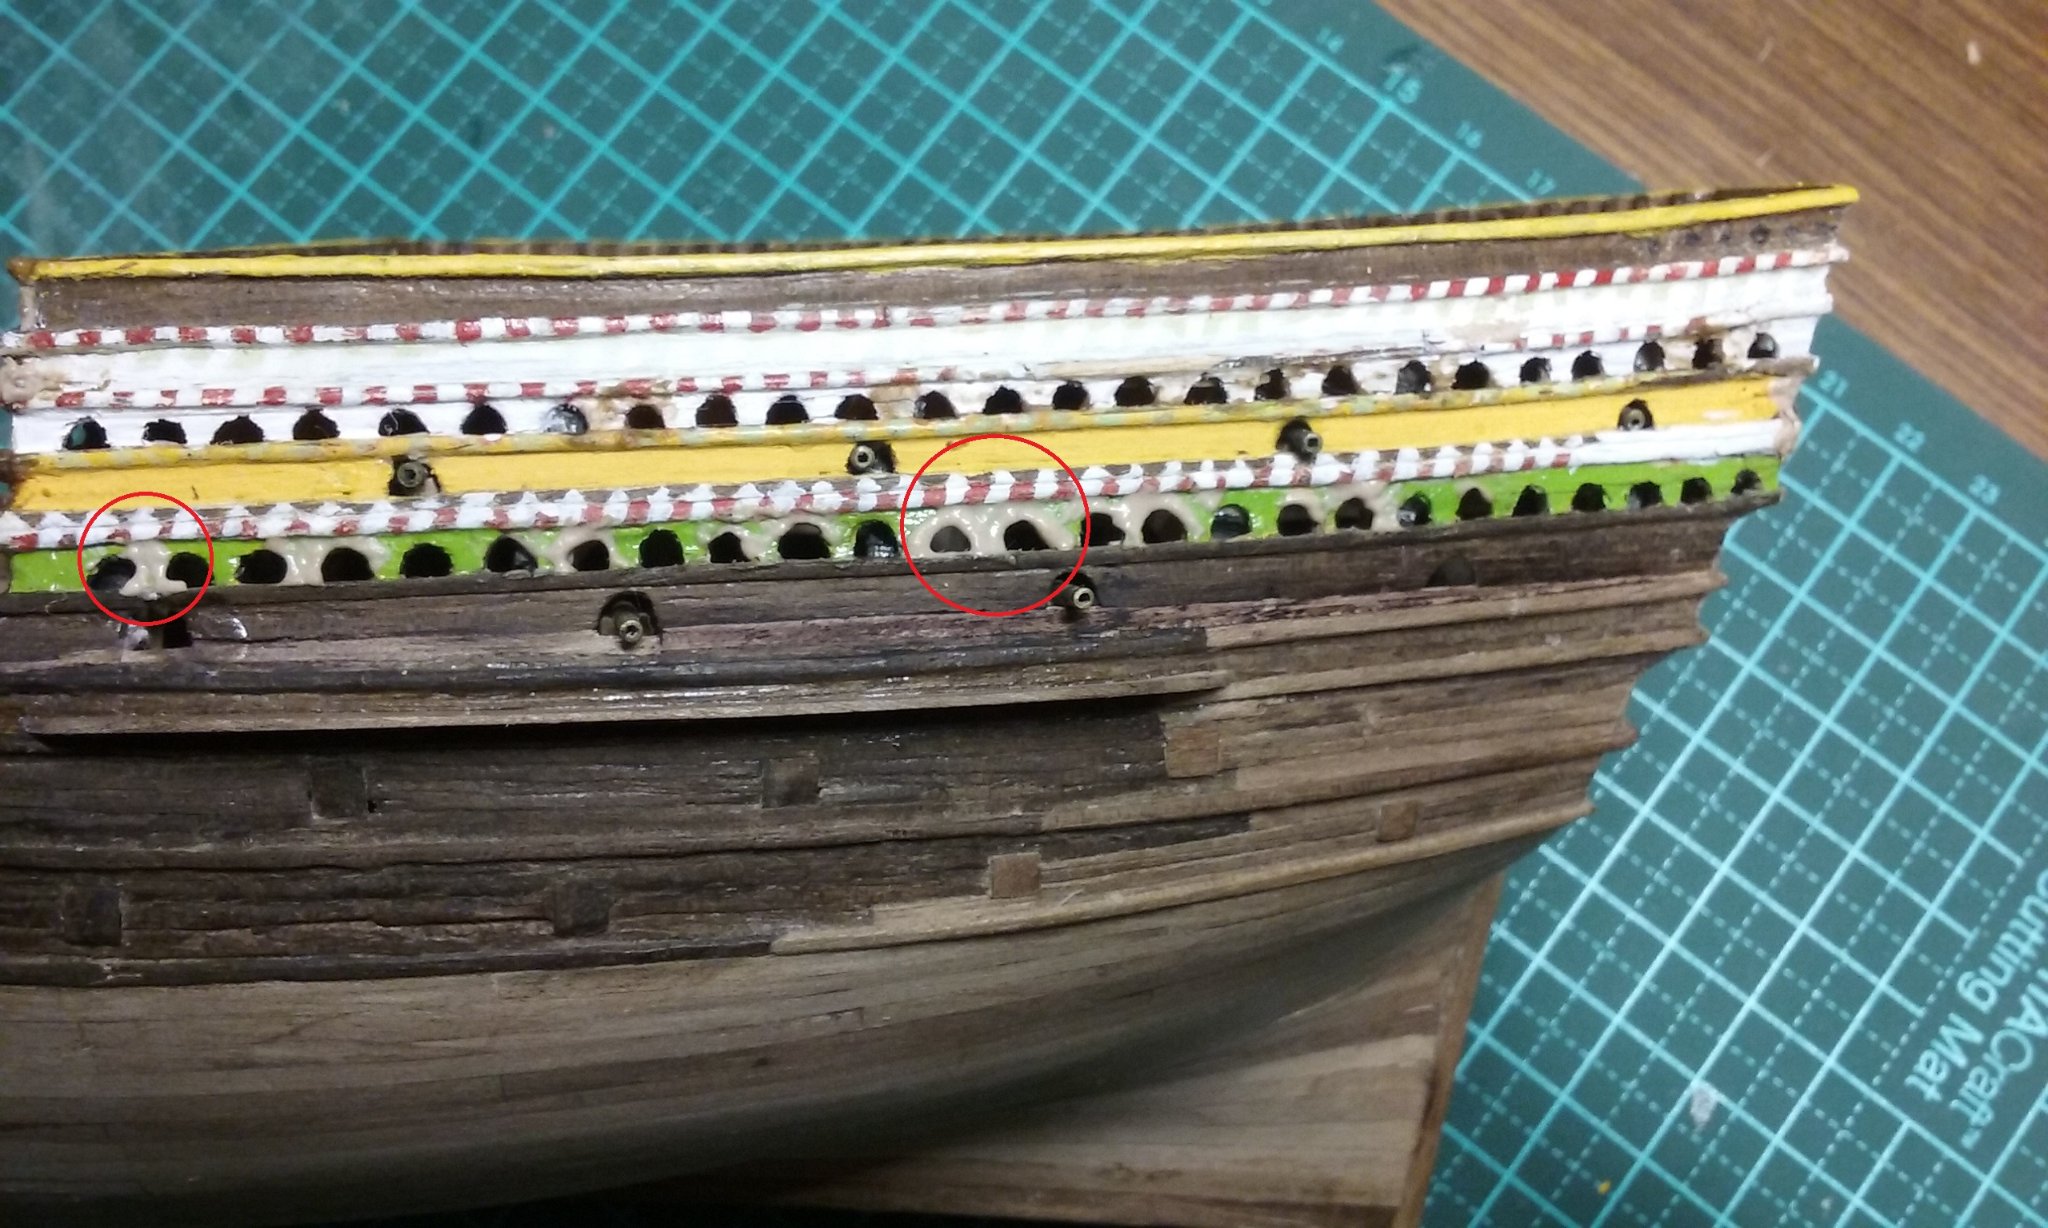
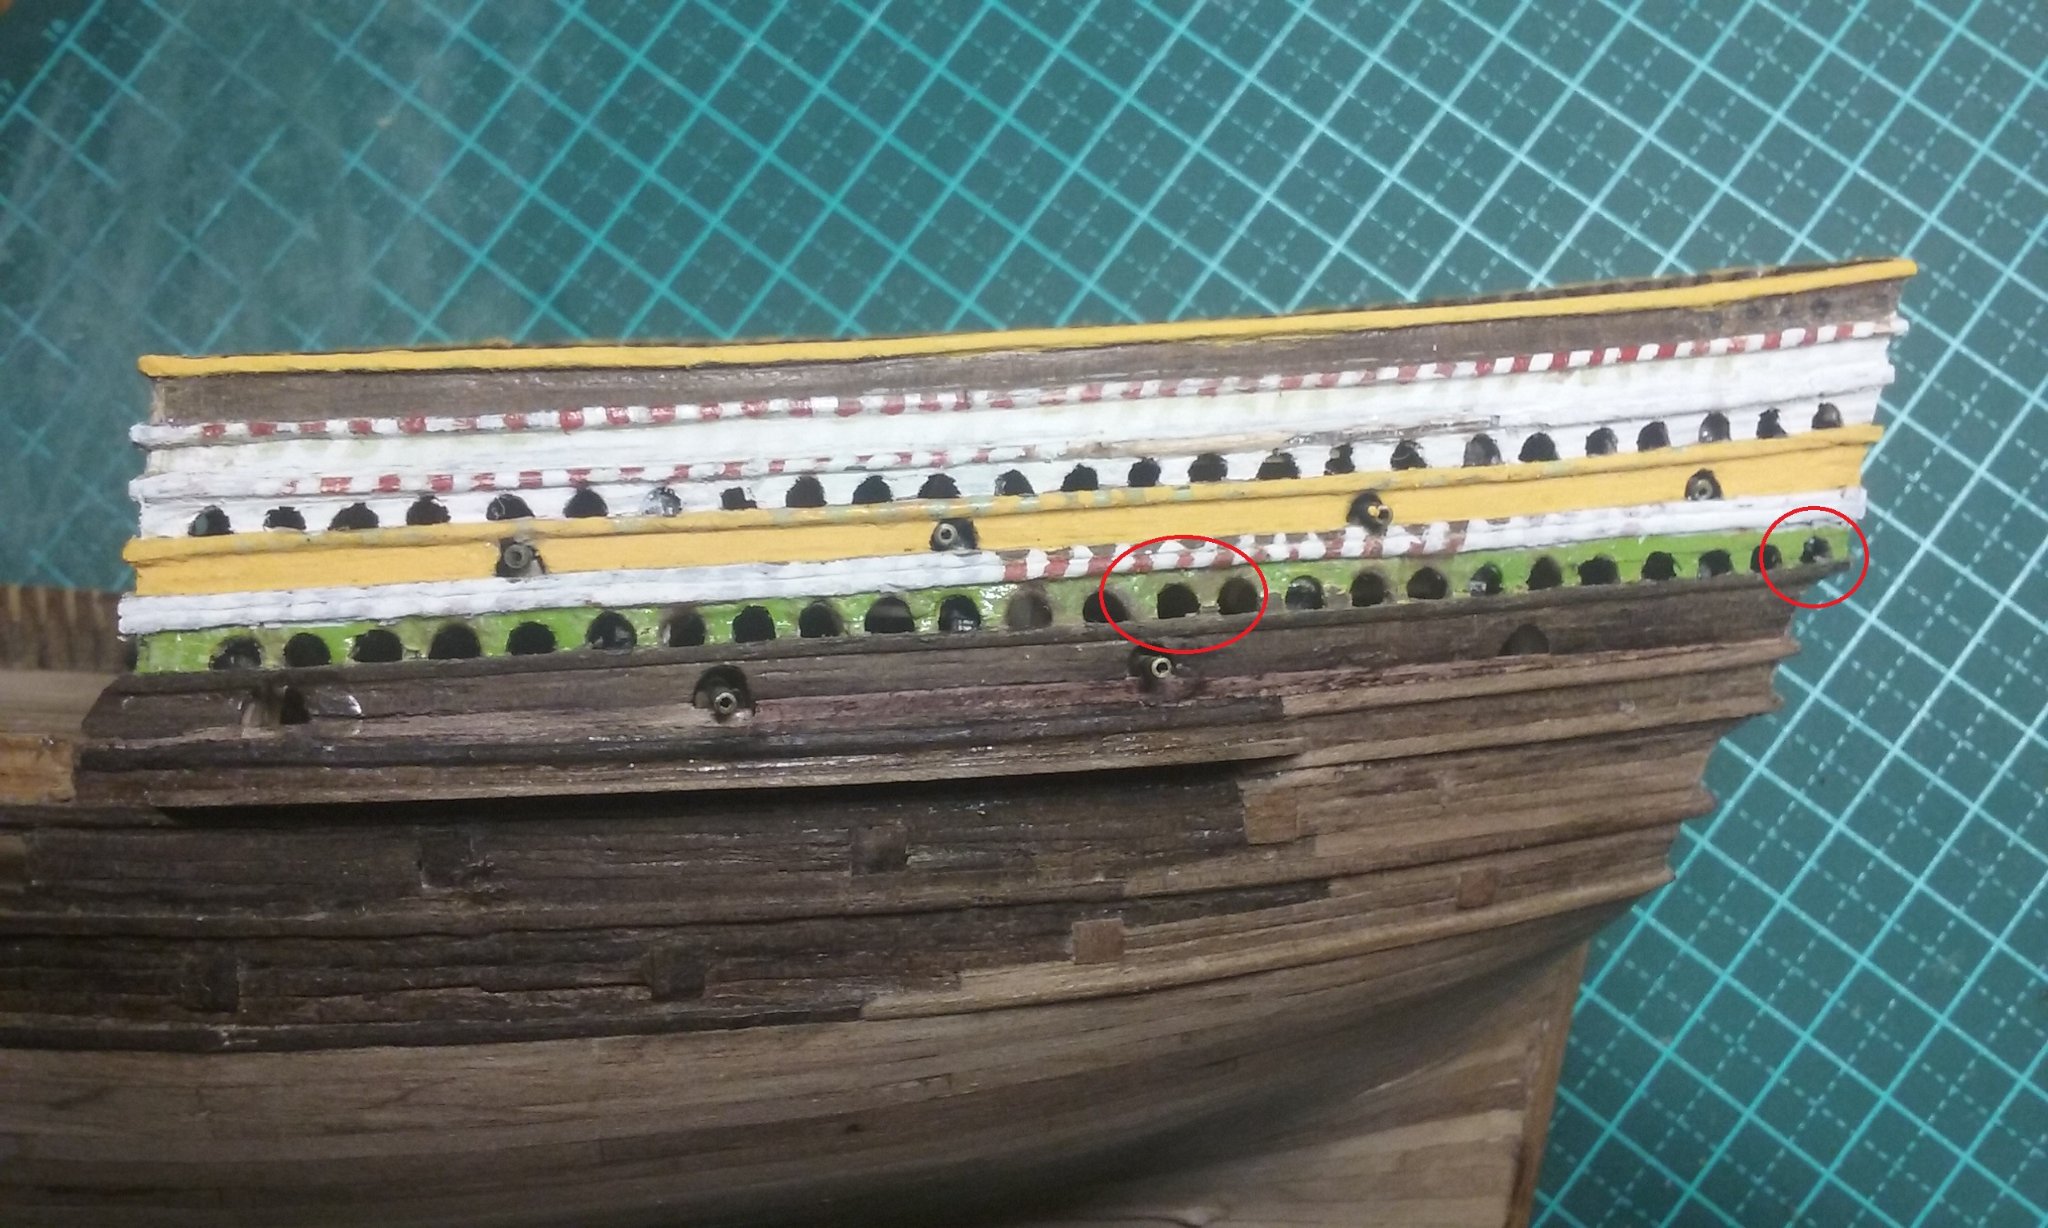
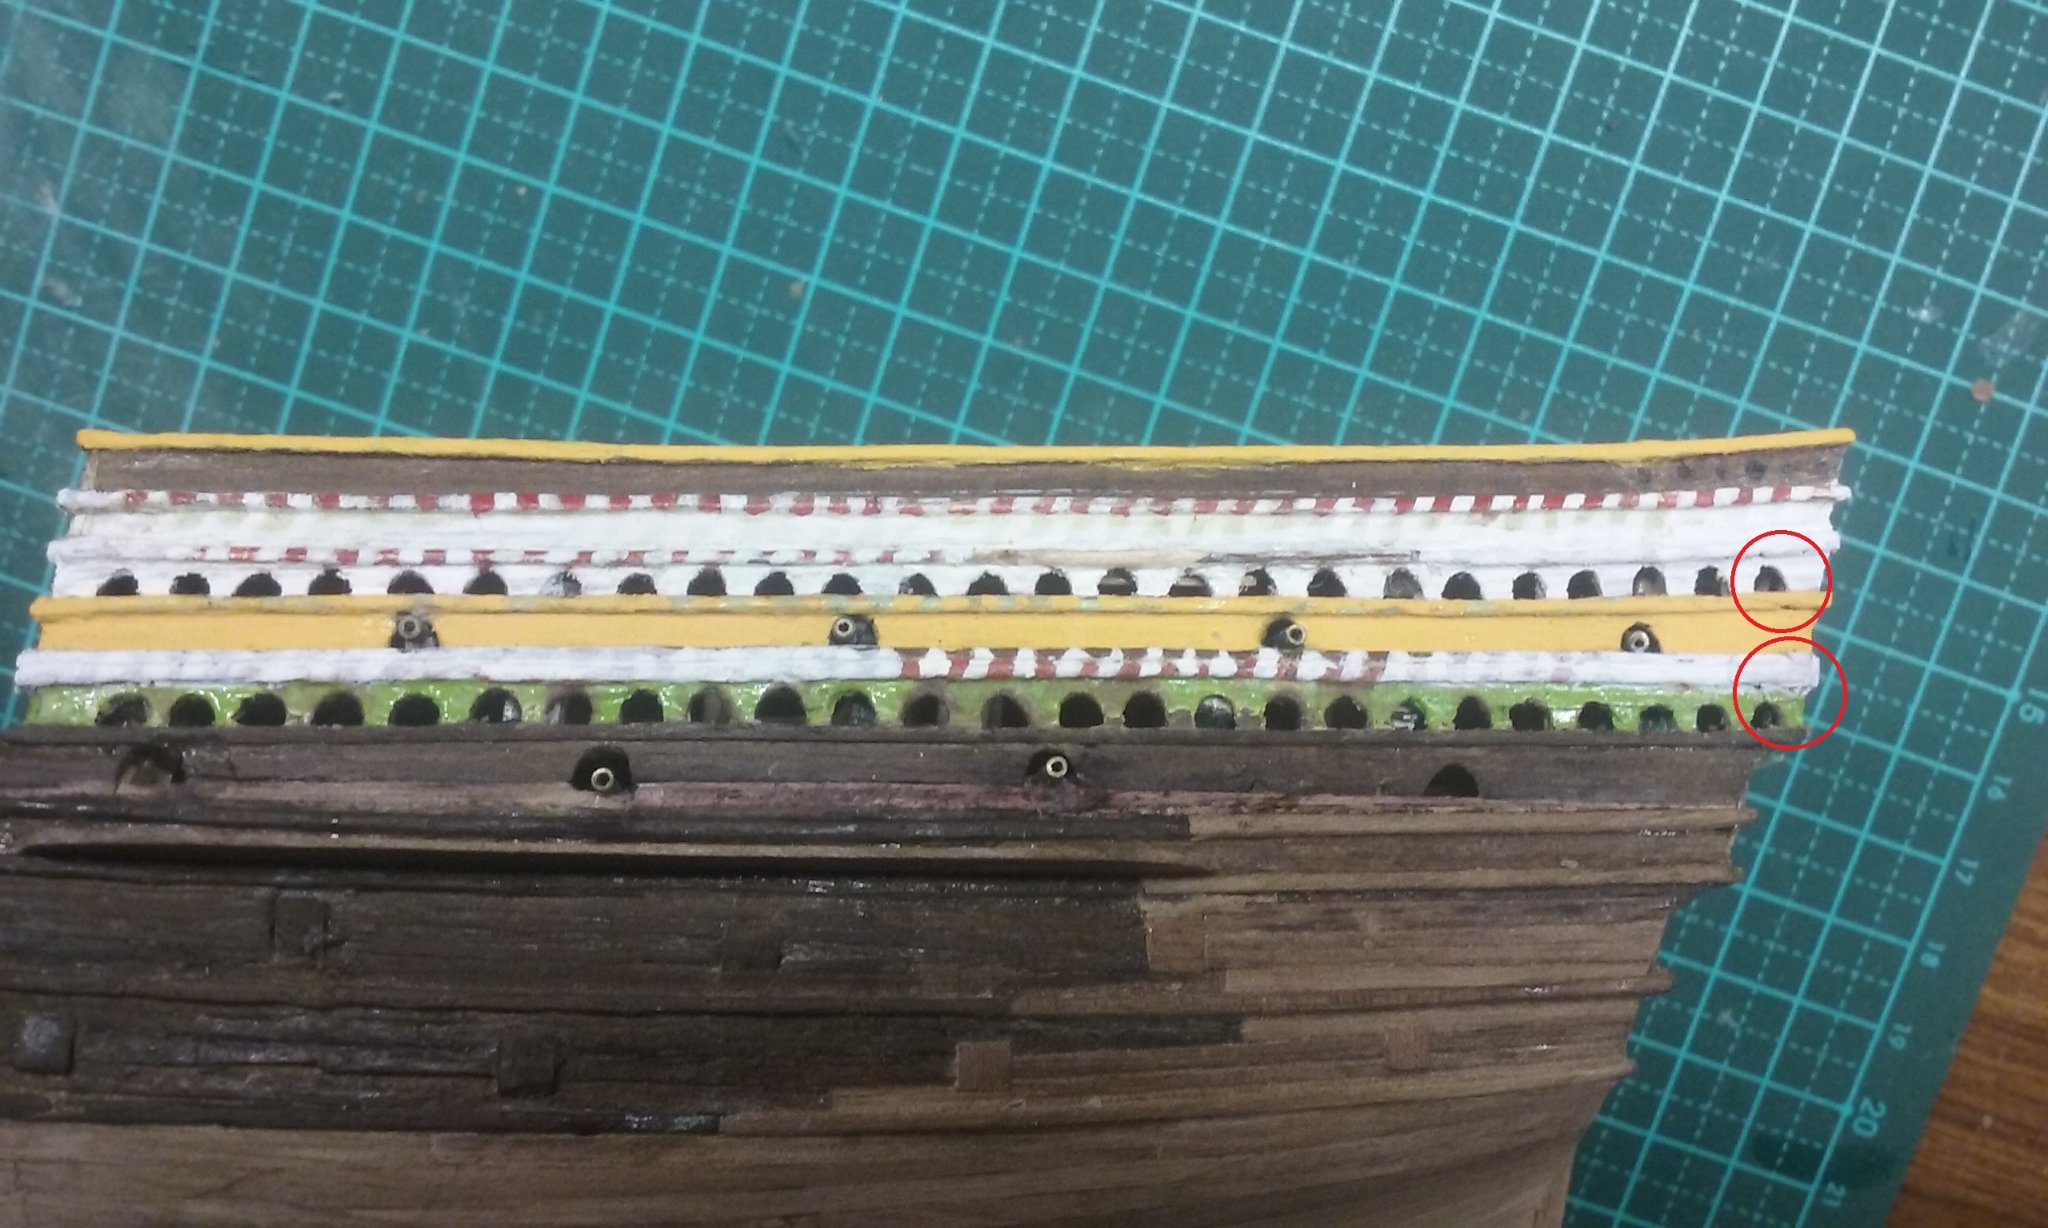
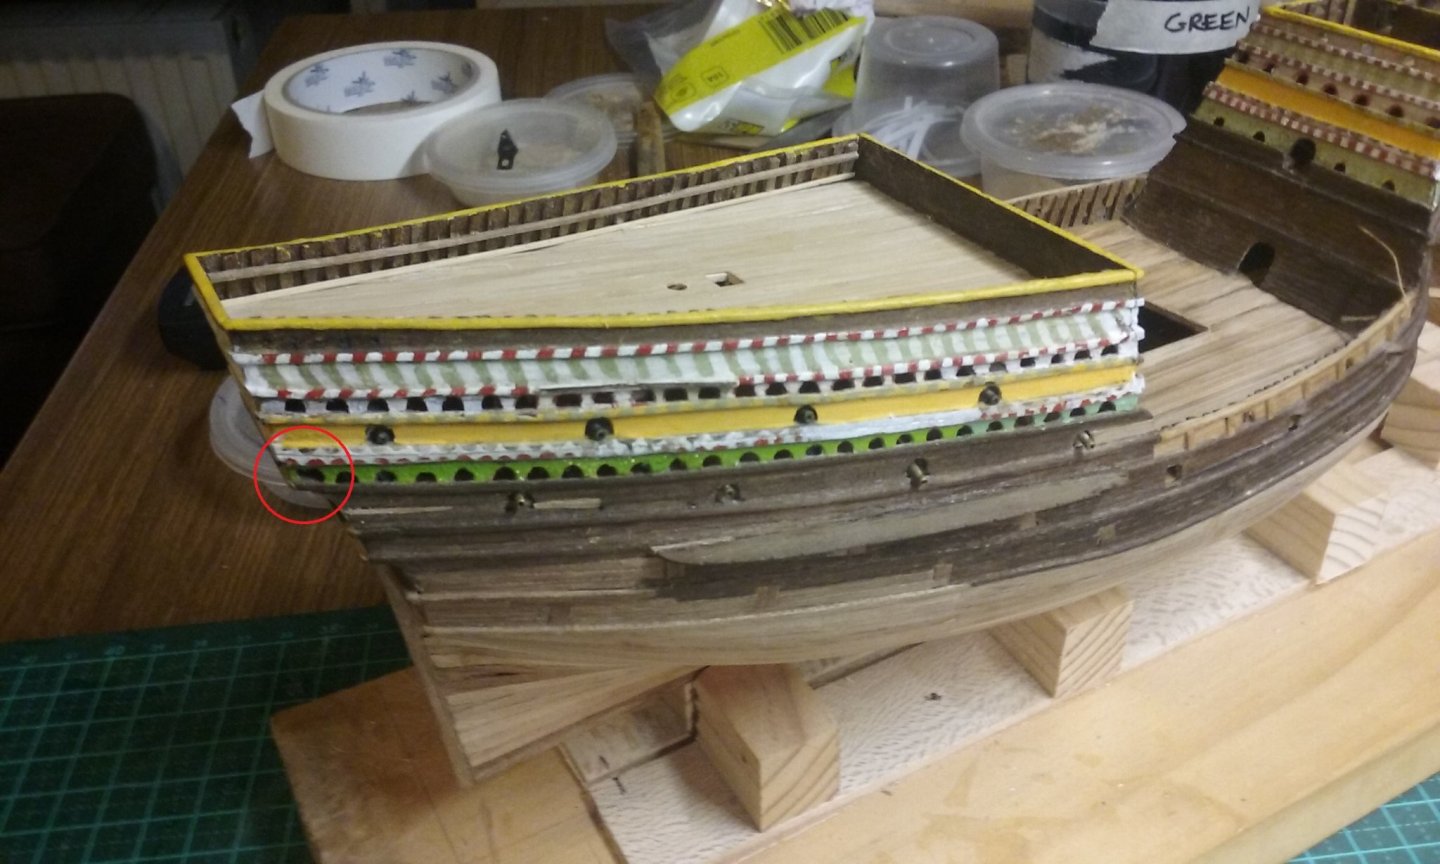
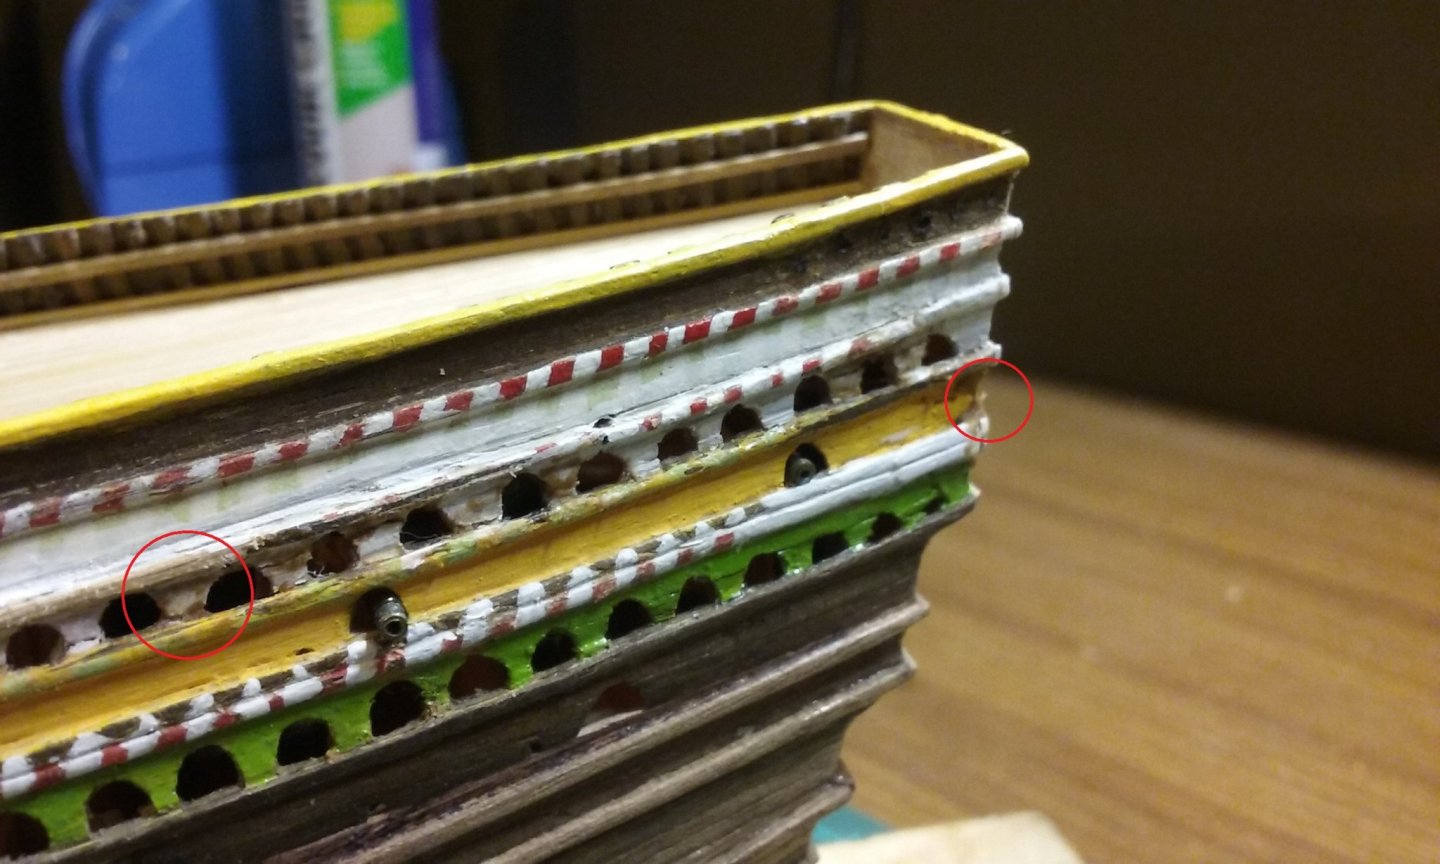
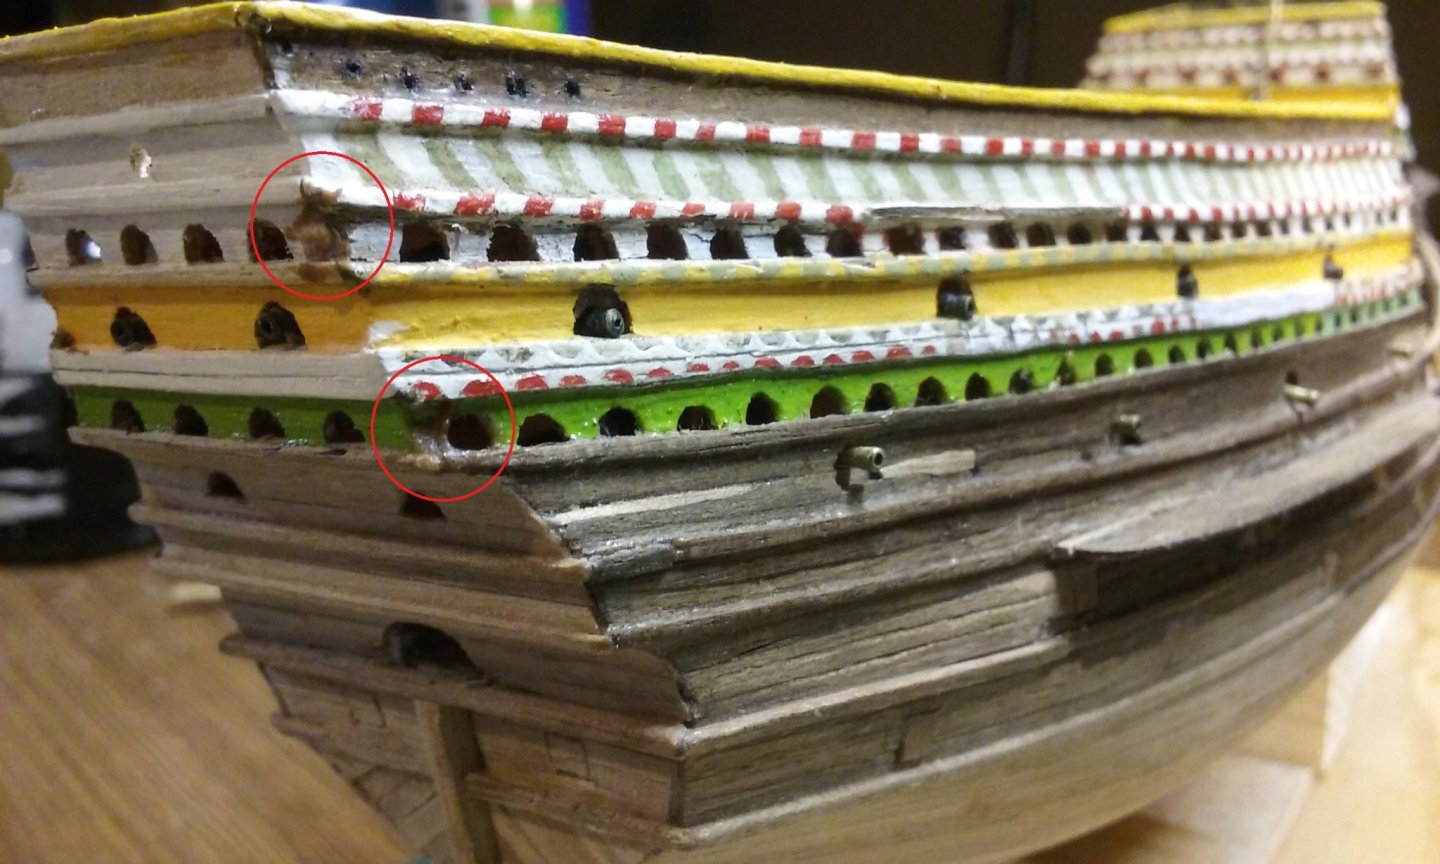
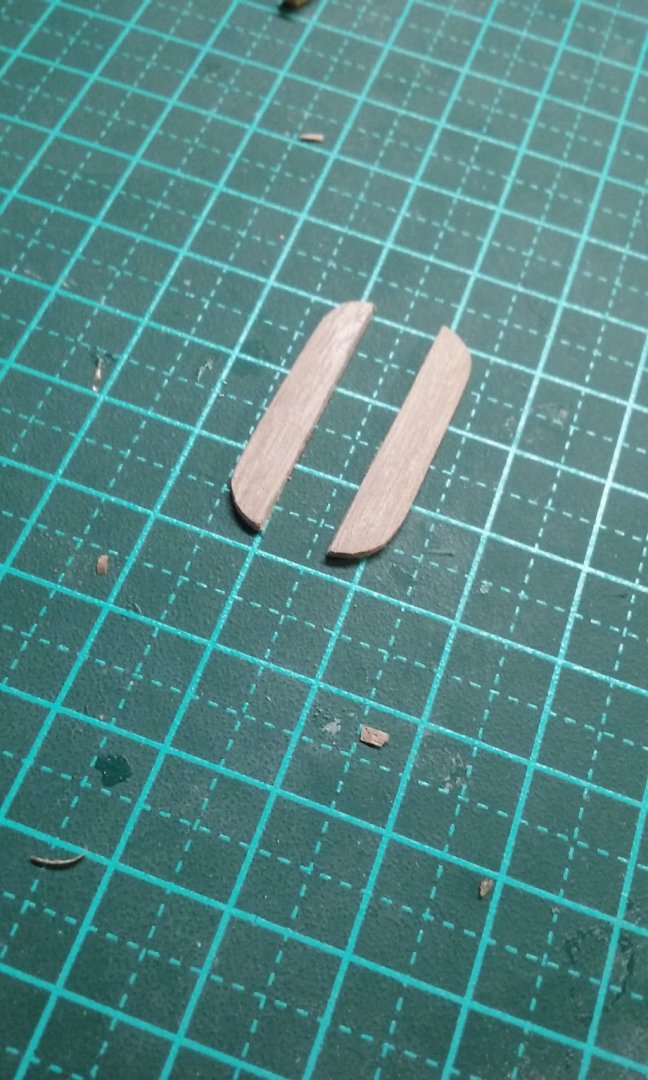
Thanks for the input, Snug Harbor Johnny. In fact I've been making the groove with a scalpel. Much easier than with a power tool, though a little laborious. However, I'm still having trouble with the wood splitting, so I'm going to experiment with card impregnated with glue. I'll be using CA for one trial and PVA for the other and see how they compare. In the meantime here's my first new pair of deadeyes since about 1970. I've been aware that the paintwork needs some touching up. I'd like to keep it all as it was but the paintwork has deteriorated and been damaged over the years, as well as getting grubby despite my best efforts to clean it. Though some of the paintwork will stay, in a lot of places I've decided to re-paint properly. The patina of age is one thing, but grubbiness is another, and with the original intention of restoring her to her original glory as much as feasible I think the paintwork really has to be re-done in a lot of places. I put an initial coat of paint in various places, and it brought to light quite a few faults and breaks in the woodwork, particularly the arched ports for the handguns. So, out with the wood filler - a mix of PVA glue and "sawdust" from hand sanding the hull with fine sandpaper. I closed up all the gaps I could see . . . Then decided also to remedy the fact that the arched gunports for handguns were as big as those for the heavy guns. Filler dried Rough bits trimmed and arches cut to shape, plus another coat of paint. Next job is to fix up the fiddly painted decoration. If I were to use the much simpler decoration shown in the picture of the Great Harry in the Anthony Roll, my job would be easier. But as I'd committed myself to copying the Landström reconstruction which has decoration much more appropriate to Elizabethan galleons than Henrician great carracks, I've got quite a job of work ahead of me. Oh, and new channels for the mizzen shrouds to replace the missing and broken ones. The bonaventure mizzzen won't have channels, as that was how she was in Landström's reconstruction picture and in the model as I originally made her. Steven


- 740 replies
-
- 10
-
-
- Tudor
- restoration
- (and 4 more)
-
Beautifully elucidated, Dick! This man inspired a whole generation in Australia to get interested in science. I remember him explaining why it's possible to boil an egg at the top of Mount Everest, despite the water boiling at a lower temperature because of lower air pressure. And for those who had a deprived upbringing . . .
- 186 replies
-
- 2
-
-
- keelless
- reverse clinker
- (and 4 more)
-
Die Kogge Von Bremen by kentyler
Louie da fly replied to kentyler's topic in - Subjects built Up to and including 1500 AD
Great stuff, Ken! The more mediaeval ships the merrier IMHO. There are several build logs on MSW for cogs/kogges etc. They may be helpful to you. You might also be interested in these contemporary representations of cogs - https://www.pinterest.com.au/lowe1847/mediaeval-cogs/ Steven -
I love your analogue plotter. As Professor Julius Sumner Miller used to say "You could sack a city with that!" I take it you have it somehow fixed immovably to the hull of the ship while you do your "plot"? Steven
- 186 replies
-
- 1
-
-
- keelless
- reverse clinker
- (and 4 more)
-
That's looking very good, Eric. We all have to make decisions on how far to take things, often constrained by things (often mistakes) that have occurred previously. I think the decisions you're making are totally spot-on. The braces (knees?) look very good and add to the verisimiltude (love that word!) of the model. The mast step is very interesting - one would have thought that they'd have made it as rigidly attached to the hull as possible. Instead they attached it to the thwarts! However, thinking about it, the forces involved would be spread over the whole length of the long mast-step assembly, so the force on any one thwart would have been quite small. This is reinforced by the frail connections of mast-steps on several Byzantine ships found in the Yenikapi dig in Istanbul - in some cases it seems to have been just resting on the keel! The rivets - well they might add to the look, but they're a very small item which may not even be very visible at any sort of distance. I can't see anybody getting too upset about leaving them off. In fact, I think many people who add treenails to their models (and obvious nails on coppering) are putting something there that would not be seen on the real thing. Overall, this is a model to be proud of. Keep up the good work. Steven
-
That's not uncommon from what I've seen in other build logs. Have a look at how others have solved the problem with Viking kits - or bypassed (fudged) it. It might help. Steven
-
Good to see you back, nose to the grindstone again. The new model looks very good, and your solution to the strake problem seems to be working. Who knows, when you're finished you might like to revisit the first model and fix it as well . . . or not . Steven
-
That planking is looking very good. I take it the bulkheads get discarded after you've got the planking done? Something that happened with me when I built a model on a plug was that the elasticity of the planks pulled the hull sides inward after I'd taken the plug out and before I could put the frames in. I had to put in some temporary structure to push the sides back out to their correct position. In your case you can probably avoid this problem if you replace each bulkhead with a frame, one at a time, rather than taking all the bulkheads out and then putting in the frames. Steven
-
Looking simultaneously suitably scruffy and aesthetically beautiful. Looking forward to the next instalment! Steven
-
And Basil Brown is of course played by Ralph Fiennes, probably best known as Lord Voldemort in Harry Potter. To paraphrase an old chestnut: Lord Voldemort has no nose. How does he smell? Terrible! Steven