HOLIDAY DONATION DRIVE - SUPPORT MSW - DO YOUR PART TO KEEP THIS GREAT FORUM GOING! (Only 44 donations so far out of 49,000 members - C'mon guys!)
×


BobG
-
Posts
3,109 -
Joined
-
Last visited
Content Type
Profiles
Forums
Gallery
Events
Everything posted by BobG
-
Welcome to MSW. The Jolie Brise is a beautiful boat and you're off to a very nice start. She'll be solid as a rock using a solid block of oak for the hull. I'll be following along as you build her. Good luck!
- 15 replies
-
- 1
-

-
- jolie brise
- pilot
- (and 1 more)
-
Thanks vey much, Bob. I really love my workspace with a view of our backyard although it's just a small work table from IKEA with a 5 drawer filing cabinet for tool storage. I have a portable, SONOS bluetooth speaker in the room and I stream music on Spotify while I work...a lot of jazz and a whole lot from the every-changing, eclectic playlist of Radio Paradise. We live in an older house, built in 1942, near downtown Sacramento. It's a typical, smaller home of that era but, back then, families raised 2 or 3 kids in 2 bedroom one bath homes. We love the older neighborhoods in Sacramento with all of their mature trees and parks. Sacramento is a designated national tree city and the density of trees is very much valued for shade during our hot, dry summers. My wife and I enjoy landscaping and gardening and, even though our property is not very big, we've made it into a very nice little oasis for us. Over the years we've remodeled the house and have completely redone all of the landscaping including planting 15 trees: 3 birches, 4 flowering cherries, two maples, 4 Japanese maples, a dogwood and a dwarf flowering crabapple. We also have 3 very large, flowering camellias and many flowering shrubs like azaleas, dwarf crepe myrtles, gardenias and others, plus perennial flowers and many potted plants and succulents. It keeps us busy and something is nearly always blooming. I have relatives who live near you in Florida. My brother lives in Largo and my nephew lives in Dunedin. They are both into gardening too. I really enjoy your build log and appreciate your willingness to share your knowledge with all of us on the forum. Best regards,
- 170 replies
-
- 2
-
-
- medway longboat
- Syren Ship Model Company
- (and 1 more)
-
Thanks, Alan, does the black color stay on well and not rub off when handled?
-
Well done, Jean-Paul, you are making the definitive, reference build log for future builders of this model.
-
Very creative idea!
-
Alan, what is the effect you are referring to? Blackening? Do you have a photo you can post?
-
What cleaning method has worked well for you, Eric?
-
She's looking great, bolin!
-
Nice scraper, Michael. I tried to make a scraper like that on the same type of blade but I couldn't get it to scape very well for the moulding on the Medway Longboat. I ended up using the AL scraper like you showed in a previous post but I found it pretty difficult to use and hard on the fingers too. It took me a long time to get it done.
- 221 replies
-
- 2
-
-
- queen anne barge
- Syren Ship Model Company
- (and 1 more)
-
I think I just taped them in place if I remember correctly. They were a tight fit to begin with so I just taped them.
-
Thanks Michael and Chris. I got it! I was getting tripped up because I couldn't get my build log link to open while in I was in the signature set up box. Of course, since I hadn't saved the changes to my signature yet...well, of course, it wouldn't be active yet....duh!! 🥴
-
I would like to add a link to my build log under my signature but I can't seem to figure out how to do it. Many forum members have links that look like this, for example: Medway Longboat and all you have to do is click on it and it takes you to their build log. Thanks very much.
-
HMS ROYAL KATHERINE 1664 by Doris - 1/55 - CARD
BobG replied to DORIS's topic in - Build logs for subjects built 1501 - 1750
Stunning and inspirational as usual! Your rigging is beautifully done also. What kind of glue do you use on your ropes and seizings? Thank you.- 1,035 replies
-
- 3
-
-
- royal katherine
- ship of the line
- (and 1 more)
-
Thanks, Bob, great explanation. Maybe I have been going too fast with Jax Pewter Black but I'll look into the Birchwood Casey Brass Black that you use always.
-
Bob, I've been using Jax Pewter Black for blackening brass and I have had problems with it flaking off and rubbing off in places exposing the brass. I've followed the directions carefully and have cleaned the parts thoroughly and rinsed and dried them before applying the blackening solution and it still happens. I've resorted to painting the brass parts with Vallejo Black Acrylic and then weathering them with Doc O'Brien's Rusty Brown Weathering Powder. They look pretty good afterwards but I like the blackened brass better but I can't seem to get the brass parts to stay permanently blackened without rubbing off when handled. What blackening agent are you using and how well has it worked for you? Any tips would be appreciated. Thanks.
-
Simply awesome detail and weathering! This is one of my favorite builds that I'm currently following.
-
Just a slight touch of medium viscosity CA will keep those rope ends from unraveling too. The whipping looks good but you might want to touch a tiny spot of CA on those ends and then you can pinch them lightly to help them form a nice shape. The CA will darken lighter colored rope so I use just the smallest amount and it's practically unnoticeable.
-
Beautifully done!
-
Thanks very much, Eric. The only thing that was frustrating today was using the Jax Blackening Agent. I spent quite a bit of time blackening the brass only to have it flake off. I'm not sure why it keeps doing this and I have tried several ways of cleaning the brass and applying the blackening solution. Other than that, I had a lot of fun today and the finish line is in sight!
- 170 replies
-
- 2
-
-
- medway longboat
- Syren Ship Model Company
- (and 1 more)
-
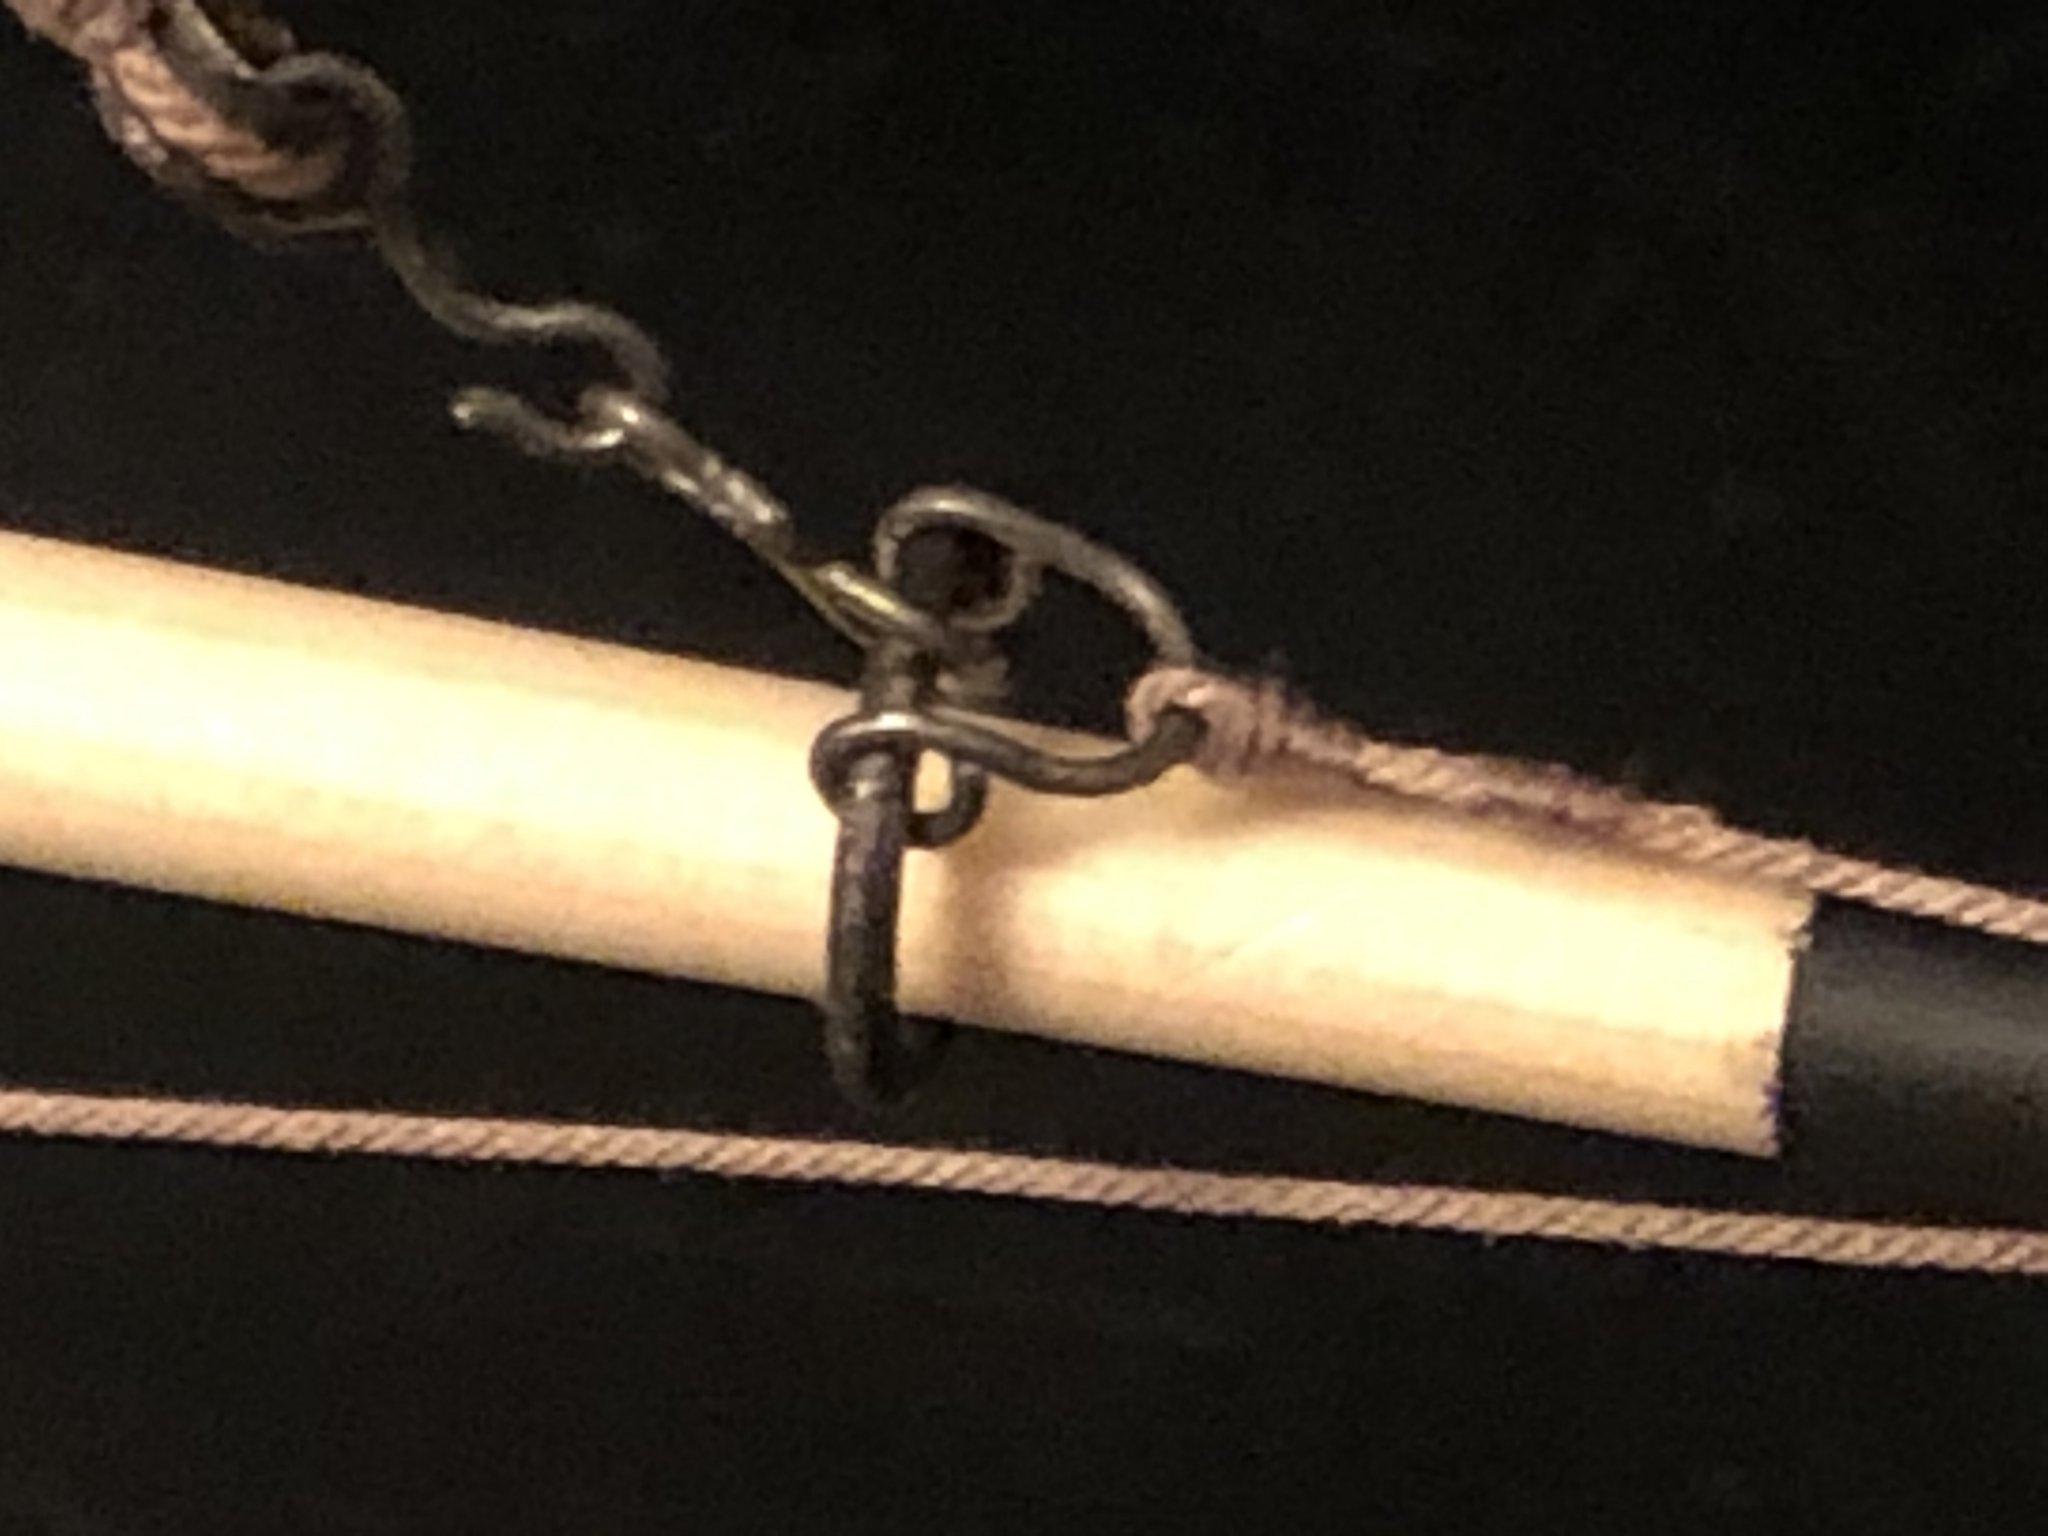
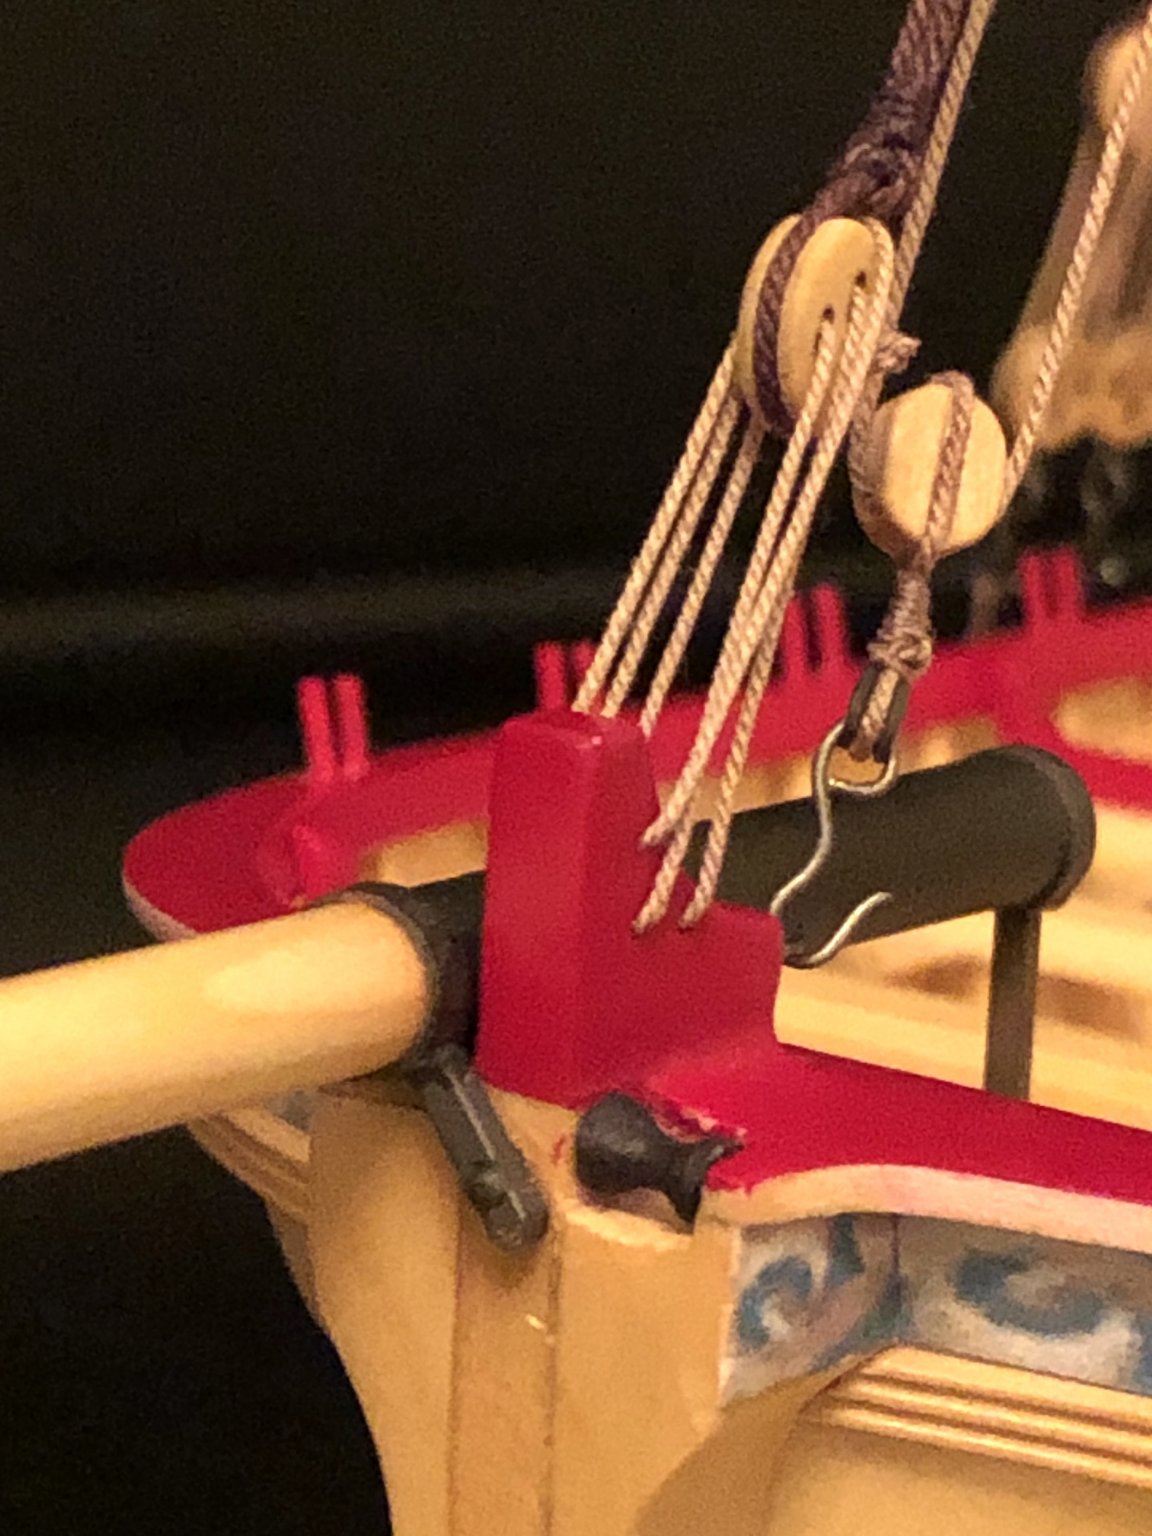
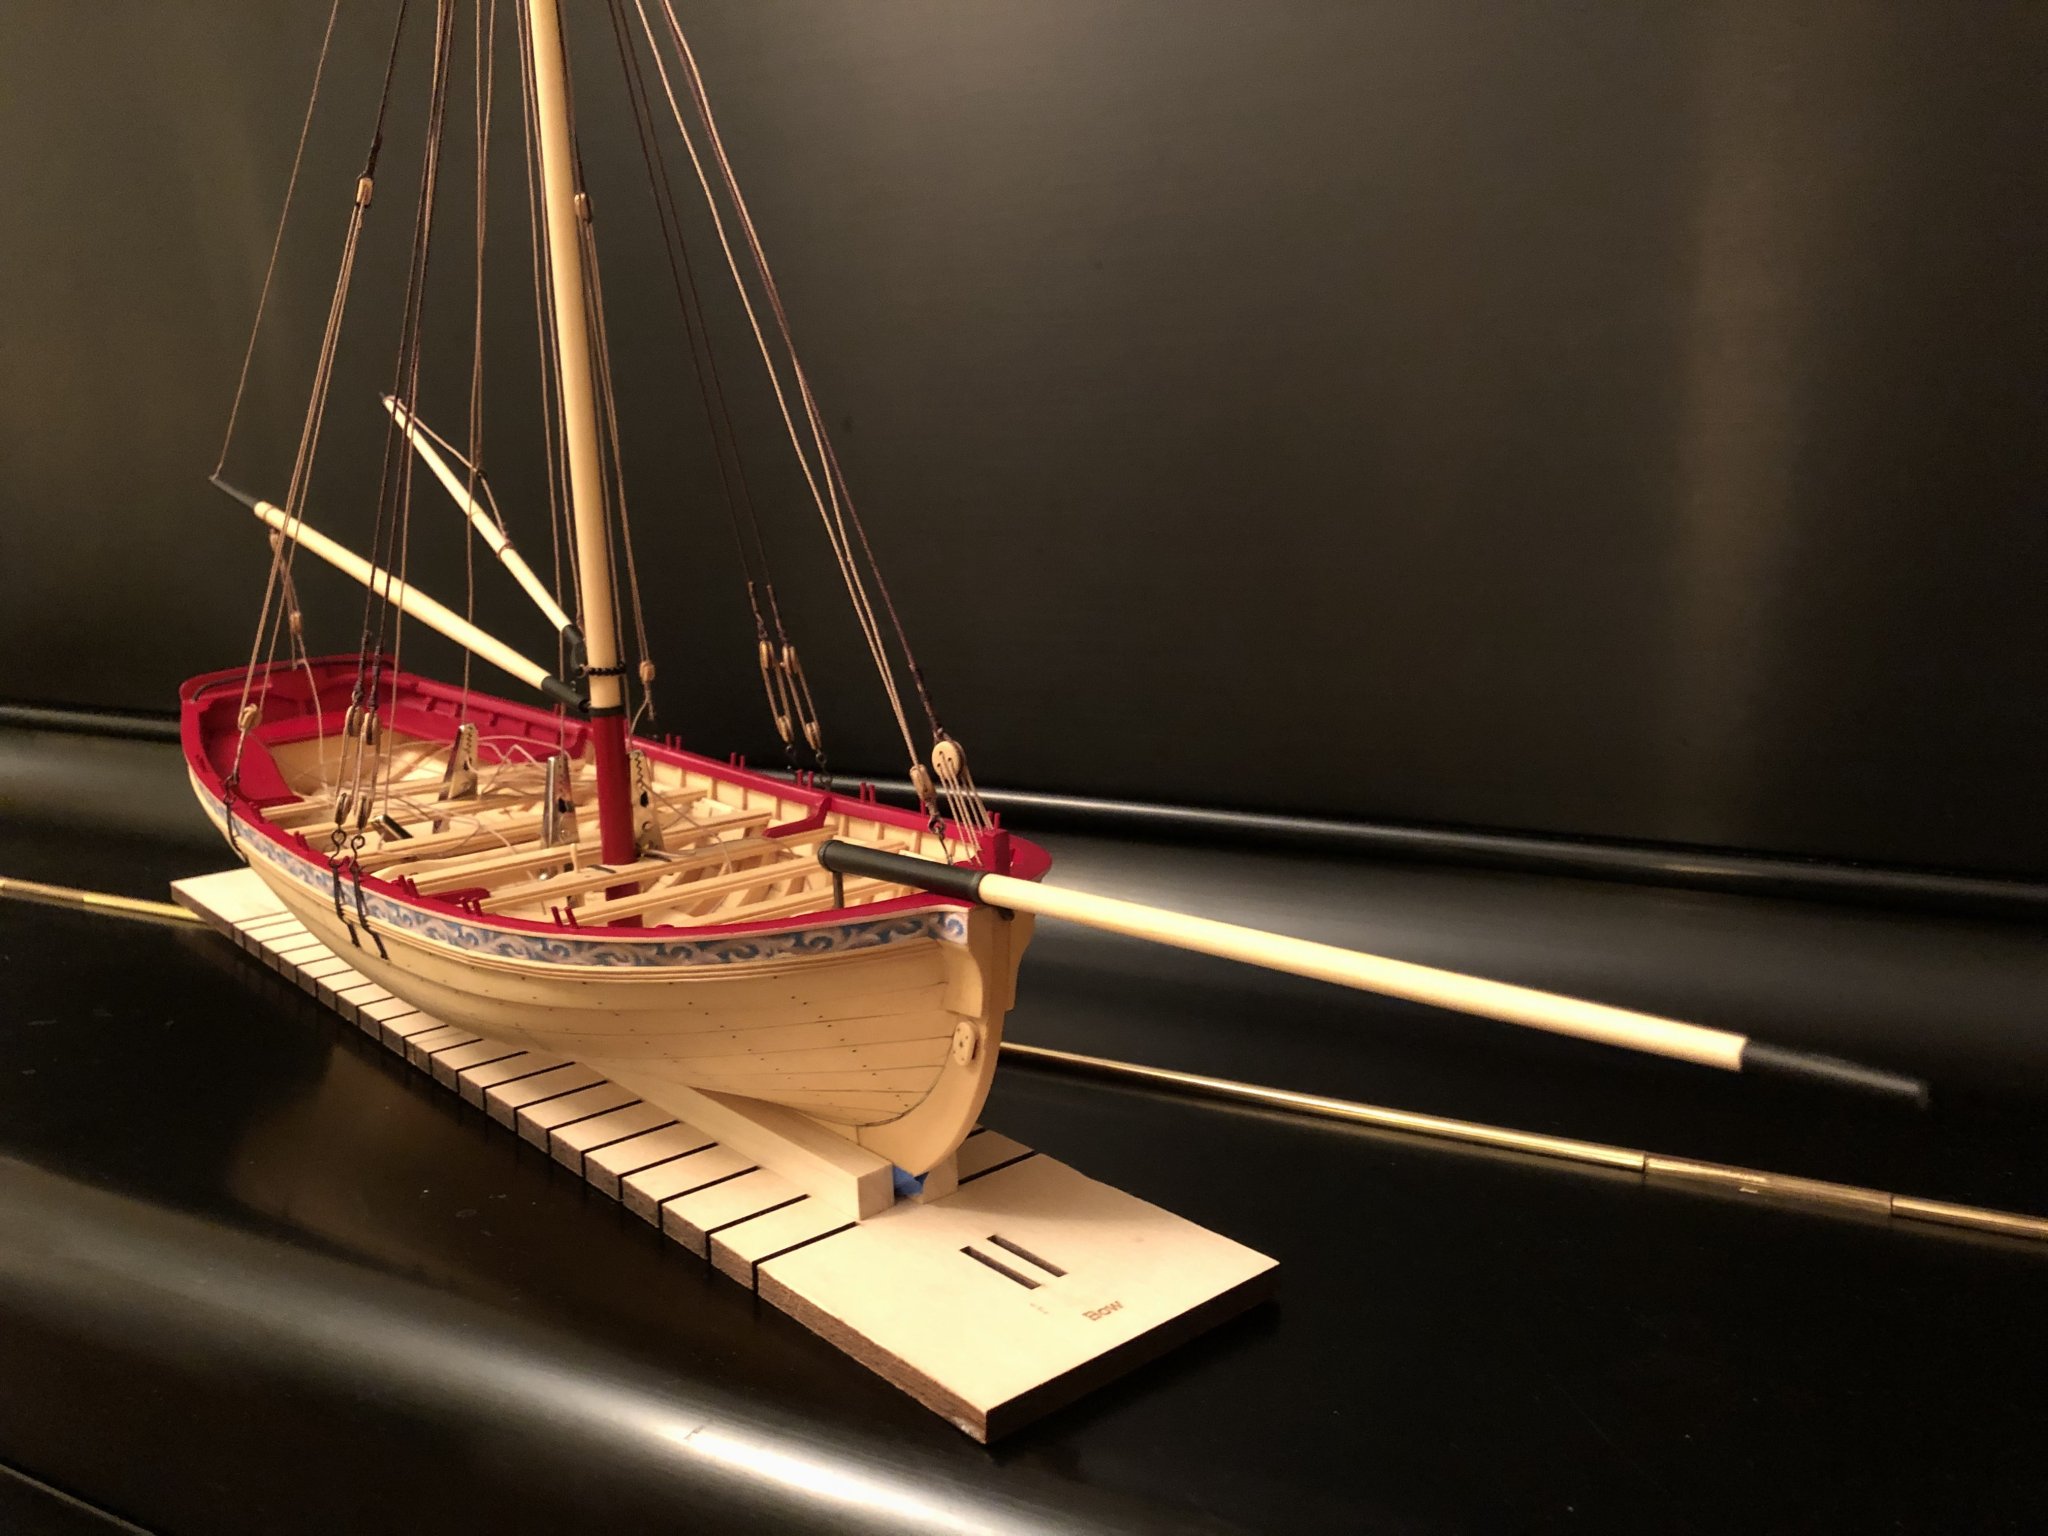
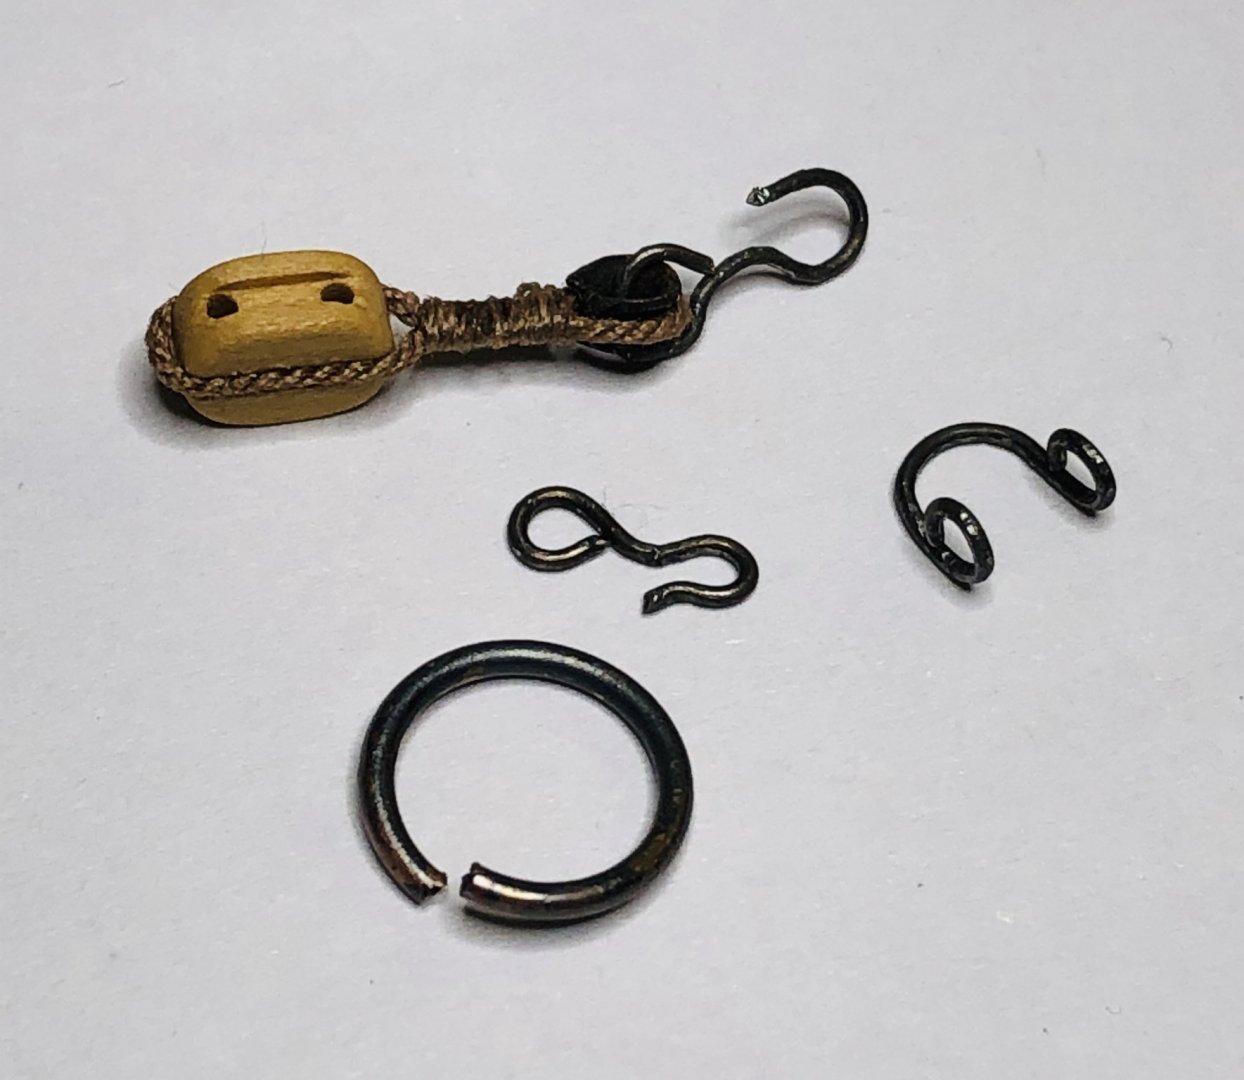
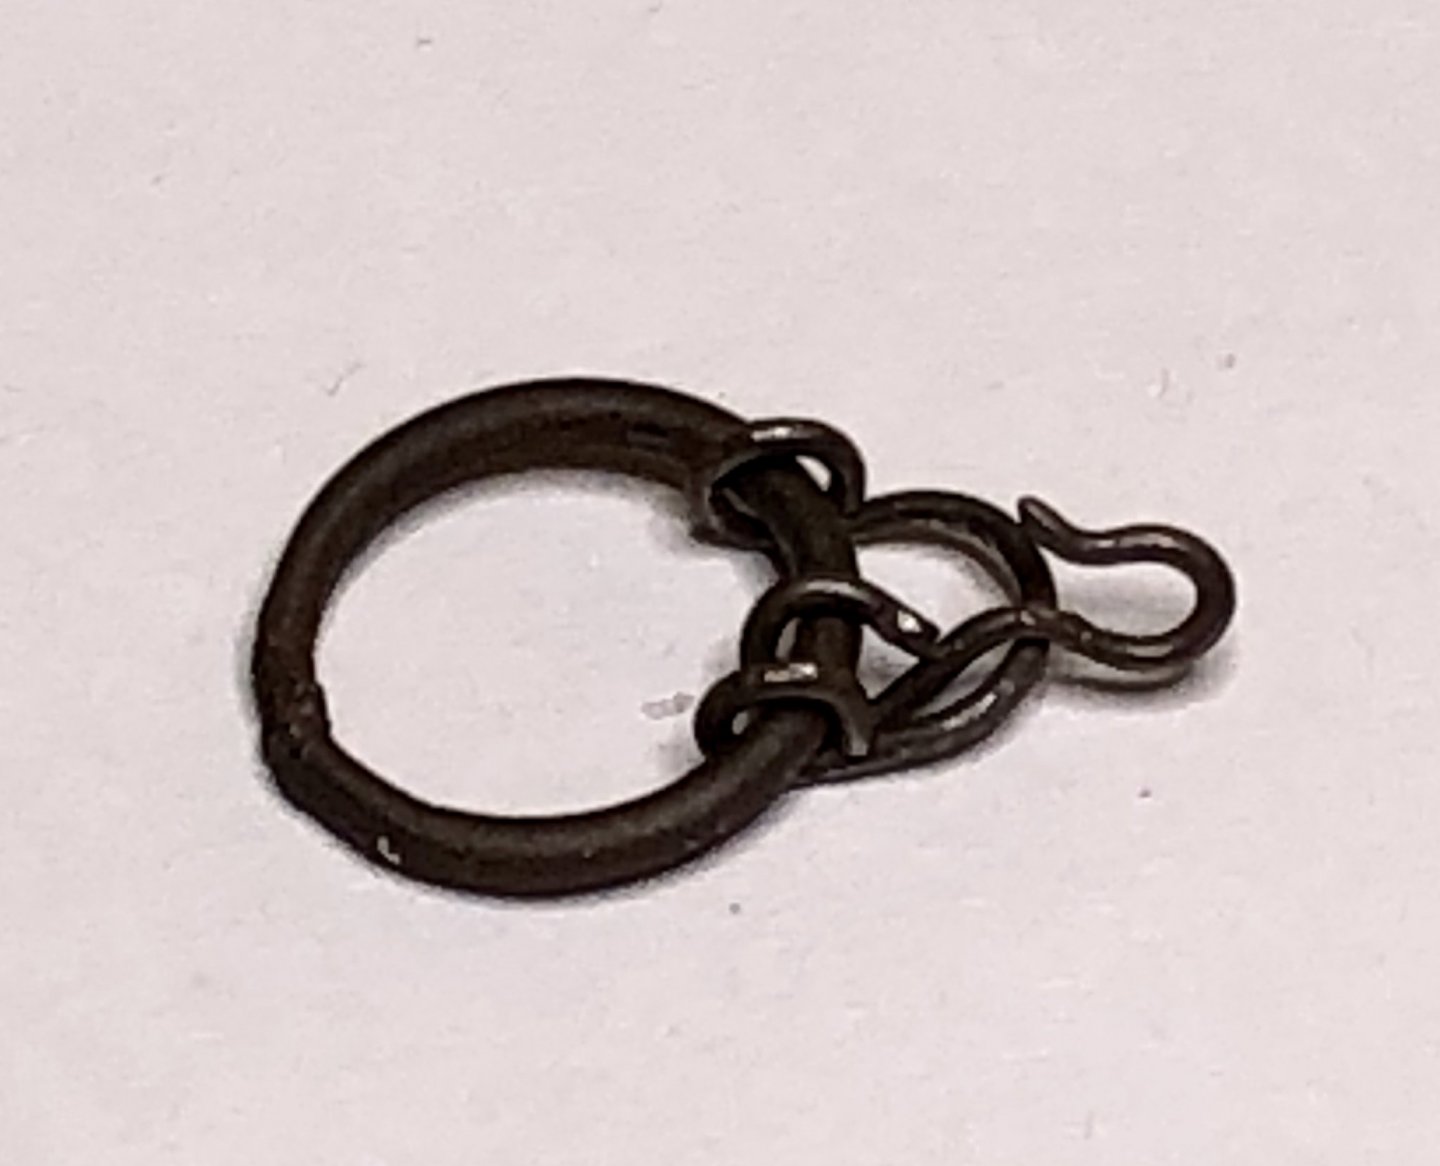
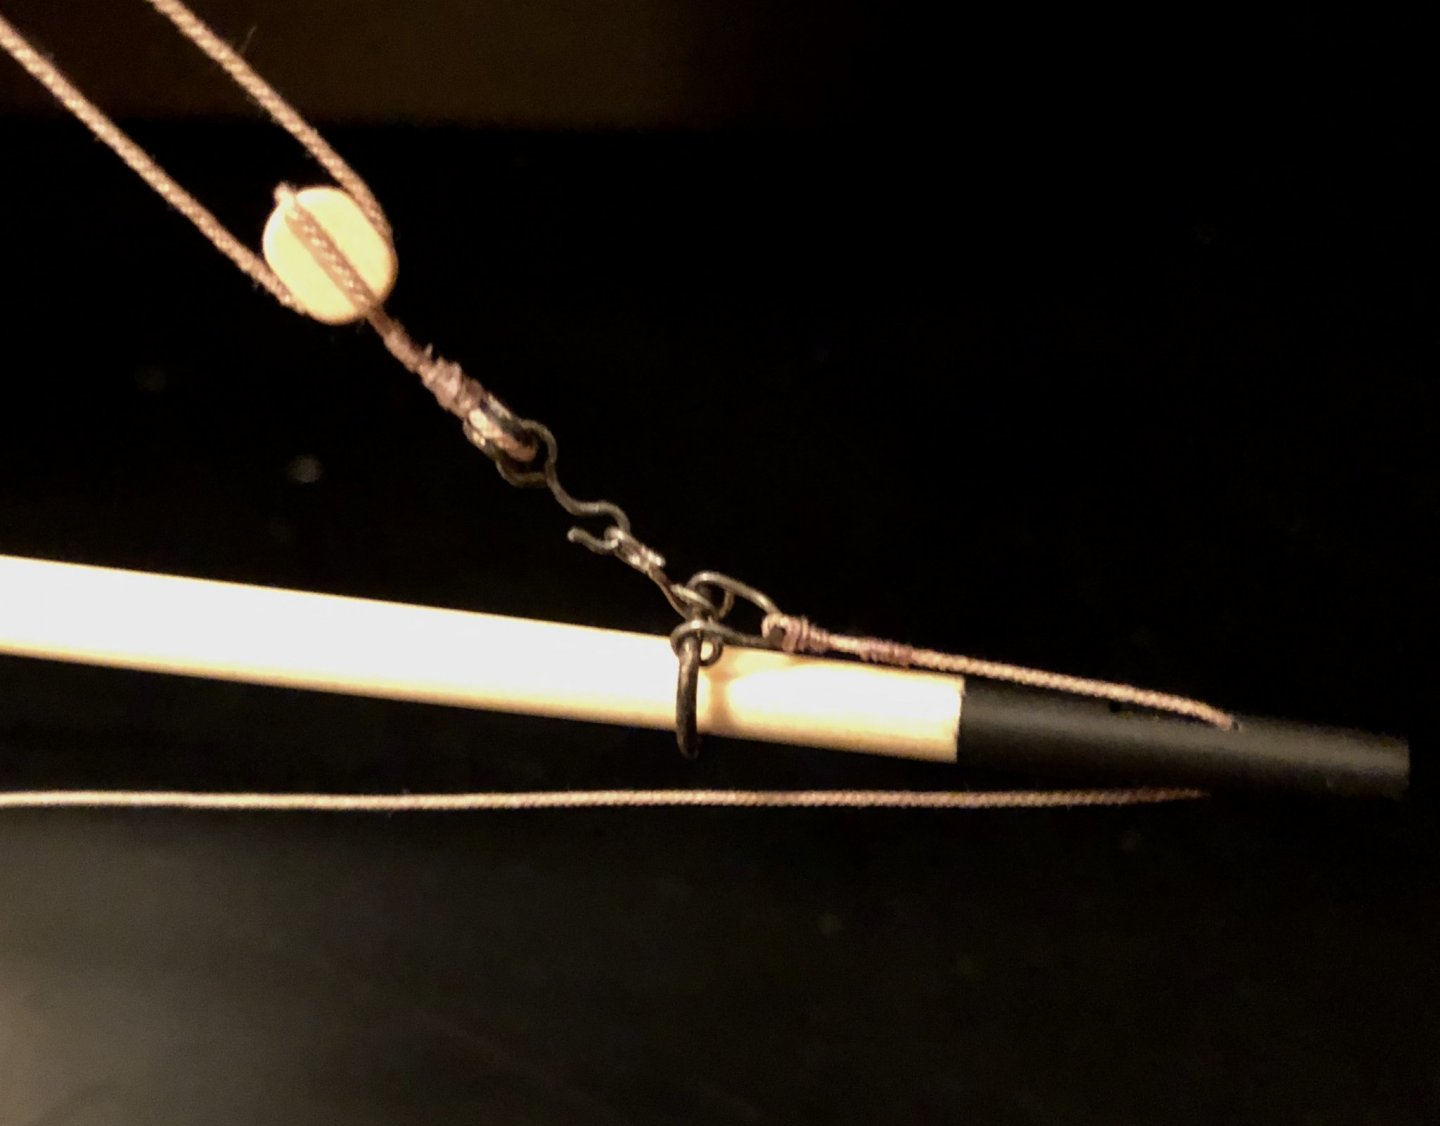
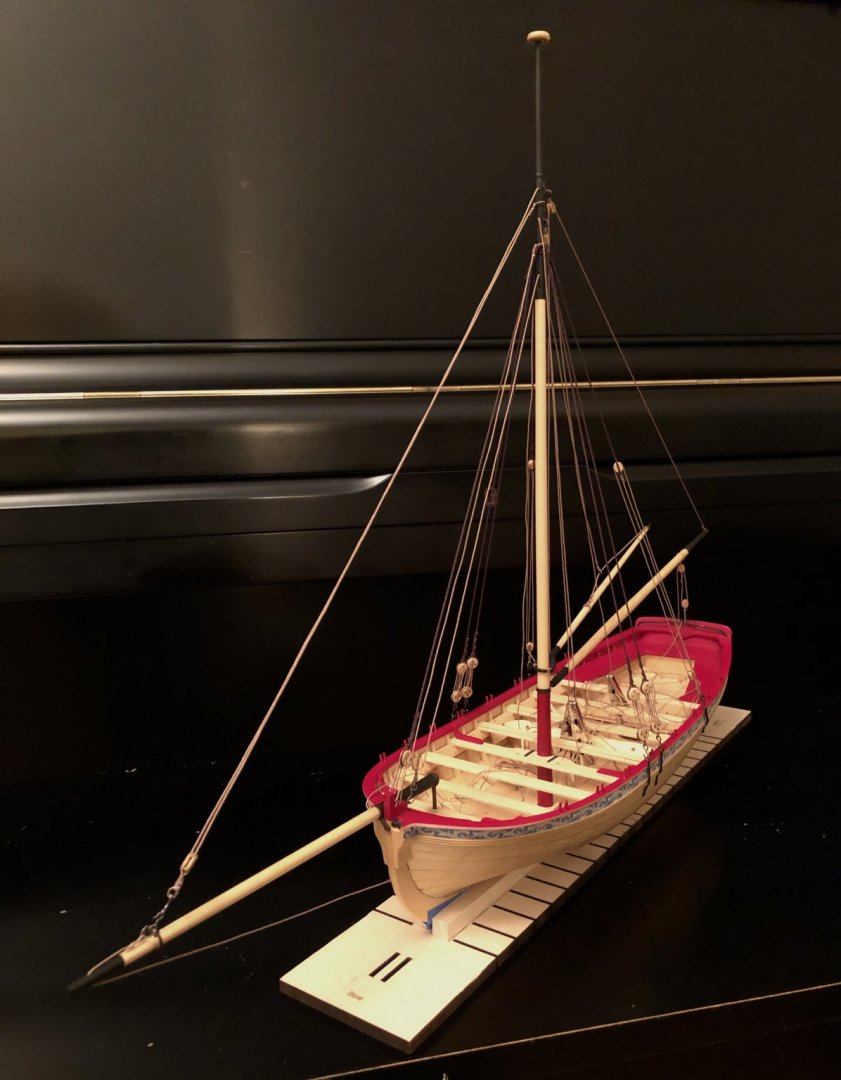
I really enjoy making the small metal and wire parts so I had fun today forming the traveler ring, the hook and the shakle for the bowsprit and rigging the jib halliard and the outhaul. The rigging really makes this boat so cool! I think I'm done with Jax Blackening Agent because, no matter what I do to clean the brass and follow the directions, the black coating rubs off when the brass piece is handled. I ended up painting the traveler ring with Vallejo Black Acrylic paint and weathering it with Doc O'Briens's Rusty Brown Weathering Powder.

- 170 replies
-
- 7
-
-
- medway longboat
- Syren Ship Model Company
- (and 1 more)
-
Nice fix. Looks good!
-
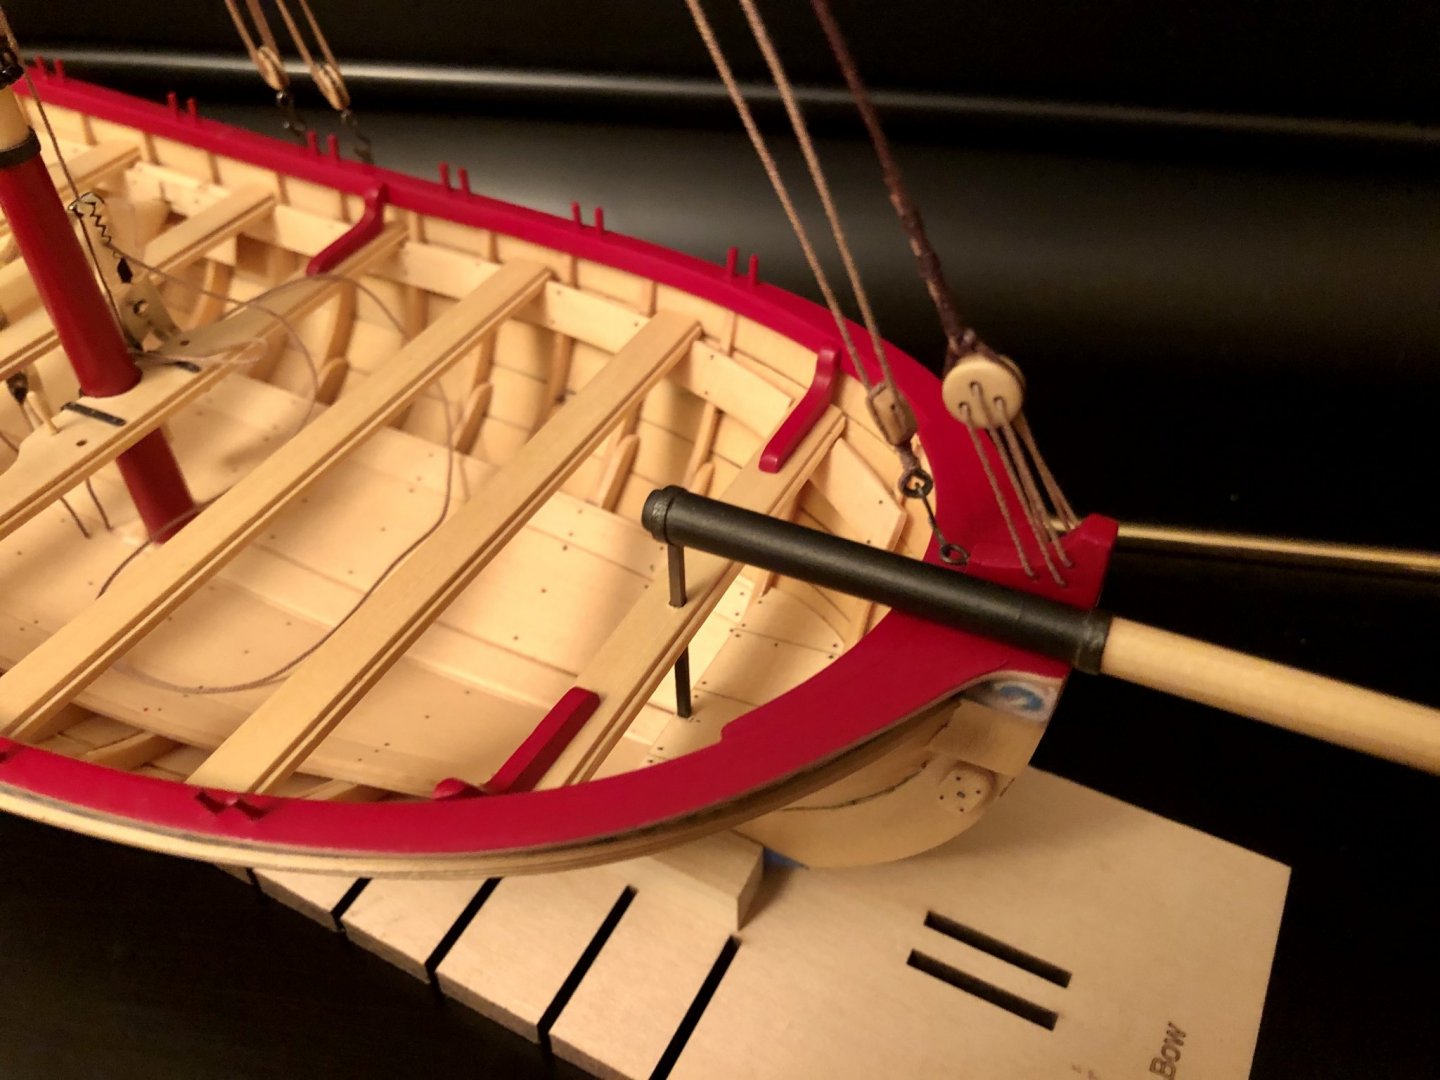
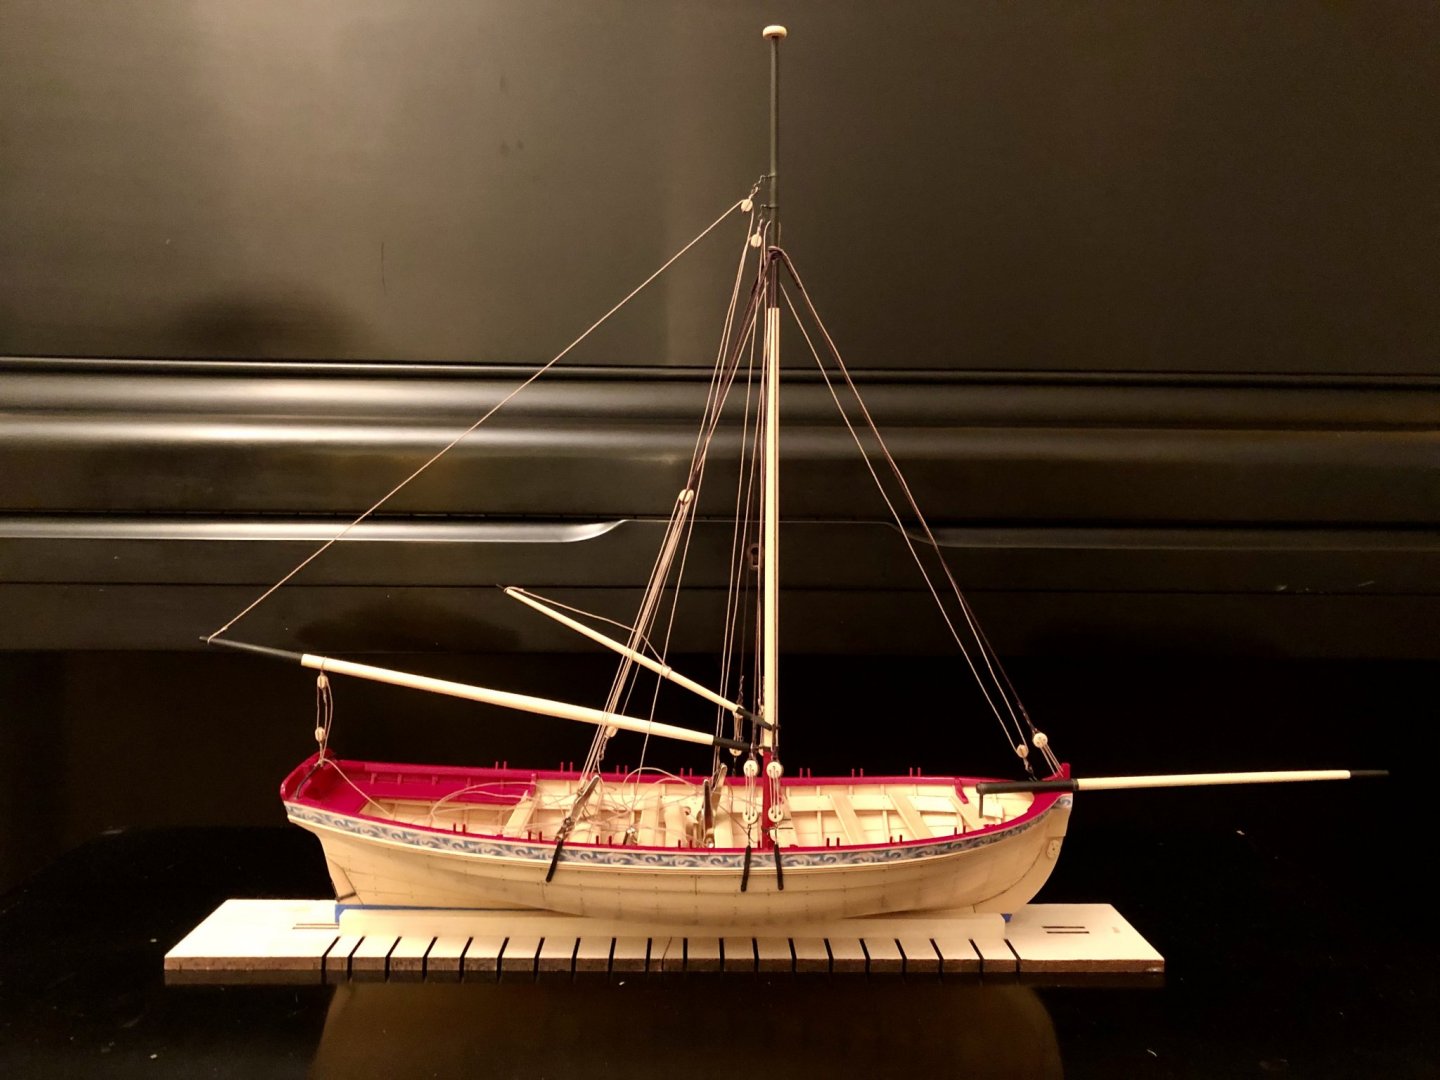
Every model seems to have a few things that can be tricky to complete and get it done well and the installation of the bowsprit was one of those for me today. Getting the bowsprit aligned properly so it is straight when viewed from the bow along with the slight upward angle...just a little but not too much was challenging. The holes that you drill need to be spot on or it won't line up right and it will be crooked or the angle will be wrong. I cut the support that goes through the hole in the bow thwart to the correct length and then I made the small support that is to be nailed through a hole to the stem and also has a tiny pin that goes into the bowsprit at an angle. I simulated the iron bands with black masking tape and brushed them with Rusty Brown Weathering Powder. Cutting the hole through the small brass support rod was tough. After 20 minutes and one broken drill bit I finally got through the 1/16" bar. Then I did a dry run. I set the bowsprit with the main support bar attached to it through the thwart and held the bowsprit down against the cap rail at the angle I wanted and lined up the small bow support to locate where the hole needed to be drilled into the bowsprit at an angle. Then I marked the spot where the hole needed to be drilled into the stem. I blackened both of the brass supports plus one tiny nail that I had cut off which is to be used to hold the small support bar to the stem. Finally, I drilled the two holes: one into the bowsprit and one into stem. Everything seemed to line up pretty well during my dry run with both supports in place so I glued the main support rod into the bowsprit and placed it through the thwart but I didn't glue it yet to the bow floorboards where the foot comes to rest. I wanted to be able to move it a little when lining up the bowsprit along with the stem support rod. Holding it where I wanted it, I glued the small support into the bowsprit. However, now the cut off nail wasn't lining up correctly with the hole in the stem and it wouldn't go all the way in without pushing the bowsprit out of alignment a little bit. So I decided to simply glue the the small support rod to the stem. Then I cut the tiny nail even shorter and glued it into the hole which goes through the small support rod. So it is actually just simulating a nail that goes all the way through it. It looks good and I'm happy with it. The Jax Blackening Agent gave me fits again by flaking off and exposing the brass in places so I ended up painting the rods with Vallejo Black Acrylic and then using Doc O'Brien's Rusty Brown Weathering Powder to make them look like metal. They turned out pretty good. So the bowsprit in in place and I'm happy with how it turned out. Tomorrow I hope to work on the traveler ring and begin rigging the bowsprit lines.


- 170 replies
-
- 5
-
-
- medway longboat
- Syren Ship Model Company
- (and 1 more)