


ccoyle
-
Posts
10,346 -
Joined
-
Last visited
Content Type
Profiles
Forums
Gallery
Events
Everything posted by ccoyle
-
True dat. I think it is more commonplace for kits to include sailcloth and patterns rather than sewn sails, but yeah, there is no industry standard on this.
-
 I laughed when I read that, but only because once upon a time during one of my extremely limited number of ski trips, I had a similar fall -- went off a groomed trail into some deep powder. Skis plunged deeply into the soft powder, followed quickly by upper torso/face. No injuries, thankfully. Of such episodes are memories made!
 -
Intro to Card Models Pt. IV: Tools & Other Supplies
ccoyle replied to ccoyle's topic in Card and Paper Models
Thanks for that tip! For hole punching, I acquired a Japanese screw punch a couple of years ago. It is likewise a very useful tool, though when shopping for one, one needs to be careful not to end up with one of the inferior Chinese-made clones. The confectionery tools you linked to are very similar to the dapping tool set I have described in some of my build logs. It's good to know that modelers have options when it comes to adapting a variety of tools to our particular art. Spotting tools used by manicurists are similarly useful. -
You can always get a member's attention by using the @ symbol. Example: Hey, @Ab Hoving, do you have any input on this discussion?
-
Since the instructions call for scribing, that means that the supplied deck material is already the correct scale thickness. Adding a layer of popsicle sticks will make your finished deck too thick. If anything is to be added at all, it should be a very thin veneer (such planking is available if you shop around). I did scribing on my two Midwest kits, and it does not look bad. It is also pretty easy to do.
- 55 replies
-
- 3
-

-
- sharpie schooner
- Midwest Products
- (and 1 more)
-
The Sinking of the Bismarck ... with LEGOs ...
ccoyle replied to uss frolick's topic in Nautical/Naval History
Very dramatic and well done! -
I assume you are speaking of the vendor at Shapeways? I have ordered from a different Shapeways vendor without issue, other than the slow delivery time coming from Canada -- not the vendor's fault. Of course, that experience may not hold true for Model Monkey -- have you tried an internet search for other builds that have used his products?
-
Always be mindful that a glass case of the size needed for Snake will be quite heavy.
- 1,144 replies
-
- 2
-
-
- snake
- caldercraft
- (and 1 more)
-
The name of the kit manufacturer would be helpful.
- 1 reply
-
- 2
-
-
Start by clicking the three dots in the upper right corner, then select 'edit' from the drop-down menu. A tray containing your uploaded images will appear beneath the editing window. Click the 'x' on any photos you wish to delete.

-
Jerry, Start with checking your uploads -- looks like one photo has been added three times -- then delete the extra copies. You might end up deleting the one photo from the trio that is inserted in the text; if that happens, just re-insert the remaining photo.
-
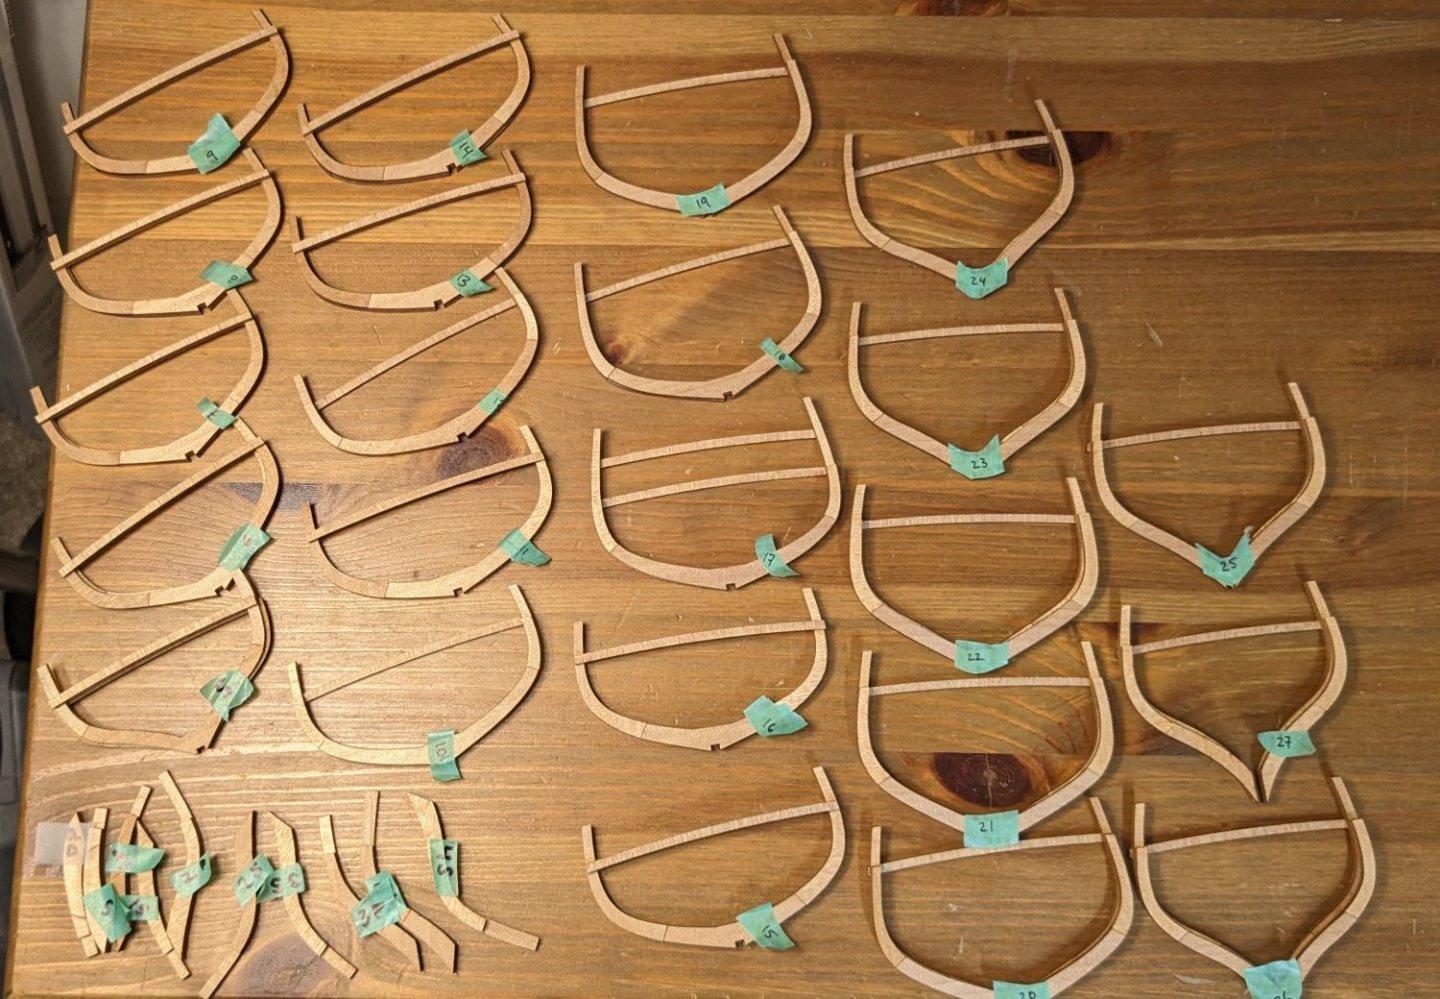
Bunches of frames made. I got all of what the instructions call "orthogonal frames" made (I don't normally build POF, so I might get the jargon wrong). There are still some stern cant frames to build (#27 in the photo is one such frame), but at this point the instructions say to mount the orthogonal frames to the keel. The instructions don't say anything about beveling the inboard sides of these frames, but it seems logical to do at least a preliminary sanding to these before mounting them; afterwards, they will be difficult to access. Thoughts?
-
Looks just like murky bay water.
-
Jenik, The site policy referring to language, can be read here: Online translating sites, such as Google, do a very good job of producing legible English. Thanks! С политикой сайта можно ознакомиться здесь: Сайты онлайн-переводчиков, такие как Google, очень хорошо справляются с разборчивым английским языком. Спасибо!

-
Welcome aboard, Gord, and good luck on your project! (I had to remove one of your photos because it was a stock photo and could only be used by license.) Cheers!
-
Welcome! Your Constitution 'model' is a highly simplified decor model. As far as modeling skills go, you'll not learn much of anything useful by working on it but, OTOH, you can't really hurt it, either, and if it has some sentimental value for you (being a gift from Grandma), then by all means fix it up. As for your plastic kit, we have many avid plastic modelers around here, including some who build tallships in that medium. I'm not familiar with that particular kit, so I can't really speak to its strengths/weaknesses or suitability as a beginner project. What I would advise you to do before jumping into any ship modeling project is take some time to thoroughly browse this site. As you do, look for projects that particularly appeal to you, especially the ones tagged as first builds. Any ship model requires a considerable commitment of time and at least some investment of capital, so you should spend these on a model that will keep your creative juices flowing. That might turn out to be your Jolly Roger kit, or perhaps you'll find your interest drawn elsewhere. Researching a new project should be a fun part of the process! Good luck with whatever project you choose!
-
Doug, Titles can only be edited from post #1. I'll fix this one for you. Cheers!
-
This often happens when painting large areas with a brush. Some portion of it starts to get tack-dry, then when you get to expanding on that area, the tacky paint 'grabs' more paint than the yet-unpainted area, resulting in a buildup. The key is to use multiple very thin coats. Also, the difference in your coverage is exaggerated by some light coming from inside the translucent hull. Once the rest of the hull is painted and the deck is added, such differences won't be as apparent.
- 15 replies
-
- 3
-
-
- Gertrude L Thebaud
- Pyro
- (and 3 more)
-
That makes me shiver just reading it!
-
I want to commend you, Halit, for creating this retro build log. This should prove to be a fantastic resource for future builders of this kit!
- 114 replies
-
- 2
-
-
- Pride of Baltimore II
- Model Shipways
- (and 1 more)
-
Swan-Class Sloop by Stuglo - FINISHED - 1:48
ccoyle replied to stuglo's topic in - Build logs for subjects built 1751 - 1800
That's a very nice tribute. I was just thinking about Danny the other day -- I miss his activity on our forum.


