Cathead
-
Posts
3,552 -
Joined
-
Last visited
Content Type
Profiles
Forums
Gallery
Events
Everything posted by Cathead
-
 How are you coming along?
 -
You've gotten this far, any further progress?
-
Whatever happened? Have you started the new kit, or still fiddling with this one? Interested minds want to know!
-
Or this winter?
-
Any further progress? I'd hate to see such a promising start get mothballed. Hope you'll let us know what you've been up to.
-
Any luck finding a job or getting back to the model?
-
Haven't heard from you in a while, are you still working on this? We'd love to hear about your progress.
-
You were right about this, that bedroom must have been some project! Have you returned to this model? We'd love to know how you're progressing.
-
New Young Model Builder from Minnesota LOOKING FOR ADVICE
Cathead replied to Kenna's topic in New member Introductions
We haven't heard from you in a long time, how did your project come along? You had a lot of people interested, I hope you can update us! -
It's been a month, how is your model coming along?
- 602 replies
-
- 1
-

-
- Flying Fish
- Model Shipways
- (and 2 more)
-
How is your build coming along?
-
Glad to see another convert. I, too, got into wooden modeling after doing lots of other styles and find that nothing is as challenging and fulfilling to me in terms of craftsmanship and results. That looks like enough warp to need fixing. First step could be to wet it, then weigh it down thoroughly on a flat surface and let it dry. This is a fun prototype that I've always longed to build, as a geologist and naturalist. If it's of interest, a few years ago (seems like a lifetime) I was fortunate to visit a full-scale Beagle replica being built in southern Chile. I posted a number of photos here, which you're welcome to peruse if they'd be of interest or use as a reference or inspiration. No promises that it's 100% accurate, but it might be useful nonetheless. Looking forward to seeing this come together!
-
Good to hear you enjoy planking as some people seem to dread it. Not familiar with this model so I'm interested to see where you go with it.
-
A good start on an interesting kit, it'll be fun to see how it turns out. Glad to see you got the photos working.
-
Chaperon by joep4567 - 1:48 - Sternwheeler
Cathead replied to joep4567's topic in - Build logs for subjects built 1801 - 1850
I'm curious about your decision-making on having the hog chains arc so high above the hurricane deck. Is this a personal aesthetic decision or are you basing it on a different prototype? -
Oh, cool! Thanks for sharing that. I thought the style looked authentic when I chose that figure, but didn't realize there was a specific precursor. Also, here's a panorama shot of the ice storm landscape here. Notice the copse bending into a wye at right.

-
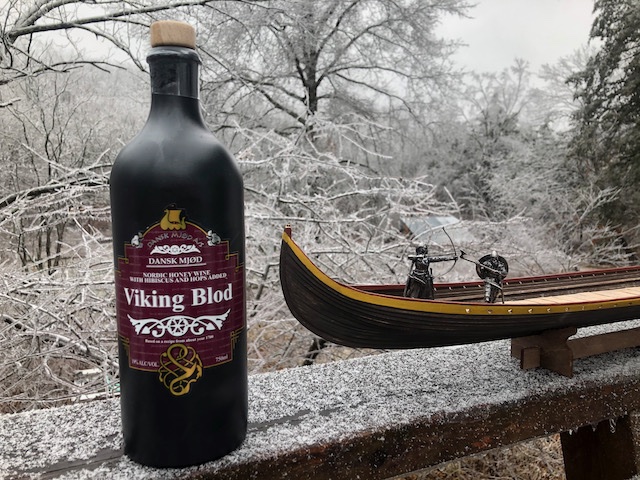
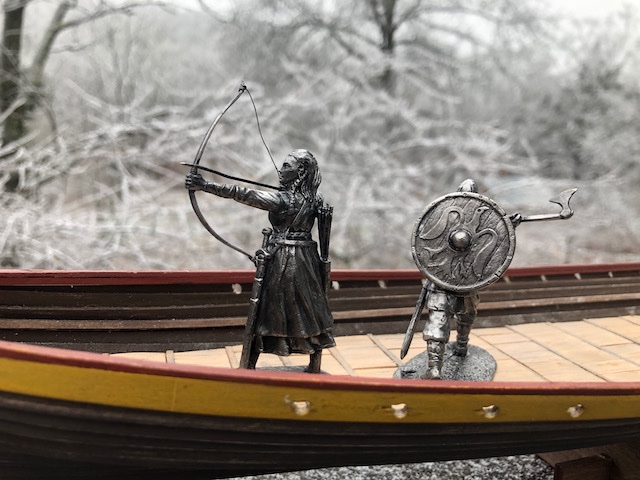
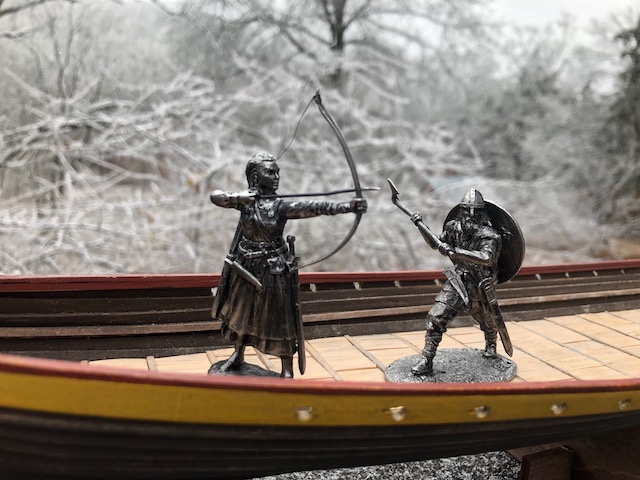
Happy New Year from the Viking shipyard. We're in the middle of a moderate ice storm that's hanging in the balance of getting much worse vs. being manageable. Seemed like an appropriate backdrop to share a few holiday photos with the latest additions to this build's arc, two more figures and a Danish mead. We brew a lot of mead ourselves, but Mrs. Cathead found this and thought it'd be a fun comparison to our products and highly topical. Speaking of mead, one of our favorite versions is pear, which I make in early summer after thinning the pears in our orchard. The roughly golf-ball-sized green pears get chopped into the initial ferment, infusing their fruity flavor into the mead and making a really distinct final product. It's a great way to use these otherwise wasted fruits. However, we need this ice storm to get no worse, as here's what the pear trees look like at the moment: The ice itself isn't a problem (in terms of temperature) but if it gets much thicker branches will start breaking, and that IS a problem. Getting back to the model, here are closeups of the latest crewmembers: I've wanted at least one proper axeman, and I really like the raven on his shield. And I thought Mrs. Cathead should have representation as well. Again, best wishes for a better 2021 for all of us.

-
Chaperon by joep4567 - 1:48 - Sternwheeler
Cathead replied to joep4567's topic in - Build logs for subjects built 1801 - 1850
I can imagine! You did a nice job. -
What you need to do is learn how such models are built in general, and then apply those skills to this (or any) model. Take the time to read the excellent planking tutorials here on MSW. Make a few mockups and practice the techniques described. When you understand the skill, apply it to your model. Do not expect a magic tool to replace knowledge, skill, and patience. The technique you are trying is akin to trying to learn to play trumpet by memorizing all the finger combinations to a specific tune, rather than studying music theory and learning how the trumpet actually works. Once you master those, you can play all sorts of songs. Otherwise you'll bang your head against the wall trying to learn one song without ever really understanding the instrument.
-
I'm going to be a bit of a young curmudgeon here and say that I did not find most of the standard books on wooden ship building particularly helpful when I was getting started 4-5 years ago. Most of them felt very out of date, frankly, and really weren't relevant to the quality and development level of modern kits. And this is coming from a voracious consumer of books who loves to learn by reading. As Roger says, a well-designed modern kit, with good instructions, will likely teach you at least as much as a decades-old book, and you'll be doing while you learn. As will spending time engaging with this forum and reading others' build logs. Even as references, books may not be as handy as the internet for a beginner; eventually you may want the definitive tome on 18th century rigging practices, but at any level of introduction to the hobby you may well be better off learning from others online and searching for the specific answers you want. Not to mention that videos are often better teachers these days than old books. Everyone learns differently, so this may not apply to you. But at the very least, you might consider requesting a few books through interlibrary loan to see if they are actually good matches for you before you splash out lots of money for a library. I quickly outgrew what little I did learn from the books I bought, and now wish I'd put that money to better use as the books now gather dust since they became irrelevant within a year, especially once I found MSW with its far broader scope of far more up to date information and advice.
-
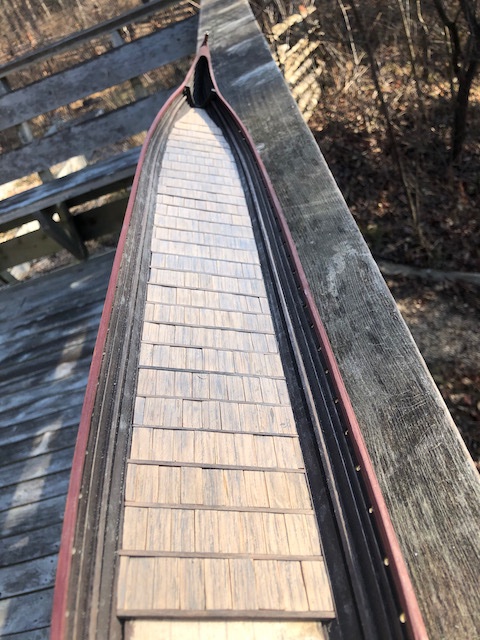
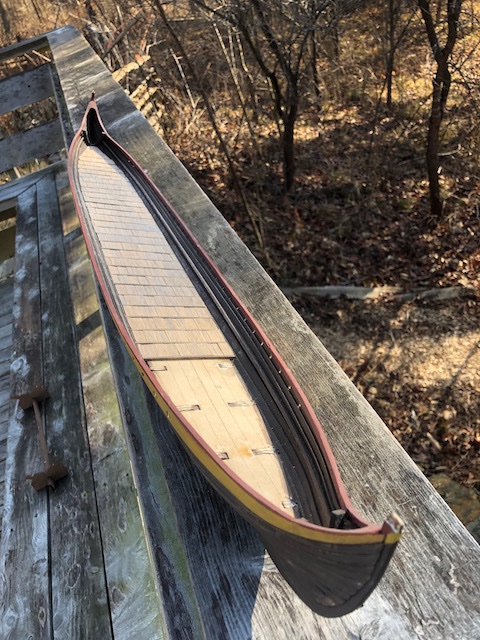
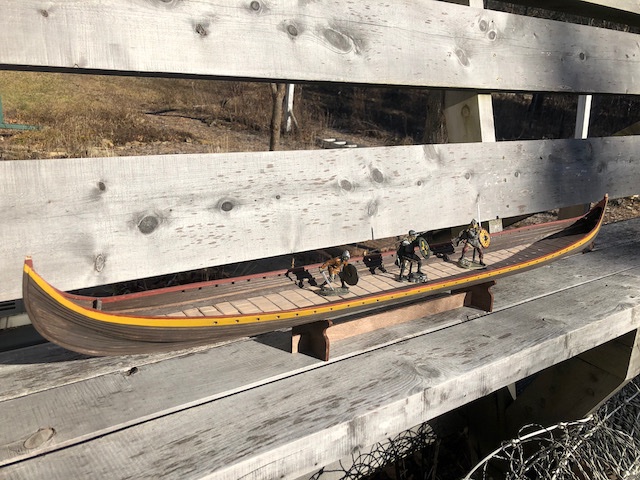
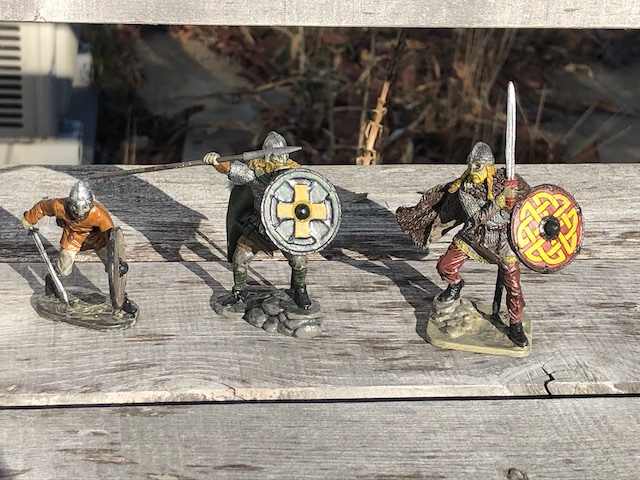
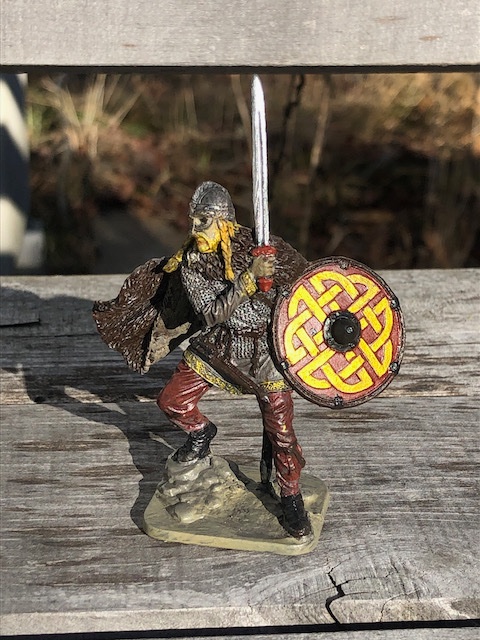
Wow, that thing is huge! Quite a bit bigger than Skuldelev 2. Petr is right, it's not a specific reproduction and in fact seems to combine styles and ideas multiple eras to create a sort of idealized craft. For comparison (figures from sites linked below): Dragon Harald Fairhair (ship in the video) 115' (35 m) long 26' (8 m) wide displaces 80 t sail area of 260 square m crew of at least 100 Skuldelev 2 98' (30 m) long 12' (3.8 m) wide displaces 26 t sail area of 112 square m crew of around 70 Thanks for sharing that video, it was a nice overview of various steps taken in construction. As for the current project, the deck is done! I rewarded myself by painting the third figure. Meet Sigtryggr, again named for a character from the Saxon Tales books but this time also a real historical figure. The real Sigtryggr was a Norseman who ruled in both Dublin and Northumbria, the former making him especially appropriate for this version of Skuldelev 2 (which was built near Dublin, though over 100 years after Sigtryggr's time). He's the most ornate and wealthiest of the three figures I've acquired, with his fur cloak, fancy shield, and cloak with embroidered linings. I tried to match his color scheme to the ship's. Here are all three figures: And here they are on the completed deck: This was a nice milestone to reach. Not sure what I'm going to work on next, but thanks for sticking with me.
-
Excellent! The rounded sides of the "look-in" really work well, and the second round of carriages is a definite improvement. Happy Holidays to you too!
-
Good to know this is still under progress, thanks for updating.
-
Nicely done! The time report is certainly interesting, I've never had the patience to do that.
-
The deck is mostly completed. I still haven't decided what to do about riveting. Leaning toward not bothering, as I'm just not sure I can do it right (or have the patience to do it right) and would rather it not be present than do in a poor, distracting way.