


Chuck
-
Posts
9,702 -
Joined
-
Last visited
Content Type
Profiles
Forums
Gallery
Events
Everything posted by Chuck
-
I am looking for six definite members who have bought this kit so I can start up the group area.....I think Jim is also doing so. So please post here is you are among those who have bought it and will be starting soon. I think we have three so far. Chuck
-
 Just wait a couple of weeks and send me your list.
 -
The cheapest way to go is buy a scroll saw and start cutting. Laser cutters dont work like describe. You would need to scan each board into a computer program and trace every part using a program like Corel Draw. Which is very expensive in its own right. It would take you 100 times the hours to do that in comparison to just buying a good scroll saw. Chuck
-
Cant wait to see some of these take shape...
-
Looking really good.
-
Yikes...that looks like an ambitious restoration. It will be interesting to follow you along as you progress. I see some real challenges in those pics to repair.
- 95 replies
-
- 7
-

-
- POW
- Bone model
- (and 2 more)
-
Look here for a ton of tutorials on rope making and ropewalks https://modelshipworld.com/forum/82-discussions-about-rope-making/ and here for info on rope walks...parts and materials https://modelshipworld.com/forum/83-rope-materials-and-parts-resources/ and here for some plans for making ropewalks... https://modelshipworld.com/forum/81-ropewalk-plansdownloads/ and here for commercially available ropewalks... https://modelshipworld.com/forum/88-commercial-sources-for-ropewalk-machines/
-
- 16
-
-

-
Look here for a ton of tutorials on rope making and ropewalks https://modelshipworld.com/forum/82-discussions-about-rope-making/ and here https://modelshipworld.com/forum/83-rope-materials-and-parts-resources/ and here https://modelshipworld.com/forum/81-ropewalk-plansdownloads/
-
Nice review and I look forward to your build log for it....maybe a group build if there is enough interest. Hopefully we can get some replies from the members here if they are interested in starting one. We need a new POF Cross section group and a kit is perfect for folks who dont have all the tools to build one from scratch. We need at least six members to start one.... Chuck
-
Materials list for Chapter five is now uploaded. Materials List for Winnie fifth.pdf I will let everyone know when I have the laser cut parts ready. I will start cutting them this week. Chuck
- 39 replies
-
- 10
-
-
Beautiful work Simon. 😀
-
You will never erase all traces of the planking run, but it should be very minimal. You should get it very smooth or as smoot as possible. Otherwise it has a tendency to look sloppy. Chuck
-
No but only because I am not that adventurous... One build at a time!!!
-
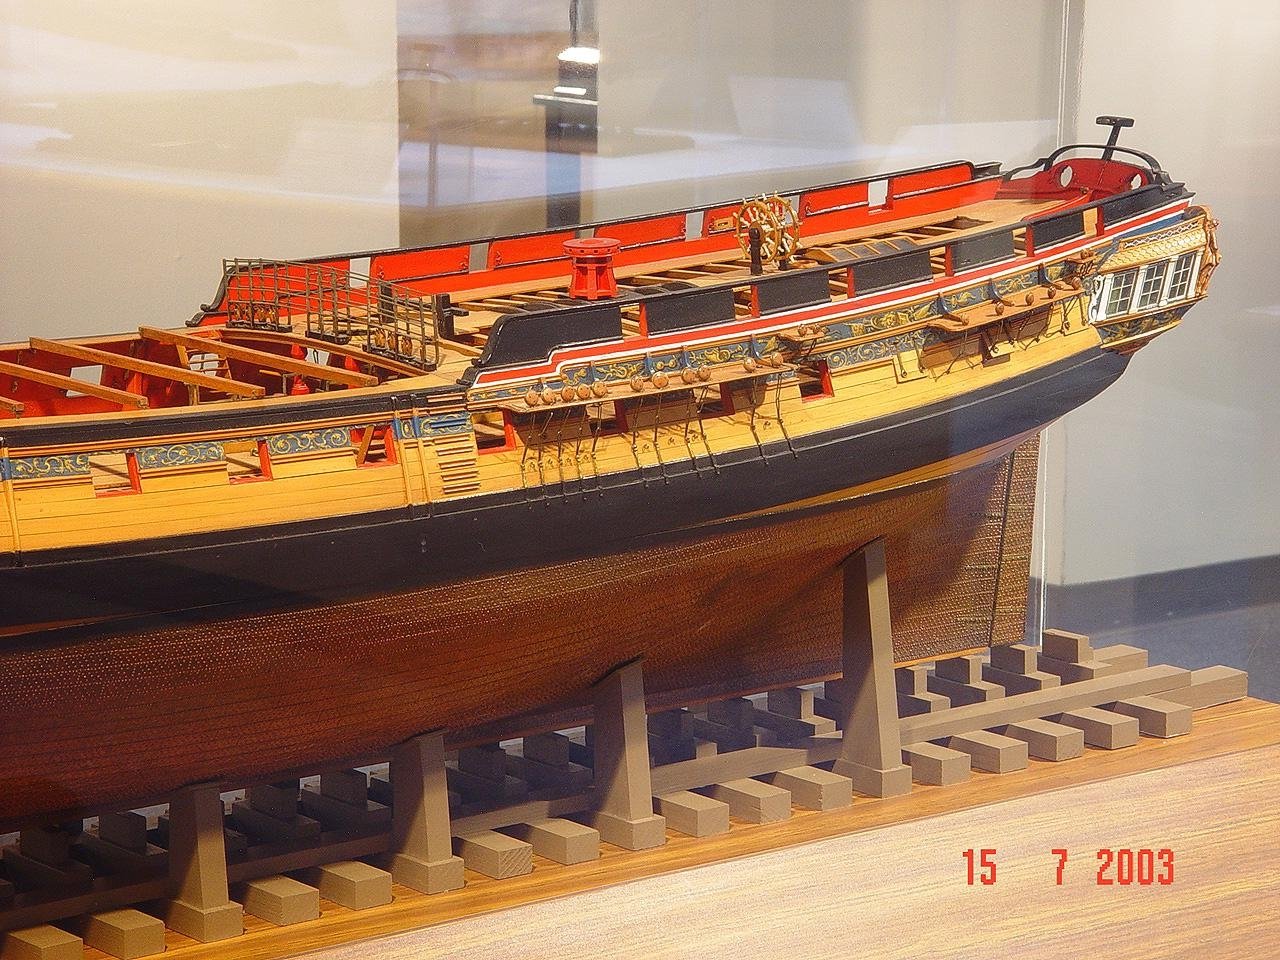
If you are going to paint the bottom white...I would highly recommend that you copy the style of the two contemporary models. Make it so that the entire bottom under the wales is painted OR just leave that small area aft as shown below....The two top photos (Amazon) is quite close to how we will fit out the Winnie by the way....as far as deck planking etc. Just beautiful!!!
-
That is correct.
-
Thats not my thing at all. Do t care for the way that looks but more power to the folks that want that.
- 1,784 replies
-
- 6
-
-
- winchelsea
- Syren Ship Model Company
- (and 1 more)
-
These...but more importantly other features and details that are now trendy to pile into a project. I am taking a step back with this project and using the contemporary examples as my guide. "Less is more".....😁
- 1,784 replies
-
- 7
-
-
- winchelsea
- Syren Ship Model Company
- (and 1 more)
-
That is the fun part and most satisfying isnt it? Well done. Chuck
- 217 replies
-
- 2
-
-
- medway longboat
- Syren Ship Model Company
- (and 1 more)
-
TO SCUPPER OR NOT TO SCUPPER!!!! Whats been on my mind as I study and read and develop as a ship modeler. As you guys know by now, I am taking a somewhat minimalist approach to my model of the Winchelsea. Although I have still included more details for a "kit" project of a frigate than any such project on the market today. Minimalist might not be the best word for it. But like any painter who studies the original master works of old, I have chosen to take a deep study of those masters of our craft for my model. I have shown the scuppers and the drains for the pumps and manger on the plans....but if this project has achieved anything, I hope it has given you that same sense of admiration for the model makers of the 18th century. I hope I have convinced many of you not to take just a passing glance at these beautiful works but instead really study them. Study them for the details that they chose to add as well as those details they chose to omit. The finished works of these early masters are quite beautiful to me in that they dont "kitchen sink" their models. The end result is pleasing to the eye because you are left with an overall picture of the graceful lines, colors and shapes on the finished models. The beauty is not lost because of the vast number of details added just because you can add them....or just because it might show others that your knowledge of such details is very broad. Have a look at as many contemporary models as you can look at....I defy any of you to find one example of a contemporary frigate model that shows the scuppers. I think they would lessen the appearance and beauty of the sheer profile because it would be distracting somewhat. I think the the original masters knew this as well, because it is not difficult to add these details. But you would be hard pressed to spot any old master works with them. So I will omit them on my Winnie but you guys can decide if you would like to add this feature among the others I am omitting. I dont want to hinder your desire to add these features because of my personal decision to go minimalist on this go-around. So this completes Chapter 5 and I will start production of the parts for you guys. Next up will be gun carriages and eyebolts for them along the bulwarks. But if you want to add them.....this would be the best time to add those scuppers. Just some inspiration below!!!! And a great conversation and worth further discussion.....As someone who schooled to become a painter at one of most prestigious art schools, this question was something we also discussed. I think based on the "trend" with current models being developed...it is a very timely question for us as artists of this craft to start asking. -How much detail becomes too much detail? -Should I add every detail to show I have the knowledge of such things? -Should I add them to show others I have the skills to create them with high levels of craftsmanship? -Will they detract from the final work of ART? -How necessary to the finished model are these details? -Is my goal to make as close a miniature representation of the original as possible, or is it to make a as beautiful a representation as I imagine it to be? -Have modelling trends gone too far simply because the technology to create them has made it easier to do so, does this make for a better object de art? Or just "because we can?" Anyway....these are the questions that are suddenly on my mind as I develop these projects as of late. I hate to get all philosophical, BUT I have been studying and reading a lot about the early painters I admire lately and it has crossed over into my thinking about current trends in ship modelling. I would love to hear your thoughts??? Especially from those more experienced builders. Having said that.....here is one of the very few examples where they are shown. I will leave it to you to decide. Although this example is a bit later and much smaller ship....a sloop of 22 guns if memory serves me correct.
- 1,784 replies
-
- 19
-
-
- winchelsea
- Syren Ship Model Company
- (and 1 more)
-
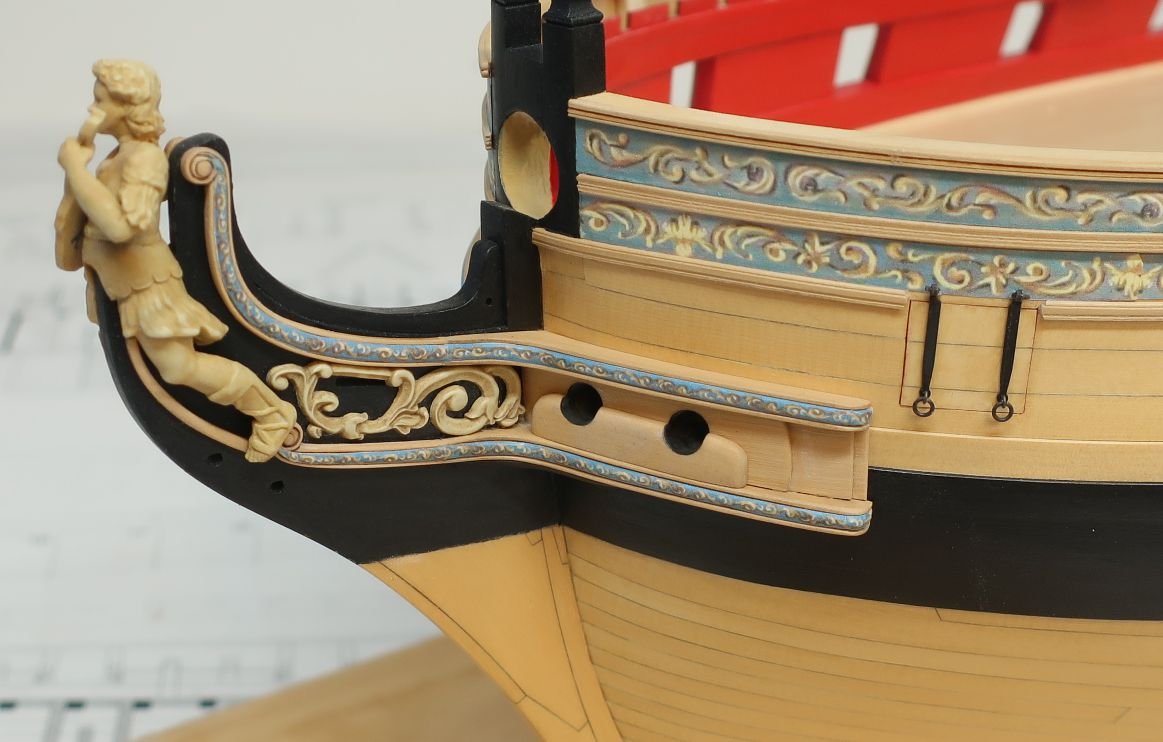
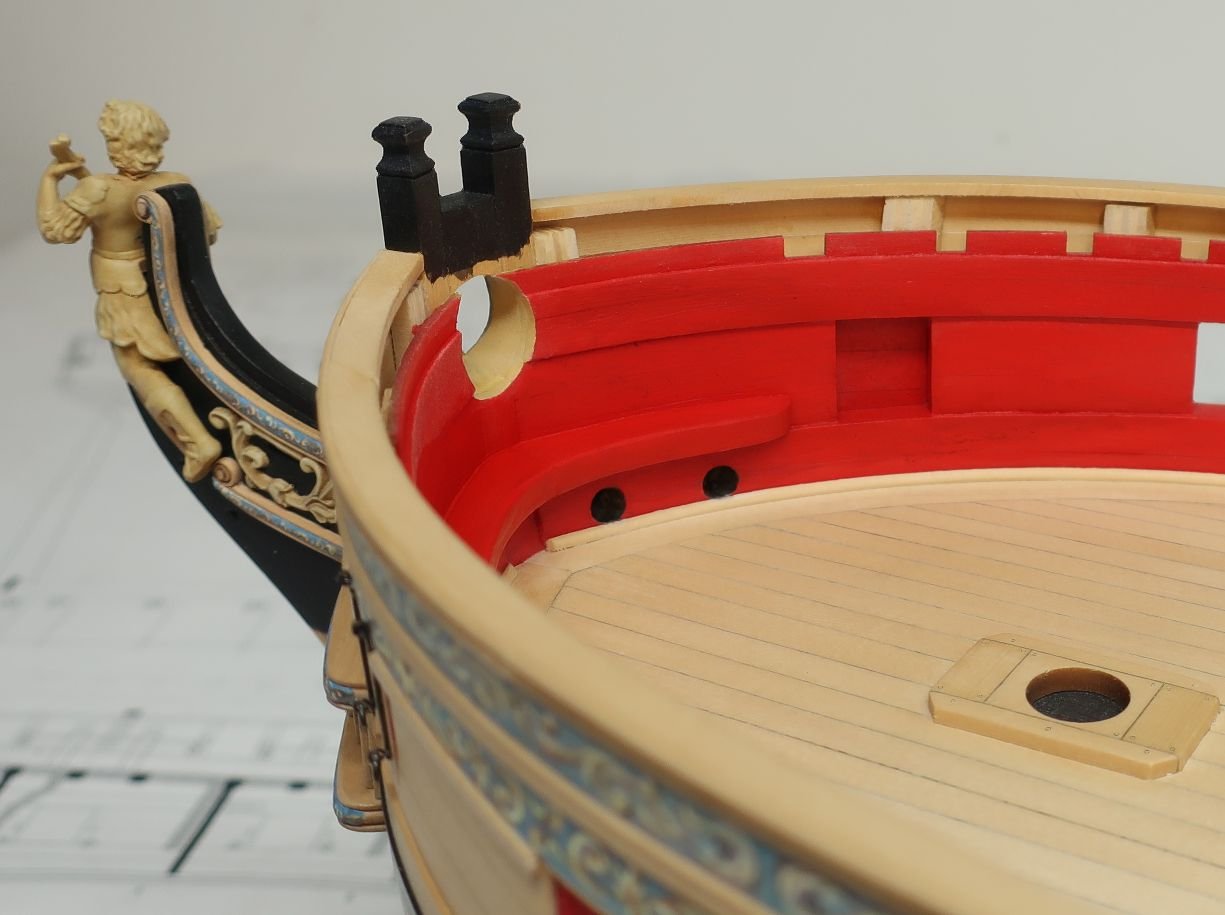
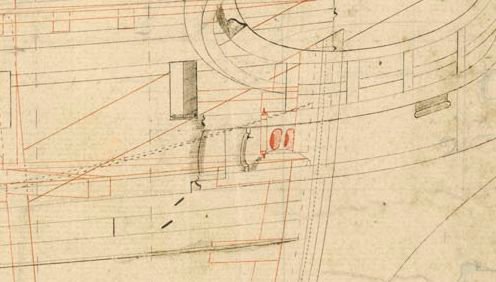
Its a little tricky but the reason why I wanted to mention it is because its a detail often overlooked. In fact I am sad to say that I indeed also forgot to adjust my angle upward when drilling that first hawse hole. Now it wasnt a catastrophe by any means....but it does make me feel stupid. Of all people to forget to adjust the angle even after I went through the trouble of showing it on the plans.... Anyway, this just means that my hawse holes are about 3/64" too low inboard as I drilled straight and level. So this should serve as a reminder to in fact remember to do this. So to drill the hawse holes, I used a much smaller drill bit than the size of the hawse holes. You can clearly see how large you need to make them after you finish the cheeks. Just try to make them parallel to the keel. Then use a small needle file to open them up larger to the finished size neatly. I touched up the edges inboard and out. Then I used graphite from a sharpened pencil to color the inside of the hawse pipe. Some people like to rill up paper but if you do a clean job drilling and filing then a pencil works nicely. Here is a view outboard.....note that the bolster was not glued on when drilling but as soon as the holes were finished up I glued them on permanently. I also used the graphite on the holes of the bolster. Some like to use paint instead of a pencil....they paint the inside of the hawse holes a dark gray. But I stick with a pencil. On the inboard side, I touched up the red pain and colored the hawse pipes with graphite as well. Then I sanded the large knee that you see above them to remove the laser char. This knee is laser cut in two halves (port and starboard) as it makes getting the shape easier. You can more easily get this large knee to fit snug against the bulwarks with it in two pieces. The outside edges were beveled slightly as I didnt want the knee to have sharp edges. Then one side was glued in position atop the spircketting. Then the other side getting a nice tight joint between the two halves. Finally it was also painted red. Note: Yes you can show the bolts on this knee inboardif you want to. But once again, as some of you might call me a minimalist with regard to this model, I have decided not to show them. You can use some 20lb black line to use as your bolts if you like that look. You can see the hawse holes just above the waterway.....they are about 3/64" too low. They should be higher and almost centered on the spirketting. I can live with it though as after drilling the first one I had to follow by doing the same to the remaining three. Once the f'castle deck is on you will never be able to even see the hawse holes under that knee. So all of you .....remember to drill with a slight angle upward so as to have your hawse holes not so low on the waterway inboard. As an addendum....on the actual ship the area inboard around the hawse holes was much more complex with upright timbers and rollers, etc. But this is as far as we will take it unless you want to bash it. This area as I mentioned will be impossible to see so its not worth adding all that stuff and was rarely , if ever shown on a contemporary model. For all of those details should you want to include them....have a look at the Fully Framed series for the Swan Class sloops. All of those bells and whistles are described there. You can actually see one of the rollers on the original draft for Pearl a sister ship....which is very unusual for a draft detail. At least that is what I think that is because its something you dont see on most inboard details on these drafts. Note the knee shown on that draft as well......the top of the roller is inserted into it.
- 1,784 replies
-
- 21
-
-
-
- winchelsea
- Syren Ship Model Company
- (and 1 more)
-
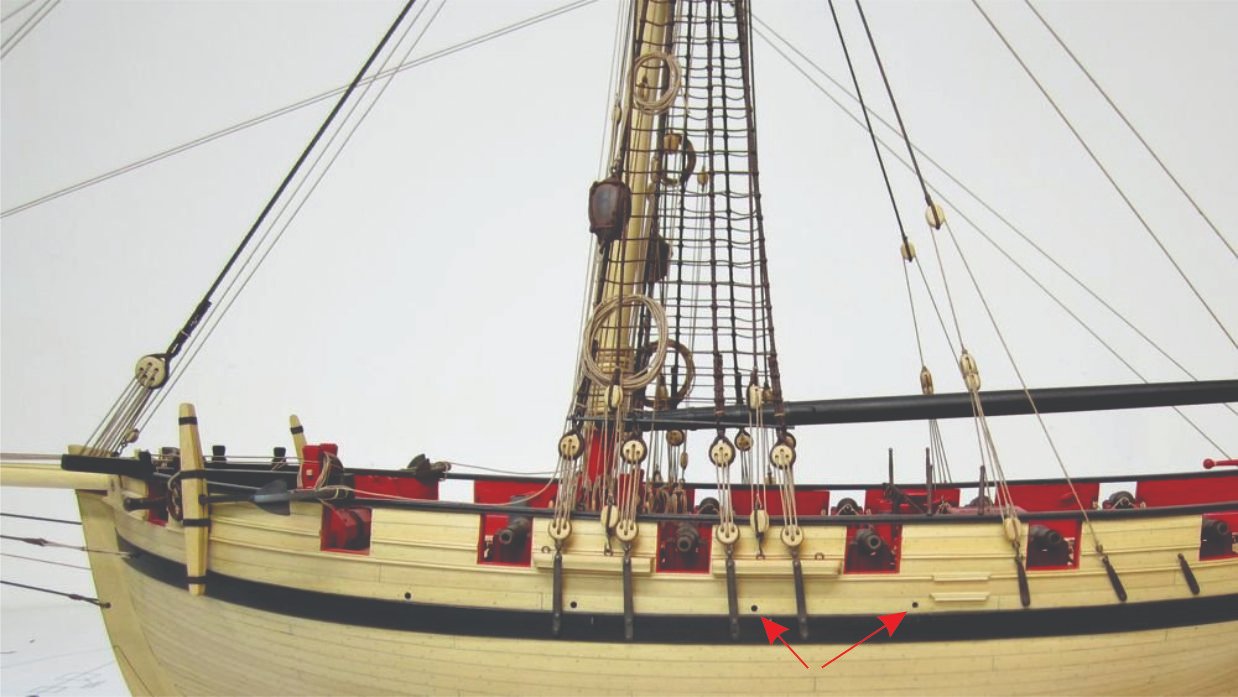
More on this in a little bit.... Hawse holes on actual ship.....curved hawse pipes But we cant drill on a curve so we have drill the hawse holes straight through.....parallel to the keel but at an upward angle like shown below. The slight upward angle as drilled from the outside is crucial. Otherwise......you guessed it....you will drill straight into the waterway and maybe even into the deck inboard. So real important......drill at a slight upward angle to try shoot for the hawse holes inboard being centered on the spirketting. Also note the large knee right above the spirketting.
- 1,784 replies
-
- 12
-
-
- winchelsea
- Syren Ship Model Company
- (and 1 more)
-
I would just user wider strips and call ot the day. It wont matter much in the grand scheme. As long as it is consistent. It would be impossible to tell what went wrong at this pint but it looks like a consistent issue which is great. Just use wider strips for the last two planks.
-
Sloooow Doooown.........Enjoy the ride. ⏱️ There is absolutely no reason to rush through the build. Plus you will just end up waiting for the next chapters to be released.
-
Thank You....No CNC.....Its 100% laser cut and engraved. It took about 2 dozen attempts and maybe more to achieve that look. Lots of experimenting. I tried to push the limits of the laser technology as much as possible.
