HOLIDAY DONATION DRIVE - SUPPORT MSW - DO YOUR PART TO KEEP THIS GREAT FORUM GOING! (Only 68 donations so far out of 49,000 members - Can we at least get 100? C'mon guys!)
×


michael mott
-
Posts
5,200 -
Joined
-
Last visited
Content Type
Profiles
Forums
Gallery
Events
Everything posted by michael mott
-
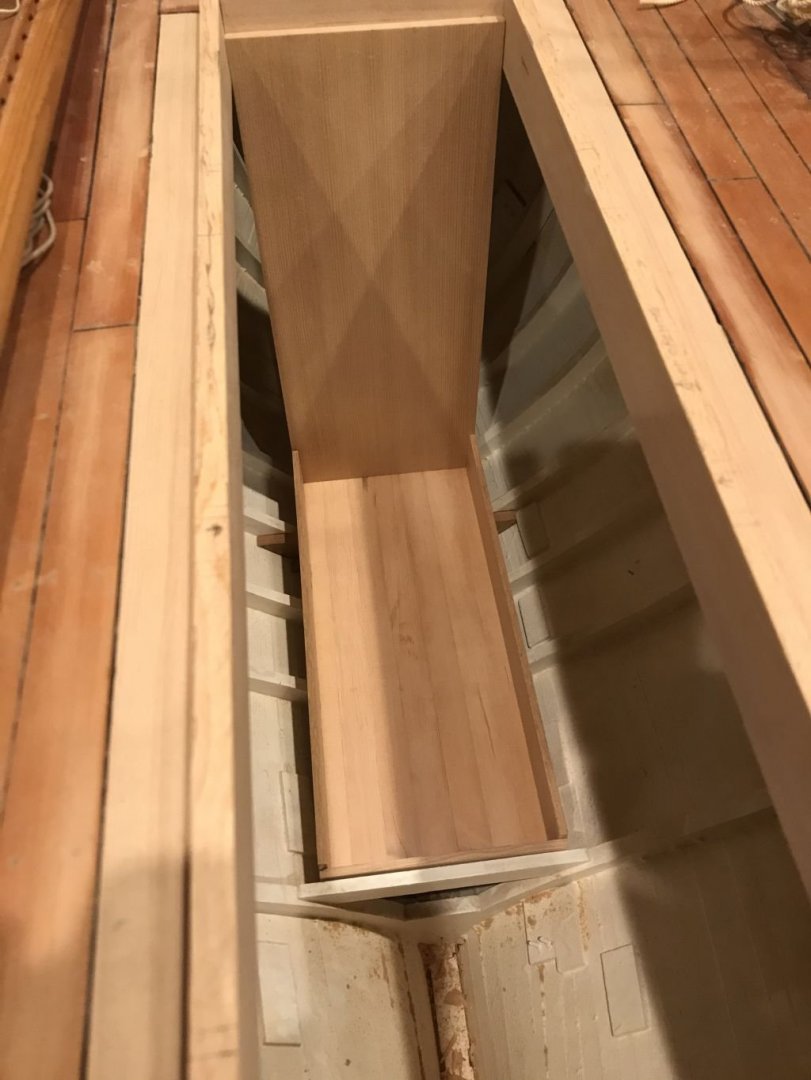
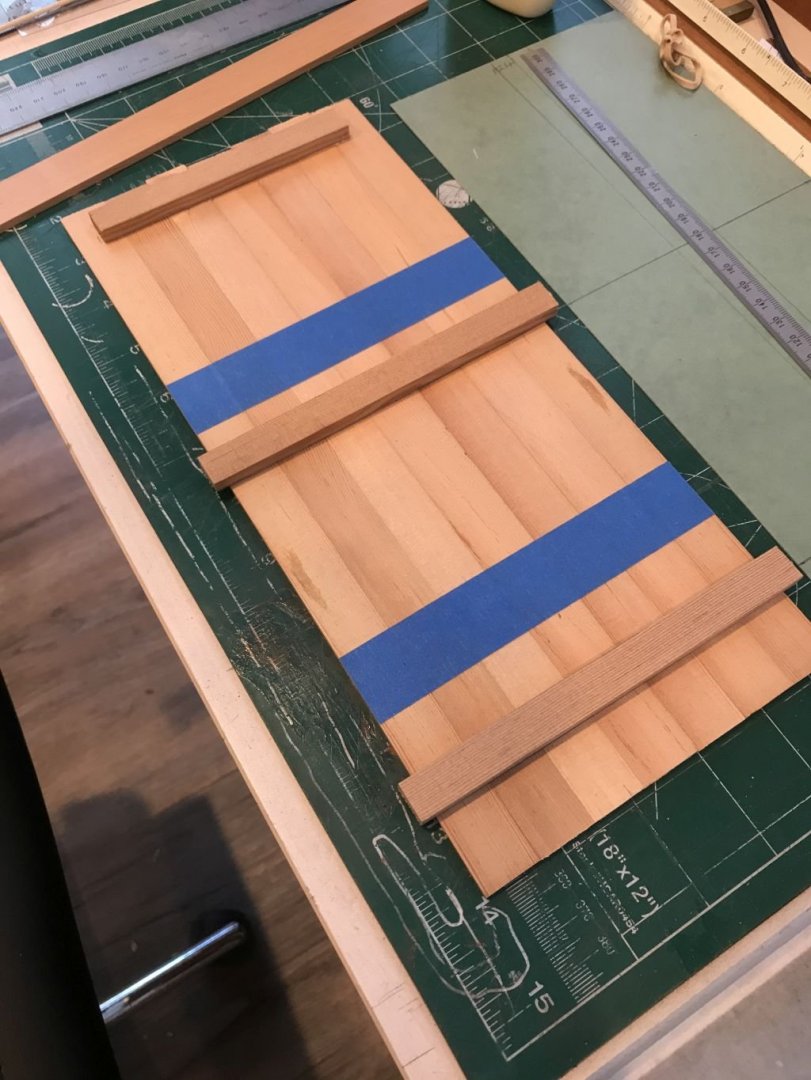
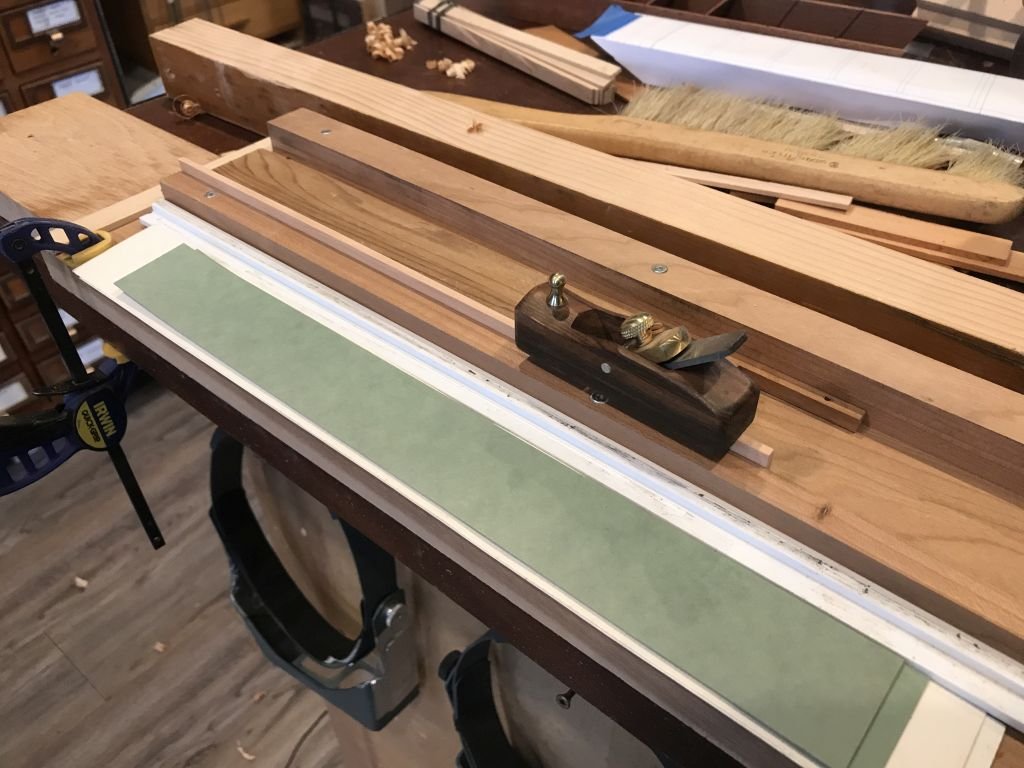
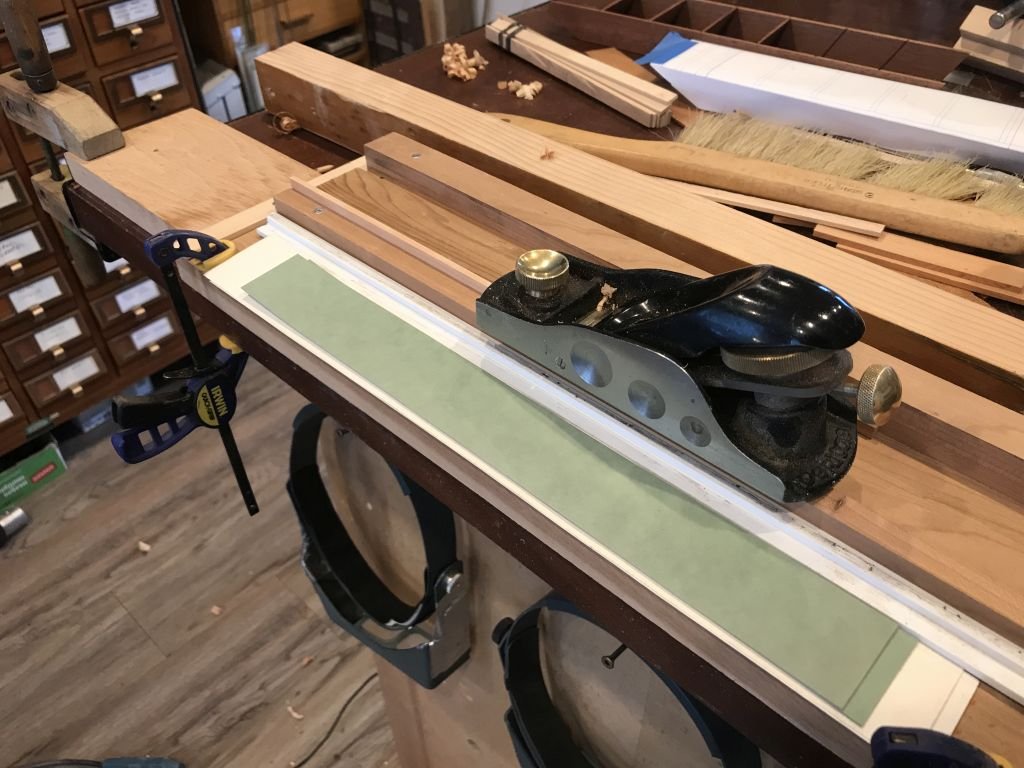
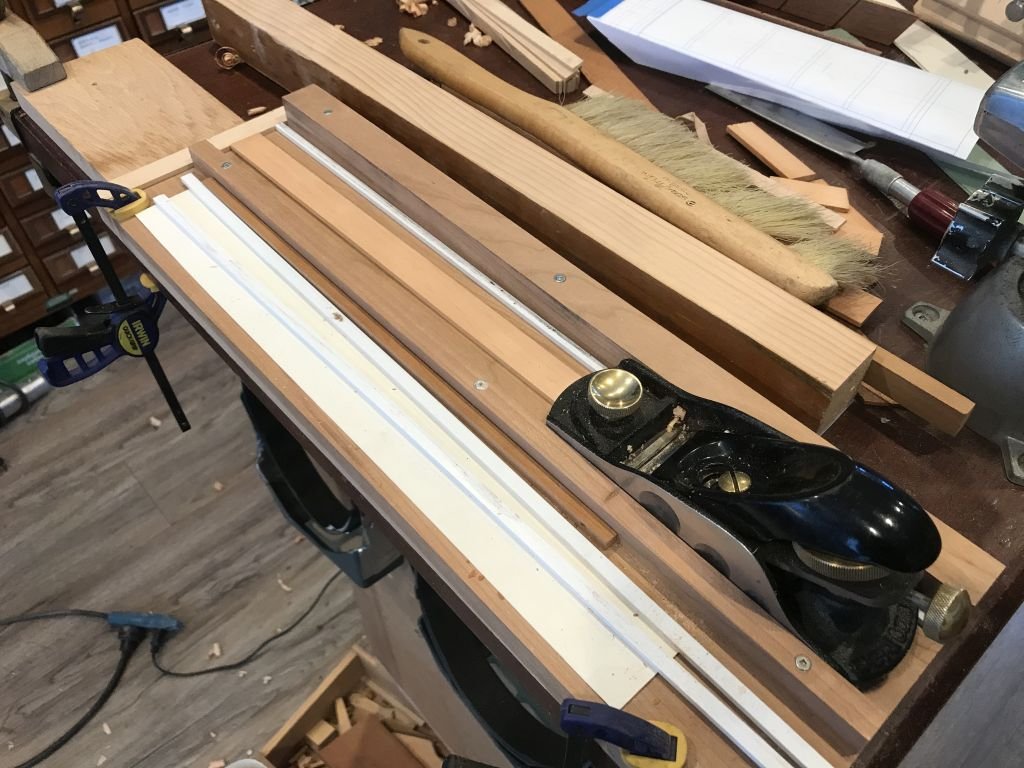
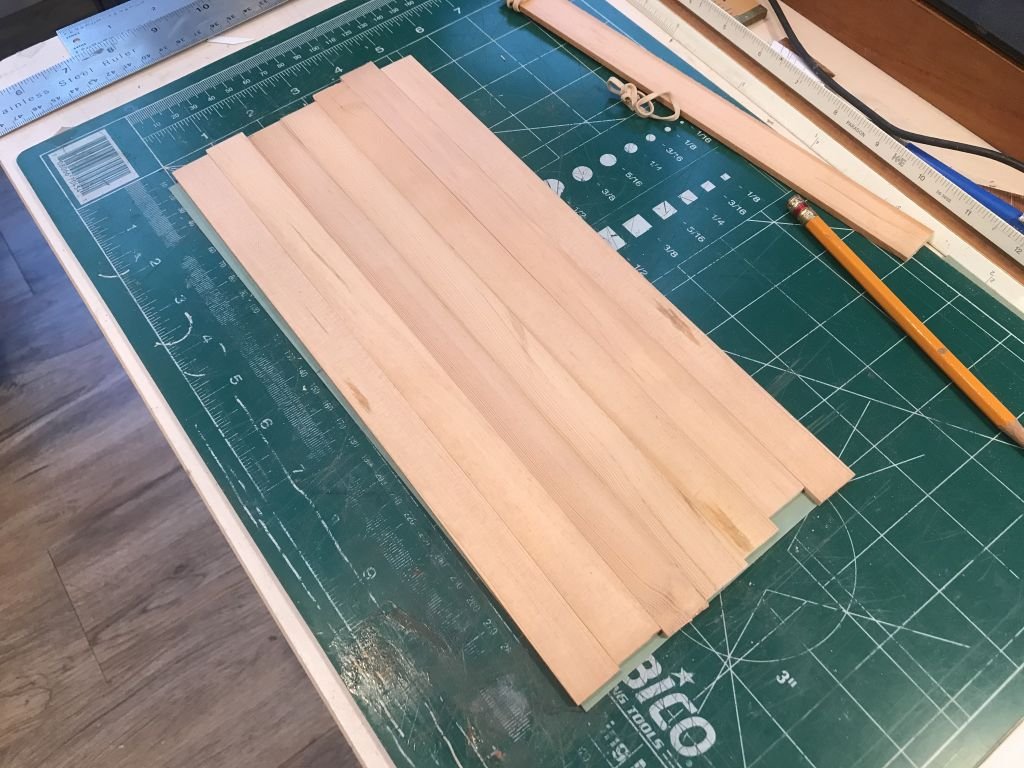
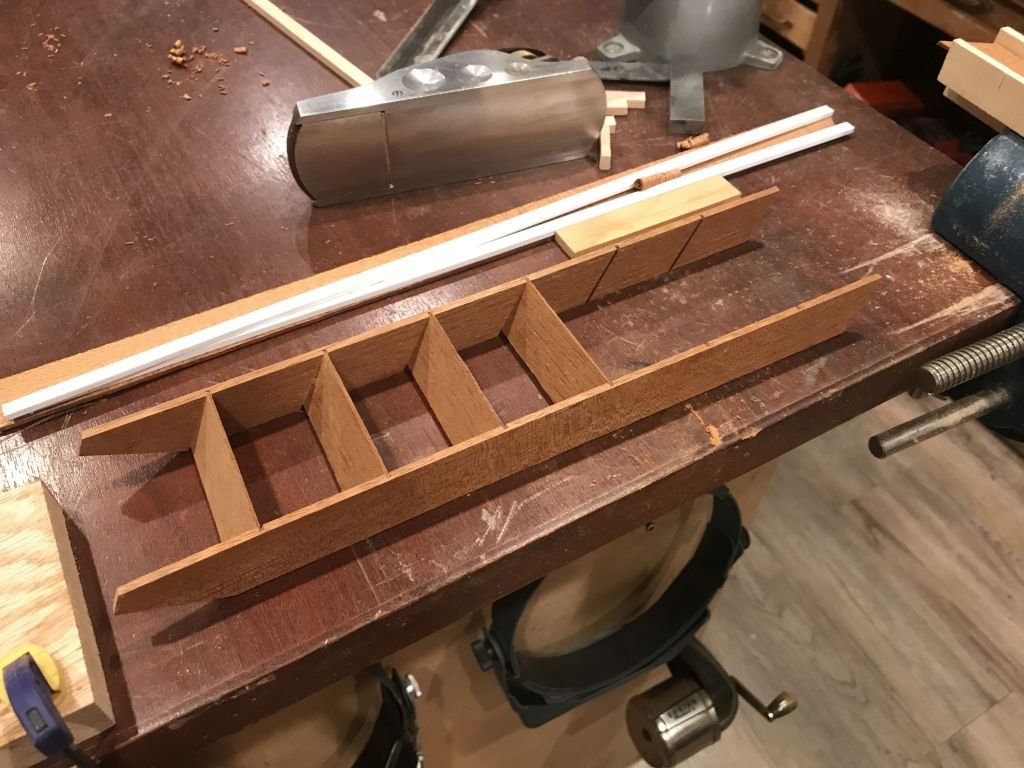
 Pat and Druxey thanks. and thank you to all of you who added the likes, I really do find them supportive and encouraging. Now that the proof of concept has been sorted it was time to begin with the base structure, I chose some 6 inch by 1 inch clear fir boards for the cabin floor these were thicknessed on the small hand thicknessing jig. first the flat side then the edges, I used some spacers and a wedge to hold the boards upright to clean up the edges and with one of the miniature planes for scale. The floors boards were cleated on the underside with some 4 x 1.5 inch cross beams for the forward vertical support wall (bulkhead) I planed up a bit of Western Red Cedar that had a nice tight grain, a bit of careful planing to match the width of the opening and ensuring that all was square before gluing it all together. I glued the main elements together oyt of the hull because it is just so much easier. The horizontal boards are 10 1/2 inches by 1 1/2 inches. thin after the glue was set I dropped it back into the hull to set up the aft piece of floor that the ladder lands on. The aft section of floor is nine inches higher than the main floor. Once it is set up I can begin to work out the elements that fit onto the sides it reminds me of the pull outs on the modern RV's Michael
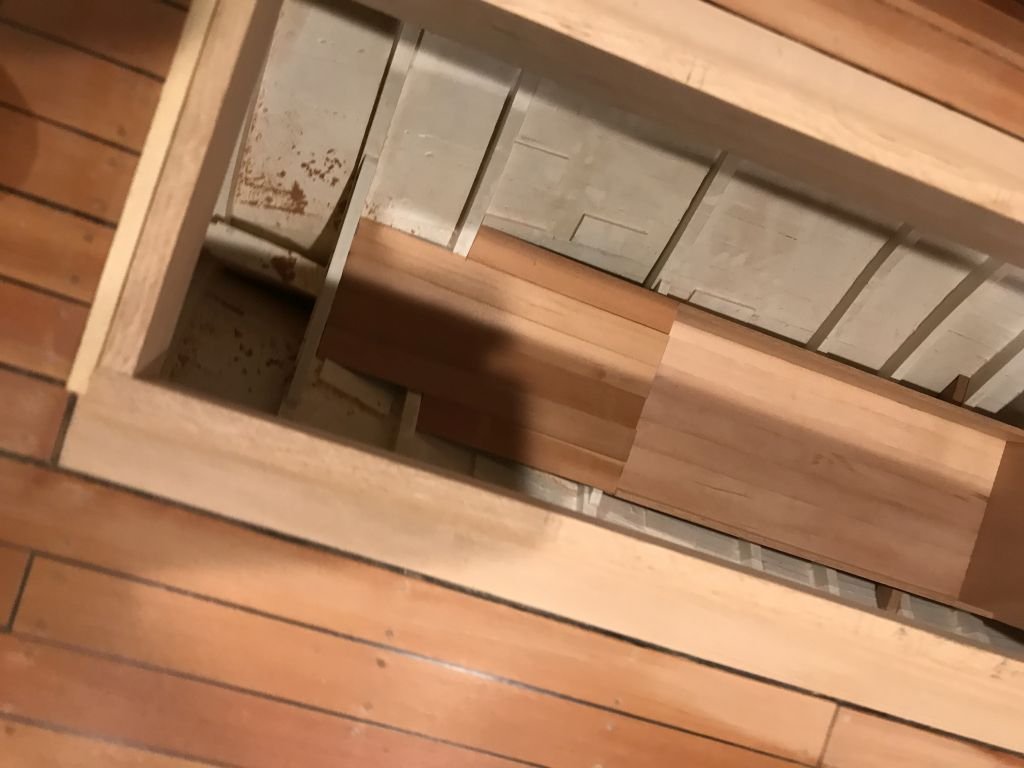

-
Johnn, in your close up picture I see that you are using a sleeve type tool to push the rope over the the end of the stave. How are you opening up the rope before sliding it over? Thanks. The results are really superb. Michael
-
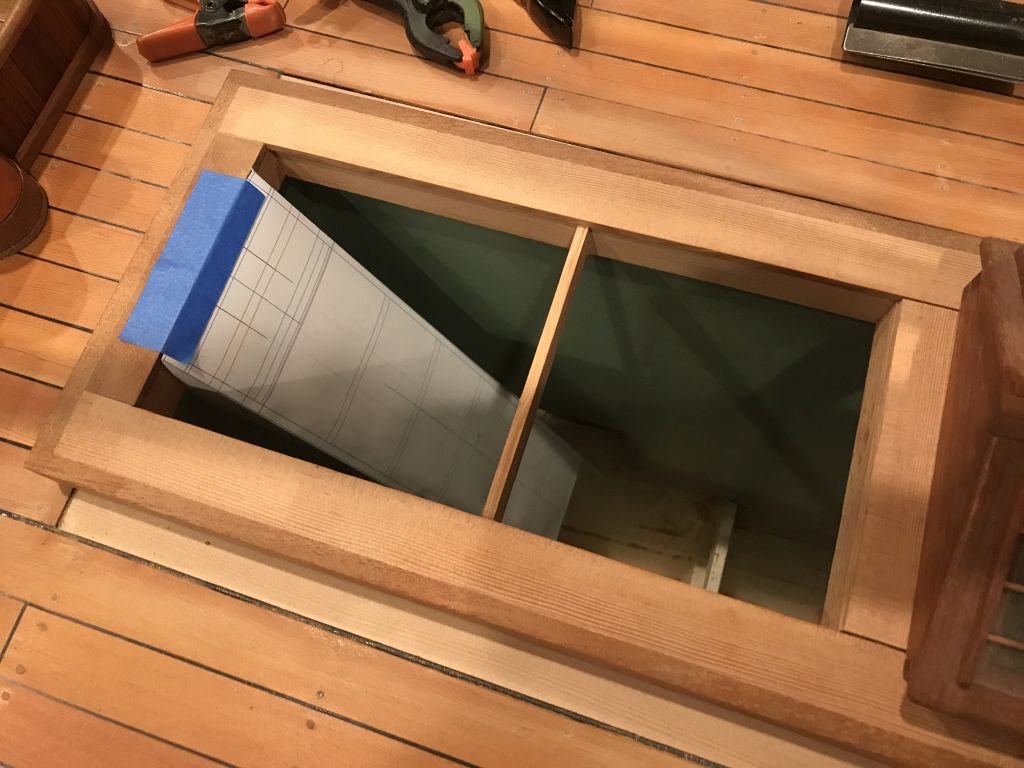
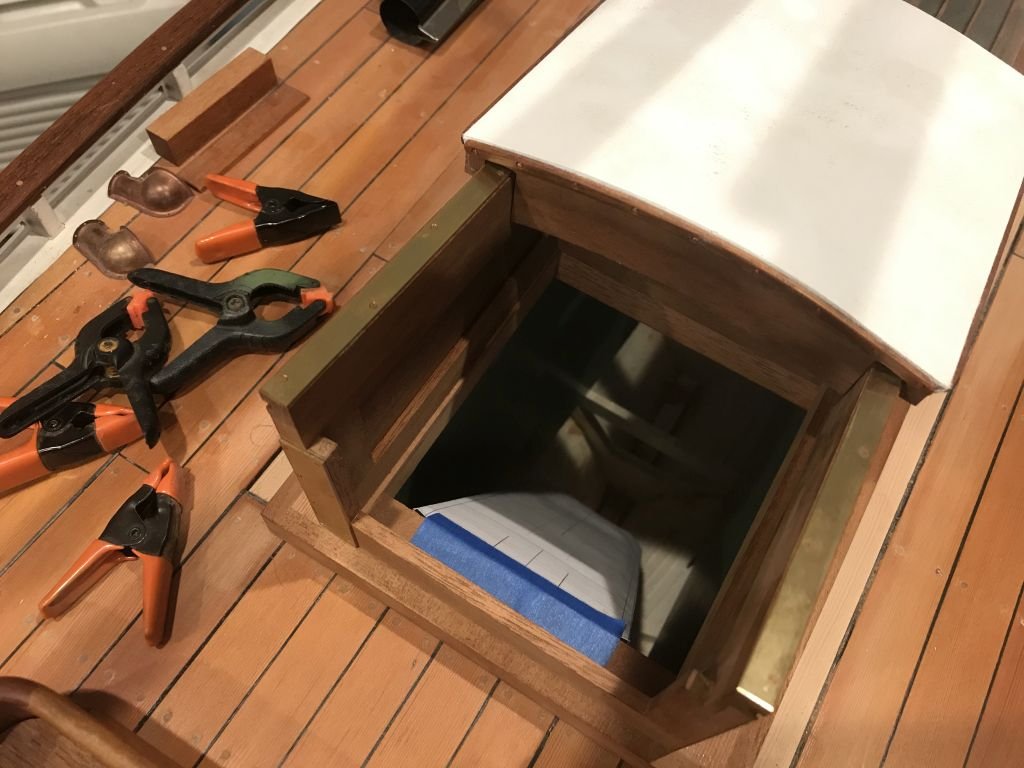
Today I did a clean up of the shop and made a better mock up of the ladder into the cabin and put a card floor to better see the area I have to work with. Tomorrow I can start the structure of the interior elements. Michael
-
Girona by augustus
michael mott replied to augustus's topic in - Build logs for subjects built 1501 - 1750
Looks good, and a happy New Year to you. Michael -
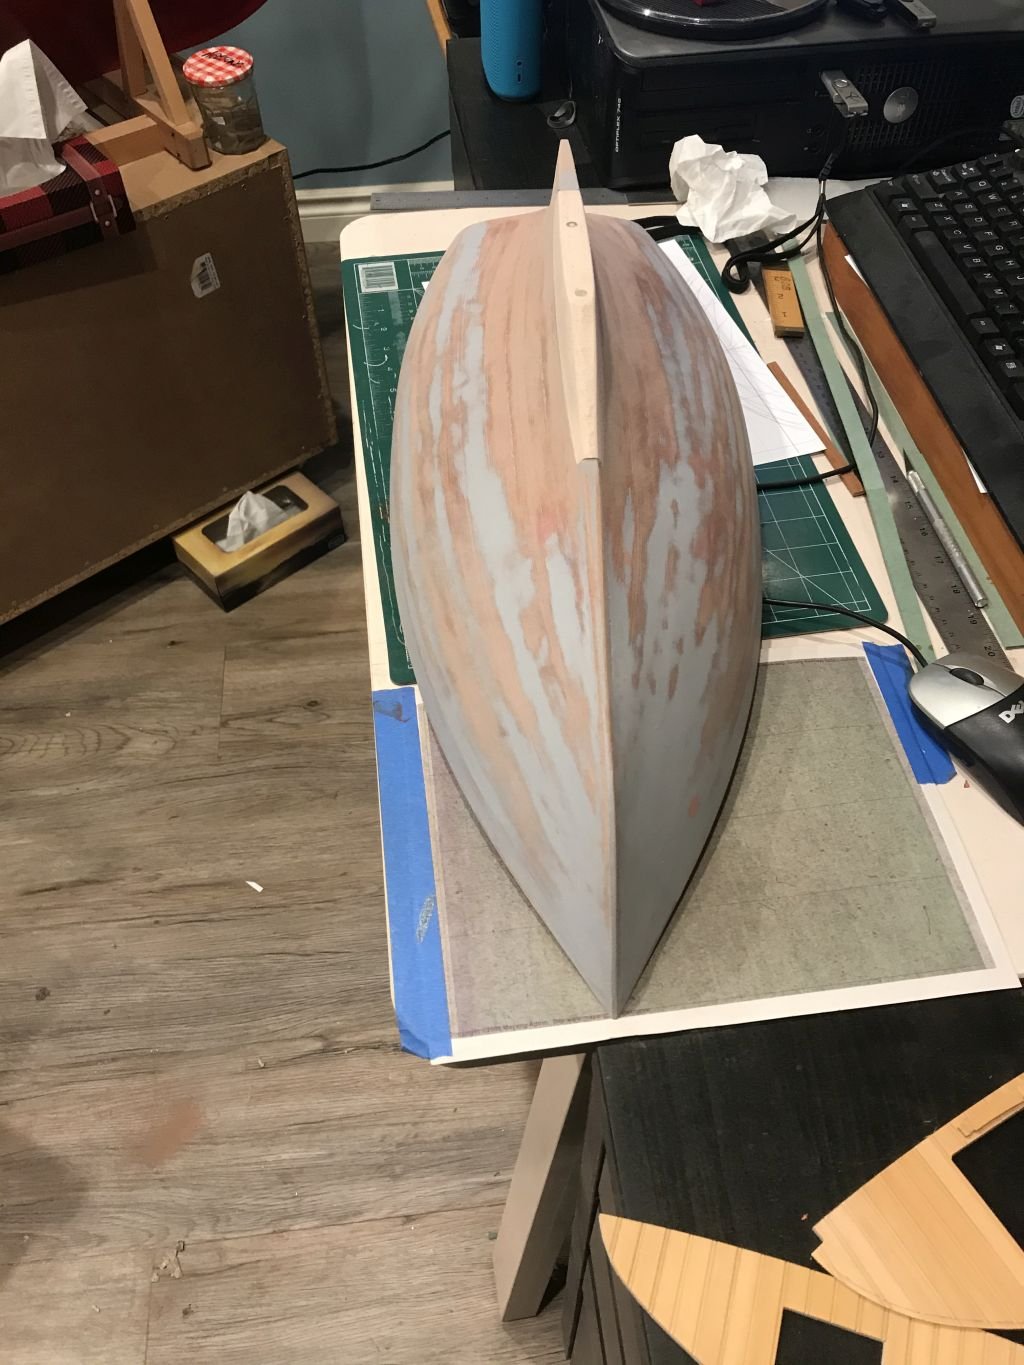
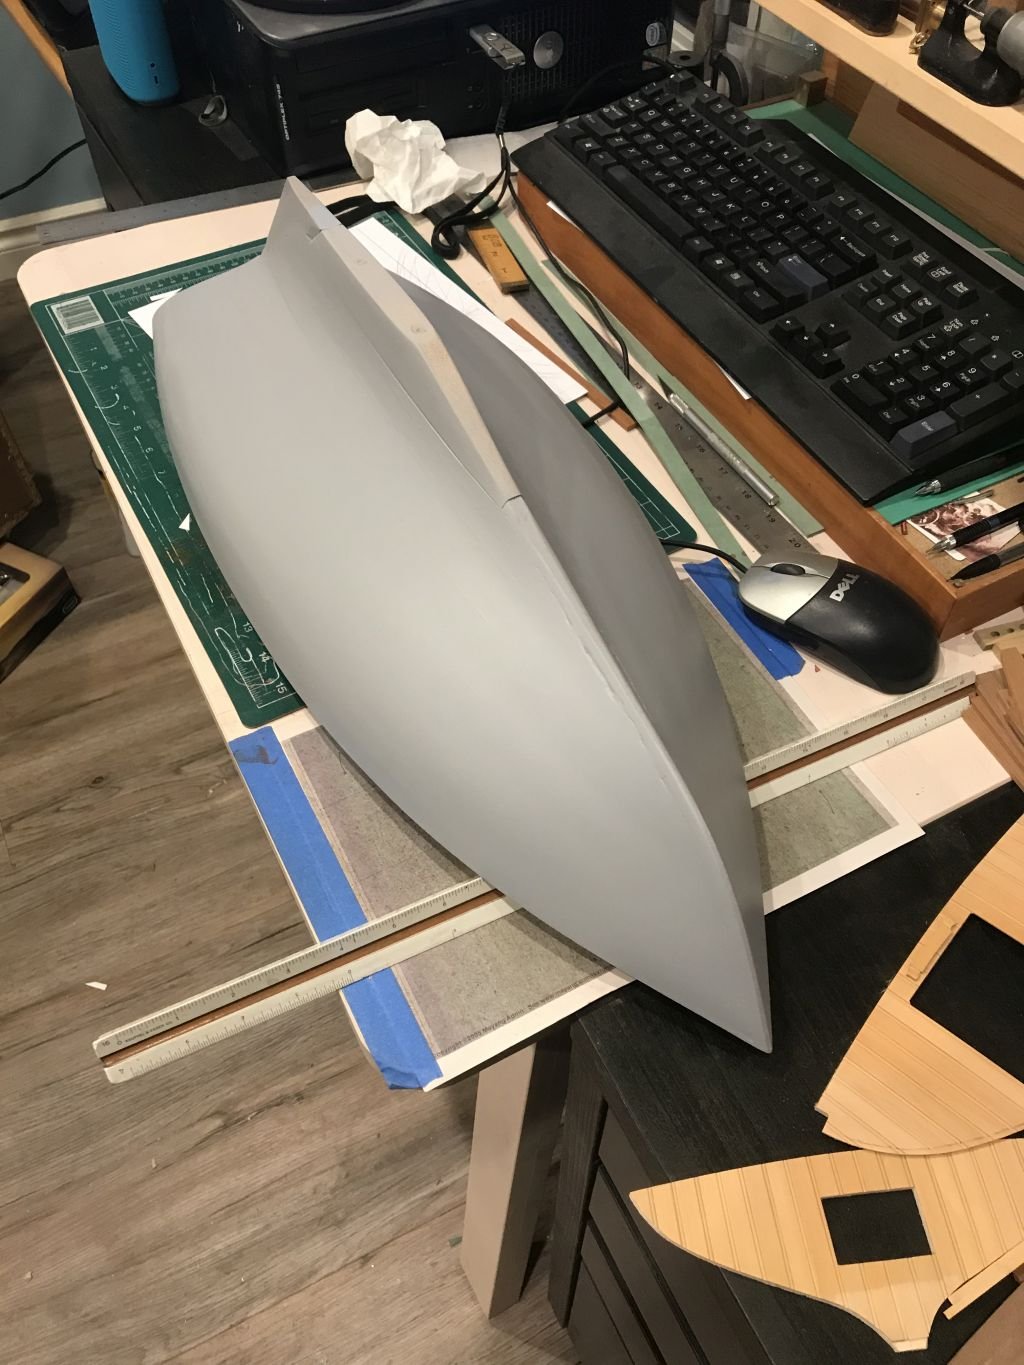
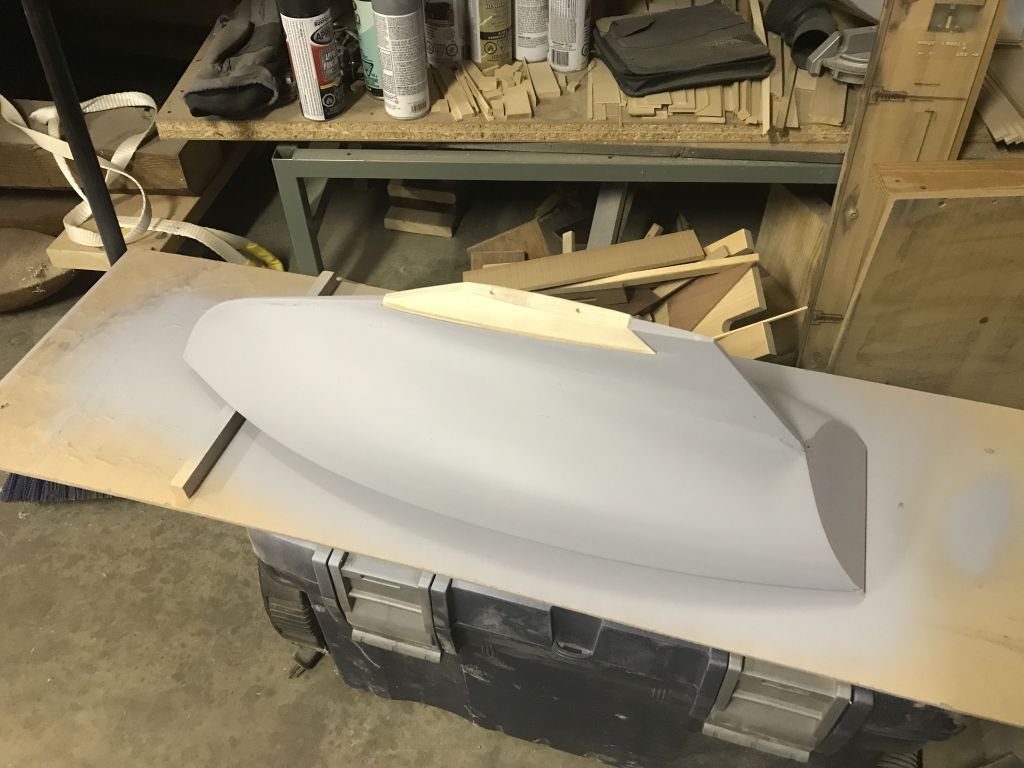
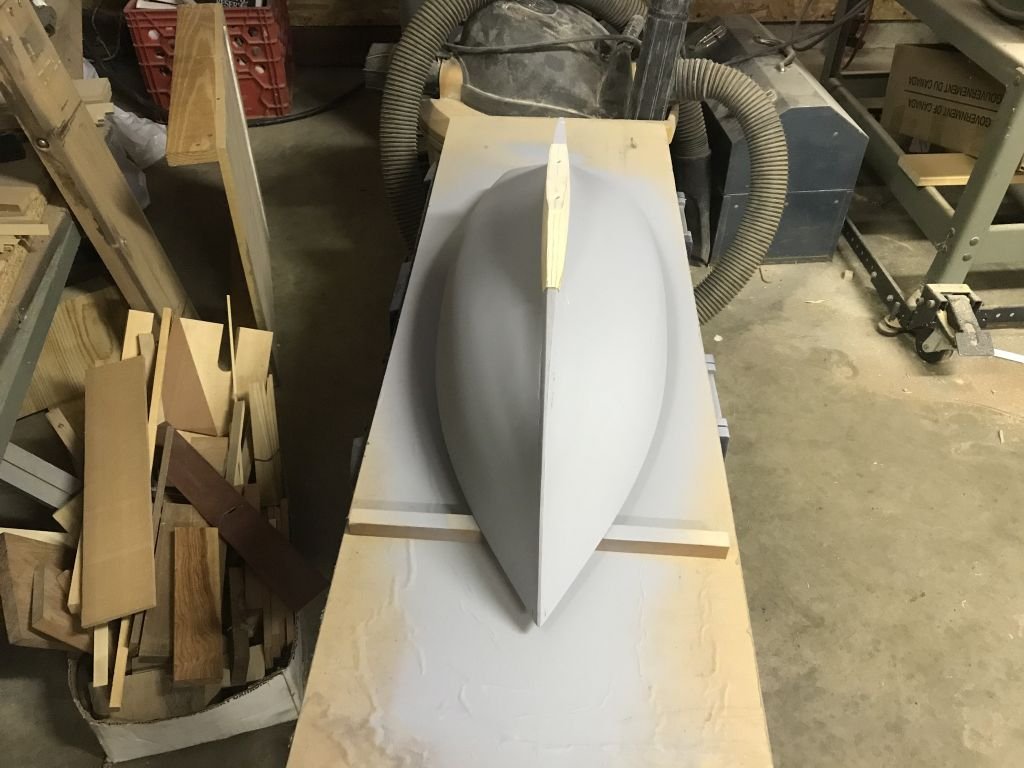
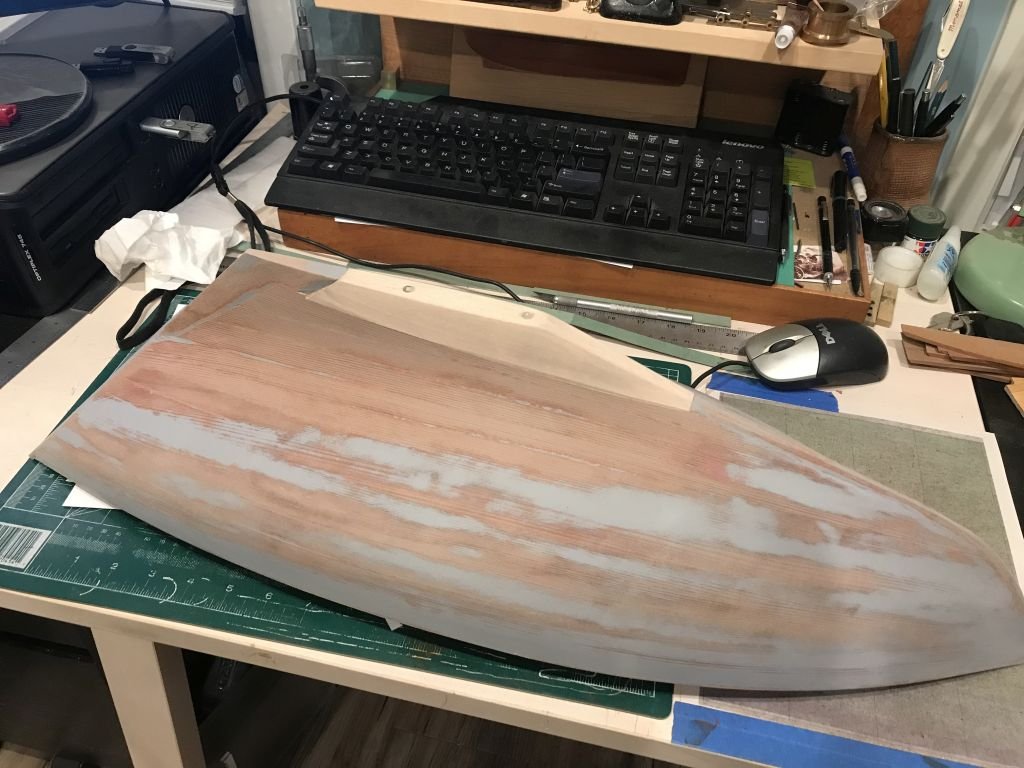
Well certainly a week of picking up on older projects. Today I started to make the pattern for the keel ballast weight. I also decided that the hull will be painted. The planking on this hull is not as good as I would like for a varnished hull perhaps on the next one. so a coat of primer and the rough block from some poplar that I cut when we lived at the lake. Build part 37 Then an afternoon of sanding to fair the planks at the stern-post and the pattern for the ballast Another coat of primer ready for more sanding tomorrow morning. So I will be working on both the Buzzards Bay 14 and the cutter for the next little while. Lots of Herreshoff deck fittings to keep my metalworking side happy. Michael


-
Just finished catching up Geert, Some lovely work it is inspiring me to get back to my Buzzards Bay sailboat, So many projects! so little time. Seeing the painted hull for some reason it shows off the form of the hull in a more soft way than seeing the planks, I like the colour as well. Michael
-
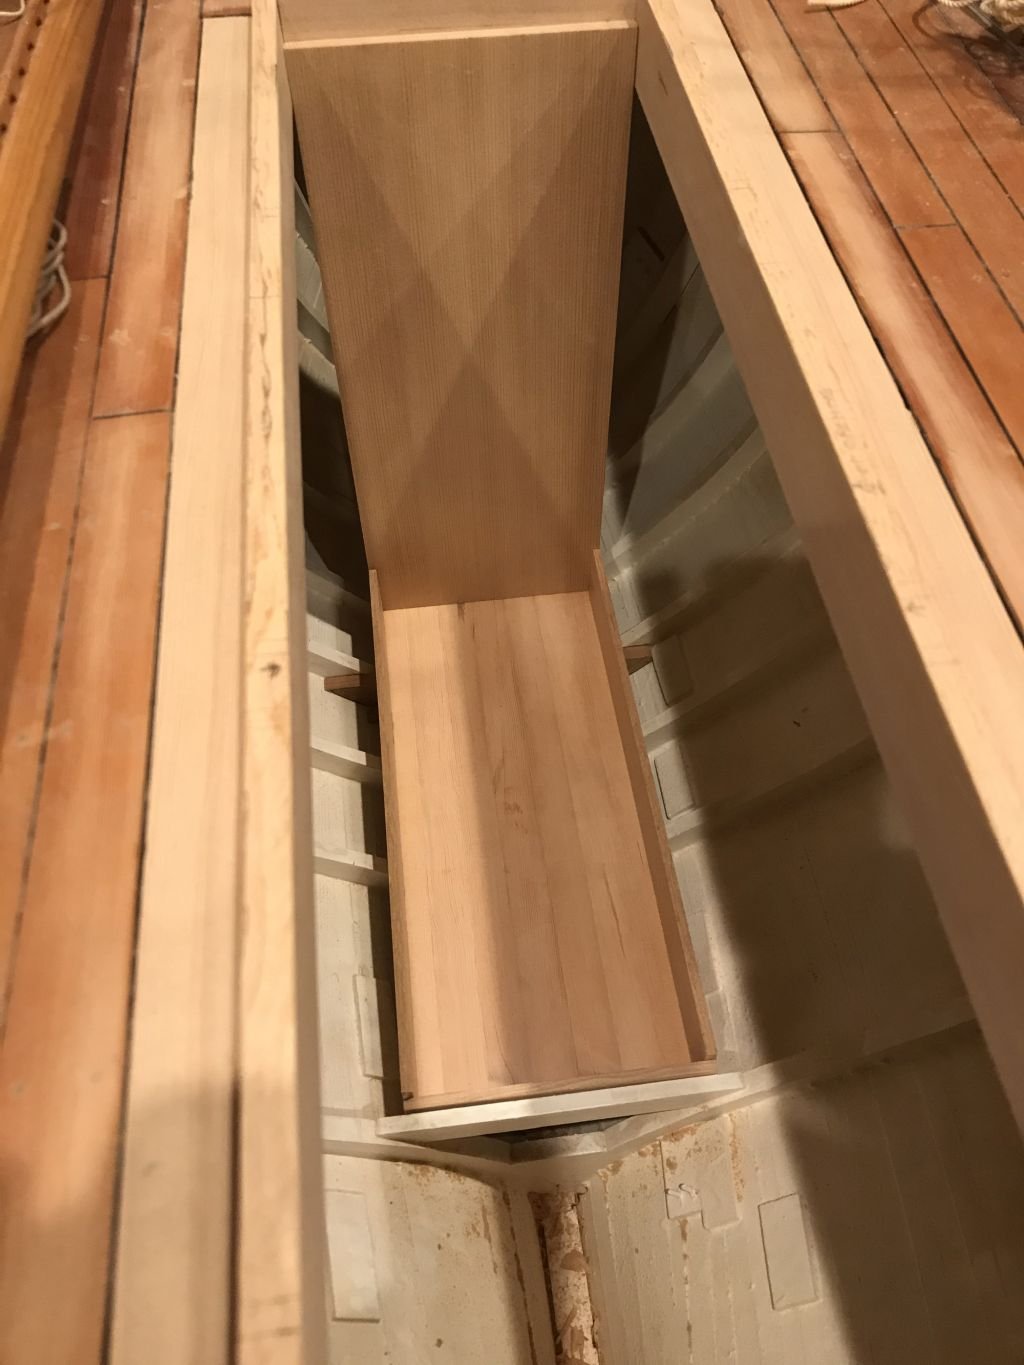
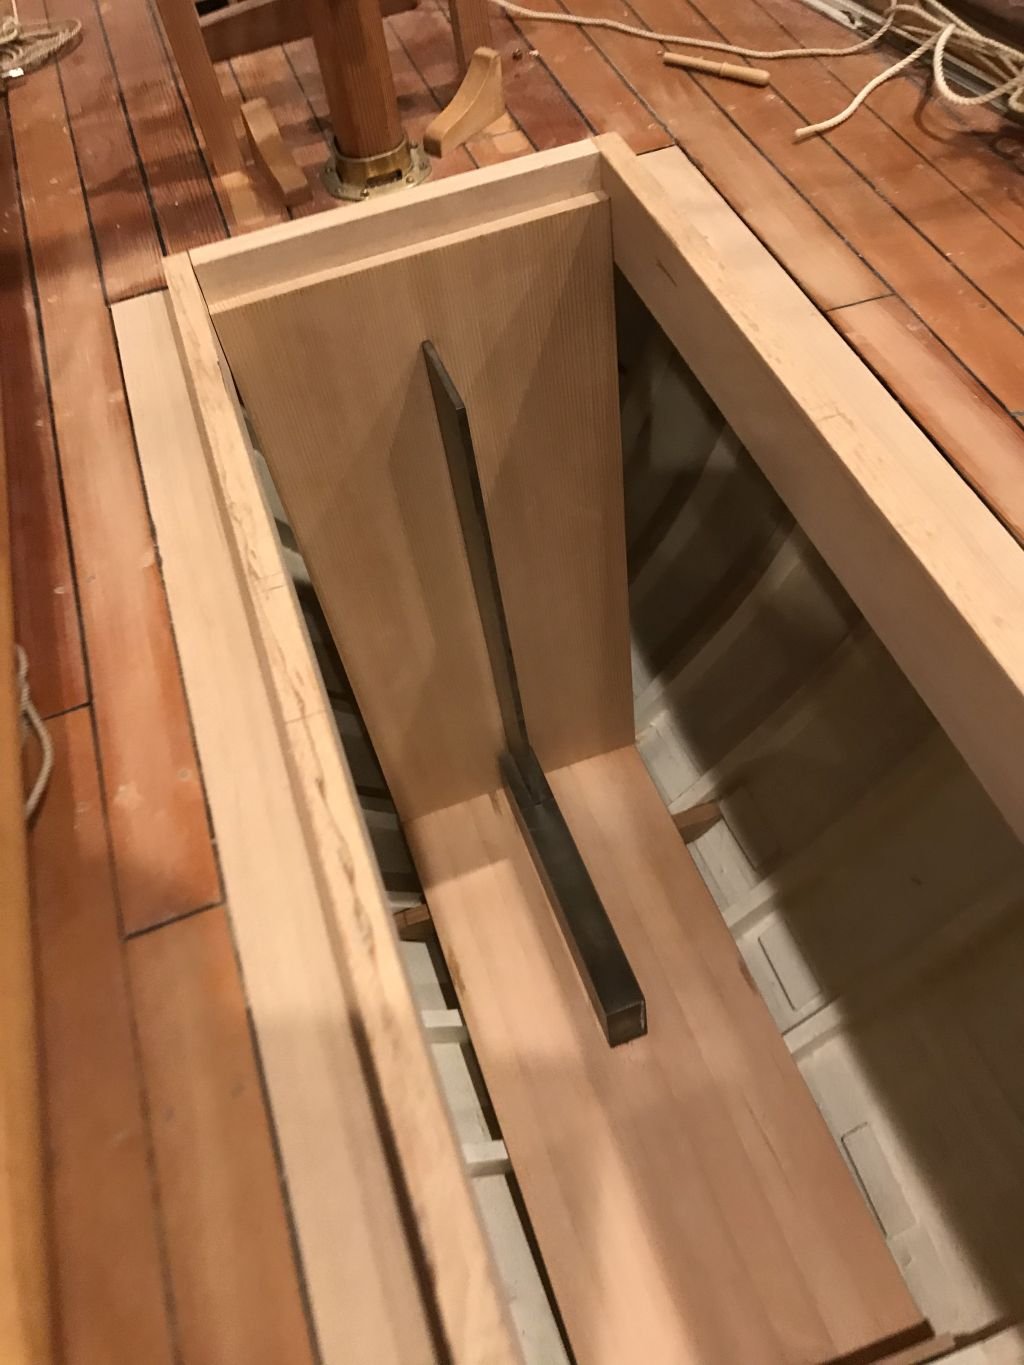
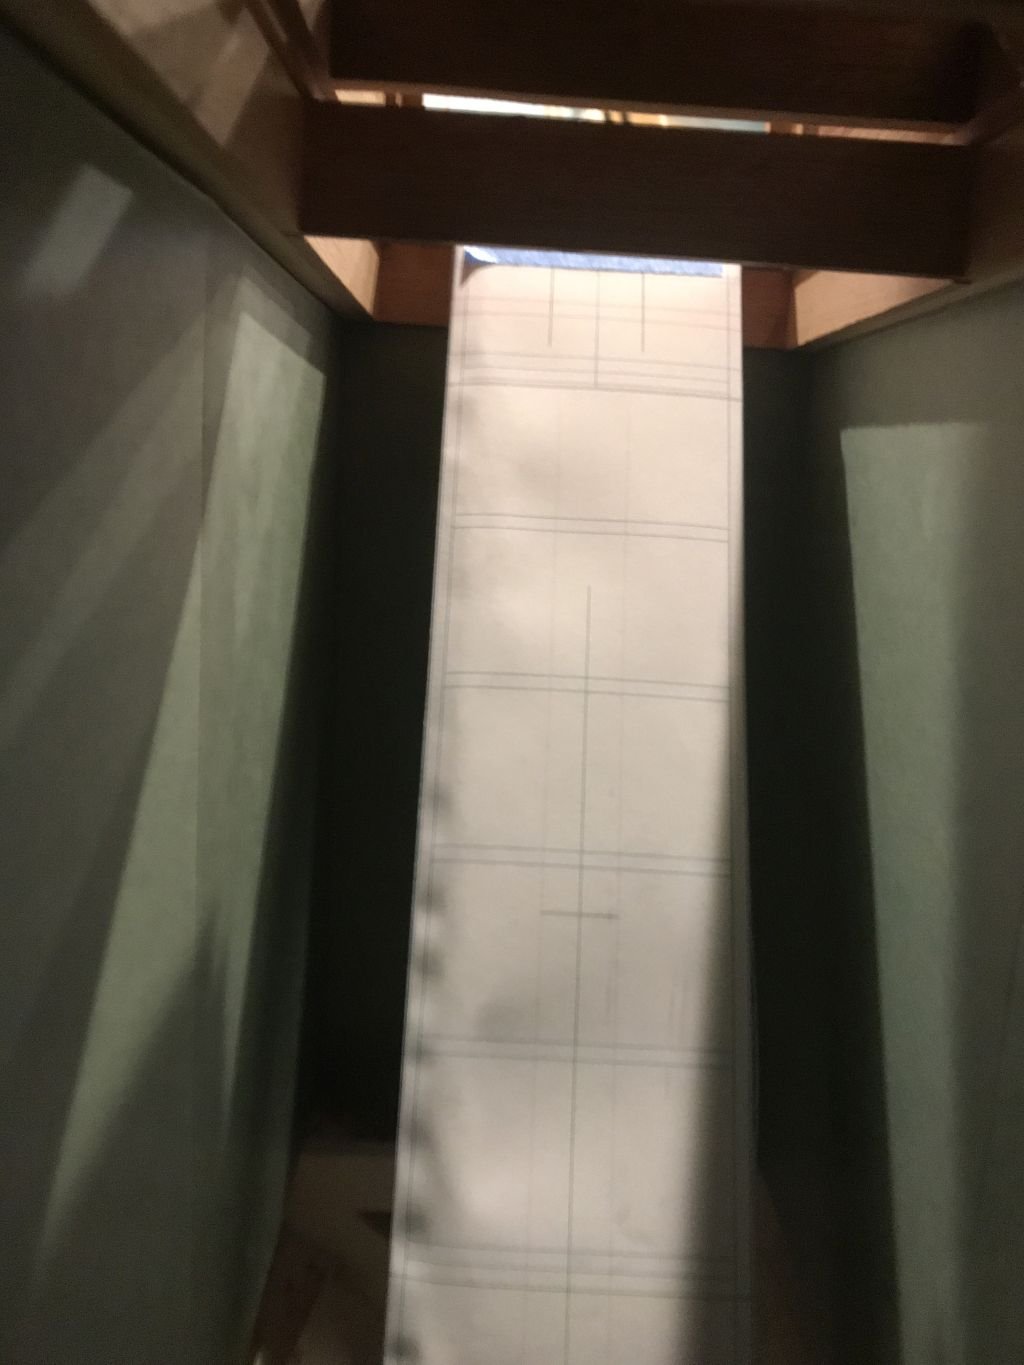
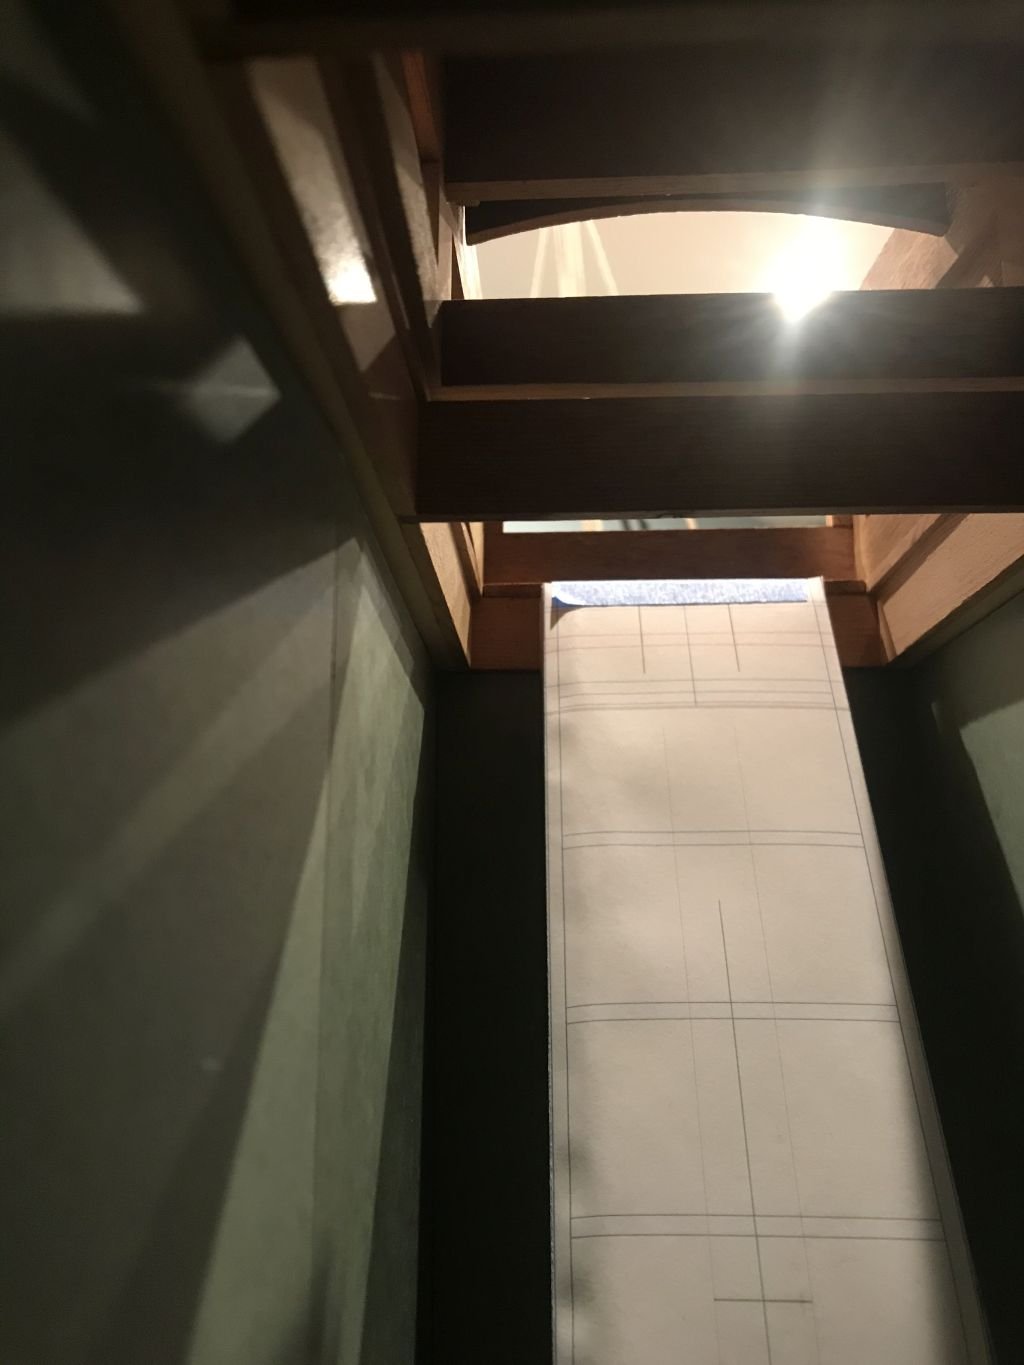
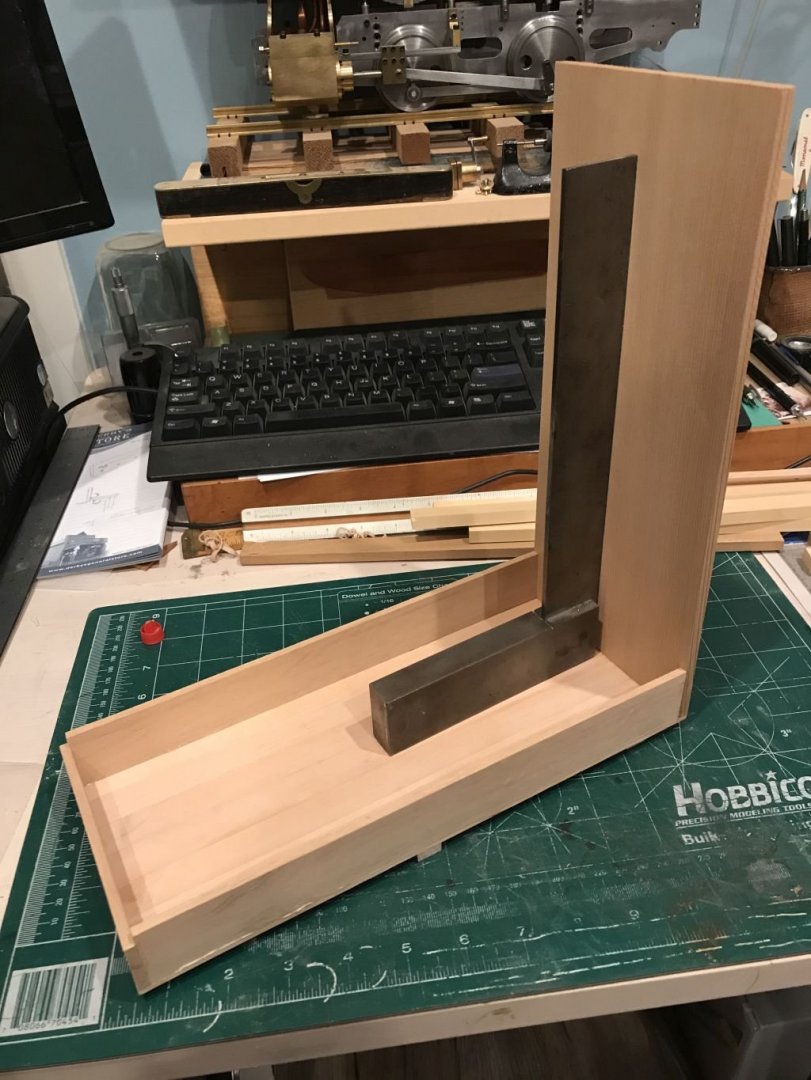
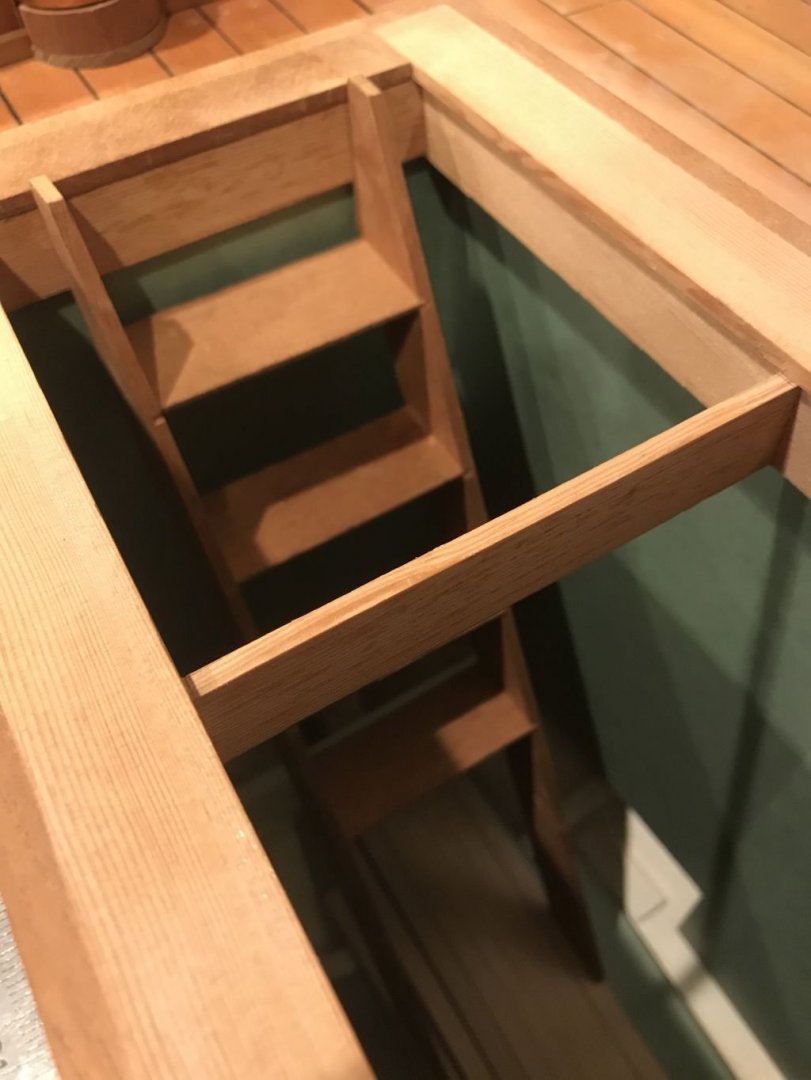
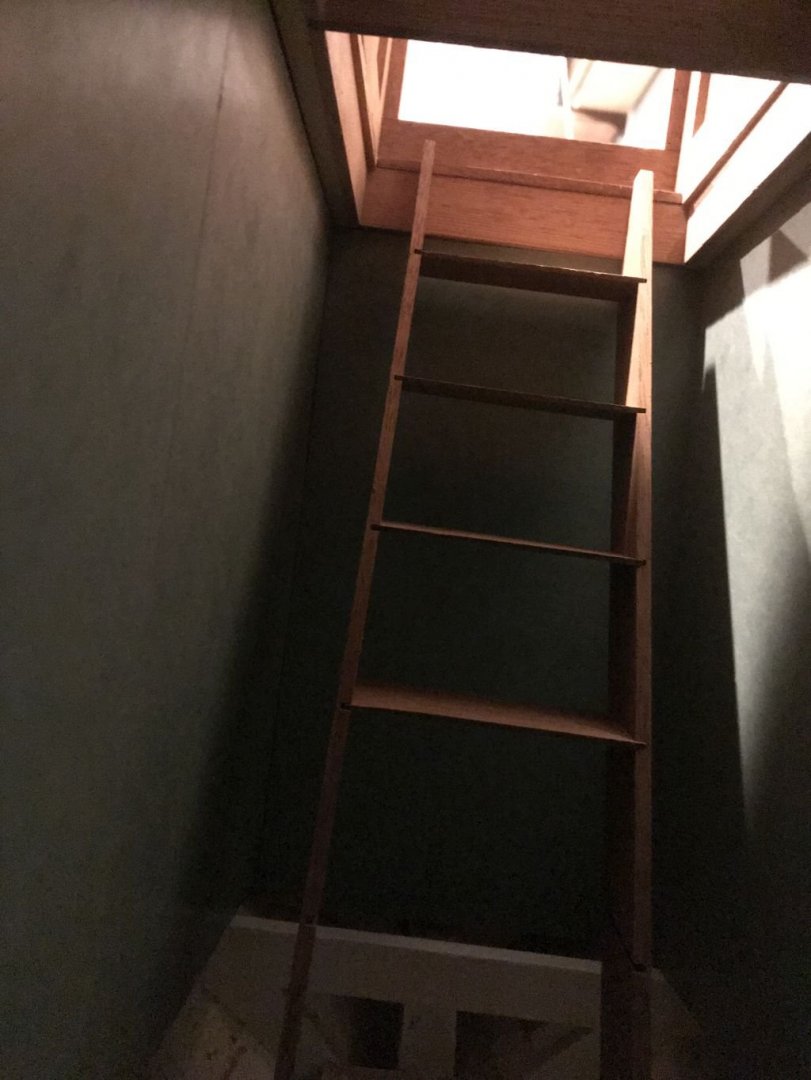
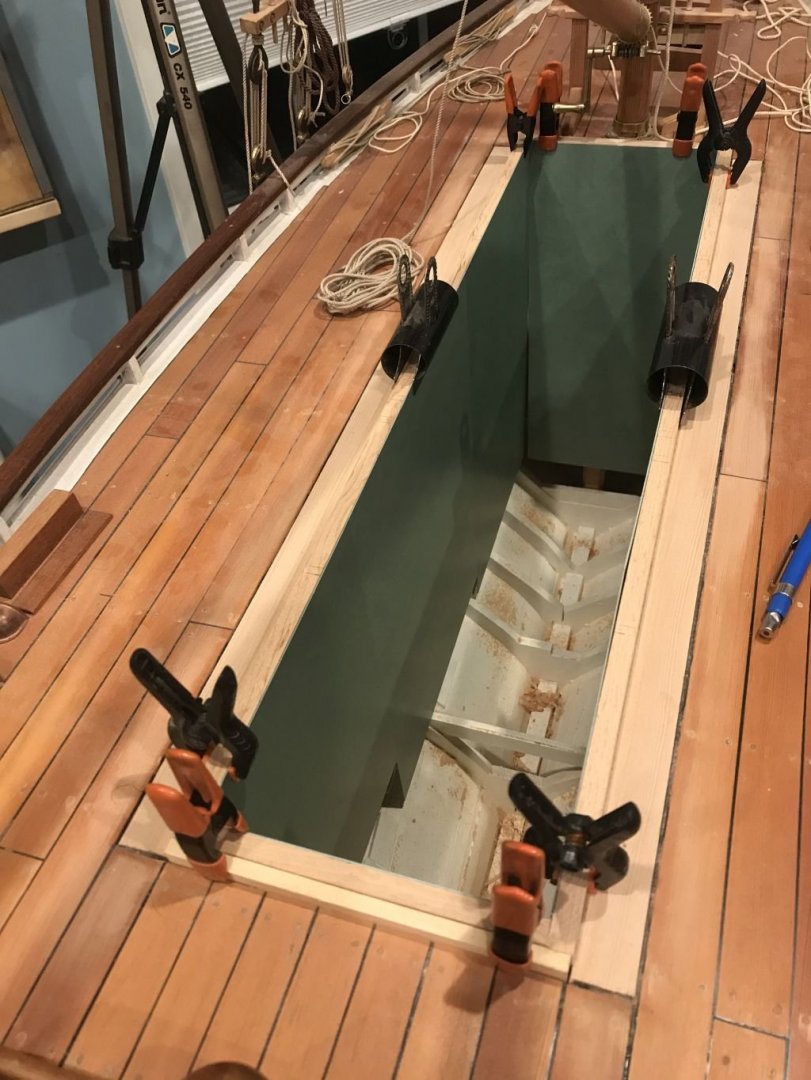
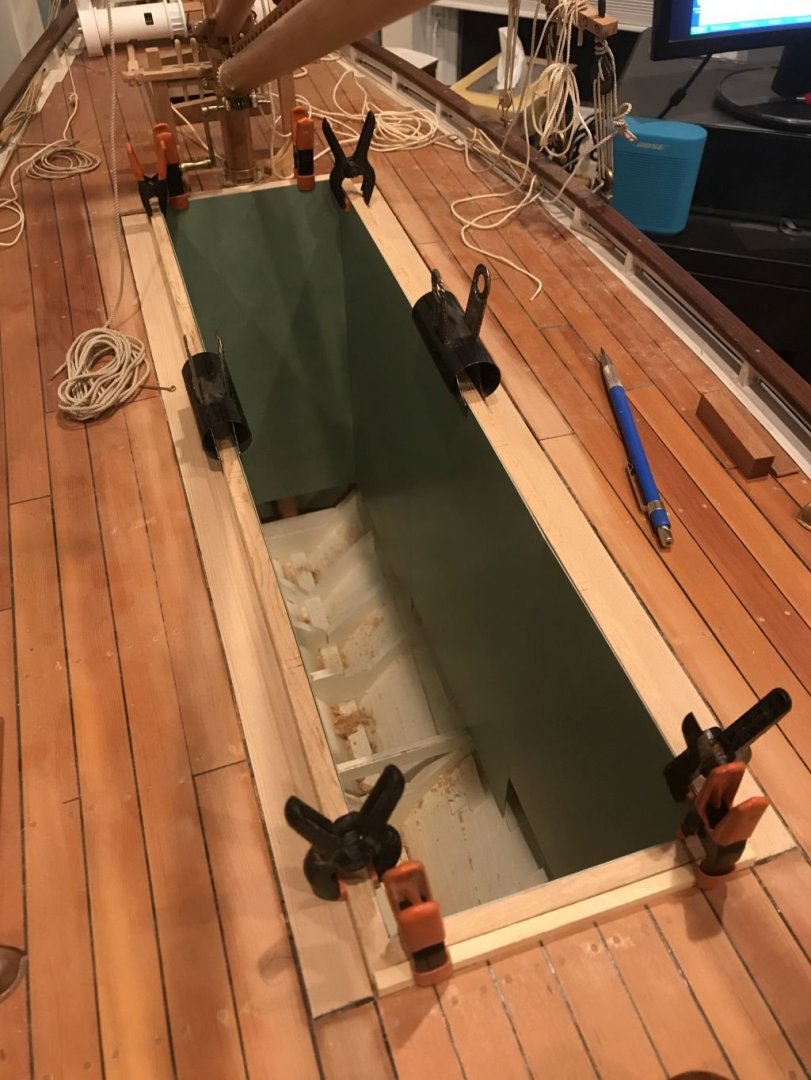
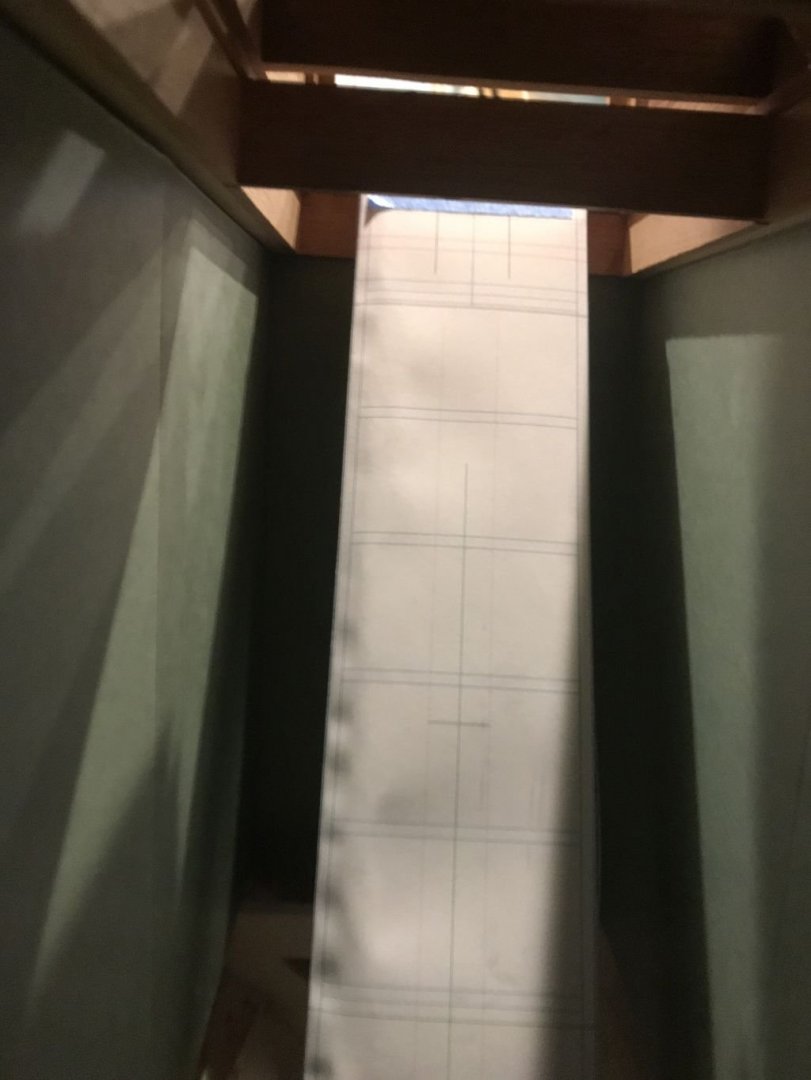
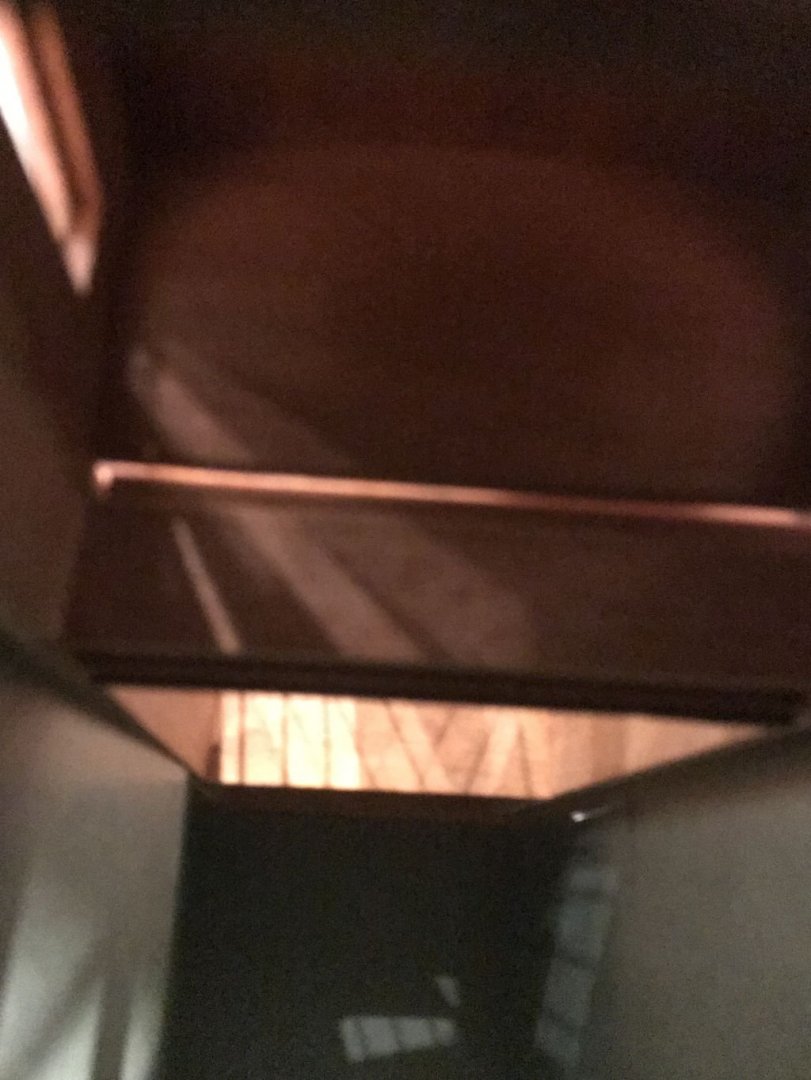
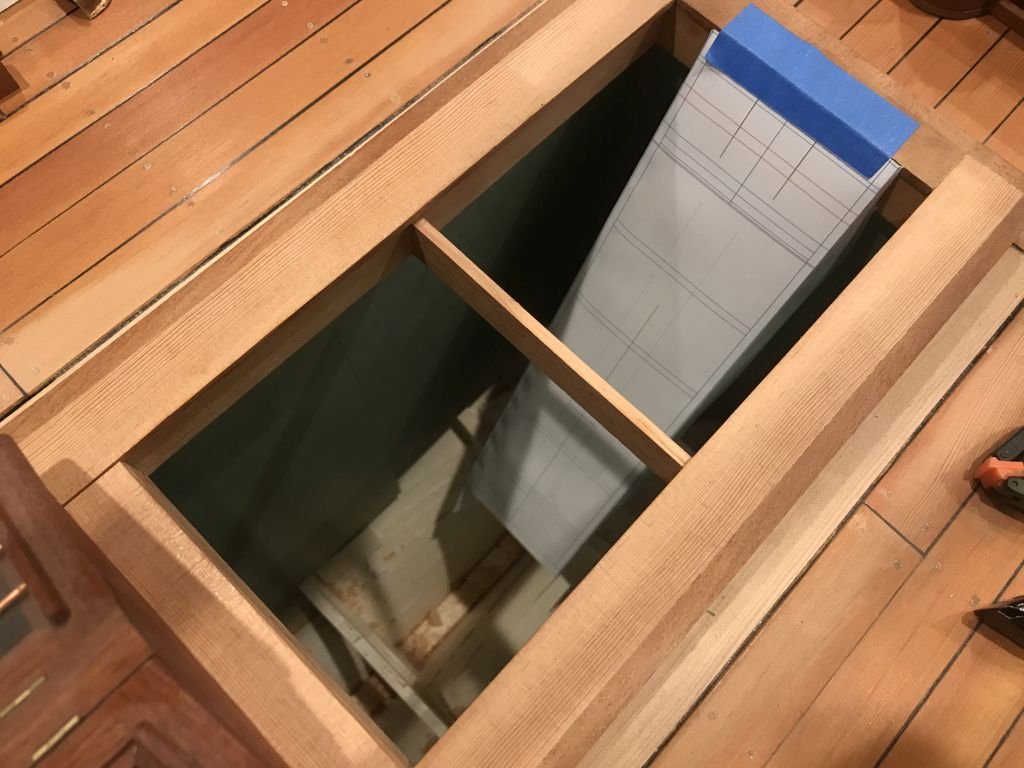
On to proof of concept for the interior of the cabin, first I needed to understand the parameters of how to make the interior be able to be removed through the narrow opening sort of the reverse of the ship in a bottle. The expanse of the cabin has to collapse toward the centre so that the components are able to be pulled up through the main opening once the top deck is lifted off. Using some old green file divider cards I cut the panels to give the interior some maximal limits of what can fit through the opening, the bottom the panels represent the floor level. Next I had to tape the panels together so that they would sit inside the opening without the clamps. so that I could place the top deck into position. in order to locate the companionway ladder to the interior. Next the cabin hatchway was placed in position to check the realistic feasibility of a person using the ladder (clearance wise) Then a shaky view from inside looking toward the ladder holding the iPhone inside and hoping that it would produce an acceptable impression. looking aft and forward I can see the shadows of the bars across the skylight windows apologies for the out of focus pics but like all of this project it will improve with practice and methodology. Michael

-
I will follow along as well Small craft are the test bed for the mettle of a sailor. Interesting how the wood points out to us the correct form as we put in the bends of the planks. Michael
- 84 replies
-
- 4
-

-
- nimblet
- knockabout
- (and 1 more)
-
Happy new year to you and your family Gary. I like the drawing of the winch and look forward to seeing it come together in your capable hands. Michael
-
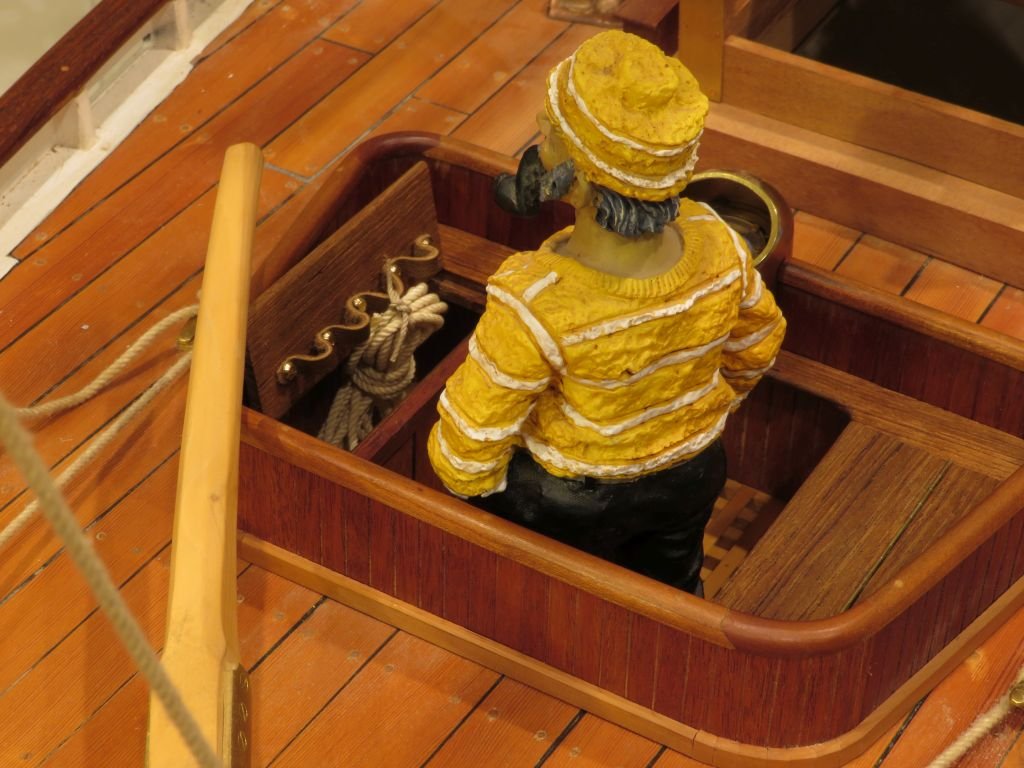
Druxey, and Greg thanks for your comments. Greg the next area that I am going to work on is in fact the companionway and the interior that can be viewed from the hatch and the skylight. The larger raised area of the deck that the companionway and skylight are fitted to is removable as a unit, so my thought is to model a minimum interior that will include the stair /ladder to the interior into the first area that will detail what can be seen.this whole section will be able to be lifted out in order to place the lead weight into the bottom for the sailing one all the other elements are completed. This will enable some fun surprises inside the cabin which I have not thought about yet. Perhaps for instance a small gimbal stove for making tea. I particularly like the interior of Stirling and Sons Integrity and this one Michael
-
Mark, if you made your form on the end of a longer piece you could have it overhang enough for the clamp to be underneath. Michael
-
Looking great John great to see the progress. and a Happy New Year to you and your Family. Michael
-
Interesting question, having sailed a small boat and coming to the dock one always need a line or two when tying up that need to be handy but out of the way while sailing. We see the Anchor on many models but there are multiple lines used in tying op at the dock my small yawl used 4 lines a bow and stern line and a 2 spring lines which cross diagonally amidships. My dock lines were 3/8 so on a 40 footer 3/4 to 7/8 seems reasonable. The cutters were often sailed with a very short crew, sometimes just a man and a boy according to some accounts. Michael
-
Eberhard that is a nice little addition Something that I shall have to look into. Michael
-
Carl first happy new year to you. From a strictly sailing point of view by removing some wedges the mast would be able to be leaned aft which would change the shape of the sail and centre of effort which could affect speed depending on the type of vessel. In Modern racing yachts the mast is bent to change the shape of the sail which affects its airfoil shape making it more full or flat depending on how much bend is put into it. Michael
-
Well Just because I like using the jewelers saw, I would think that a curved bench pin one that is like the normal pin but fixed to the end of the bench with a couple of hold down screws like the one I have used for the brass stuff but on a curve. This is getting to complex to explain I will make one because I will no doubt need one sometime in the next little while. having said all that i do like using the littel planes and chisels for odd curved bits. Your planking does look superb Mark. and Happy New Year to you and your family. Michael
-
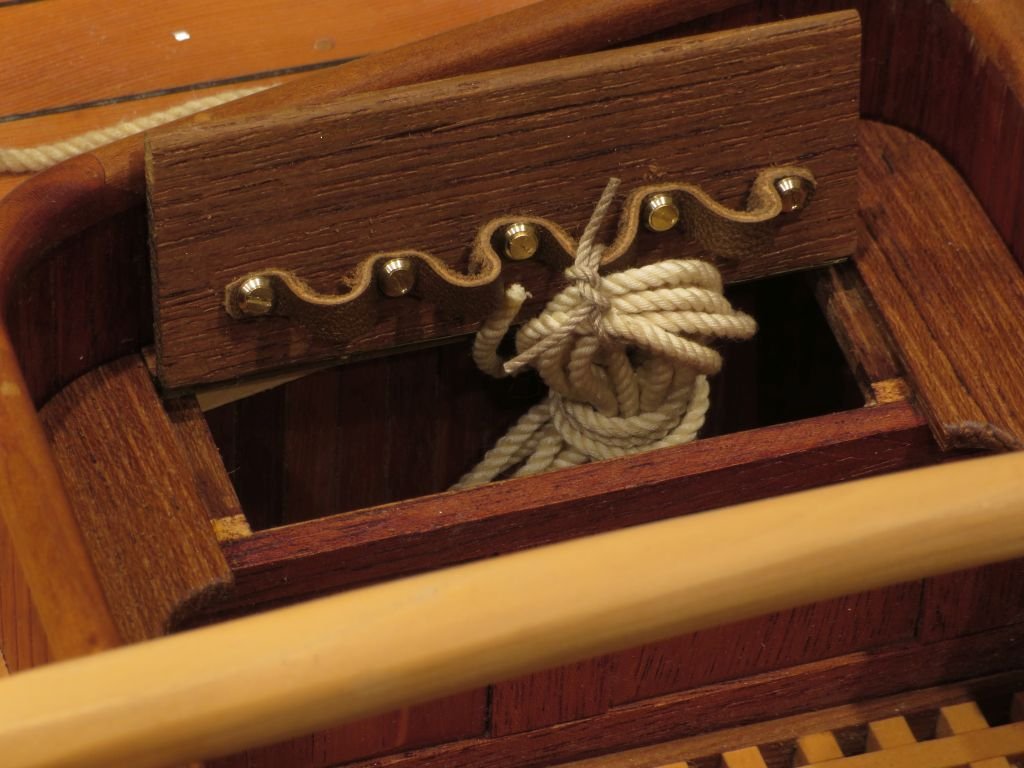
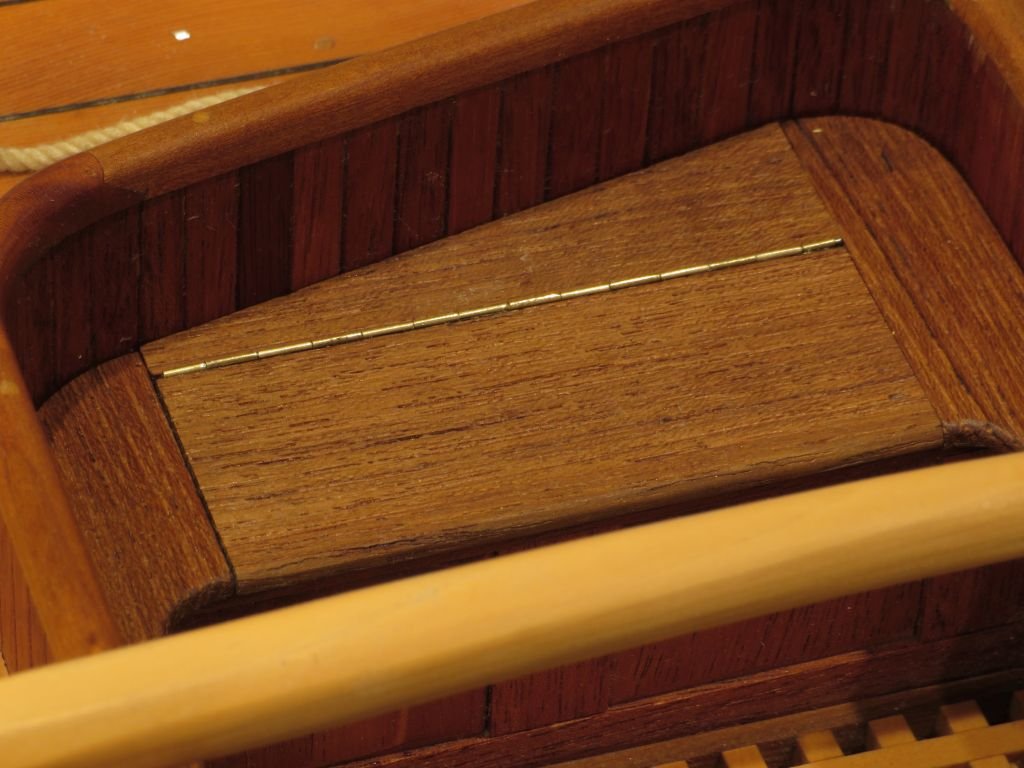
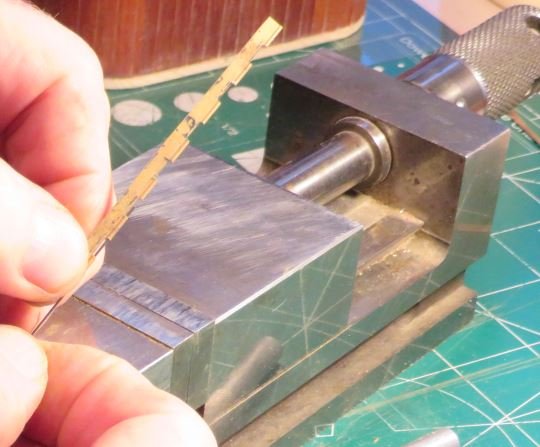
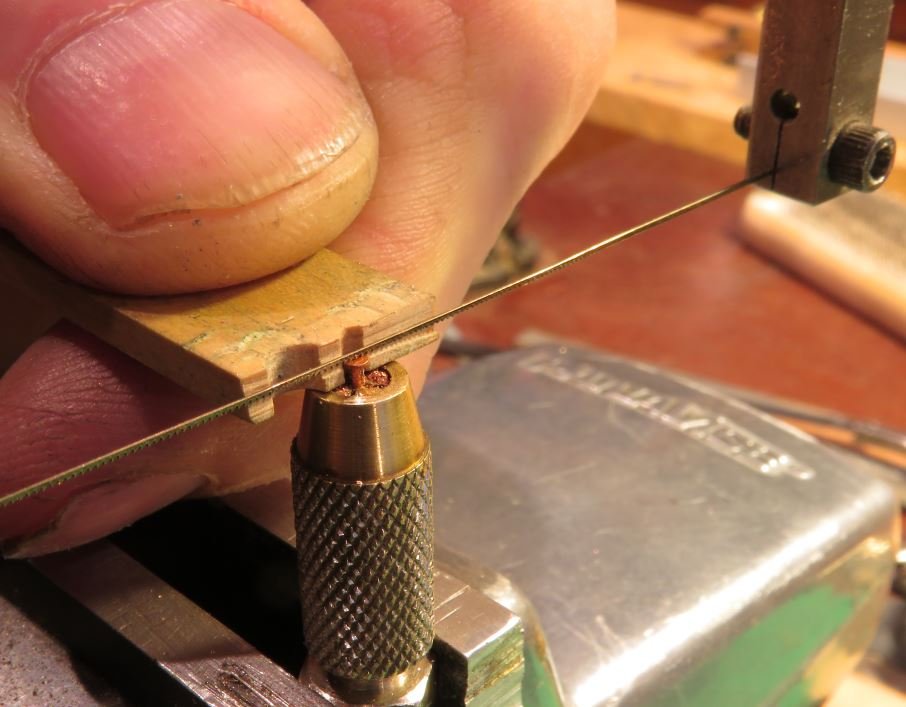
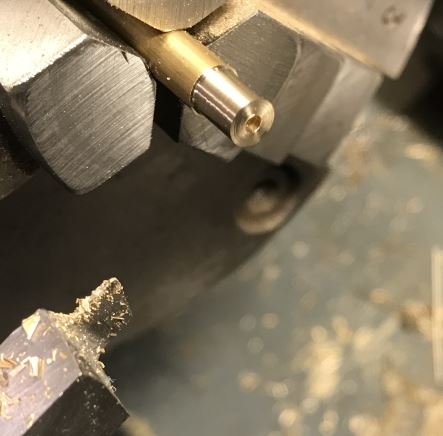
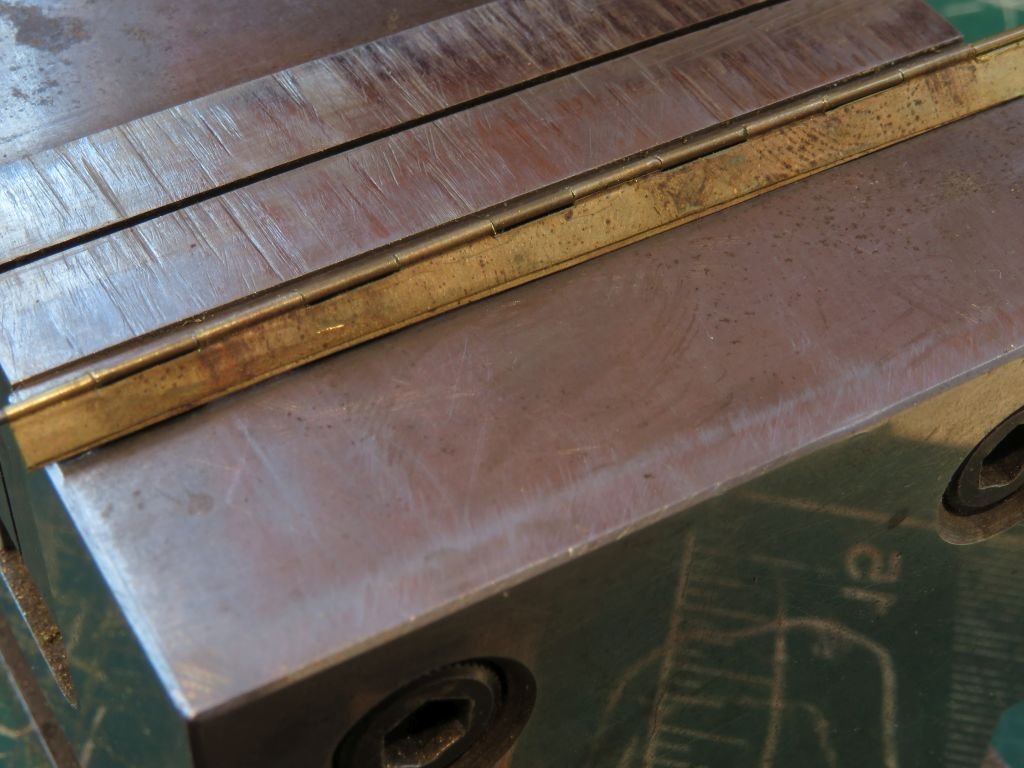
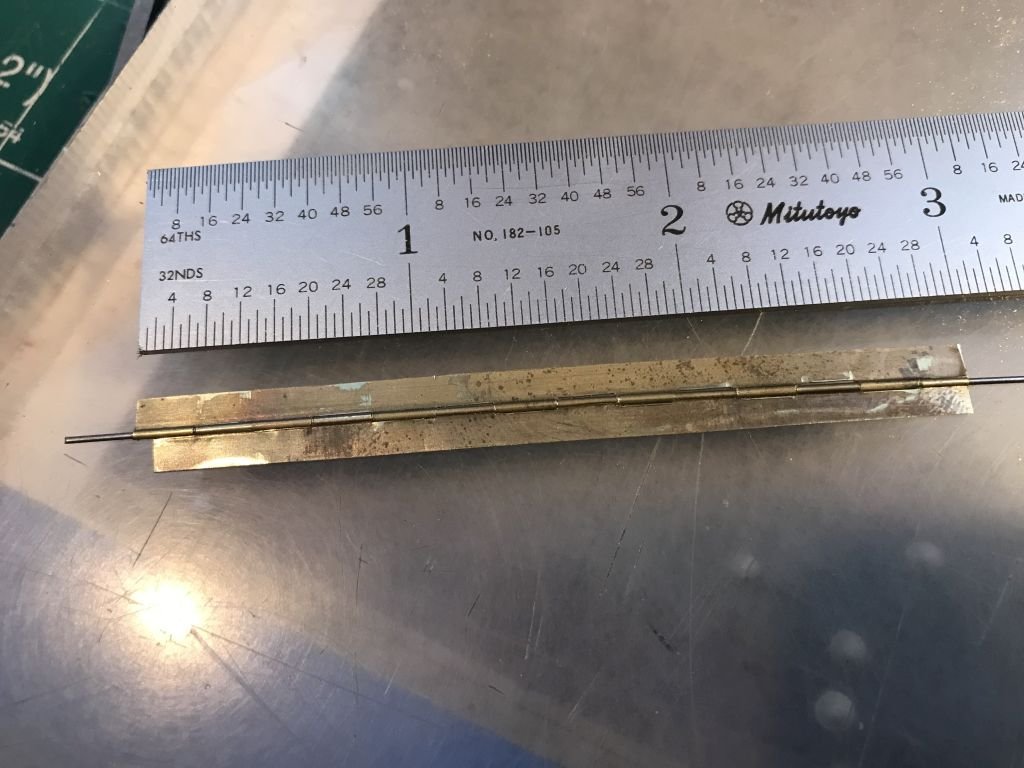
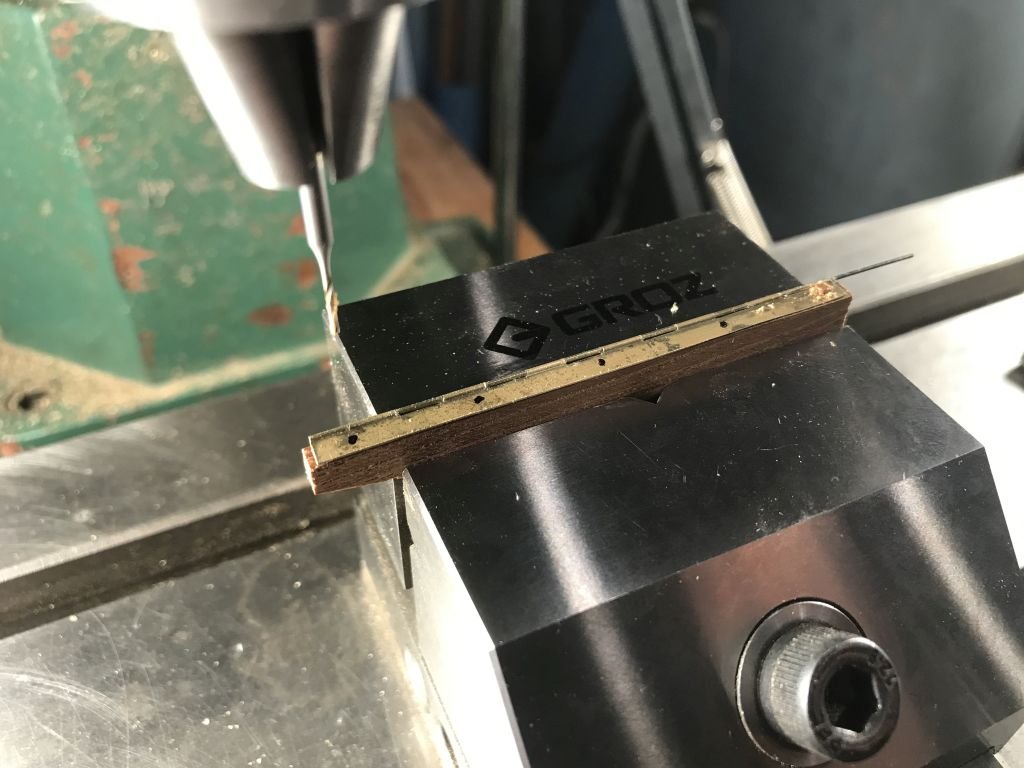
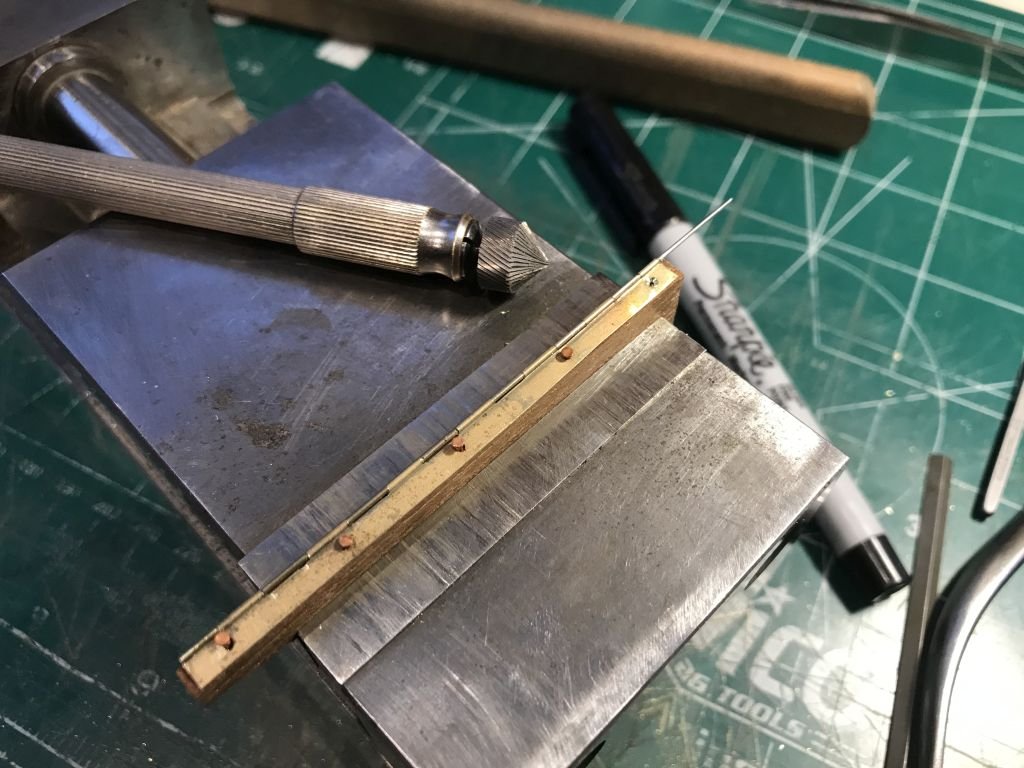
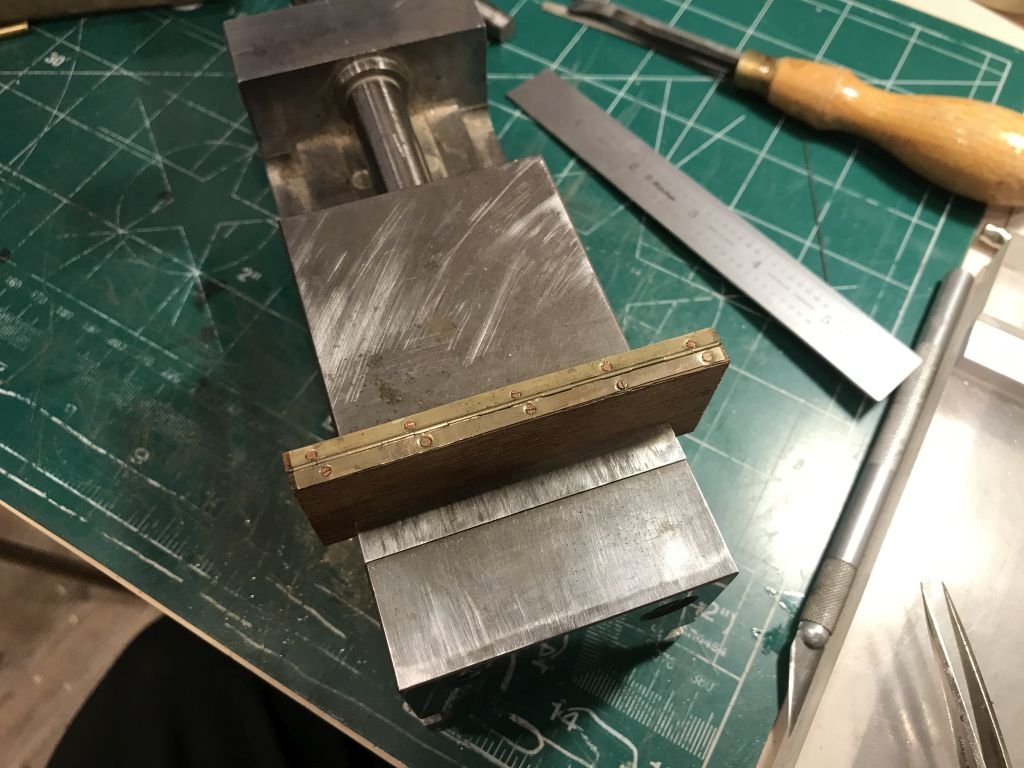
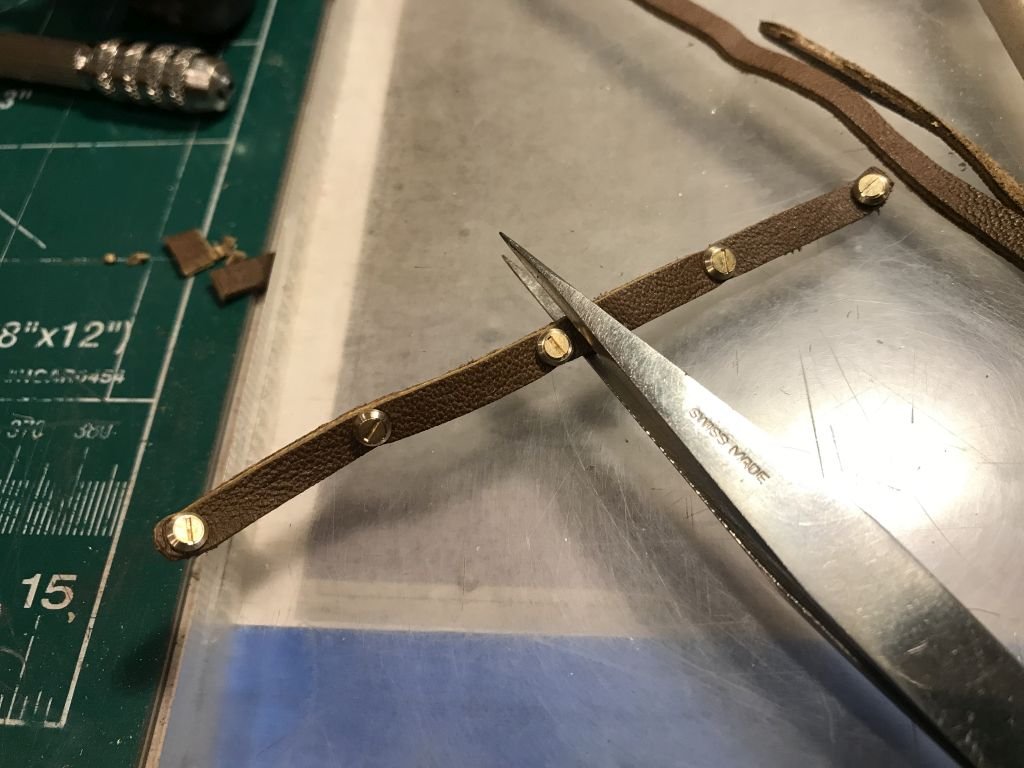
Druxey, Paul, Mark, and Pat thanks for your comments, and that you to all who have added a like, it is greatly appreciated. Today I finished the second hinge and made a couple of adjustments to the sequence which made the fabrication a little easier in some aspects. After folding the brass as in the first hinge I ran some CA glue along the edge to glue the sides together forming a stronger lamination of .006" before filing the tabs. The following along the same as before fitted the two halves together. This time I did take the pictures of the rest of the sequence. First drilling the holes and placing the pins Then removing them to make a small countersink into the wood, this helped with the countersinking of the brass which was also slightly deformed by the countersink as it formed the depression, the brass was soft anyway and there is not much to actually cut away when countersinking, so it is a bit of a fake countersink. The tiny copper rivets that I have used before are flat head 1/32 Sig Rivets that I purchased eons ago I snipped the end to an angle so that the rivet formed a tight fit for the last bit of the hole which was drilled just a little shy of the full length of the rivet. The head was slotted with the jewelers saw with a # 08 blade I think it is the finest one I have. I use a small bit if Boxwood with a notch filed into it as a guide this works very well once you get the notch depth set and it is easy to reset as the saw wears away the side. I thought I had lined up the heads, but I see in the brutal close ups that I didn't. Oh well, there was a knot in the wood that's my excuse and I'm sticking to it. After getting the lid fitted I decided I wanted to ad a way of hanging some rope from the bottom side of the lid (would have been better if I had decided this before gluing it into the cockpit Which made it a bit more difficult to accomplish. At first I tried making some hooks (hats off to yo u Johann your hooks are professional looking compared to the ones I rejected. I rethought the hooks and decided on a leather strap forming some loops things could then be lashed to the loops. Because the lid is only 1inch thick I had to use the smallest real wood screw I have #1 x 1/4 inch the shank of these is .058" + or - they are certainly not precision screws but nice enough. I wanted to use the flat eads so needed to make some fake flat head washers I use some 3/16 brass rod and reduces the diameter about .040" and then bored the .058" hole and countersunk the hole beveled off the outside them parted them off. I used the Small leather awl I made for the leather stitching test I did earlier for the cushions to punch the holes in a strip of brown leather from the leather scrap bin. After drilling the pilot holes very carefully not to poke through to the top, the strap got fitted. I hung a coil of 7/8 rope with a bit of 3/8 rope to the strap for testing the concept. Walter seems to like the method. So I closed the lid on this part of the cockpit, ready to move on, to the next task. Michael


-
Very interesting how you set the frames up, it does seem like a lot of work though. your drawings of them are wonderful. I am thinking that one of these days it would be fun to make a small boat and only use hand tools both drawing and the building, and this is what you are doing (mostly). I am enjoying watching the boat take shape. Michael
-
Happy New Year Jack. Good to hear that you are recovering well and that you are able to get back to your "Challenging" Kit It appears that you have a good looking model for all your effort in overcoming the pitfalls of less that good instructions, I was surprised that they did not include the info on the rabbet at the bow and stern that is a serious omission in my view. I'm envious of the new miniature plane, looks like a nice bit of kit. Michael
- 52 replies
-
- 6
-
-
- artesania latina
- titanic
- (and 1 more)
-
Eberhard, Keith, Dirk, GL, Johann, and Mark. Thank you all for you feedback. I am happy that the work I am doing has helped, and given ideas to you all, the feeling is completely mutual I assure you. I have learned so much by participating in this fantastic forum there is so much knowledge held by the membership here that it would fill volumes of books (which it does) my own library is very modest at this point but it grows slowly. and this forum is a world class library in itself. So finally thank you to the administrators and owners of this site for your great work that allows us to share this hobby safely, and a happy and prosperous New Year to you all. Michael
-
Happy new year to you and your family Johann. Lovely work on the blocks and rigging elements, A nice workshop space too. Michael
-
First A happy new year to you and your family Gary Yes Retirement is wonderful One has to learn to use the "NO" word once in a while because people think that now you are retired you have all the time in the world, and it is amazing how fast it gets eaten up helping others. The workshop looks pretty nice. Michael
-
First a Happy New year to you and your family. The model is coming along nicely Eric. Michael
- 599 replies
-
- 4
-
-
- sidewheeler
- arabia
- (and 4 more)
-
HMCSS Victoria 1855 by BANYAN - 1:72
michael mott replied to BANYAN's topic in - Build logs for subjects built 1851 - 1900
Don't be too hard on yourself Pat, those skylight look great. The rest of the ship is coming along nicely as well. Michael- 1,013 replies
-
- 8
-
-
- gun dispatch vessel
- victoria
- (and 2 more)