


mbp521
-
Posts
973 -
Joined
-
Last visited
Content Type
Profiles
Forums
Gallery
Events
Posts posted by mbp521
-
-
4 hours ago, Cathead said:
I didn’t realize you could DIY kit-like parts like that.
It wasn’t until I started making the parts that I realized that many of the kit manufacturers probably use similar equipment to make their kits. Albeit their machines are likely a lot more pricey and robust than this one.
-Brian
- mtaylor, Ryland Craze, Keith Black and 3 others
-
 6
6
-
1 hour ago, Roger Pellett said:
what sort of software does thing use?
It runs on a free downloadable proprietary software called XTool Creative Space (XCS) which is real easy to use plus there are several tutorials out there to help with the more complicated features. Another program that interfaces well with it and a lot of XTool owners use is Lightburn, but that’s a aftermarket software that costs, but it does offer many more features than XCS. You can also create a .svg file in any supported software and manipulate it in the XCS program. I managed to learn a good bit in a few short days.
-Brian
- Keith Black, Canute, Roger Pellett and 3 others
-
6
-
Hello again,
Time has a way of getting away from us, and I didn't realize that it has been over a month since my last update. With the holidays, I needed two of me to keep up with everything that I was doing. I have made some progress on the the Caroline though, and I figure it about time to get something posted.
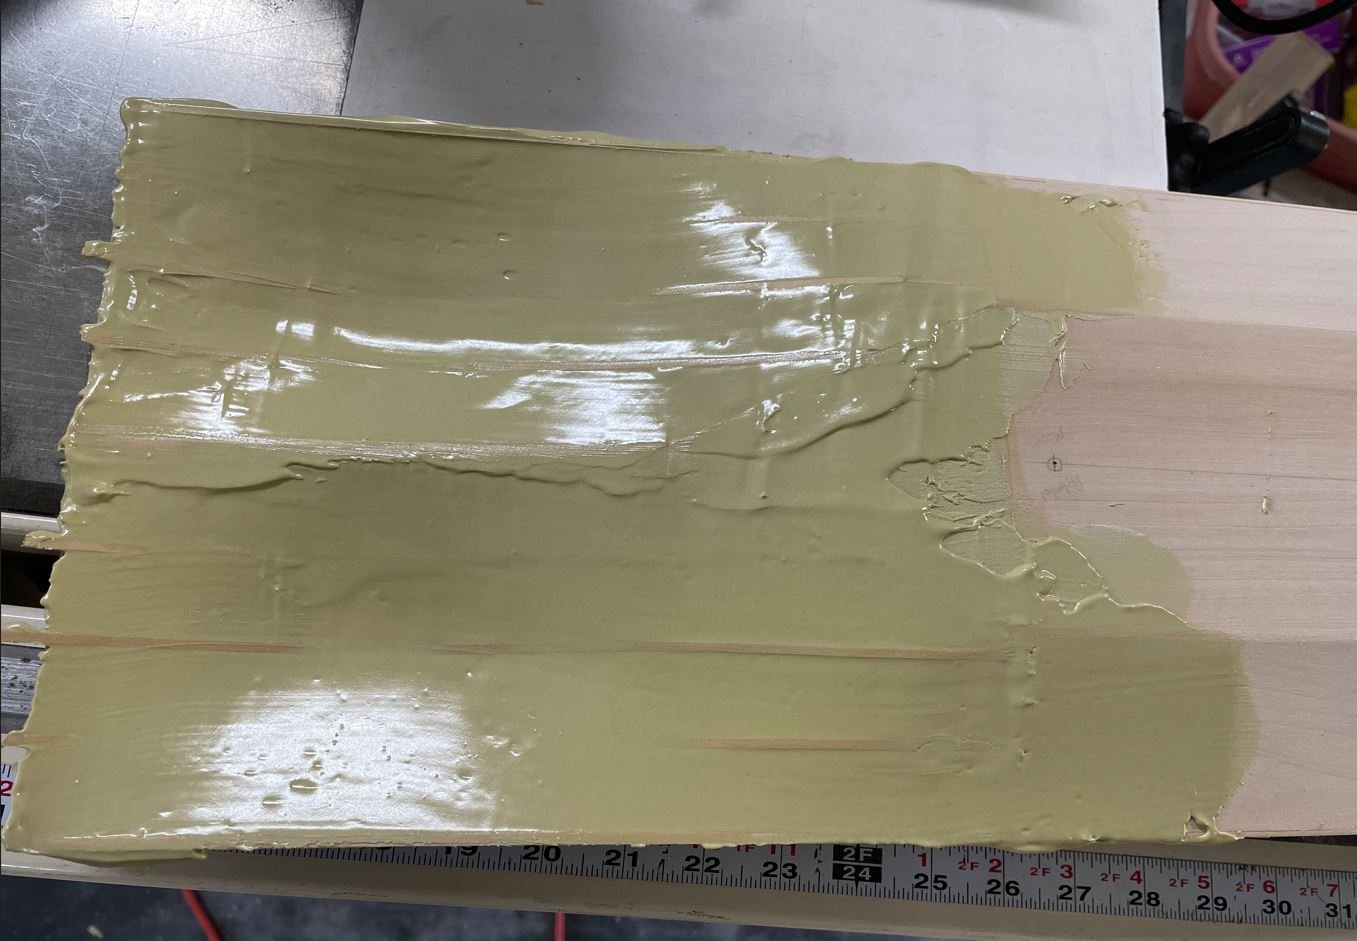
So before the holiday's hit I managed to work on the Kort Nozzles. For these I found that 1 1/2" plastic conduit was the perfect diameter for these, and saved me a ton of time having to shape these out of styrene. Ok, I admit the size wasn't exactly perfect, they were .75mm larger than the correct scale, but I figured that was close enough, and by the time I finished shaping them I would be close enough. Besides these will be on the bottom and not fully seen.
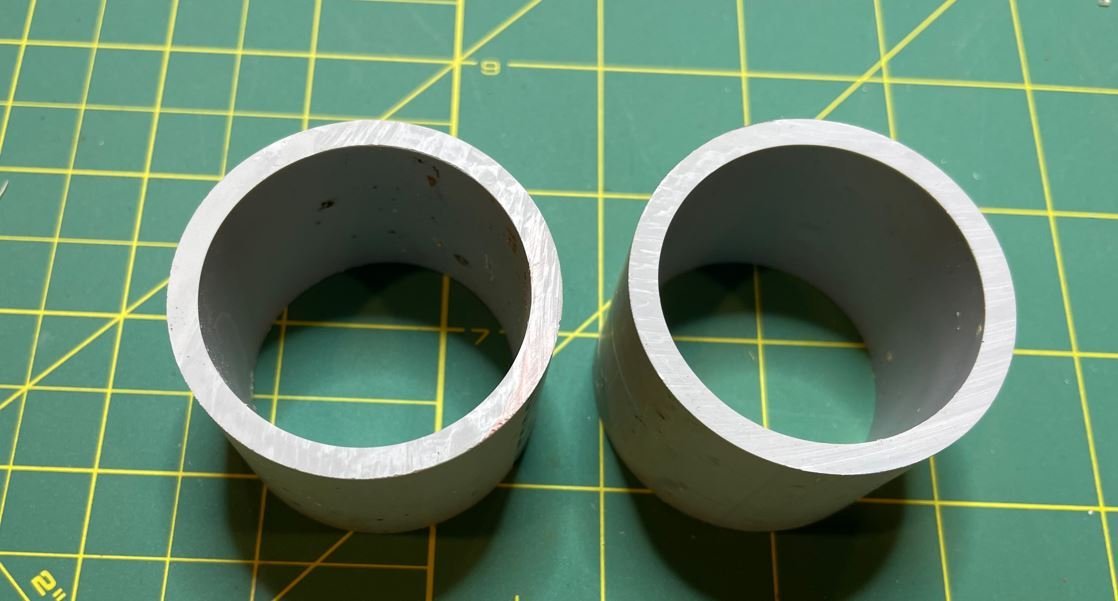
Placement on the hull in there approximate location.
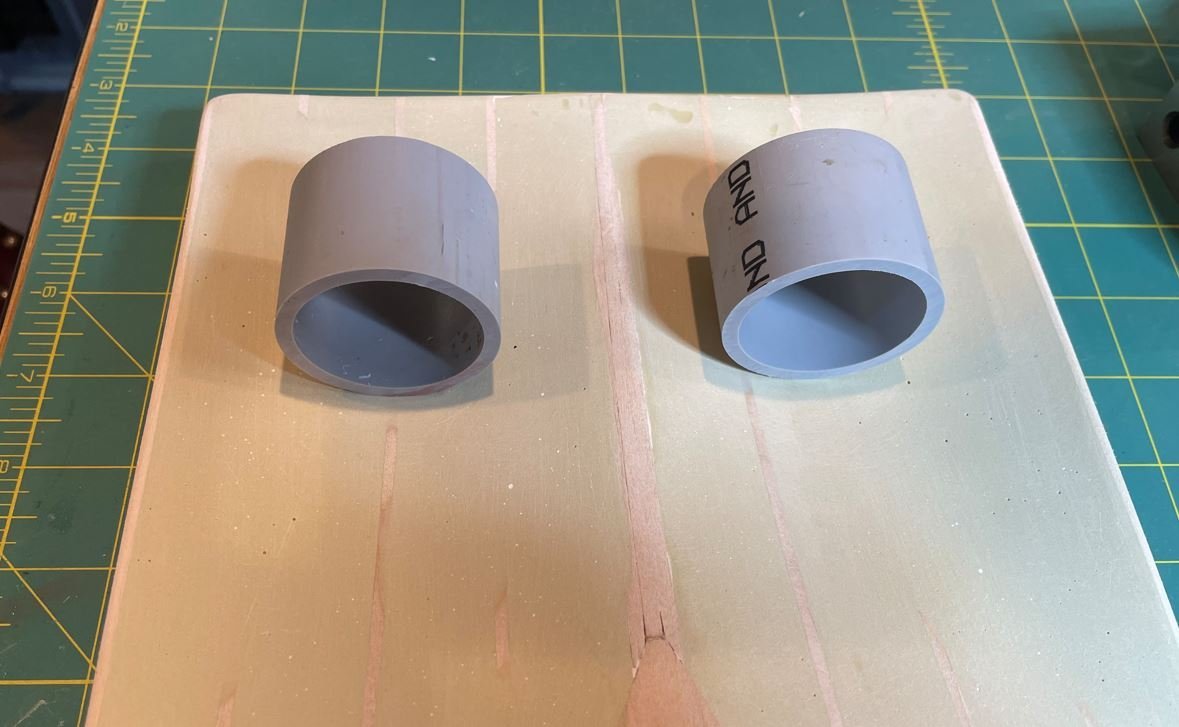
I put the nozzles on my drum sander and used that as an arbor to sand them into shape with a sanding block and files. I forgot to take photos of the process, my phone was in my hobby room and I was too lazy to go get it. But anyway, this was the first nozzle roughly shaped, compared to the original pipe.
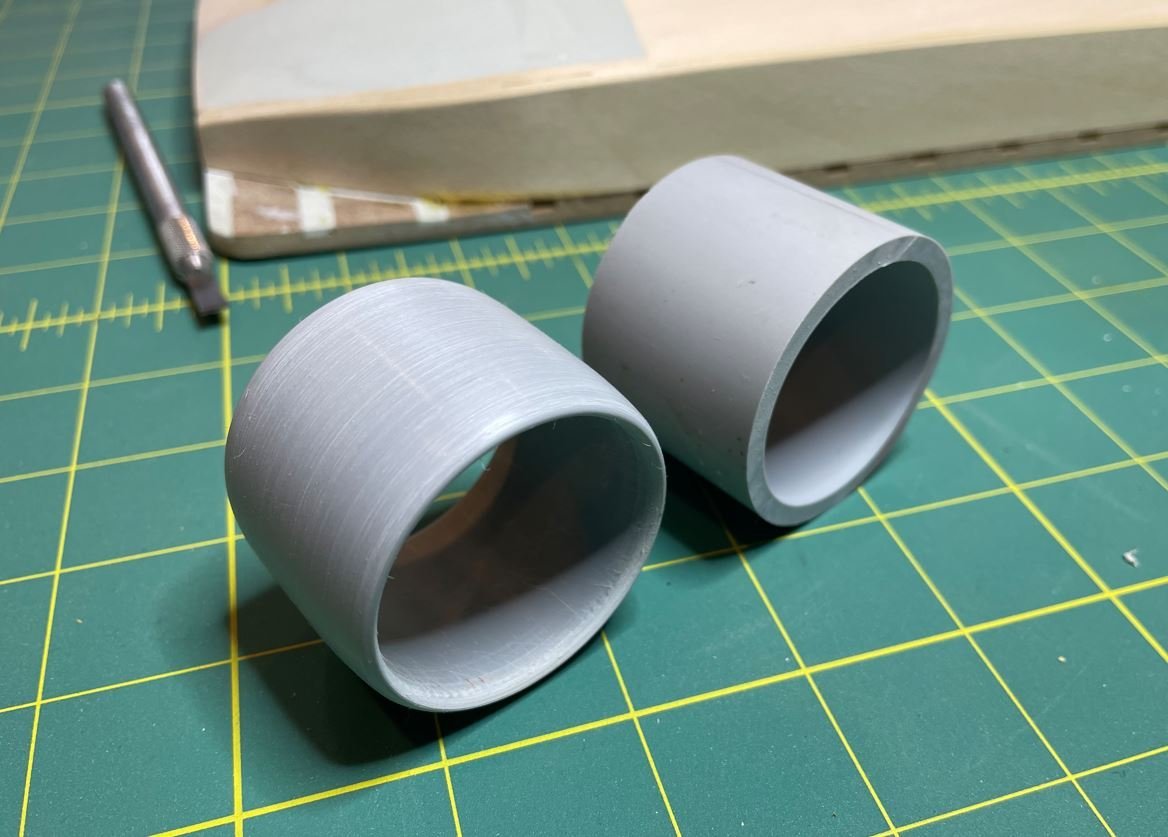
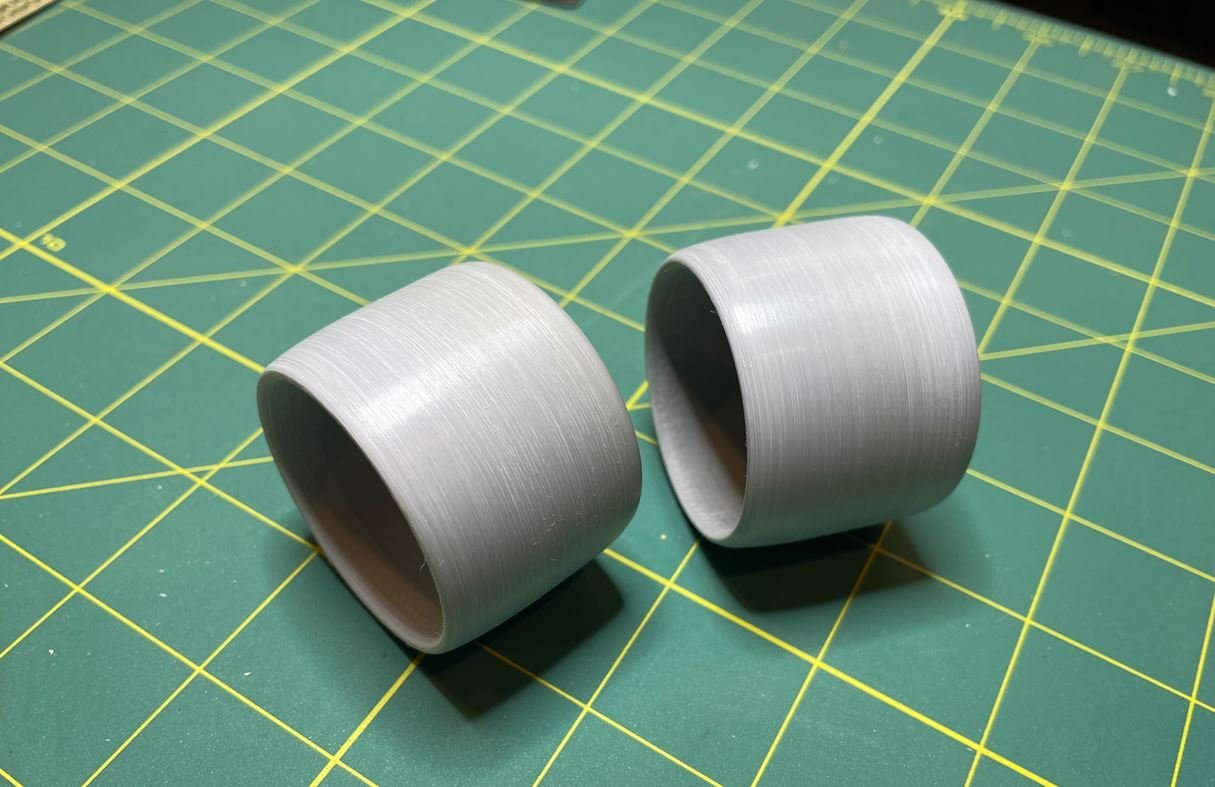
Both nozzles with their general shape. I still need to get them smoothed out a little more and add a few details for them, but I like what I have so far.
Then the Christmas holiday hit and Santa was very good to me. The Admiral and I decided that we needed a new toy to support our craft and shipbuilding hobby and we decided to invest in a laser engraver. After extensive research we decided that an XTool S1 would be worth the investment, so we bit the bullet and purchased one.
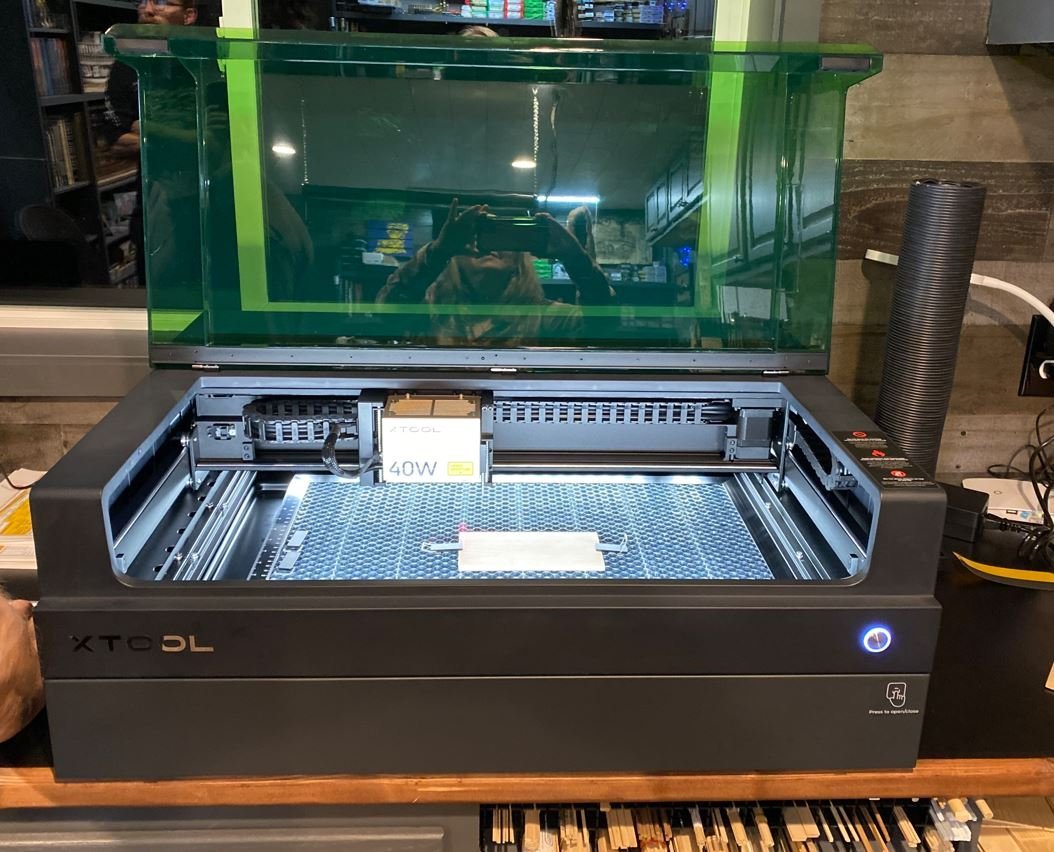
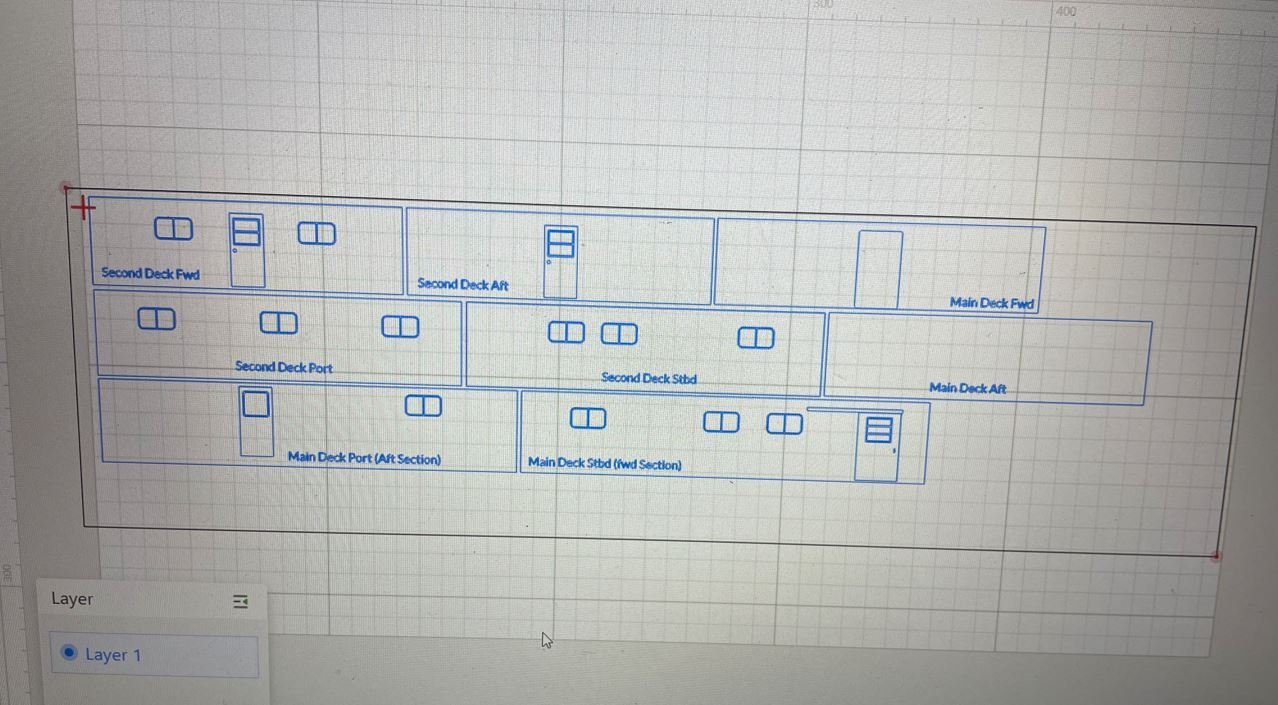
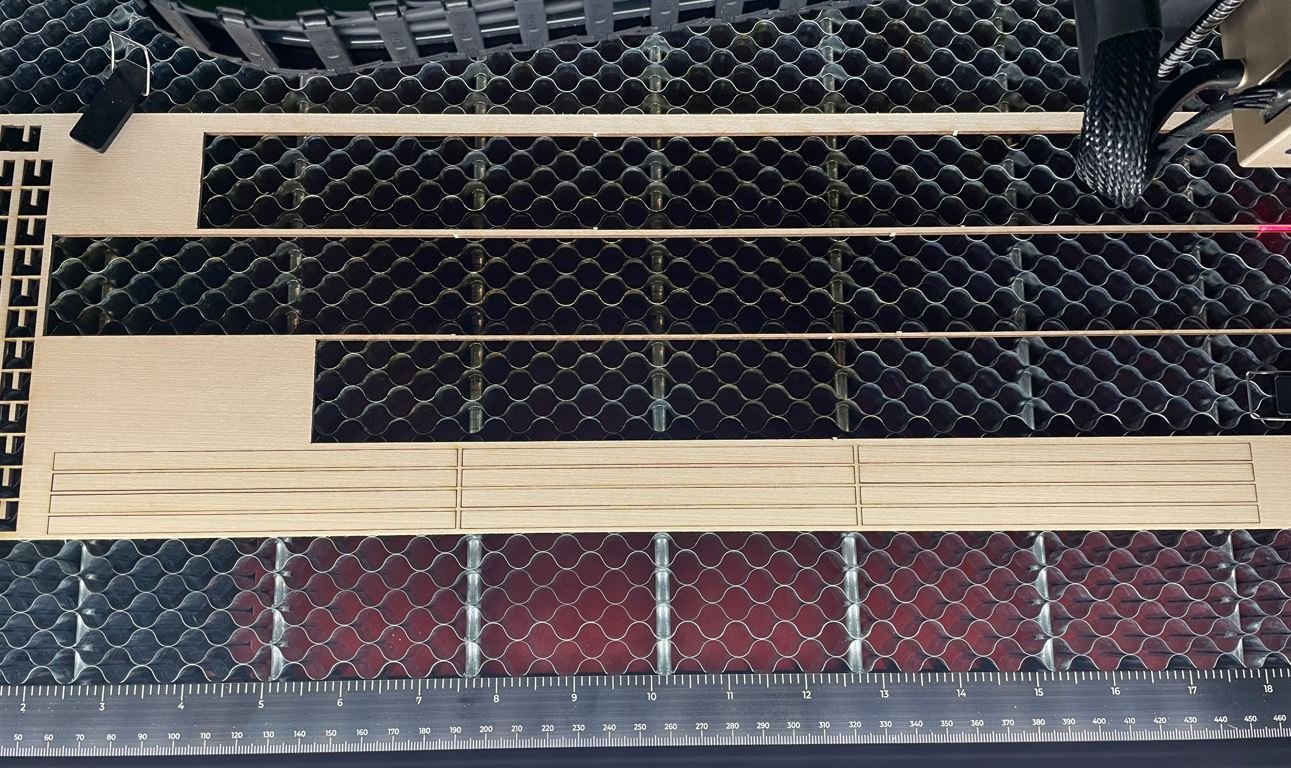
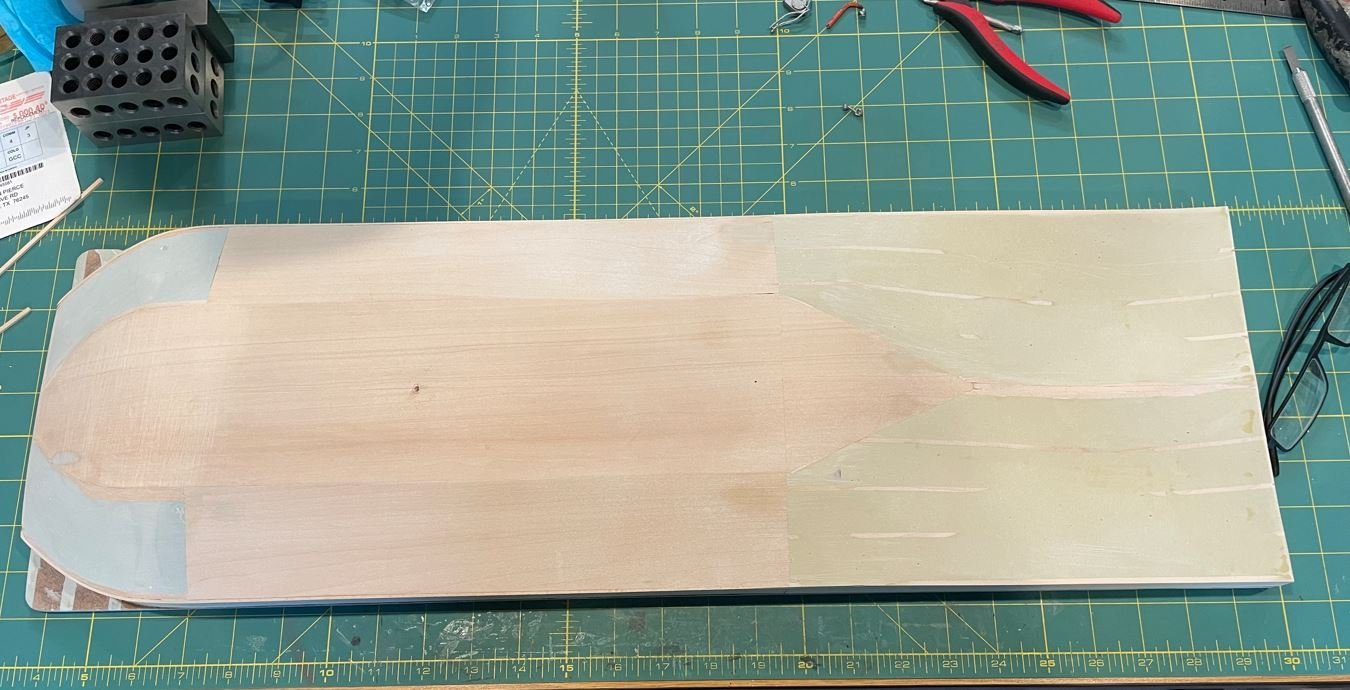
So I spent a few days tinkering around with the engraver and it's software, making small, little simple projects just to get the feel for it, then it was time to see what it could really do. So why not try it out on the Caroline. Here I am working on the walls for the first two decks. Pretty easy since they are somewhat square.
Then it was time to see what this baby would do.
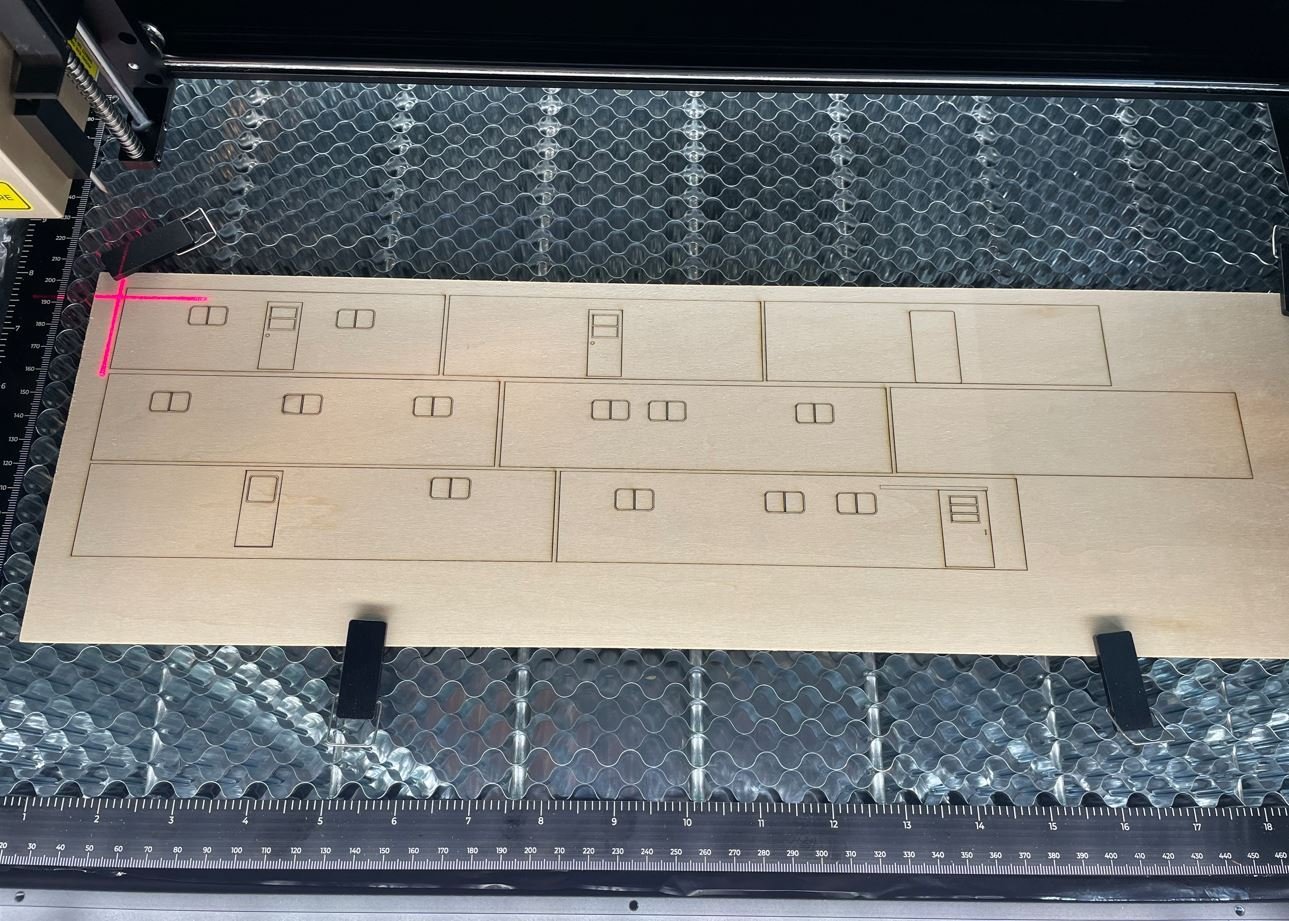
Couldn't ask for better results. So I played around with the windows a bit, using different thicknesses of wood to give them more dimension and depth and engraving the window frames, as well as some of the door features.
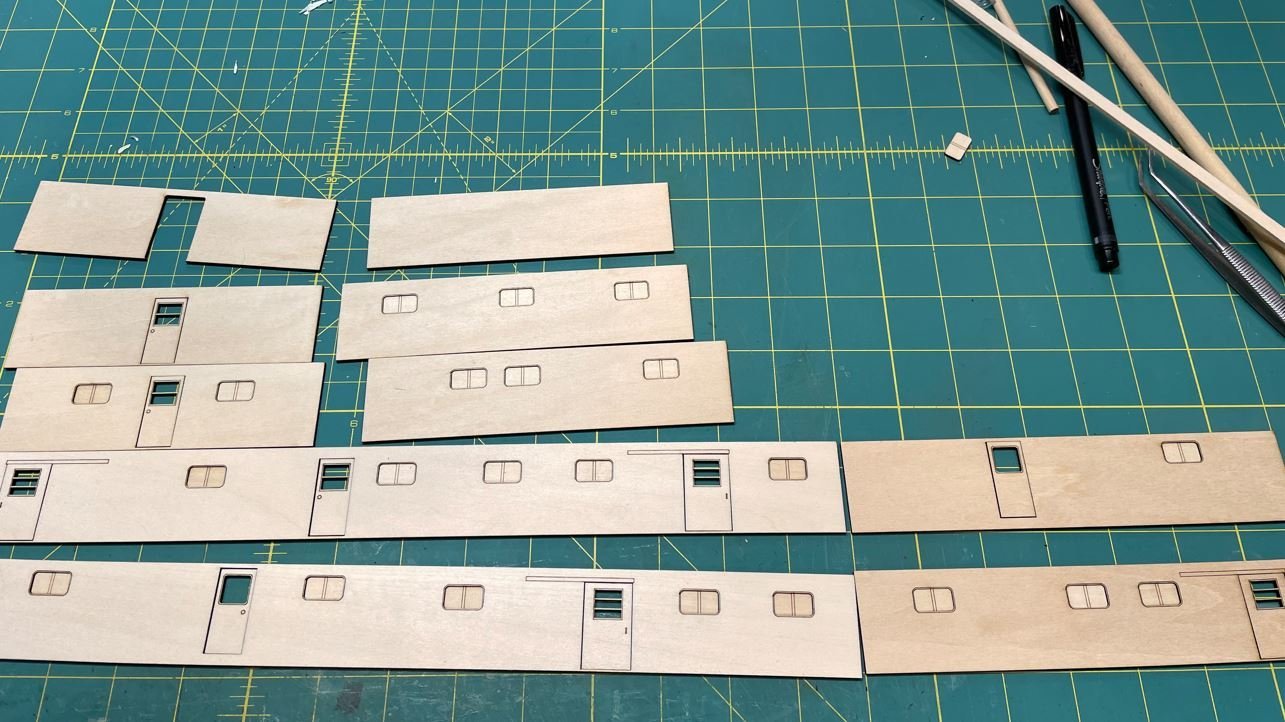
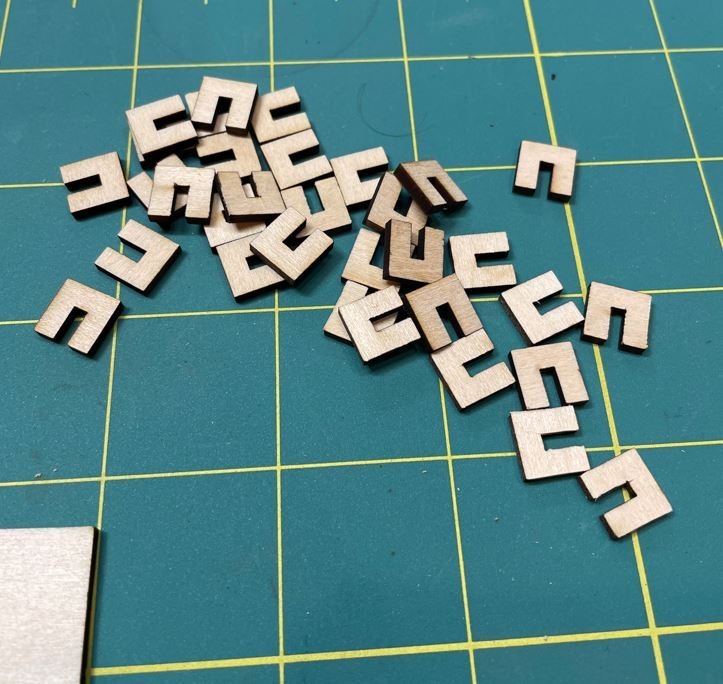
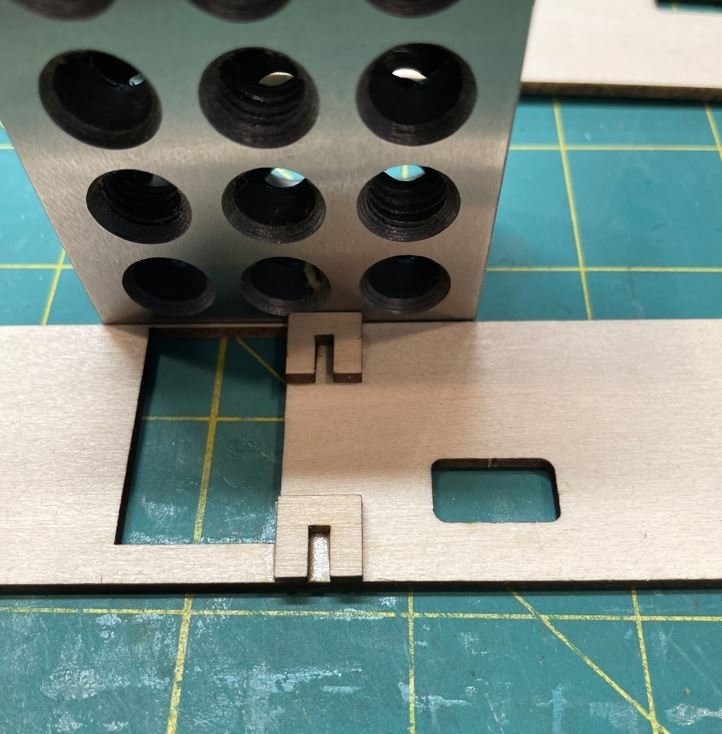
So to help with some of the wall structure I drew up little brackets to help support the wall braces and cut them out as well as the braces.
Then it was time to give it all a test fit. I'm thinking I am going to really like this tool.


I do realize that this is somewhat turning a scratch build into a kit build, and hopefully no one thinks that this is cheating. But hey, aren't most kits started from a scratch built model?
I've got more to come, but I just found out the hard way that CA has a shelf life, and after first opening my current bottle two years ago, it's adhesion is just not what it used to be. So for now I'll work on some of the other deck walls and get them designed while I am waiting on a new bottle of CA to arrive.
That will do it for this update. Thank you all for stopping by and the kind comments.
-Brian
-
13 hours ago, Roger Pellett said:
This allowed me to put tension on the wire to endure round, uniform rings.
I hope you don’t mind me stealing this method Roger. I usually just wrap the wire around a small drill bit with finger strength for rings. The end results like you said were not quite round, but I found they worked at the time. Never thought of putting tension on the wire. Still learning.
-Brian
- Glen McGuire, KeithAug, Keith Black and 5 others
-
8
-
-
Oh wow! That photo really shows the scale of just how small this boat really was. Now I understand how she got by with just one boiler.
-Brian
- Jack12477, FriedClams, mtaylor and 3 others
-
6
-
I was thinking it was called the flume, but my knowledge of steamboat terminology is somewhat limited. However, I do like Eberhards description of “thingy between boiler and stacks”. A technical term that works well 😁.
It’s surprising that she only had one boiler, I would think that she would have had at least two given the power needed to propel her upriver. However, thinking about it, steam locomotives got by with just one boiler and they seemed to function quite well.
-Brian
-
Looks like it fits nicely where it’s supposed to.
Merry Christmas and Happy New Year to you and Mrs. Cathead as well.
-Brian
- Keith Black, Cathead, Jack12477 and 3 others
-
6
-
So good to see you back at it Keith! I to have been guilty of letting other things get in the way of shipbuilding. Hopefully your recent progress can inspire me to sit back down at the bench and get some work done.
Here’s wishing you and your family a Merry Christmas and a safe and happy Nee Year!
-Brian
- Keith Black, FriedClams, mtaylor and 4 others
-
6
-
 1
1
-
Looking good Eric. This has to be a first that I’ve seen, off-model building of the deck. I totally understand the reason behind it, given the deck is not too structurally sound, and the pressure needed to deck the frames. I admire your approach to it. Anxious to see how it all works out.
-Brian
-
2 hours ago, KeithAug said:
It turns out that the world is incredibly blue and bright.
Right there with you Keith. I had cataract surgery on both eyes back in September. They replaced the lenses in both eyes and the world has never been so clear. I’ve been wearing glasses since I was nine and contacts the last 40 years, and I am amazed at the clarity the surgery has given me.
-Brian
-
Congrats on a magnificent build. It’s been a pleasure to ride along on the journey.
-Brian
- AJohnson, mtaylor and FriedClams
-
3
-
Just catching up Eberhard, and as usual your work still amazes me.
-Brian
- Ras Ambrioso, FriedClams, mtaylor and 1 other
-
4
-
1 hour ago, KeithAug said:
I guess she is quite stern heavy - a common problem! 😀
Oh so true Keith. She’s going to have some weight to her.
-Brian
- Cathead, Keith Black, FriedClams and 2 others
-
5
-
Hello again everyone,
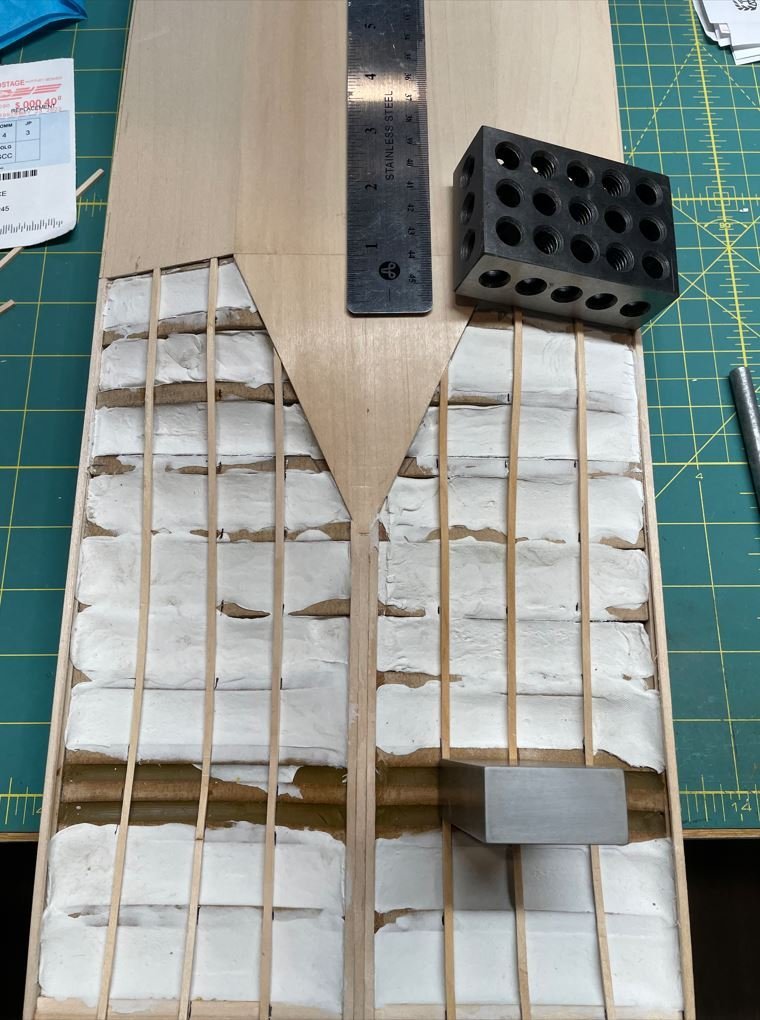
It is finally about time that I get back to the bench and get some real work done, and not this around the house to-do list stuff. I don't have a lot to show right now, since I am just getting back into the groove, but I wanted to get something out there. I last left off working on getting the bottom of the hull covered. I was initially going to skin the whole thing over with basswood sheets, but the bow and the stern area had way too many compounding curves and angles to get the wood sheets to lie down correctly so I then decided that I would plank it to see how that would look. Still with the difficult curvatures around the Kort Nozzles, I still struggled to get the planks to line up and lie down as well. I started planking the middle and got so frustrated that I finally decided that I would just go in and fill the whole thing with body filler. So I tore out most of the planking and used a light weight air drying clay to fill in between the bulkheads, The clay was cheaper than the body filler, but took several days to fully cure. I then took a few strips of planking and glued them in place about an inch or so apart. The strips will serve as a depth guide for the applicator as well as an indicator of how far I need to sand the body filler down. I figured with all the gaps that I was going to have to fill in with the planking in this area, I might as well save some frustration and wood and just fill the whole thing in. Besides, this area will hardly be seen at all anyway.
Here are the guide planks going and the clay filler in place. Even pre-soaked the planks had to be held in place with weights to keep their form while the glue dried.
Next I slathered on a couple of coats of body filler and let that set. This is the first coat going on.
First round of sanding is done. There are some low spots and pinholes that need to be filled in, but for the most part I think it turned out well.
That is all for this update. I know it's not much, but I hope to have more next time around. Winter will be here before you know it which provides ample time for shipbuilding. I'm actually just tickled to finally get to use the new bench and shipyard setup.
Thanks for stopping by.
-Brian
-
1 hour ago, Keith Black said:
Since the Chaperon takes up most of the shelf space it sits in, wouldn't it make some sense to just let the shelf space act as a case and front it with a piece of plexiglass?
Keith/Mark, that is exactly what I plan to do. I am going to run some LED lights to illuminate the model and enclose it with a pane of plexiglass. A lot cheaper and easier thank building a dedicated display case.
19 minutes ago, Cathead said:Gotta say I'm curious about some of the curios, like the baseballs (huge baseball fan and I have a few special ones of my own). I also dig the armadillo.
Eric, the baseballs are a couple that I had autographed, one by Nolan Ryan and the other by Tony Gwynn Sr. As for the armadillo, I got that thing for Christmas when I was around 10 years old (45 years ago). Needless to say it has a few miles on it, but since I’ve had it for so long, I find it hard to part with. One of my grandsons has laid claim to it when I’m gone.
-Brian
- Egilman, Cathead, Keith Black and 4 others
-
7
-
Hello again everyone,
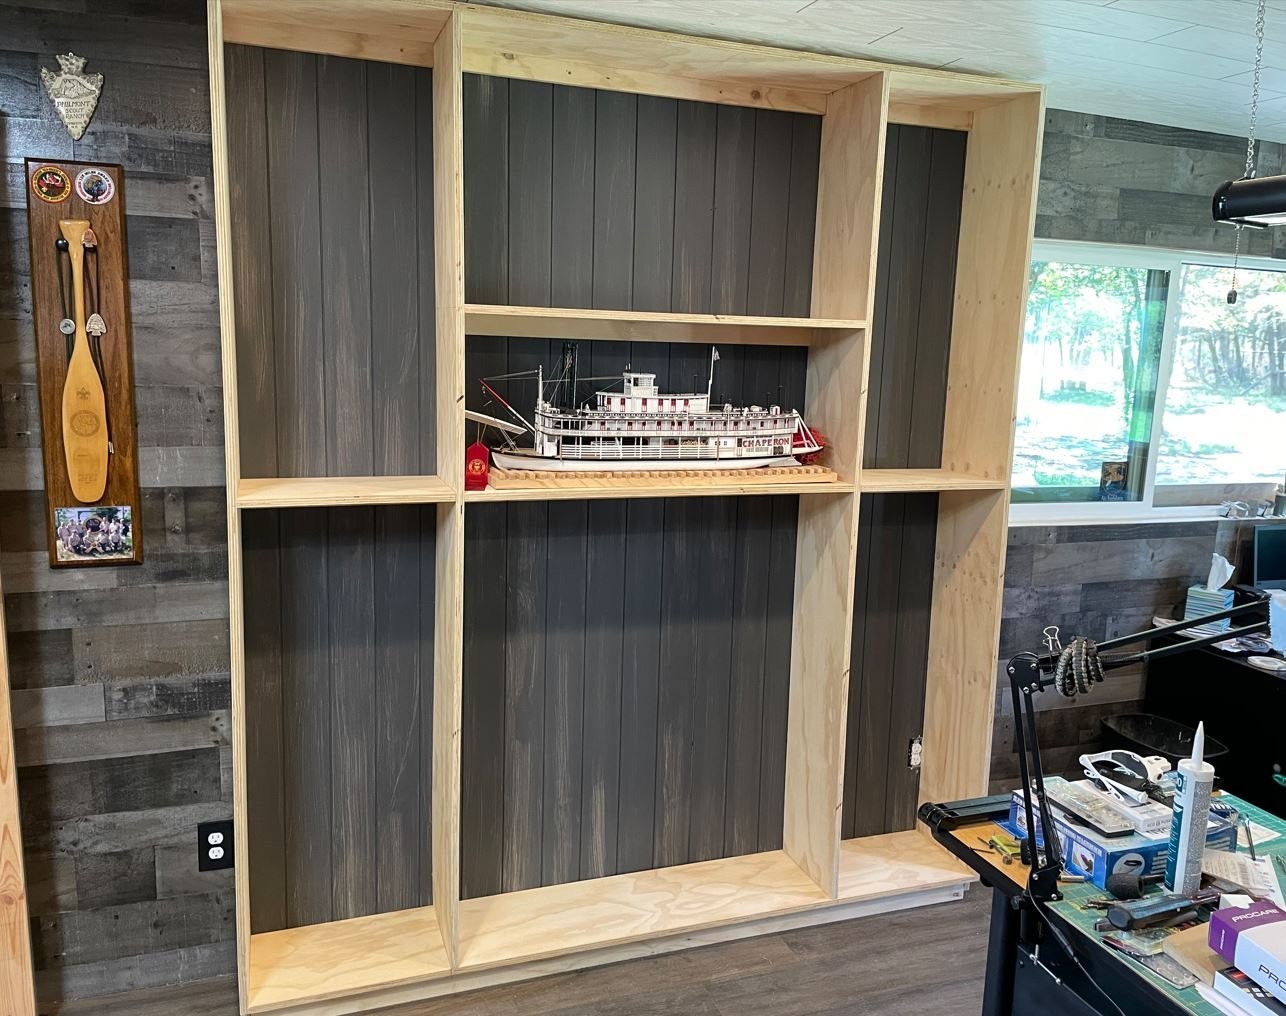
Well once again I failed at taking progress photos of my work, I guess the anxiousness of me wrapping this project up got the better of me. The weather has finally cooled down, so more attention needs to be focused on other projects and to be honest, I am really ready to sit down at my new bench and start making some sawdust. The past couple of months that I have actually been doing “work” work in my new room has found me staring at the incomplete hull of my Caroline towboat, just chomping at the bit to get back to work on her. So for now, I am calling this project done. The bookcase is finished and my nicknack shelves are done, the only thing that remains is the lighting and glass for my Chaperon, but I’m putting that off for the time being. For now this will have to do.
The finished results of my bookcase and all my junk to fill its shelves. Still have more to move in, just haven’t found all the boxes with the rest of my books.
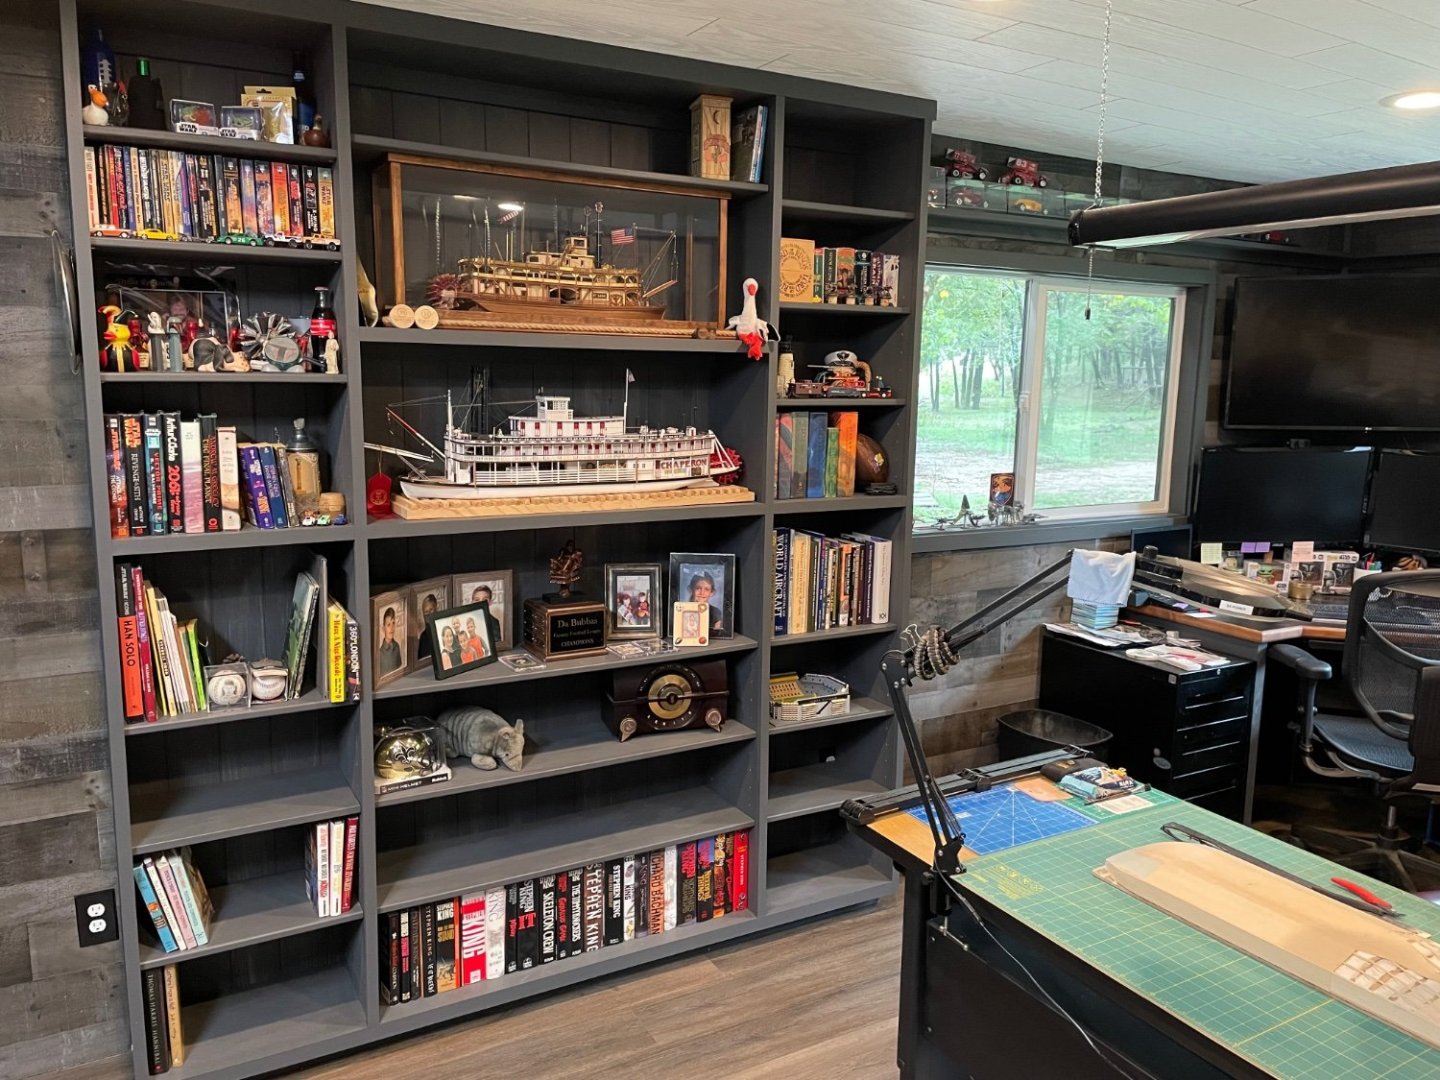
Thanks for following along. For now I am leaving this build open for some final shots once I get the Chaperone properly displayed. But for now, I’m calling it good.
-Brian
-
-
That’s quite the unique load she’s carrying. A far cry from the normal cotton bales. 😁
The masking tape tarpaper turned out great! It’s hard to tell from the pictures, but did you leave the scribe lines for the skylight visible through the tape?
-Brian
- Cathead and bobandlucy
-
2
-
Thanks for the update Tim. You guys' level of detail is just amazing!
-Brian
- Keith Black, Cathead, davyboy and 2 others
-
5
-
1 hour ago, yvesvidal said:
Chaperon is in place, but you will need to protect it from the dust.
Thank you Yves! She’ll have a proper, dust free place once I get the bookcase completed. I just wanted to make sure she’d fit and at a good viewing angle so thats the reason for her sitting there right now.
-Brian
- yvesvidal, mtaylor, Old Collingwood and 6 others
-
9
-
Howdy everyone,
I know it has been a while since I last updated this log, This has been one busy summer and I have hardly had time to work on any personal projects. Most of the last few months have been spent helping my daughter and son-in-law get their house finished, most of the stuff they didn't want to contract out like running the 900' water line, fencing, dirt work, tree clearing and other odds and ends. However with the bulk of the work done I finally found some time focus on my projects and get some work done on the shipyard.
I am not real sure what day I left off on so I will just post some of the things that I have accomplished.
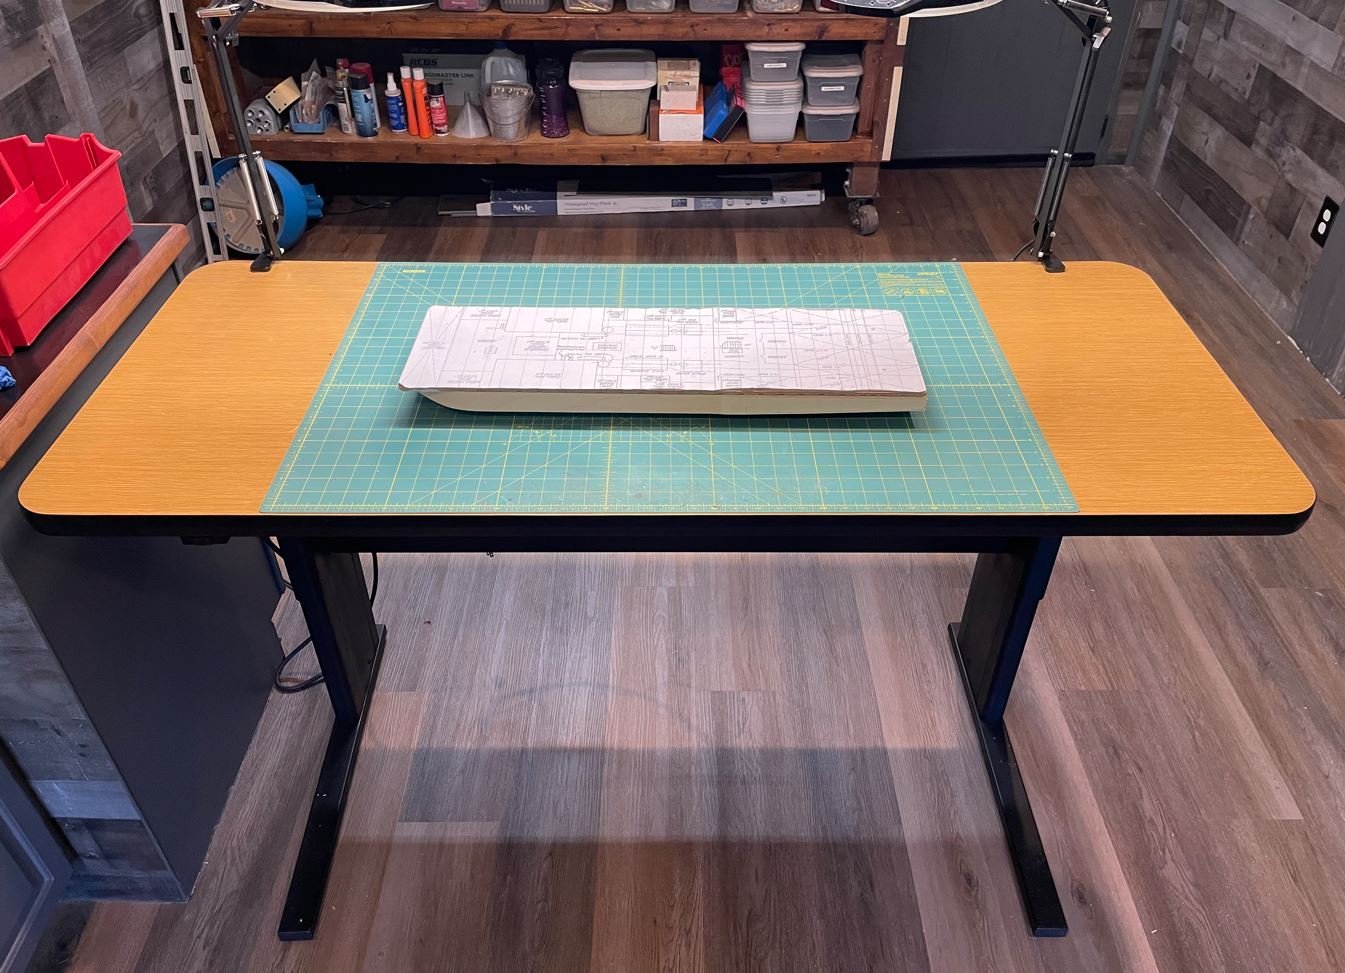
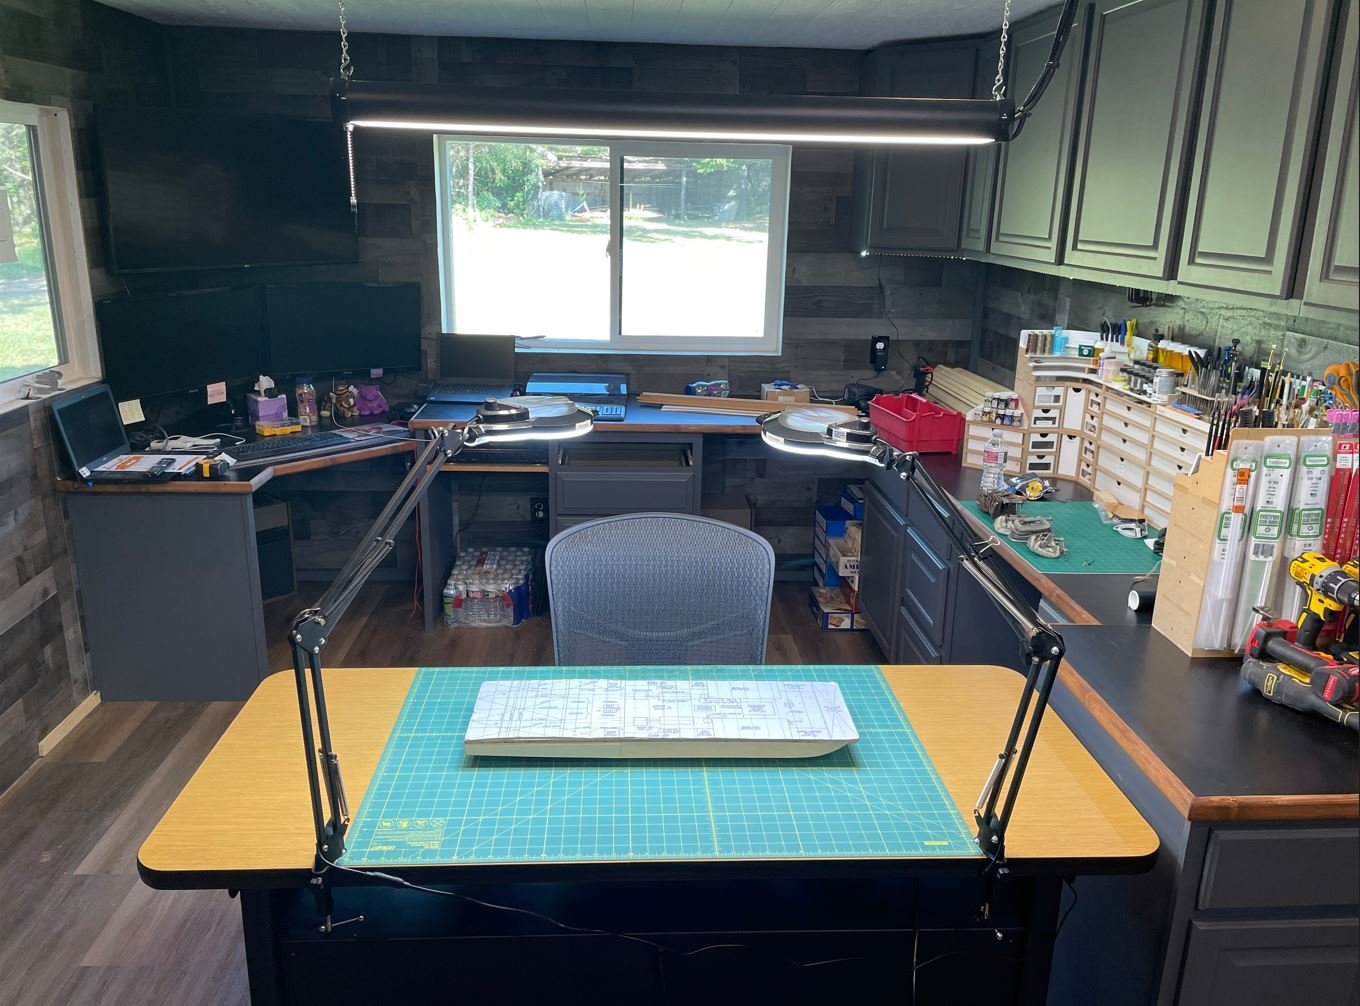
First, I took ,my adjustable work bench and scaled sown the top a bit to fit in the room. The length had to be cut down to 5' from 6' and I squared off the front to make it more uniform.
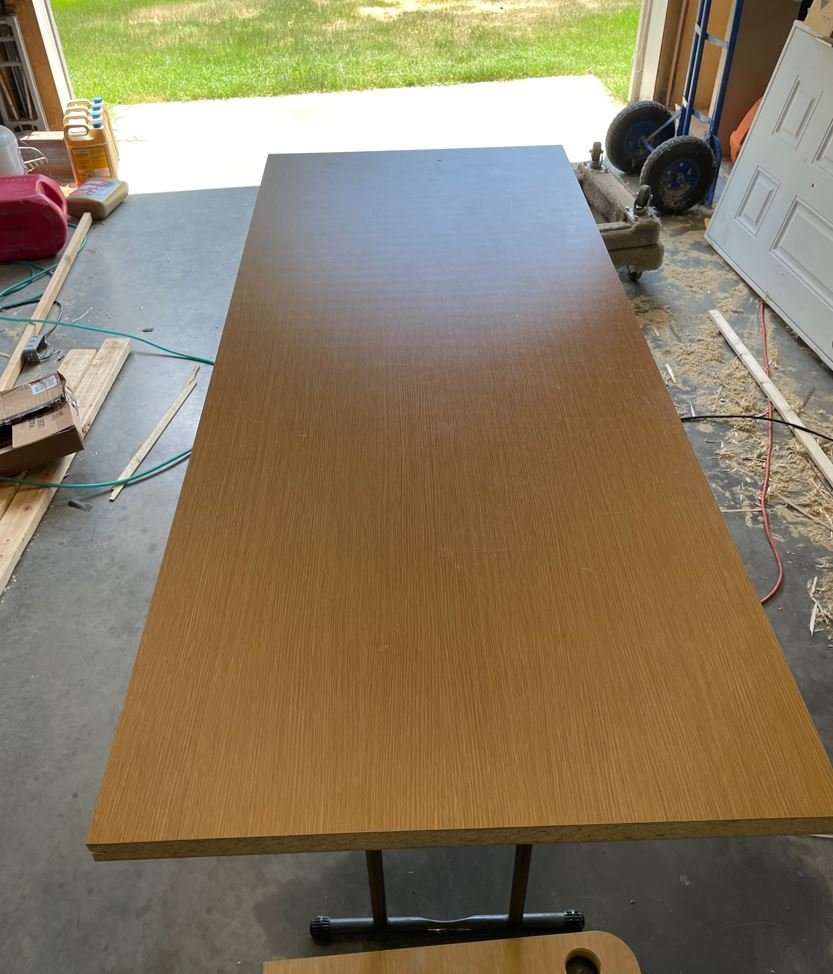
I took the old gray, dinged up bottom and gave it a fresh coat of flat black, to fit my color scheme of the room a little better.
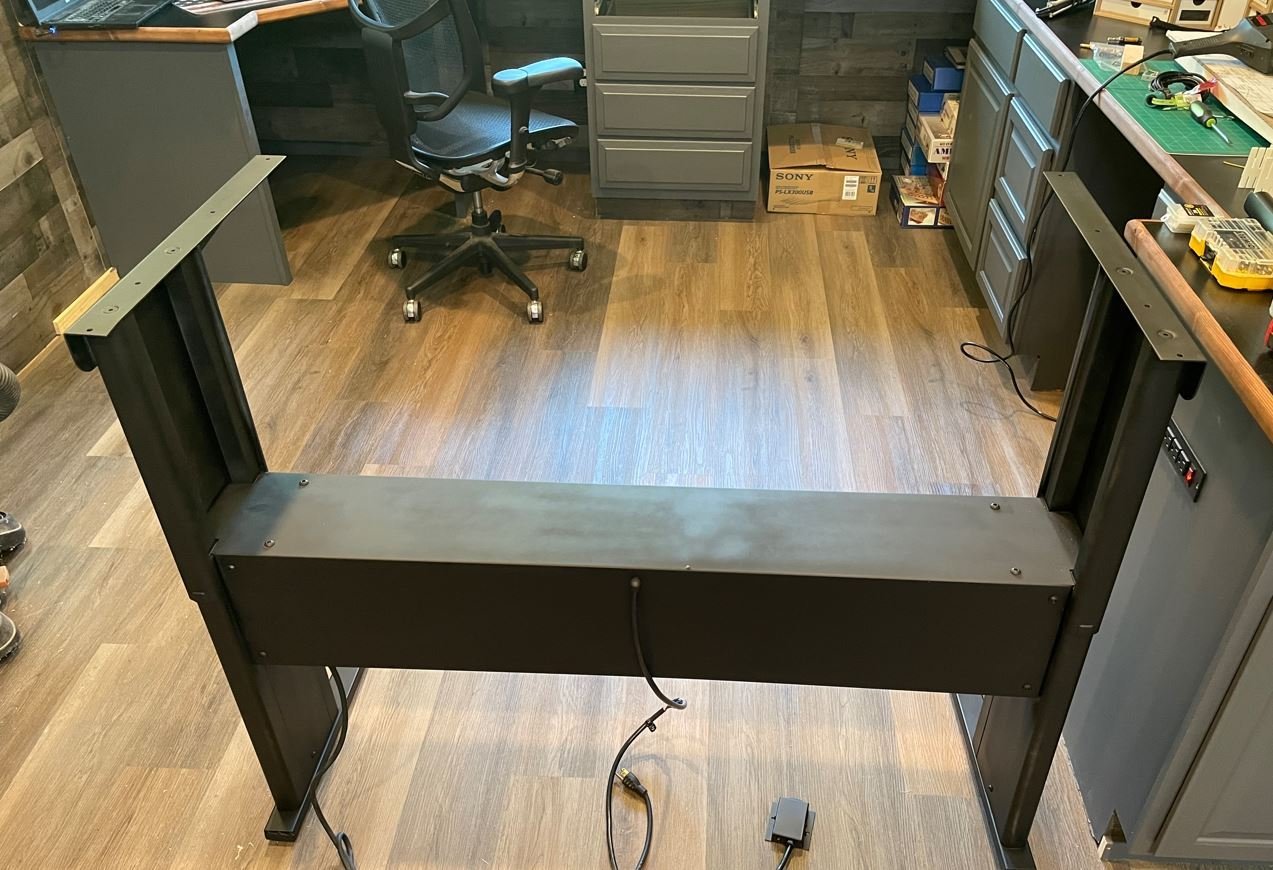
Next, I wanted to dress off the edges of the top, so I purchased some vinyl trim to protect the edges, routed the groove and installed the edging.
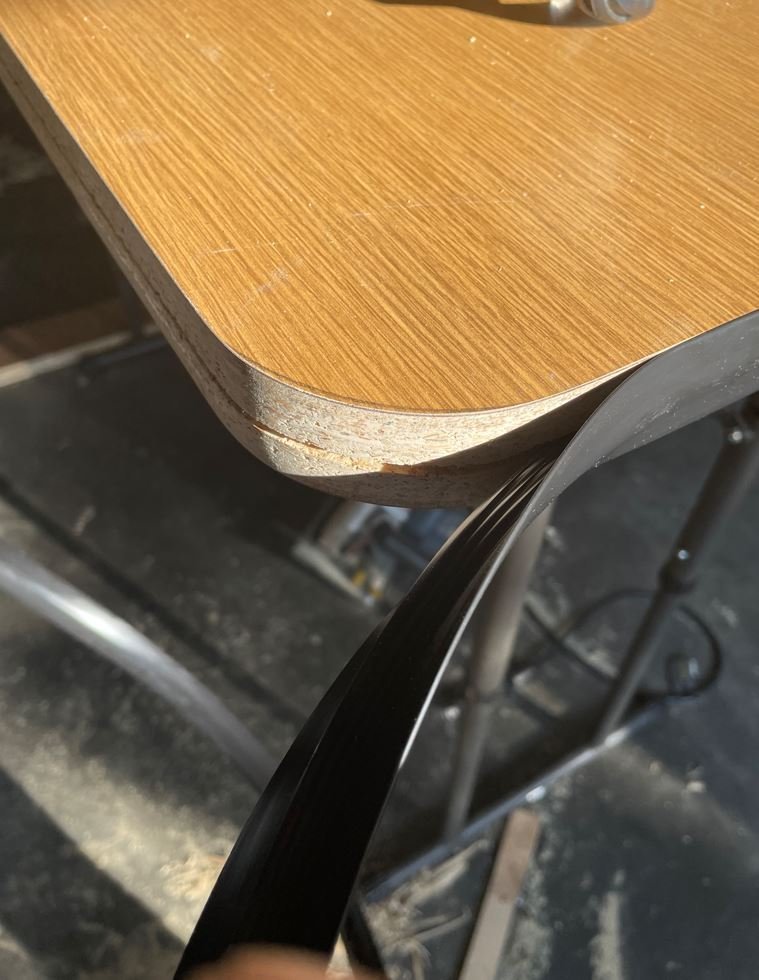
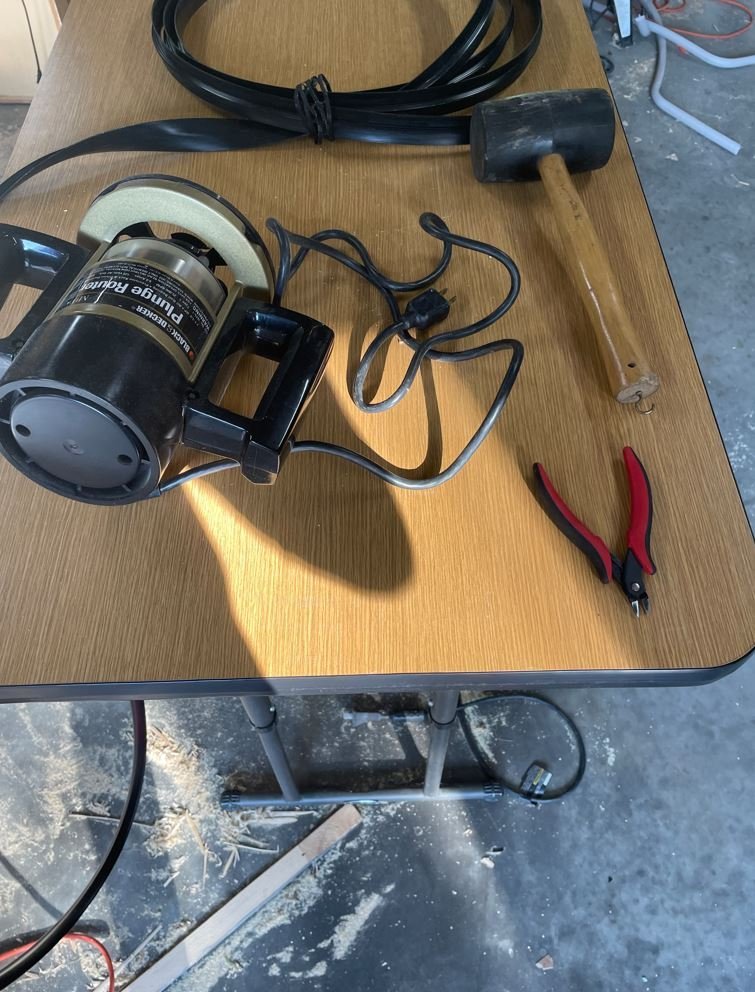
The final product, I am completely satisfied with.
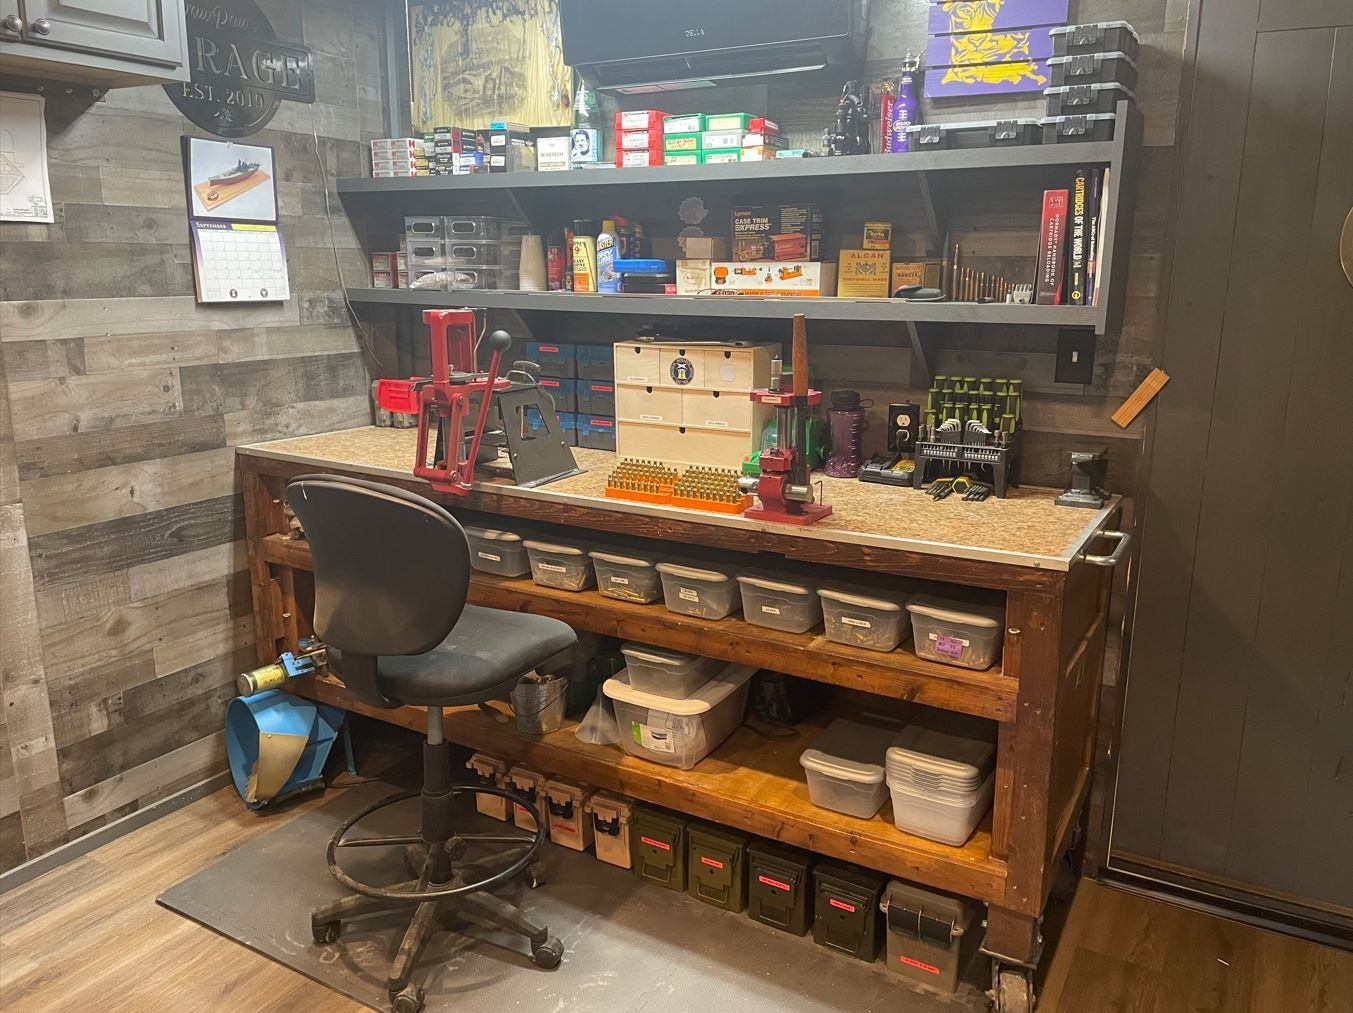
Then it was on to building the shelves for my reloading bench to help organize some of the clutter. I didn't take any pictures of the building process, but this is the finished results.
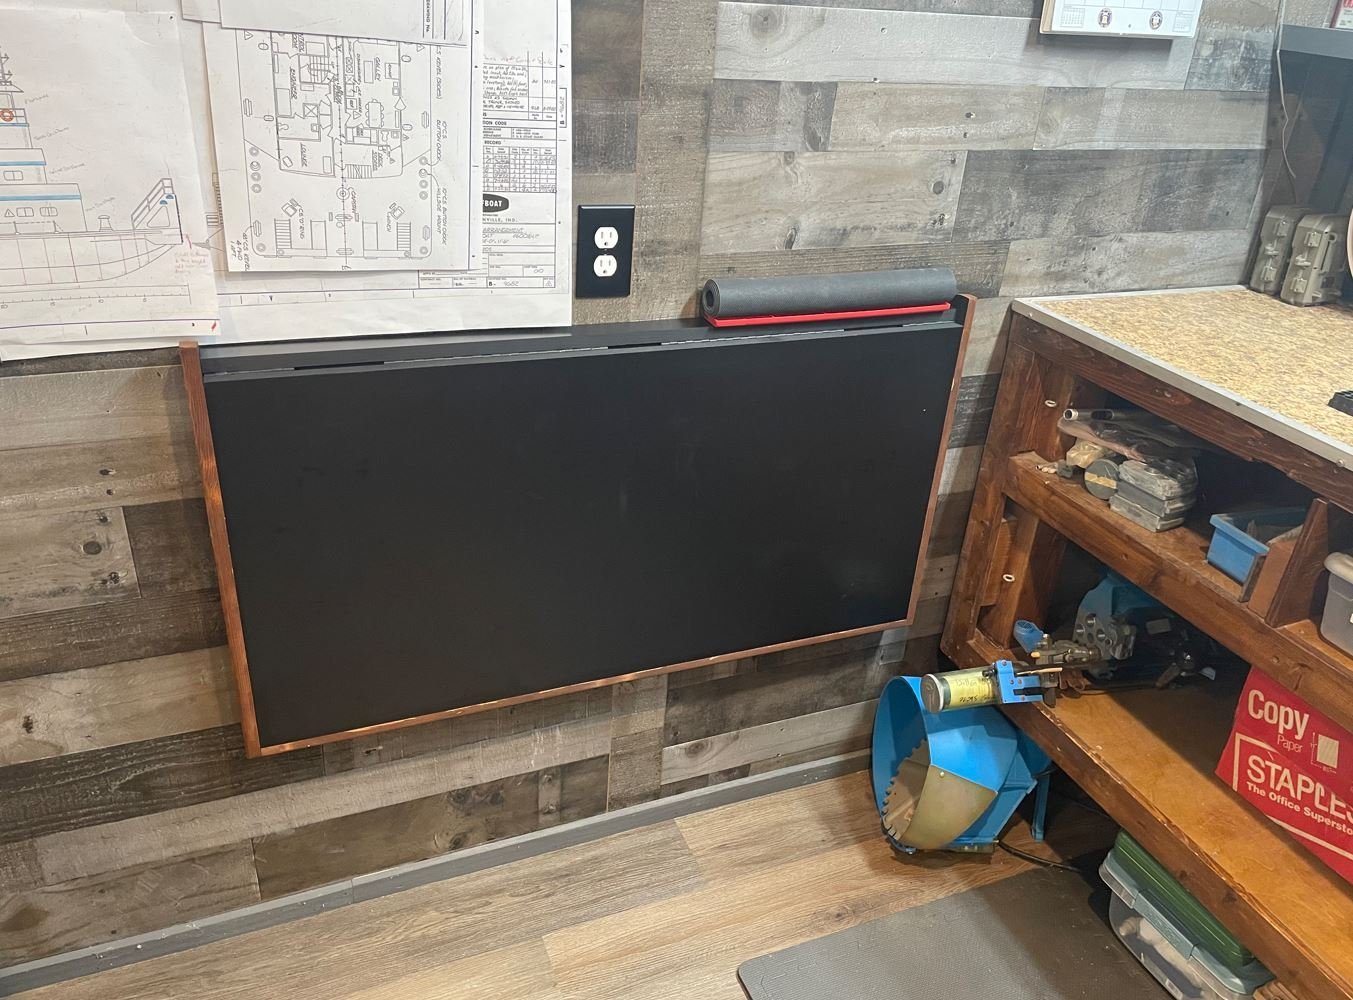
Next, I wanted to have a place that I could use to clean my guns, or work on them, or other tasks, but didn't want to take up more space, so I decide to build a Murphy Desk. Some thing that would fold up out of the way, but could be setup quickly if I needed the extra counter space. Again, I failed to take pictures of the build, but this is what I came up with.

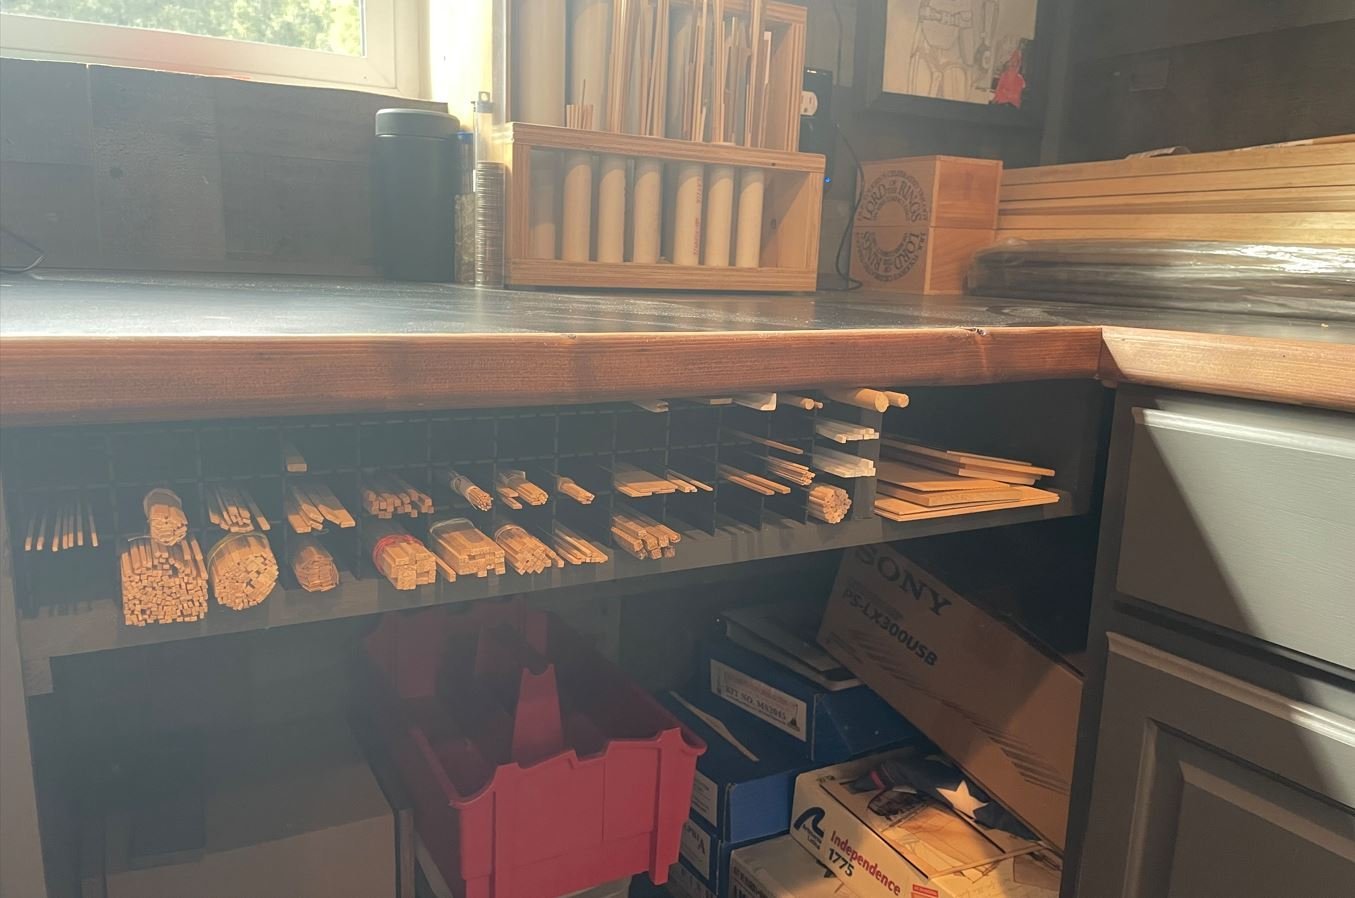
Finally, needed a place to store all of my wood strips that wouldn't take up valuable counter top space. Some place out of the way, but with easy access. I decided that a small shelf under my storage area was the perfect place. I just purchased some inexpensive drawer dividers, turned them on their side and glued them into place on the shelf. Now I can keep them nice and organized and out of the way, and all I have to do is a 180 from the workbench and grab what I need.
I've started work on the book/display case. So far I have managed to get the main framework of it built, I just need to cut and install the facing and trim, then paint it all up. I plan on running lights to the display area, where my Chaperon proudly sits temporarily and I will also install a glass panel on the front to help keep the dust off of her.
More to come soon. The brutal Texas summer has finally started to subside and the weather is getting a bit more tolerable to work out in the barn.
Thanks again for stopping by, and I hope to not wait so long between updates. I'm really ready to be done with this project and get back to the Caroline. Her hull has been sitting on the workbench, neglected and untouched for way too long.
-Brian
-
-


USS Tennessee 1869 by Keith Black - scale 1:120 - Wood Hull Screw Frigate - ex Madawaska 1865
in - Build logs for subjects built 1851 - 1900
Posted
Beautiful Keith! I have often found myself in the quandary of getting the inside work done before the shrouds or visa-versa.
Doing the internal work without the shrouds is so much easier to access, but I’ve always thought that once the inside work was done and the shrouds added later that the tension of installing the shrouds would cause a sag on the inner lines. So, I’ve always worked from the outside in, praying to the ship gods that i didn’t snag a line and dump the whole thing in the floor. Oh the trials of model shipbuilding. 😁
-Brian