gjdale
-
Posts
4,894 -
Joined
-
Last visited
Content Type
Profiles
Forums
Gallery
Events
Everything posted by gjdale
-
 Excellent work Daria! Thank you for sharing your build with us. I think pretty soon you'll be helping Dad with his model too!
 -
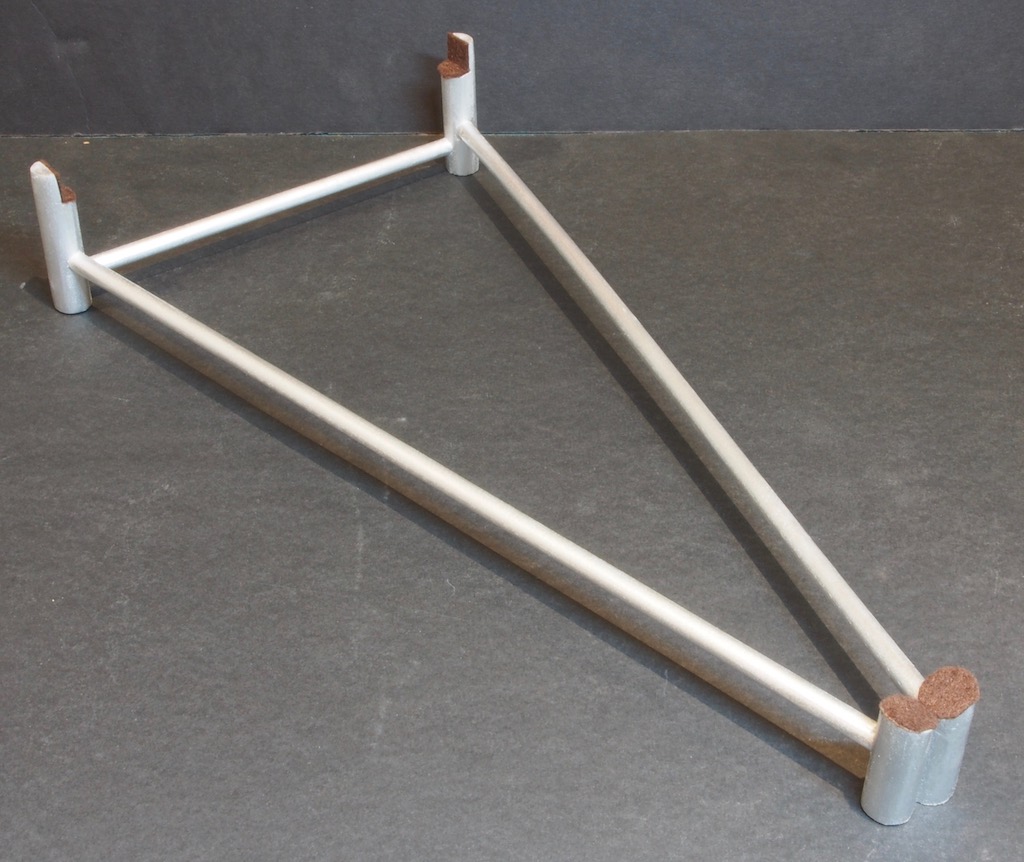
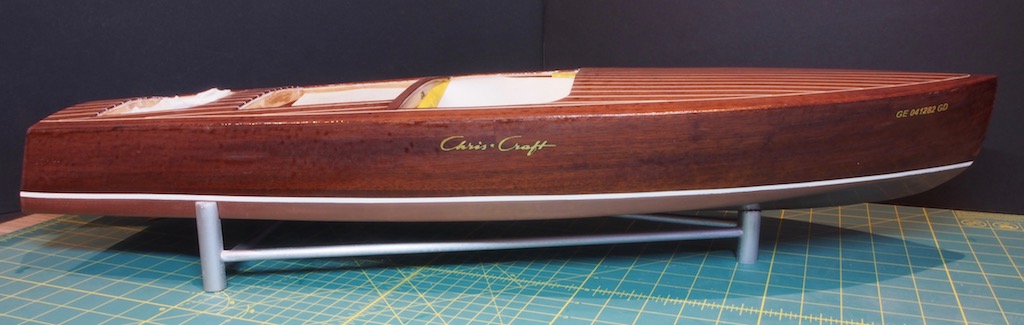
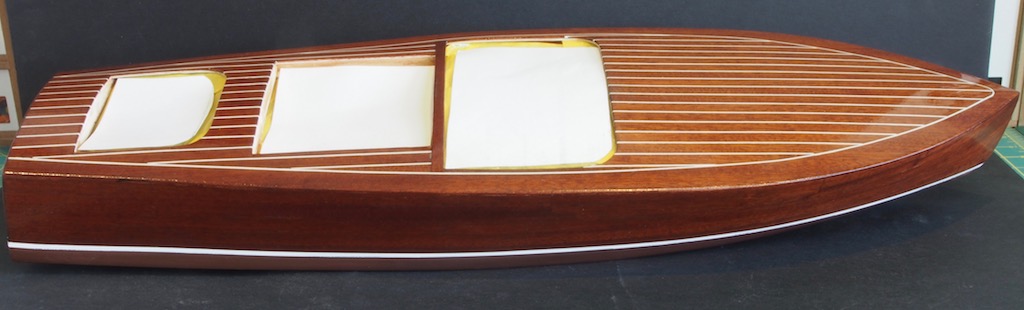
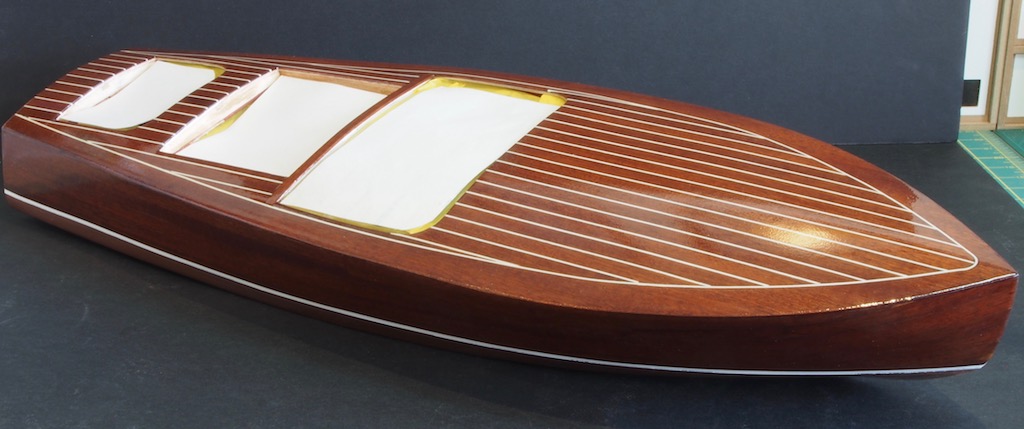
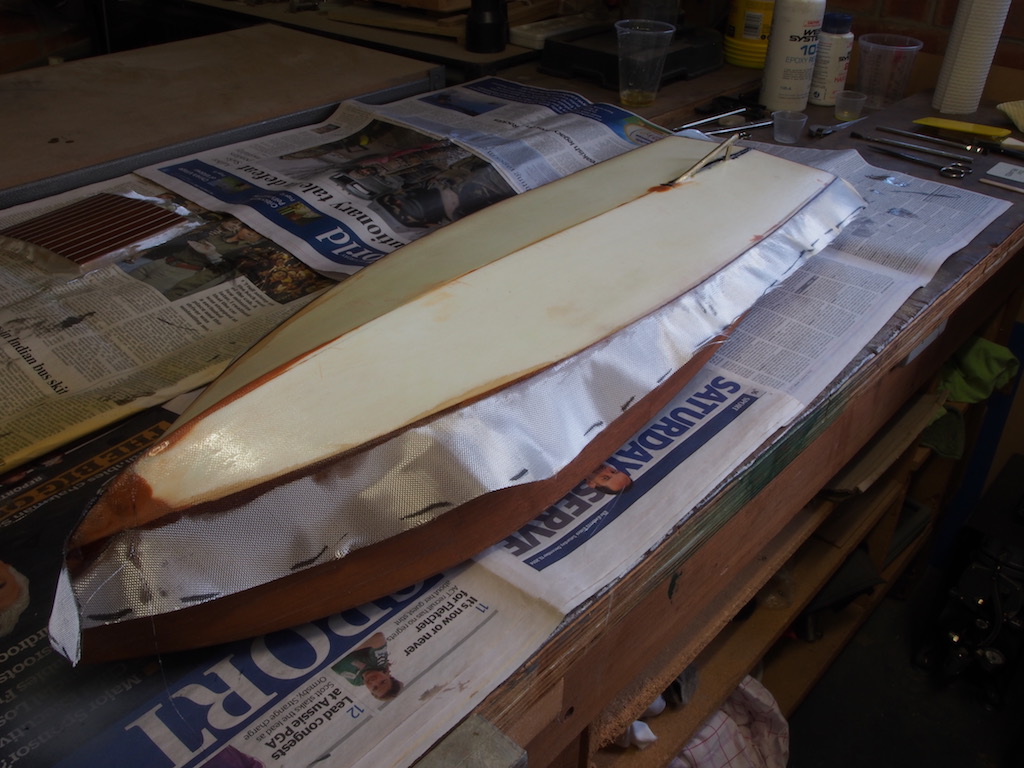
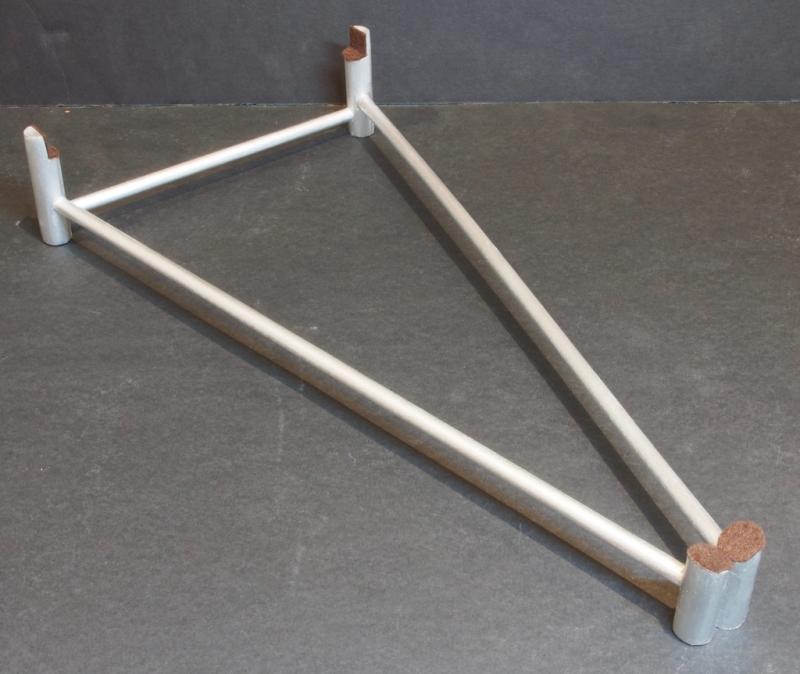
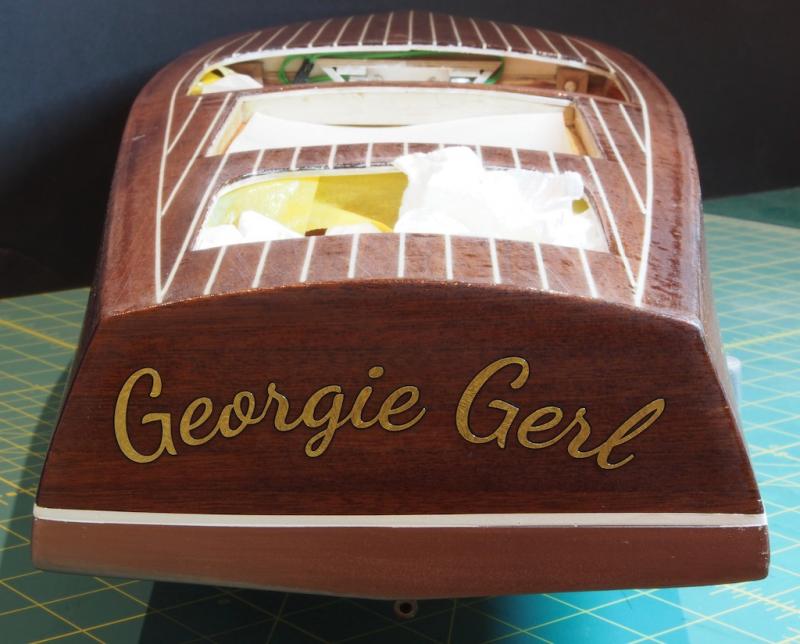
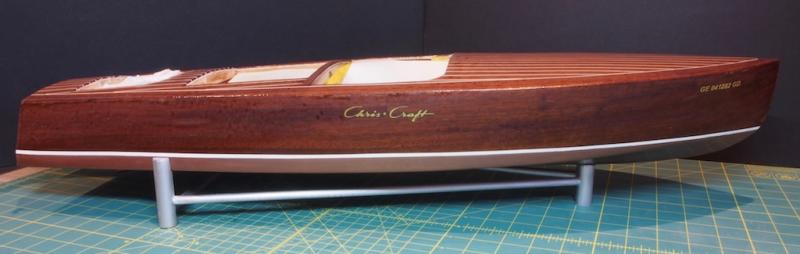
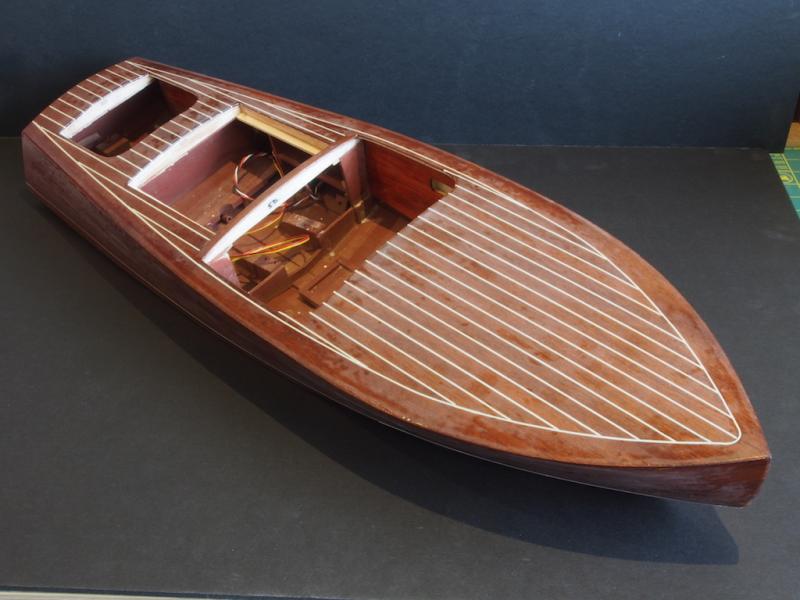
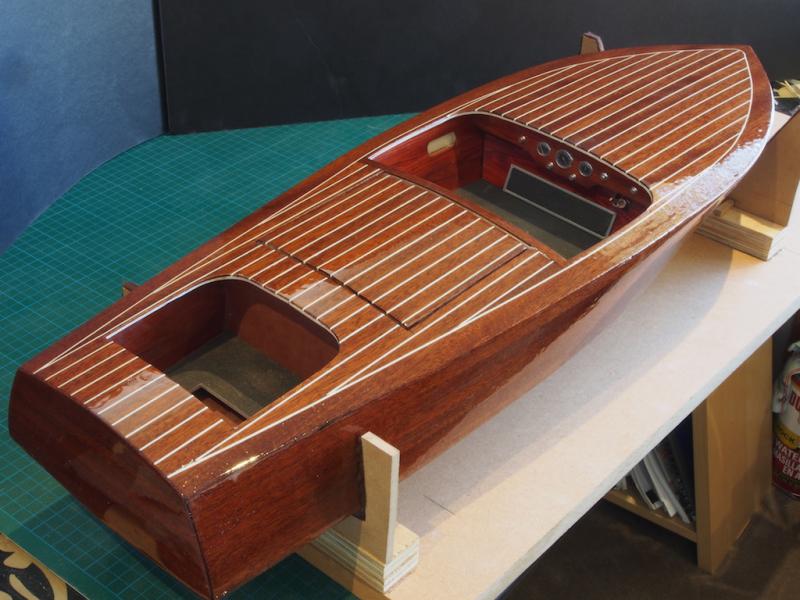
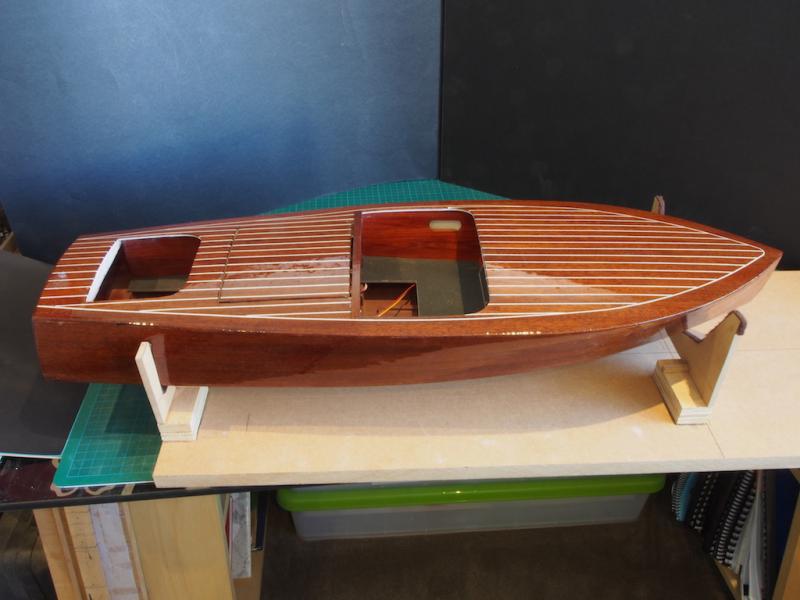
A Stand and some Graphics Now that the finish on the hull is approaching a state that I’d like to preserve, I decided that it was time to make a stand. So today that’s what I did. Not sure yet if this will feature as part of the final display but in the meantime, it is quite functional. It is simply made, copying the design in Pat Matthews’ excellent book. The uprights are 16mm dowel, while the cross-braces are 8mm dowel. I finished it off with Vallejo Metal Colour “Chrome” and the Vallejo Metal Varnish (Gloss), all applied via the airbrush. One advantage to using these paints is that they dry almost instantly. A coat of primer, a coat of colour, and a coat of gloss, all applied in quick succession through the afternoon. The contact points have a self-adhesive felt applied for protection. Then it was time to apply the graphics. I first gave the entire hull a light wet sand wit 600 grit paper, so the overall look is a bit ho-hum (the gloss will return with the next coat of clear). The graphics are vinyl and come from Callie Graphics in the US. I went there following a recommend of several others over on the RC Groups forum and must say that I’m delighted with both the service and the product. I had a quick email conversation with Callie, sent her a pdf of the general design and told her what they were for. She quickly came back with some proofs for me; we made one minor change; another set of proofs and we were in business. A few days later the finished product showed up in the mail. I ordered two complete sets and with postage the whole lot cost me less than AUD $20. So now for the big reveal! I may have mentioned that this is going to be my wife’s boat, so it is named for her, Georgina. Georgie Gerl (yes, the spelling is correct) is her email “handle”. And of course, one must have the Chris Craft logo and a registration number: If you look closely, you will see that the registration number is GE 041282 GD, which is a combination of our initials and the date of our wedding (in non-American date format). I know, I’m just an old romantic…….. The admiral inspected the graphics on completion and has given her seal of approval. Next up, sealing the graphics under several more coats of clear varnish……………
- 339 replies
-
- 24
-

-
- dumas
- Chris-Craft
- (and 3 more)
-
Thanks guys. Keith - yes, I was aware of the little bit of "orange peel" but am confident I will deal with that with the remaining coats and sanding. Thanks for the links for the micromesh - I've got some really small pieces (about 50mm square) but was starting to think about finding some on a larger scale. I've just ordered a bunch from the linked site, so when the Admiral asks, I'm blaming you okay?
- 339 replies
-
- 4
-
-
- dumas
- Chris-Craft
- (and 3 more)
-
Thanks Hoff - no problem answering questions here - that doesn't count as a "highjack". It started with fibreglass cloth and 3 coats of West Systems Epoxy Resin (using their 207 Hardener). The "shiny" stuff that goes over that is a Feast Watson Spar Marine Varnish that has been diluted with 10% Mineral Turpentine and sprayed on. At the moment there is only one coat of that in place and it looks almost satin in appearance. By the time I have applied the remaining 4 or 5 coats, it will look a lot shinier. Then the hard work of polishing will begin. I have a cunning plan for that but you'll have to stay tuned to find out what that is........ Incidentally, the main reason for using the Spar Marine varnish is that it contains UV protection. As this boat is going to be exposed to the elements, it makes sense to use products designed for such.
- 339 replies
-
- 6
-
-
- dumas
- Chris-Craft
- (and 3 more)
-
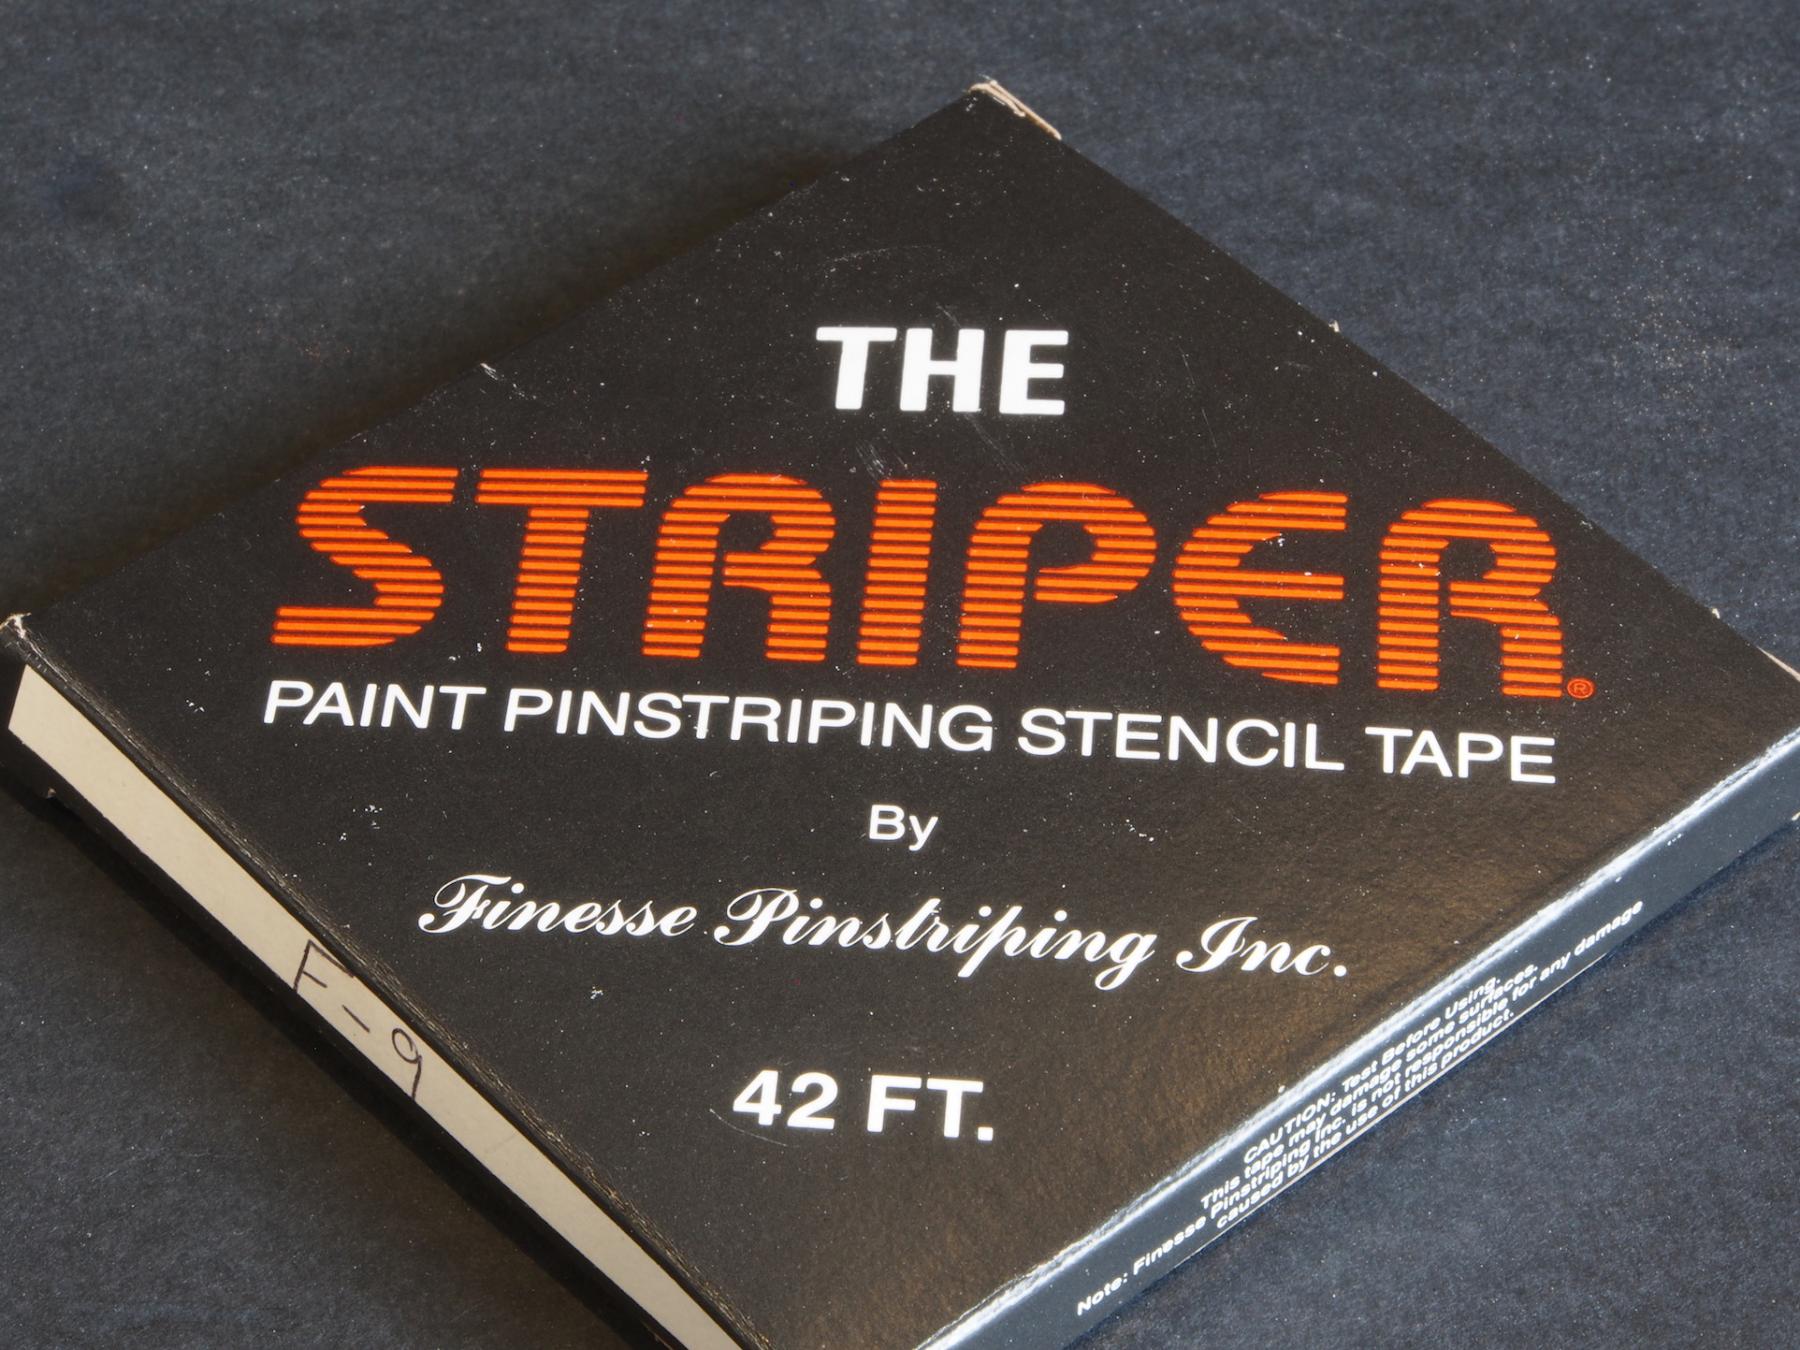
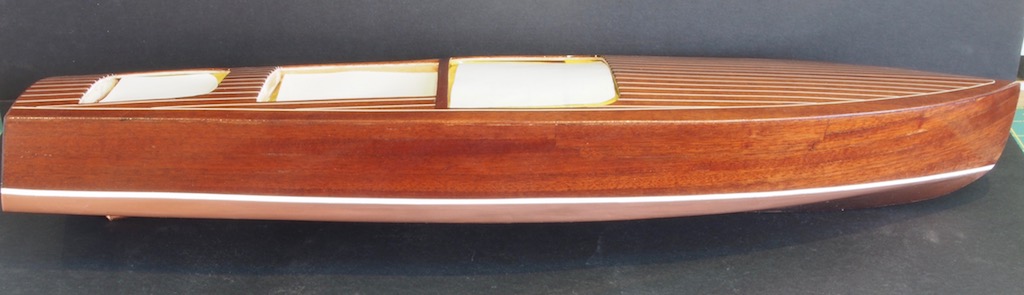
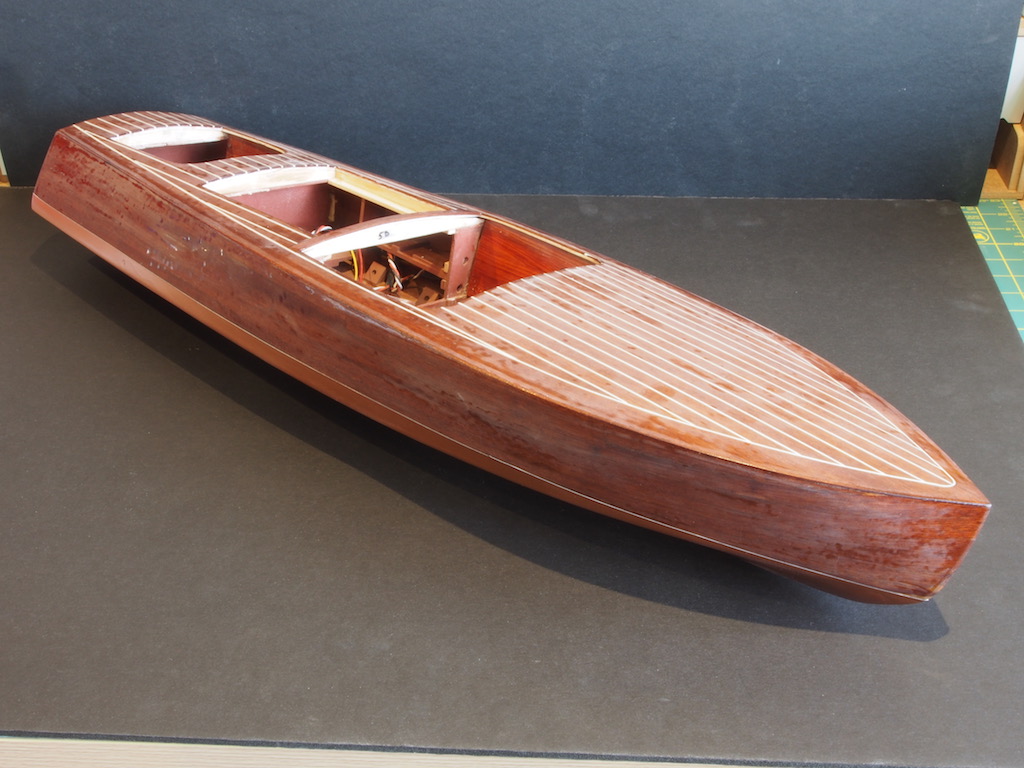
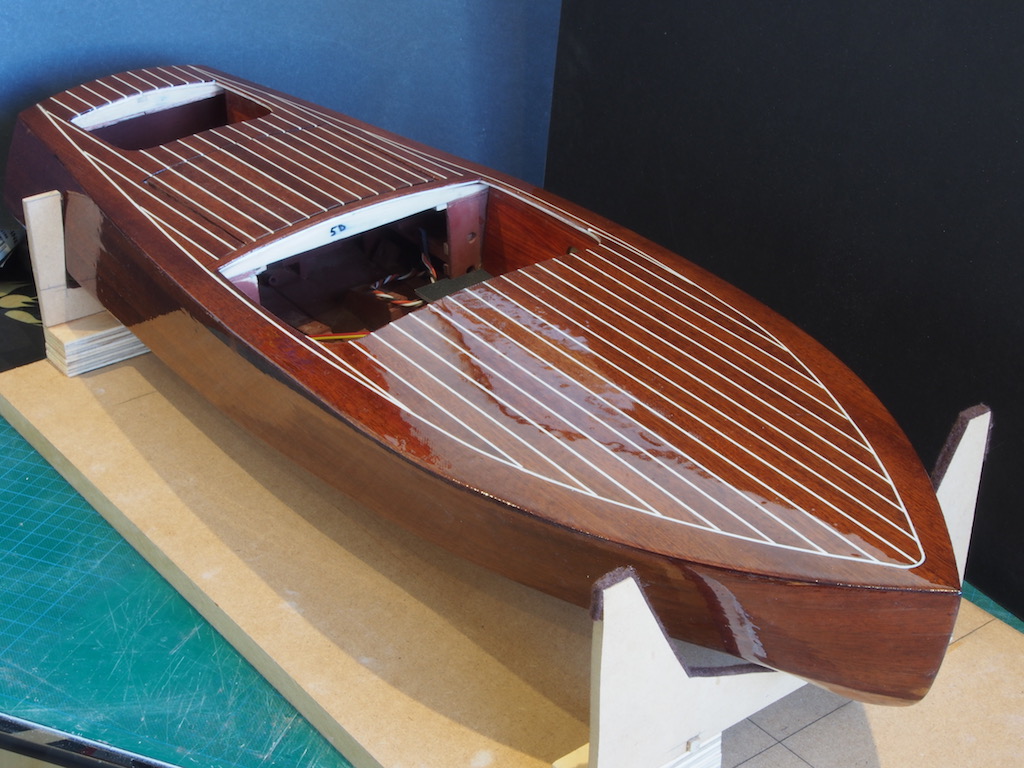
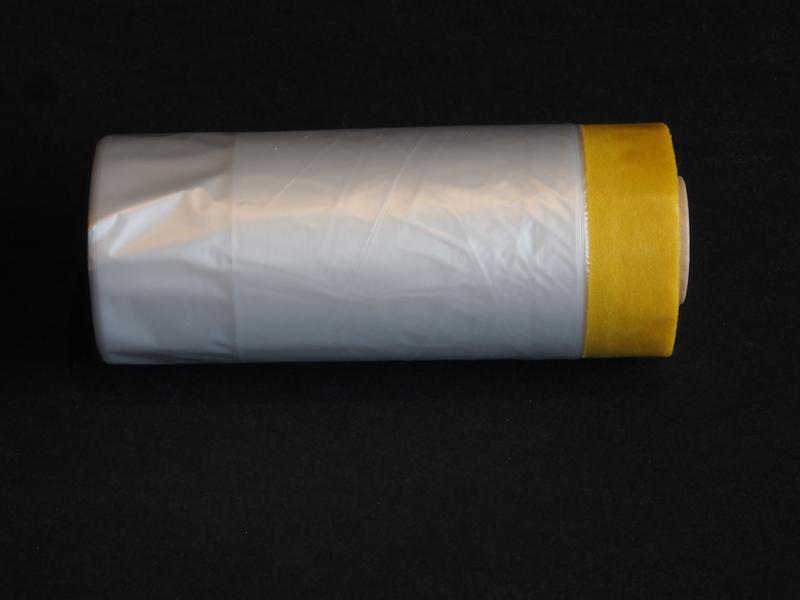
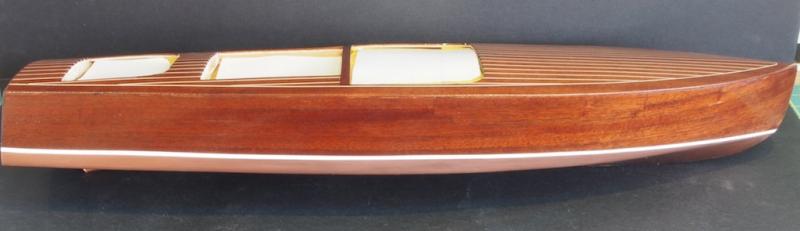
Thanks Bob, Keith, Carl and David for the comments (and the pictures David - very cool), and also for all the "likes". I applied one coat of clear coat this week in preparation for the boot topping and artwork. I used my new mini-spray gun for this and learned a little in the process – primarily that my little airbrush compressor is only just up to the job for this. The spray gun sucks a lot of air (it needs about 30 - 40psi to shoot the clear coat), so short bursts and some patience while the compressor re-charges are required. There is a little bit of an ‘orange peel’ effect evident on this coat, but that will disappear with further coats and light sanding (and improved operator technique). To apply the boot topping, I used two new products. First up, some pinstriping stencil tape from Finesse. Quite expensive, but does a super job. Essentially it is two pieces of masking tape with a clear carrier tape over the top. It is applied as “one” tape, and then the carrier tape is removed, leaving two perfectly parallel masking lines. The second product I stumbled across in the LHS while picking up some extra paint. It is a masking tape combined with plastic sheeting. It comes in a roll like this” As you can see, one edge has standard Tamiya yellow masking tape, which is pre-attached on one edge to some thin plastic sheeting that unfolds to be 550mm (nearly 2 ft) wide. By running the tape along the outer edge of one side of the Finesse stencil, the sheet was wide enough to go completely over the model where it was taped down with some more Tamiya tape to the stencil on the other side. The process was repeated for the opposite side of the stencil and in no time at all the hull was completely masked except for the boot topping space. If anyone is interested, the Tamiya product ID is 87164**640 The boot topping was airbrushed on using Vallejo Model Air White (71.001) at about 15psi. The first coat was left for about two hours (I had to go out) and then a second coat applied. About 30 minutes later I removed the masking and voila! I’ll leave this to fully cure overnight and then apply another clear coat before starting on the artwork.


- 339 replies
-
- 18
-
-
- dumas
- Chris-Craft
- (and 3 more)
-
What a great thing to do with your daughter Mike! Kit looks great - especially for the price. I'm pulling up a chair for this one. Don't forget to get your daughter to make some posts herself so we can all say hello and give her some encouragement.
-
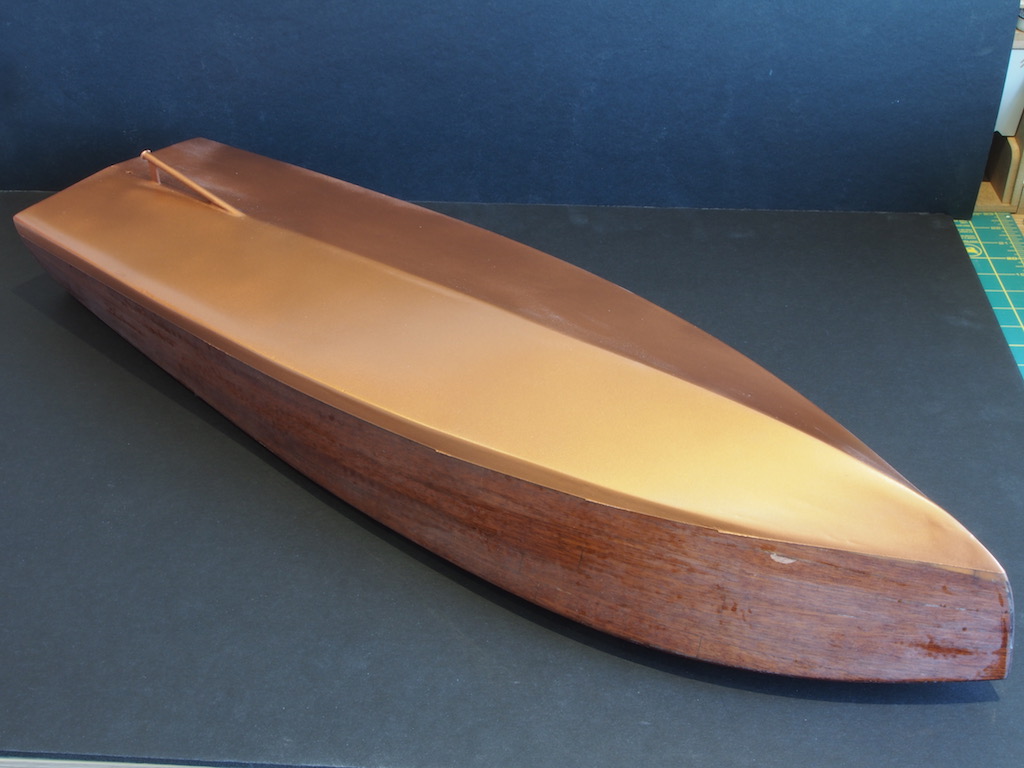
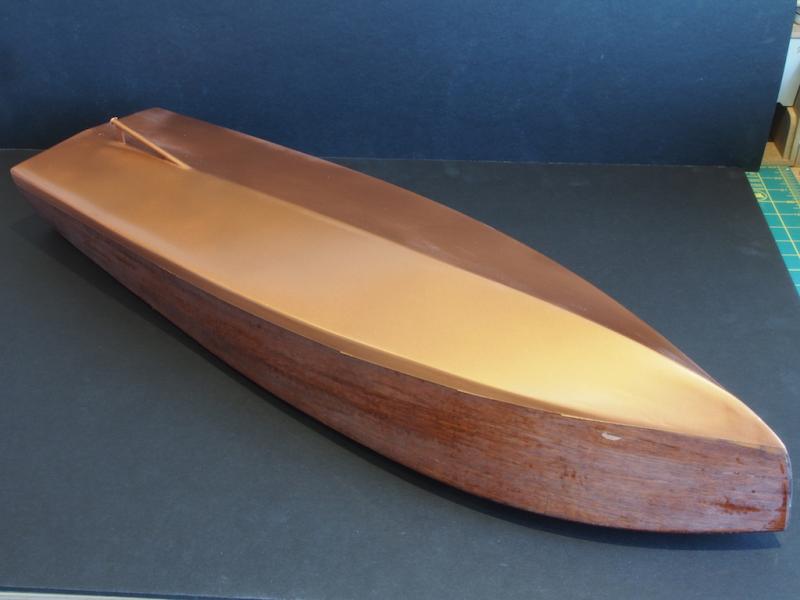
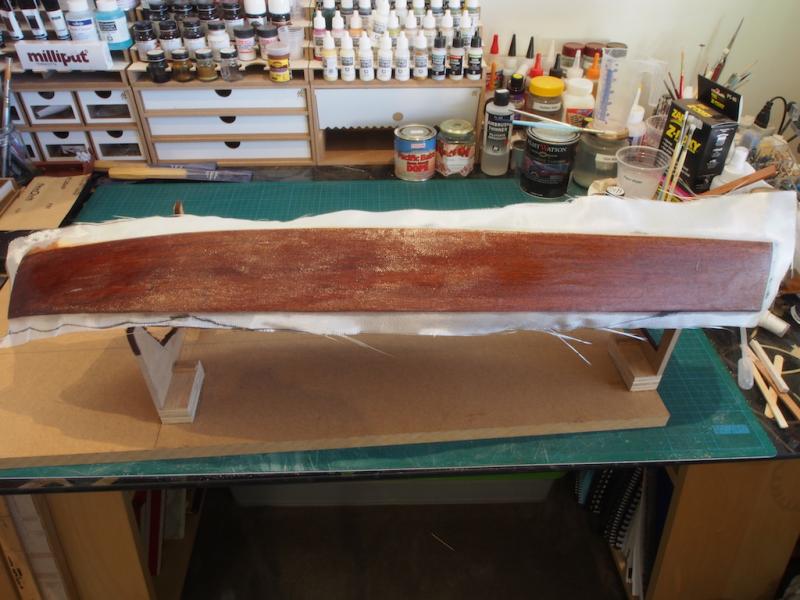
Thanks again for all the encouraging comments and "likes". Progress seems to have been slow, but that's because I've spent a lot of time waiting for resin and/or paint to dry!. A minor update tonight: After a third coat of resin, the hull was wet-sanded with 120, 240 and 360 grit sandpaper and is now ready for finish coats. That left me with something of a chicken and egg dilemma. Should I apply the colour to the bottom of the hull before commencing clear coating, or should I clear coat the top/sides to a finished state before applying the bottom colour? I’ve seen it done both ways, so I figured it didn’t make a critical difference in the end. I decided that my approach would be: Apply bottom colour Apply one clear coat over everything (mainly to protect the bottom colour from lifting with the masking for the next stage) Apply waterline boot-topping stripe Apply graphics Apply remainder of clear coats (to a total of five coats) I decided on a copper bottom colour as this is fairly typical for these boats. I marked the waterline as indicated in the plans and then used Tamiya masking tape to define the “wet edge”. Regular painters tape and some scrap paper completed the masking job and I was away. I started with two coats of white automotive primer, with a very light sand afterwards, and then applied three coats of Krylon “Premium Copper Brilliance” from a rattle can (as per my earlier trials), with a light wet sanding with 360 grit after the first coat and 600 grit after the second coat. I decided that I was happy with the result and unmasked her this evening. There is a little bit of fairing required to remove the raised edge along the ‘wet edge”, but otherwise it looks okay – certainly a big improvement on the white plastic! The photo shows the sanded resin with a whitish appearance. This will disappear with the application of the clear coat. Here’s a couple more shots to show overall progress. Next I will apply a coat of clear over the entire boat before re-masking for the boot-topping. This painting lark is a slow process….

- 339 replies
-
- 14
-
-
- dumas
- Chris-Craft
- (and 3 more)
-
That's great news indeed Jerry. Bluenose is looking splendid - but from the sound of it, you don't need us to tell you that any longer!
-
Dumas do sell some three-bladed brass props of varying sizes. I'm not certain, but I think they may be Raboesch ones. I bought one for my Chris Craft and am happy with it. I think M.A.C.K. Products also offer a range of brass props.
- 146 replies
-
- 2
-
-
- dumas
- Chris-Craft Commander Express
- (and 2 more)
-
Nice haul Mike. Are you going go with the plastic propellers or replace them with brass ones? (Hint, hint )
- 146 replies
-
- 3
-
-
- dumas
- Chris-Craft Commander Express
- (and 2 more)
-
Hi Joop Ham, I made my own blocks following Chuck's method, with some minor mods of my own. You can see my methodology in my HMS Victory build log, starting from post #374 on pg 19. Here is a link to that page. http://modelshipworld.com/index.php/topic/163-hms-victory-by-gjdale-finished-mamoli-scale-190/page-19 I must say, the method works really well and I now make all my own blocks this way.
-
Congratulations on the book deal Ken. I'm sure the second edition will be a sell-out as well.
-
Just stunning Nils. Such a treat to see the "overall" photos too.
- 2,625 replies
-
- 3
-
-
- kaiser wilhelm der grosse
- passenger steamer
- (and 1 more)
-
Nice to see you back at the bench Andy. Looking forward to following your progress again.
-
At last count Mike, 10 people (including me) liked your boats. So I guess you have at least 10 friends........
- 225 replies
-
- 6
-
-
- chaperon
- model shipways
- (and 1 more)
-
Great to have you back in business Jerry!
-
Looks great Rusty. Looking forward to seeing resumption of play.
- 310 replies
-
- 2
-
-
- cheerful
- Syren Ship Model Company
- (and 1 more)
-
John, Thanks for looking in, and for the question. The answer is, I have absolutely no idea! I don't understand why a chopped mat would be less weight - at 2oz. this cloth, while not the lightest available, is still pretty light. As for layers of resin, from what I've read (and experienced so far), three layers seems to be the common wisdom for "minimum" number of layers of resin: first layer to adhere the cloth to the substrate, second layer for general filling of the weave, third layer for final filling of the weave. Of course, more layers may be necessary, but I can't see fewer layers being used, unless using something like the method mentioned above by Pamela. I have to say, that with two layers of resin so far, the hull feels nice and solid without feeling heavy.
- 339 replies
-
- 5
-
-
- dumas
- Chris-Craft
- (and 3 more)
-
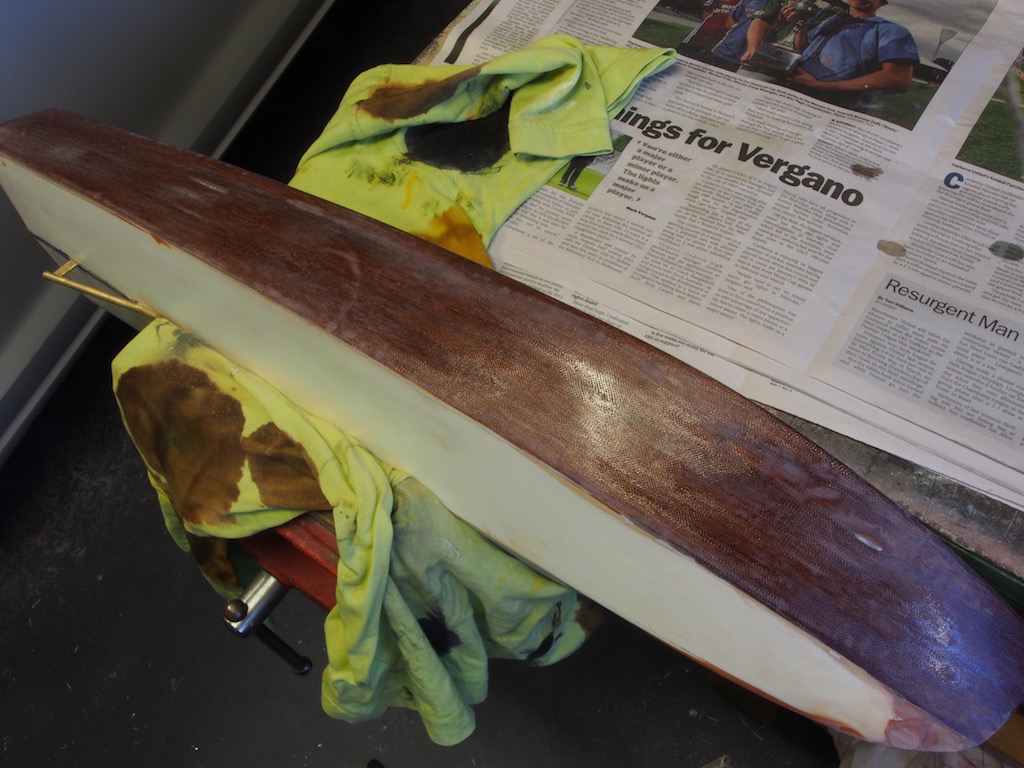
Thanks Mark, This is only the second coat of epoxy, prior to sanding. It will get one more coat of epoxy (at least) to fully fill the weave of the cloth. Then another sanding followed by several coats of spar varnish, which will be sprayed on. After the epoxy and before the varnish, I will apply the vinyl artwork so that it gets sealed under the varnish, just like on the full size version.
- 339 replies
-
- 4
-
-
- dumas
- Chris-Craft
- (and 3 more)
-
Thanks for that tip Pam - though a little late to be used for this build. I just had a quick look at the Peel Ply and while it looks good, it does have some limitations. I found this on one suppliers' site (http://www.clcboats.com/shoptips/epoxy_and_fiberglass/peel-ply-release-fabric.html): "We’ve written before about the challenge of getting smooth surfaces with epoxy and fiberglass. It takes at least three coats of epoxy to “fill the weave,” and then hours of sanding to get to a surface finish that’s ready for paint or varnish. What if you could skip two of the three coats of epoxy and most of the sanding? Well, you can. Sometimes. “Peel Ply,” also called “Release Fabric,” is a synthetic cloth that you drape over your epoxied surface as the epoxy sets up. Once cured, you can peel off the fabric, and what’s left behind is a perfectly smooth surface that’s ready for a quick sanding, or for the next round of epoxy. No runs, no sags, no low spots. Not only is the surface under the peel ply nearly perfectly smooth, it actually has a texture that improves adhesion if you have anything else to stick to it. We use it here whenever we can. Like all things, there’s a downside to this miracle. Peel ply isn’t stretchy like fiberglass, so you can only use it on really flat surfaces. Hatch covers, for example. Or the components of a stitch-and-glue boat that haven’t been assembled yet, but which are pre-coated in epoxy and/or fiberglass prior to assembly. If you try to get peel ply to conform to curves, you might end up with wrinkles in the peel ply. And the peel ply will cast those wrinkles in solid epoxy, leading to a horrifying sanding session." Nevertheless, an interesting concept and useful tip thanks Pam. Maybe next time.....
- 339 replies
-
- 7
-
-
- dumas
- Chris-Craft
- (and 3 more)
-
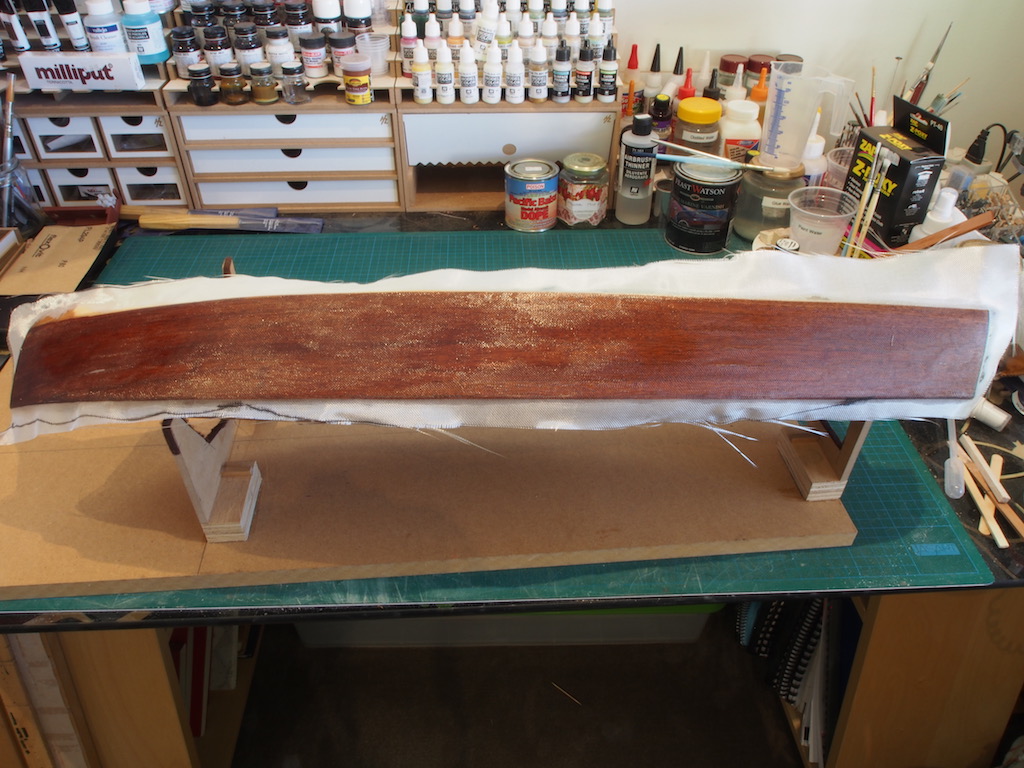
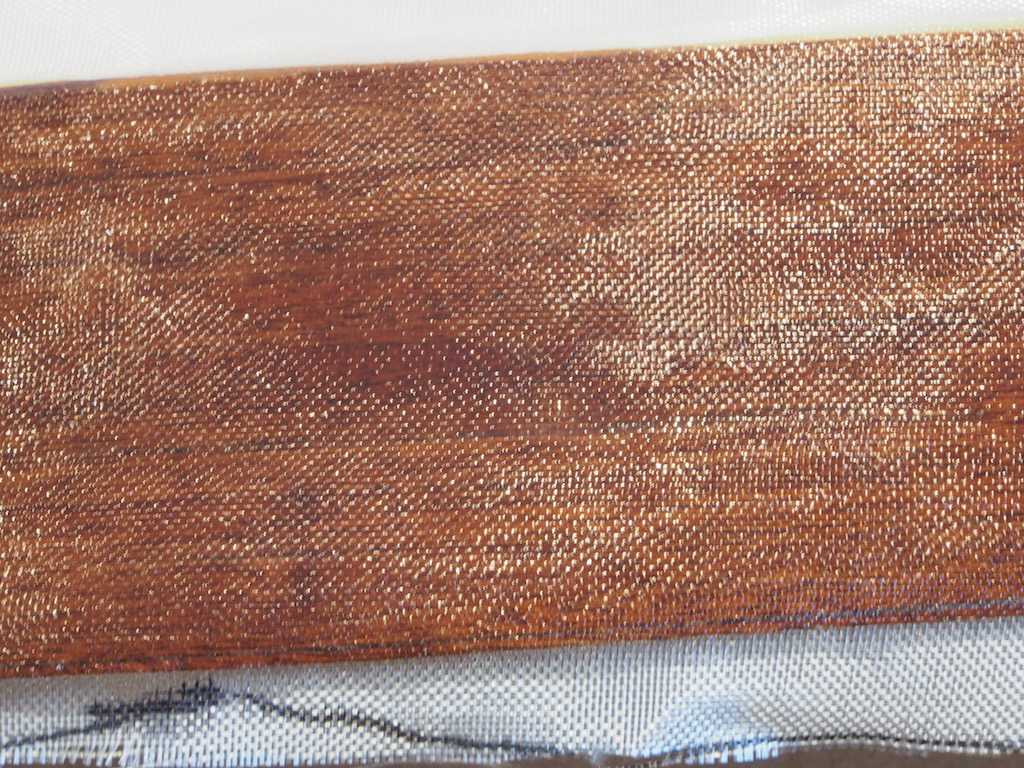
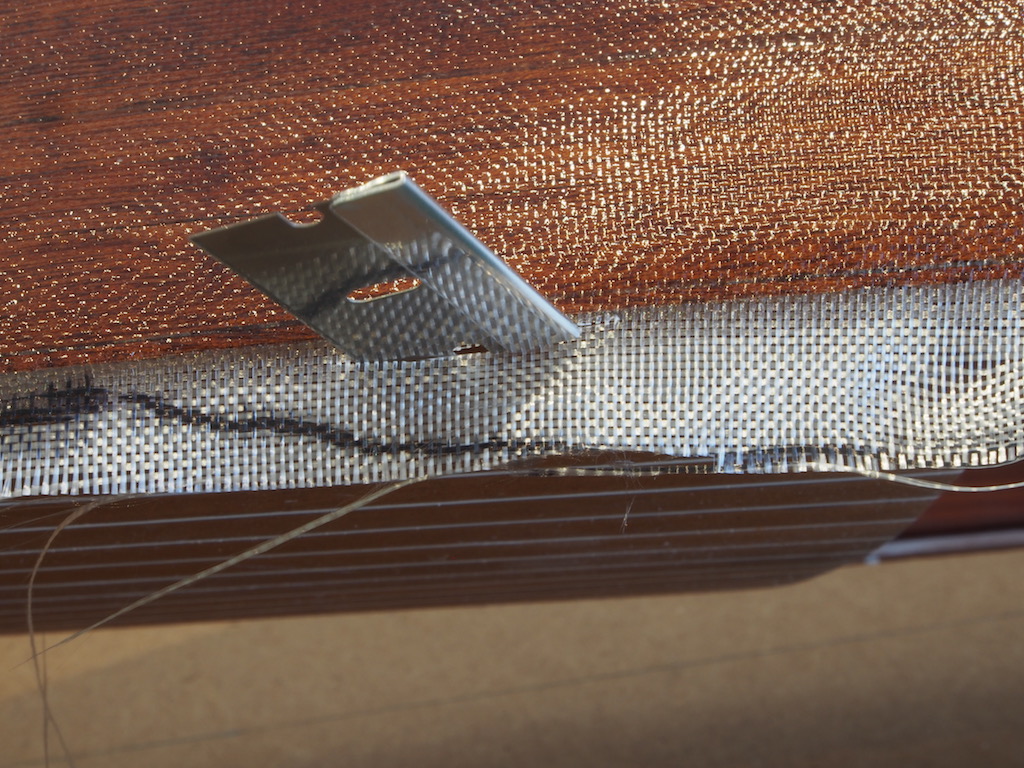
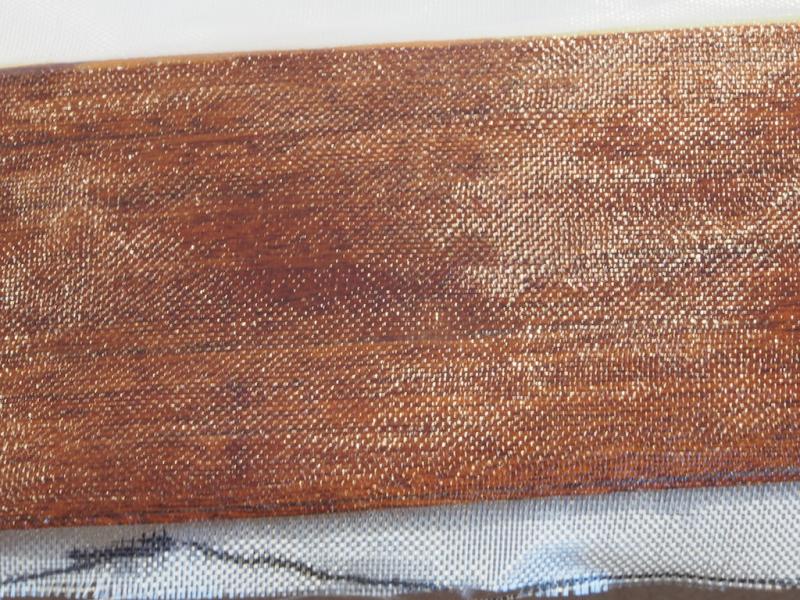
Thanks for all the kind comments and the likes. It's been a while since I updated this, but not because I haven't been making progress - it's just that this is a slow process! Anyway, here is a little update of sorts. Fibreglassing the Hull Having declared a win with the trials, I commenced the process of glassing the entire boat. Although the instructions say not to bother glassing the bottom of the boat as it is plastic (Sintra), I decided to take the precaution of glassing it anyway. This is a slow process overall as it is necessary to work on only one surface at a time and to allow it to fully cure before proceeding to the next surface. Here is a couple of in-progress shots of the first phase – applying the glass mat with the first layer of epoxy resin. It followed much the same path as the trials (happily). I began with the bottom, cutting the glass mat slightly larger than required. In hindsight, I could have trimmed this much closer prior to applying the epoxy. The resin was applied by pouring a small amount into the centre and spreading outwards with a rubber squeegee. Care needs to be taken to avoid any drips landing on the overhang and sticking itself to the hull sides – don’t ask how I know this! The sides were next: Here is a close-up of the side, showing just how much of the weave of the cloth is visible at this stage. Remember, trust the process! Once the epoxy had cured (overnight) the cloth was trimmed back using a single edged razor blade: It’s not clear in the above photo, but I found that with a little caution I could run the blade right along the adjoining edge, making final clean up with some 80 and 120 grit sandpaper that much easier. Speaking of clean-up, this next shot shows the side after it had cured, been trimmed and lightly sanded with both 80 and 120 grit. The purpose here is to remove any high spots and create a smooth (but toothed) surface for the next layer of resin. As you can see in this photo, it looks pretty ugly. There were quite a few “blemishes” where the cloth may have lifted slightly during the initial coating. Remember, trust the process! Once both sides had been done, the transom followed, and finally the deck. All went pretty much as shown in the above photos, though perhaps with fewer flaws as I gained experience. Then it was time to apply the second layer of epoxy. Again, it was a case of doing just one surface at a time, keeping that surface as horizontal as possible to allow the resin to level and not overflow the edges. As per the trials, the second coat was applied with a stiff brush, care being taken to ensure that the “oopses” from the first phase were filled in by firmly stippling the area with the brush until the oops disappeared. I didn’t take any “in-progress” shots of individual panels, but here are a few on completion of the second coat of epoxy. At this stage, the epoxy has fully cured but no clean up sanding has been done. This will be carried out prior to applying the third coat of resin. However, I thought it useful to post these overall pics to show just what a difference the second coat of epoxy makes. It has almost entirely filled in the weave of the cloth and the “shiny-ness” gives an indication of what is to come. It’s very difficult to take pictures of a highly polished and reflective surface, but I think you can get the idea. And yes, you can see a slightly uneven “wavy” effect on the surface – this will come out with the between coats sanding. Hopefully, one more coat of resin will be sufficient prior to commencing the finish coats of spar varnish. If not, we’ll keep going until it is! It will be a little while before the next update as I'm travelling for work over the next couple of weeks.


- 339 replies
-
- 26
-
-
- dumas
- Chris-Craft
- (and 3 more)
-
Hamilton, Some good news and a good decision! As far as debonding goes, DO NOT use water - it won't do your plywood any favours. Instead, use Isopropyl Alchohol. Either paint it into the joints, or soak a paper towel in it and clamp that along the joints for about 10 minutes. Depending on how much PVA you used, and how long it has been set, this should do the trick fairly easily. IF not, simply repeat until it does. As the alchohol evaporates fairly quickly, there is less chance of distorting the plywood. If you are not familiar with Isospropyl Alchohol, it is sometimes sold as rubbing alchohol but we warned that it comes in diffenrent concentrates. Some of the rubbing alcohol is 50% water - you don't want that one. I get mine from the local hardware store and it is 90 or 99% alcohol commonly used for cleaning computer keyboards and the like.