HOLIDAY DONATION DRIVE - SUPPORT MSW - DO YOUR PART TO KEEP THIS GREAT FORUM GOING! (Only 13 donations so far - C'mon guys!)
×


FriedClams
-
Posts
1,368 -
Joined
-
Last visited
Content Type
Profiles
Forums
Gallery
Events
Everything posted by FriedClams
-
 Good to hear you're on the mend, Keith. It's best to feel confident about the lines before proceeding on a multiyear project. Really looking forward to following this build. Gary
 -
Nice update on the hatch and ventilators, Keith. I hate to display my ignorance in such an obvious way, but what was the purpose of using canvas ventilators over cowled metal ones? Was it to elevate the intake above smoke from the guns? Gary
-
Brig Le FAVORI 1806 by KORTES - 1:55
FriedClams replied to KORTES's topic in - Build logs for subjects built 1801 - 1850
Wonderful result Alexander, and in my personal opinion, better than what is achieved through CNC. I don't knock anyone for using CNC, but to my eye it doesn't stand up to the hand-crafted artistry that you've shown here. I can't carve for darn, but I admire those how can. Gary -
Valeriy, Denis, Marc and Tom - thanks for the nice comments and your interest in this build. It is so appreciated. Fairhaven is a nice town. In my high school years, the A&W drive-in on route 6 was a regular stop after a beach day with friends on West Island. Yes, it will definitely have some weathering, but nothing extreme, just some honest reality. Well, that’s the goal anyway. Thanks. Gary
-
Very nice! Gary
-
I agree with Glen’s post. Ditto. Nice work Grant. Gary
-
Happens to most of us, Denis. Sometimes it’s best to just step back and let it run its course. Good to hear from you. Gary
-
Hey Andy, yes a small percentage of the orange guts are saved here also for those same purposes. I’ve not heard of any culinary uses for them though. I can eat my weight in seared scallops and my wife has the cooking technique down, but I’m going to tell her about that chili ginger and garlic treatment - sounds delicious. It’s always good to have you looking in, Paul. Gary
-
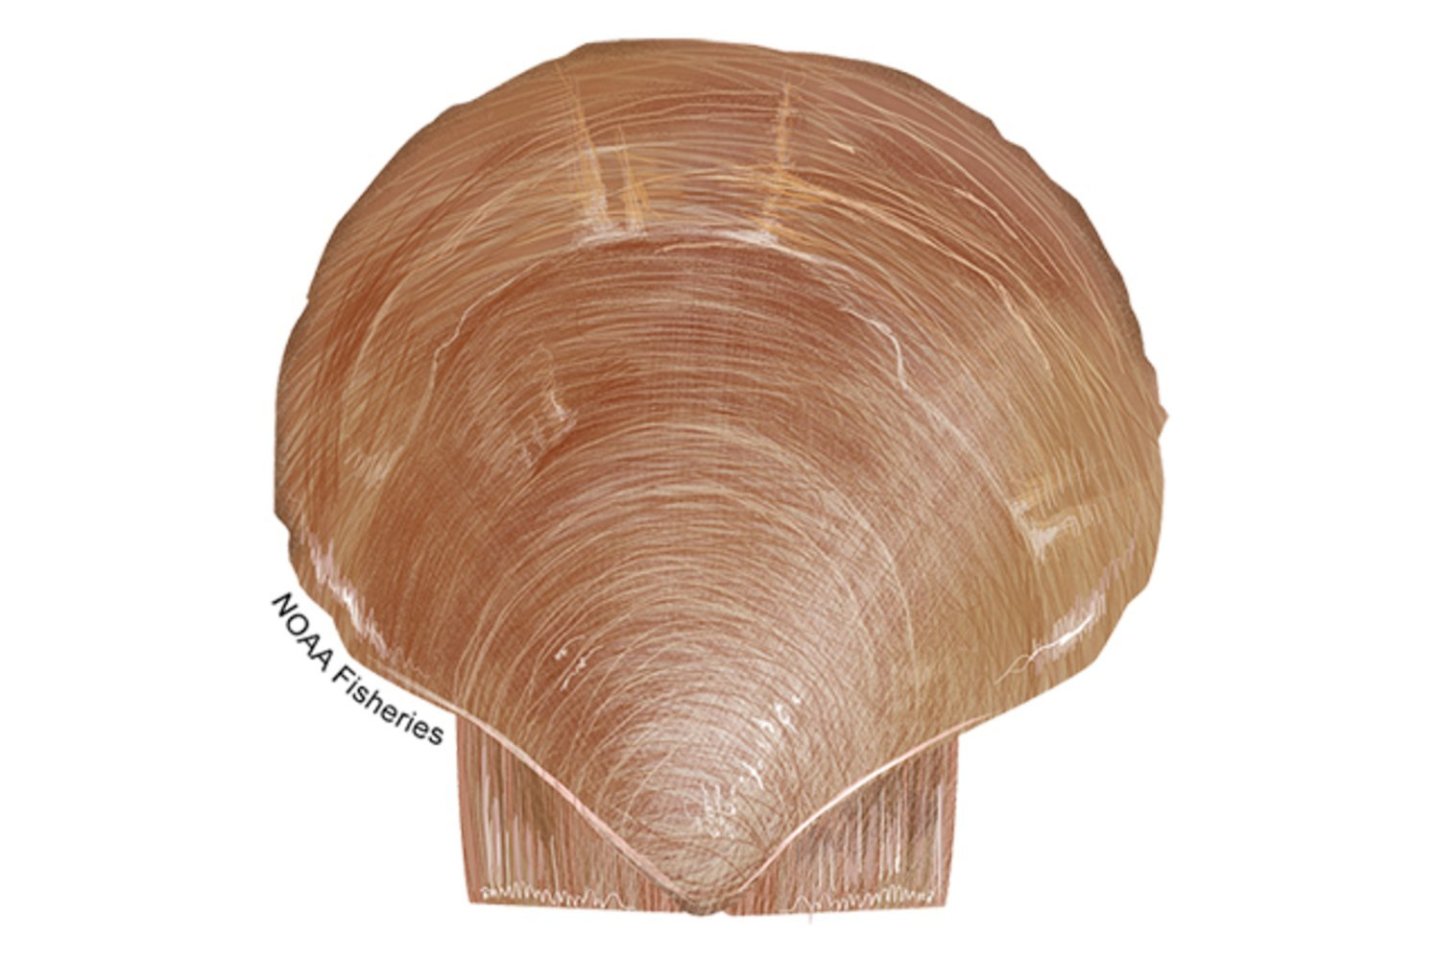
Paul, Andy, Chris, Keith, Roger, Richard, John and Keith – thanks for your warm comments and interest in this build – I sincerely appreciate it and it's great to know you'll be watching. And thanks to all for the likes. I was hoping someone would be able to identify those Coast Guard boats. Never heard of the “Six Bitter” patrol boats, but after a quick search on the web, I found they have an interesting history. Would make a great modeling project - hmm. Thanks Roger. They are shucked on board between dredge haul backs. Only the adductor muscle is kept and eaten. This is the muscle the scallop uses to snap shut its shell halves to propel itself and evade predators (and dredge rakes) that other bivalves such as clams and oysters can't. Once shucked, the meats are rinsed and sacked in 40 pound cloth bags. The sacks are immediately taken to the pens below and put on ice. They are allowed to chill on top before they are totally buried in the ice. This is done to avoid ice melt pockets around the sacks. Because wood can harbor bacteria, the sacks are kept from coming in contact with the pen planks. Atlantic sea scallops are usually less than 6” in height and oddly, their shell is not scalloped. I can't say how modern F/V chill or refrigerate the shucked meats, but it wouldn't surprise me if ice was still being used. Speaking of modern scallop boats, check out this 2019 high-tech New Bedford boat. Viking Power F/V Be safe and stay well. Gary
-
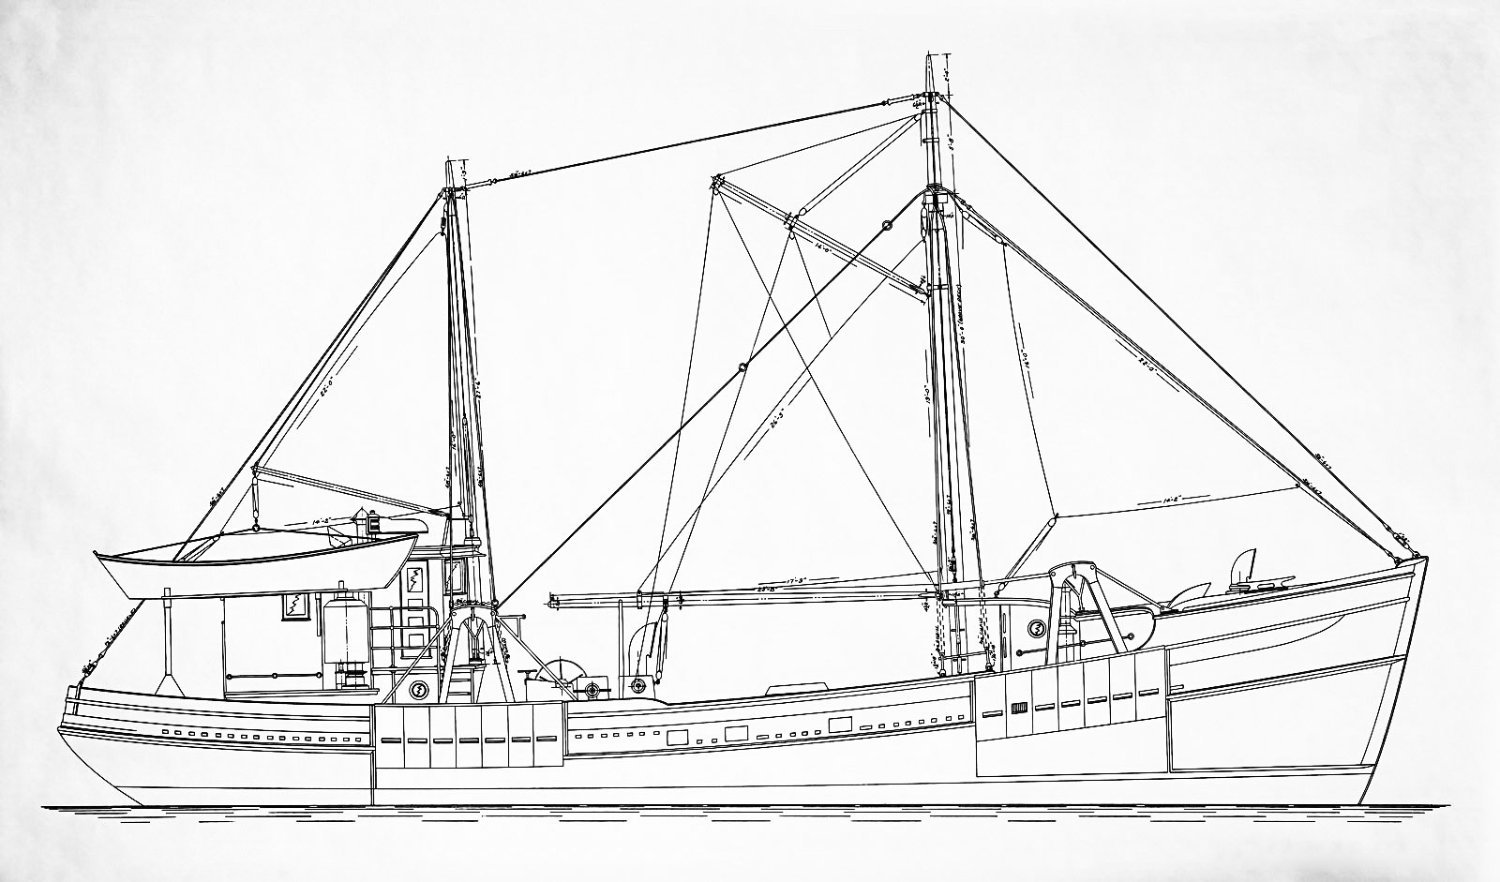
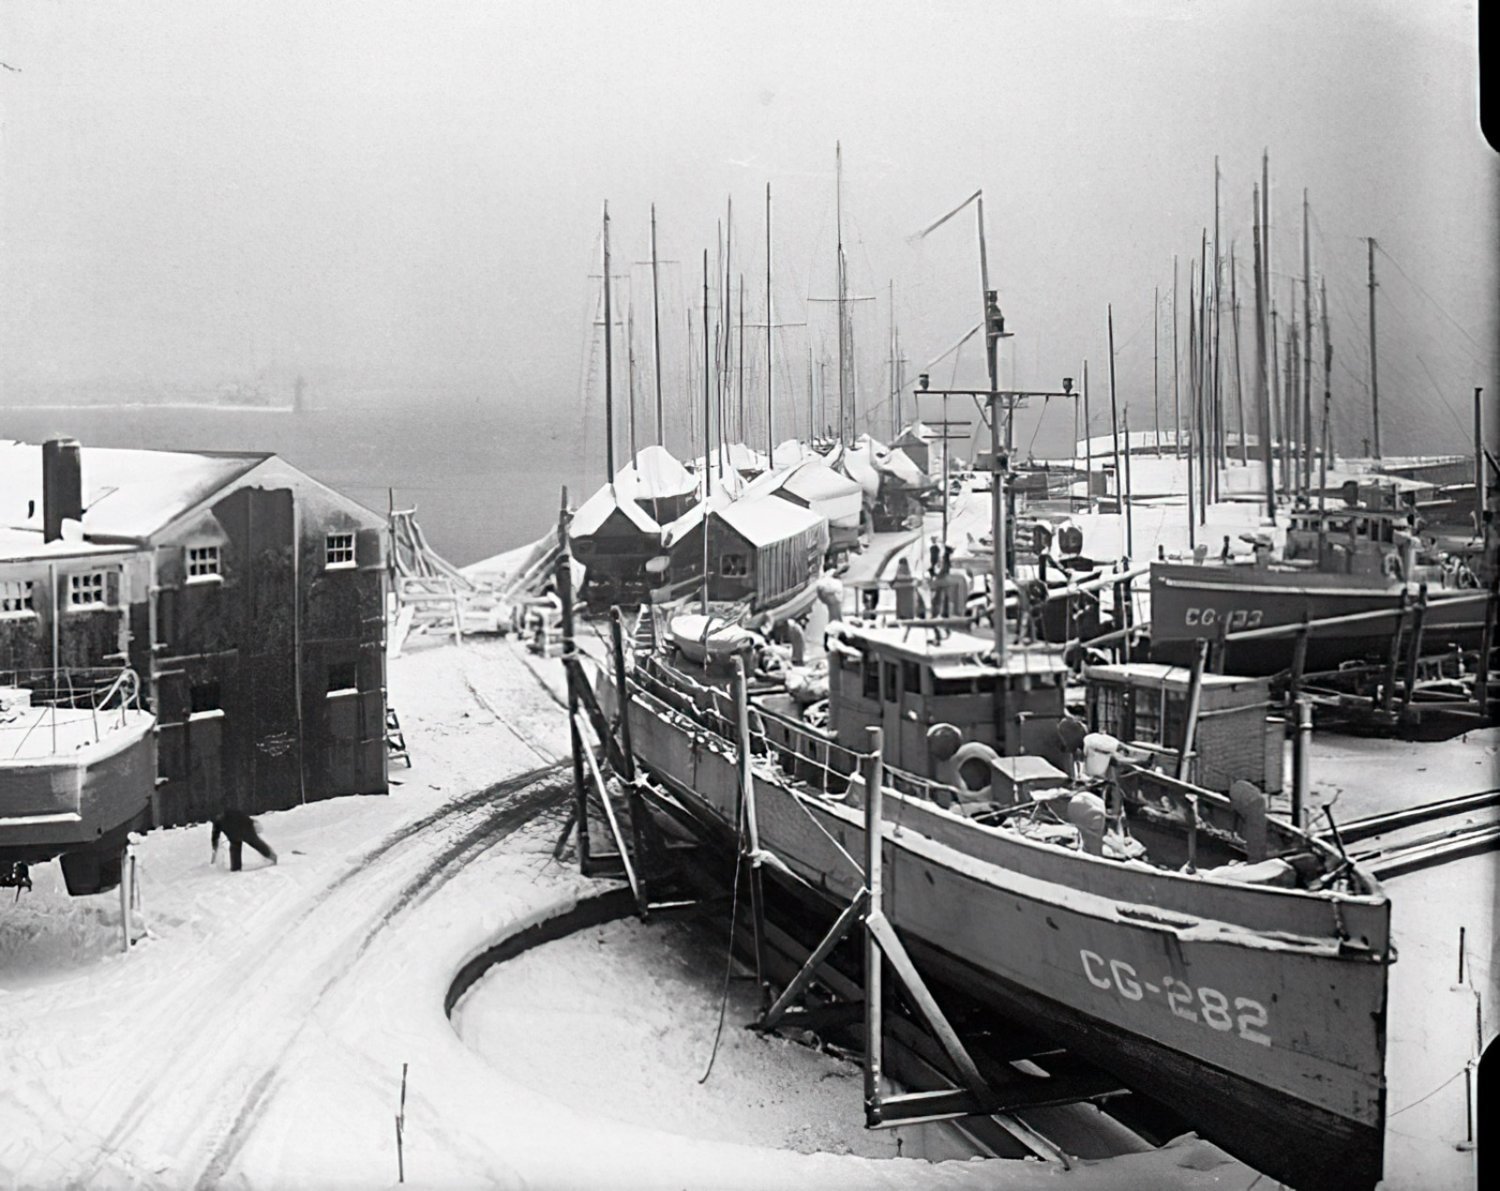
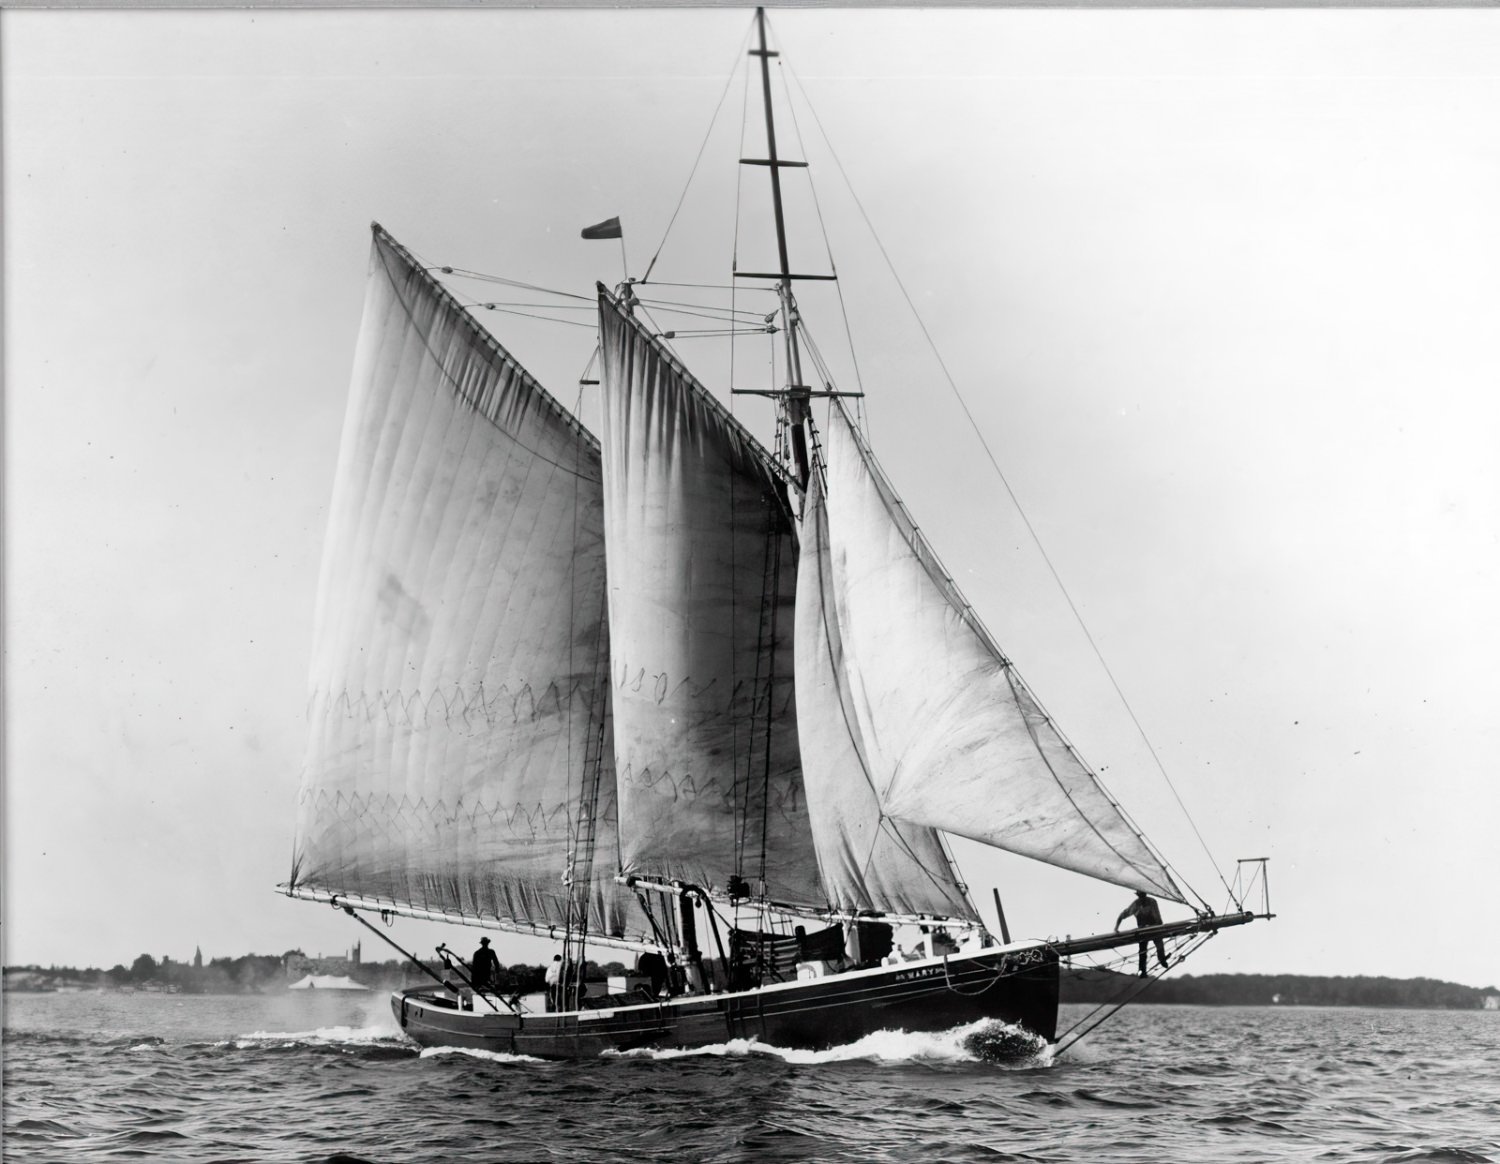
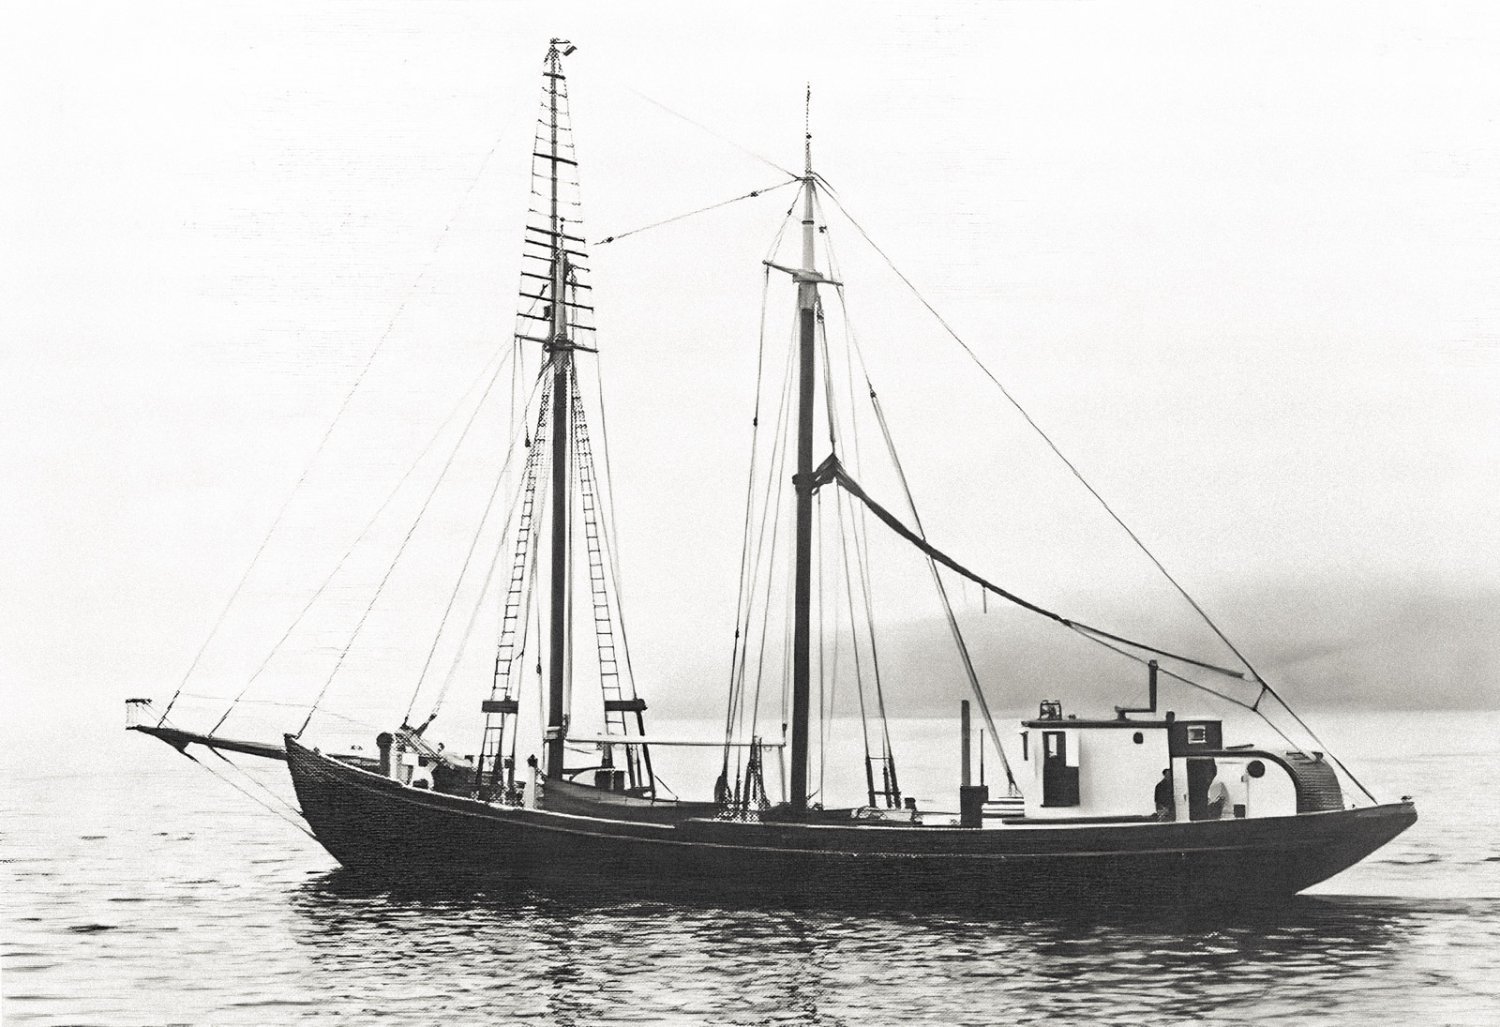
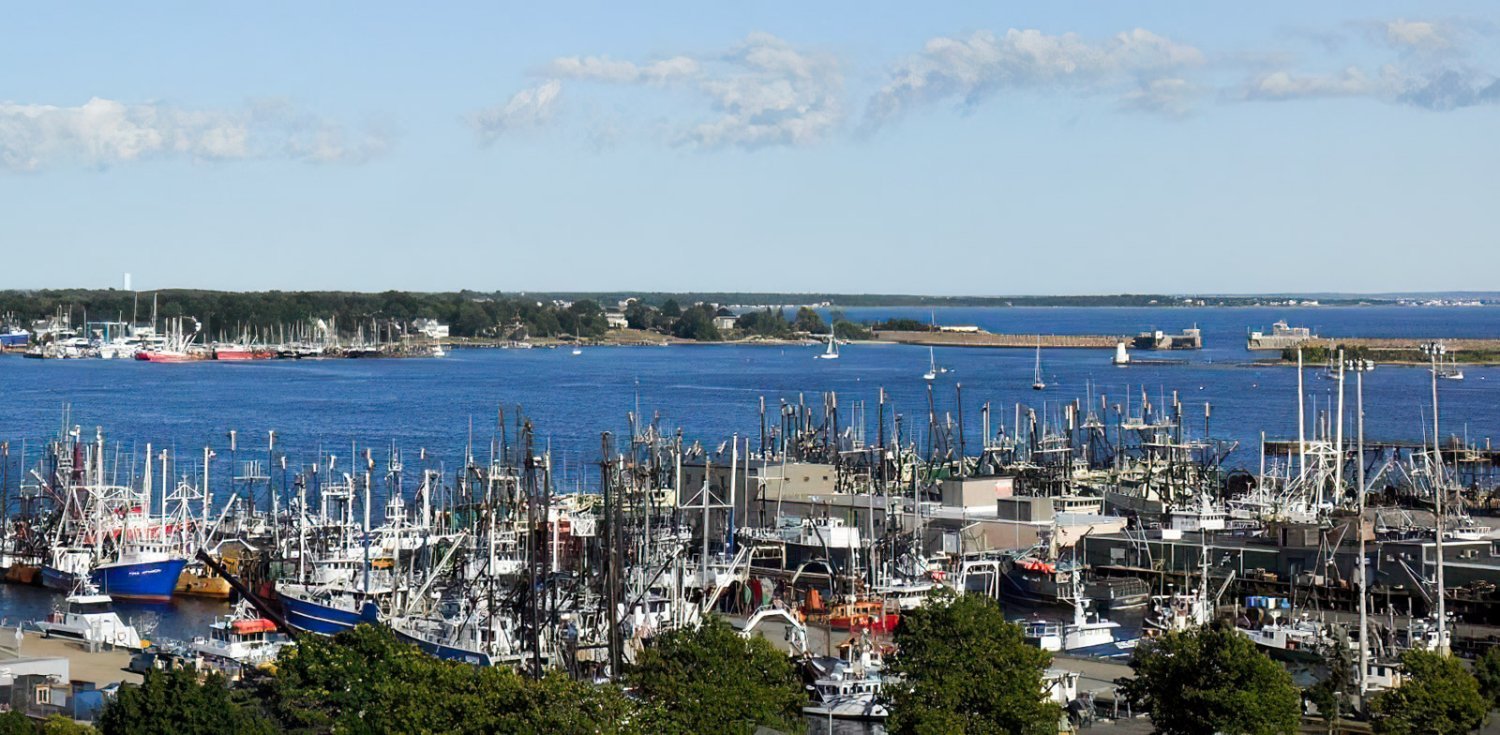
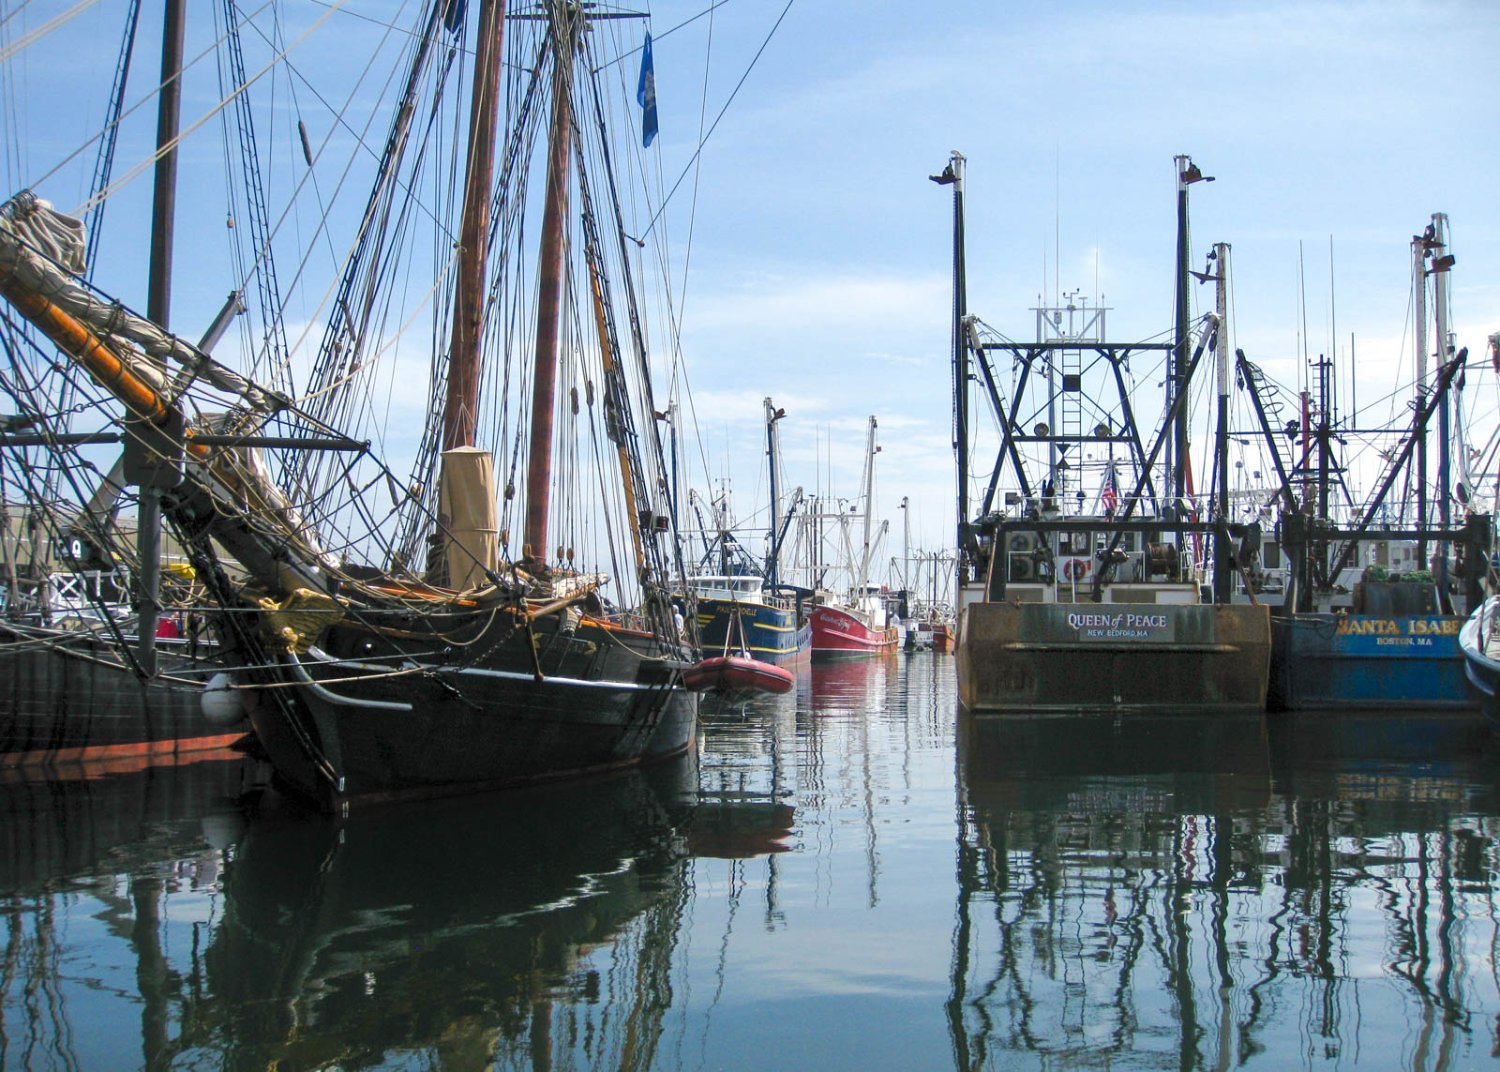
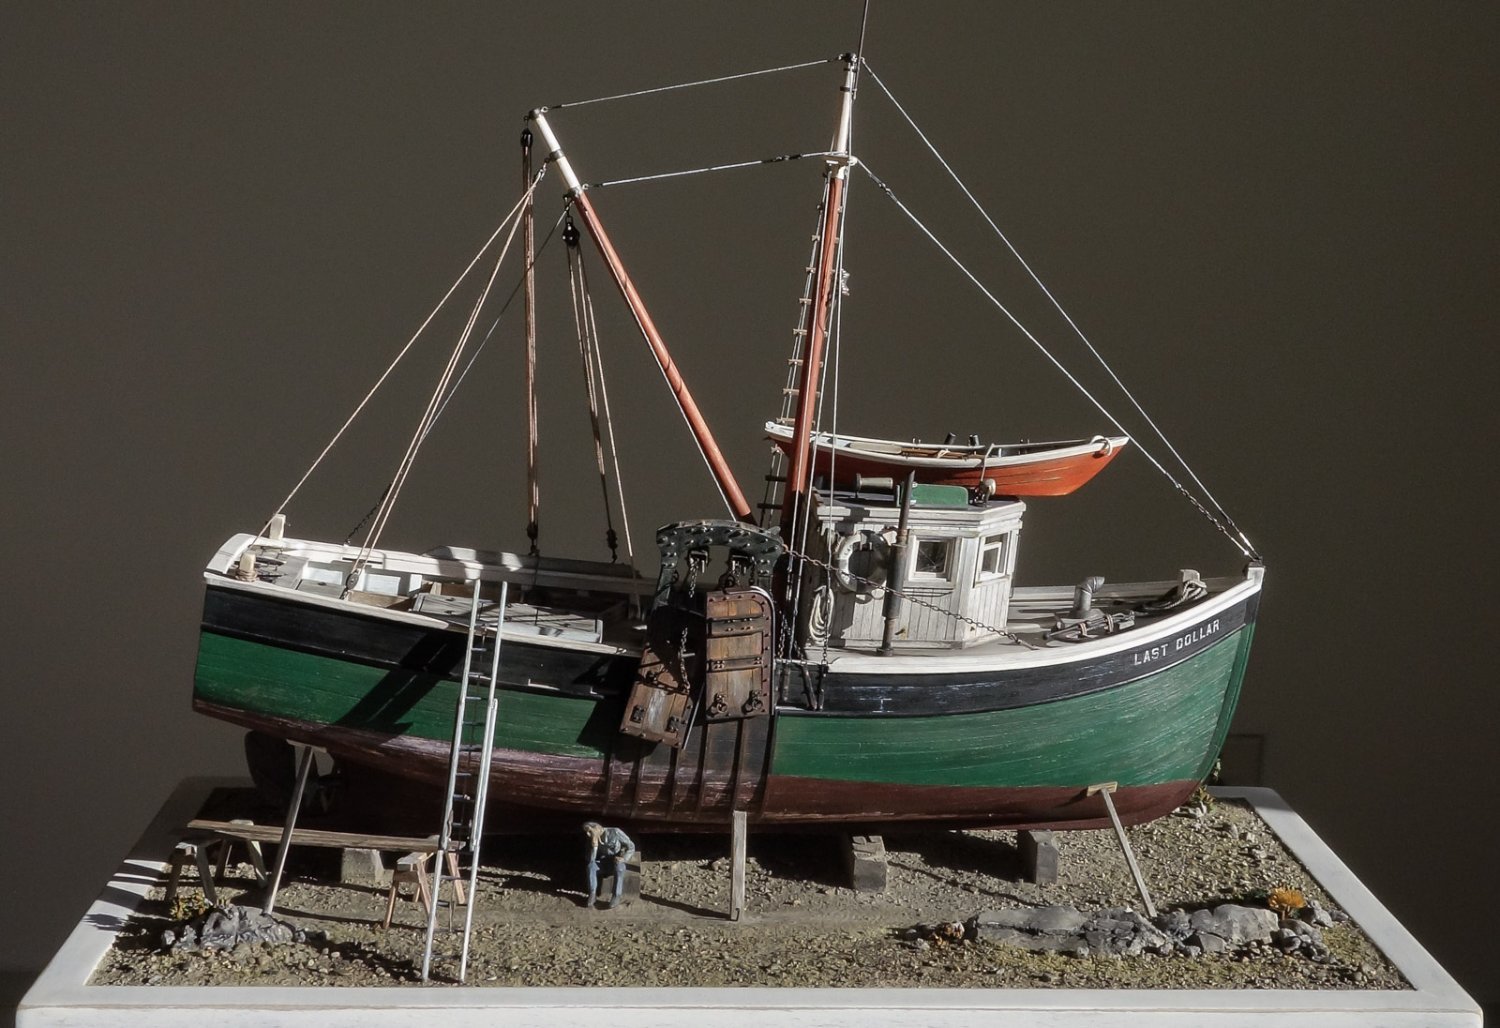
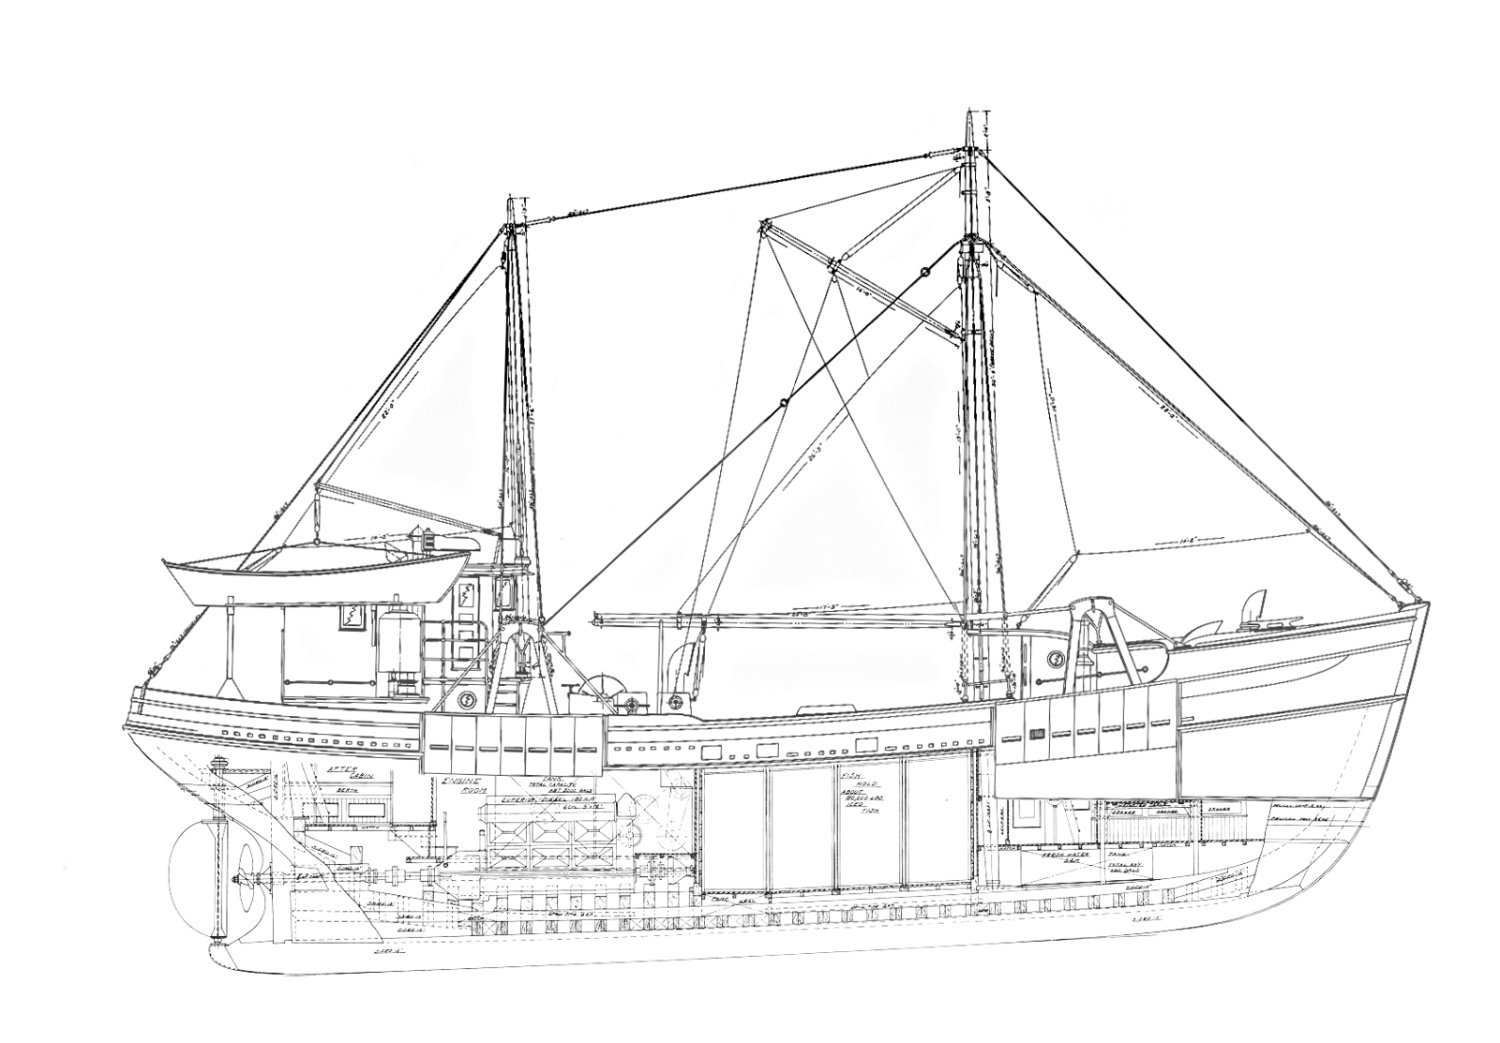
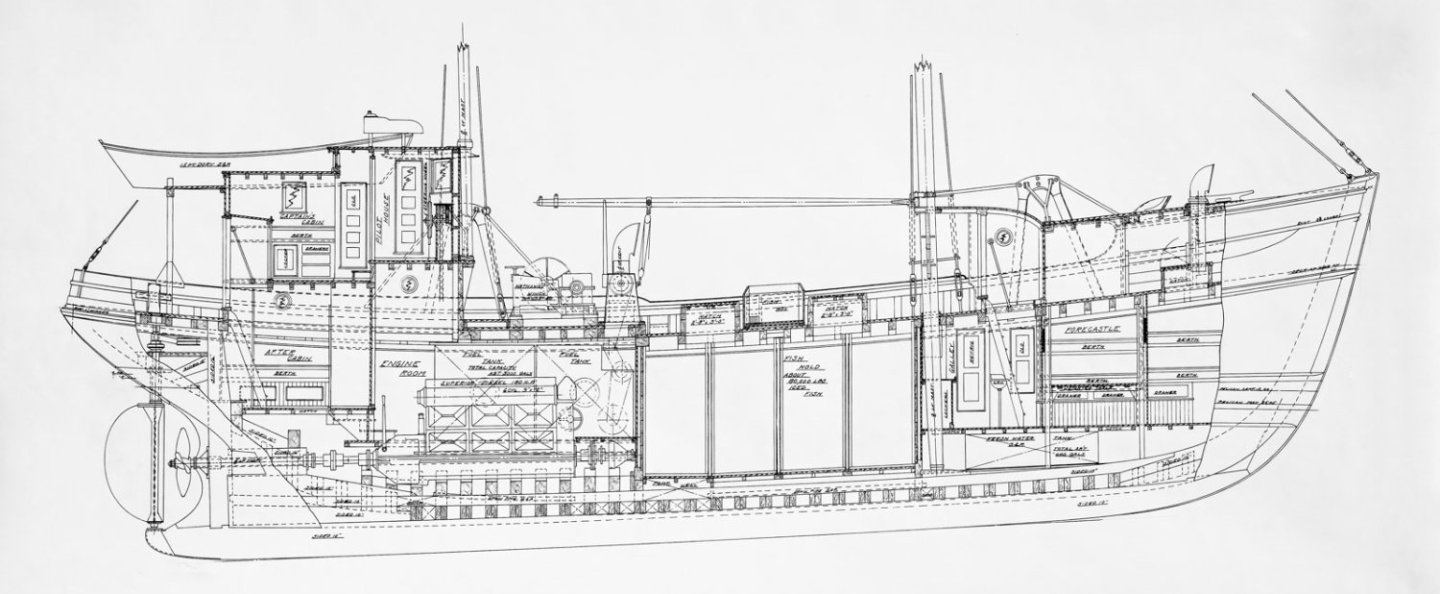
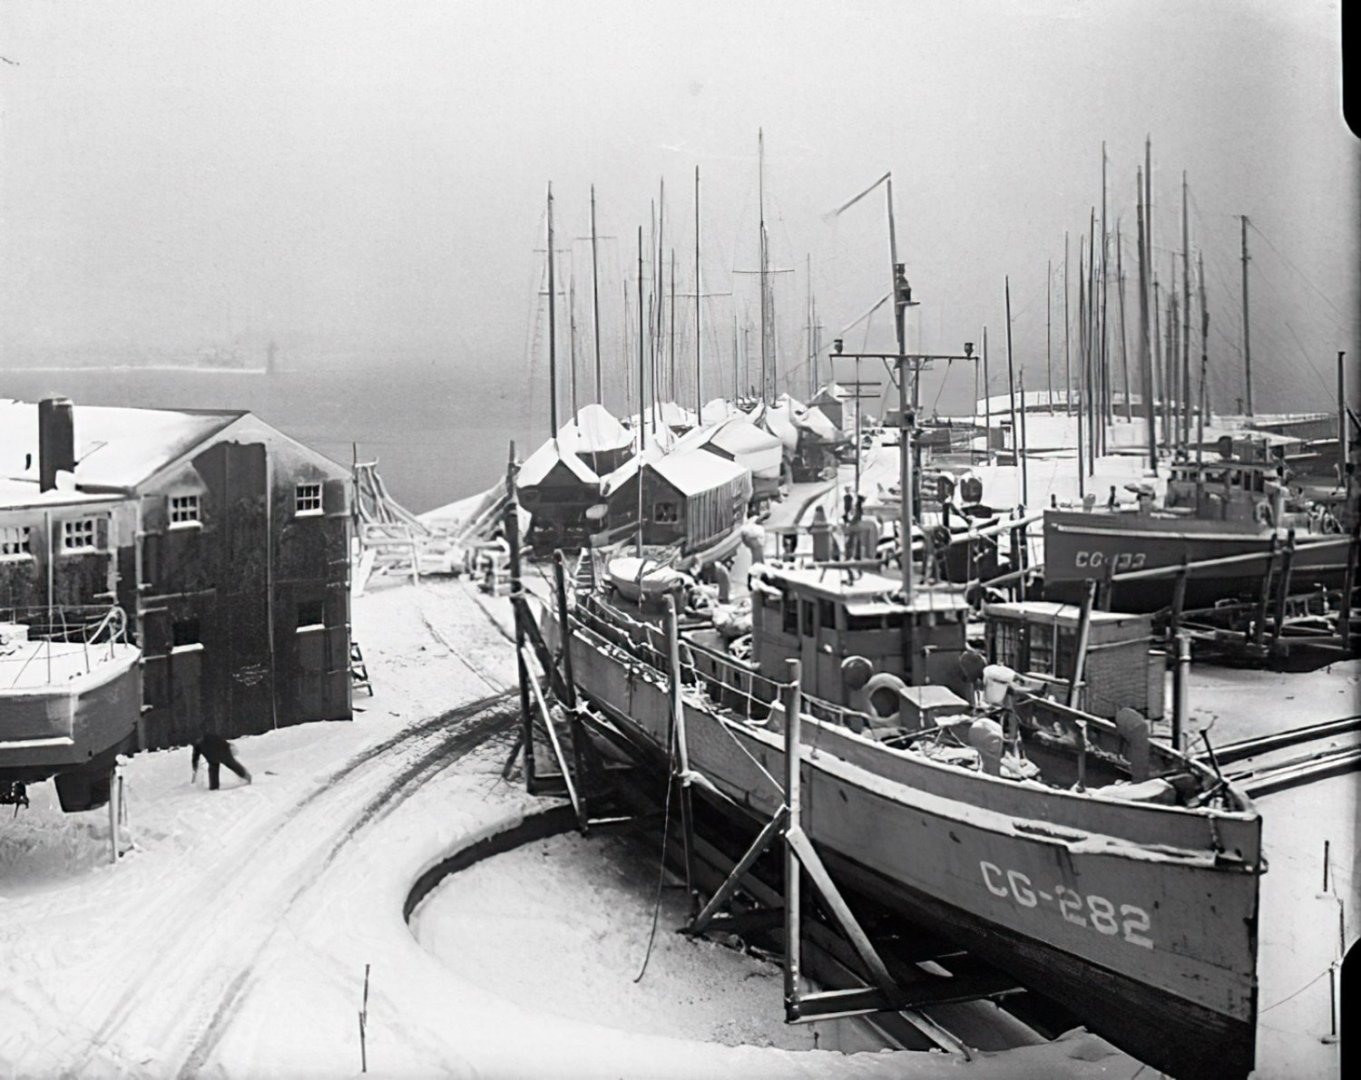
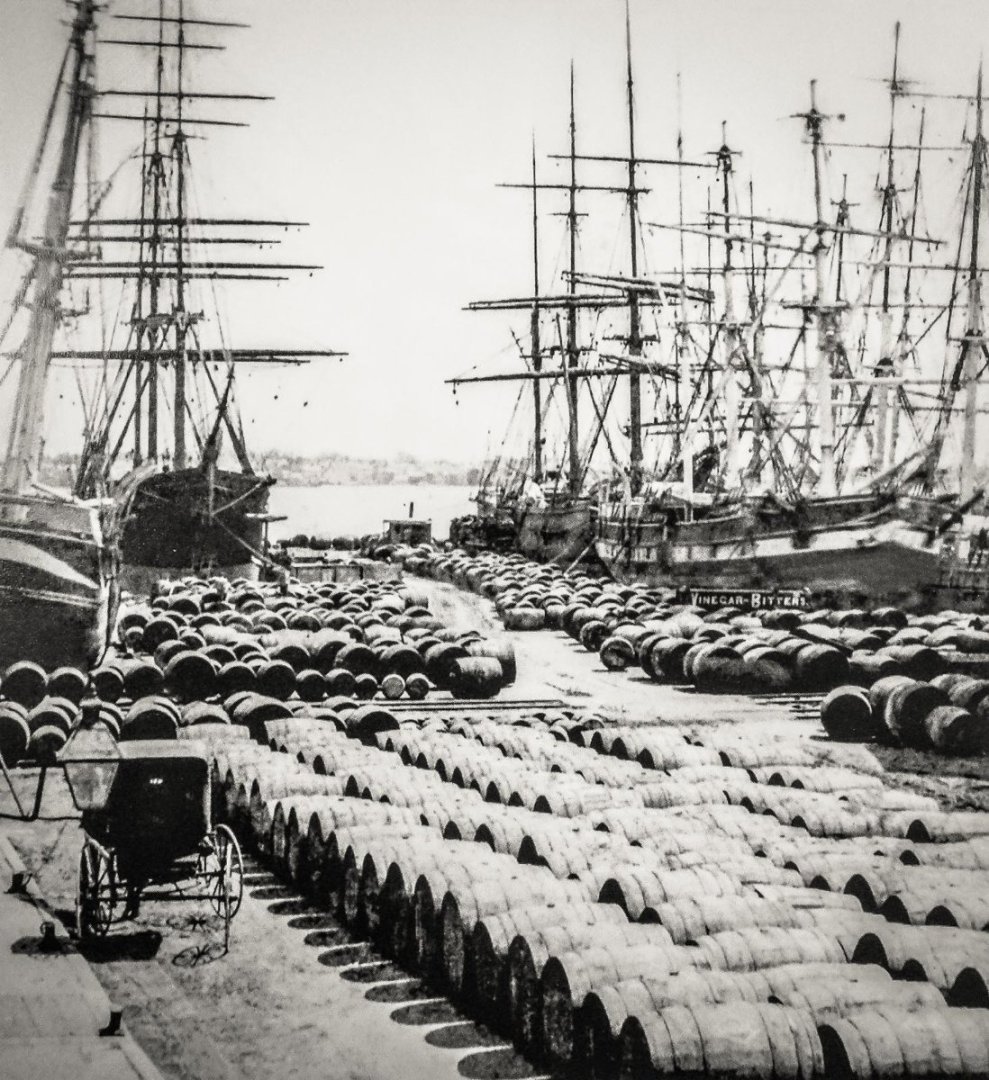
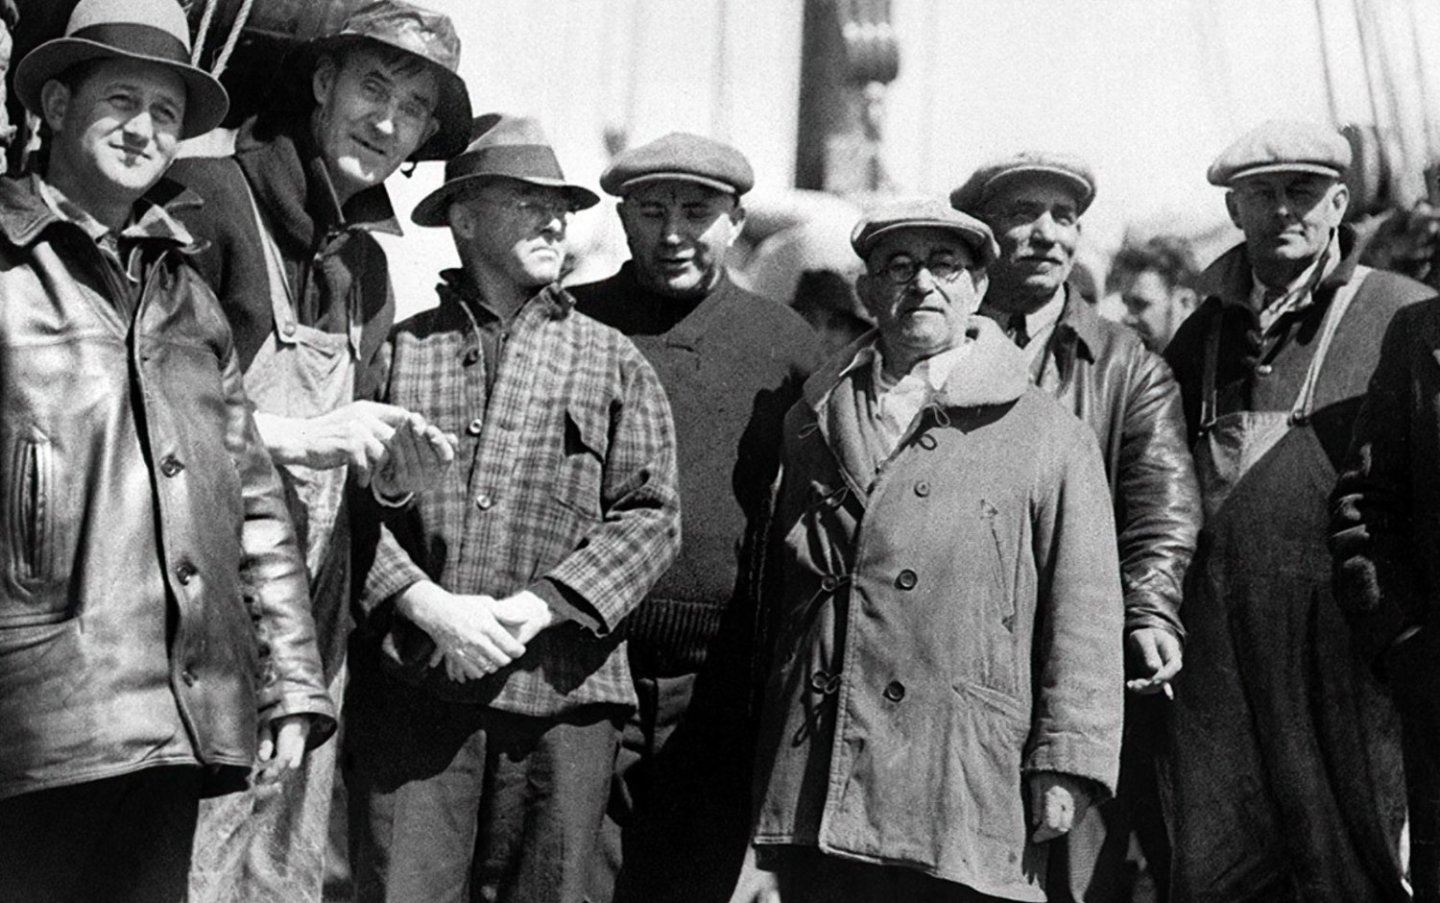
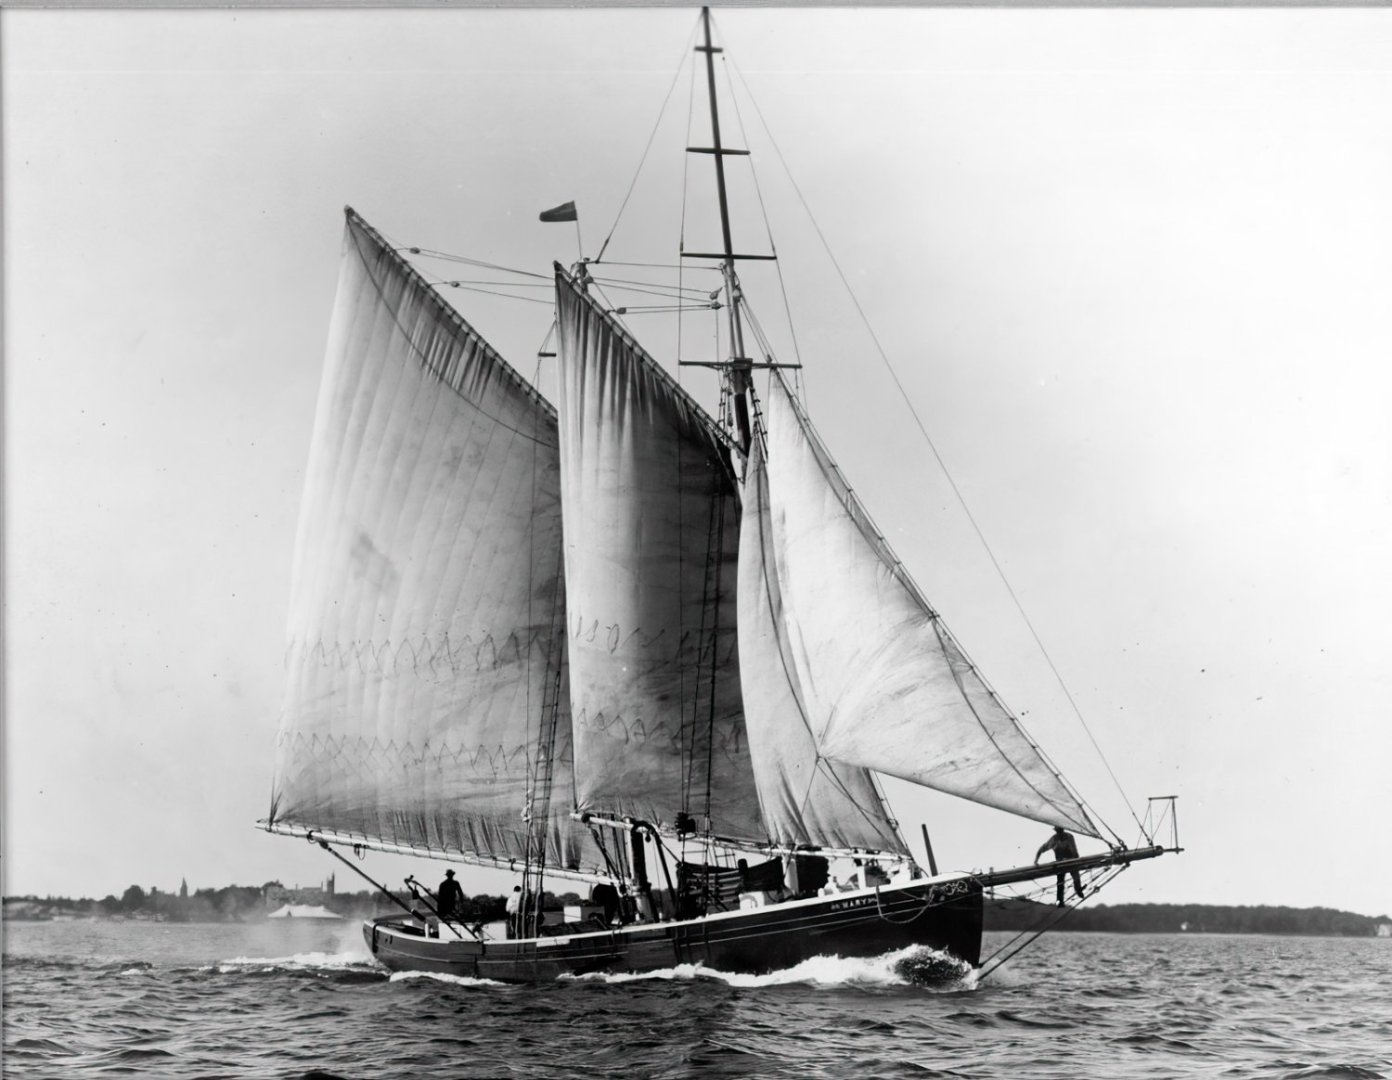
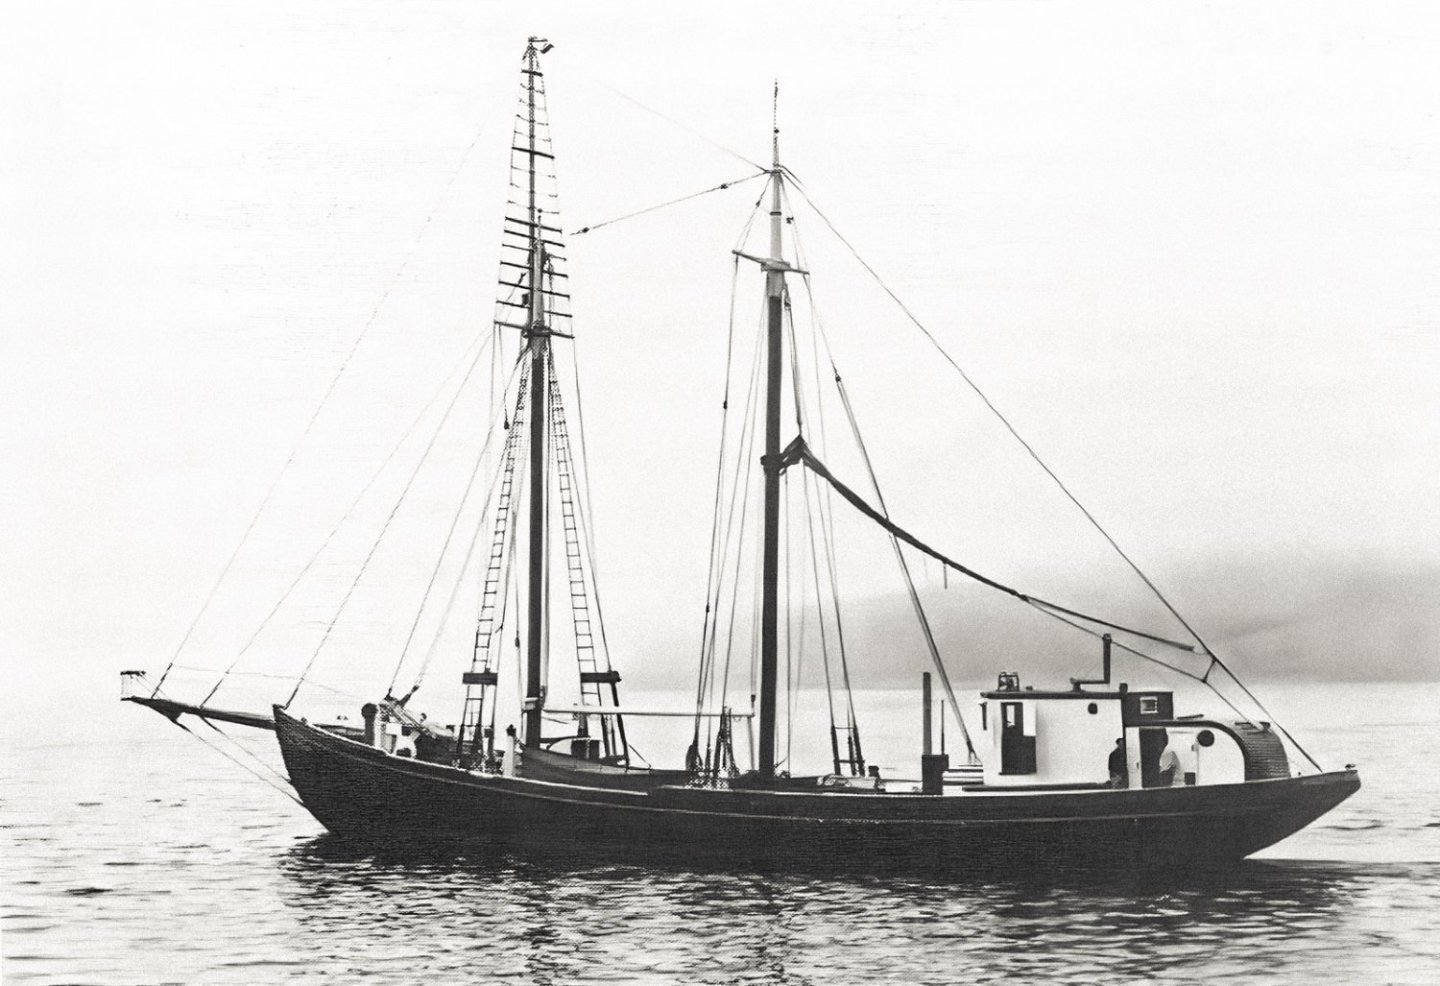
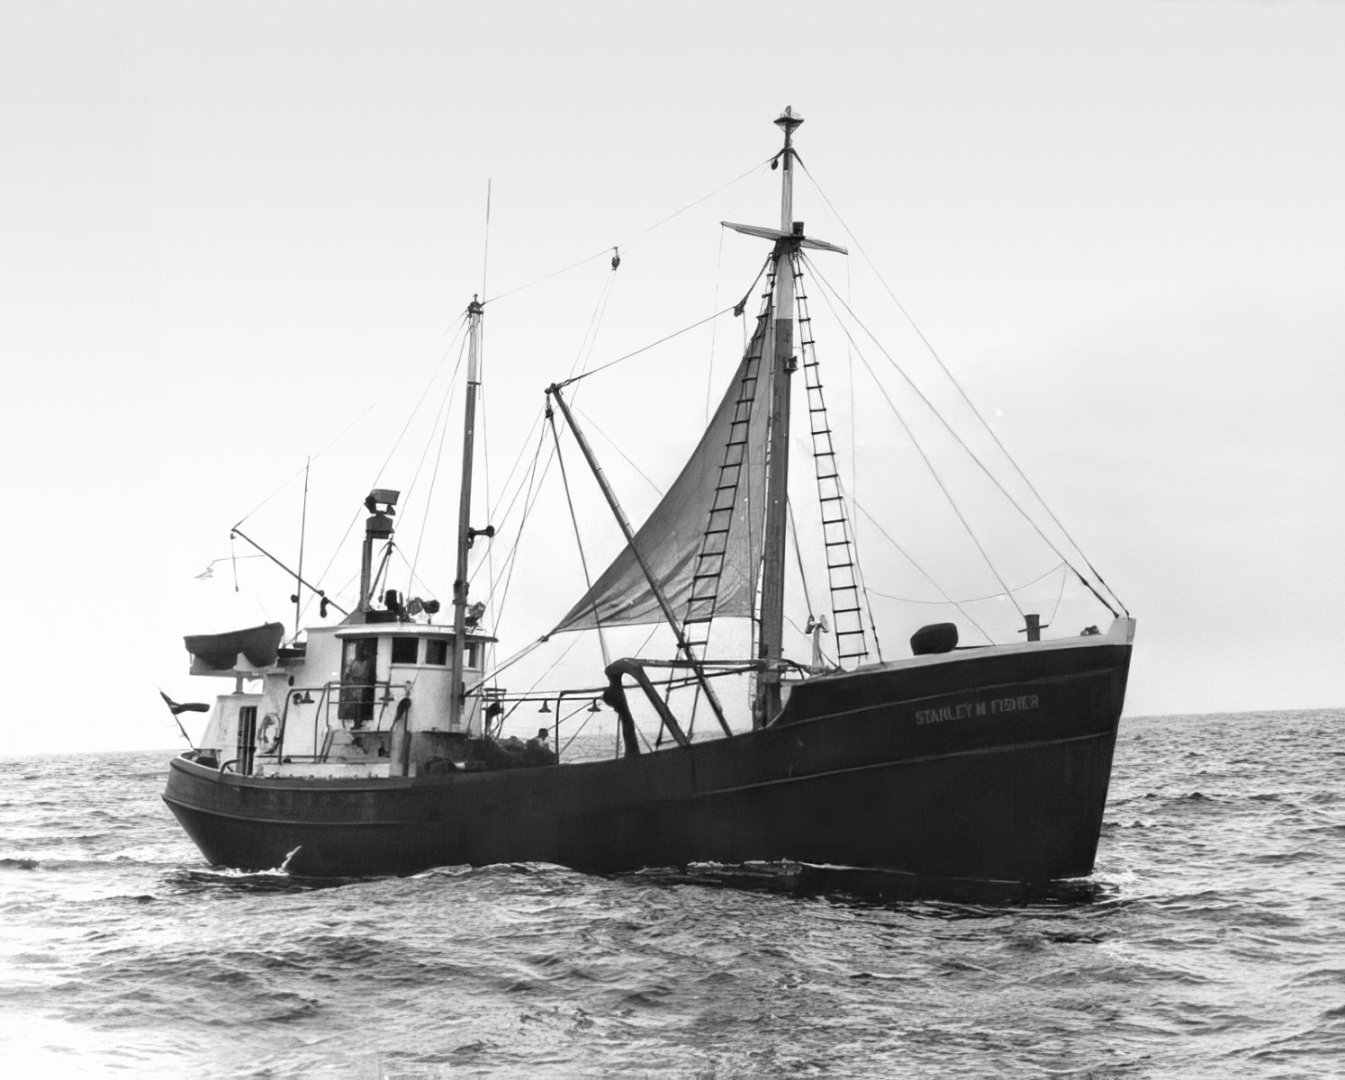
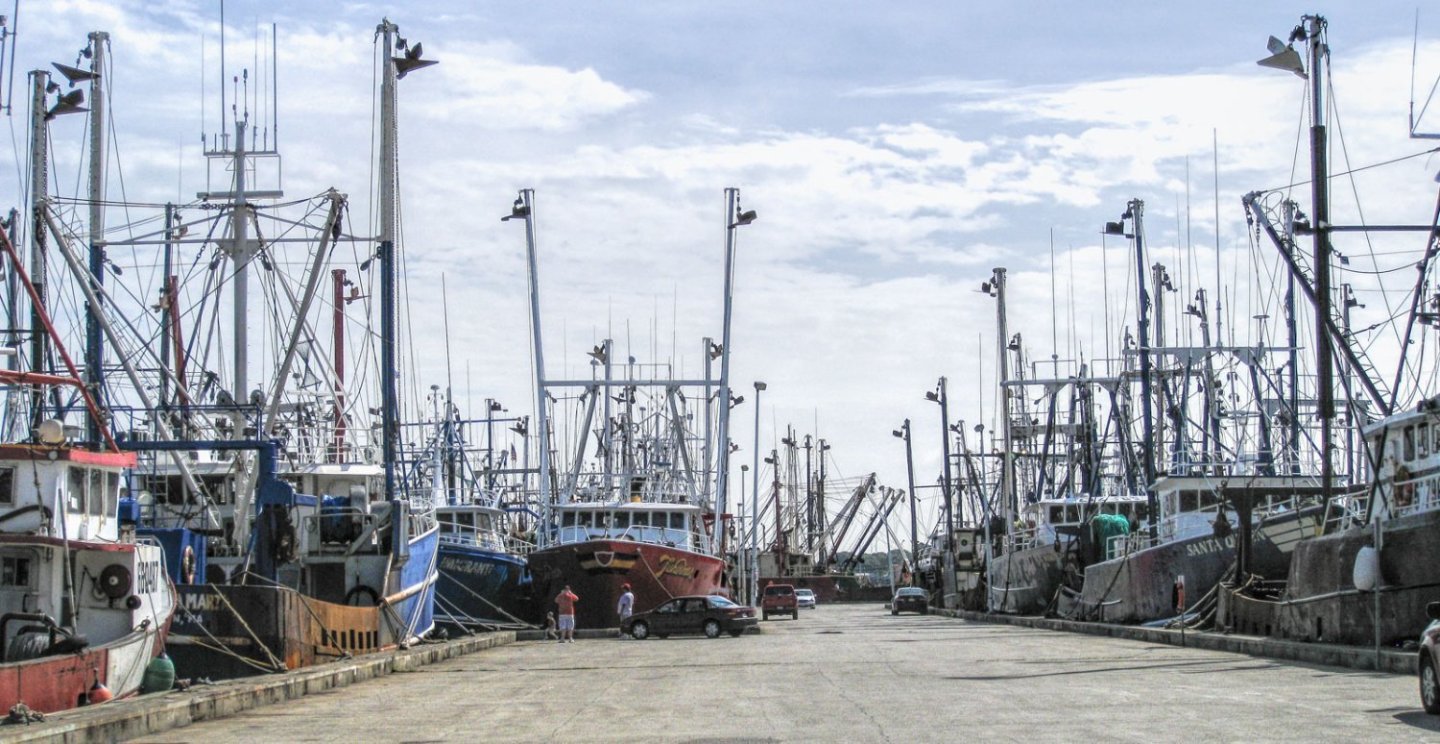
Greetings Fellow Modelers, I'm beginning a new scratch build project of a mid-century New England fishing vessel. It's a wood hull, round stern, eastern-rig dragger that was built in the mid 1940's. A “dragger” is a small to medium size fishing trawler used in groundfishing, scallop dredging, etc. This is a style of fishing vessel that has long been on my build list but have hesitated to start because I know it will consume most of my bench time for a couple of years. But now that I've made the mental commitment to build it, I'm anxious to get started. There are two reasons why I decided to build this boat in particular. First, the boat is the right era, size, and configuration with characteristic lines that define the vessel class. Secondly, this boat worked out of New Bedford, Massachusetts, the place where I was born and grew up. Pelican - From the Mystic Seaport Plans Catalog Pelican - From the Mystic Seaport Plans Catalog Albert E. Condon (1887-1963) - Mystic Seaport Catalog Albert E. Condon The Pelican was designed in 1943 by Albert E. Condon. A native of Friendship, Maine, Condon worked from a young age at the many boat and shipyards along the Mid-Coast region where he apprenticed and became an accomplished boatbuilder. Intermingled with his apprenticeship, he pursed a formal education in navel architecture and graduated in 1916 from Boston's Franklin Union. In 1939 he became the superintendent and resident designer for the Peirce & Kilburn yard in Fairhaven, Massachusetts and it was during those years that he produced his most notable designs – three dozen or so eastern-rig draggers. The Fairhaven waterfront is located in the New Bedford Harbor at the mouth of the Acushnet River. It sits across the river from its larger neighbor and together they comprise the Port of New Bedford/Fairhaven. Peirce & Kilburn Shipyard – date unknown The Beginnings of a Fleet and the Eastern-Rig During the 1800s New Bedford was the worlds' largest whaling port and at its peak in 1857, boasted some 340 whaleships. When the industry collapsed at the end of the century, it left behind an underutilized waterfront situated within a days sail of one of the most abundant fishing grounds anywhere. In 1900, the city's fishing fleet was small and insignificant, consisting of small sloops and catboats. They worked short trips swordfish spearing, mackerel seining or hand lining for cod and haddock. Because the whaling industry had monopolized the waterfront for so long, the town had little or no tradition in fishing, particularly under sail as did the famous sailing schooner ports like Gloucester and Boston. This may seem like a disadvantage in growing a successful commercial fleet, but it actually drove innovation forward by not being entrenched in old fishing methods. New Bedford was quicker to adopt new trawling methods, equipment and full engine powered boats than did other New England ports. Shortly after 1900, large steam powered British style trawlers began making their appearance in New England. These large vessels introduced new trawling technology to the region, but that technology hadn't been adapted in any significant way for use on smaller craft. Captain Dan Mullins is often credited with being the father of the New Bedford fishing industry and he was very influential in the creation of the eastern-rig dragger, or at least in how it evolved to become what it did. Mullins didn't invent new technology, but rather he refined and combined existing equipment and methods into a new way of fishing. In 1909 he installed a small auxiliary engine on a sloop named the Edna J. Morse and used it dragging for flounder on the sandy bottom off southeastern Massachusetts. He also began experimenting with a small primitive version of the “otter” trawl on this same boat. Typically, a sloop such as this would drag a small “beam” trawl using sail power only. In 1919 Mullins had a 81 foot vessel built that was essentially a “schooner dragger” and was equipped with a small 60 HP engine. Named the Mary, it was the first small vessel to use an otter trawl in conjunction with gallows (or gallous) frames to raise and lower the heavy trawl gear. He also rigged the gallows frames as the towing points instead of using the frames solely as a means to deploy and retrieve the gear. This meant that transferring the burden of the tow lines to a block lined off the mast or having to use an additional boom wasn't necessary. Another first by the Mary was the use of a two headed winch that was a precursor to the large drum winches used from the 1920s onward. Mullins also started using a single gypsy head that was engine-connected to pull back the net onto the vessel rather than doing it by hand. And at some point during Mary's career, he re-rigged her from a schooner rig to a ketch which proved to be less cumbersome while dragging. All these adaptations and re-configurations are considered by many to be the beginnings of the eastern-rig and in time these methods would be widely adopted by other New England ports. Although the big steam trawlers were already working out of ports like Boston, these vessels and their associated gear were extremely expensive to purchase and operate. They were mostly owned by investor partnerships and far beyond the financial reach of the average fisherman. In contrast, Mullins had invested approximately $22,000 in the Mary, and after several refits and configurations, the first two working trips with her landed $7,800 in catch. Dan Mullins and the Mary demonstrated that the captain-owner or small company could earn strong returns on a relatively modest investment. Whaleships and oil casks – 1870 – Old Dartmouth Historical Society Dan Mullins (3rd from left) - mid 1930s - Spinner Publications The Mary left New Bedford in February of 1933 and was lost somewhere east of Georges Bank. She was never seen again and despite an extensive search, neither wreckage nor the crew of eight was found. Captain Mullins was not on board. From the Lost Fisherman website. From Fishing Schooner to Eastern-rig The eastern-rig is a descendant of the 19th century American fishing schooners. It evolved over time and its design was strongly influenced by not only Dan Mullins, but also by Thomas McManus and others. The “schooner dragger” or “auxiliary fishing schooner” was a vessel that bridged the transition from full-sail schooner to the full-powered eastern-rig. These early 20th century transitional boats began as sail powered craft with an engine assist, and in time flipped to become engine powered craft with sail assist. Taking advantage of the schooner's fast hull, these auxiliary boats were often rigged in full sail for swordfish harpooning and then converted back to engine power for groundfish dragging once the swordfish season was over. As more powerful engines became available and affordable, the dual role of harpooning and dragging with a single hull design became unworkable. The sleek light hull of the schooner could not hold up to the vibration and hull stresses of dragging ever larger trawl gear with powerful engines. Vessels that were intentionally built as auxiliary schooners and not simply converted over from old fishing schooners, held up much better. One can imagine the structural stress on a these relatively small boats when the trawl hung up on protruding ledge or finds a sunken wreck, even when brake-slip was properly set. Deeper, heavier, full bellied hulls, designed to be strong at the expense of speed were needed for this method of fishing. The eastern-rig became its own unique fishing vessel type and was used widely throughout New England and beyond. Auxiliary fishing schooner rigged for swordfishing with harpooning pulpit. The eastern-rig below is setup to drag for scallops as witnessed by the single gallows frame forward. Groundfish dragging requires two frames stationed fore and aft to handle the two warp lines leading out to the trawl, whereas a scallop dredge has only a single line. Also, note the shucking stations on either side of the pilothouse with the overhead lighting reflector shades. Like the schooners and aux schooners before them, the deck arrangement of these boats required the helm to be above or near the rudder. But even after these vessels became fully powered with a tiller system and rudder quadrant, the pilothouse remained aft and is a defining characteristic of the eastern-rig. New Bedford was an integral part of a region wide shift to full powered eastern -rig boats, but those old wooden boats that were once an ever-present sight in New England ports, are now almost entirely gone from the fishery. It is estimated that some 500 of these fishing vessels were built and now only a handful remain. There are a few steel side-draggers around, but it's the steel hull boats dragging off the stern that predominate the fishing grounds. Because the Pelican was a New Bedford boat, I'll finish with an update on the city's fishing industry. Today there are more than 300 commercial boats in the fleet and another 150 from other ports that regularly land and sell their catch there. The scallop fishery that was gaining in importance during the 1920s and 30s, has grown to become the port's bread and butter. Proximity to the scallop beds on Georges Bank, Nantucket Shoals and the Great South Channel, along with its substantial waterfront infrastructure gave it an edge in the scallop industry over other ports. By the mid 1960s, 95% of all scallops were landed in New Bedford and that dominance continues to this day. So much so, that its daily morning auction sets the price of scallops worldwide. There are still many boats targeting fish species, but it's the value of the scallop landings that has made New Bedford the highest value fishing port in North America for the last consecutive 20 plus years. Dutch Harbor, Alaska is the number one port in terms of volume and far exceeds the total weight of landings in New Bedford, but the value of that catch is less than half. And I do want to mention here that the New England scallop fishery is strongly regulated and sustainable with gear requirements, quota limits, area closures and rotations. So enjoy your scallop dinner guilt free. U.S. Geological Survey A portion of the fleet is shown in the foreground with Fairhaven on the opposite shore. The hurricane dike stretching across the mouth of the harbor, protects it from high water surge during storms. The port suffered disastrous damage after the hurricanes of 1938 and then again in 1954. Construction of the dike was completed in 1966. Beyond the barrier is Buzzards Bay. Steamship Pier in 2015 Freedom Schooner Amistad surrounded by the locals during a visit in 2009 I purchased plans for the Pelican from the Mystic Seaport Research Center. The Albert E. Condon Collection is a small subset of the center's vast library, but still contains some 598 sheets representing 153 designs. Three individual boats were built using these plans, but only the Pelican stayed in New Bedford. The boat is 79' (24m) LOA with a 19' (5.8m) beam. Unfortunately, I have not yet found a single photo of the boat. A couple of years ago a scratched a western-rig boat that was also a common sight in New England ports contemporary to the eastern-rig. It's a Stonington style dragger and a build log link for it can be found below in my signature area if anyone is interested. Thanks for looking in, and I invite you to stop by on your travels around the forum. Be safe and stay well. Gary


-
Nice progress Andrew, ejector seats look great. Gary
-
Very nice progress, Grant! Looking good. Gary
-
Looking very nice, Ras. Gary
-
US 6” gun by RGL - FINISHED - Panzer Concepts
FriedClams replied to RGL's topic in Non-ship/categorised builds
Terrific job on the Holt Greg! Yes, I’ve watched Martin’s Night Shift channel, wonderful work. But it’s one thing to watch and another to execute. Your weathering on this tractor is really exceptional. Gary -
Nifty little lantern, Keith - and a great detail. A nice visual and unexpected surprise for the viewer. Gary
-
Beautifully done, Craig! Great construction and superb paint. Very, very nice. Gary
-
Very happy to see this new build starting up, Keith. You are a remarkable modeler and I know this will be another superb model. The best of luck on your new project! It's going to be quite large isn't it - a little over 5' (1.6m) - am I figuring that right? Gary
-
Looking good Paul - nice careful and clean work. Gary
- 201 replies
-
- 2
-

-

-
- Oyster Sharpie
- first scratch build
- (and 1 more)
-
It can be very frustrating when you have to scrounge around for information and be forced into making educated choices. I think what you have accomplished so far is very authentic indeed. Gary
-
Keith, I frequently use a variation of Rob’s approach when working with rope/thread, by soaking it in a solution of 50/50 PVA/water with a tiny bit of dishwasher rinsing agent (JetDry) to help break the surface tension. I then arrange it on an off-model mockup that maintains the desired form until it’s dry. It doesn’t dry solid like a piece of plastic but still holds the shape. But the material needs to be absorbent and typically a natural fiber. Nylon and other synthetics have a memory, are non-absorbent, and difficult to work. My two cents for what it’s worth. Excellent progress Keith. Gary
-
Nice score Craig! Your model is looking great. Gary
-
Me thinks so too. 1:160 is just too darn small to do much of anything else. Nice work! Gary
-
Ditto to all the above. Simply beautiful Keith - thanks for sharing it with us. Gary