BANYAN
-
Posts
5,958 -
Joined
-
Last visited
Content Type
Profiles
Forums
Gallery
Events
Everything posted by BANYAN
-
You have done a terrific job on all your paintings, Jim. I hope that does not sound condescending, rather it is intended to convey my pleasure in viewing your work. I especially like the Falklands poetry painting as somehow you have conveyed the bitter chill in the air in those climes. cheers Pat
-

HMCSS Victoria 1855 by BANYAN - 1:72
BANYAN replied to BANYAN's topic in - Build logs for subjects built 1851 - 1900
Thanks Dave; I should be able to move along at a much greater pace very soon. cheers Pat- 1,013 replies
-
- 3
-

-
- gun dispatch vessel
- victoria
- (and 2 more)
-
No problems; good luck cheers Pat
-
Hi Snow, My preference is to attach the bottom deadeyes (closest to channels) as part of fitting the chain plates. Basically, I attach the deadeye off the ship as part of the total chainplate fixture. I then attach the bottom end of the chainplates and position each of these in the associated notch in the channels. Once positioned, I add the edge strip to the channels in a temporary way (no glue) locking the lower deadeyes in place while you get the rigging of the upper deadeyes sorted. Do not glue the outer edge strip in place until you are confident there will be no need to replace/refit a chain plate etc. (I learned the hard way as I snapped several chainplates at weak solder points when doing ratlin and other rigging tasks that put stress on them.). I fit the upper deadeyes to each shroud leg on the ship having made a jig (a search of this site will show a few different types of jigs) to ensure they will all be level. Once the upper deadeyes have been secured to the shrouds, I then lash each set in turn with their lanyards, ensuring even tension on each. It is best to loosely reeve each lanyard, then tighten each incrementally until you have sufficient tension on the shrouds and ensuring each of the deadeyes in the upper rows remain level. I only temporarily tie off the tails of the lanyards until well into the rigging. Once all are done and the ratlines etc completed I finally tie them off permanently so that should the inevitable 'accident' occur, you do not have to destroy the lanyard or the shroud in getting it off. I hope that helps you. cheers Pat
-
HMCSS Victoria 1855 by BANYAN - 1:72
BANYAN replied to BANYAN's topic in - Build logs for subjects built 1851 - 1900
Thanks for the comments John and Carl, much appreciated. cheers Pat- 1,013 replies
-
- 2
-
-
- gun dispatch vessel
- victoria
- (and 2 more)
-
HMCSS Victoria 1855 by BANYAN - 1:72
BANYAN replied to BANYAN's topic in - Build logs for subjects built 1851 - 1900
Another small update; the funnel and steam waste pipe are coming along. the spider bands for hold-down/support chains and bands to imitate the collapsing section still to be added. The funnel is being made by the same guy who made the screw - a bit of a wiz at metal! cheers Pat
- 1,013 replies
-
- 9
-
-
- gun dispatch vessel
- victoria
- (and 2 more)
-
HMCSS Victoria 1855 by BANYAN - 1:72
BANYAN replied to BANYAN's topic in - Build logs for subjects built 1851 - 1900
Thanks for looking in and your kind remarks Russ; I was beginning to think no one was going to comment cheers Pat- 1,013 replies
-
- 4
-
-
- gun dispatch vessel
- victoria
- (and 2 more)
-
HMCSS Victoria 1855 by BANYAN - 1:72
BANYAN replied to BANYAN's topic in - Build logs for subjects built 1851 - 1900
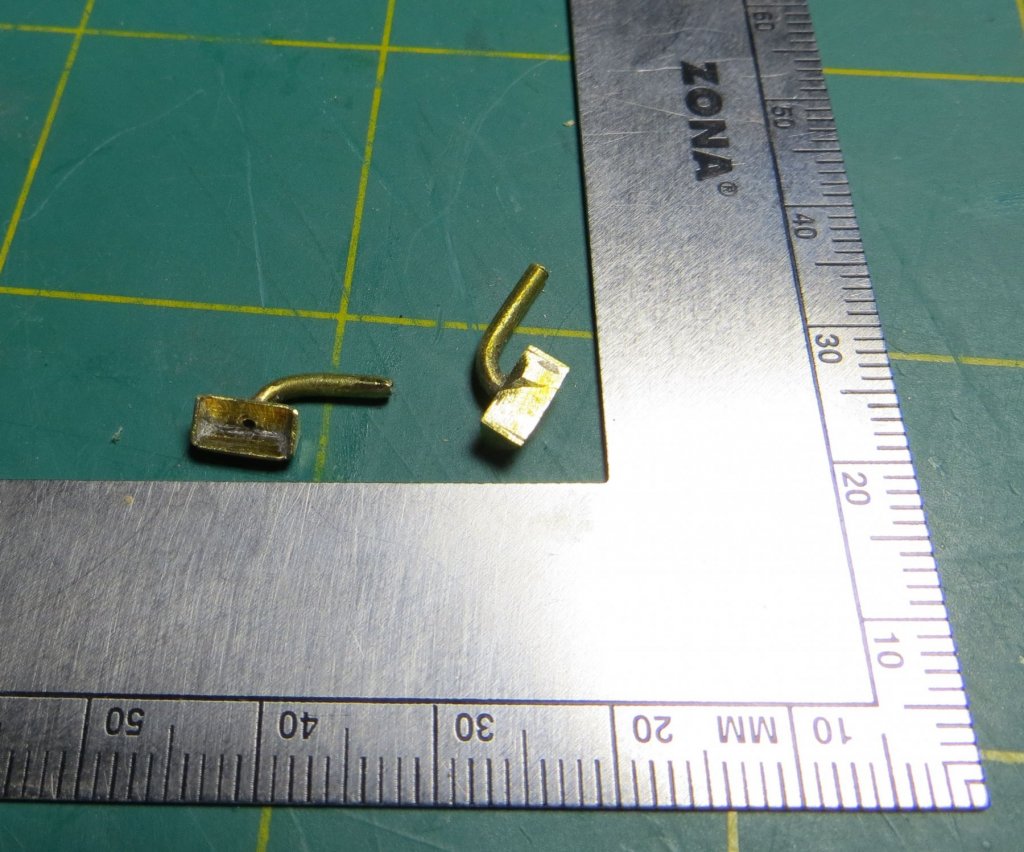
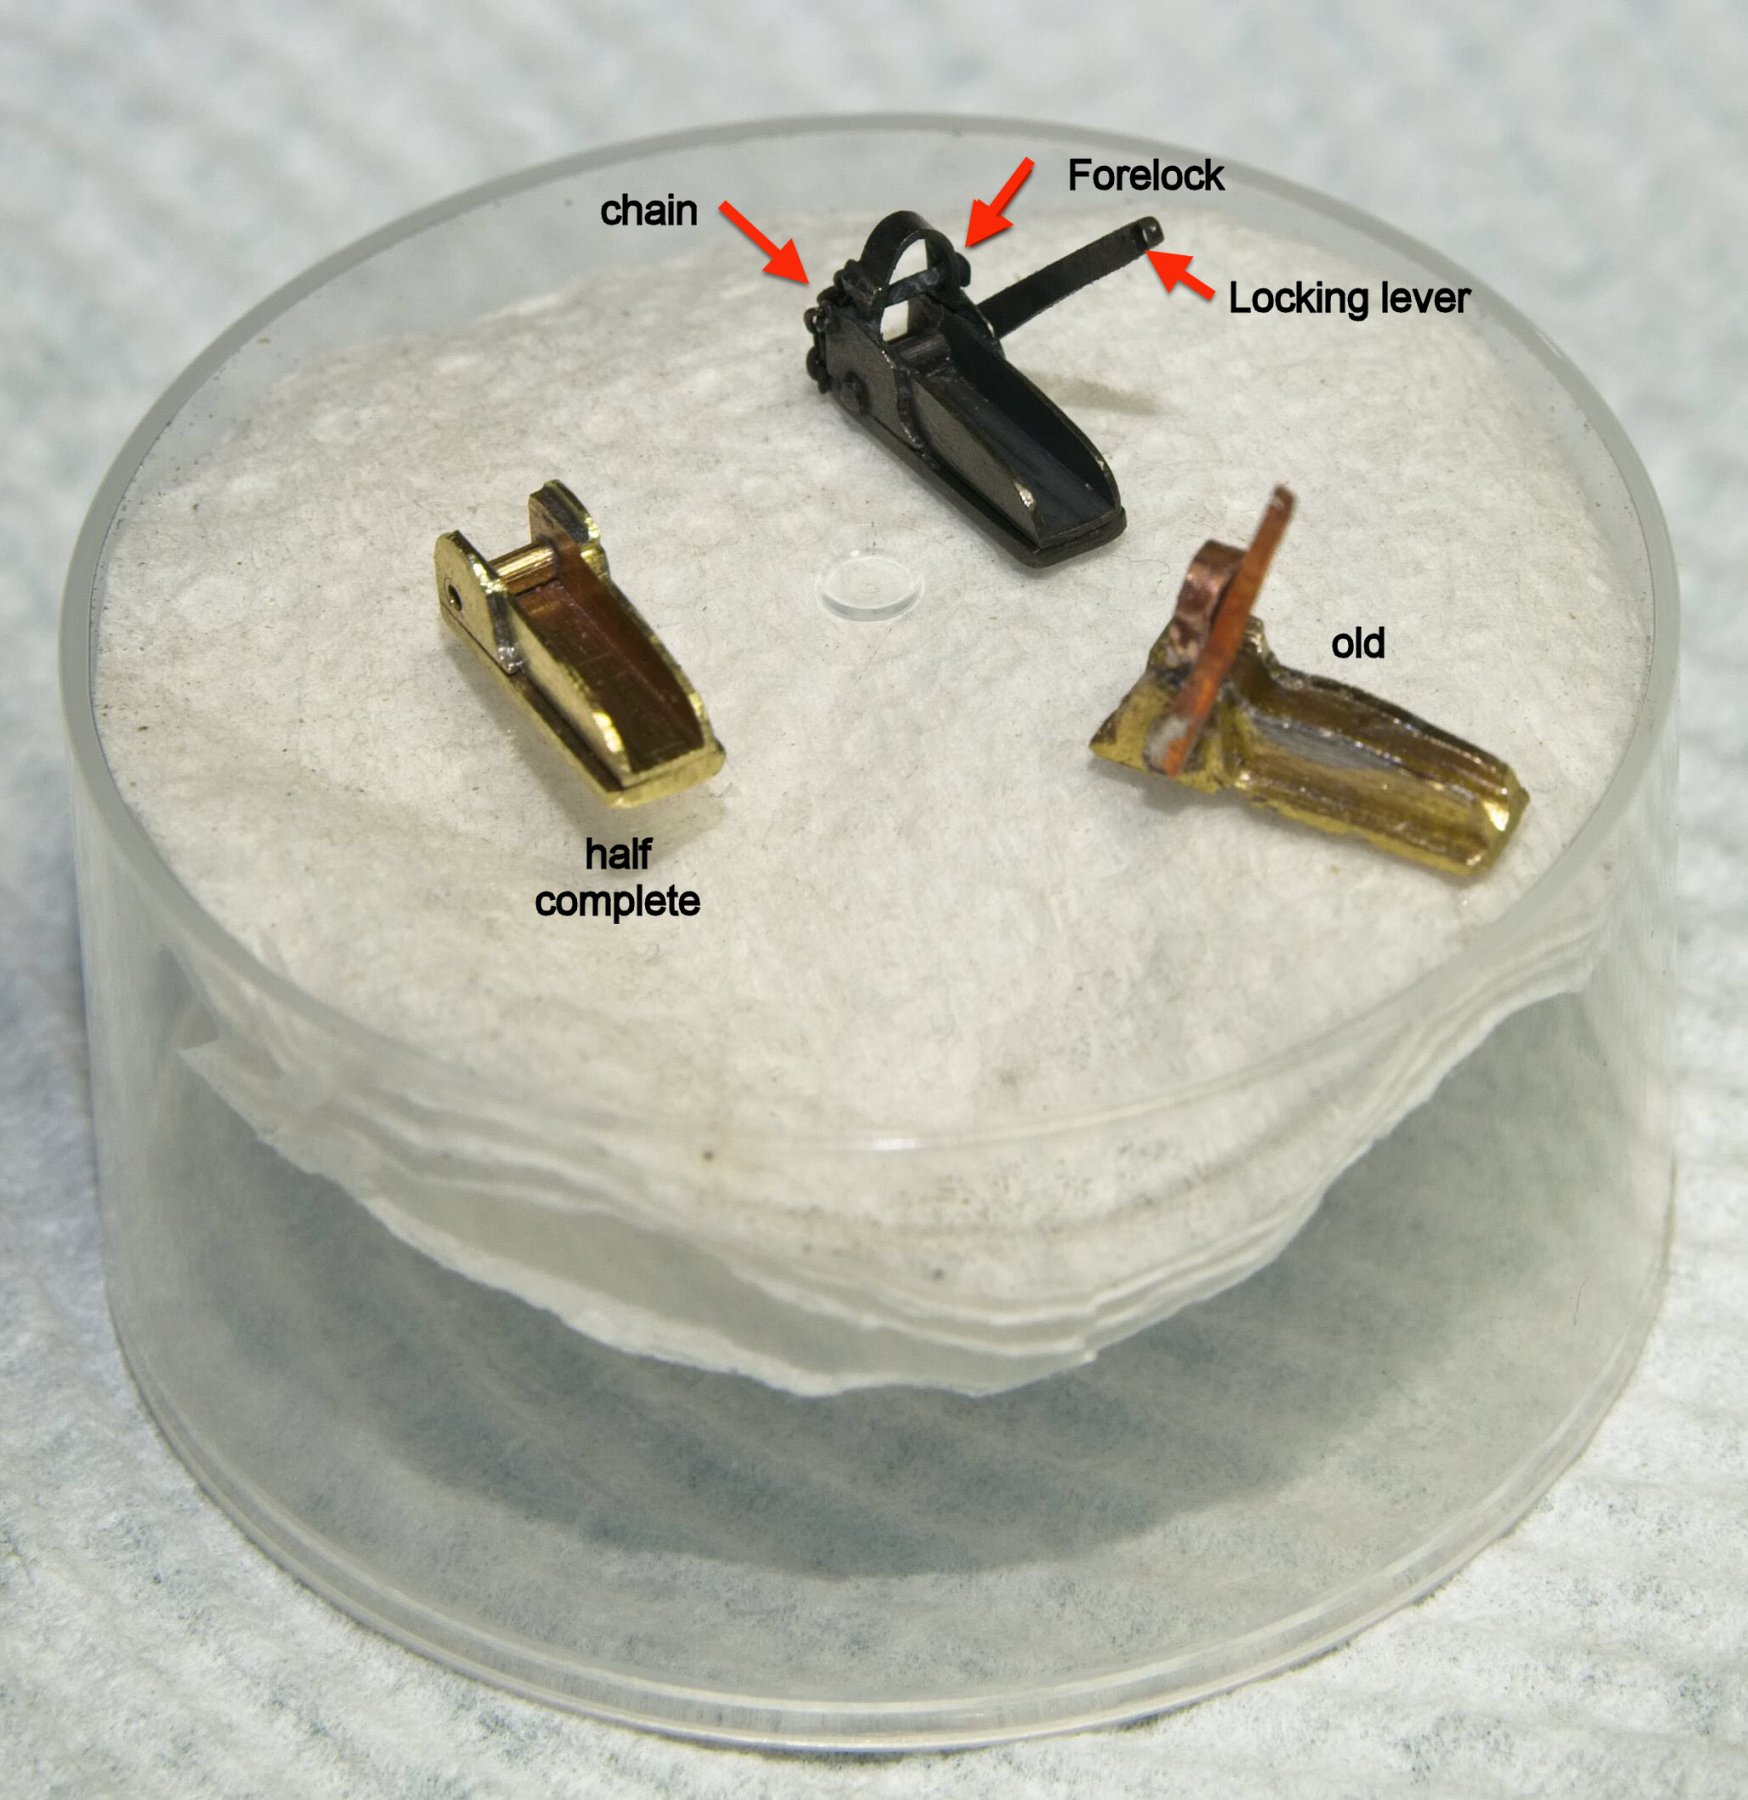
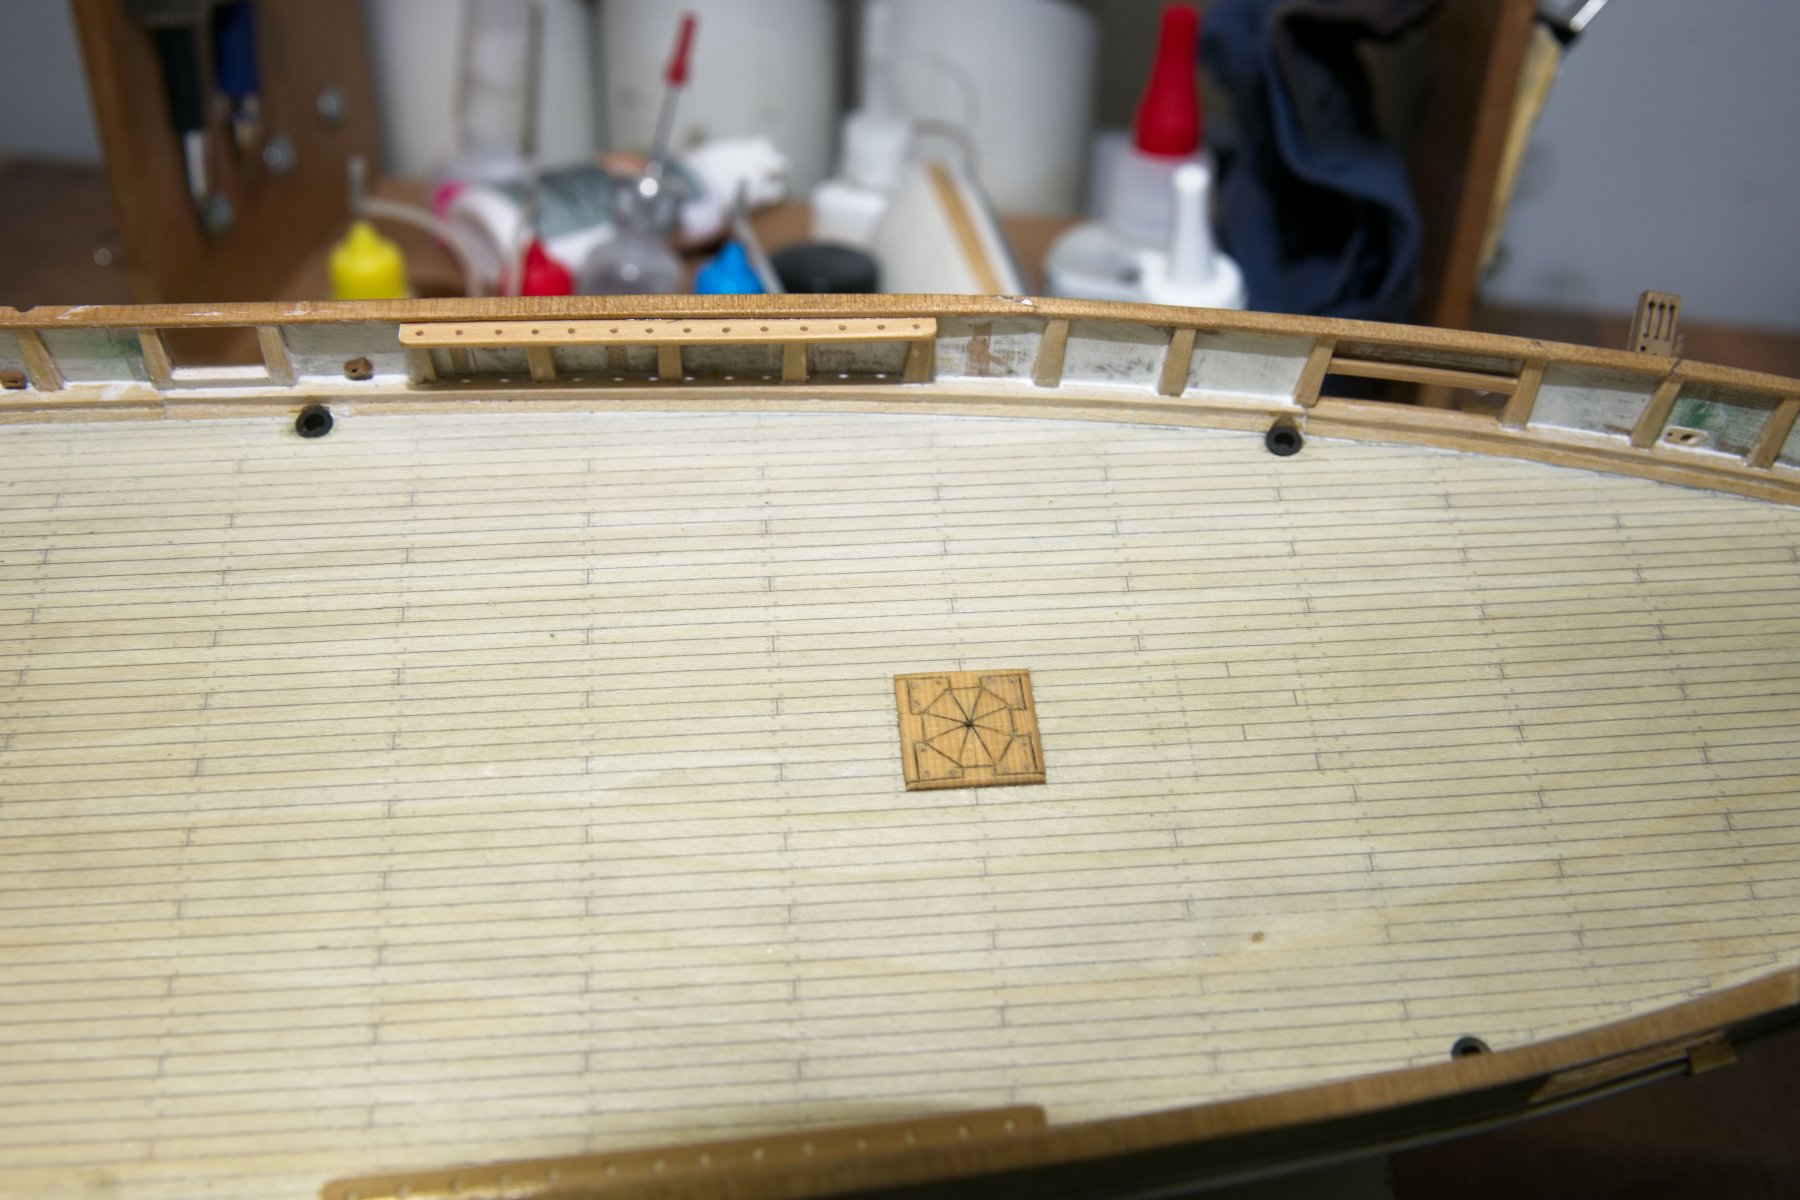
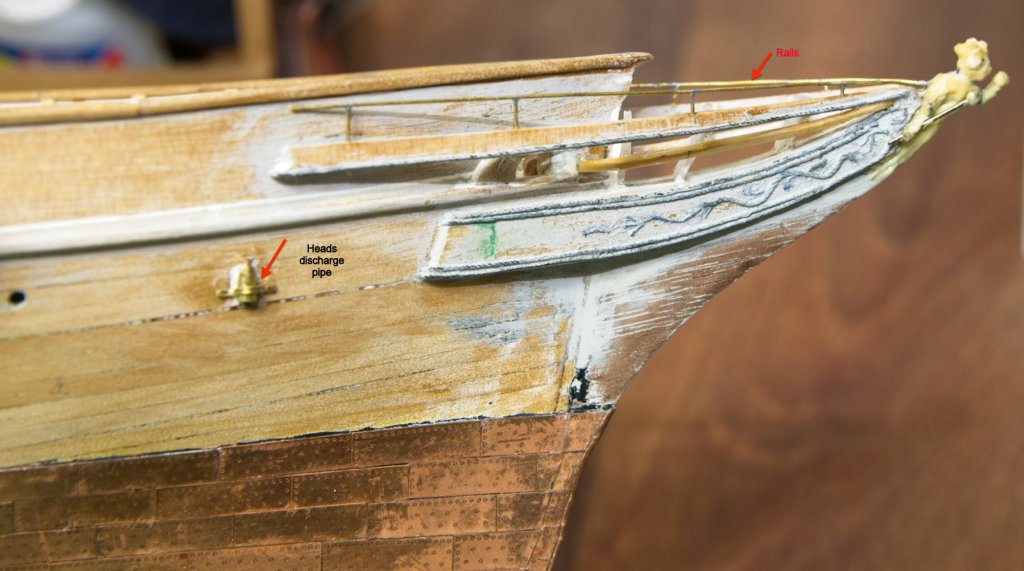
Hi again folks. It has been a while and I have been busy doing small parts in preparation to fit prior to starting to airbrush the model again. I have still to make and fit the chainplates, and the common service lifebuoy before I can paint but I think I should be able to start in the next week or two. I have added the rails to the cheek pieces. These are made from 0.5mm brass wire (stiffened); soldering these was not so difficult but drilling the holes in the top of the cheeks was a little daunting as they are only 1.2mm wide. They still need a little cleaning up and blackening (or etching) so that paint will stick. I have also made the cable stoppers. I forgot to add a scale, but these are only 11mm long but I was able to place a forelock pin and retaining chain on them; and the lever works. The second is half complete. Unfortunately, the old one, made by a club member, was too narrow so I had to redo them. The anchors are being made at the moment, so much of the forecastle equipment can be added when the airbrushing has been done. The mast partners still need to be drilled out to the mast size, but I am hoping the net effect is that the remaining parts of the central triangular shapes will look like wedges. Again I for the scale, but this is 12 mm x 13mm. I took the dimensions from the Arrow Class Gun Despatch Vessel plans I have from the NMM, as they were roughly the same size vessel and contemporary. I had several attempts at assembling the various parts but could not get a neat fit, so I cheated and resorted to inscribing them. cheers Pat

- 1,013 replies
-
- 11
-
-
- gun dispatch vessel
- victoria
- (and 2 more)
-
Great to see you back Mark and I hope all remains well for you. Nice adaption to the tool - now that is thinking outside the box. Like Dan, I tried the flap wheels, but just could not consistently keep that "light touch' he mentions - may have to look at something similar to what you have done cheers Pat
-
The metal work looks very good Maury. Ed Tosti shows a good technique for lining them all up in his book, cannot recall if he has it in his log also. he used a long pin through the gudgeons to align them, and if the pintles are then set straight all should be good. I think he does top and bottom first if I recall. Sorry if you were aware of this? cheers Pat
- 525 replies
-
- 5
-
-
- anchor hoy
- hoy
- (and 1 more)
-
Learning experiences don't stop do they, Danny? You're making rapid progress with the build. cheers Pat
-
Darn, I am sorry I missed your log before this Maury; a very nice build of a non-typical subject. I will take some time to go back to the start and look more closely at your work. I hope you don't mind the last minute arrival of an audience? cheers Pat
- 525 replies
-
- 2
-
-
- anchor hoy
- hoy
- (and 1 more)
-
ancre Chebece 1750 by Jeronimo - FINISHED
BANYAN replied to Jeronimo's topic in - Build logs for subjects built 1501 - 1750
Bravissimo! Wunderbar! Very neat work Karl. WRT the photos (sorry not in German), I find if I upload them all first, then place the cursor in the position in the response, then click on the uploaded photo I want to include, it is placed where I want it. Therefore to get the right sequence, simply place cursor for the first and add photo (from the uploaded ones), then place the cursor under that one etc etc. I hope that helps? cheers Pat -
Hi Dan and Druxey, I am not sure if this applies to the merchant/commercial ships but in the 'grey funnel line' a breakwater was a larger structure, usually on the forecastle to 'break' larger waves/water coming over the bows etc. A spurnwater was smaller and used to divert/control water - one place was the raised metal plates near the 'devil plates' to guide water to the scuppers. Very nice detail Dan, this build is looking great. cheers Pat
- 287 replies
-
- 4
-
-
- michelangelo
- ocean liner
- (and 1 more)
-
ancre Chebece 1750 by Jeronimo - FINISHED
BANYAN replied to Jeronimo's topic in - Build logs for subjects built 1501 - 1750
No images showing - is it just me? cheers Pat -
Very nice build Greg; quite the collection you have now. I can understand doing several of a similar type will make you feel stale; good idea to change tack for a while. cheers Pat
-
Very nice Toni, can't help you directly with your question, but my current build (the 1850s, so much later) had stanchions with manropes and no nets. I am not sure if that was an option in your build era? cheers Pat
-
She is looking great Dave with some very nice detail, you can be justifiably proud of your efforts mate. cheers Pat
- 742 replies
-
- 6
-
-
- constitution
- frigate
- (and 1 more)
-
Hi Jason, could it be that if they are equal stacks (same dimensions separated) that one axle set is for the front the other for the rear? Nice simple assembly jig you have set up. cheers Pat
-
What a fantastic portfolio of maritime and related art. You certainly have a talent for this. cheers Pat
-
pin pusher / nail nailer amati
BANYAN replied to michael101's topic in Modeling tools and Workshop Equipment
Ditto, unfamiliar with the two tube version. I have also stopped using these and find it better to use an old carpenter's hack/trick. Push the pin through a thin piece of card that is shaped to suit the job, and use a tack hammer - keeps the fingers out of the road and you have more control Sorry, that does not help you with the tool, but might be worth considering? cheers Pat -
I would have thought chicory - isn't that used for smoking (meat etc) cheers Pat
- 46 replies
-
- 5
-
-
- o16
- pacific crossroads
- (and 2 more)
-
Please help! What to buy.
BANYAN replied to semorebutts's topic in Metal Work, Soldering and Metal Fittings
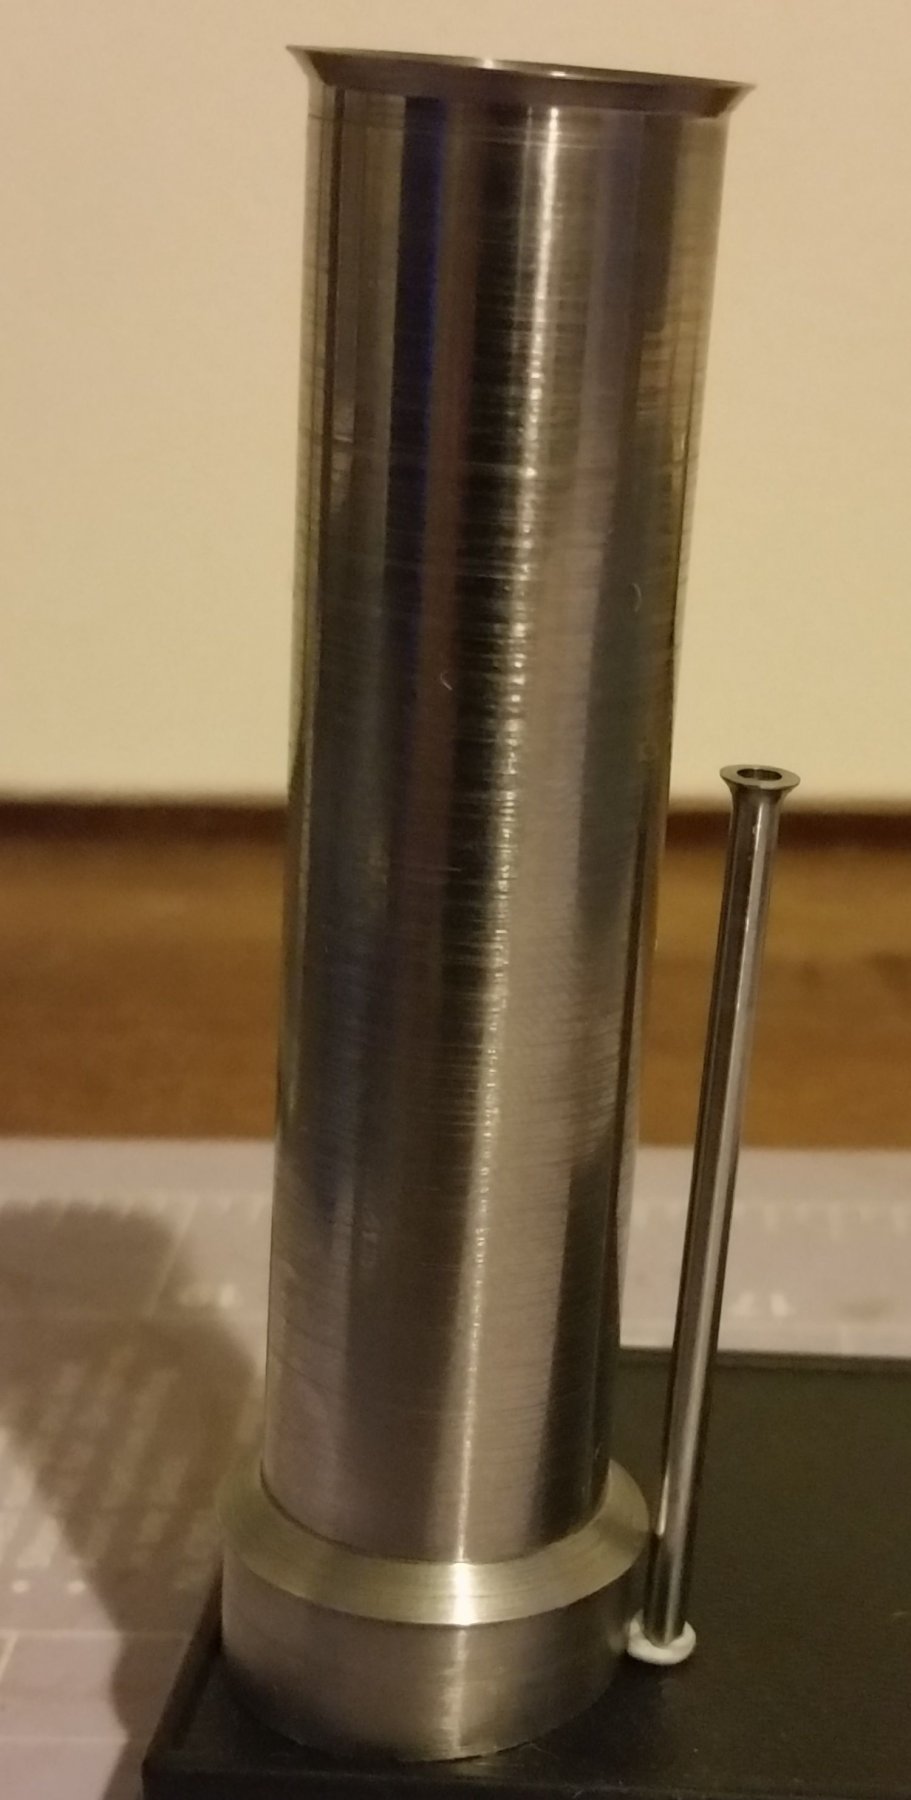
Hi all, I have become a real fan of resistance soldering due to the control you have over it. I have been able to do some intricate work without heat sinks by placing the probes, and the solder, in the right place, The solder will draw towards the heat, and by using differing melting point solders, able to achieve this. The biggest issue with PE is that if you are not carefull you can blow through it very quickly with excessive heat. The pissdales below still need cleaning up but as you can see these are only 4.5mm and the two end pieces (triangular) and the tubes were soldered in without heatsinks. cheers Pat