

Gregory
-
Posts
3,176 -
Joined
-
Last visited
Content Type
Profiles
Forums
Gallery
Events
Everything posted by Gregory
-
 Hang in over there.. The 1949 caught my attention.. I was born Jan 15 1949 in Hearne, Tx near Bryan/College station. I see by the Farmers Almanac, the temp on that day was 75.. Then on Jan 31 it was -2.9... Brrr. We lived out in the country, so I don't think we had electricity, and pretty sure we didn't have internet..😁
- 778 replies
-
- 2
-

-
- cheerful
- Syren Ship Model Company
- (and 1 more)
-
I have learned a lot over the years. The biggest thing to wrap your head around, is that you can't cover a curved surface, with flat, straight planks. Few kit instructions bother to point that out. To make it worse, they are often curved in more than one dimension. You are doing a great job so far. Most importantly, you are asking questions and not getting discouraged.
-
One more thing I don't see mentioned, is that in general, the more expensive kits took more to develop, Thousands of man-hours for something like the Caldercraft Victory. The higher retail price helps recover that cost, hopefully make a profit and keep them in business. This is a prime concern when it comes to knock off kits - the producer did not incur those development costs, and their sales price is virtually all profit after a few kits are sold..
-
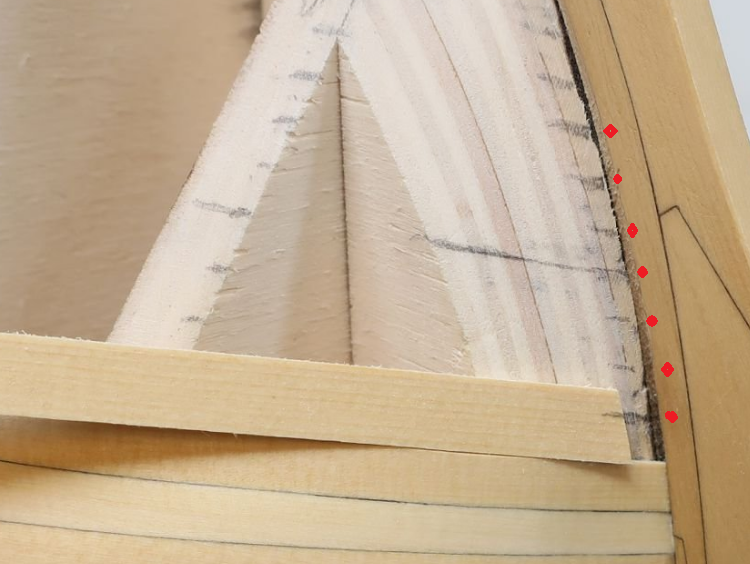
It looks like you are not taking into account the amount of tapering needed at the bow. You need to measure the number of planks needed at midship, then divide the area at the bow by the same number. Here is a little section from Chuck's Winchelsea. He is single planking, but you can use the same method on POB. You can practice on first layer and refine the process on 2nd layer.. Don't undo what you have done so far, because it will clean up just fine as a basis or 2nd planking. You may end up with some sharp pointed blanks, but don't worry about that now. Here is a little detail to show the marks ( red dots are mine ) made when lining off the hull and determining plank width.. Looking ahead you will find the area at the stern post may be wider than mid-ship and you will have to introduce a stealer or two, because you don't have wider planks to make up the difference. I'll try to help you later with stealer info, if you need it. I am certainly no expert, but I have had to dig deep on this forum for the help I need.. You will probably see I talk about Chuck a lot, but I have found he is good at explaining things in a way the beginners can understand.
-
Gratings
Gregory replied to DaveBaxt's topic in Discussion for a Ship's Deck Furniture, Guns, boats and other Fittings
You are correct. I checked some MODEL SHIPWAYS GRATINGS, 39 X 1.25MM SQ.60 I have, and the first number is the length of the strip and the 2nd the height of the strip.. On mine, the .6 is the size of the opening on an assemled grating.. -
1/48 HMS Surprise, who makes the best flags.
Gregory replied to ratskiss's topic in Wood ship model kits
Technique from another Chuck -
Should be able to avoid the heat problem with some LED lighting.
-
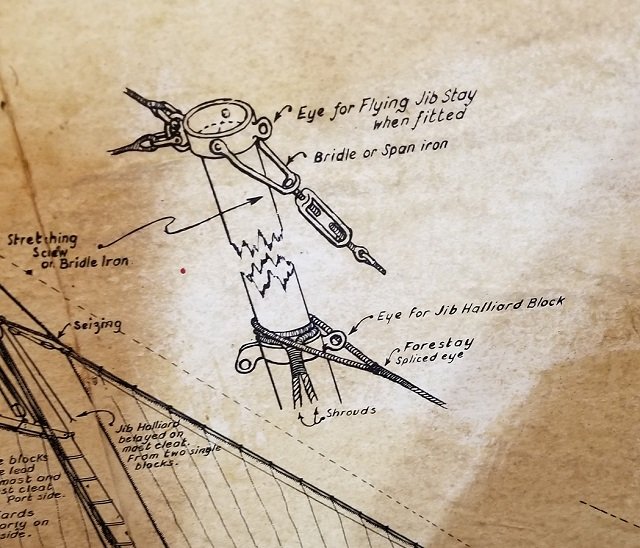
I have plans drawn by George Campbell for an old Model Shipways kit. They show what Tomculb is speaking of. The two block tackle doesn't look right to me, but I'm no expert...
-
Model Shipways USS Constitution Cross Section
Gregory replied to Jorge Hedges's topic in Wood ship model kits
Nice video, but do you have one about the Model Shipways USS Constitution Cross-Section.. 😁 -
Model Shipways USS Constitution Cross Section
Gregory replied to Jorge Hedges's topic in Wood ship model kits
The only cross section of Constitution I am aware of is from Mamoli. You should be able to find several build logs. See if this search link works for you: Click Here -
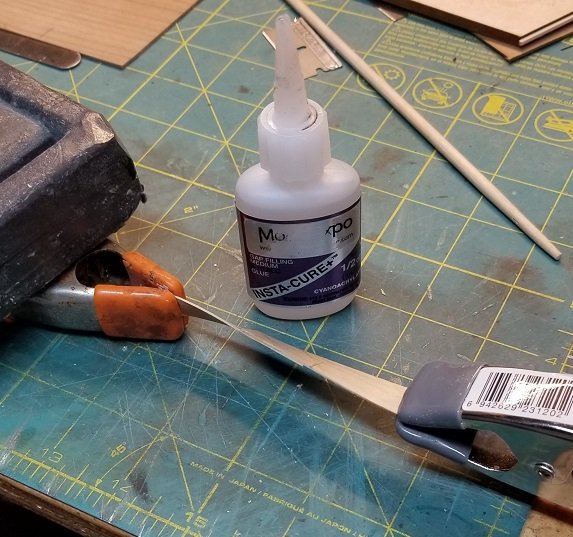
Thanks for the hard work. very interesting.. It looks like you used some very thin CA. I mostly use some stuff called medium gap filling from BobSmith industries. I mentioned in another discussion how I threw away a lot of stuff before I found the stuff I use. I was trying to fill out an order at ModelExpo to get free shipping, and I ordered their house label CA. Turns out it was re-labeled BobSmith Industries, and I haven't used anything else sense with any satisfaction. I'm sure there is other good stuff out there, but I have no further need to experiment. It doesn't spread out like your last examples on wood. The only time it leaks out from under the edge is when I use too much. It took me a long time to get used to how little it takes I have used it on pear, cherry, boxwood, walnut, mahogany and others. When I get visible residue, I use acetone on q-tip, stroking it several times, and it virtually disappears, even after it cures.
-
There are a lot of different options, and too much for a single post from me. You could use the clamps until you have no room without putting holes in the 2nd planking. There are techniques for bending the planks so they lay flat on the curves. I'll find you some links. There are wood glues that set up relatively quick and there are methods of using rubber bands and various bumpers to hold down the plank until the glue sets. I personally use CA ( super glue ) but it has taken me a while to get comfortable with it. Do the Corel pans/instructions call for scaling the planks? You might have to rely on advice from others who have built the kit. Here is info about Chucks bending techniques.. This is single planking, but would be just as useful for double. Chuck uses CA and no clamping, but you could adapt it for wood glue and some sort of clamping. If you do use CA you need to experiment with a formulation that works best for you. I threw away a lot of CA before I settled on this: Gap Filling 4oz CA Glue ( Medium Bob Smith Industries Glue Keep asking questions and I'm sure you will get a lot of help..
-
I love those little clamps for 1st Planking. Used them on my first build over 25 years ago..
-
I don't think this was discussed in detail beyond pointing out it works better on porous material. I have had mixed results on painted and varnished surfaces. I make it a point to rough up such surfaces, and usually have good results.
-
Actually I did that.. About two minutes after I glued them up. I pulled with my fingers because the clamps slipped off too easily. I was thinking about hanging it up with some weight, but don't have a quick way to do that without some further thought, but I will work on it later. I need a good fish scale to get a meaningful number..
-
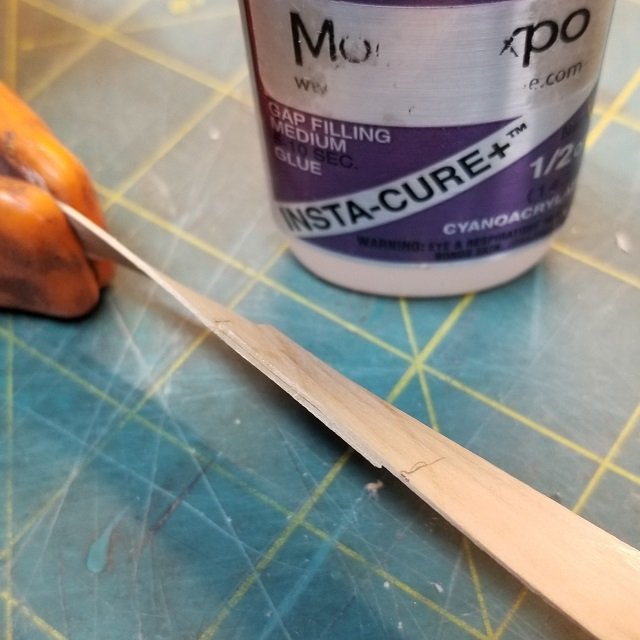
A little test I did this afternoon.. Some 1 x 13 mm boxwood with a 90° twist. Are there shear forces at work?
-
Advice needed. How much rope do I need?
Gregory replied to bruce d's topic in Masting, rigging and sails
At this point, I would think that might be the best way , considering the Mediator and Pickle are relatively simple rigs. I would go with your measurements and add at least 10%.. Even if there are similar builds in the forum, I would doubt that people are measuring the rope as they go along and keeping a record of it. Maybe someone will prove me wrong. It is going to be hard to find a good replacement with Chuck out of the picture. Another good reason to consider making your own. -
You might be interested in this post by Chuck:
-
I used it as a fraction of a pound, in terms of pound-force. Perhaps I used it improperly. What is the proper expression when pound/square inch <1 ? It would be possible to measure the spring-back force on a twisted/bent model plank. Do you think it would approach a pound or more? CA two strips of bass wood together and measure the force it takes to slide them apart, or how much force it takes to pull them apart. ( In my experience, the wood splinters and comes apart before the glue joint separates ) There may be any number of reasons to choose not to use CA on a wood model ship. The bond strength with wood, is not one of them. As with any adhesive, there can be inferior formulations, and improper use. The bond strength of CA can be thousands of pounds per square inch when properly used. I fail to see how the bond strength of CA is a consideration when it comes to wood ship modeling, unless it is a question of the necessity to un-bond at some point.
-
Any guess about how many pounds per square inch is going on there? Or should we be talking about ounces?
-
That appears to equal 4267 pound-force per square inch https://www.convertunits.com/from/kgf/cm2/to/psi
-
That looks great for entry level for the type of project you have described..
-
What kind of shear forces are we talking about in psi when it comes to model ship planking or even deck fixtures? I am reading numbers in the hundreds for various types of glues including CA, on various types of materials.
-
It doesn't sound like like a good idea at all.. Chuck's suggestion of a scroll saw would be your best approach.. What sort of kit ( name ) are you talking about ? Is there something special about it that rules out acquiring a new kit that doesn't require cutting out the major components?
-
Like Matt asked, " What is reasonable.. That Snapmaker comes in at $1250 for the base model and has a very low power laser, which would take multiple passes for the typical wood that comes in wood ship model kits. A computer would also be needed to operate the machine. You would also need to worry about a work area with a serious extraction ventilation system " Something simple " for what you want to do, doesn't sound like a realistic goal.
