HOLIDAY DONATION DRIVE - SUPPORT MSW - DO YOUR PART TO KEEP THIS GREAT FORUM GOING! (Only 13 donations so far - C'mon guys!)
×


mobbsie
-
Posts
1,493 -
Joined
-
Last visited
Content Type
Profiles
Forums
Gallery
Events
Everything posted by mobbsie
-
 Hi Dragzz, Nicely framed gun ports mate, they look much better now. The planking is looking nice and neat as well, well done mate. Middle gun deck aft I see you have an area where there is just a space, would I be right in thinking that that is for the entrance. If it is, should you not be making the doorway now. Not being familiar with the plans for Victory I may be out of line in mentioning it, if I am please forgive me. Keep up this good work mate and I look forward to further updates. Be Good mobbsie
 -
Hi George, You have done some really nice work there mate, well done. I have one reservation though, I think the Stunsail Boom is a little to high on the yard, looking at the pics which are superb by the way, the boom looks to be on top of the yard. It should be slightly forward of where it is now. Having said that, I wouldn't change it, she's is looking absolutely great and like Sjors I love the paintwork. Looking forward to further updates mate. Be Good mobbsie
- 83 replies
-
- 1
-

-
- agamemnon
- caldercraft
- (and 1 more)
-
Hello Mate, Sails are looking good my friend, well done. I wouldn't have thought there was much difference between Spanish and English rigging, but if you already have Spanish on her then you should continue with that rig. It would take a very discerning eye to pick up what I would assume to be subtle differences so go with what you are happy with. Be Good mobbsie
- 1,873 replies
-
- 2
-
-
- occre
- san ildefonso
- (and 1 more)
-
Hi Gents, Joe, thank you so much for the good words mate, I really do appreciate them. Ray, What a lovely thing to do, this ship will have so much going for it with not a small amount of sentiment, as a child I always had a thing for HMS Cossack, I liked the lines of her, I still today keep a lookout for any articles on her, nothing like your Tanatside though. Good on you. Kevin, Thanks for the good words mate, HMS Triton Cross Section, see you on the dark side, don't forget to bring a torch with you. Be Good mobbsie
-
Going to send you a PM in a little mate, you might find it handy. Be Good mobbsie
- 2,191 replies
-
- 1
-
-
- confederacy
- Model Shipways
- (and 1 more)
-
Hello Adriaan, It's great to see you back in the shipyard mate and posting. The G/F has some very graceful lines and I know you will do her justice with a very fine paint job, once rubbed down she's going to fantastic. Be Good mobbsie
-
No worries mate, I'll wait patiently in the corner twiddling my thumbs chomping on Sjors's popcorn. :P Be Good mobbsie
- 456 replies
-
- 5
-
-
- finished
- bomb ketch
- (and 2 more)
-
Wow John, That last post really puts a lot of things into perspective, you survived where a lot of people wouldn't have. Really really glad to have you around my friend. Be Good mobbsie
- 2,250 replies
-
- 4
-
-
- model shipways
- Charles W Morgan
- (and 1 more)
-
Were talking 3 slows here Augie, there's my slow, there what you term as normal folks slow and then there's Grants slow. I reckon this will just about see Grant to his retirement mate, lets see, Grants 54 this month, that gives him 11 years. Sounds about right to me. :D Be Good mobbsie
- 456 replies
-
- 7
-
-
- finished
- bomb ketch
- (and 2 more)
-
Hi Guys, Mike, glad to have you on board mate, I just hope I am able to full-fill your expectations. Ken, your right mate, a few Echo gents are here, hope we are able to assist with useful info mate. Alan, now that Sjors has taken a seat mate we do have Popcorn on offer, cos if pies are around I'll likely eat them. Sjors, better late than never my friend, I just hope you brought your Popcorn with you. Captainsteve, welcome aboard me arty. Hope you enjoy the ride guys, I'm really looking forward to this trip. Be Good mobbsie
- 255 replies
-
- 2
-
-
- granado
- bomb ketch
- (and 2 more)
-
Morning George, Thanks very much mate, appreciated and I'm glad I was able to help whilst building her, if you should have any questions please don't hold back. To answer your question regarding displaying her, she will be under glass and displayed in my lounge. It's a bit of a saga mate. The size, I'll do metric if that's ok. 4mm Toughened Glass with polished edges, Sides 2 @ 1372 x 1016, Ends 2 @ 559 x 1016, Top 1 @ 1372 x 567, Base 1 @ 1397 x 592 the price I got from Kent Blaxill in Colchester, the cost from them for 4mm toughened glass with polished edges was £353.00 inc VAT. For them to actually make the case was £15.00 per bonding = 8 bonds @ £15.00 each = £120 + VAT + labour, total = £550.00. I must mention here that my friend purchased the glass for me through his company which saved me a bit of money. The base as I say is Cherry, the size is approximate because my friend is going to cut it down and make it to fit the case, 1397 x 592 x 15. I decided this was too much so just purchased the glass with the intension of putting it together myself, I mean how hard can it be. I gave it up as a bad job and decided to get K. B. to make the case, I took the glass back following a phone call and left it with them, I was then told they couldn't bond 4mm glass that size, they would only do it with 6mm, no way was I going to scrap what I had and so I gave it to a very good friend of mine who is going to make a wooden frame for it. He is also going to make the base, he has some Cherry which he is going to use. I also checked out a plastic case but this worked out dearer than glass, so the lessen learned is, if I want to bond a case this size get 6mm glass and don't try to do it myself. So there we go my friend, I hope that helps mate. The last post I saw from you was when you completed your Ratlines so we must be due an update by now. I hope you have become accustomed to them being black, I think they look great. Be Good mobbsie
- 1,279 replies
-
- 3
-
-
- agamemnon
- caldercraft
- (and 1 more)
-
Hi Chuck / Mike Thanks Chuck, we did have our moments though as you can imagine. Mike, Thank you mate for your kind words. Like most builds of this size all the emotions come into play from time to time, because of her size you'd think she would be easy to work on but she has her demands the same as smaller ships so concentration is a must. There are things I would do differently but don't we all say that, there are aspects of her that I would change but a lack of forethought and limitations in the skill department dictate a lot of what I do, each build is a learning curve and we all gain from that and it doesn't matter if your in the top echelon of builders or just starting the journey. She's a lovely ship to build so enjoy all you do on her and I know she will come out a first class ship and definitely one to be proud of. Be Good mobbsie
-
Thanks for the comments guys, and thanks for hitting the like button. Pull up a pew Mark, your always welcome. It's going to be an interesting build Frank, more importantly an enjoyable one. Never mind Dave, you may be able to play catch up, this is going to be a slow build. Now Grant, I've served in the Army and seen active service, but let me tell you, I would do that all over again rather than cheat and face the wrath of an Ausie Naval Officer, I aint that brave. Anja, thank you so much for helping out an old man who cant help making mistakes. Hopefully more updates soon. Be Good mobbsie
- 255 replies
-
- 7
-
-
- granado
- bomb ketch
- (and 2 more)
-
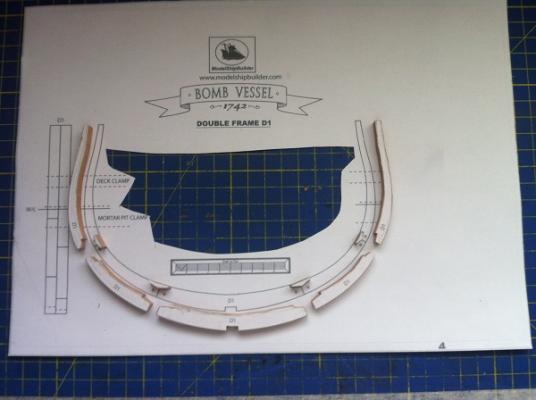
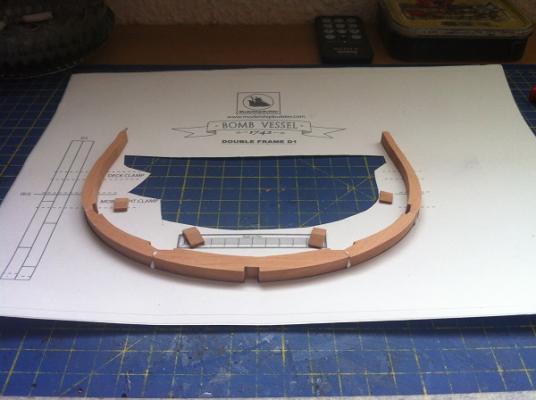
Hi Joe, I must apologise for any confusion, I am building the cross section, the heading needs to be changed to reflect that. The plans came from model ship builders, here is a link http://modelshipbuilder.com/page.php?135 They really are a good set of drawings. With regard to the frames, they are cut out from the timber billets, I will post a couple of pics to show you. Best way to go is to copy the original page onto sticky A4 labels, these are then cut and placed onto the wood, a tip gleamed from Grant is to put painters tape on the wood first. Cut out the frame sections and sand down to just above the lines, position the sections onto the main label, clean up the joints until a snug fit is obtained, when you are happy with the fit glue together using PVA white glue, when dry clean off excess glue and sand down to the lines. Hope that makes sense Joe. Be Good mobbsie

- 255 replies
-
- 15
-
-
- granado
- bomb ketch
- (and 2 more)
-
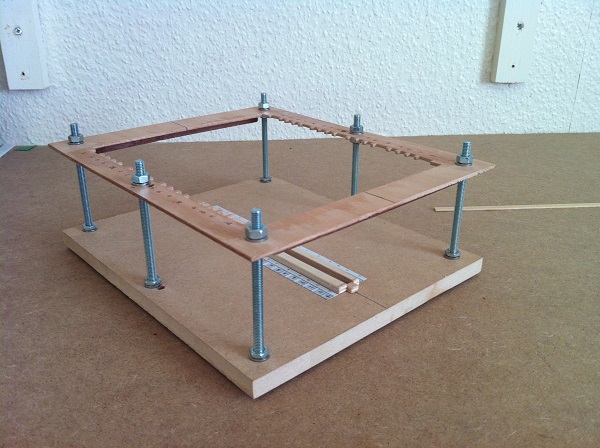
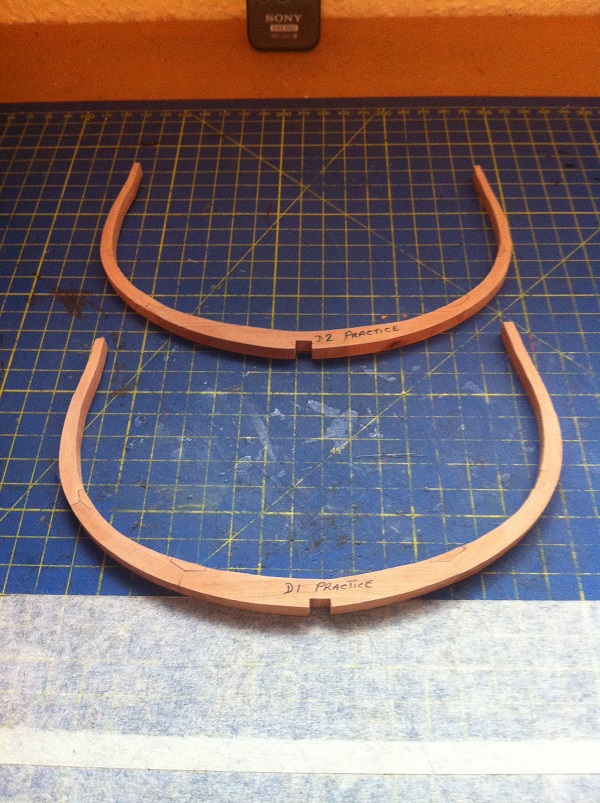
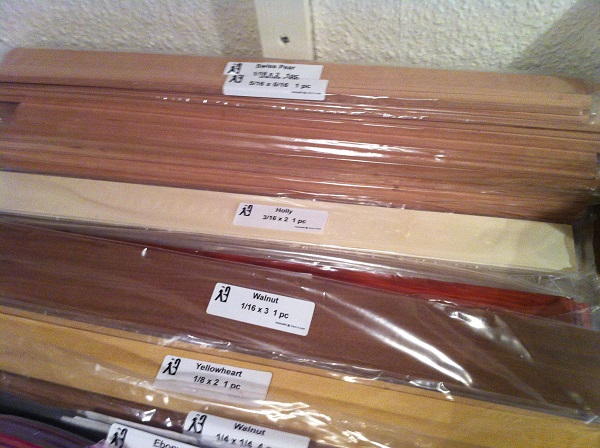
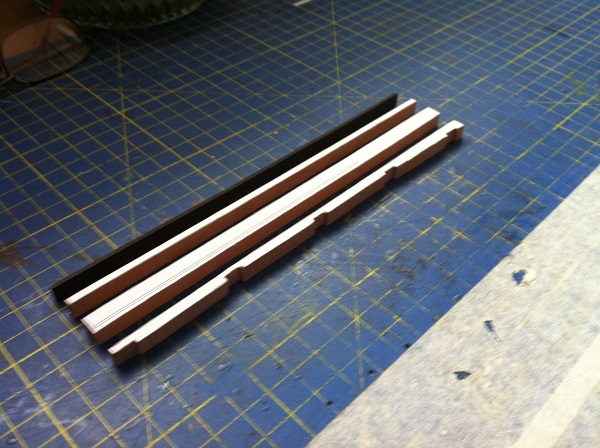
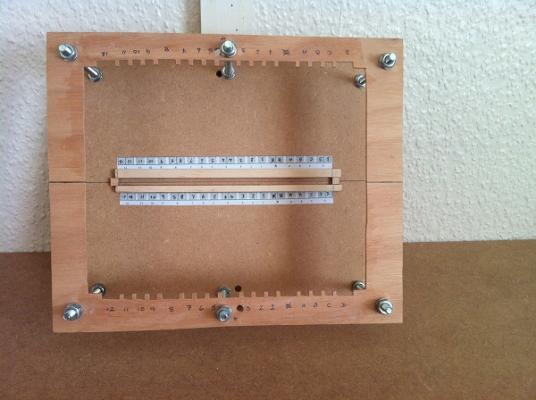
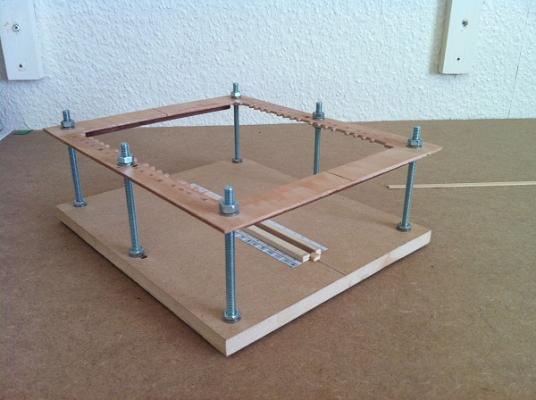
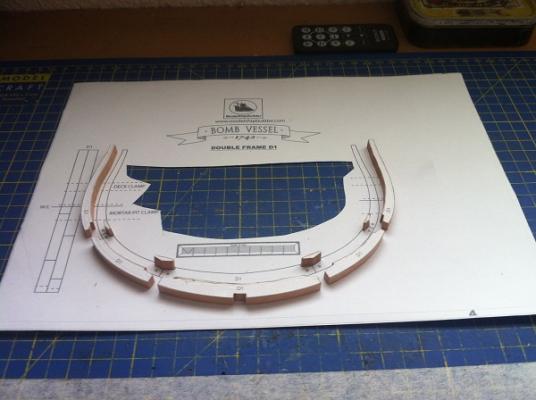
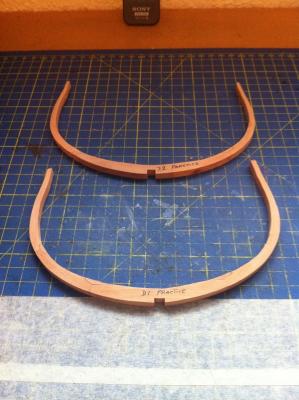
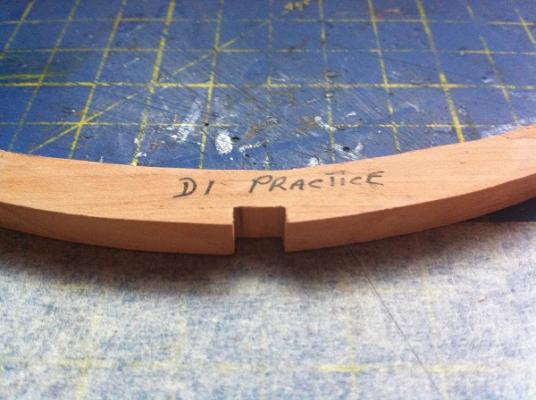
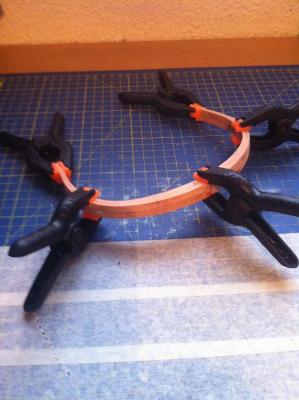
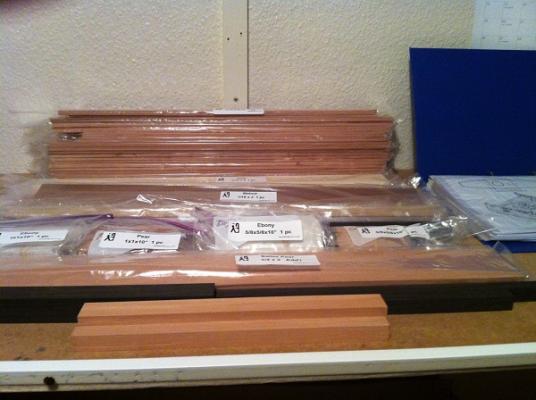
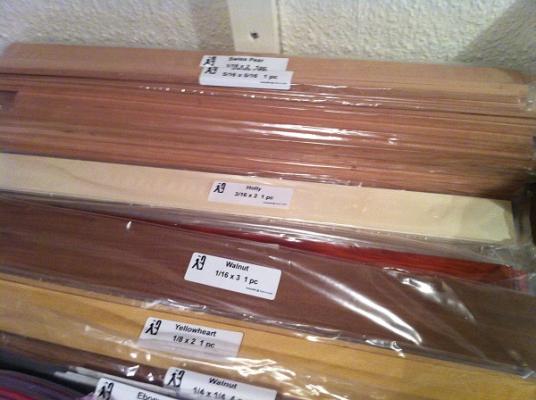
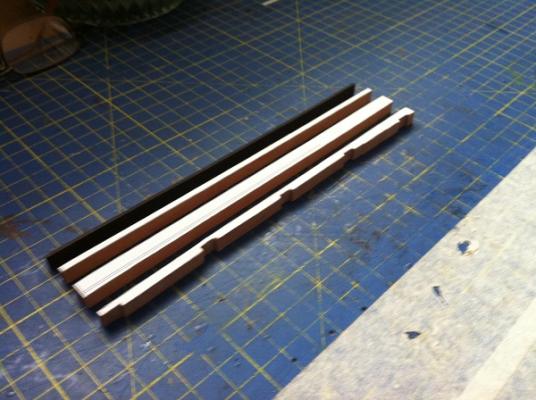
First off let me say Hello to all the Lords of the Dark Side, your tolerance will be gratefully accepted. I would like to give plaudits to Jeff Hayes of Hobbymills for superb quality materials, the timber really is first class, also to Jeff Staudt for a fine set of drawings. A special thanks to Grant for all his hard work in working out the quantity of timber required and the different types, I just had to make some minor adjustments to the order. Below is a taster of the timber to be used. As you are probably aware this is a group project build with Grant, Jack and myself, ( at the moment ), this the first scratch build for all of us apart from prefabricating kits parts that were not happy with and I think we've all done that. It would be great if others wanted to join in. We will be working in unison and posting in our own logs and this is the start of my log. I started by practicing with my tools and would you believe it this framing jig appeared, as this was a practice piece and it didn't count towards the build but on investigation I found I hadn't got any more material I could use and so had to keep it. Following on from the jig, I started practicing on the frames themselves and I found out a few things I need to work on, 1st, Don't cut so close to the lines, give your self a bit of room. 2nd, Easy on the sanders, don't put so much pressure when sanding down and 3rd, It doesn't take much to remove the skin from the knuckles with a disc sander, this had been switched of and was slowing down, I helped it stop and found out how good my bandaids are. I made a double frame but will not be using it, I can and will do better. Following on from that I attempted the Keel, this is made up from 4 pieces, Ebony for the Keel, followed by Swiss Pear for the False Keel Upper and Lower and the Hog. This Keel looks difficult but in reality is quite simple, you just need to be accurate, a rabbet is cut into it when all the pieces are assembled. I was going to use my router for this but there is a deviation 2/3rds along it's length so this had to be cut by hand, I used my trusty Stanley knife carefully, (we have a history) and finished with a triangle file. Below is the completed practice keel So, that's the start of my new log, if anyone has any questions please don't be afraid to ask Grant !!!!!!!!!!!!!!!!!!! Be Good mobbsie
- 255 replies
-
- 25
-
-
- granado
- bomb ketch
- (and 2 more)
-
Thank you all so very much Ladies and Gents, in the most I have enjoyed this journey and in many ways it has set me up for my next build, The Bomb Vessel Granado Cross Section ( scratch ). You all have kept my spirits up when I felt at times that she was overwhelming me and I thank you for that, we all need encouragement from time to time and you didn't fail me. I am looking forward to working alongside both Grant and Jack on this group project and if anybody wishes to join in please do, it doesn't matter if you have already started, your experience and knowledge will be welcomed with open arms. I invite you one and all to join the 3 of us as we enter the DARK SIDE. Ray, the stand is really easy to make mate and you can let your imagination run riot with it. A question :- Will your Destroyer be a scratch or is there a kit for it, I ask because I have just been given a boxful of ships drawings and deck layouts and there are details for destroyers in there ?. I haven't seen any schematics yet but then again I've only had the box a 1/2 hour so you never know. David, I only have one place I can display her, that is the sideboard in my lounge. The sideboard is 6ft long and when the Aggy is on it there will only be approx. 3 inches each end, so I would strongly advise prospective builders to check for display areas before the ship is purchased. I forgot to mention that I have to pull the sideboard away from the wall by 5 inches to allow for the base. That's it guys, this journey ends and another begins, they say all journeys start with the first step so, see you all on the DARK SIDE. Be Good mobbsie
- 1,279 replies
-
- 4
-
-
- agamemnon
- caldercraft
- (and 1 more)
-
OK, now for the main event . So there we go, all done. I hope those who followed enjoyed the journey and I thank you again for your help and support. See you all in the next log I hope, that will be opened on Saturday. For those that don't already know it's the 1/48 scale Bomb Vessel Granado cross section. This is a scratch build so I'm venturing into dark and unknown side of this hobby, not on my own I might add, Grant and Jack Panzeca will be taking the journey with me, should be fun. So for now I'll say adios amigo's, see you soon. Be Good mobbsie


- 1,279 replies
-
- 40
-
-
- agamemnon
- caldercraft
- (and 1 more)
-
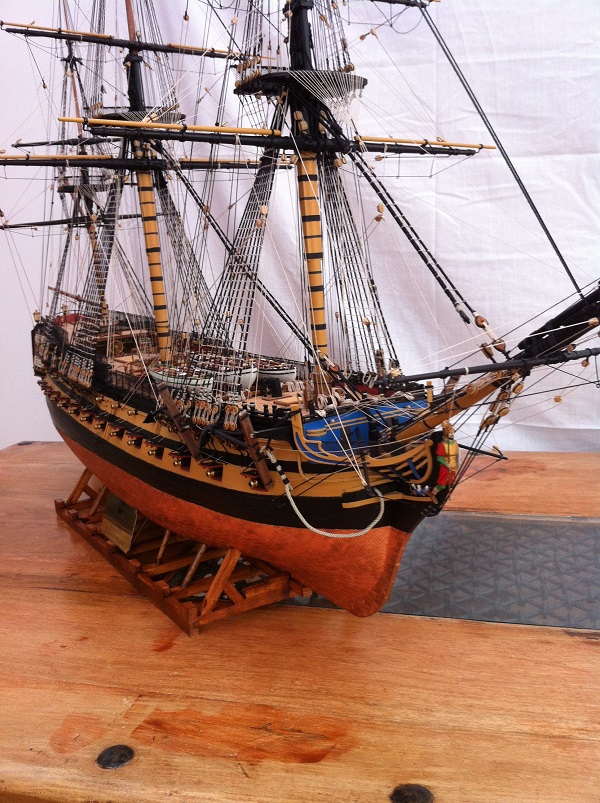
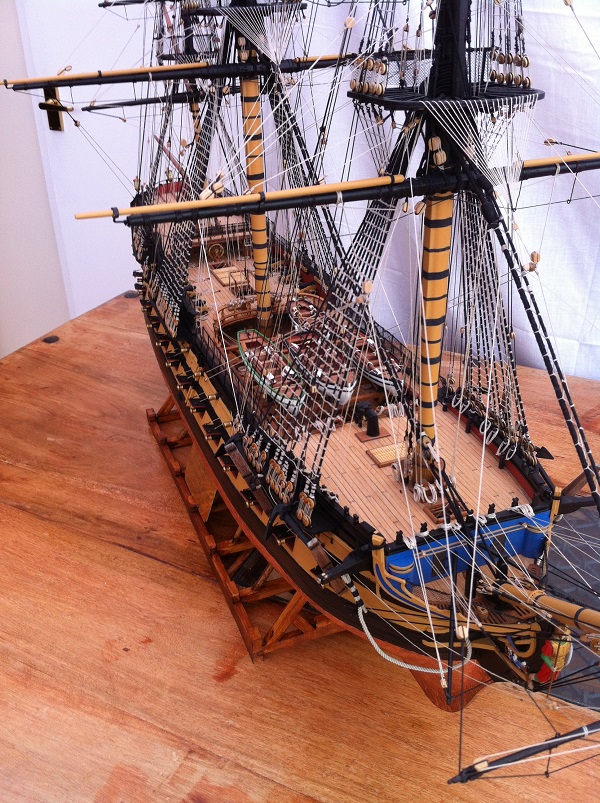
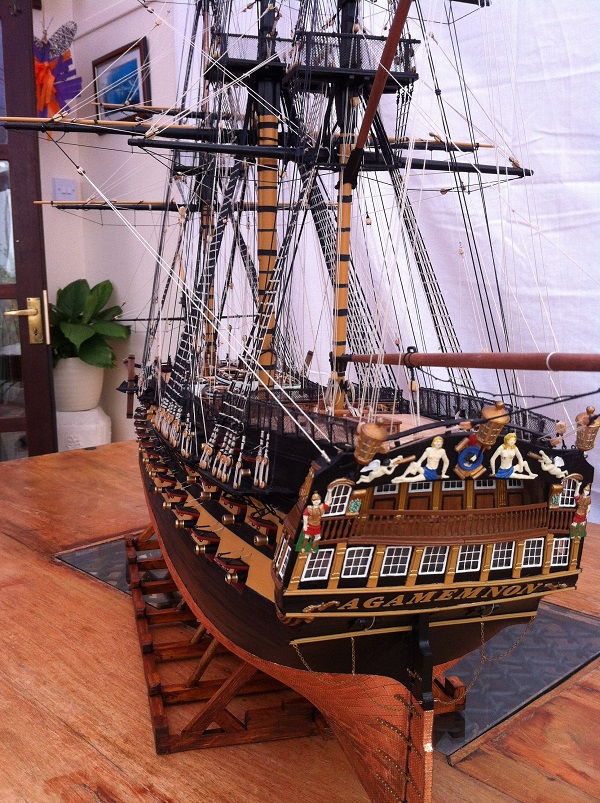
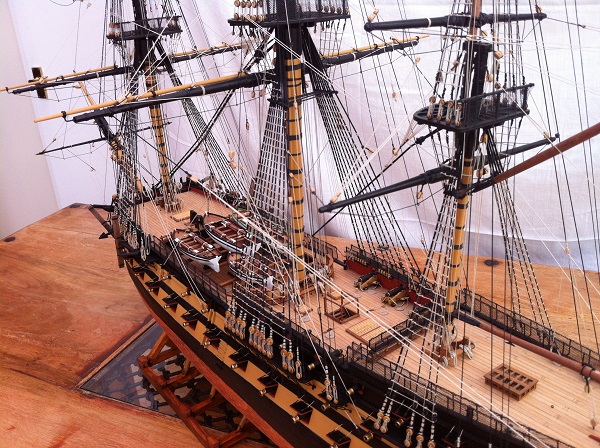
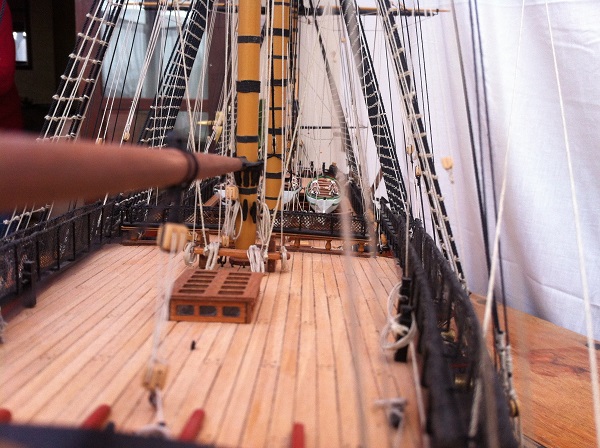
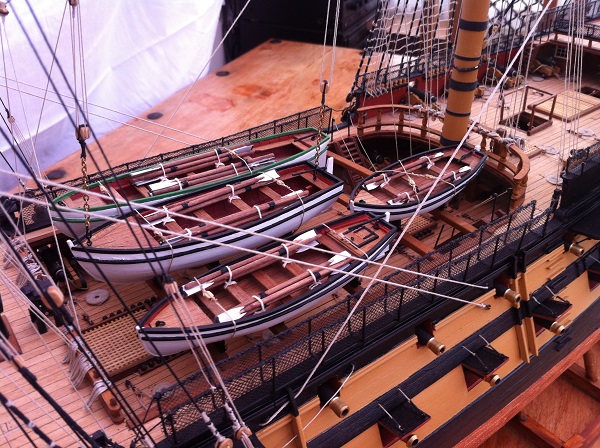
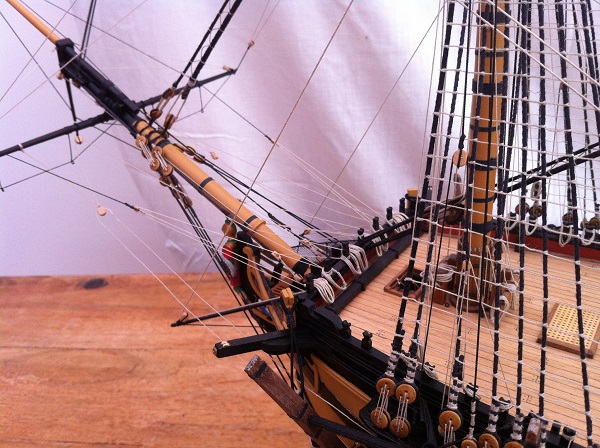
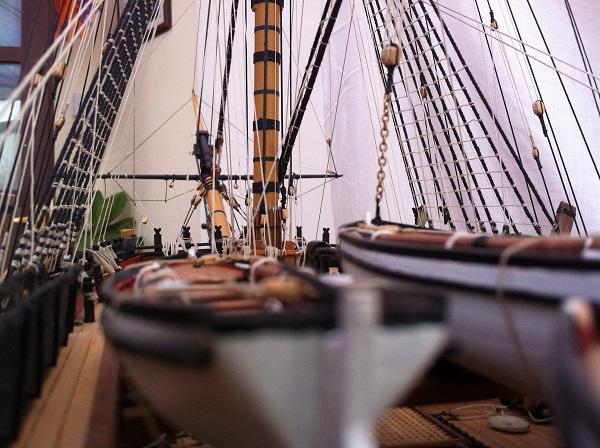
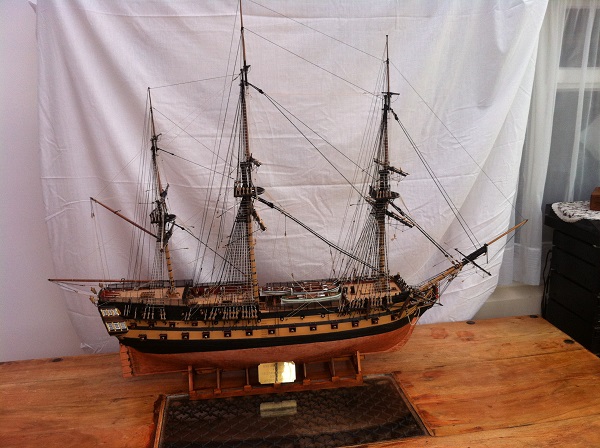
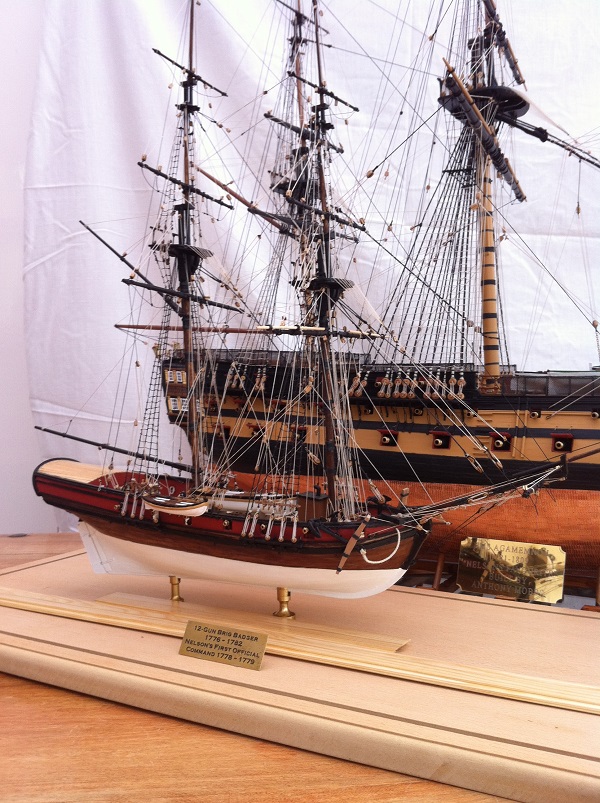
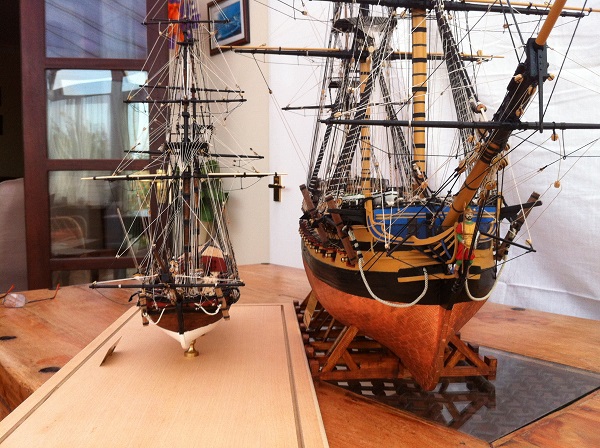
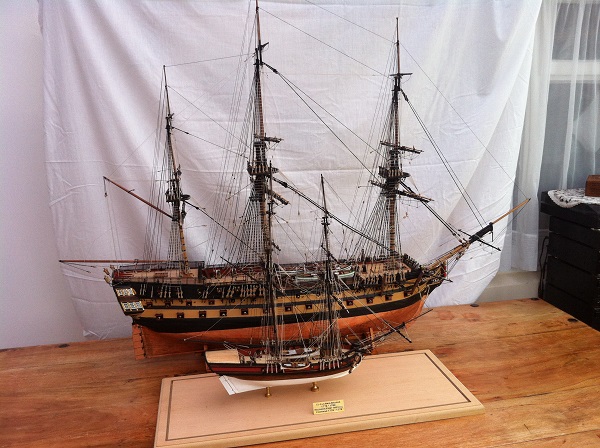
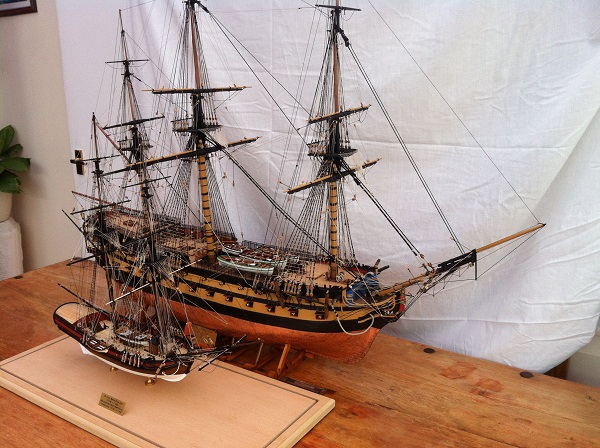
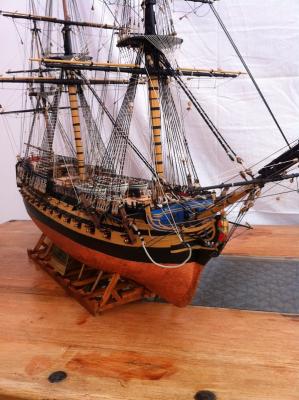
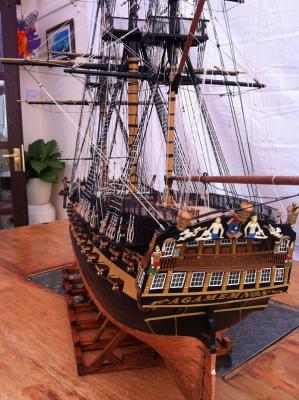
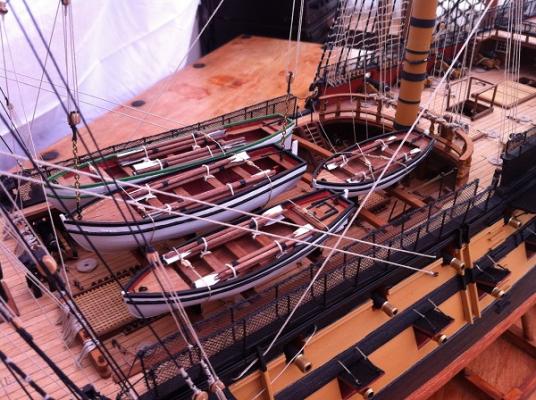
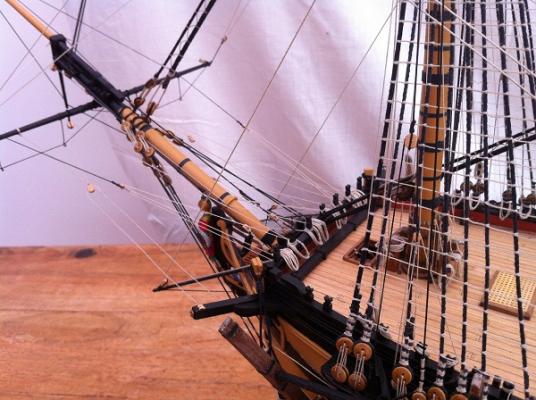
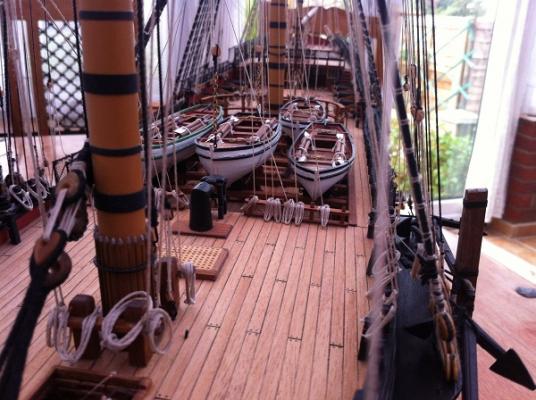
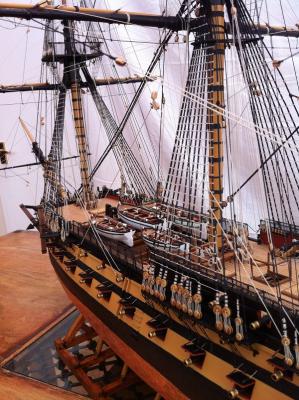
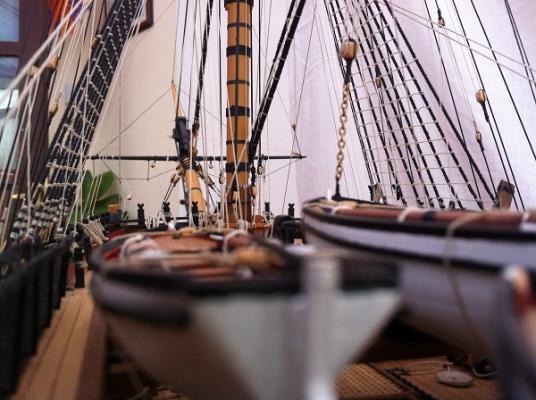
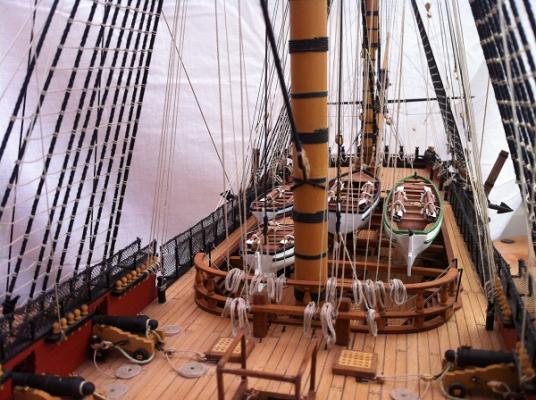
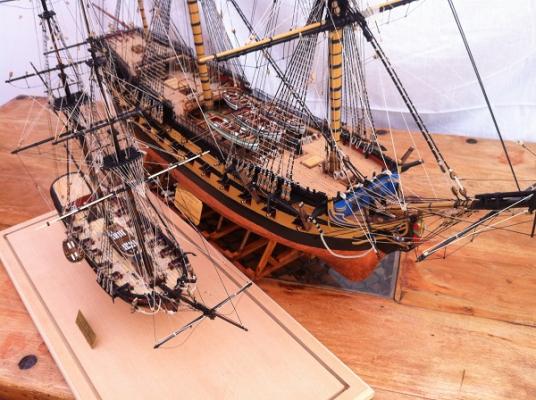
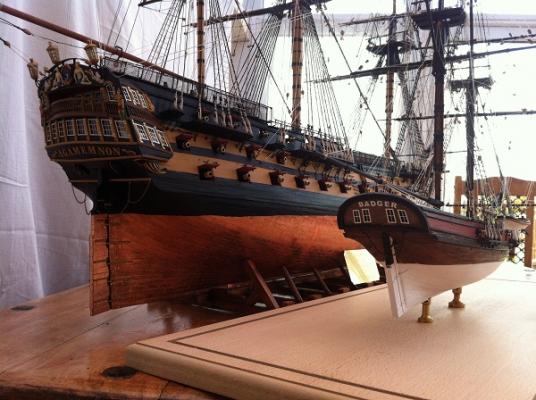
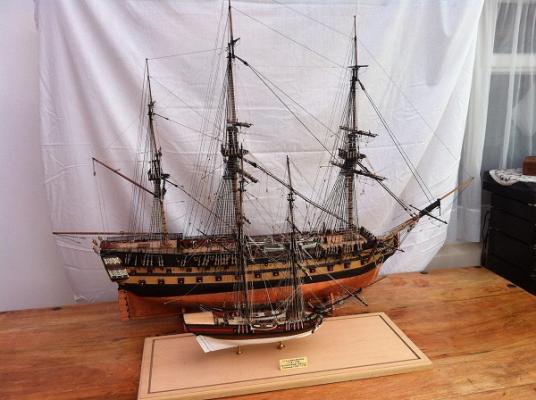
As promised gents here is my latest update. SHE IS FINISHED, well to be truthful she has been for the last two weeks but I have been waiting for the display case to arrive, no luck yet so I'll post without the case and base. I want to thank everybody who has followed this build and those who pressed the like button, to get 75,500+ hits has really taken me back and I thank you all for the support, help comments and advice, there has been plenty along the way and it's all been good. This will be last big build for a couple of reasons, the first being space, I don't have enough space at home to display them properly, the museum has taken the smaller ships but it still leaves me with a problem, secondly is the repetitive work that these big ships require, there's a huge amount of planking, plating, gun making and gun rigging and so it goes on, so from now on it's only small stuff. Hopefully this will be a one time only event, but I have a few shots of my first build, HM Brig Badger alongside Agamemnon, both are 1/64 scale and the difference is really surprising. Badger took me 4 months from start to finish and the Aggy has taken 19 1/2 months. Anyway enough talk, lets see the pics, first up the two together. I'm going to close this post and I'll open another with just the Agamemnon, I hope you enjoy these shots. mobbsie


- 1,279 replies
-
- 33
-
-
- agamemnon
- caldercraft
- (and 1 more)
-
Hi Richard, Thanks for looking in. I just used Pine for the outer frame and cross members, the poles are bits of bamboo I nicked out of the wife's garden, hopefully she wont notice her beanpoles are a little shorter on one side. I will have another update on the Aggy tomorrow gents, you never know, it may be the last one. :) Be Good mobbsie
- 1,279 replies
-
- 3
-
-
- agamemnon
- caldercraft
- (and 1 more)
-
Boy did I ever miss a build and a half here, what a great job your doing Steve. I love every thing about this little boat. With your permission Steve I pull up a tool box. Be Good mobbsie
- 625 replies
-
- 2
-
-
- bounty launch
- model shipways
- (and 1 more)
-
Hi John, Great to hear from you mate, glad your back. The shipyard can wait a while longer, no sweat. Be Good mobbsie
- 1,279 replies
-
- 1
-
-
- agamemnon
- caldercraft
- (and 1 more)
-
Hi Dragzz, The planking's coming along nicely mate, there's a lot of it aint there. Keep it up mate Be Good mobbsie
-
Gut feeling mate, to my eye they do look a bit large but I have no experience with type of vessel. One thing I do know is that you've made a lovely job of the coppering and the rudder is a very snug fit. All in all she's looking great. Be Good mobbsie
- 69 replies
-
- 1
-
-
- fair rosamund
- occre
- (and 1 more)
-
Kevin, if you going to keep bringing her outside for photo shoots your going to need bigger doors, like most folks her age she gets wider mate. She's looking lovely Kevin. Be Good mobbsie
- 1,319 replies
-
- 5
-
-
- caldercraft
- Victory
- (and 1 more)
-
What a fantastic bit of planking Jason, would you please just explain one thing for me:- how in hells teeth do you expect me to emulate such clean and concise work, cos I aint got a clue. Simply superb work mate. Be Good mobbsie