


dvm27
-
Posts
2,468 -
Joined
-
Last visited
Content Type
Profiles
Forums
Gallery
Events
Everything posted by dvm27
-
 You picked a great section to model with lots of interesting details. Very fine job!
 -
"Too much information". But accidents do happen in the workshop Druxey so we must be prepared!
-
Just to clarify, Mike, I use only two small beads of CA at the extreme end of the plank to make sure the plank does not move while the carpenters glue sets. This was Harold Hahn's technique and it works quite well, ninety seconds of digital pressure (by the clock). This also works quite well for bleeding - five minutes of direct pressure by the clock.
-
I just apply a couple of small drops of cyano to the plank at the very tip. As for the yellow glue I apply it to the hull and edge of the plank. Probably the cyano sets on contact if it overlaps the yellow glue on the hull but I had no problems. As always, I clean the joints with a paint brush dipped in water before any squeeze out dries. On my hull I used cyano every 4th or 5th frame with yellow glue on the rest. But I had spaces between the frames. Your wales gluing surface is continuous so I would just add a small pencil mark on the surface of the plank to be installed and the corresponding wale location for the location of the cyano drop. Needless to say you want to press that plank into position exactly where you want it as the cyano bites quickly! Think of it as an internal clamp.
-
Lovely work, Siggi. Your planking shows the beautiful flowing lines of your model. And the finished figurehead is a reminder of the level of perfection you strive for in your models.
-
Yes, adding deck clamps and internal details makes clamping of the outside planks more difficult. What finally worked for me was to glue only the first 1/2" or so of the plank in place (also using a couple drops of cyanoacrylate on its edge at the rabbet). As no curves are involved here all that was needed was digital pressure for 90 seconds until the cyano and carpenters glue tacked. Then I used one of your horizontal clamps on this section and let it set for several hours. Once the fore end of the plank was secure on the hull it was relatively easy to glue in the rest of the plank, repeating the above technique every inch or so. This way you are only dealing with short sections of curves or twists at a time. It is time consuming but worked quite well for me.
-
Great progress report Chuck! Technically, the upper sill mortises are angled cuts and the lower ones are called birdsmouth mortises (V-shaped like a beak). As they are only an inch or two deep and cause endless difficulties to everyone but David Antscherl I think your simple mortise solution is excellent. During the fairing process the joint itself becomes barely visible anyway. And any slight gaps are easily erased by placing some white glue in the space followed by light sanding.
-
I was wondering about that Mark, having just completed a similar process. Did those parallel mini-clamps at the bow tend to lift the bottom edge of the lowest wale plank off the hull? Or perhaps your plank was so perfectly spiled that it fit in all directions?
-
Thanks to a terrific response I can proceed with the order. I'm just going to wait a few days before proceeding as I keep receiving additional orders.
- 6 replies
-
- 3
-

-
- swan
- sixth rate
- (and 4 more)
-
Hate to make a boring comment but really lovely work Mark!
-
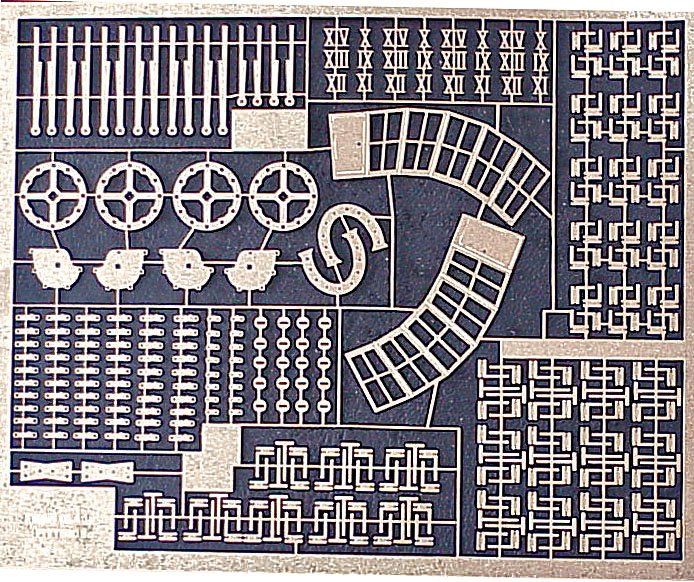
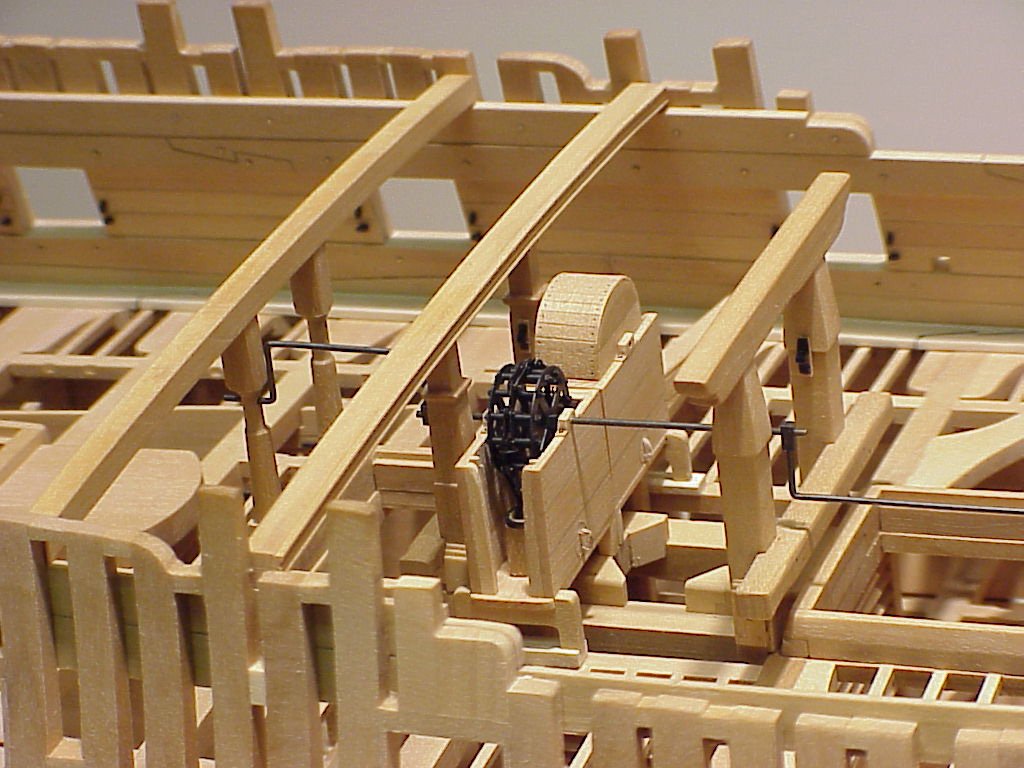
I have had some requests for our discontinued photoetched sheets over the past few years. The sheet is depicted below and was designed for those building a Swan class model at the classic 1:48 scale. They are difficult and expensive to produce but I would be willing to do it one last time if ten individuals commit. They cost $60, plus postage. Included are door hinges, lantern brass housings, horseshoe and dovetail plates and gunport straps. In addition (and the main reason we designed the sheet) included are all the components necessary to build the complicated metal chain pumps (except the brass tubing) that reside within the pump housings. Those of you building a Swan, Echo, Triton or Chuck's new Pegasus cross section may consider purchasing one of these sheets as nothing similar is on the market. If you would like one (or more) of these sheets please send me an e-mail at dvm27@comcast.net. Please do not respond to this post here. This will be the last time these sheets will be produced! It is my impression that Chuck will not be including details of the pump mechanism in his new Pegasus cross-section in order to keep the cost managable.
- 6 replies
-
- 9
-
-
- swan
- sixth rate
- (and 4 more)
-
Alan, from Figureheads of the Royal Navy, by David Pulvertaft. "Her figurehead was described as the naked figure of the young Greek hero, Bellerophon, riding bareback on the rearing winged horse, Pegasus, wearing a golden helmet with white plumes and a short red cloak flying back from his shoulders." (Citation Edward Fraser, Bellerophon, The Bravest of the Brave, Wells Gardner, Darton and Co, 1909). Didn't know if you have the above reference but thought I'd mention it just in case. So the wings were spread and rearing
-
Just to expand on what Chuck wrote, Camarata's Confederacy model was very well researched and his rig is based on Crother's review of others primary source material, notably Dr. DH Robinson's article and survey of material in the Nautical Research Journal (Volume 8, No. 2). So, I would say Justin's rig is probably pretty close to the original. Perhaps he might be willing to provide you with his plan. Insidently, all the window frames and muntins were photoetched. That's why they look so perfect.
-
Hey guys - this forum is supposed to be in English. What language are you speaking?
-
Just curious, Ed. Did clipper ships ever have stanchions or railings on the tops like navy vessels? Looks like one could easily fall off the aft top, especially when wet or dark!
- 3,618 replies
-
- 2
-
-
- young america
- clipper
- (and 1 more)
-
HMS VICTORY 1759 by isalbert
dvm27 replied to isalbert's topic in - Build logs for subjects built 1751 - 1800
Tres bien fait! -
Looks terrific, Mike. I also prefer the boxwood but understand the economics of offering the kit in cherry.
- 607 replies
-
- 6
-
-
- winchelsea
- Syren Ship Model Company
- (and 1 more)
-
Chris, no matter how good your work looks now you'll want to replace it six months down the road. There's a definite learning curve here but you've made a good start. I find that what helps me a lot is to wear 5x loops when doing any joints. I use them not only because I have extra crappy vision but I find that if I am happy with a joint made under magnification it looks really good without them. That's an adorable puppy. By the time you've finished your model she'll have tumors, osteoarthritis, glaucoma and bad breath.
-
ancre Chebece 1750 by Jeronimo - FINISHED
dvm27 replied to Jeronimo's topic in - Build logs for subjects built 1501 - 1750
Wonderful work, Karl. I would of thought it would be easier to plank around those gratings then cut the openings later but you've done a perfect job. -
Echo by tlevine - FINISHED - Cross-Section
dvm27 replied to tlevine's topic in - Build logs for subjects built 1751 - 1800
Very nice job, Toni. I think you'll find the cross-section a pleasant diversion from the fully framed model. Those scupper insets look spot on. -
Afraid not Azzoun. Those, like everything else in that photo, are computer renderings.
-
Positive frame registration top and bottom will make it very hard to screw up. This is a very innovative concept, Chuck! And how lucky to have a willing group of testors come to your house.
-
And that's how one achieves a perfect joint! It all start's with a perfect pattern. Love watching you work, Amalio.