dvm27
-
Posts
2,468 -
Joined
-
Last visited
Content Type
Profiles
Forums
Gallery
Events
Everything posted by dvm27
-
 This sets the bar for what ship model kits should look like!
- 263 replies
-
- 5
-

-
- Medway Longboat
- Syren Ship Model Company
- (and 1 more)
-
I was wondering about that Mark, as the guns looked to be sitting a bit low in the ports without the decking under them. As I have learned, much of your painstaking work will be hidden once you add the deck(s) above. But we'll always have those photos (which we never look at).
-
Yes you are technically correct, Alan. What I have used are simulated bungs. I'm not sure I've seen a model deck correctly spiked, countersunk then bored to receive a bung. That level of detail would be quite remarkable. The point is that the trunnels I use are @ 1.75" in diameter, roughly the same diameter as a bung. So the end result looks the same except the bungs are end grain. To quote David Antscherl in The Fireship Comet "I did not treenail the deck, as in the original ships the plugs that covered nails and other fasteners were virtually invisible, as they were side-grained rather than end-grained." Bottom line is that they should be barely visible at 1:48 scale.
- 125 replies
-
- 7
-
-
- 9 pound naval cannon
- 3d cannon barrel
- (and 1 more)
-
HMS ROYAL KATHERINE 1664 by Doris - 1/55 - CARD
dvm27 replied to DORIS's topic in - Build logs for subjects built 1501 - 1750
Another huge fan, Doris. Would love to see you demonstrate your techniques at a Nautical Guild Research meeting one day!- 1,035 replies
-
- 7
-
-
- royal katherine
- ship of the line
- (and 1 more)
-
Very clever, Mark. It's a very hard area to apply clamping pressure to.
-
Perhaps apply cyano liquid over the repaired joint? It should penetrate and strengthen the area.
-
I look forward to this build. As Heinrich mentioned, it is in the same class as our Speedwell ketch-rigged sloop of war. I also question the use of a wheel vs. tiller on a ship of this size but have not seen contemporary plans for Wolfe (if they exist). I do have the Wolfe monograph by Shipyard and it is very well done. The card model kit is not inexpensive and I do hope they included it.
-
Echo by davec - FINISHED - cross-section
dvm27 replied to davec's topic in - Build logs for subjects built 1751 - 1800
When drawing bamboo down to 0.018" they are barely perceptible on the model, especially if you sand the plank before installing them on the model. On your next model, where you'll have thousands of them, make sure you bamboo stock is fairly uniform. I ran out while making my last model and the replacement bamboo was decidedly darker. -
Bravo, Toni! I wouldn't know how to display her...unplanked side out, planked side out? They're equally exquisite. Greg
-
It's a nice little book with beautiful color photographs but hardly comprehensive. Those wishing a more complete treatise on the subject would could do no better than Englishman of War 1600-1850 by Peter Goodwin or Arming and Fitting the English Ships of War 1600-1815 by Brian Lavery
-
Either you have very small hands or that's a very large model, Michael. Exquisite work!
-
Congratulations on landing this contract, Dan. Lucky you're a lawyer because that contract would be rather daunting for a lay person!
- 238 replies
-
- 4
-
-
- leviathan
- troop ship
- (and 2 more)
-
Just curious Ed. Have you ever tried working with silk? There are Navy Board models in Annapolis with original silk rigging. Surgical silk can be had in very small diameters (ex. 6-0 silk = 0.1 mm diameter). I've used it for ratlines and it worked very well.
- 3,618 replies
-
- 1
-
-
- young america
- clipper
- (and 1 more)
-
Echo by davec - FINISHED - cross-section
dvm27 replied to davec's topic in - Build logs for subjects built 1751 - 1800
Welcome back Dave. Lovely work as ever. Congrats on the new home (and workshop)! -
I will eventually sell my entire ship model reference collection...except for these Model Shipwright books (and of course our Swan series 😉 ). They represent the best examples of writing, construction and collection of esteemed authors (Hahn, McNarry, McCallup, White, Antscherl, etc) that our hobby has offered since the 1970s. I don't believe they will ever be digitized so I shall happily read them in my old age, with trifocals, reminiscing about the golden age of ship model making. BTW, most of these are available on the Advanced Book Exchange for 5-10$ each. So Nav is offering them at an exceptional price.
-
Pandora by marsalv - FINISHED - 1:52
dvm27 replied to marsalv's topic in - Build logs for subjects built 1751 - 1800
Bravo Marsalv! Well deserved. -
Congratulations on the completion of an extraordinary Swan class model, Toni! You've done TFFM chapter and verse and my hats off to you.
-
Unless your model has an unusually bluff bow the planks will fit into the rabbet at an angle. Thus the fore end of the plank needs to be angled to match. If it still does not fit flush perhaps your rabbet is too shallow or not wide enough. The plank needs to be pre-shaped to fit the curve of the bow without a lot of pressure or the fore end (hooding) may lift up a bit. Sometimes it is helpful to glue just the very end of the plank into place first. Once set it will be easier to glue the rest of the plank down without the end lifting from the rabbet.
-
That is a very lovely model Chuck. Tell me your not tempted to float it in the sink!
- 421 replies
-
- 6
-
-
- medway longboat
- Syren Ship Model Company
- (and 1 more)
-
Chuck's incredible modeling skills aside, his wood choice does have a very pleasing scale appearance when viewed close up. Looks a lot like full scale pine to me. Certainly more realistic than boxwood in my opinion. I've been working on a project using the yellow cedar for the first time and had trouble achieving a finish similar to Chucks. He recommended using much finer sandpaper 280 - 400 grit and the results are much better.
- 421 replies
-
- 8
-
-
- medway longboat
- Syren Ship Model Company
- (and 1 more)
-
Using a moulding scraper tool?
dvm27 replied to alde's topic in Modeling tools and Workshop Equipment
I do have a complete set of those Micro Shapers and find the profiles too large for most of the moldings I need at 1:48 scale. -
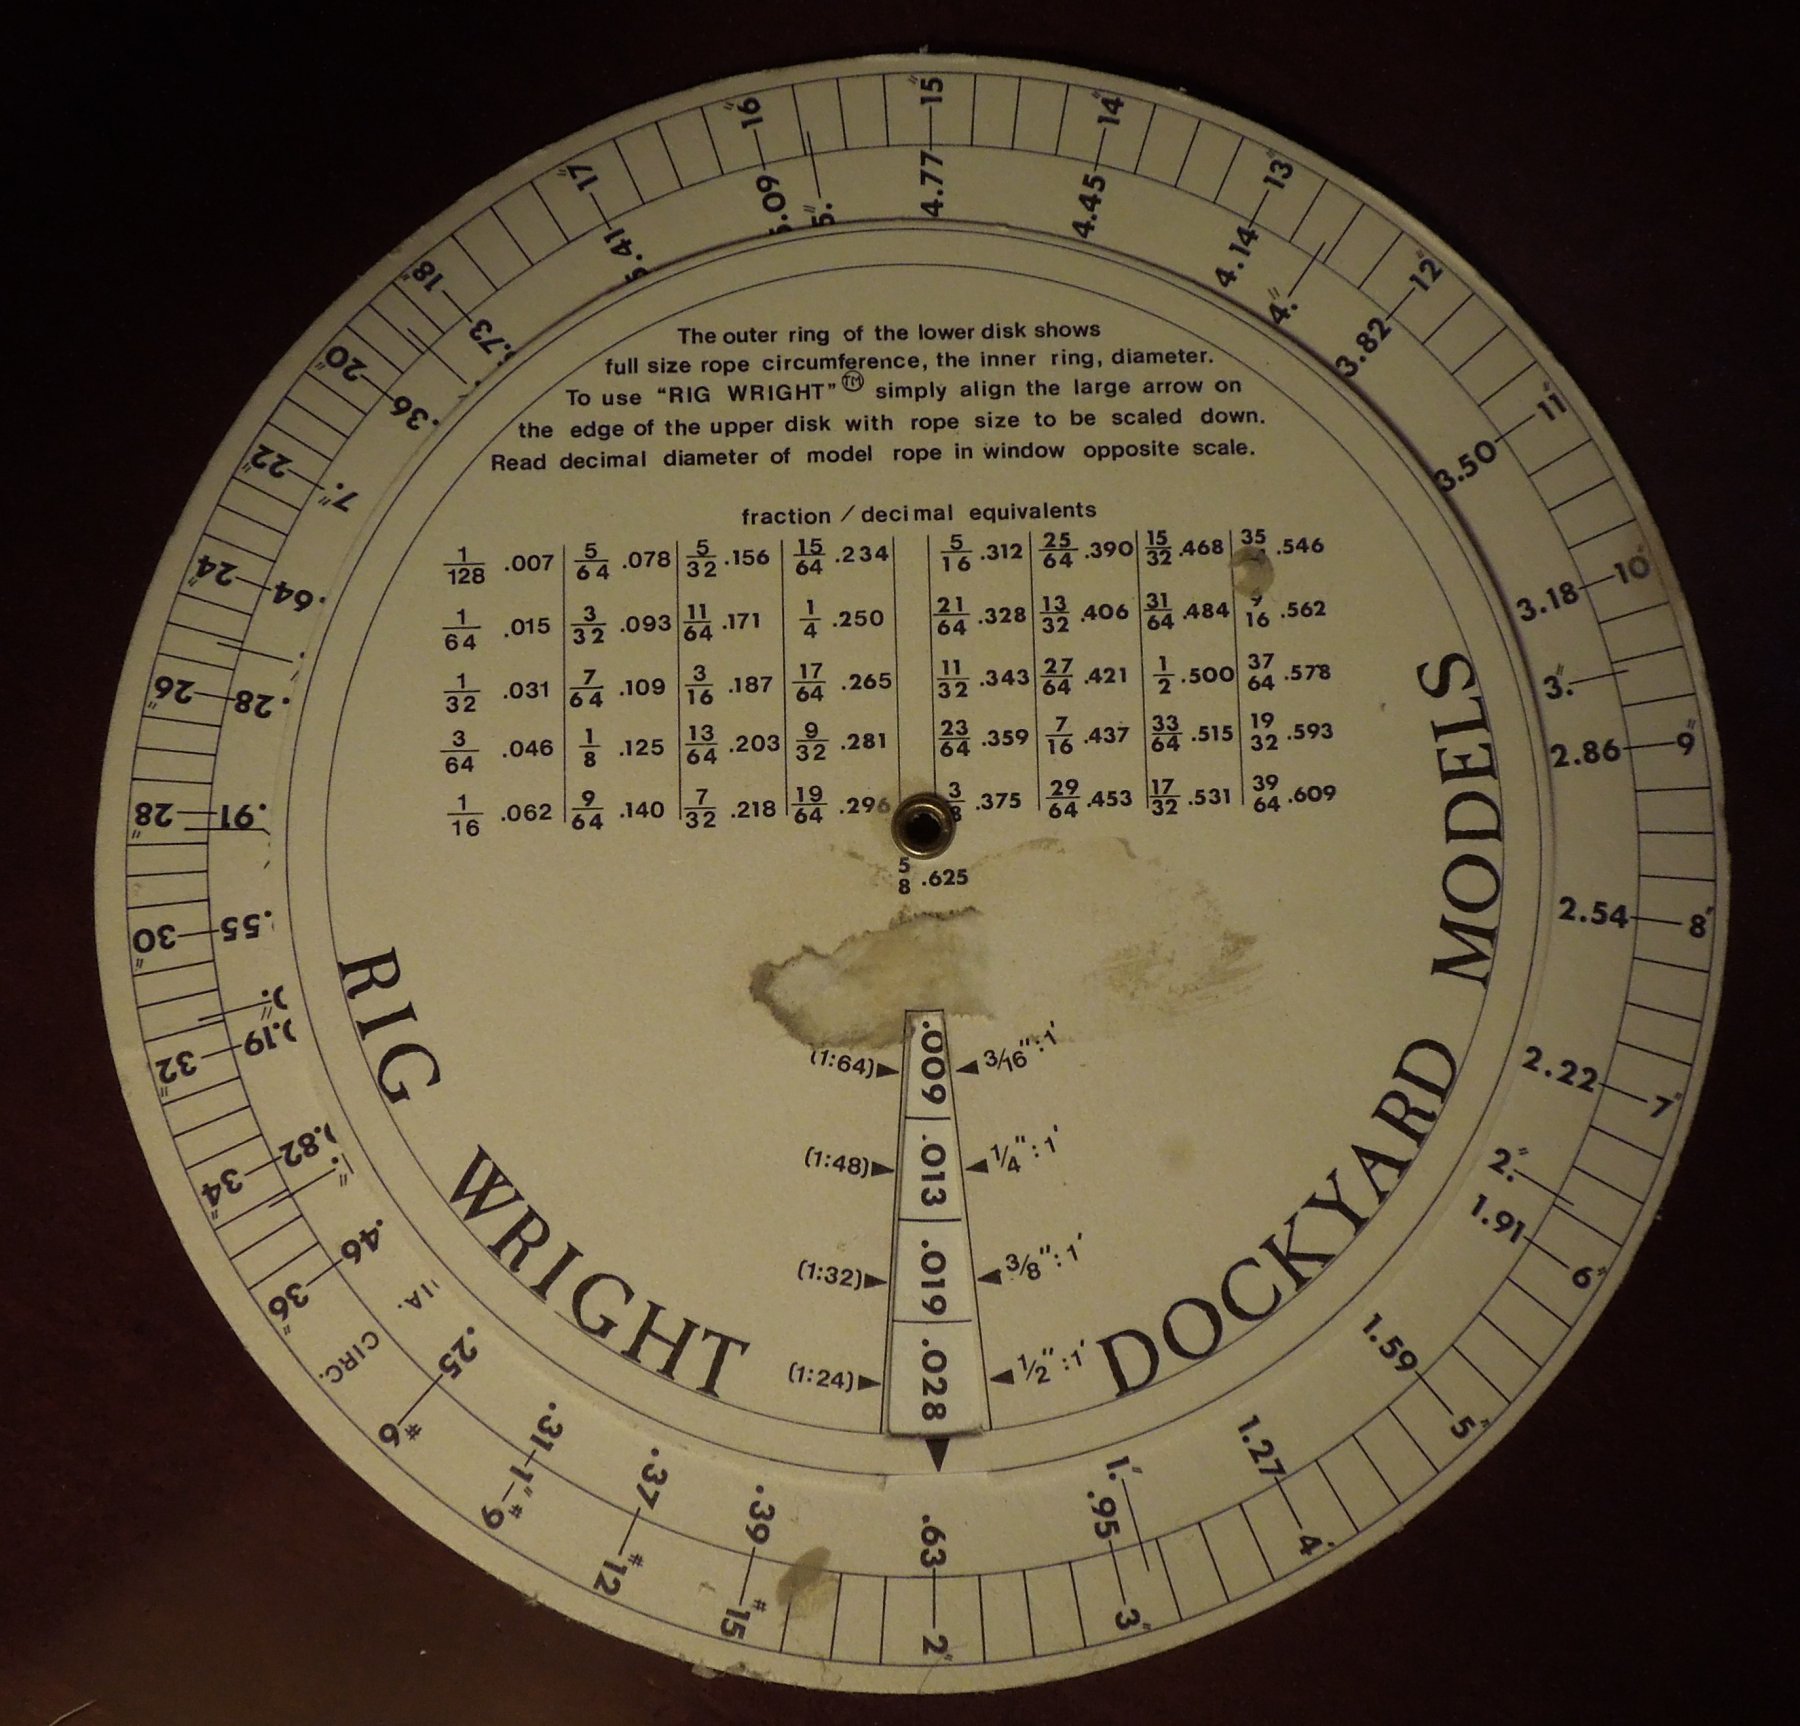
You mean you guys don't have the famous Rig Wright? It converts circumference to diameter and scale diameter in four different scales by rotating the dial.

- 3,618 replies
-
- 15
-
-
- young america
- clipper
- (and 1 more)
-
Great planking tutorial, Chuck. Of course, you could transfer those faired tick marks from your hull to the edge of the laser cut frames for the production run. One might introduce slight variations while raising the frames but overall it would be easy to adjust the spiled planks to these reference marks. But then you are providing the fish instead of teaching how to fish.
- 421 replies
-
- 11
-
-
- medway longboat
- Syren Ship Model Company
- (and 1 more)
-
Making small nails with round head
dvm27 replied to Aleksei Domanov's topic in Metal Work, Soldering and Metal Fittings
For those wishing to purchase rivets and bolts of very small size check out https://model-motorcars.myshopify.com/collections/small-parts-hardware/rivets. They purchased Scale Hardware when they went out of business and have an ibcredible varieth of micro fasteners.